


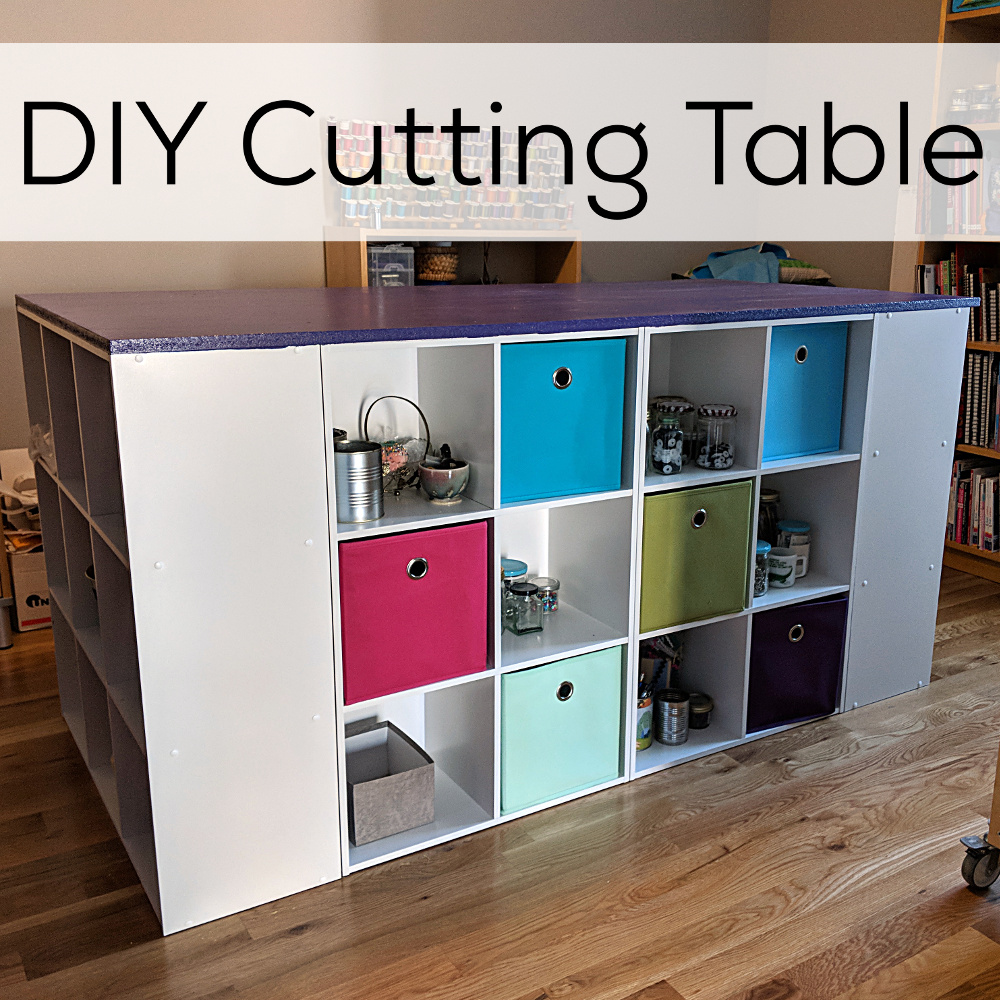
I love my new cutting table!
I cut a lot of fabric for bundles, so I really needed a large table at the right height for working while standing. Standing for hours at a dining table height surface will kill your back!
I used to have some good storage shelves that worked, but the bottoms of the legs got mangled in the move. The exact shelves weren’t made anymore (and the new version was much flimsier) so I needed to find something totally new.
I posted in the Shiny Happy People group to see what solutions other people had come up with and I got So Much Good Information! Click here to hop right to that post and all the amazing comments.
I liked the look of an Ikea Kallax hack, but the height wasn’t right for me standing. I was going to go for kitchen base cabinets with a laminate top – but that was way (WAY) out of my price range. So I was walking around Lowe’s to see if there was anything that might work, and I stumbled across Cubicals from ClosetMaid.
They’re similar in look to the Kallax pieces from Ikea (though admittedly not as sturdy-looking) but the size is different. A piece 3 cubes tall was just the right height for me standing – and they made that configuration!
So here’s what I used.
- 2 – 9 cube (3×3) pieces
- 4 – 6 cube (3×2) pieces
- 1 – 3 ft. x 6 ft. sheet of medium density fiberboard (you’ll need to buy a 4×8 sheet, but you can ask the folks at Lowe’s to cut it down to size for you)
- 1 piece of trim 1 1/2 inches wide x 3 feet long x 3/8 inch thick (optional – for cutting guide)
- 2 elevator bolts to hold the cutting guide in place (optional)
Assemble all the Cubicals cabinets.
Stand them in a rectangle with the cubes facing out. The two 3×3 cabinets are on the ends. There are two 2×3 cabinets (standing tall, not wide) on each side between each of the end cabinets. There’s some empty space in the middle.
Get everything lined up neatly – exactly where you want it because this is NOT movable) and set the big MDF sheet on top. Drilling up from underneath the table (up through the top of the cabinets) screw the table top into place. We used 1 inch wood screws and put some tape on the drill bit to make sure we didn’t drill all the way through to the top of the table.
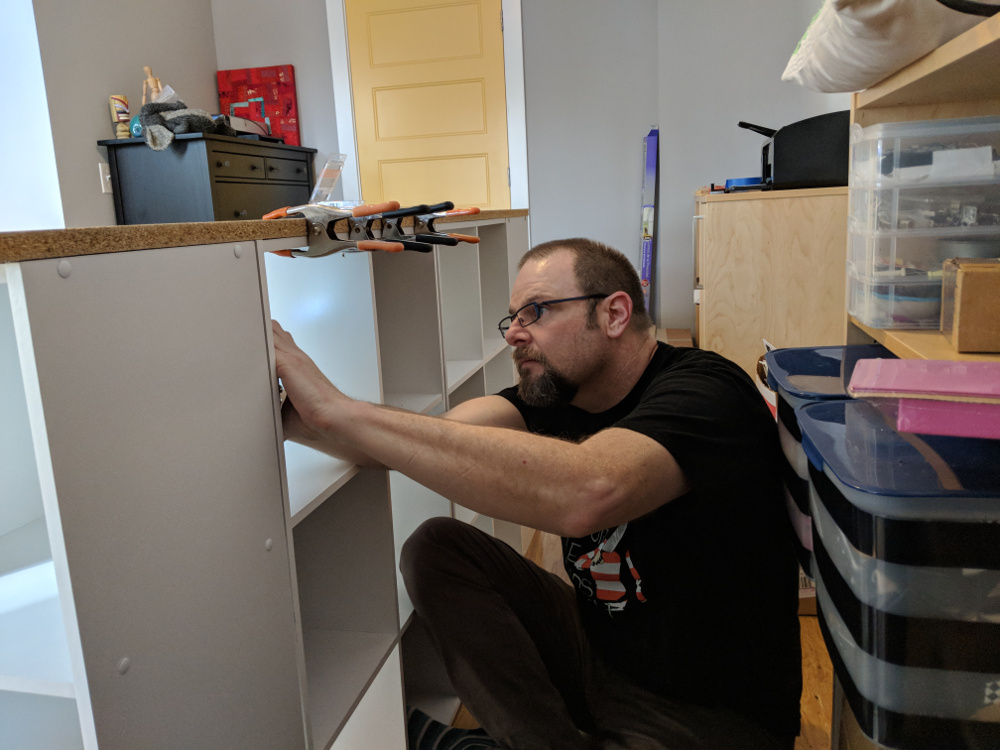
That’s my husband – bestselling author Alan Gratz – helping me attach the table top. 🙂
That’s pretty much it – except for a special feature I added to the top for cutting fabric bundles. I don’t know how many of you will need this feature – but you can see it in action in this video.
I sanded the sides and just barely rounded the top edge, and added several coats of pretty purple paint. Those colorful fabric drawers that fit right in the cubes are fun – but Lowe’s doesn’t carry many colors. You can find a bigger selection at Target.
One more thing. They make Cubicals with two different size cubes. These are the smaller ones (each cube is 11 inches). The cabinets with the larger cubes look and feel more sturdy (and more polished), but they won’t work for a table like this because they’ll end up way too tall for most humans. These smaller cubes feel a little less sturdy until they’re all assembled and now it seems pretty super strong.
Make sure you’re getting the right size. 🙂

Here are handy links to all the posts about quilting tools and supplies.
Sewing Machine
- My Sewing Machine and Why I Love It
- How to Choose a Sewing Machine for a Beginner
- My Favorite Sewing Machine Feet
- Basic Sewing Machine Maintenance
Iron
Rotary Cutting Tools
- My Favorite Rotary Cutting Tools
- How to Use a Rotary Cutter and Ruler
- How to Clean a Fuzzy Cutting Mat
Scissors
Other General Sewing Room Supplies
- Easy Pattern Weights (a free pattern)
- Pincushion (a free pattern)
- Needle Cushion (a free pattern)
- Sewing Machine Cover (a free pattern)
- How to Make a Design Wall
- How to Make a DIY Cutting Table
One More Hugely Popular Post that Seems to Fit Here Better than Anywhere Else
Return to the Let’s Make a Quilt main Table of Contents.
Move on to the posts about choosing your quilt pattern.
Have fun!

Hi Wendi, I have been wanting to make a cutting table too. I kinda had this concept in mind, but not this layout. I like this so much better. I had been doing my cutting on thr floor, but spinal surgery won’t allow for that kind of bending anymore. This is the solution to my problem. I am so glad you gave the info and pictures. I am trying to figure out what you have on top of the plywood. It looks great. Thank you so very much.
I am starting my third quilt from your Craftsy class. The Woodland Animals. My great grandchildren adore them. Such a fun class with such a great instructor . Thank you for that too.
It’s MDF (medium density fiberboard) on top – not plywood. They had a really smooth cabinet grade plywood that I almost got for the top, but the guy said if I’m running scissors along the same lines over and over again, it would tend to lift up fibers/splinters over time (even if I painted it) and the MDF wouldn’t do that. Plus the MDF was a lot cheaper. 🙂
Hi Wendy, thanks for sharing your project. Do you have a ball park figure on what it cost to make this? I saw a similar one in Family Handyman’s magazine about organization solutions. They used some ikea ones and put them on a plywood base with wheels (with brakes) underneath, so it could be moved around as needed. Thank you.
All together (including paint) I think it was about $300 – about a fourth of what base cabinets and a countertop was going to cost me.
Can you share how tall you are to give me an idea of whether this would for me too? (I’m about 5ft 2.
I’m 5′ 3 1/2″ and I like a nice tall table so I don’t have to bend over at all to cut and fold. If you go to that Facebook post I liked to someone posted a worksheet where you put in your height and it tells you the best work height for you.
BRILLIANT! Love the cutting idea.I just love your blog.You make things easy and fun.
That cutting table is fabulous. What a great idea. Thanks for sharing
Great idea Wendi, please I would like to know the height of the table. Also, I do not understand what you mean by the 9 cube pieces (3×3) is this the measurement of each of the cubes and is it in inches? Also you also mentioned that the cube sizes were 11 inches. Do you mean each 9 cube pieces is 11×11 inches? If yes, then where does the 3×3 apply.
The finished height (with the tabletop added) is 37 inches. Each cube is 11 inches square – but you don’t buy individual cubes. They come as a unit that is 3 cubes wide x 3 cubes tall (a total 9-cube piece).
Hello! I am 6′ tall. What height would I need for an ergonomic cutting table?
I’m sorry – I don’t know. But I’m sure you can look that up online somewhere.
I would like to hear what she is saying. She is talking but no sound coming out. I raised the vol. on my computer but nothing. I give up trying. Sorry.
Please check your settings. I just double-checked the video and the sound is definitely working.
How thick is your MDF board?
3/4 inch
What kind of paint did you use and how many coats?
Just regular latex indoor paint in a satin finish. Nothing fancy. I think it took just two coats to cover – maybe three?