


There are two common ways to sew up stuffed animal openings – whipstitch and ladder stitch.
Whipstitch is super easy – it’s what I do with the youngest stitchers, as young as four. Here’s a video showing how to whipstitch.
The drawback is that the stitching is visible.
Ladder stitch is preferable because it’s totally invisible.
It isn’t exactly tricky, but it does require a little more skill with the needle than the whipstitch method. So if you’ve never done much handwork, try the whipstitch a few times – until you get comfortable with it. Then give ladder stitch a try. It really is invisible and once you get the hang of it, it doesn’t take any longer than whipstitching the opening closed.
In the top photo (and in the video) you see what ladder stitch looks like when it’s used with woven fabric. Here’s a photo showing how it looks with fleece – which I use for a lot of softies.
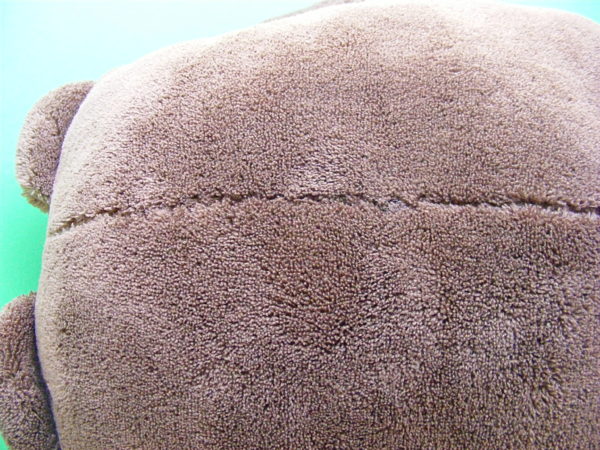
See? Just about invisible!
Update – There’s an excellent question in the comments about when to iron. I iron after I turn it right side out and poke out the corners – but before I stuff it. It’s really easy to turn those raw edges in and press them nicely while the softie is still flat.
Ladder stitch is perfect for stitching up those stuffing holes. It also works really well for sewing up pillows, patching and mending clothes, sewing in linings, and more. I also use ladder stitch for the hand-sewing step every time I bind a quilt.
Give it a try. 🙂
Happy sewing!
So… the ironing – do you iron before you sew the rest of the pillow or do I need one of those tiny irons to get in there after the rest of the pillow is machine sewn?
Excellent question! I just answered it in a note at the bottom of the post. Thanks!
Excellent demo . . .thank you for sharing =)
Excellent demo! Its perfect timing for me I’m making pillows.
Thanks!
I LOVE how user friendly your videos are.
you use contrasting thread/fabric. the background is sympathetic. the camera zooms in on the area. your fingers are not in the way. so now i can SEE what is going on, i can copy and work it out.
other sewing videos show WHITE thread on WHITE fabric, with WHITE background, camera zoomed OUT, fingers in the way, and i don’t see what happening, so i don’t get it.
i am so HAPPY to have found YOUR videos, if i can see what’s happening, i can pick it up. thank you so much.
(can you tell i’ve watched HUNDREDS of the hard to see ones?)”
Your clear, easy to see video style is VERY appreciated.
thank you
thank you
thank you
Thanks so much! I’ve passed your comment on to my husband too, since he’s the one who’s holding the camera and doing all that zooming. 🙂
I work in surgery and this is the same way a surgeon sews invisible stitches. I have been doing this on my pillows that i make since the first time i saw them do this on a tummy tuck. Pretty cool huh?
thanks for all your info, maggie
That is awesome! Thanks!
Brilliant , thank you!
I can use the ladder stitch as shown above, but I have a lot of feltie instructions that use the ladder stitch to stitch a small neck (body) to a large head. I can’t seem to figure that out — my heads are always wobbly. Any tips on that?
Thanks, Judy
I’m going to be adding feltie patterns (and some videos to support them) throughout this year and I’ll work on avideo just for attaching heads. But that’ll be a while. In the meantime – my best advice is to really push the head down HARD on the neck while you stitch. That way the springiness of the stuffing in the head will kind of push back against the stitches and keep it on the neck without wobbling. Good luck!
Thanks for the advice, and I will look forward to your videos on attaching heads!
Pingback: Video – How to Attach Limbs to a Felt Softie | Shiny Happy World
Pingback: Just a quickie – Hexagon pincushion FO | Colorize
When you pulled that thread and your black stitches went invisible, I actually GOL – gasped out loud, lol. I can’t wait to try this – I just finished Brandon Beaver and I’m not very happy with my stitching to close him up – I used a non-fuzzy fleece type fabric and there’s no real design or patterning on the fabric to hide my stitches, so they’re pretty obvious to me. He’s going to a soon-to-be-4 year old who I’m sure won’t care, but it does bother me! I will be giving this a shot – it looks very doable 🙂
Pingback: Baby Bib Pattern - Adorable and Free - Shiny Happy World
Thanks Wendi! Now how do I close the faux fur softies? I am following your Pattern on Monster Hand Warmers… Can’t figure out how to close him without grabbing all that fur! Monster Mash.
You can use the same stitch for faux fur – just smooth it out of the way as best you can while you stitch. You’ll still catch some of the fur, but once you fluff it up you’ll never notice. And if you catch a lot of fur in the stitching you can carefully pick it out with a needle or awl after you’re done sewing.
Pingback: DIY Pygmy Puff Plush Tutorial | @laurenfairwx | My CMS
Pingback: How To Make A Doorstop - Swoodson Says
Hi Wendi and thanks a lot for the ladder stitch tutorial! Have a great day! 😎🌸
Pingback: How to Reupholster a Piano Stool the Easy Way | Windmill & Protea
I’ve done a ladder stitch several times before but realized I didn’t put the needle in parallel so thanks for taking the time to show the Exact way to do it. Great video!
I swear, I learn something NEW from you every day! Although this is my first time quilting (and just starting a Softie today), I made clothing and such since I was a young girl, and did a fair amount of whip stitching. But I just saw how you “buried” the thread into the Softie at the end of the ladder stitch (after you made your knot). I always hated clipping that knot so close–and here is the perfect solution!! Your website and your tutorials are the best. When I feel like a project, Shiny Happy World is my “GO TO” place.
Thanks so much!
Thank you so much for this awesome video.
LOVED you moved up close to SEE what you were doing. Just for future do show a what not to do (mistake). I couldn’t tell why my ladder stitch was poofy, but after your longer stitch I saw the “poof” mine had was because my stitches were too far apart. THANK YOU so much, great video as always.
Pingback: How To Make Cheerful Christmas Scatter Cushions | Windmill & Protea
Same as blind stitch.Works great.
Great video, especially that it was up close. I tried this so many times and got frustrated because it would come out wonky. I was trying to get ahead of myself and my stitches were wrong. Thank you!
Nicely done. I wanna add a tip too 😇
Ironing is almoust a must (or you draw a straight line with fabric chalk or something similar),
the trick comes before you start sewing, unfold it a bit or even all the way. You can hold the flaps along each other or even put one on top of the other, and just follow the lines, sewing across. There is just a bit longer thread between the sides, so it is cruical you do the pull every few (the most 5 of them at time, depends of course on fabrick and used thread, the tiner (but still strong enough) the tread is and the tickeri is the fabrick, more stitches you can make at one time
Pingback: How to sew a door stop the simple way - Swoodson Says
Hi Wendy,
I have a special needs grandson, 2, so I’m particularly worried about the beads coming through. I’m wondering about creating an interior pouch of beads to help keep them from accidently escaping. Have you tried this? Would you recommend it? If so any suggestions on how to do this? Like a square pouch to sit in the square bottom. Thank you for your excellent help.
You could definitely do this – just use any scrap fabric and make it very roughly the same shape as the base – but smaller. You might want to tack it in place a tiny bit – loose pellets always migrate to the bottom but a pouch may not as easily.
Thank you so much for sharing this pattern! The first one I made was so easy and fun and whimsical, and I look forward to making and donating a bunch more!