


 sewing pattern for pyramid bags")
These triangle totes are handy-dandy little things. Use them to hold make-up, coins, little toys, a handful of crayons and a small notebook – anything you can think of.
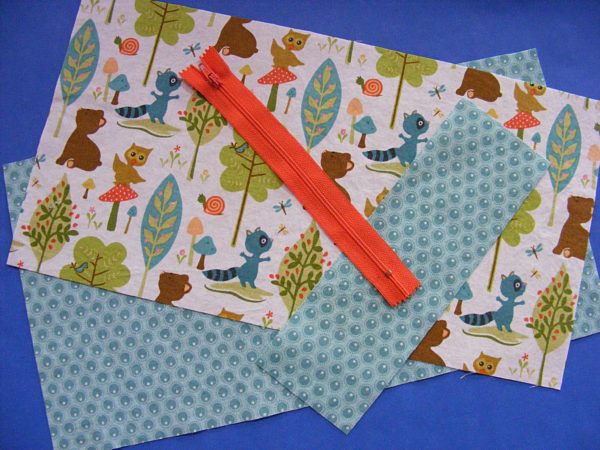
Materials you’ll need for all three pyramid bags:
- Two fat quarters of contrasting fabric
- Three zippers – 7 inch, 5 inch, and 3 inch (follow package instructions to shorten plastic zippers if necessary)
- sewing machine, thread, basic sewing tools
Skills you’ll need (links take you to video tutorials):
Ready? Let’s sew!
Step 1
Gather your materials. For the large bag you’ll need two fabric rectangles, each 8″ tall and 15″ wide, one piece for the handle cut 3″ wide and 9″ long, and one 7″ zipper.
The medium bag pieces are cut 6″ x 11″ with the handle piece cut 3″ x 7″ and a 5″ zipper.
The small bag pieces are cut 4″ x 7″ with a 3″ zipper. The small bag has no handle.
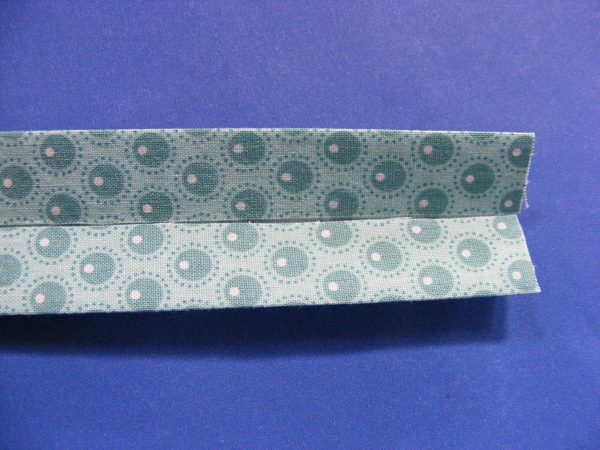
Step 2
We’ll start by prepping the handle. Fold your handle piece in half the long way and press a crease down the center. Open it back up and fold each edge in to the center crease. Press. Refold down the center crease and press.
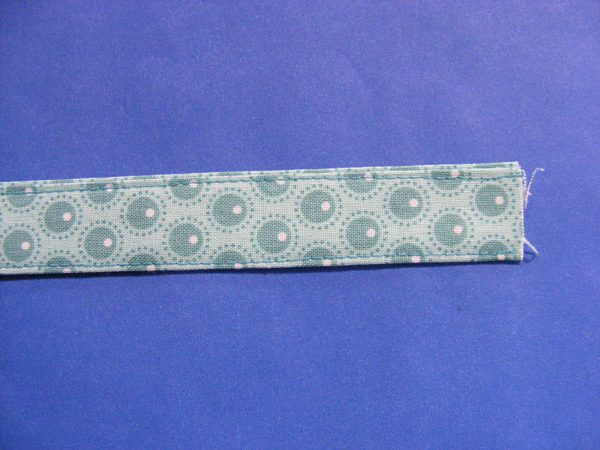
Step 3
Now stitch down the length of the handle, about 1/8 in from each edge. Press with steam to make all those stitches settle in and look nice. Set the handle aside for now.
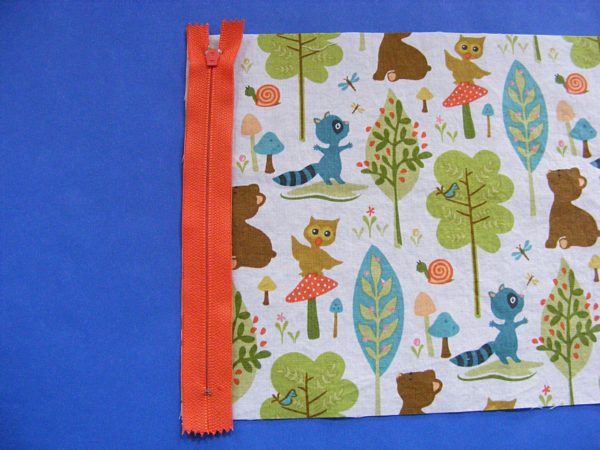
Step 4
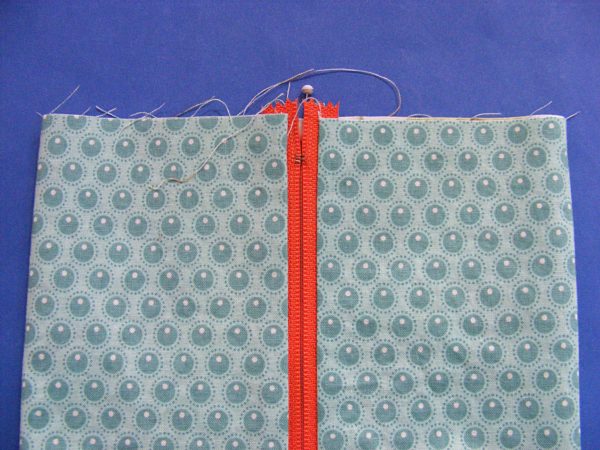
Now we’re going to start with the bag itself. That means sewing in a zipper. Don’t worry! It’s easier than you think. Watch this video first if you’re nervous.
First, switch out your regular presser foot for a zipper foot. Now lay your outside fabric face up on your workspace. Lay the zipper face down over one short edge.
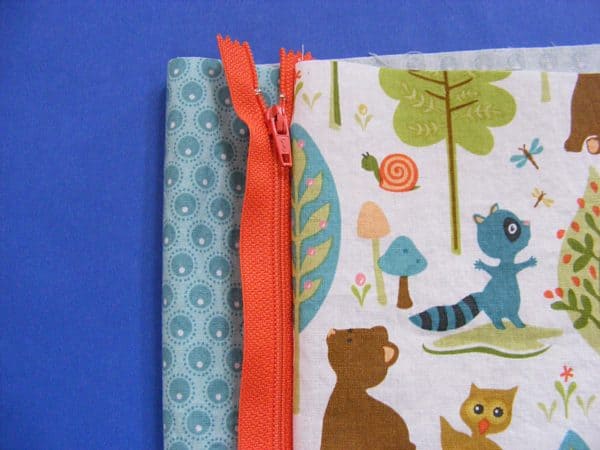
Step 5
Lay the lining fabric face down over the zipper. Line up all the edges and sew them together as close to the teeth of the zipper as your zipper foot will let you get. When you open up the layers, the zipper will be sandwiched between the right sides of the two fabrics, with the zipper pull facing the outside fabric.
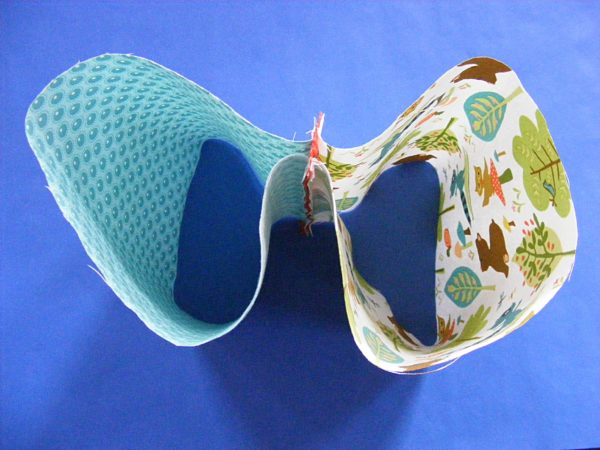
Step 6
Now you need to attach the other ends of the fabric to the other flap of zipper tape. It will look weird when you get them all together – like a figure 8 with a zipper at the center. Don’t worry – it’s supposed to look like this.
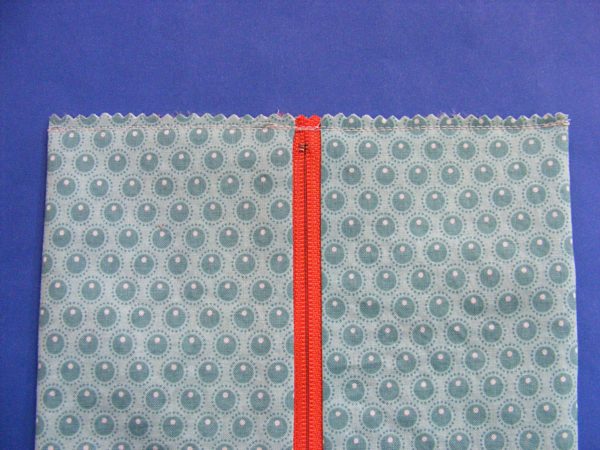
Step 7
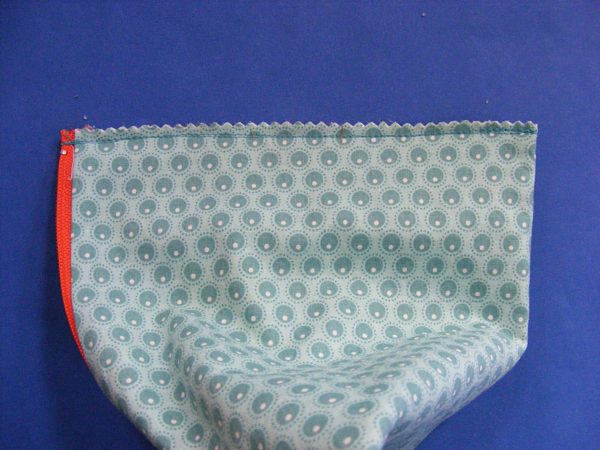
See? When you turn it right side out you’ll have a tube with the main fabric on the outside, the lining fabric on the inside, and the zipper in between them.
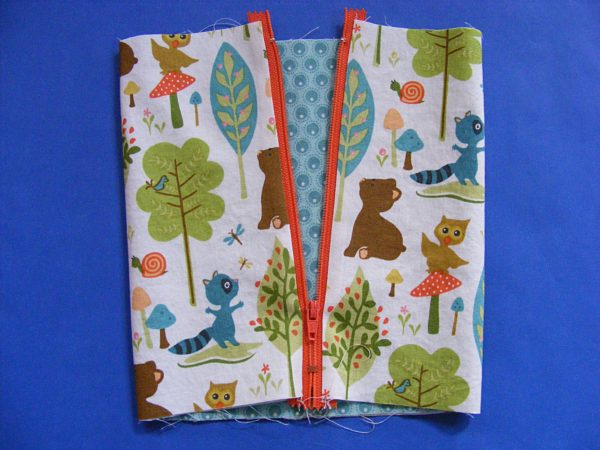
Step 8
Now that you’ve admired your nice zipper installation, turn the tube inside out, so the lining fabric is on the outside. Flatten the tube so that the zipper is running down one side. Mark the fold opposite the bottom of the zipper with a pin. Basically, you’re just finding the center here.
Step 9
Reflatten the tube so that the bottom of the zipper is lined up with the pin. See? Now the zipper is exactly centered and you didn’t have to measure anything. Geometry is awesome!
Step 10
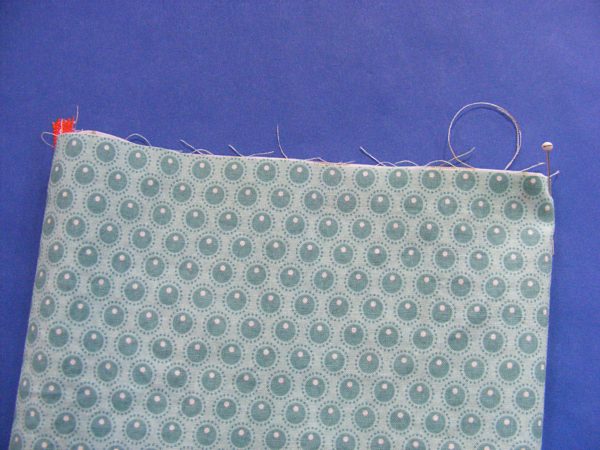
Using 1/4 inch seam allowance, stitch across the bottom of the bag. Stitch right over the zipper (if you’re using a plastic zipper) but do it slowly. Trim the raw edge with pinking shears.
I sewed this seam twice. I don’t know about other kids, but my daughter likes to stuff as much as she can into any bag and I don’t want the seam to split.
Step 11
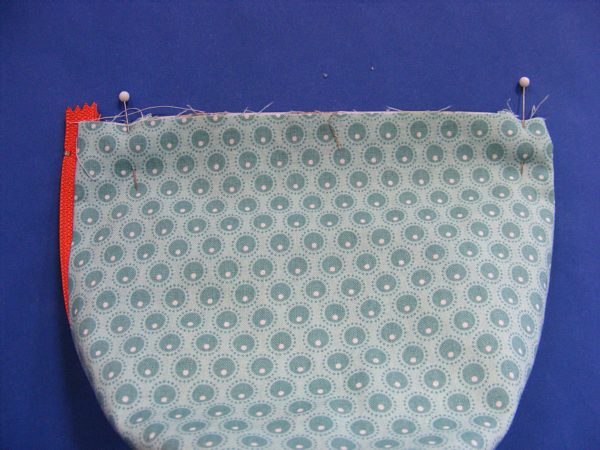
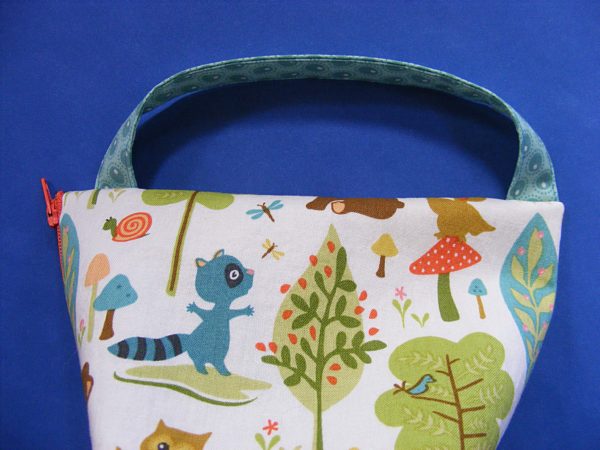
Now we’re going to sew the top seam and attach the handle. First – unzip the zipper. You will be very unhappy if you forget this step so do it now! Reflatten the top of the bag so that the zipper is running up the side. Sandwich the handle between the two layers. Put one end at each edge of the bag for a handle like on the biggest bag (shown here – see the pins?).
Put the ends together as close as possible to the zipper for a handle like on the middle bag.
Make sure the raw edges of the handle are lined up with the raw edges of the bag and pin in place.
Step 12
Using 1/4 inch seam allowance, sew across the top edge of the bag. I double-sew the seam here too – and you might even triple-sew across the handles. Strong is good. 🙂
Trim your seam allowance with pinking shears. Not too close to your seam – just neaten things up a bit.
Step 13
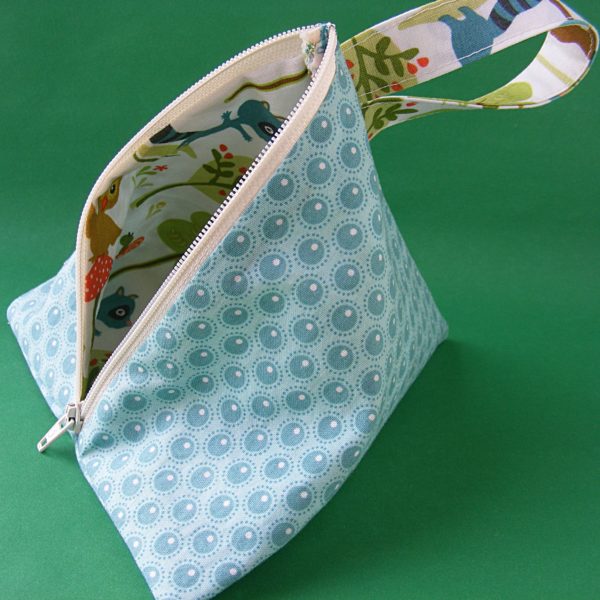
Turn the bag right side out through the unzipped zipper opening. (See why you had to unzip it before sewing?)

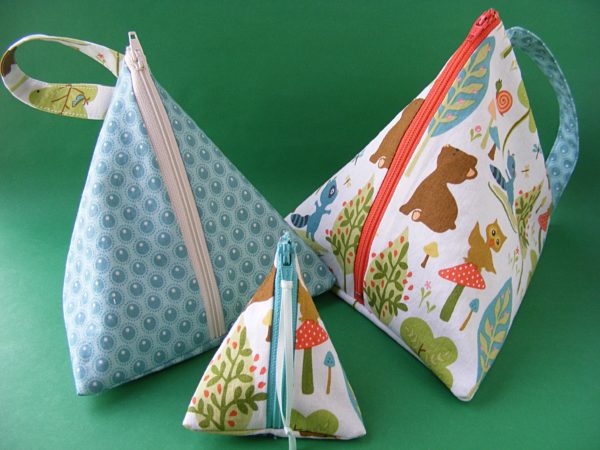
Gorgeous! And so useful! Give yourself a pat on the back and make another. You can get all three bags out of a pair of fat quarters.
Here are all three together. The smallest bag has no handle – but I attached a bit of ribbon to the zipper pull.
Make a bunch for yourself, and to share with friends! When you make them, share photos in the Shiny Happy People group. We would love to see!
Happy sewing!
Having been looking for so long for a pattern for a large pyramid bag, with no luck, so I am absolutely delighted to see your pattern, I can’t wait to start sewing it!! Thanks!
Pingback: Episode 5: Along, along, along! – A Spring Snowflake
Hello
I can’t seem to load the video that goes with this post. Can you help at all.
Thank you
There’s no video – it’s a downloadable pattern. There are links to individual tutorials within the pattern.
Aqua¹
Going to try this Thanks for this lovely pattern.
Beautiful bags and clear tutorial. I have made a lot of the smallest suze. Only now seeing a bigger obe with handle. Thanks.
Can it be used to teach others/ sell tge products? TIA!
Yes! Just please keep my link(s) and credit info intact on any handouts you use. 🙂
Pingback: 19 Free Tote Bag Sewing Patterns For DIY Projects 2019
Is the largest size the size for a mini iron? May I make one to use as a door prize at our next retreat? I don’t want to violate any ownership issues. I will be glad to put a tag on the item saying where I got the pattern.
I don’t think the largest would work for a mini iron – but it’s easy to size the pattern up or down as needed. Feel free to use the pattern however you like – no need to add a tag if that’s a hassle. The only thing I ask is that you don’t duplicate and distribute the pattern itself. 🙂
Pingback: 15 Purses, Bags, and Totes You Can Sew! | The Crafty Blog Stalker
I have been looking for the pattern for the Triangle tore bag and can’t open the pattern can you help me?
It’s updated and corrected now. 🙂
bonsoir
thank’s for the tuto , I love it …
How do I download the pattern for the triangle tote bag?
There are no pattern pieces to download – they’re made from rectangles and the cutting instructions are in the post.
This is a fabulous tutorial! I enjoyed it very much! Just like having you peeking over my shoulder coaching! Easy to follow and the results are great! Thank you so much!
Is there a way to add more structure to these? I’m thinking of giving as a purse to my gkids.
Absolutely! Just add a fusible interfacing of the weight that you want.
Hello, I love the bags but the link to the pattern just provides a photo of the bags, please can you advise?
There’s no pattern to download – the pieces are all rectangles and the blog post has all the cutting sizes and instructions.
Thank you for the clear instructions. I made the large and medium bags for doggy treats and whatever when going walking. I added a handle and a swivel clip to to top end.
Pingback: 20 Sewing Patterns for Purses and Bags - Crafty Blog Stalker
Can you please do a triangle back pack with one strap
Thank you very much for posting this pattern and the zipper video. I am self-taught and this pattern, video, pictures and instructions. I’ve always thought triangle bags were adorable and hard to do, but not with your pattern, Thank you again for posting it!
I wish I could attach a picture of the ones I made, with your explanations, I think they came out pretty cute.
You can join the Shiny Happy People group on Facebook and share photos there. It’s a great group! https://www.facebook.com/groups/854216274691588
Can you give the dimensions of the finished bags?
Measuring at the zipper, they are 3, 5 and 7 inches.
Pingback: Triangle Tote Bags Free Sewing Pattern