Instructions for Cut & Sew Christmas Stockings

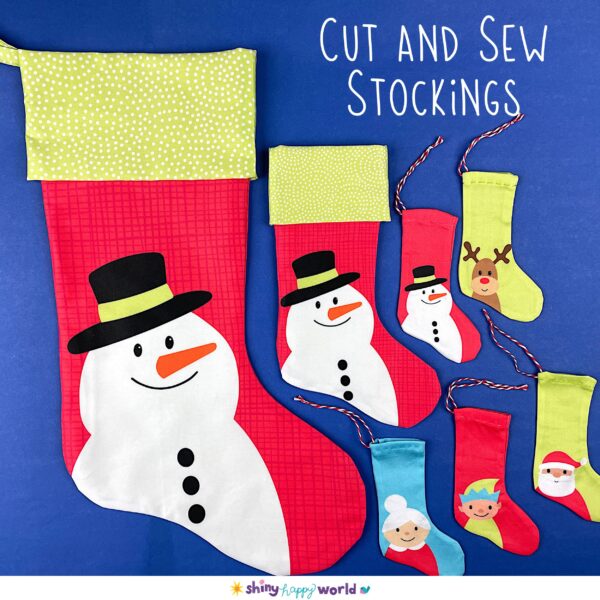
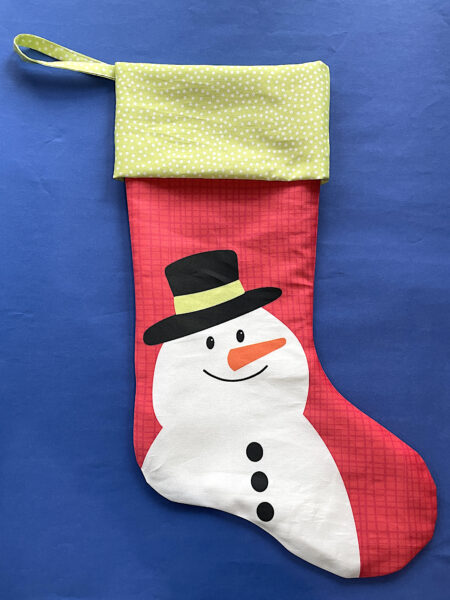
Make adorable Christmas stockings using a yard of cut & sew fabric. These stockings are SUPER easy to make, and there are instructions printed right on the fabric. But if you’ve never sewn a stitch before and you want a little extra help you can find additional instructions (with videos) here.

Buy your fabric here. You need to get a full yard printed on any of Spoonflower’s fabric bases that are at least 56 inches wide. I used Organic Cotton Sateen because I love how the colors print on that fabric.

One yard gives you all the pieces you need for the following:

  • one large stocking (19 inches tall) fully lined with a contrasting cuff and hanging loop
  • one small stocking (10 inches tall) fully lined with a contrasting cuff
  • five small (5 1/2 inches tall) stockings perfect for filling with candy and hanging on the tree

Here’s a video showing ALL the steps.

If you’d rather have written instructions, here are all the steps – with links to a few additional videos you might find helpful.

  1. Cut out stocking front and back, and the rectangle for the hanging loop. Do NOT cut the line between the main stocking (red) and the lining (light green).
  2. To make the hanging loop, fold and press the rectangle in half the long way. Open, and fold each edge in to the center fold. Press. (There’s a video showing how to do this here.) Stitch down the long edge.
  3. Pin stockings right sides together, sandwiching the hanging loop between the layers where indicated.
  4. Sew around the edges using 1/4 inch seam allowance. Leave open for turning where indicated.
  5. Clip seam allowance in concave curves. (There’s a video with more info about that here.) Turn right side out and press.
  6. Sew up the turning opening. You can use whipstitch, ladder stitch, or your sewing machine.
  7. Tuck the lining down into the stocking, smoothing as you go.
  8. Turn down the cuff.
  9. Hang it by the chimney with care and fill it with treats!

Easy peasy!

Want more super easy projects?

Find all the Cut & Sew Projects here.

Find all the Cheater Quilt fabrics here.

Sewing Machine Feet

photo showing a close-up of a clear plastic applique sewing machine foot. text reads: Sewing Machine Feet

I get a lot of questions about sewing machine feet. Mostly people want to know one of two things. What kind of specialty feet should they buy for their machine? And do they really need to have a walking foot?

Well – it all depends on what you want to sew!

There are so many specialty feet out there! I have a few I’ve bought for specific projects – a ruffling foot when my daughter was little and liked ruffles and gathered skirts, a piping foot for I-don’t-even-remember-what. You get the idea.

But there are a few feet that I use ALL THE TIME – and they’re what I want to talk about here.

Zipper Foot

I don’t sew much clothing, but I do like to make little zippered pouches and pillows with zippered backs. A zipper foot is pretty essential if you’re going to sew zippers. I guess technically you can do without it – but I wouldn’t want to. 🙂 The good news is that most machines come with a zipper foot, and if yours doesn’t, there are lots of inexpensive universals available.

A zipper foot is also really handy for sewing piping or other fancy trims where you want to sew right up against a chunky bit.

Handy links. . .

Walking Foot

If you like to machine quilt, a walking foot is essential. Basically, what a walking foot does is give you feed dogs that sit on top of your fabric, pulling it through at the same rate as the feed dogs built into your machine below the throat plate. This keeps the top and bottom layers feeding evenly through the machine. Genius!

A lot of fancier machines now have a built-in walking foot, but there are universals available for every brand and some of them are pretty inexpensive. I highly recommend getting one!

Handy links. . .

Quarter Inch Foot

This isn’t one of the essential sewing machine feet, but I really love it for when I want to be super precise in my seam allowance.

Here’s what mine looks like.

close-up photo of a quarter inch sewing machine foot for a Bernina

That weird piece sitting beside the foot actually screws into the machine and becomes a wall that you butt your fabric against, to help you get an exact 1/4-inch seam allowance (or whatever depth you set it to). This is perfect for joining quilt blocks – especially for quilts with half blocks and double blocks where the seam allowance needs to be really accurate.

For some machines, the quarter-inch foot has the “wall” built right into the foot, but those aren’t adjustable. They ONLY do a quarter inch seam allowance.

Handy links. . .

Clear Applique Foot

I saved my very favorite sewing machine foot for last – a clear applique foot.

If you do ANY machine applique (or any topstitching or edgestitching) this foot is absolutely necessary.

Here’s what a typical sewing machine foot looks like.

It’s metal and it might have a small opening like this one – but you can’t see much. And there’s very little visibility where the needle is actually going in – that smaller slot behind the main “toes.” It’s REALLY hard to see where you’re stitching with this foot.

Here’s a clear applique foot.

Close up photo of a clear applique foot - one of my favorite sewing machine feet.

Look at that! The base of the foot is made entirely of clear plastic – giving you total visibility as you stitch. That ability to see what I’m doing is what allows me to outline applique shapes like this so neatly.

cute applique chameleon made with striped green fabric and the Carter Chameleon - easy applique pattern from Shiny Happy World

Handy links. . .

So there you are – the four sewing machine feet I use most often.

Here are handy links to all the posts about quilting tools and supplies.

Sewing Machine

Iron

Rotary Cutting Tools

Scissors

Other General Sewing Room Supplies

One More Hugely Popular Post that Seems to Fit Here Better than Anywhere Else

Return to the Let’s Make a Quilt main Table of Contents.

Move on to the posts about choosing your quilt pattern.

Happy stitching!

Joining Strips with a Diagonal Seam

Joining Strips with a Diagonal Seam - a video tutorial from Shiny Happy World

I almost always use scrappy bindings in my quilts and I get a lot of questions about how I get those diagonal seams.

I show the diagonal seam in my video How to Bind a Quilt – but I never actually showed how to do it.

Until now.

See how easy that is?

I use this method any time I’m joining strips together. For me that’s usually binding a quilt, but it can also be for bias strips on bags, clothing, and any other application.

Happy stitching!

Best,
Wendi

Tips for Dark Eyes on Dark Softies

dark brown crochet cat with black eyes

Felix is a new crochet pattern and I love him. 🙂

For the pattern I stitched him up in yellow, because lighter (and solid) colors make it easier to see the individual stitches. But I also wanted to make him in this tweedy dark brown for more of a tortoiseshell cat look – just for fun.

The tricky part of using dark yarn – or dark fabric for a sewn softie – is getting the eyes to show up well. The eyes are the most important part of the face!

I’ve got two solutions for you today.

If you want to use a solid black craft eye (which is what I use for most of my softies) then it’s a big help to back those eyes with a circle of a lighter colored felt just a smidge bigger than the eye. That’s what I did with Milton Monkey. . .

Milton Monkey - a softie pattern from Shiny Happy World

. . . and with Brandon Beaver. . .

Brandon Beaver - a Cuddle Club pattern from Shiny Happy World

And that’s what I did with Felix. Here you can see those eyes a little closer.

I used a 1/2″ circle of sandstone felt with 9 mm eyes.

I use this tool to trace nice neat circles in lots of sizes.

circle template

I don’t remember where I got this exact template, but I’ve seen similar items at Office Max and Staples.

If you make a lot of softies and tend to use the same size eyes, you can also buy die-cut eyes which are perfectly perfect circles. I like the ones from Woolhearts on Etsy. You can choose the size and an assortment of up to six colors. It’s handy to keep a little stash of favorite colors.

Once you have the circles cut, there’s one more step. You need to punch a hole in the middle for the shank of the eye to go through! You can use an awl, or you can use a 1/8 inch hole punch for extra neat holes.

Use a hole punch for nice neat holes in felt

Perfect little backs to set off your eyes! I usually stick to a color that’s a lighter shade than the main color – but not too light! White in particular can make your softie look scared.

Another option is to use an eye with color already in it.

(When I do that I usually use a slightly larger eye than what the pattern calls for – like jumping from a 9 mm to a 12 mm eye.)

Look at Sharon’s cat (named Arnold). She also made a dark brown kitty, but she used awesome cat eyes for hers!

dark brown cat with yellow eyes

With those big eyes and no mouth he immediately reminded me of the cat from Kiki’s Delivery Service.

And now I need to make a black cat. 🙂

Here are handy links to all the posts about amigurumi eyes. . .

Return to the main table of contents for Let’s Learn to Crochet Amigurumi.

Move on to the lessons for standing legs.

Happy stitching!

How to Sew a Zippered Pillow Cover – a video tutorial

How to Add a Zipper to a Pillow Back - a video tutorial from Shiny Happy World

I’m pretty picky about pillow covers.

I don’t like the envelope backs. They’re easy to sew, but they don’t cover the pillow as snugly as I like.

I like zippered covers, so they cover tightly and can be removed for washing – but I don’t like when the zipper is in one of the side seams. They never “sit” the same way as the other seams, so the finished pillow shape is always a little distorted.

I like the zipper to be somewhere in the pillow back (it doesn’t have to be the exact center) but I don’t like it to extend all the way to the edges, because the stiffness of the zipper again can distort the overall look of the pillow.

So here’s how I sew a pillow with a zipper in the back.

  1. I make the cover a little small. If the pillow is 18 inches square, I cut my fabric 18 inches square. When I sew the front to the back using a 1/2 inch seam allowance, the pillow cover ends up 17 inches square – perfect for the nice snug fit I like.
  2. I make the zipper a little short. Specifically – two inches shorter than the cut fabric. So for an 18 inch pillow, I buy a 16 inch zipper.

Here’s how I assemble the zipper back.

See how easy that is?

(Do you like that super fun, slightly wobbly gingham print? It’s part of the Gingham Play collection from Michael Miller Fabrics and I have fat quarter bundles in a rainbow of pretty colors.)

I make a LOT of these pillow covers.

My daughter doesn’t like using regular rectangular bed pillows. Instead she has an enormous pile of square pillows – mostly with quilted and applique designs on them. 🙂 She doesn’t like the inexpensive “hard” pillow forms. She likes these Fairfield brand Home Elegance pillows. They feel like down pillows, but they’re a LOT less expensive and they’re machine washable. Win!

You can use any quilt block pattern to make a pillow cover.

How to Turn Any Quilt Block into a PIllow

There are basic instructions here, and the Think BIG class has instructions for making giant floor pillows!

Happy sewing!

Best,
Wendi

How to Use Safety Eyes

Craft eyes. Plastic eyes. Safety eyes. Animal eyes. They’re called lots of different things!

You can use them for both sewn and crocheted softies. I’ve even used them in applique wall hangings. I just use a pair of wire cutters to snip off the post that sticks out after you attach the washers.

colored craft eyes or safety eyes fro making stuffed animals

I’ve made a video (below) that shows you how to install them. In the video I’m demonstrating on a crocheted stuffed animal, but you can use these eyes in sewn softies as well. You just need to poke a hole! I like to use a ball point awl. It creates a hole by stretching the fibers around the opening instead of by cutting any of the threads. If you cut a hole in stretchy knit fabric, that hole can run over time, just like a ladder in your stockings.

I prefer eyes with ridged shanks and plastic washers. I feel like they hold the best BUT they’re harder to use with smaller size eyes. It’s just really hard to hold such tiny pieces straight while you push the very tight washer on! So for the smallest eyes (4.5 mm) you’ll get smooth shanks and metal washers instead. They’re still small, fussy pieces, but they’re not nearly as hard to work with. Also – 4.5 mm eyes are so small that I really only use them for small felt softies – the kind of softies that stand on a shelf instead of being played with a lot. 

Speaking of safety – just because they’re called “safety eyes” doesn’t make them safe for babies. The eyes themselves will never come apart (here’s a video showing how to remove safety eyes – you’ll see how hard it is to do). But babies can chew through the fabric around the eye, which then frees the eye (along with the still-attached washer) which is a choking hazard. So only use these on toys for kids over three, or toys that will be played with under supervision.

Below the video I’ve also included a quickie photo tutorial for those of you who want to get ‘straight to the point’ as well as some other links you might like!

Video Tutorial for Craft Eyes

This is a little 5 minute video. Enjoy!

How to install craft eyes

Do you see those little points?

plastic washer on a safety eye

Those little ‘barbs’ dig into the fabric and keep the eye from rotating. Which isn’t a big deal if you’re just using a black craft eye, but is crucial if you’re using a comic eye. You don’t want them twisting and giving you googly eyes!

The ridges on the posts of craft eyes help the washer click on (and stay on!) securely. I love hearing the ‘click’ as I press the washer on! The ridges also help to make sure the washer presses on evenly.

how to attach a craft eye 2

So, let me show you how to install a craft eye with a plastic washer.

First, insert the post of the craft eye between the stitches on your piece where you want it to go. For sewn softies, use a ball-point awl or a small knitting needle to poke a hole. I recommend that you place the eyes first, before pressing on the washers, just to see if you like the look.

monkey with heart eyes

Once your eyes are positioned how you’d like, press the flat side of the washer (that’s the one with the tiny barbs!) onto the post.

Here’s a photo of how it will look (but without the fabric getting in the way… obviously, your piece doesn’t really look like this!):

how to attach a safety eye or craft eye for making stuffed animals

I don’t want you to stress too much about this, because if you try to put the washer on backwards, it just won’t go.

Now, push! You’ll hear that click, and it’s on!

A note about smaller eyes

Most 6 mm craft eyes, because they are SO tiny, have smaller plastic washers without the ‘barbs’. And most 4.5 mm eyes (as mentioned above) have metal washers. But don’t worry, the same rule applies: flat side towards the fabric. 

6mm safety eyes

This post about sources for my favorite tools and supplies has links to places where you can buy safety eyes.

Here are handy links to all the posts about amigurumi eyes. . .

Return to the main table of contents for Let’s Learn to Crochet Amigurumi.

Move on to the lessons for standing legs.

Happy stitching!

Make Extra Fun Rag Dolls with Faux Fur Hair

Fun Faux Fur Makes Extra Awesome Rag Doll Hair - tips from Shiny Happy World

I usually use wool blend felt for the hair on my Dress Up Bunch dolls. It’s durable, easy to work with, and relatively inexpensive and it has a nice, classic look – even when I use non-traditional hair colors.

But you don’t have to use felt.

If you scroll through some of the photos in the Shiny Happy People group on Facebook you’ll find adorable dolls made with printed cotton fabric hair and cuddly fleece hair – but you can also use fun faux fur!

If you use a regular “hair-colored” fur you can make a doll with pretty realistic hair. If you use a more wild and funky fur (like the one I used) you can make a fun pixie. 🙂

Here are some tips to help you out. . .

Cut out the fur just like you would cut out the felt. Make sure the nap of the fur is running in the correct direction. To minimize flying fur bits, cut just through the fabric backing, as shown in this video – Intraux to Working with Faux Fur.

Fun Faux Fur Makes Extra Awesome Rag Doll Hair - tips from Shiny Happy World

I stuck the fur piece for the bangs down to the top of the head using a glue stick, then appliqued the bangs edge with a wide and fairly open zigzag stitch.

Fun Faux Fur Makes Extra Awesome Rag Doll Hair - tips from Shiny Happy World

You can see how to do that applique in this video – How to Applique Faux Fur.

After you get the bangs sewn in place, sew up the doll just like normal. You just need to make sure to smooth the fur into the seams. Here’s what the back of the head looks like – the fur is smoothed down between the back of the head piece and the back of the body piece.

Fun Faux Fur Makes Extra Awesome Rag Doll Hair - tips from Shiny Happy World

You can see how to do this in the Intraux to Working with Faux Fur video.

Here’s how it looks when you clip the doll front to the doll back.

Fun Faux Fur Makes Extra Awesome Rag Doll Hair - tips from Shiny Happy World

The fur on both pieces is smoothed between the layers.

Fur can be fat and difficult to pin. Sewing clips work really well with it.

And here’s my finished wild-haired pixie. 🙂

Fun Faux Fur Makes Extra Awesome Rag Doll Hair - tips from Shiny Happy World

A couple more things. . .

I used Poppy’s bangs with this doll and they come down pretty close to her eyes. If you’re using a very long fur you might want to choose a doll with a higher hairline.

I skip the pigtails or the buns when I work with fur. They just don’t work very well with that fabric.

You can read about my favorite source for faux fur here.

If you like these dolls and want to make your own, you can find all the patterns for the Dress Up Bunch dolls and clothes here.

Happy sewing!

Best,
Wendi
Wendi Gratz from Shiny Happy World

Make Your Own Laminated Fabric

Make Your Own Laminated Fabric

Sort of. True laminated fabric has a very thin layer of polyurethane film permanently stuck to the right side of the fabric. The resulting fabric is waterproof, but still has a nice drape to it.

There’s a great post here about the difference between oilcloth, laminated fabric, and chalkcloth.

It’s terrific when you can find it – and more and more manufacturers are making it. But it can still be pretty hard to find, and when you do – the print options are usually fairly limited.

So what about when you find a lovely fabric collection like this one. . .

Spring Walk fabric collection from Cloud9 Fabrics

Spring Walk from Cloud9 Fabrics – and you want to make it into an adorable, doll-sized raincoat and boots?

Dress Up Bunch Doll Raincoat Pattern

And you want to make that raincoat and boots out of laminated fabric because your kid is smart and they know regular cotton is not waterproof?

You make your own laminated fabric!

I used a product called Pellon Vinyl Fuse and it worked great. Heat & Bond also has a couple of laminating products (including one that brushes on!) that I’ll be testing soon. I’ll update this post after testing.

It’s very easy to use – you just iron it on. The package has very clear instructions.

After that you treat it almost like any cotton fabric – with a few key changes.

Tips for Working with Laminated Fabric

  1. Do not iron it from the vinyl side of the fabric! Save the backing paper you peeled off when you applied the vinyl and use that as a press cloth if you absolutely must iron from the front. I found the stiffness of the fabric meant all I ever needed to do was a quick finger press – no iron needed.
  2. The resulting fabric is stiffer, with less drape than a true laminated fabric. Choose a simple pattern without pleats of gathers.
  3. Some people recommend sewing over a piece of tissue if you need to sew with the vinyl side down – for fear of the feed dogs scratching the vinyl. I sewed with the vinyl side up and down – with no tissue – and had no scratching or grabbing problems. But your machine may be different! I recommend sewing a tiny test.
  4. If the laminated fabric crinkles a lot when you turn it right side out, you can hit it with a hot hair dryer and smooth things out really easily.
  5. Use clips instead of pins to hold the pieces together. Pins will leave permanent holes in laminated fabric.
Use clips instead of pins when working with laminated fabric.

One more reason to love my sewing clips. 🙂

And now – one more photo because these tiny boots are so dang cute.

Adorable doll rain boots - from the Rainy Day pattern collection for the Dress Up Bunch dolls

Seriously! I want them for myself! You can get the Rainy Day pattern collection for the raincoat and boots here. But they only fit dolls – not you or me. 🙁

Happy sewing!

The Dress Up Bunch is a collection of cute and cuddly rag dolls. Get patterns for the dolls, plus all their fun outfits and accessories!

Using Stretchy Knit Fabric for a Rag Doll

Using Stretchy Knit Fabrics to Make a Rag Doll - Tips from Shiny Happy World

As soon as I wrote this post about sewing softies with stretchy knits, I started getting questions about using knits to make Dress Up Bunch rag dolls. I decided to give it a try and the answer is YES!

With a couple of caveats. 🙂

Everything in the post about stuffed animals applies to rag dolls.

  • Test your fabric with a universal needle and prepare to switch to a stretch or ballpoint needle if needed.
  • Do not overstuff.

The Do Not Overstuff rule is especially important for rag dolls. If you stuff them too fat, they won’t be able to fit into the regular Dress Up Bunch clothing patterns!

Using Stretchy Knit Fabrics to Make a Rag Doll - Tips from Shiny Happy World

The knit fabric will change the proportions of your doll a bit – she’ll be a little wider. You can see the difference here between the knit Poppy (purple hair) and the woven Poppy (copper hair).

Using Stretchy Knit Fabrics to Make a Rag Doll - Tips from Shiny Happy World

I was super careful not to overstuff, but you can see that the knit Poppy still has a slightly wider head.

The other thing to keep in mind is that you’ll also want to use a knit fabric for the hair. If you use felt hair with the knit skin, the hair will not stretch but the face will and it will look like her face is bulging out from under her hair. Not cute. 🙁

I used this peat solid from Cloud9 Fabrics for the hair, and a very high quality Waldorf doll skin fabric in tan (from Weir Crafts) for the body.

So you need to be extra careful with the stuffing, but the finished doll is incredibly soft and cuddly in a way that you can only achieve with knit fabric. Give it a try!

Update – I added a new post here showing a Dress Up Bunch doll made with Cuddle Fleece – and it has an overview of all the specialty fabrics I’ve used for these dolls over the years. Go take a look!

Happy sewing!

Best,
Wendi
That's me!

The Dress Up Bunch is a collection of cute and cuddly rag dolls. Get patterns for the dolls, plus all their fun outfits and accessories!

How to Add an Opening for Dolls with Wagging Tails

How to Add an Opening for Wagging Tails - a tutorial from Shiny Happy World

Most of the Dress Up Bunch dolls are human, but a few of them are critters with tails. And those tails need wagging room! Here’s how to add an opening to any pants or skirt pattern for the Dress Up Bunch dolls.

Cut out all the pieces as normal.

When you come to the part of the pattern where you sew the center back seam, jump in with these steps. . .

Measure down the center back seam 2 inches and mark with a pin.

Measure down 1 3/4 inches from that pin and mark with another pin.

Sew from the top to the first pin with a normal stitch length. Sew the space between the pins with a longer stitch length – the longest you can set on your machine. Switch back to the regular stitch length and sew the rest of the seam.

How to Add an Opening for Wagging Tails - a tutorial from Shiny Happy World

Make sure you backstitch (with the normal stitch length) a bit at the top and bottom of the section of long stitches. You’re going to cut those big stitches and this will keep the rest of the regular stitches from unraveling.

Press the seam allowance open.

How to Add an Opening for Wagging Tails - a tutorial from Shiny Happy World

Sew a tiny little rectangle around the section of long stitches to reinforce that opening.

How to Add an Opening for Wagging Tails - a tutorial from Shiny Happy World

(You’ll want to use matching thread, of course.)

Use a seam ripper to cut the large stitches inside that reinforced rectangle.

How to Add an Opening for Wagging Tails - a tutorial from Shiny Happy World

And voila! You have an opening for the tail! Continue with the rest of the pattern instructions.

This works for pants and shorts (as shown above) or with a skirt.

How to Add an Opening for Wagging Tails - a tutorial from Shiny Happy World

If you’re making Pip the Cat, Squeak the Mouse, or Spot the Dog this is a method you can use to adapt any of the clothing patterns to fit their tails. Have fun with it!

Happy stitching!

Best,
Wendi
That's me!