


My daughter Jo has been a mask-making machine. She made over 1000 masks and donated them to our local United Way who is distributing them to the clinics and organizations that need them.
I don’t want to get into a debate here – so please don’t send me an email or comment about how you read these aren’t effective. Medical people in my area are asking for them, and right now I’m going to give them anything and everything they ask for.
When I mentioned making and donating masks in my most recent newsletter, I was INUNDATED with emails from patients, nurses, mothers of nurses, hospice workers and more telling me how much these masks are needed and appreciated.
And when production has ramped up and hospitals and clinics are getting all the PPE they need, there will still be a need for masks to help reduce transmission when we all start leaving our homes again. I thought this article laid it out especially well. The short version is – everyone should be wearing masks when they’re in public. My favorite line in the article is, “My mask protects you. Your mask protects me.”
In addition to people saying they wish more people were making and donating masks, there were a lot of emails from people asking for the pattern I’m using. Keep reading for the complete tutorial.
This is a no-elastic mask. Everyone is sold out of elastic and I’ve heard from a number of health professionals saying that a behind-the-ears elastic mask is very painful when worn for hours at a time – which is what they’re having to do. I’m also hearing that some places are washing these masks multiple times a day, and the elastic is wearing out quickly under those conditions. So our mask uses fabric ties. One ties up at the crown of the head (it doesn’t seem like it would stay put there, but it really does) and the other ties behind the neck. This size fits any size head.
If you’re keeping a mask for yourself to wear to the grocery store, walking your dog, etc. make sure to remove it properly. Don’t grab it by the front of the mask and toss it on your kitchen table. Remove it by the ties, put it in the laundry, and then wash your hands.
Whew! That’s a lot of preface. Here’s how to make it. Scroll past the video for written instructions with step-by-step photos.
And here are the written instructions.
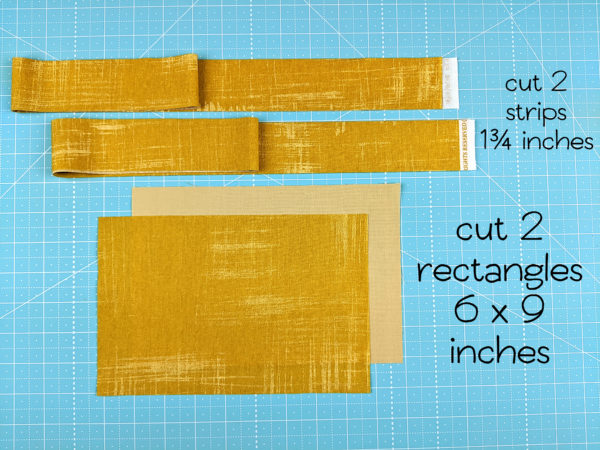
For each mask you’ll need two 6×9 inch rectangles and two 1 3/4 inch strips. I read several studies that said NOT to add any additional layers to this kind of loosely-fitted mask. Yes – additional layers will increase the filtration, but they make it harder to breathe THROUGH the mask, resulting in more unfiltered air being drawn in around the edges. Use tightly woven cotton – quilting cotton is great. T-shirt fabric also tests very well, but I don’t have any so I haven’t tried that with this pattern. It should work fine, though.
The ties need to be 1 3/4 inches wide and at least 40 inches long. We went with the full width of the fabric – selvedge to selvedge – because that’s 40 – 45 inches wide. Don’t trim off the selvedges. That finished edge means you don’t have to hem, which will save time. 😄
With this method, every 3/4 yard will make 4 masks.
If you prefer to use purchased bias tape – that will save time and stretch your fabric stash. Make sure you get 1/2″ double-fold bias tape. There are TONS of people selling large rolls on Etsy

If you use purchased bias tape, then 1 yard of fabric will make 12 masks.
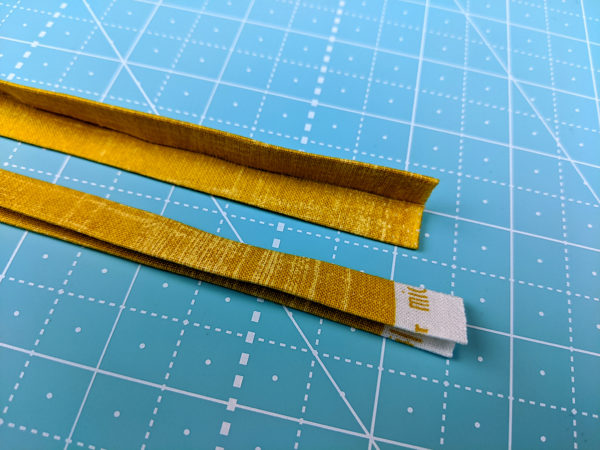
Press your strips into double-fold bias tape. There’s a video tutorial here showing two different methods for doing that. Jo is using a 25 mm bias tape tool to make hers. That’s the right size for 1 3/4 inch strips of fabric. If you have a different sized tool at home, you can adjust the size of your strips accordingly. Just don’t go too skinny or it will be hard to catch all the mask layers when you sew it in place.
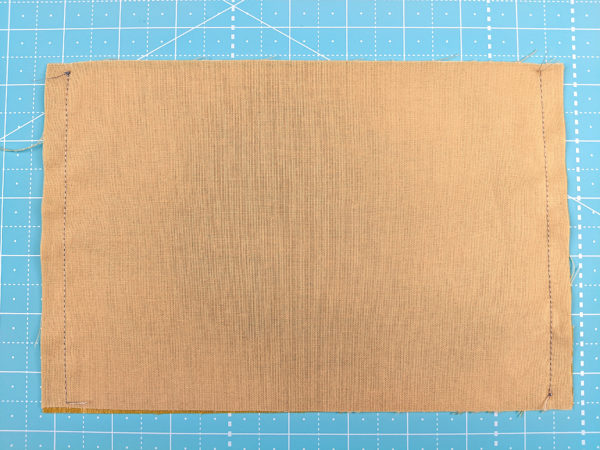
Put the two rectangles of fabric right sides together. (Nurses are recommending using two different fabrics so that if they have to remove the mask and put it back on, they can easily tell which is the outside and which is the inside.) Sew them together along the short sides, using 1/4 inch seam allowance.
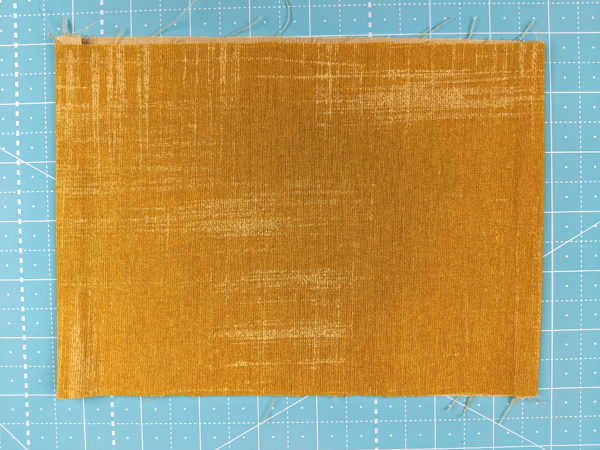
Turn the mask right side out and press it flat.
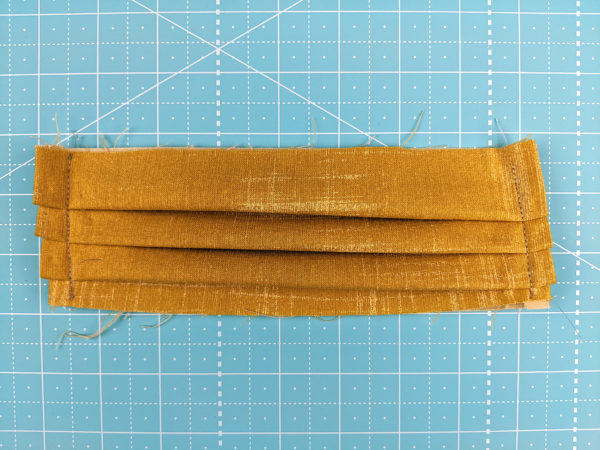
Now it’s time to pleat the sides. You need to put three evenly-spaced pleats in each side of the mask.
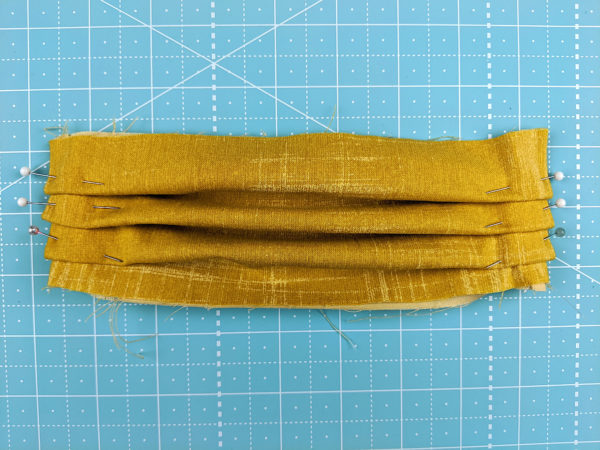
If your fabric has a direction to it, make sure the pleats are pointing down.
You can eyeball the position of the pleats, but Jo has been measuring to keep things nice and even.
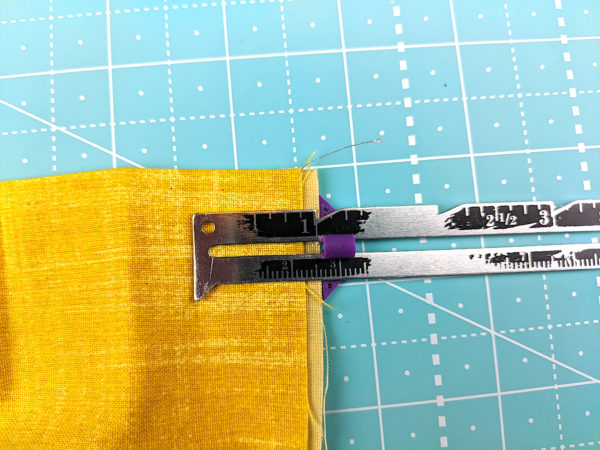
Measure up one inch from the bottom edge of the mask (turned sideways here). Then fold the rest of the mask down over the end of the ruler, and fold it back up at the half-inch mark.
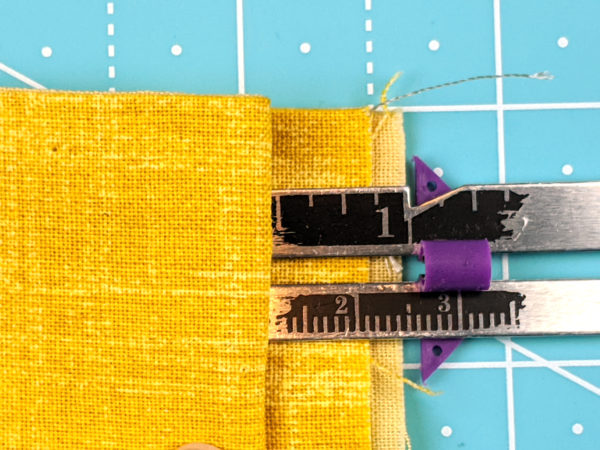
Hold that fold with a pin and continue up the side of the mask with two more pleats, each starting one inch from the fold of the previous pleat.
Pleat up both sides, then sew those pleats in place by sewing 1/4 inch from the short edges.
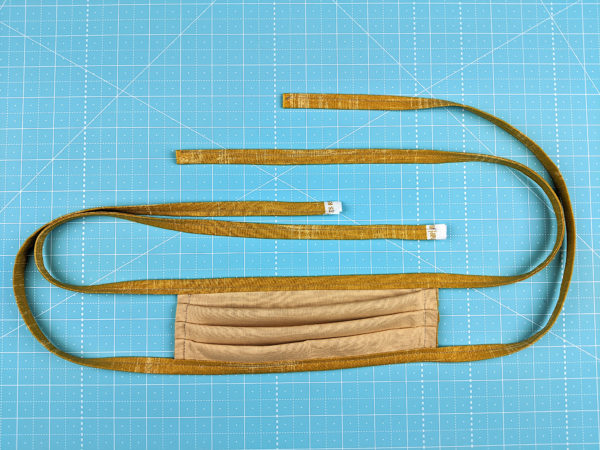
Time to add the ties.
Fold the mask in half to find the center. Mark the center top and center bottom with pins. Fold the ties in half to find their centers. Wrap the center of one tie around the raw edge at the center of the top of the mask and pin. Repeat with the second tie and the bottom edge of the mask.
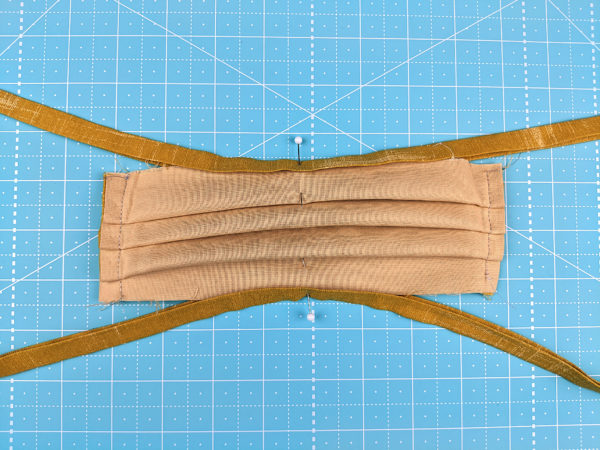
We’re only pinning at the centers to hold the ties in the right place. You can get the bias tape wrapped around the rest of the mask edge when you get to it while sewing.
Now it’s time to sew up those ties.
Start at the end of one tie and sew the folds together as close as you can reasonably get to the edge. When you get close to where it starts to wrap around the edge of the mask, pause, make sure the mask edge is tucked all the way up into the fold of the bias tape, and keep sewing. Continue past the edge of the mask, and on to the other end of the tie.
Repeat for the second tie.
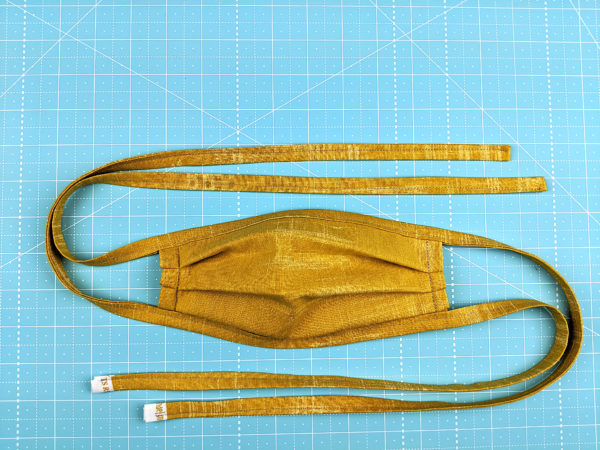
Finished!
A few more notes. . .
If you have elastic and want to make a mask with behind-the-ear elastic loops, there’s a pattern here.
If you have smaller pieces of fabric and don’t mind taking a little more time, this center-seam pattern might work best for you.
Before you make any masks, you can contact a local organization to see if they’re requesting a particular pattern or materials.
If you’re looking for where to donate your masks, reach out locally first. I found our local United Way by contacting our county health and human services office. United Way has taken it from there, finding out which organizations can use DIY masks and handling distribution to them. There’s probably someone in your county doing the same thing.
If your local hospitals/clinics/hospice care workers/etc. don’t need masks – fantastic! You can still make them for regular people. Maybe your grocery store employees need them, or your friends and neighbors. You’re also welcome to sell masks made with this pattern. In the Czech Republic, a grassroots effort provided ten million masks in just three days.
If you post on social media, please use the hashtags #coverourcaregivers and #masks4all to help spread the word.
Thanks so much!
Thank you! Any word on whether we need to double-stitch the pleats down? I was making the lines masks and we were asked to reinforce the pleats. Maybe there isn’t as much stress on the fabric without the lining? (Definitely easier to make and wear in your pattern!)
Thank you SO much!
We haven’t been doing that, but maybe we should. It certainly can’t hurt.
Thank you so much, Wendi and Jo. Your efforts are deeply appreciated and much needed. We are all so grateful!
We’re happy to help! We have no medical skills – but we have a sewing machine and fabric!
Wendi I read professionals that need these are asking that they be made using two colors of fabric, one that they can always wear on the outside and one that they will always wear towards their mouth. This way, if forced to wear the same mask all day due to low supply, they can put it back on safely in case they remove it briefly. Thanks for the pattern!
Thanks! Jo mentioned that in her video (it’s uploading as I type this) but I forgot to include it in the written instructions. I just added it.
Thank you for this information. I had planned to Google it today. This saved some time. Thanks again for your service to all.
Hi Wendy and Alan! Your former neighbor from Mitchell County here! Thanks for sharing your pattern. I can no longer get elastic and your pattern is easier than the one I’m currently making. Wow, I’m really proud of Jo! Carolyn
It’s so nice to hear from you! I hope you’re doing well.
I just bought elastic from Etsy. You could try there. Good luck and thank you for supporting our healthcare personnel.
Thank you! Very informative video. Is there a particular type of fabric you should use? Can I use felt for the outside? Thanks!
Several studies are recommending two layers of quilting-weight cotton, no interfacing. Felt can’t be washed and you’re supposed to wash these after every wear.
I’ve just gotta laugh; someone did NOT cut off the selvedge edge. OK by me; I’m always looking for ways to save / use that, since it doesn’t need to be hemmed. I wanna say that my Home Ec. teacher said to use that edge sometimes, in our clothing class.
If you are using bias tape (I seem to have a stash of it for some reason and never really use it) do you need to sew the ends of the bias tape? (the video has the selvedge ends which don’t need the same kind of finishing).
I would probably hem them. Depending on use, these could get a lot of washing and without some kind of finishing the ends will fray.
Thanks Wendi and Jo!!! I have struggled with making those pleats and Jo’s way is great! Jo, you did a great job in the video explaining each step! I’ve watched so many mask making videos and yours is one of the best! Thank you!
Thank you Wendi! <3
Thank you for your demo and your mask donations Jo!
Thank You for all you are doing. My question is: Do I wash my material before I make the mask or do I wash the whole mask after I make it?
I don’t wash them before donating – I leave that up to each organization because they all have their own requirements.
Great job, Jo! I made 51 masks and gave them to my family to use since our State requires the use of masks whenever outside of the home. I was fortunate to acquire elastic.
Just a reply to those who say these masks aren’t useable in healthcare. n95 masks are more precious than gold right now and as a health care worker who is not currently working I can say the cloth mask is used as a cover for the n95 extends it’s life. To remove an elastic mask slip you thumb under the bottom lower mask, hooking the inside of mask and removing it. Wash mask in hot water no bleach or fabric softeners and was your hands immediately after touching