How to get started selling at craft fairs

Remember when I chatted about the results of the reader survey? And I even came up with an action plan, based on what you wanted to hear more of. One thing on that plan?

Increase the number of posts about the business side of things: from designing to selling your finished items.

You got it!


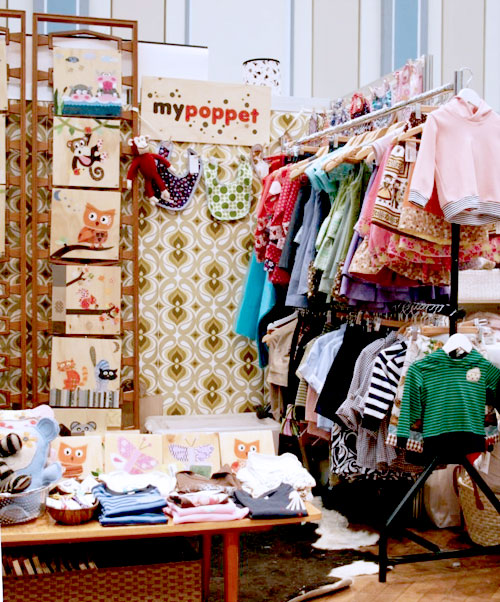
In thinking about how to get you more juicy information on the topic, I thought of Cintia Gonzales-Pell, who is the crafty genius behind MyPoppet.

Not only that, she’s the co-author of The Craft of Markets: how to achieve market stall success. It’s a great book that’ll set you on the right track for selling at a craft fair.

Cintia has been sweet enough to pop over and provide her top 5 tips for getting started at a craft fair! And then scroll down for my review of her book!

Five tips for getting started at a craft fair

by Cintia

So you like to make things? Maybe you’ve considered selling some of your craft. Well there is a whole world of markets and fairs out there waiting for you to dive right in. But before you jump into the deep end, a little bit of planning will help your market experience be a successful one.

Here are some tips to help you get started:

1. Think about why you would like to have a craft stall.
Do you want to market your business, make friends or make money? If your goal is to make the big bucks at a holiday-show, then you’ll spend much of your energy in the lead-up making sure you have plenty of stock. If your goal is networking, then you might want to be sure to email some people in advance to get your contacts off to a start.

By understanding your motives, you’ll be better able to plan for the show, and also enjoy the experience a whole lot more!

2. Choose the right style of fair for you.
Think about your product and lifestyle, and select a fair that seems suited to your craft. For example, you don’t want your product to be outrageously expensive or dirt cheap compared to the other sellers. Also, fitting in with your fellow sellers is a sign that the audience at the show is the sort of customer you’re interested in.

Attend lots of markets to see what the best fit is. Know that this will take a little trial and error!

3. When pricing your products aim for ‘good value’ not ‘cheap’.

Remember to price your product fairly for the customer AND yourself. You are selling your craft as a way to sustain your livelihood!

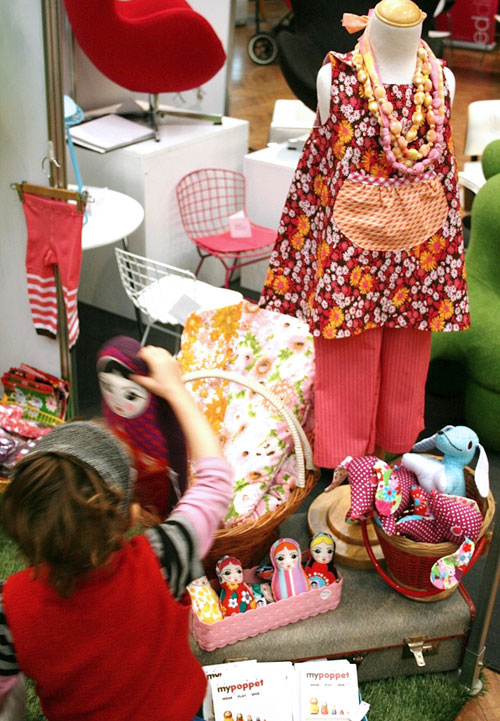
4. Plan how you will display your product and practice the set up at home to see if the layout works practically.

You want your display to shine from far away (it’ll draw customers in!) and set up so that items are easy for the customer to find. Keep in mind that you’ll have a limited-size stall, will need to chat with customers, store extra stock and run the cash register. Practice makes perfect!

5. The most important thing is ‘Have Fun!’ Be proud of your product and your enthusiasm will rub off on your customers. Enough said.

Markets are a wonderful introduction into selling your products, and often lead to other interesting opportunities. My market experiences started my journey into the retail and blogging world, and the friends and connections I’ve made along the way have been invaluable.

Where will your journey take you?

Are you a market newbie? Get the guide!

You may notice that the cover of the book says ‘from an Australian perspective’. Don’t let that scare you!

Australians may talk different (compared to us Americans) and watch funny sports (cricket, anyone?), but neither of those things are terribly important for grabbing the good information in this book. It’s full of helpful tips and ideas that, in my opinion, are applicable world-wide.

There are a couple words that might throw you off, so just to help you out, I’ll give you a little Australian-American dictionary: (in the order in which they appear in the book)

  • marquee = tent
  • bookings = reservations
  • Eftpos facilities = ATM/accepting a debit card
  • piles of washing = piles of laundry
  • dressmakers busts = dress forms
  • pin board = bulletin board
  • bar-be-que (barbie) = grill
  • trolly = dolly/cart
  • gumboots = rainboots
  • bum bag = fanny pack
  • Layby = lay away

Phew! Glad all that time I spend in Australia has come in handy!

Now that those worries are aside, I can chat about the actual book!

Why craft fairs?

This is the only book I’ve seen specifically aimed at advice for selling at craft fairs. Sure, many craft-business books include a little section on selling at fairs, but the advice is rarely comprehensive.

You may ask… why is it so important to spend so much time talking about craft fairs? Here’s the thing: craft fairs are an entirely different animal than other types of selling (in store, online). You’ll need to worry about:

  • the application process
  • the logistics of lugging tables/racks/product to a site for only a day
  • creating a display that shows off your product
  • accepting payment in person

All of these things are details that sellers with an online store totally avoid. So, if you’re interested in selling at a craft fair (which can be a great way to grow your customer base!), then this is stuff you’ll need to know.

The book is full of practical advice (you can tell these girls have done it before!). I’d recommend this book to anyone who’s even thinking of having a stall, since it contains information about how to decide if applying to a craft fair is right for your business.

Love Cintia? Love the book?

Cintia is a Crafter and Blogger and has many years of craft market experience under her belt. You can find her at My Poppet sharing one colorful crafty project a week.

You can buy the e-book The Craft of Markets from the My Poppet shop.

Thanks so much, Cintia, for coming by and giving us your tips!

Better Photography: creating a seamless white background


I’m really excited to be taking part in the Better Photography Blog Hop! I’ve joined some crafty geniuses: Diane from CraftyPod, Haley from The Zen of Making, Michele from Michele Made Me and Megan from Rad Megan’s… and we’re each sharing our great photo tips!
Scroll down to the end of this post to get links to each post this week!

Today, I’m going to show you how to get a seamless white background, with just a white posterboard and photo-editing software.

Why a white background?

When you’re running a handmade business, there are two important considerations for taking quality product photos:

  • Each photo needs to clearly show your product
  • Your photos should be consistent across your webpage/shop

I find a white background to be the easiest way to meet these criteria. It’s possible to find a lovely, non-distracting fabric as the background, but taking consistent photos with a patterned background requires much more photographic skill than using a white background.

And you know what? I’m not a photographer. I design crochet patterns… so I need something easy! And this is it… so follow along!

A note about software

I’m not going to try to pull the wool over your eyes… I have fancy photo-editing software. (I use Adobe Photoshop CS3) With the number of photos I need to process, it made sense for me to splurge and purchase it.

However, it may not be worth it to you… that’s a personal decision. Fortunately, many of the tricks I’m going to show you use tools that are available on freebie photo editors (PicMonkey is a great one).

So, don’t fret if you don’t have expensive photo-editing software. Follow the key steps on whatever software you’re using, and you’ll still get great white backgrounds!

The setup

Ready for the materials list? Here’s what you’ll need:

  • a white piece of posterboard
  • your camera
  • the thing you want to photograph
  • some natural light

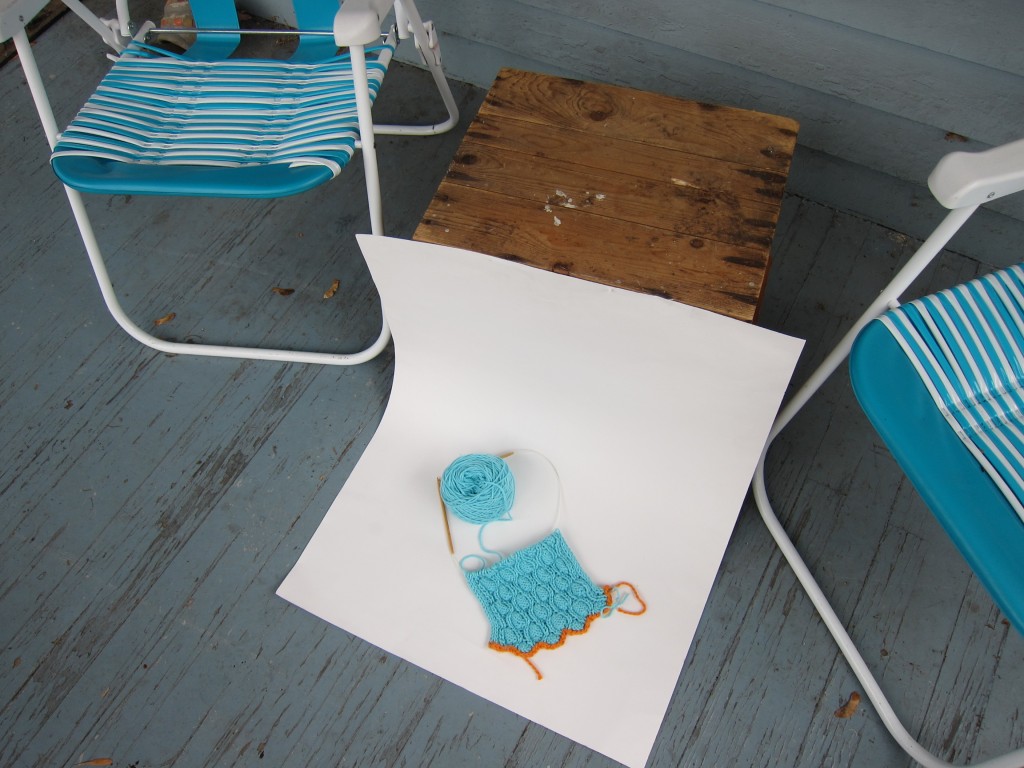
Seriously. That’s all. Here’s the photo of the setup I used for the photo I’ll be editing today:

You can read some more details about setting up the posterboard and snapping the photos in this blog post. I live in a often-cloudy climate where I’m able to get great indirect lighting on my porch. But, if you don’t, you’ll want to read Megan’s post on creating a light box.

Keep in mind: the better your photo is, the less editing you’ll need to do. And there’s no editing that can fix a blurry or way-poorly-lit photo, so snap the best one you can!

Step 1: Change the Exposure

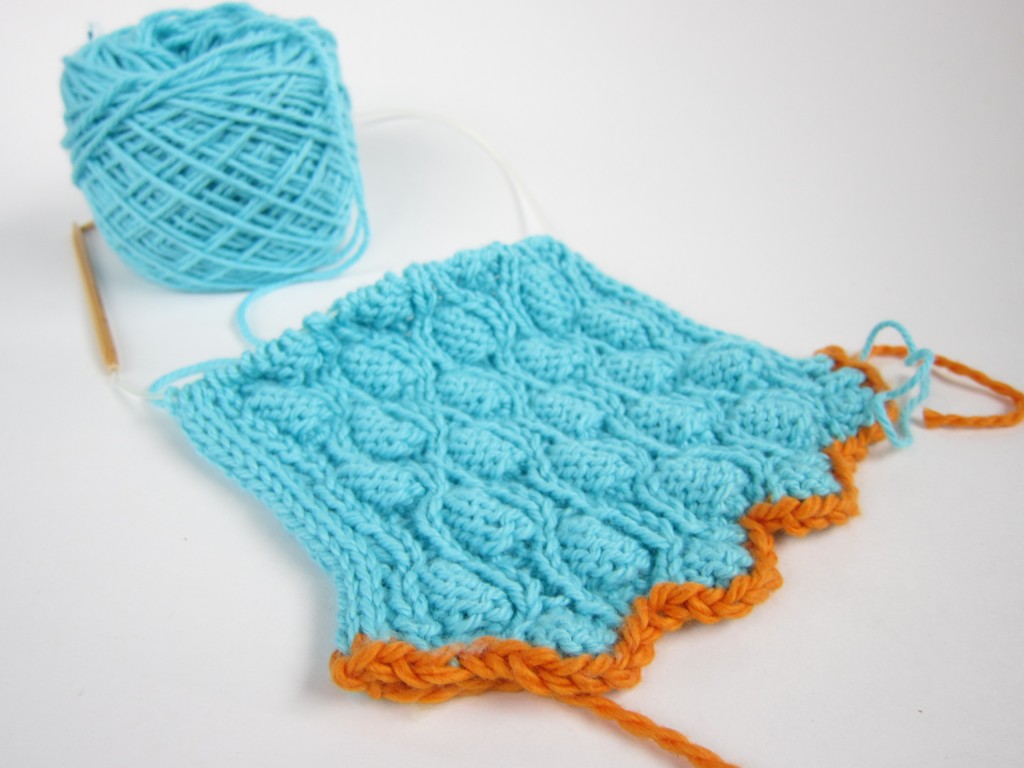
So, you’ve snapped your photo… here’s what mine looked like:

See how the background looks grey? Not good.

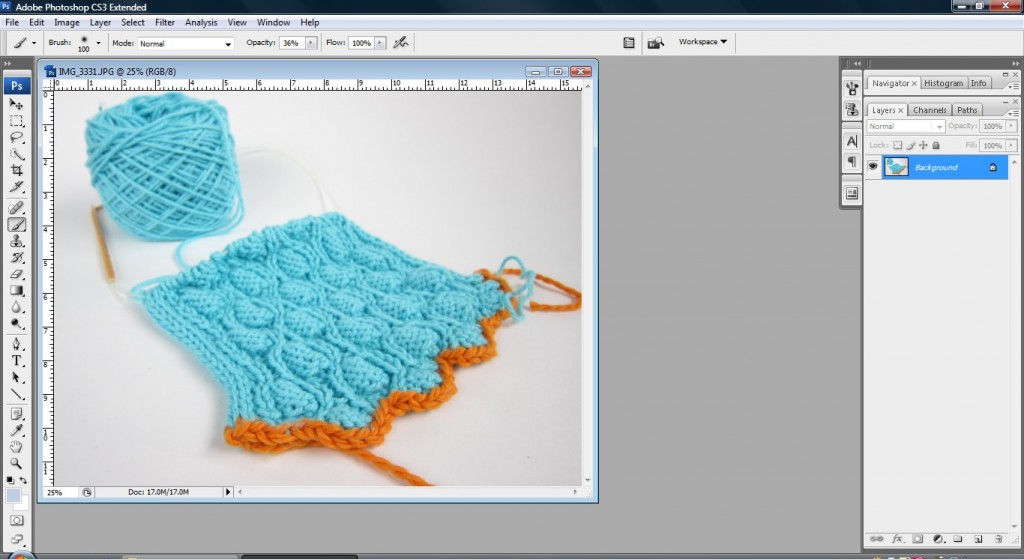
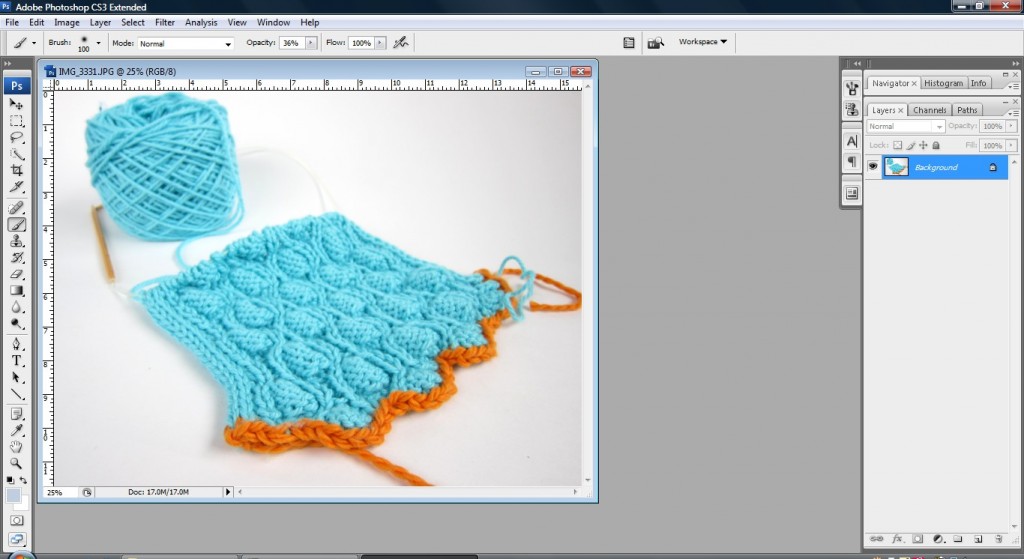
Open your picture up in your photo editing software:

Click on any of the photos in this post to enlarge
Your goal is to use the tools in the software to get the background as close to white as possible… without making the item you photographed look funny.

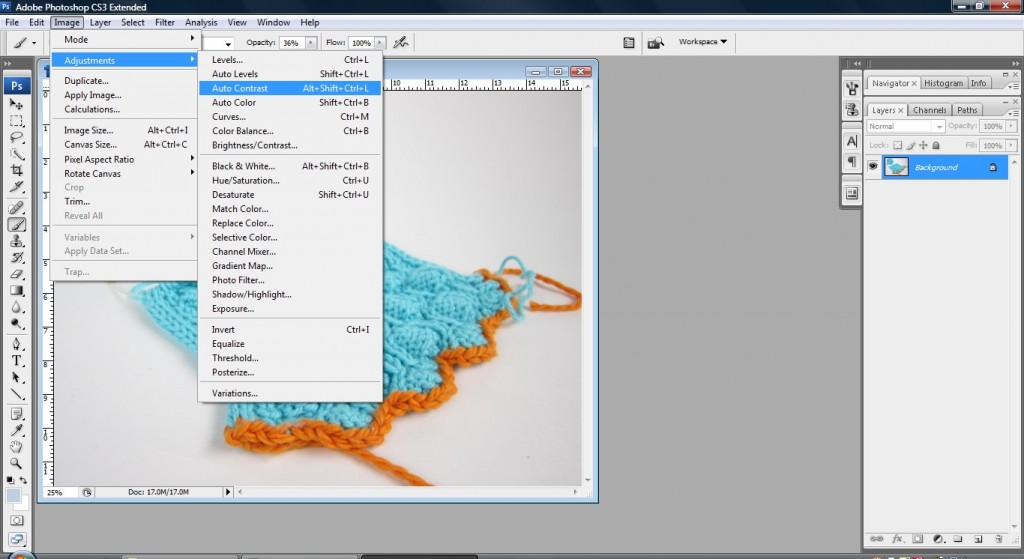
The first thing I like to do is run ‘Auto Contrast’. This isn’t required, but it tends to make the background whiter and the product a little sharper. On Photoshop, it’s under Image>Adjustments>Auto Contrast.

Here’s what my photo looks like after Auto Contrast:

See? The background’s a little whiter. You may also try ‘Auto Levels’, but depending on the color of your item, this tool can significantly alter the color, so it may not be best.

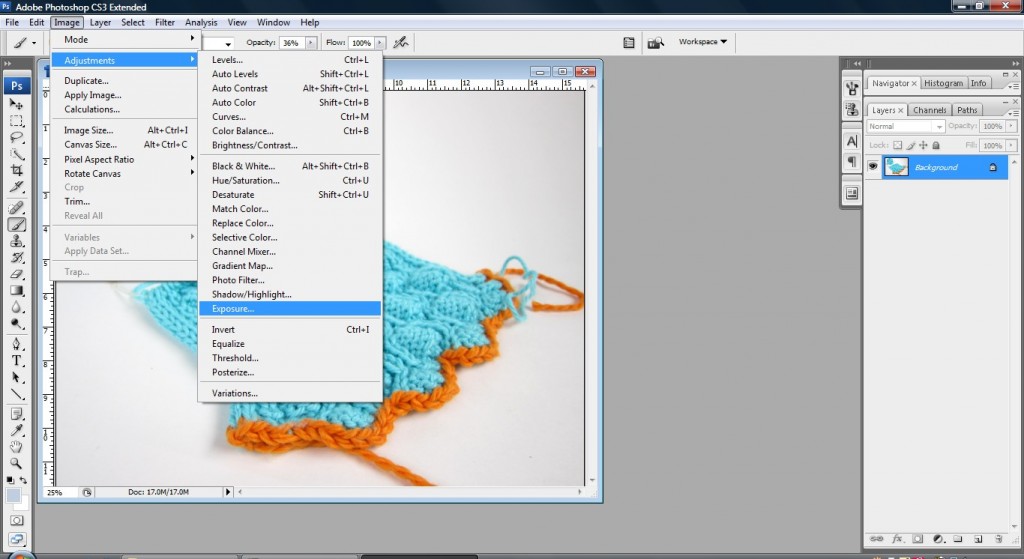
Okay, now we want to make even more of the background white. To do this, we’re going to increase the Exposure, which is under Image>Adjustments>Exposure.

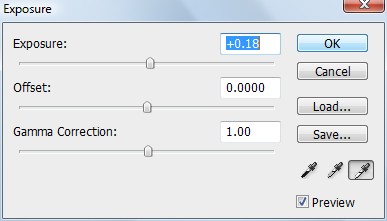
When you click, a little dialog box will come up:

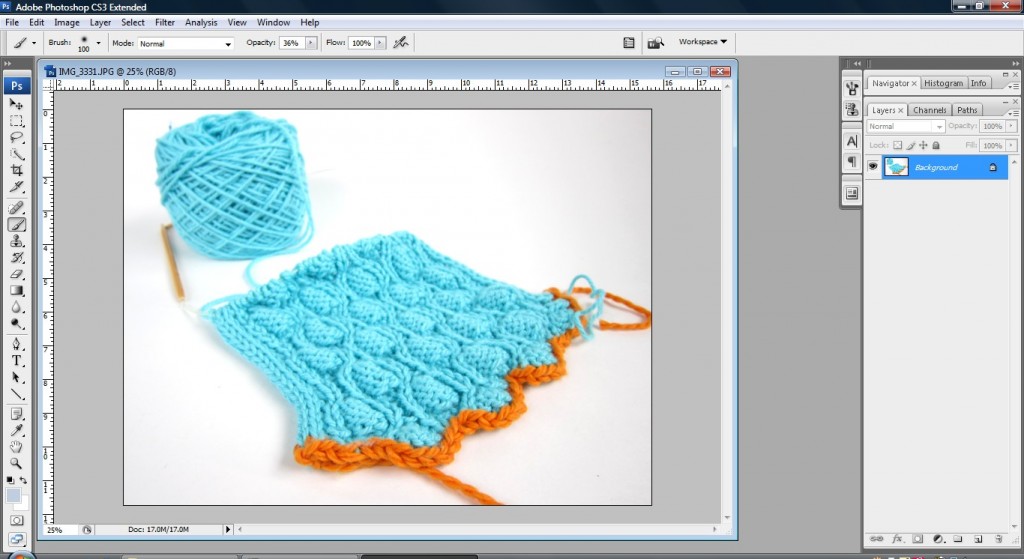
Fiddle with the exposure, increasing it until you get as much background to look white as possible… without making the item look washed-out. Here’s how mine turned out:

This step is an art… there’s no ‘right number’ that’s going to work. Just keep playing with it!

Step 2: Clean up the edges

My photo looks pretty good… but we’re not quite at the point where the background is perfectly white. To do this, we’re going to need to do some touch-up with a brush.

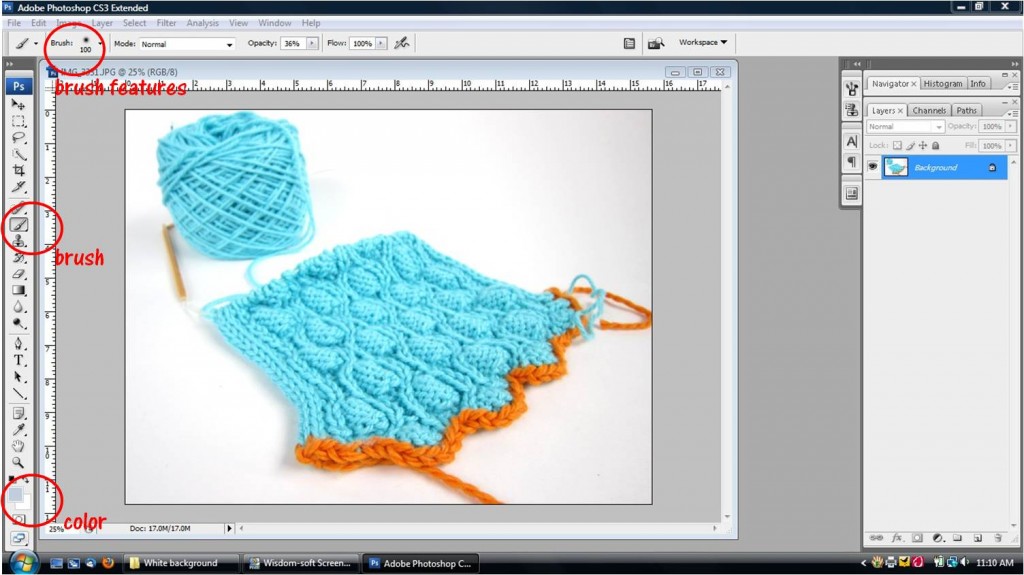
Now, you’ll select the brush (it looks like a paintbrush in the toolbar), set the color to white and pick the features of your brush:

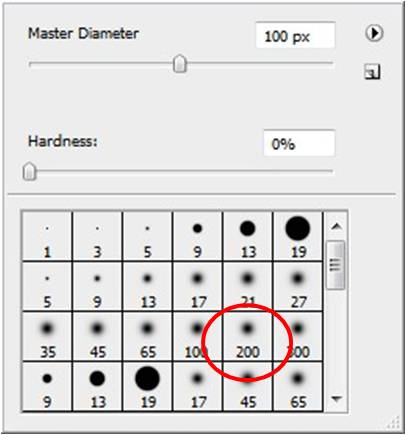
For the ‘brush feature’, I like to pick a brush with a fuzzy edge:

This makes it easier color around the edges of your item and make it look natural.

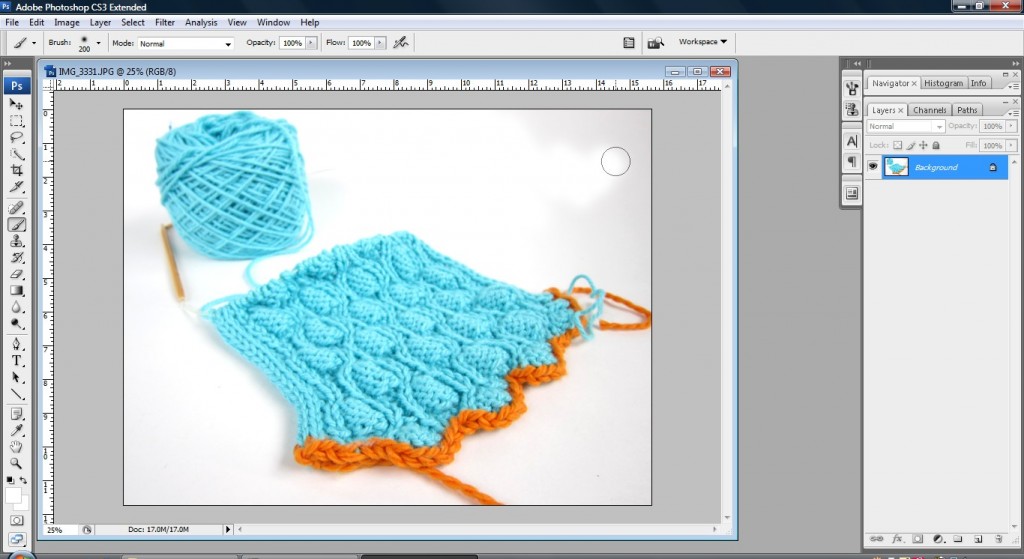
So… go ahead and paint everything in the background to look white!

Some tips:

  • Pay particular attention to the corners: these tend to be the darkest parts of the photo
  • Be cautious when it comes to shadow: you may want to leave the existing shadow in place. It can be difficult to remove and still have the item look natural.
  • If you’re having to do a lot of painting, this might be a clue that the exposure needs to be higher (see step 1).

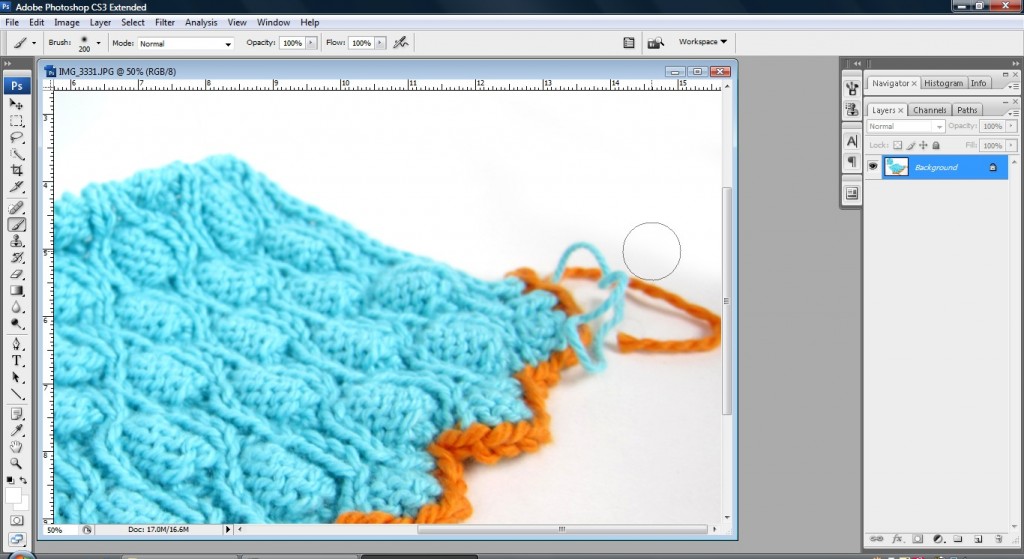
If you’re painting close to the item, you might want to zoom in and use a smaller brush:

Ta da!

Here’s how mine looks when I’m done!

Yay!

As I said before, the better your photos are to start with, the less editing you’ll need to do. So, it’s worth taking the time to find a location with good lighting and become familiar with the exposure settings on your camera. If you take a fabulous photo, you’ll probably only need to paint the corners white to have a totally white background.

Give it a try!

I hope you give this tutorial a try! I’m sure that with a little practice, you’ll be able to take great photos with seamless white backgrounds.

And be sure to visit the other posts in the blog hop this week… such great photo tips!

Patterns & the sale of finished items, one designer’s perspective

I began designing crochet patterns 4 years ago this month (whoa!). Soon after I began selling patterns, I received the question:

Oh, dear. I hadn’t thought about that! So, I looked online to see what other designers did.

The majority of designers did not allow customers to sell the finished items made from their patterns. In fact, the policy seems to spread beyond indie designers: take a peek at the copyright notice in a pattern book or the small print on a McCall’s sewing pattern that you buy from the craft store.

The message is the same:

Surely these experienced companies must know something really important, right?

I, a newbie designer, followed suit. I replied to my customers that my patterns were for personal use, only. (don’t worry… this story has a happy ending, so keep reading!)

The Fear Factor

Why don’t many designers permit customers to sell finished items from their patterns? Let’s take a look at some of the reasons I read:

  • Allowing customers to sell finished items allows factories in China to mass-produce your design, making millions of dollars and stealing your potential customers.
  • If you allow a customer to sell finished items from your pattern, they could make thousands! And they only gave you $5! That’s not fair!
  • What if you allow a customer to sell items made from your pattern, but the crocheter has very poor craftsmanship. Then this will reflect poorly on your design.
  • If someone sells items from your pattern, it takes away customers who will buy the finished items you make!
  • Allowing people to sell items from your pattern promotes the illegal copying/distribution of your pattern.

Boy… the designing world is suddenly a very scary place, isn’t it?

Everything I read suggested that if you allow customers to sell items made from your pattern, you’re signing the death certificate of your design company. Scary stuff!

But… do any of the items listed above seem a bit extreme? Uh, yeah… they did to me, too.

Having a serious think about the problem

After a while (as I gained confidence as a designer), it became less clear to me that prohibiting the sale of finished items from my patterns was the right thing to do. So, I looked at all of the reasons I read about, and had a really serious think about them.

Below are my thoughts about each of the points mentioned above.

Allowing customers to sell finished items allows factories in China to mass-produce your design, making millions of dollars and stealing your potential customers.

This is a really common fear amongst designers: that a factory in China (or Vietnam or wherever) will snatch up your design and mass-produce it without your permission. We see these knock-offs happening to designers of red-carpet gowns the day after an awards show.

But, here’s the important question for our discussion: is allowing customers to sell items made from your pattern make knock-offs any more likely? My opinion is: no. Firstly, the knock-offs that happen are knock-offs precisely because they are copying your design, meaning they don’t care if they have your permission or not. Put differently, your design can be stolen at any time. Secondly, if you allow customers to sell finished items, you are not also licensing out the mass-production of your design.

Finally, crochet is notoriously difficult to mass-produce. So even if a factory fell in love with my design, it’s unlikely it would be profitable for them to reproduce it. They would turn to a knitted/sewn design, instead.

If you allow a customer to sell finished items from your pattern, they could make thousands! And they only gave you $5! That’s not fair!

Let’s get serious. No one is becoming rich by hand-crocheting items from home. In fact, I frequently talk about how to make a profit at all!

The fairness issue is something to mull over. Some designers license their patterns to crafters. For example, if you wanted to sell owls, you might be charged a ‘cottage-industry fee’ (maybe $50) to get permission to sell items made from my owl pattern.

To resolve this issue for myself, I had to think about my customers. I made up a customer, Zoe:

Zoe represents my typical customer. She loves to crochet, and her family and friends have asked her to make some stuffed animals for them. Because she values her time, she wants to charge for making a stuffed animal. Let’s pretend that I charge her a fee. One of three things will happen:

  • Zoe will think the fee isn’t worth it, and will use another pattern that permits her to sell the finished items without a fee.
  • Zoe will decide that the fee is too expensive, so instead of charging for her hard work, she will give the animals away so that she isn’t ‘selling’ them.
  • Zoe will pay the fee, significantly reducing her profit.

You see… most of my customers want to sell just a few finished products. Charging a fee would significantly impact their product.

And realistically, I want them to use my pattern! I love seeing people make items from my patterns. Why drive them away from my patterns by charging?

What if you allow a customer to sell items made from your pattern, but the crocheter has very poor craftsmanship. Then this will reflect poorly on your design.

Hmm… I suppose this is true. But frankly, people will crochet what they crochet and post the photos online regardless of whether or not they are selling them. And they’ll link to your pattern. Not sure what you can do about that.

The flip side is true, too! Customers will post beautiful photos as well! And oftentimes, the crocheter is happy to let you post the photo on your company’s Facebook page.

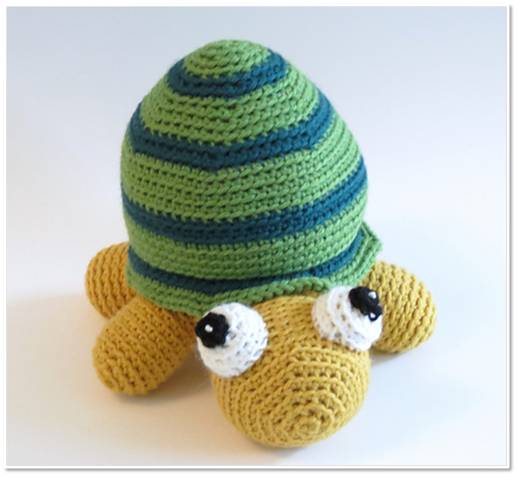
A photo of my Tino the Turtle, crocheted by Adriana. Just one of the many beautiful customer photos I get!
In my opinion, the solution is to promote the lovely photos instead of attempting to disconnect yourself from your patterns.

If someone sells items from your pattern, it takes away customers who will buy the finished items you make!

How severely this ‘scare’ affects you depends on your business model. My business is to sell patterns. I actually don’t have time to make many finished items for sale. So, if others sell finished items, it doesn’t take business away from me!

In fact, others selling finished items actually increases my business, because more crocheters are buying my patterns!

Allowing people to sell items from your pattern promotes the illegal copying/distribution of your pattern.

Uhh… I’ve read this a lot, but I just don’t understand how it could be true. People make illegal pdfs. But this is totally unrelated to whether or not you allow crocheters to sell finished items.

My policy

Have I busted all of those scary scenarios? I hope so!

I decided that, for my business, it was actually beneficial to allow customers to sell finished items from my patterns. Why?

  • It results in increased pattern sales: from customers who choose my patterns over others because I permit the sale of items.
  • I benefit from the increased number of projects connected to my patterns. If a crocheter makes 20 owl for sale, those 20 owls are listed on Ravelry, making my pattern more popular.
  • Customers are often keen to share their photos with me, and posting these additional photos on my Facebook page shows the variety of colors that look great in my pattern!
  • I am personally passionate about helping crocheters make a fair wage from their handiwork. By not charging a licensing fee, I am contributing to making stitching a viable wage-earning job.
  • I couldn’t find any reason not to allow folks to sell the items!

So here’s my policy: You are welcome to sell items from my pdf patterns. I ask that you include a note about the item being a ‘FreshStitches Design’ on the tag (at a craft fair) or a link to my shop (in an online store like Etsy).

It makes me happy. It makes my customers happy. What could be better?

Chime in!

Are you a designer? What’s your policy and why?

Are you a crocheter? How does the ability to sell finished items affect your pattern purchases?

I want to hear!

Best,
Stacey

5 Surprising Reasons Your Handmade Biz isn’t Making Money

I’ve talked before about pricing and selling handmade items, but the same principles apply to handmade businesses of all varieties. Because you may have missed it, I’ll summarize some key points here.

Here’s the kicker: whether you make items for sale, sell instructions/patterns for handmade items or are a teacher of a crafting skill, there are a few common roadblocks to earning the money you deserve. Warning: they may surprise you!

Reason #1: Your prices are too low

Counter-intuitive, isn’t it?

Here’s the thing: people often their perception of quality on what they pay. Think about it: if you were given the option of having a steak dinner at a restaurant for $3, what would be your first thoughts about the dinner? The restaurant?

You’re not assuming that you’re getting a lovely meal, are you? And why not? Because your alarm bells are telling you that the price is too low for a high-quality product. Not only are you going to assume the food is crappy, but you’re probably going to walk away from the entire restaurant. Who wants to go somewhere that serves (potentially unsafe) food?

Solution: Evaluate your prices

I’m not saying that you should to raise your prices just for the sake of it. But, you should ensure that you’re charging the correct amount… and not selling yourself short.

Do a market analysis. See what others who are selling comparable products are charging. This goes for teachers, too… do a little sleuthing to discover the going rate. You don’t want to be the cheapest one, around!

Reason #2: Your customer doesn’t know why they should pay for your product

I hate to break it to you: you can’t expect your customer to know why your product is valuable. Let’s say you charge $8 for a very detailed knitting pattern, which is slightly higher than average and seems very pricey in a sea of free patterns. Does your customer know that it’s full of step-by-step photos? That purchasing the pattern comes with unlimited email help? That the pattern has been tech-edited and is error-free?

How would they know unless you tell them?

Solution: Be clear about the value of what you offer in a concrete way

Maybe you think it’s obvious that any knitting pattern worth it’s salt would have clear instructions with photos. Maybe you’ve even attempted to convey this to the customer by saying “it’s a quality pattern”. But words like ‘quality’ mean different things to different people. So it’s up to you to concretely explain why your product rocks and is worth what you’re charging.

If you make products, do you make clear the materials and workmanship that go into your pieces? If you’re a teacher, is your skill at targeting in on student’s concerns apparent? I’m not saying this is easy to do… you may need to come up with creative ways of demonstrating what you bring to the table. But it’s worth doing.

Reason #3: Your customers don’t know what you do

Oy… this is even worse than the last one!

Let’s think about dinner, again. You really want a nice steak. Are you going to go to a restaurant with a reputation for being the best steakhouse in the area? Or one that serves lots of food… and sometimes it’s steak?

I think we both know you’d choose the one with a great reputation. And you’d probably be willing to pay more, too!

Are you heading towards being a person who sews dog hats, crochets baby booties and silkscreens onsies? Is that the best place for you to be headed? What if you could be the person who sews the BEST dog hats?

Solution: Make a niche

Who am I? I’m the chick who sells the most well-written crochet stuffed animal patterns. And… they even come with amazing customer service. I’m constantly writing tips and posting videos on the blog, and I take great care to answer questions that come in via email. That’s what I do.


Why don’t I design knitting patterns? It’s not because I can’t… because I can! But, customer service is my number one priority, and I know that I couldn’t provide the level of tips, videos and tutorials for both knitting and crochet (at least, not right now). So I don’t.

Can you find a niche? Don’t worry… you can still crochet baby booties on the side. But maybe just not for your business!

Reason #4: You’re not interacting with your customers

What’s the difference between you and a big company? YOU are a person. YOU make each item (or teach each class, or write each pattern) with your own little hands. YOU are a crafter with passions and ambitions that your customers want to hear about! In fact, the average customer is willing to pay more/more likely to buy from a crafter that they feel a connection with.

How do you build this connection? Maybe by sharing photos on Facebook. Or by posting stories about your work on your blog. Or even by putting a little bit of you in your item descriptions.

Solution: Share!

I know it’s hard. We all have a limited amount of time. As a small-business owner, you’re handling shipping and accounting in addition to the actual making of your product.

So, start with one way customers can connect with you. Begin with the medium that makes you most comfortable. And begin sharing your story!

Reason #5: You’re giving away your work for free

As crafters, we love what we do. It can be easy to forget that you should be getting paid.

I’ve heard it happen so many times: teachers who are roped into teaching a group of school kids to knit. Designers who add a new size in the pattern at a customer’s request. Crafters who put too much time doing modifications of a custom design without charging for the overtime.

Stop it! How are you going to earn a fair wage if you’re giving it away for free?

Solution: Set boundaries

I’m not gonna fib. Almost everything about running a business is hard. Especially setting boundaries. But you have to do it.

(I’m half kidding: don’t actually be mean. But, I’m serious about not working for free.) Don’t hesitate to quote a price for what is being asked of you. Watch, I’ll show you how it’s done:

Customer: Stacey, I LOVE the owl in your Etsy shop! I was wondering: can I order one with horns and pigtails (my husband is a Vikings fan), and about 24″ tall (he’s a big guy!)?

me, option 1: I’m sorry, but those modifications are pretty serious, and that’s not something I’m able to do. Thanks for thinking of me, though! When you need a just-plain-cute owl, I’m your girl!

me, option 2: Ooh! Sounds like so much fun! My rate for custom work is $xx per hour, and I estimate that those modifications will take about 2 hours, plus require $xx in additional materials fees.”

See? Either way, I’m not doing work that I’m not getting paid for.

Any of these reasons give you ideas for changing how you do business?

How to take great photos with white backgrounds

How to take Great Photos with White Backgrounds - tips from FreshStitches and Shiny Happy World

Last week, I told you my top 5 tips for taking great photos. This week, I’m going to go into a bit more detail about how to get photos of items with plain white backgrounds.

Mastering ‘the white background’ is an easy way to get professional-looking project photos. This is how I take the photos of my stuffed animals for my website, skeins of yarn for my stash and small items that I’ve knitted/crocheted.

So, let’s see how to do it, step-by-step and without fancy equipment!

Step 1: Grab a piece of posterboard and find natural light

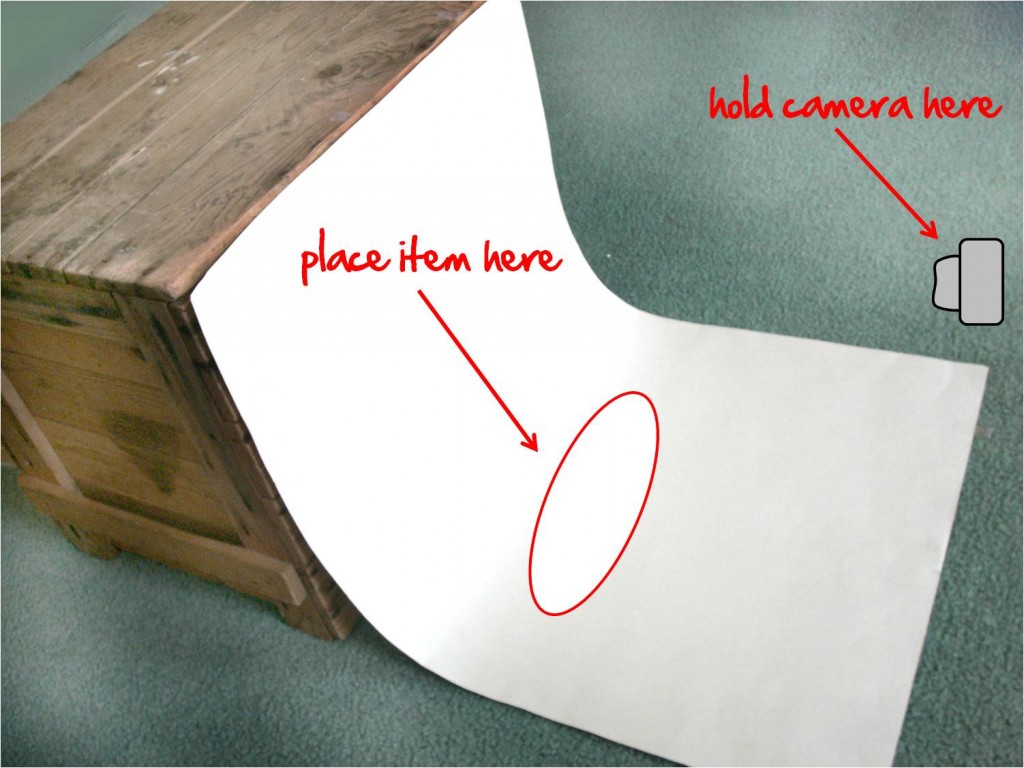
Last week, I showed you my setup: a piece of white posterboard taped to a box in front of a window:

The setup really is that easy!

What if you can’t find natural light? I’ve found this great tutorial on how to build a light box for $10, which might work for you. I’ve tried it, and while the box is easy to make, the lights that you need to cast a natural-colored light are pricey. If you use plain desk-lamps, you tend to get a yellowish tinge to your photos. So, trust me when I say it really is easiest to use a window- even if it means you need to take all of your photos at 1pm on the weekends.

Step 2: Use the Macro setting

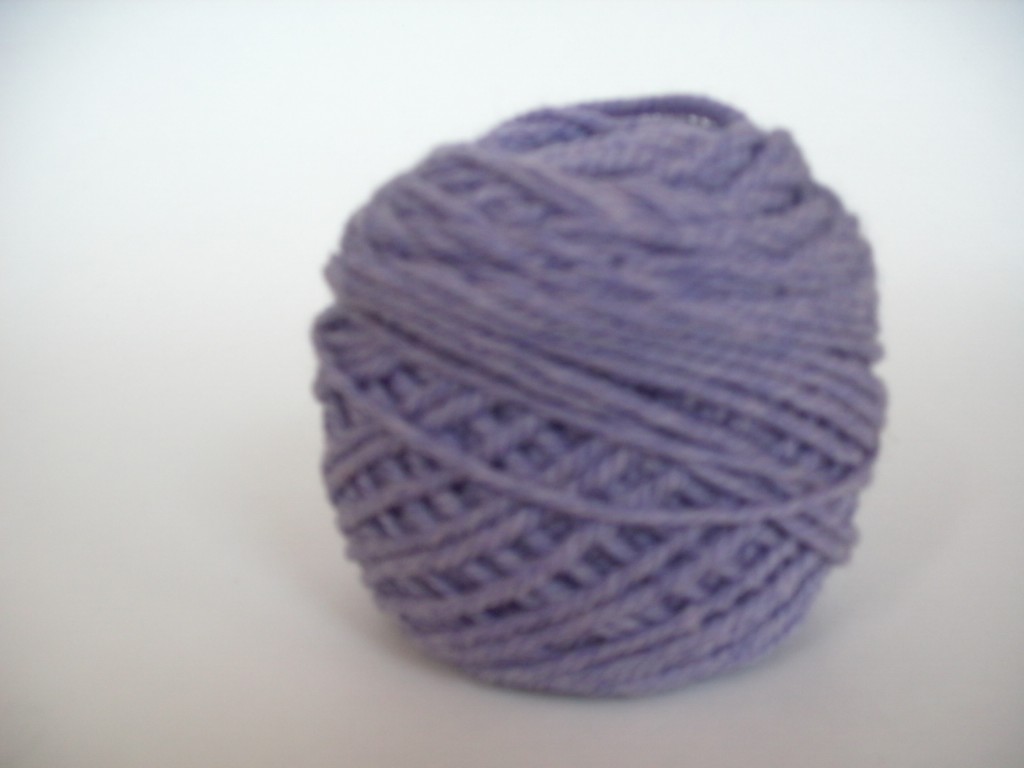
We’ve all seen out-of-focus pictures like this:

Eep! What a disaster! Do I need a better camera? No!

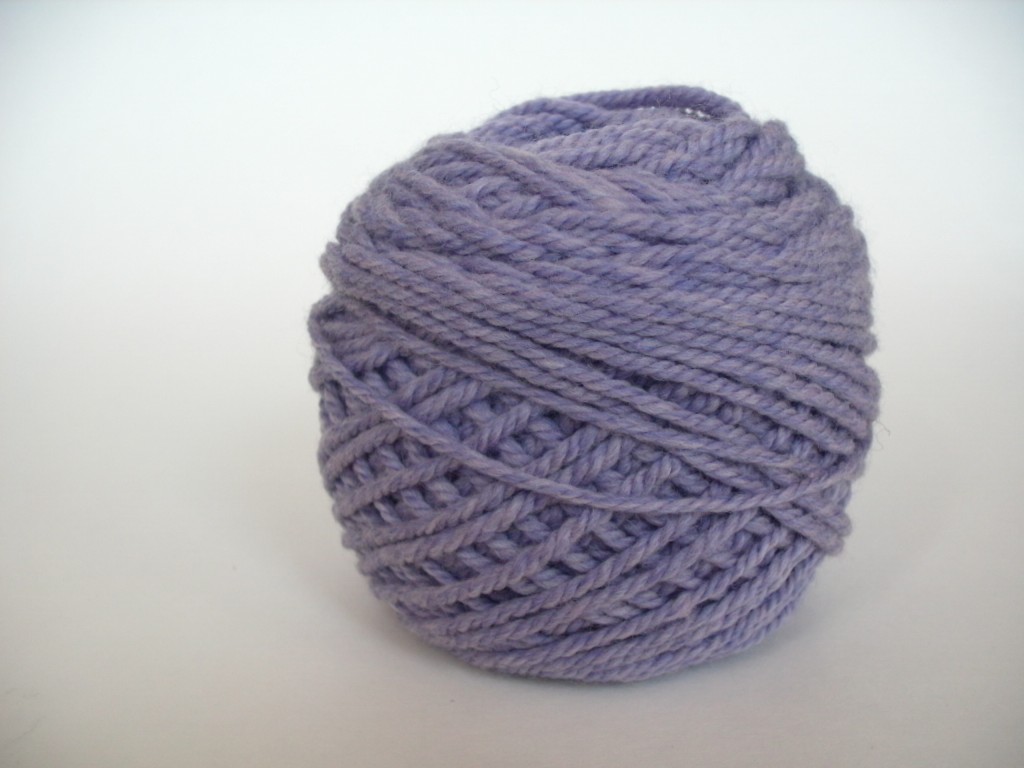
I’m a big believer that you don’t need a fancy camera to take decent photos… you just need to read the instruction manual and know how to use the features that you have. Every digital camera has a ‘macro mode’ (with an icon that looks like a flower), and that’s all you need to get the photo in focus:

Isn’t that much better? You’ll want to use macro mode to focus on items that are close to the camera. No fancy camera needed.

The photo is still a little dark, though…

Step 3: Fix your exposure

Notice how the previous picture, while in focus, is a little dark? You need to increase the exposure (light) level. There’s two ways to do this.

Change the exposure settings on your camera. Most basic digital cameras do this… just read your manual! Here, I took the same photo with a higher exposure on my camera:

Edit the photo to change the exposure settings. Let’s say you’ve already taken the photo… you can also change the exposure in software like Photoshop or PicMonkey (which is free!). Here, I changed the exposure by photo-editing:

As you can see, both of these techniques get pretty similar results, and make a big difference!

Step 4: Crop or paint corners

Cameras, because of the curve of the lens, tend to leave photos with some darkness in the corner. For a totally white background, you’ll want to either crop the photo (cutting the corners out altogether), or use photo editing software to ‘highlight’ the corners and remove the darkness.

Here, I’ve cropped the photo:

And here, I’ve highlighted the corners:

Step 5: Show it off!

Look at your fabulous photo! Show it around, proudly!

You can see Wendi’s simple setup for taking photos here.

Best,
Stacey

5 Easy Photography Tips

5 easy photography tips from FreshStitches and Shiny Happy World

If you’re like me, you’re a crafter… and NOT a photographer! But, you still want to take nice photos of your completed projects for your blog or to share on Ravelry. Help is here! In this blog post, Stacey and I share share 5 easy photography tips you can use to take lovely project photos, without lots of fancy equipment.

No fancy equipment needed!

The most common misconception about taking nice photos is that you need to have a super-fancy camera to do so. But you don’t! You can take fabulous pictures with a point-and-shoot-camera and having a few tricks up your sleeve. Nowadays I use my phone for all my photography.

So, what are these photography tips? Let’s get started!

Tip 1: Use Natural Light

I can’t say enough about the fabulous sun! To take beautiful photos, you want to find a well-lit area that’s not in direct sunlight.

For outside photos, this means picking a time of day that’s not noon – directly in the sun means lots of glare and harsh shadows. For best results, choose a day that’s slightly overcast. Those clouds filter the light and make everything perfect.

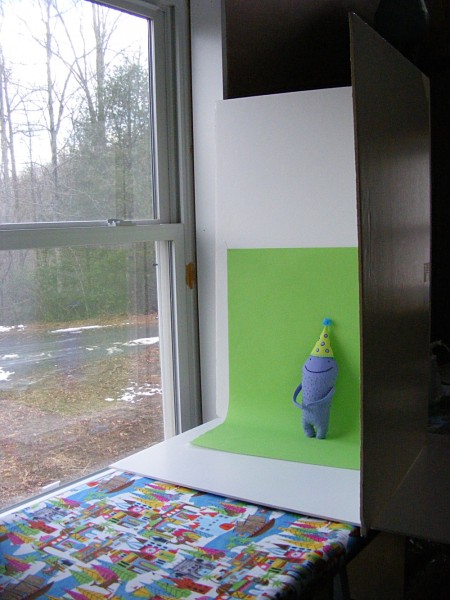
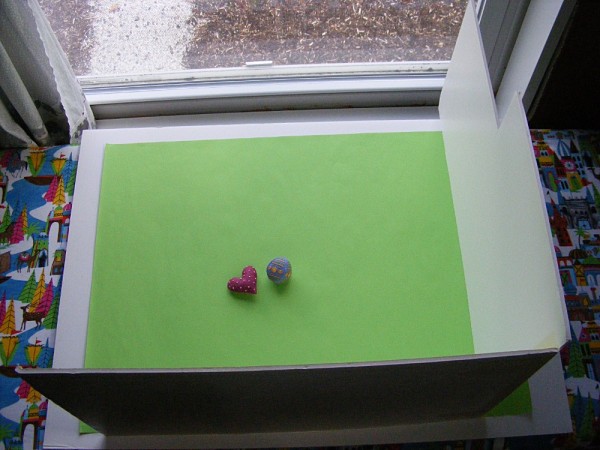
For inside photos, I use a spot next to a window that has loads of light flooding through. So I don’t get harsh shadows, I use a couple of pieces of foam core to bounce the light around.

Here’s a shot of my “tall” set-up. I use this set-up to photograph stuffed animals from the front.

A Peek at My Photography Set-Up - Shiny Happy World

It’s just two pieces of foam core taped together to make a hinge so I can stand them up.

When I shoot a flat lay (looking it everything from straight above) I do the same thing, just with shorter pieces of foam core so I can see over them.

A Peek at My Photography Set-Up - Shiny Happy World

I stand on a step-stool to be able to shoot straight down.

Tip 2: Use White Posterboard for the ‘Clean’ Look

I used to think that I needed a photographer’s tent and all sorts of fancy equipment to get that fabulous white background, but now I know that you don’t!

Here’s how Stacey uses a white piece of posterboard, propped up against a wooden box that she found by the side of the road.

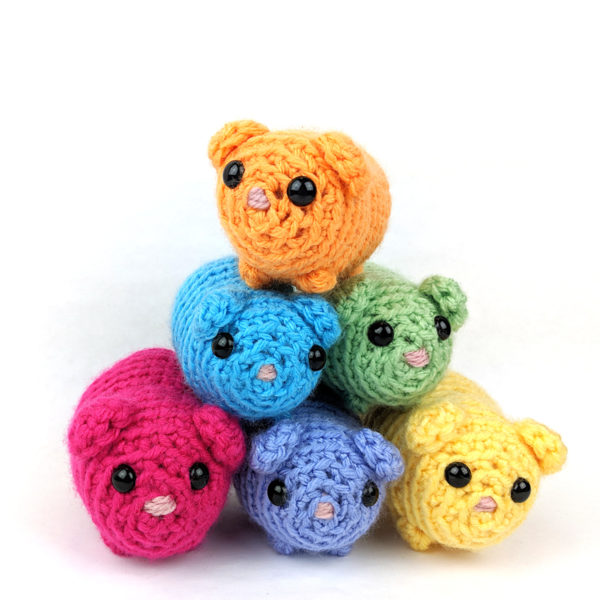
Using the posterboard allows you to get a white background for photos like this. . .

pyramid of crocheted rainbow guinea pigs

I prefer to have colored backgrounds like this. . .

So I use a large sheet of paper the same way Stacey uses the white posterboard. I pins my paper to those foamcore light bouncers.

Tip 3: Get a Tripod

I said ‘no fancy equipment’… but Stacey highly recommends this Joby Gorillapod Tripod.

She loves it for two reasons. The first reason is that the Gorillapod is magnetic and has bendable arms, which means that she can stick it on a stop sign/pole and take self-portraits.

But that’s not all! A tripod is also really useful in low lighting. When there isn’t a lot of light, the camera lens needs to stay open longer to get enough lighting… meaning that any shake of your hand will make a blurry photo. By having a tripod, you can be sure that the camera stays still, and take photos even when your natural light is fading.

Tip 4: Take Lots of Photos!

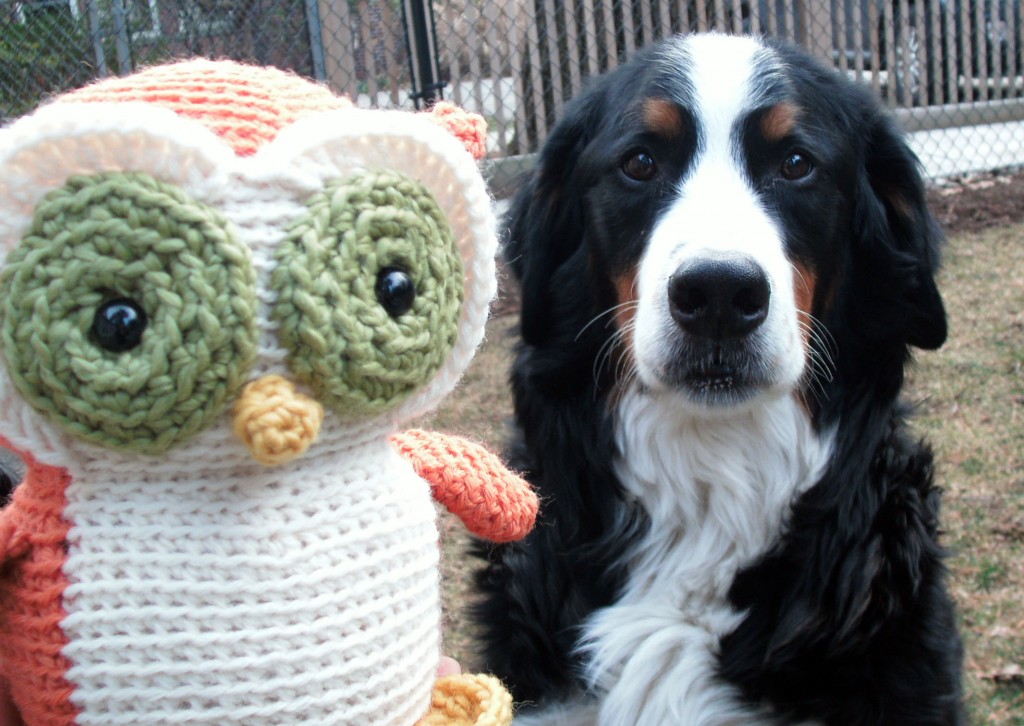
Stacey once snapped a great photo of a friend’s dog and an owl she crocheted.

Her friend was so amazed! She asked, ‘How did you get him to sit still like that?’

And Stacey’s answer was – she didn’t. She just took oodles of photos until she got a good one!

A lot of people seem to think that a photographer snaps the perfect picture and carries on their merry way. In reality, even professional photographers take tons of photos, and only later pick out the best ones. So do the same thing! Take a ton, and weed through them later. It increases your chance of catching that perfect shot!

Tip 5: Edit your Photos

It’s totally okay to edit your photos after you’ve taken them!

Photoshop is the professional standard, but it’s expensive. There are lots of other options! I use GIMP (which is like a free version of photoshop) and there are lots and lots of apps out there to choose from.

I edit almost every photo I take. Even when I take a photo on my white posterboard, I often have to up the exposure a little bit to get it to a true white. Or, in the case of the dog photo (above), Stacey snapped a great picture, but had to crop it so you wouldn’t see the garbage cans on the side.

It’s free, only takes a few minutes and turns your pictures from ‘nice’ into ‘wow’… so try a little editing!

Give it a try!

I’d love to hear if you do any of these photography tips already, or if you’re giving one a try today! I hope to have convinced you that you don’t need fancy lights or a thousand dollar camera to take great project photos!