


I didn’t try using zippers for a LONG time because I thought they’d be too hard. Looking back, it’s astonishing to me how many things I avoided because I thought they’d be too hard. Seriously – how long did I think I could make clothing without using any closures? And then when I did venture into closures – I tried sew-on snaps (Yuck! What a pain!) and velcro. Velcro! Anyway – when I finally learned out how to sew in a zipper I couldn’t believe how easy it was. It’s three straight lines and some work with a seam ripper. Don’t believe me? Watch the video. You’ll be putting zippers into everything you sew.
I never pulled back in the video to give you a shot of the finished zipper, with all the loose threads cleaned up and the tape pulled off the back. (Yes, tape. Watch the video and you’ll see.) Here’s the front. . .
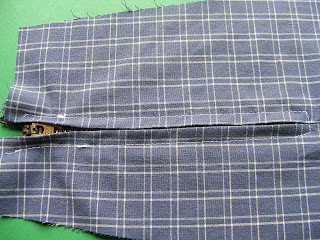
. . . and here’s the back.
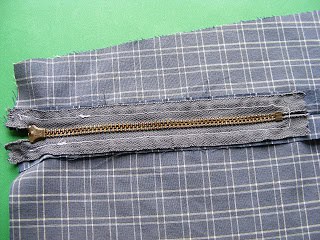
This zipper is kind of hidden behind two flaps of fabric. If you want your zipper to be visible, take a look at this video instead.
Happy sewing!
Best,
Wendi
![]()
I used to sew the zipper out, but I will give a chance to your hidden zippers, it seems to be easy and much more proffesional!! thanks for your blog!!!
Oh my gosh, this is so much easier than the ridiculous way I have attempted to do this in the past! Great tips, thank you!
Glad it was helpful!
I have a purse that is 11″ wide and I can only find 10″ or 12″ zippers at my local Jo-ann store. Is there something I can do in either case to use one of these sizes or is there an 11″ zipper out there somewhere?? Thanks!
You need to buy the longer zipper and shorten it. That’s really hard to do with metal zippers – but if you’re buying one at a Jo-Ann I’m guessing it’s a Coats & Clark plastic zipper. They actually have instructions inside the package showing you how to shorten it. It’s easy.
Great video. Have a question, why didn’t u sew the sipper on the back. u could see the foot line up with the zipper. Also maybe thinner masking tape or even scotch tape (a little sticker but still easy to remove)instead of the thick tape. This coming from a person who hasn’t put a zipper in since high school. LOL
You could sew it from the back – but the stitching will be visible from the front so I like to watch it on that side to make sure it’s staying lined up with the seam. Some people have had luck with using scotch tape – but not me. I’ve tried a few different types/brands and none of them stick well at all to fabric. Not well enough to hold the zipper in place.
so helpful! Thanks! I have used the tape method twice now and I love it. Do you have a tutorial on a lap zipper?
Sorry – I don’t. It’s not something I do very often since my main focus isn’t clothing.
Thank you for making this simple to follow and understand. I am a newbie to sewing, totally! In fact, my primary question may sound pretty silly but since Im learning as I go, I need to ask you this; ” what is the “regular stitch length” you refr to in your video? I was given an older machine to begin learning on just this year. It is not digital on the settings, just single numbers on a dial. Do these numbers correspond to stitch length? What number should I have the dial turned to as your “regular stitch length was on the zipper? Also, where do I find your video tutorial, “Sewing An Exposed Zipper” ? Thank you for your time.
Every machine uses different numbers for the same stitch length – and some machines don’t use numbers at all. On my Pfaff a “regular” stitch length is a 5, but on my Bernina it’s a 2.5. It sounds like your machine has a dial setting (though that could be a tension adjustment). Start out somewhere in the middle and test it out on what you’ll be sewing. I like to do my regular sewing at about 10 stitches per inch. I go shorter if there are a lot of tight curves, longer if I’m quilting, as long as possible for basting. If that dial ends up setting your tension, try looking for a lever or slider bar somewhere. Sometimes that’s the stitch length. And – if your machine no longer has the manual, try searching for one online. You can download PDFs of a lot of older models and it will help you out a LOT.
Here’s the link to the video showing how to sew an exposed zipper. http://wendigratz.wpengine.com/2011/05/how-to-sew-in-an-exposed-zipper-video.html
Thanks — this is an excellent video. I want to make a cushion cover with a piece of wonderful fabric I have and now I feel slightly less scared of putting in a zipper. 🙂
Been sewing for 50 years and never thought to use tape to hold the zipper in place! Old school basting before sewing. How quick this would be. Am going to try it next time. Your videos are SO clear. Thank you!