Stuffed Animals: the must-have sewing book of the year!

Oh, I know. It’s only April. How can I make such a bold claim?

Because this book is that good.

I’ve been waiting for this one…

Stuffed Animals: From Concept to Construction is a fabulous new book by stuffed animal designer (and buddy of mine), Abby Glassenberg.

Stuffed Animals design book by Abby Glassenberg

As she was writing the book, I could tell that Abby was really excited about it. She’s an incredibly passionate designer, and pours her heart into not only designing adorable stuff, but also teaching others how to make things. So, I knew this book would be good.

But now that the book is out, and I have my hands on a copy… I can tell you that this book is fabulous! Whether you’re new to sewing stuffed animals, or you’re a sewing pro who wants to get deep into designing, there’s oodles of information in this book that you’ll love!

Stuffed Animals: From Concept to Construction

Have a peek at this trailer for the book:

Stuffed Animals Book Trailer from Abby Glassenberg on Vimeo.

Squee! Doesn’t it look like so much fun?

What’s inside

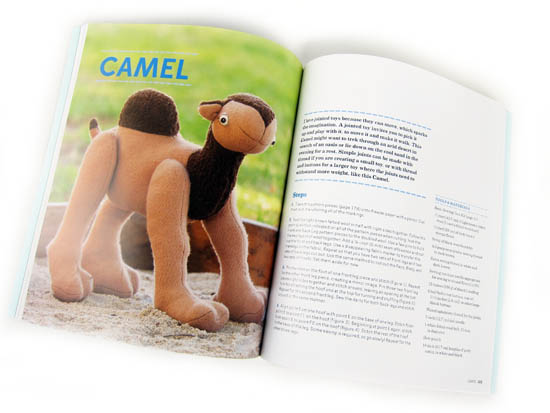
Stuffed Animals contains 16 projects (complete patterns for sewn stuffed animals) and 52 lessons (designed not only to give you tips to complete the projects, but also to help you design your own pieces).

inside stuffed animals by Abby Glassenberg

The book also contains a hefty introduction, so that even if you’re a newbie to sewing, you’ll be set to start on the easier projects in the book! Some of the topics covered in the introduction are:

  • Basic materials needed (including a big secret… using hemostats!)
  • Using freezer paper for making sewing patterns
  • How to draw/mark/edit a pattern
  • Tips for using your fabric, including considering the grainline
  • Notes about seam allowance in patterns
  • How to adjust/correct your sewing machine tension
  • Various techniques for sewing stitches, by machine and hand
  • Step-by-step details on clipping curves, basting, turning & stuffing
  • Info about the proper finishing of your animal

And that’s just some of the topics covered in the intro!

The book continues… and features adorable patterns and oodles of great tips.

sewing camel pattern

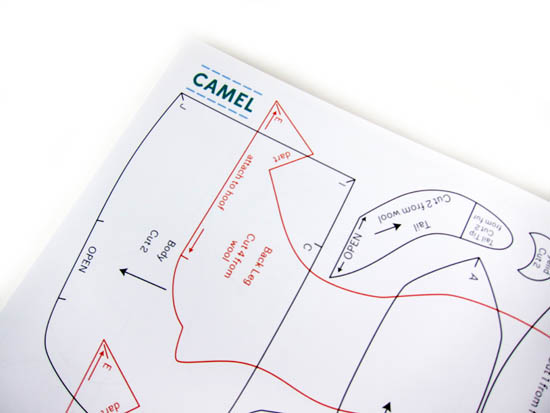
And… (this book is almost 200 pages!) the pattern pieces are included in their actual size! That means that you can trace the pattern pieces without running to a copy shop to do fussy enlargements (as you need to do with some books).

pattern pieces in sewing

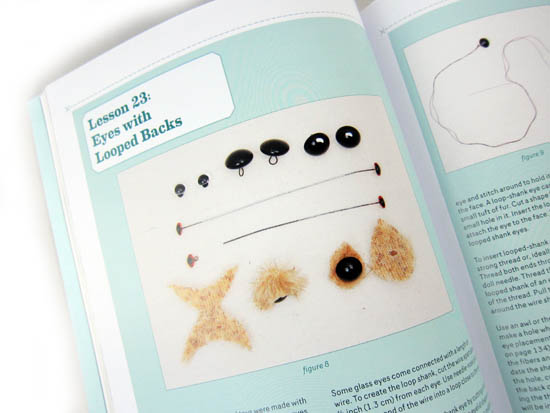
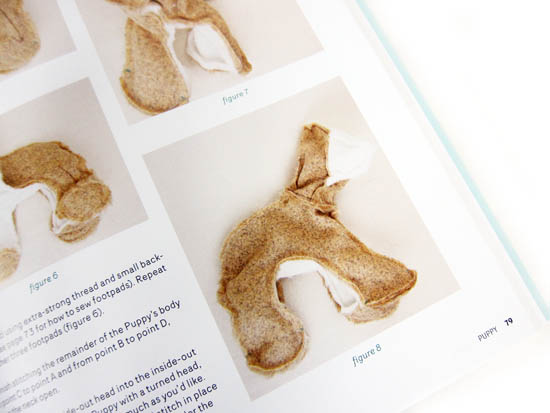
Each pattern and lesson contains step-by-step photos, so even if you’re not too confident about your sewing skills, you’ll be able to follow along! Love that!

inside1

What am I going to do?

Well… the first thing I’m going to do is re-read the entire book, cover to cover, because it’s just chock-full of so much inspiration!

Then… this sheep is pretty darn irresistible:

ram stuffed animal pattern

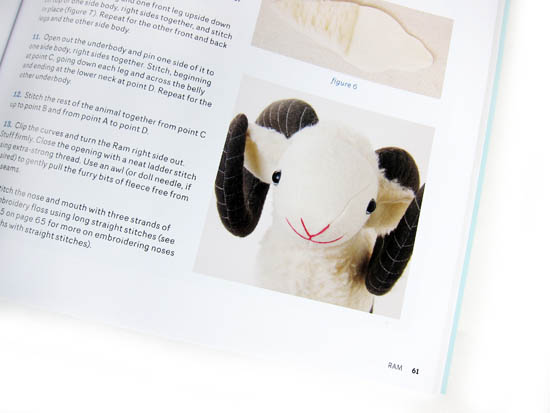
(and get it? I knit and crochet… so he’d be sorta like a mascot!)

Or… I’m pretty drawn to these monsters that can be made up with scraps:

monster pattern abby glassenberg

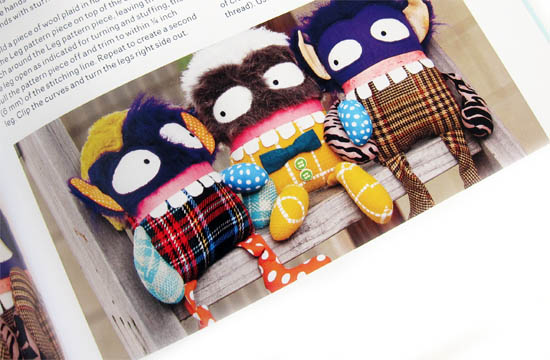
(you know I love using leftovers!)

Can you tell I’m inspired?

Ready to get sewing?

If you’ve been looking to sew some adorable stuffed animals, then grab yourself a copy… you’ll love it!

I think this is the sort of book that’ll last your whole sewing life: from starting out as a newbie to designing your own adorable animals. What better value is there than that?

And if you’ve already snagged a copy… let me know what you think!

(To read Wendi’s review of the same awesome book, click here.)

Best,
Stacey

disclaimer

Adorn Anew Blog Tour: How to dye a gradient yarn with kool-aid!

Today I’m going to show you how to dye gradient yarn in two fabulous colors – with Kool-aid! But first, a little background. . .

I was excited when Laura Nelkin asked me to be on the blog tour for her serialized ebook, Adorn Anew. It’s a beautiful collection of knitted & beaded jewelry and accessories, with a new pattern released each month in 2012.

Adorn Anew by Laura Nelkin - book cover showing yarn and beads

Laura is well-known as the ‘knitting with beads’ goddess (okay, I made the title up, but that’s an accurate description!), and is the instructor of the crazy popular Knitting with Beads course on Craftsy.

I had never knitted with beads before, so the reason I was so stoked to be on the blog tour is that I knew it would give me a push to give knitting with beads a try. Beads add such a beautiful bling to your project without increasing the difficulty by too much. Besides, I know Laura’s work. The instructions in her patterns and accompanying videos on her site are fabulous. I wouldn’t run into any trouble.

Four hand-knitted Stellani shawls draped over a wall - all made with gradient yarn

So, anyway… (this is one of those stories where my husband would say, “where’s the point of this story?” And I would say, “I have to tell the story chronologically!”) I signed up to be on Laura’s blog tour back in early summer, when only half of the patterns had been revealed. I was anxiously awaiting November, so I’d discover which pattern I’d be knitting. I nearly fell off my chair when I found out that November’s pattern is Stellanti! It’s an amazingly beautiful shawl… and I spotted Laura wearing it at Rhinebeck, but I had no idea it would be part of Adorn Anew! I had been coveting it… and I am so excited to be knitting it!

What is a gradient yarn?

A gradient yarn is a yarn that slowly shifts from one color into another. Although Stellanti would be beautiful with any fingering weight yarn… the gradient yarn used for the sample gives it a little extra pizzazz.

The samples were knit in Nightfall by Fibro Fibers, which is absolutely stunning. But since each skein is hand-dyed (and there’s currently a huge demand for Stellanti!), this particular yarn can be hard to get your hands on.

And since this shawl requires 490 yards, purchasing a standard 440 yard skein (of Noro or another commercial gradient yarn) won’t work… since you’d run out of yarn and would need a 2nd ball… which would mess with the gradient.

Sound like a pickle! No worries! I’m going to show you how to dye gradient yarn, using Kool-Aid! It’s fun, cheap and easy!

How to dye a gradient yarn

Let’s do it! You’ll need:

  • 490 yards of undyed yarn (details below)
  • 2 colors of Kool-Aid, 5 packets each
  • 4 mason jars or containers

Prepare your yarn

To begin, you’ll need 490 yards of an undyed fingering weight yarn, mostly wool (a little bit of nylon is fine, but avoid plant fibers, since these won’t take dye the same way). I’m using LB 1878 from Lion Brand, but I’ve also had great success with the bare skeins from Knit Picks:

Roll your yarn into a cake… this step is important!

Select your Kool-Aid

I’ve blogged about dyeing with Kool-Aid before (read the different techniques here!), but today we want to dye gradient yarn, which means selecting only 2 colors. For the effect I want, I need to make sure one of my colors is noticeably darker than the other.

I chose Tropical Punch (red) and Grape (purple). I discovered that there’s a special Halloween color called ‘Ghoul-Aid’, which is closer to black and would work amazingly, but I didn’t know about it when I was dyeing!

Prepare your yarn and Kool-Aid

First, prepare your yarn by separating it into 4 approximately-similar-sized chunks. This is easy because you wound your ball… pull out one center chunk, then another…

Line your mason jars up in a row. Pour 2 packets of color 1 into the far left one, then 2 packets of color 2 in the far right one. For the center two jars, combine the colors to create your gradient. For example, my 2nd jar contains 1 packet of Tropical Punch and a teaspoon of grape:

Setting up the colors to dye gradient yarn

Next, pour very hot water into your jars:

Four mason jars, each holding a different blend of colors to dye gradient yarn - with a bundle of white yarn sitting in front of each jar

At this point, it would be wise to stick a little sample yarn into each jar… just to make sure you like the color. You can add more Kool-Aid to alter the color at this point.

Dye!

Stick the yarn in the jars! One yarn ball per jar. . .

Four mason jars holding a blend of dye shading from red to deep purple - each with a ball of yarn soaking up the dye

Use a utensil (remember, the water’s hot!) to poke at the yarn and make sure every bit of yarn is getting wet. If there’s a section that doesn’t absorb yarn, you’ll end up with a white blotch!

detail of yarn being dyed red

Do you notice a little section of white yarn between the jars? Be sure to dunk those sections into the dye as well!

Let dry

Remove the yarns and squeeze out the excess water:

How to dye gradient yarn - four balls of yarn each dyed a different color, shading from red to deep purple

Let these dry completely before you do anything else… you don’t want any tangles!

You have a gradient yarn!

Once dry, wind into a cake:

Finished cake of yarn dyed in a  gradient from red to purple

Ta da! Isn’t it beautiful!

Want to see my progress?

I think my Stellanti is knitting up beautifully!

And look at my beads! Aren’t they fabulous?

Knitting with beads isn’t too complicated… the most difficult part (in my opinion) is that once pre-strung, you have to keep scooting the beads down your yarn as you work. No biggie.

Want to get started?

Now you can dye gradient yarn yourself – no special tools or supplies needed, just two colors of Kool-aid! You can grab the Adorn Anew ebook (for the whole collection of fabulous patterns), or just the Stellanti pattern.

Happy stitching!

Want to discover a whole new world of patterns? Try reading crochet charts!

I adore Japanese craft books. It doesn’t matter if the craft is sewing, crocheting, needle felting… you name it and I can guarantee that you’ll find a supply of irresistible Japanese books on the topic.

Just one example of the crochet fabulous-ness that comes out of Japan.
Of course there’s a little bit of bad news that accompanies this discovery: many of us (myself included) don’t read Japanese.

Meet your friend: the crochet chart

Want to know the good news? Japanese crochet patterns are written with charts: meaning that, if you can understand the international language of the charted symbol, you’ll gain access to all of those amazing patterns!

Page from Crochet with Color, book reviewed below.
(Actually, the illustration-heavy nature of Japanese instruction books applies to other crafts as well. You can read about my latest needle-felting book purchase in this blog post.)

I know… it can be daunting to pick up an entire book in another language. And, I’ll be honest with you: buying a Japanese book as a way of trying to learn the charts will be tricky. But fear not: I have an idea that will set you on your path to charted bliss.

Crochet with Color

What if there were a magical book: originally written in Japanese (so it contains all of the charts and illustrations, exactly as they would be written in a Japanese book), but with the text of the book translated into English? Wouldn’t that be the perfect way to get your feet wet with charts?

Crochet with Color is your book!

This book contains 25 beautiful & colorful crochet projects, all fabulously photographed and totally enticing. But really, if you’re just curious about the projects in the book, you can head on over to Amazon and use the ‘look inside’ feature. It’ll tell you everything you need to know about what the book contains.

Although the projects are adorable and lovely… if you’re buying a book for the projects, it’s a personal judgement about whether the particular projects in the book speak to you. And I can’t tell you that! But, I think there’s a real value to this book aside from the projects, and that’s the charts I’ve been talking about.

Don’t get me wrong, there are American books that contain charts (Robin Chahula‘s books are almost all charted, and are fantastic). However, let’s say your goal is to gain the skill set to read Japanese crochet books. Crochet with Color is, in my opinion, one of the best stepping stones you can get: since the charts and illustrations are exactly what you can expect to find!

And yes, I really do think that once you can read the charts and understand the illustrations, you can use Japanese crochet books… because I’ve done it!

Feed the addiction…

Once you feel comfortable with reading charts, you’re going to want to get your hands on more Japanese books!

If you live in a big city, you might have a Kinokuniya, an import book store with a huge crafting section! I definitely suggest a visit if you’re near one!

Aww! So cute!
If you’re shopping online, it definitely takes a little searching to find a source: since most of us don’t know the Japanese characters you would need to search a Japanese website. The Etsy store, Japan Lovely Crafts sells Japanese knitting, crochet and sewing books. Ebay is also a good source, search “Japanese Crochet Book”, and a good number come up.

Just be cautious, you want to make sure you’re buying the actual (legitimate) book and not an illegal pdf photocopy!

I hope you’re motivated to delve into a new world of crocheting!

Review of The Big Book of Knitted Monsters by Rebecca Danger

Love knitting cute monsters? Rebecca Danger’s Big Book of Knitted Monsters has been on the wish-list of every monster-knitter I know! And for good reason: it’s packed full of adorable monster patterns. This book isn’t for every knitter out there, so you’ll want to skip down to reading my review to see if it’s for you. But first, I want to show off the cutie I knitted from the book!

Hugo the Couch Monster

I couldn’t wait to break into the book and make a monster of my own! I chose Hugo the Couch Monster… he’s a real cutie! Since all of the patterns in the book are ‘any size, any yarn’ patterns… I was pleased to use up some of my stash! Hooray!

The book recommends using magic loop, but I’m a two-circulars sort-of-girl, and that technique worked out just fine!

And I’m very happy with my resulting cutie!

What do you think?

The Review

If you’re familiar with Rebecca Danger and her adorable monster patterns, then you know what this book is about! Big Book of Knitted Monsters contains 20 patterns for cuddly monsters that you can customize to be any size you’d like.

Besides the cuteness of the monsters, one of the big strengths of this book is the variety of yarns that are used to make the samples. Rebecca says in the introduction that the monsters can be knitted with any thickness yarn (and the appropriate sized needle), and she demonstrates the flexibility of her patterns throughout the book. Every monster in the book is knitted in at least two yarns: often a bulky yarn and a worsted weight yarn. It’s really great that you’re able to see how the pattern works up in different yarn choices… gets your creativity flowing!

One of the weaknesses of this book is the lack of detailed introductory and finishing information. I know why there isn’t: Martingale (the publisher) imposes an 80 page limit on its books. So of course, if you have a book with 20 different patterns, there isn’t much room for details. There are very helpful photographs sprinkled throughout the book, which I appreciate… but there are a few spots where you’re left to fill in the gaps. You’ll be instructed to ‘sew the arms on using a whipstitch’, but the exact positioning of the arms is up to you to sort out from the photograph (or maybe, your own creativity!).

Pros

  • The writing in the book is whimsical, playful and enjoyable to read.
  • The monsters are adorable.
  • Each pattern can be knitted in a variety of yarn thicknesses and colorways, so there’s lots of options!
  • Tricky knitting techniques are demonstrated through photographs: which are much clearer than an illustration.
  • If you can knit on double points (or two circulars, or magic loop), you can do almost any of the patterns in this book. Most of the monsters are fairly simple to knit.

Cons

  • The introduction is sparse. It contains information about how to do the magic loop technique, but you’ll need to look at an outside resource if you need help with other knitting techniques.
  • Other reviews I’ve read have been disappointed in the similarity between the various monsters in the book. I, personally, am not too bothered by this… they’re knitted in Rebecca’s signature style, and each one demonstrates a different shape/feature. However, each monster has a glued-on mouth, and I would have liked to have seen one that doesn’t- since glued-on mouths aren’t safe for small children to play with. She mentions in the introduction that the monster would be just as cute with an embroidered mouth, but we don’t ever see one knitted up.

So, if you like monsters and are comfortable with basic knitting techniques (or, at least, feel confident looking for outside help if you need it), then this book is for you! Happy monster knitting!

Come Visit Me at Made By Joel

Made by Joel Embroidery

Hey everyone! I’ve got a guest post over at Made by Joel – one of my very favorite blogs!

For those of you who don’t know about Joel – he’s an awesome Dad who make The Most Amazing Toys for his kids. Simple things out of everyday materials that have LOADS of play value. Scroll through his archives and order his book, Made to Play!. It looks fabulous!

Anyway – Joel does these terrific coloring pages – really great lines drawings that just beg to be embroidered. So I stitched one up and wrote up a post on how to do it.

There’s a lot of info you’ve already seen on my site about how to transfer the pattern and what some of the basic stitches are. But I also include some information about my thought processes as I made the design decisions about what stitches to use where, where to add color, and what color thread to use. I think it would be useful to anyone who wants to learn more about making their own embroidery design decisions.

Check it out!

Best,
Wendi

A finished Clapotis and some tips

Tips for knitting Clapotis
Just the other day, I finished my clapotis, a wonderful scarf/wrap pattern by Kate Gilbert available as a free download on knitty. Clapotis is a wrap that makes use of dropped stitches for a great finished texture. It’s a very popular pattern (over 14,000 people on ravelry have made it), and no wonder! The pattern is easy to remember and it’s fun to do!

tips for knitting clapotis
After a successful Clapotis attempt, I learned a couple tips and tricks to share. These tips will be most useful once you’ve familiarized yourself with the pattern.

  • selecting a yarn Keep in mind that you’ll need to drop lots of stitches (on purpose) for this pattern. That will be easier to do if your yarn isn’t fuzzy or sticky. I used a 50% wool 50% silk for mine, which I loved, but dropping the stitches took a bit of effort because it clung to itself. If a yarn is hard to unravel, then it’s going to be hard to drop stitches.
  • switching yarns If you’re using multiple balls of yarn, you’ll have to change yarns at some point. Some folks are ‘switch yarns at the end of the row’ people, but I’m a ‘switch yarns in the middle of the row’ sort. If you’re like me, it’ important to switch yarns in the middle of a k3 sequence. This will ensure that your change isn’t near a stitch that will be dropped, and also give you solid surroundings to weave in your ends.
  • customizing Don’t forget that you can change the size from what is called for in the pattern (either by changing the number of increase repeats- to alter width- or the number of straight repeats- to change length)! Mine is much longer than what is called for, so I can wrap it around me oodles of times! If you’re looking for a quick project, you can do a skinny scarf version.
  • knitting through the back loop Don’t forget to knit through the back loop… especially the row after you’ve done your yarn overs! If you forget on this particular row, it will look very sad when you drop the stitches. And, the saddest part is… you will have knitted lots of rows before you find out!
  • instead of stitch markers If you’re low on stitch markers, you can purl the stitch that you’re going to drop. This will remind you when to knit through the back loop without oodles of little rings. (thanks, Ravlery, for that tip!)

If you’re interested, you can check out the full details of my clapotis project. I loved it so much, I’ve already started a second one!