I’m super-excited about this one, because it features 2 firsts for me. It’s the first time I’ve followed a pattern in bead crochet, and it’s also the first time I’ve added a glue-on clasp:
It’s magnetic!
Isn’t that so cool?
And… more beading!
Since I’ve been feeling really into beads recently, I decided to take a class at my local bead shop. Check out this necklace I made:
The main technique I learned was wire wrapping (to attach the dangling sea glass beads onto the chain), and it was really fun!
It’s just what it sounds like! Using two separate balls of yarn, you’ll knit round one of the first sock, then round one of the second sock. Then, you’ll move onto round two of the second sock…
It’s a great technique for ensuring that two pieces are exactly the same!
Once I got the hang of socks, I moved onto knitting other pieces this way, like these monster arms:
And now…
Do you remember when I told you I’d started knitting a Charleston Tee?
When it came time to knit the sleeves, I thought, ‘hey! I should do them both at once!’
(I apologize for the late-at-night photo… I’m busy knitting!)
This way, the sleeves would be exactly identical, and I’d only have to read through the directions once! Hooray!
Because the sleeves are knitted flat (instead of in the round), I only need one needle instead of two.
It’s almost finished… fingers crossed it’s ready for me to wear at Stitches East!
That’s what I’ve been up to this week… how about you? I hope you have an awesome Wednesday, and get some great knitting/crocheting done this week!
If you want to check out more Work-In-Progress posts, please check out Tami’s Ami’s Blog, who’s been organizing a great WIP Wednesday blog theme! And, don’t forget to come back for FO (Finished Object) Friday!
Today I’m going to show you how to dye gradient yarn in two fabulous colors – with Kool-aid! But first, a little background. . .
I was excited when Laura Nelkin asked me to be on the blog tour for her serialized ebook, Adorn Anew. It’s a beautiful collection of knitted & beaded jewelry and accessories, with a new pattern released each month in 2012.
Laura is well-known as the ‘knitting with beads’ goddess (okay, I made the title up, but that’s an accurate description!), and is the instructor of the crazy popularKnitting with Beads course on Craftsy.
I had never knitted with beads before, so the reason I was so stoked to be on the blog tour is that I knew it would give me a push to give knitting with beads a try. Beads add such a beautiful bling to your project without increasing the difficulty by too much. Besides, I know Laura’s work. The instructions in her patterns and accompanying videos on her site are fabulous. I wouldn’t run into any trouble.
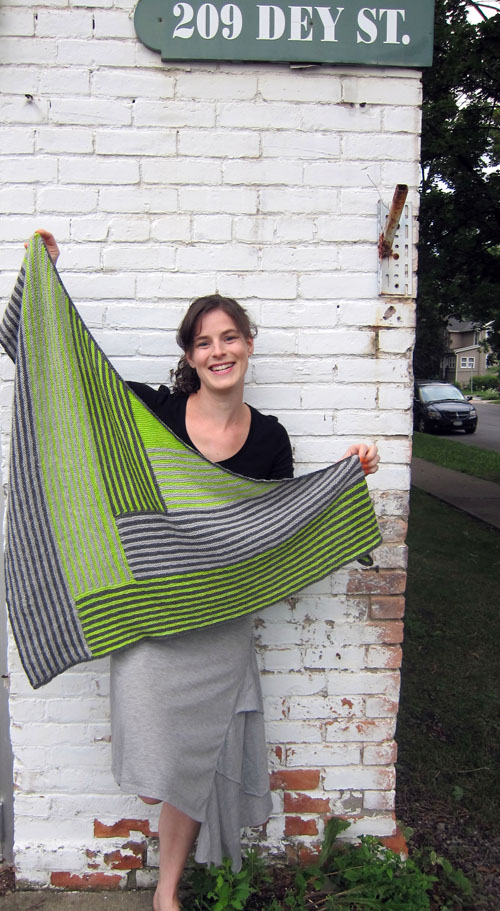
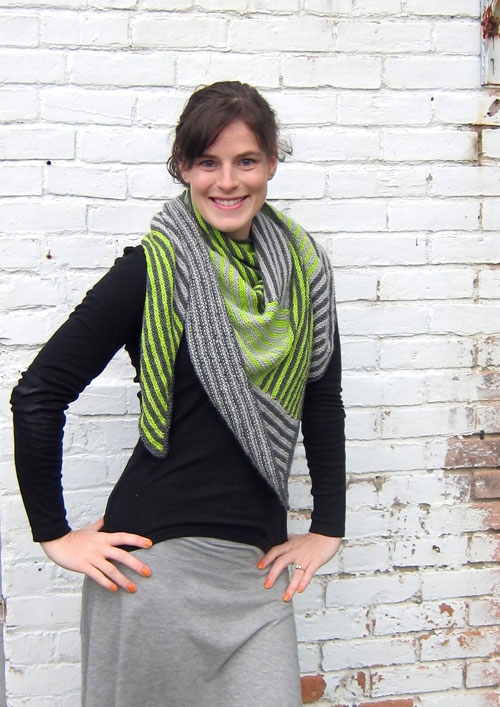
So, anyway… (this is one of those stories where my husband would say, “where’s the point of this story?” And I would say, “I have to tell the story chronologically!”) I signed up to be on Laura’s blog tour back in early summer, when only half of the patterns had been revealed. I was anxiously awaiting November, so I’d discover which pattern I’d be knitting. I nearly fell off my chair when I found out that November’s pattern is Stellanti! It’s an amazingly beautiful shawl… and I spotted Laura wearing it at Rhinebeck, but I had no idea it would be part of Adorn Anew! I had been coveting it… and I am so excited to be knitting it!
What is a gradient yarn?
A gradient yarn is a yarn that slowly shifts from one color into another. Although Stellanti would be beautiful with any fingering weight yarn… the gradient yarn used for the sample gives it a little extra pizzazz.
The samples were knit in Nightfall by Fibro Fibers, which is absolutely stunning. But since each skein is hand-dyed (and there’s currently a huge demand for Stellanti!), this particular yarn can be hard to get your hands on.
And since this shawl requires 490 yards, purchasing a standard 440 yard skein (of Noro or another commercial gradient yarn) won’t work… since you’d run out of yarn and would need a 2nd ball… which would mess with the gradient.
Sound like a pickle! No worries! I’m going to show you how to dye gradient yarn, using Kool-Aid! It’s fun, cheap and easy!
How to dye a gradient yarn
Let’s do it! You’ll need:
490 yards of undyed yarn (details below)
2 colors of Kool-Aid, 5 packets each
4 mason jars or containers
Prepare your yarn
To begin, you’ll need 490 yards of an undyed fingering weight yarn, mostly wool (a little bit of nylon is fine, but avoid plant fibers, since these won’t take dye the same way). I’m using LB 1878 from Lion Brand, but I’ve also had great success with the bare skeins from Knit Picks:
Roll your yarn into a cake… this step is important!
Select your Kool-Aid
I’ve blogged about dyeing with Kool-Aid before (read the different techniques here!), but today we want to dye gradient yarn, which means selecting only 2 colors. For the effect I want, I need to make sure one of my colors is noticeably darker than the other.
I chose Tropical Punch (red) and Grape (purple). I discovered that there’s a special Halloween color called ‘Ghoul-Aid’, which is closer to black and would work amazingly, but I didn’t know about it when I was dyeing!
Prepare your yarn and Kool-Aid
First, prepare your yarn by separating it into 4 approximately-similar-sized chunks. This is easy because you wound your ball… pull out one center chunk, then another…
Line your mason jars up in a row. Pour 2 packets of color 1 into the far left one, then 2 packets of color 2 in the far right one. For the center two jars, combine the colors to create your gradient. For example, my 2nd jar contains 1 packet of Tropical Punch and a teaspoon of grape:
Next, pour very hot water into your jars:
At this point, it would be wise to stick a little sample yarn into each jar… just to make sure you like the color. You can add more Kool-Aid to alter the color at this point.
Dye!
Stick the yarn in the jars! One yarn ball per jar. . .
Use a utensil (remember, the water’s hot!) to poke at the yarn and make sure every bit of yarn is getting wet. If there’s a section that doesn’t absorb yarn, you’ll end up with a white blotch!
Do you notice a little section of white yarn between the jars? Be sure to dunk those sections into the dye as well!
Let dry
Remove the yarns and squeeze out the excess water:
Let these dry completely before you do anything else… you don’t want any tangles!
You have a gradient yarn!
Once dry, wind into a cake:
Ta da! Isn’t it beautiful!
Want to see my progress?
I think my Stellanti is knitting up beautifully!
And look at my beads! Aren’t they fabulous?
Knitting with beads isn’t too complicated… the most difficult part (in my opinion) is that once pre-strung, you have to keep scooting the beads down your yarn as you work. No biggie.
Want to get started?
Now you can dye gradient yarn yourself – no special tools or supplies needed, just two colors of Kool-aid! You can grab the Adorn Anew ebook (for the whole collection of fabulous patterns), or just the Stellanti pattern.