Making the Miu Top – Knitting Pattern Review

Knitting pattern for the Miu Top, featuring a cozy, textured design perfect for spring and fall wear.

I saw the Miu Top by Una Gil on Instagram and thought it looked cute, so I made it. 

Here’s the cover photo for the pattern.

This top is a little out of character for me style-wise, but I’m trying to upgrade my closet, so I want to take a chance on some new silhouettes.

It has a wider neckline than I normally like, and it’s a sleeveless top. I don’t like wearing sleeveless tops so I’ll probably always wear a thin layer underneath. 

Before I talk about the pattern, let’s talk about the yarn. It’s Harrisville Designs Nightshade yarn. 

Yarn skeins in dark shades of purple, black, and teal for knitting projects.

I spotted it at the Rose City Yarn Crawl this year, and I thought it was so gorgeous that I had to make something with it. These yarns are black wool marbled with another color. It gives them an almost black look, but in the sun or other bright light, the color is more visible. I originally wanted the color VCR, which was a nice green color, but they didn’t have enough in stock. I ended up going with Talk Radio, which is their purple. 

Hand-dyed purple and black yarn from Harrisville Designs.

It knits up well. It’s not a superwash wool, so it felts together pretty quickly. On the one hand, that makes a nice dense fabric, on the other, it’s a pain if you need to rip anything out. The yarn felt rough when I worked with it, but it blocked much softer. I have worn thin layers under the top when I’ve worn it out, so I’m not sure how itchy it is when worn against bare skin. 

DISCLAIMER ABOUT THIS YARN. As pretty as it may be, I had major problems with it breaking. It didn’t seem like the kind of yarn that would break so easily. (It’s 3ply, not single ply, which is where I usually run into breakage problems.) The yarn broke twice when I was trying to cast on. It also broke while I was knitting when I was pulling some from the ball in my project bag. In addition to that, it broke MULTIPLE times when I tried to seam the shoulders. I ended up getting the seams sewn, but it took a few tries and an extremely gentle hand. On their website, someone left a review about breakage that seemed similar to what I experienced, and the company responded saying it wasn’t normal. Maybe I just got a bad batch. Honestly, the colors are so pretty that I would still work with it again, I’d just be mindful of the breakage and be cautious from the beginning. 

The top itself worked up quickly. It’s worked bottom up. The waistband is worked in the round until you get to the underarms, then you split the front and back and work them flat. Once you work the front and back to the length that you want, you seam the shoulders and you’re done! 

Knitting pattern for the Miu Top, featuring a cozy, textured design perfect for spring and fall.

Overall I like the fit. I made a size medium, and I used two full skeins, and then part of a third. 

I’m still undecided about the wide neckline.

Making the Miu Top knitting pattern, featuring a colorful ombre hair style and cozy dark sweater.

I might go back and sew up a bit more of the shoulder seam (although I don’t know if I want to fight with the yarn again).

Final review…

The pattern is great – easy to follow, very adaptable, exactly what the cover image shows. I’m not 100% sold on the silhouette for me, but that’s nothing to do with the pattern itself.

The yarn is lovely and the color is beautiful. I’d use it again, but with caution in case the breakage issue wasn’t a one-time weirdness.

Giveaway: "Mini Knitted" Book Series + Interview with Sahiyo Ishii

Mini Knitted Books

I have an amazing opportunity for you today! Search Press (the publisher of the adorable Mini Knitted series) is giving one reader 5 books, including:

Keep reading for details on how to enter! Sachiyo Ishii is the author of 4 of these books, and she’s joined us to tell us a bit about herself and her process!

Each book is packed with projects (more than 25 patterns per book), using a variety of techniques with simple knitting stitches.

Interview with Sachiyo Ishii


Sachiyo is the prolific author of 4 of the Mini Knitted books, and I was delighted that she took the time to come talk to us! Welcome, Sachiyo!

How did you begin knitting? And when did it take a professional turn?
I took up knitting in my 30’s after my second son was born. I could not knit a stitch until then. I thought dressing my boys in my handmade clothes was trendy and very Yummy Mummy, but soon discovered that knitting requires skill and patience. With my friend’s help, I did achieve my very first piece, but the stitches were messy and uneven, and the sleeves came out in different lengths.

It seemed to me that I had a very long way to go until I would be able to knit a decent garment. I almost gave up knitting altogether, however, I discovered that you can make small toys with basic skills. I practiced published patterns for some time and then, I started creating my own to add personality. I knitted many animals and proposed my current publisher, Search Press the idea of the knitted animal park. It is great to find a channel that I can put my effort into.

You’ve written so many books! Where do you find your inspiration?
I get inspiration from everywhere. When I walk in town, looking through books and magazines, shop windows, everywhere! I am constantly thinking of new designs no matter where I go or what I do. Illustrations and cartoons, felted work and sugar craft are a good source, too. They are already in simplified forms and it is easy to make them into my craft projects.


What do you like to do in your free time?

I enjoy attending fitness classes and swimming. When I get stuck with a project, swimming can be the best solution to get a fresh idea. I don’t do enough but I like visiting craft shops and fairs. I guess I cannot completely be free from crafting.

What is your favourite yarn/knitting needle/craft supply?
For many years, my favourite yarns are Rowan. I love felted tweed especially. It is such a delight to knit with quality yarn.
I have been using bamboo needles since I took up knitting. They are less slippery and keep stitches well and the best of all, they feel great in hands. If you are still new to the skill, bamboo needles are must. I have been using Clover Takumi needles.
My favourite is Clover products. My mother loved them for many years and recently I inherited them all. Some are bought over 30 years ago but still in very good condition.

Is there a favourite piece you’ve made? Perhaps for yourself?
It is hard to say since I have many favourites, but I love the knitted carousel. I have a whole set of amusement park in knitting and would love to do a book someday. Most of my creations are for myself except occasional gifts to my friends. It is great to be an author. You get to keep all samples!
knitted carousel Sachiyo Ishii

Thank you, Sachiyo!

Find Sachiyo!

Website: www.Knitsbysachi.com
Instagram: knitsbysachi
Facebook: www.facebook.com/KnitsBySachi/
Ravelry: sachiyo-ishii
Pinterest: knitsbysachi
Twitter: Knitsbysachi

The Crochet Wildlife Guide Review + FREE Penguin Pattern + Giveaway!

I am so excited! I love showing off a great book to you… and there are so many goodies! Keep reading to grab a FREE download of the Chinstrap Penguin by Philip Ha (aka Sir Purl Grey) AND enter to win a digital copy of the book, The Crochet Wildlife Guide.

The Crochet Wildlife Guide

You may have heard me say this before on the blog, but I get a lot of amigurumi books across my desk and for many of them, I say, ‘oh, ok. This has some cute patterns.’ And it ends there.

And I’ll admit it, my books are among them.

Much of the bare-bones nature of many books you see is completely driven by the publisher’s desire to save money. Cute illustrations? You have to pay an illustrator for those. Step-by-step detailed instructions? Nope. That takes too many pages. Fancy shaping techniques? Oh, no. That doesn’t appeal to a wide-enough audience.

For a crocheter who wants extra information either because they’re a beginner (and need the help and explanations) or are adventurous and want to try something new (hence, needing explanations of new and complicated stitches), this formula can be very frustrating.

Needless to say, when a book comes to me that breaks the mold, I jump out of my chair with glee!

The Crochet Wildlife Guide

The Crochet Wildlife Guide is a self-published book by Philip Ha and Jeff Wiehler, and the book is filled with creative crochet ideas and an artist’s touch. I was impressed by the coverage of basic crochet techniques as well as detailed instructions and illustrations for each animal.

The Crochet Wildlife Guide bird

Each project contains a diagram (as shown above) that allows you to see each piece and how they are put together. These photos are often what takes a good pattern and makes it amazing and easy-to-follow. (It’s why I include step-by-step photos in all of my individual patterns… no matter how many words you have, sometimes, you just need a photo!)

I was also enchanted by the darling illustrations in the book (including this table of contents).

The Crochet Wildlife Guide table of Contents

The patterns included in the book walk the line perfectly between wildlife-realism and kawaii cuteness. Amigurumi like the red panda on the cover, have little details so the animal is instantly identifiable and unique, but not fussy and still cute with wide appeal.

The book also includes a table of the skills required for each pattern. This is such a great idea… you can identify the project that’s just right for you!

The Crochet Wildlife Guide difficulty levels

Throughout the book, the authors emphasize places where you can become your own designer, by highlighting small changes you can make or pointing out the design techniques used to create a particular shape.

The Crochet Wildlife Guide Bat

The photography, with animals photographed in nature, is lovely as well.

The book is available for purchase in digital or print form, from The Crochet Wildlife Guide website or from Amazon.

FREE Chinstrap Penguin Pattern

Free penguin crochet pattern

Phillip and Jeffrey have given us a pattern that didn’t make the book for FREE so that you can get started on some crochet cuteness right away!

Click here to download the pattern:  Penguin pattern by SirPurlGrey

Happy stitching!

Norah Gaughan’s Knitted Cable Sourcebook: Review

This book. Norah Gaughan’s Knitted Cable Sourcebook. Drool.

I saw it. And I bought it.

I don’t buy a lot of craft books. (Seriously, all of my books fit on one shelf!)

But I bought this one and love it. And I added my old cable stitch dictionary to my ‘Spring Cleaning’ pile. Because I don’t need it any more.

Norah Gaughan's Knitted cable sourcebook

(does this inside cover give you an idea of all of the amazingness inside?)

I had read a lot of amazing reviews about this book, but I’m a bit of a skeptic. I thought, ‘oh, they’re probably just saying nice stuff because Norah Gaughan is really famous’. (geesh, that makes me sound really awful, doesn’t it? It’s just that in my job, I see a lot of books.) And the cable on the cover is nice, but it didn’t make me pass out from the amazingness.

But once my book arrived I discovered that my skepticism was unwarranted. It actually IS really amazing.

The introduction isn’t very long, but it’s packed with pretty juicy information. The topics covered include:

  • Using a double point needle as a cable needle
  • Left vs. Right slants
  • How to slip stitches onto a needle & how to work the held stitches
  • Cable terminology
  • How to read cable charts
  • Tips for keeping your place on a chart
  • A full explanation of Norah’s own Stockinette Stitch Equivalent System (SSE), so you can swap different cable stitches into different patterns
  • How to fix a mistake in a cable
  • How to count cabled rows

I read the introduction and felt like, ‘Wow. That has everything I need to know.’

The cable designs (many not previously published) are just stunning. Look at this one.

Norah Gaughan's Knitted Cable Sourcebook

What?!?

Very few are this complicated… most of the stitch patterns are two notches above ‘simple’, but stunningly beautiful and hovering significantly below ‘crazily complex’. Which is exactly what you want in a stitch dictionary.

I fell in love with the Seed Rib Half Drop (#84 in the book) and cast on for a scarf immediately.

Seed Rib scarf from Norah Gaughan's Knitted Cable Sourcebook

Isn’t it gorgeous? (The cable pattern, I mean… not my knitting!) It was so enjoyable to knit… I felt like each cable was a little piece of knitter’s candy. I just kept wanting to get to the next one!

FreshStitches scarf cable pattern norah Gaughan's

The book also contains 15 projects, which are all quite lovely and creative projects using cables, in addition to the more than 150 stitch patterns in the book.

Pullover Norah Gaughan's Knitted Cable Sourcebook

Whoa. This book is just plain fabulous. Treat yourself.

Those links are affiliate links. That means I earn a tiny commission if you buy after clicking through. 🙂

Zoomigurumi 5 Review + Giveaway!

Zoomigurumi 5

Today I’m reviewing and having a giveaway for Zoomigurumi 5! I’m really excited about this one… keep reading for details on how to enter the giveaway.

The Zoomigurumi series is published by the folks at AmigrurumiPatterns.net, which, in my opinion, is the premiere place for amigurumi patterns. The offerings are curated (giggle, I’ve even had some of my patterns rejected!), so you’re browsing through a lovely selection of both paid and free patterns by the leading designers.  There are over 22,000 amigurumi patterns on Ravelry. It can be overwhelming.

And by the way, Zoomigurumi 6 is available for pre-order! It’s your chance to get one of the first copies!

Zoomigurumi 6

The Review

All of the Zoomigurumi books are curated by the editor of AmigurumiPatterns.net… and the result is 15 amazing and adorable patterns! Other AmigurumiPatterns books (like Amigurumi Circus) are created by customer votes on submissions… isn’t that such a great idea, too?

table of contents for Zoomigurumi

I don’t think I’ve ever said this before, but I’m going to say it: this book is as close to a perfect amigurumi book as you can get. At least in my opinion, anyway.

Look at all these cuties!

Zoomigurumi 5It’s a pretty thin book, only 80 pages. So I was expecting compromises. Sometimes small books skimp on the step-by-step photos. Or they don’t include tutorials on the basics, like how to single crochet or do magic ring. Or they write the patterns in a super-cramped format (like “[inc, 2] 6 times”). Or the patterns are crazy simple to keep the instructions really short. But this book doesn’t take any of those shortcuts.

inside of Zoomigurumi 5

The patterns are delightfully complex (not overly complicated, but have significant character) and the pattern pages feature step-by-step photos of advanced parts. The introduction covers all of the basic stitches and skills (with illustrations!) and the patterns are well-written and include the specific rounds in the attaching instructions.

And a beautifully illustrated table of contents and biographies of the authors! How did they squeeze it all in? I have no idea.

caterino the walrus from zoomigurumi 5

Each pattern features multiple photos of the finished object, so you can see it from every angle.  It’s truly very lovely.

Each pattern includes the yarn weight, recommended hook size and yarn shown in the sample, something that is often omitted from amigurumi books. Sometimes you really DO want to know what yarn the author used!

If you love these cuties, then grab this book. I don’t think you’ll see patterns done much more clearly in a printed book. And they’re adorable!

Giveaway

Would you like to win a copy? Sure you would!

To enter, just leave a comment on this page! It’s that easy! A winner will be randomly chosen on Tuesday, February 14th.

Update – The giveaway is closed now.

Good luck!

Save

Save

Book Review – All Points Patchwork

Vibrant patchwork quilt and book on English paper piecing for quilting and small projects.

I may have mentioned once or twice here that I really love handwork. 🙂

I love the feel of the fabric and thread in my hands.

I love the little pop I hear when the eye of the needle with the doubled-over thread passes through the fabric, followed by the low shush of the thread.

I love that I can take it anywhere.

I love the slow, meditative pace – and the fact that it allows me to sit and watch TV guilt-free. I’m “working” while I watch. 🙂

I can not believe that it has taken me this long to try English Paper Piecing.

I got interested a year or two ago when I started seeing fun projects popping up on Pinterest – but then I heard that Diane Gilleland was writing a book and I decided to wait for that. I’ve read Diane’s books before and they are always amazing and comprehensive and inspiring.

All Points Patchwork is available now – and it’s everything I knew it would be!

Quite simply – it’s the best craft book I’ve ever read. Even better than Anatomy of a Doll – the book that got me interested in 3D sewing.

Like Anatomy of a Doll, there are no projects – it’s pure instruction and inspiration from start to finish – exactly what I look for in a craft book.

Let me show you what I’m talking about. . .

I love that the front of the book shows a block with some of the pieces flipped over. On the back of the book you see the same block, entirely from the back (so you can see the construction details) and the most basic instructions for English Paper Piecing.

Colorful paper patchwork craft instructional guide for kids and adults.

Really – that’s all there is to it. Choose a shape and cut it out of paper. Baste some fabric around the shape. Join the bits together.

If it’s that simple, why do we need a whole book?

Because Diane teaches you EVERYTHING YOU NEED TO KNOW.

EVERYTHING.

The pros and cons of different template materials.

Where to buy pre-cut templates.

How to design your own blocks – on the computer with high-tech drawing tools or on paper with nothing more complicated than a compass and a straight edge.

Different basting techniques.

I could go on and on and on. It’s all in here.

And she doesn’t just throw the information out there. She anticipates any possible problem you might have and helps you fix it. I love this bit on getting the perfect, invisible whipstitch seam, with good and bad seams shown, along with several troubleshooting suggestions.

Shiny Happy World sewing book instructions on sewing stitches and techniques.

The tone throughout the book is warm and encouraging – like she’s sitting on the sofa next to me helping me learn this new craft. Just what I need!

The book isn’t just for beginners, though. She includes more advanced techniques too, like how to add a pieced, finished edge to your work.

Colorful paper piecing quilt with pink, white, and gray fabric, focusing on detailed quilting techniques.

So fabulous for a table runner or mug rug where the back will be seen and where you don’t want to square off the edges!

Or this bit, where she shows two different ways to baste diamond shapes, and then explains when she uses each method. Throughout the book she shows exactly what she’s doing (with really terrific photos), and also explains why. This is so rare – and so helpful!

Bright blue and white quilted fabric pinwheel patchwork for DIY sewing projects.

After a general intro with all the basics, she moves on to more detailed sections for each type of shape you might use. This, to me, was the real meat of the book.

For each shape she shows how to draft it by hand, and exactly how best to baste it.

Colorful craft book pages showing hexagon drawing instructions, with hands folding fabric, on a purple background.

Then she shares a couple of pages showing sample layouts, the different kinds of arrangements that each shape lends itself to.

Colorful diamond pattern making instructions on quilt design from Shiny Happy World.

Finally, she gives tips for how to join individual pieces and larger units together.

Hexagon sewing pattern instructions for quilting and patchwork designs | Shiny Happy World.

She does this for hexies, diamonds, jewels, triangles, tumblers, octagons, pentagons and even curved shapes. It’s so comprehensive!

And then there are the “Project Inspiration” pages. They’re scattered throughout the book, and each one shows a finished project, with suggestions for fabric choices and alternate ways of using it.

Colorful hexagon journal cover quilt made with fabric scraps, perfect for craft projects and home decor.

This lovely book cover, for example, is a great way to showcase tiny scraps of favorite fabrics – really setting the bits off surrounded by a frame of solids – and would also be good for placemats, a pillow, or a table runner.

Or this one, showing a softie made with EPP fabric.

Colorful patchwork stuffed animal, fabric craft project, plush toy pattern, soft toy design, handmade toy inspiration.

Basically, she’s showing us how to create fabric using EPP, then showing us how we can use that fabric with any of our favorite patterns!

I’m not sure I ever would have thought of using EPP for a softie, but now that I’ve seen this image, I can’t stop thinking about how great Bailey Bear or Bartholomew Bunny would look with this technique. Their construction is very simple, just like this little guy, and I’m going to have to try it now.

(If you don’t have a favorite pattern for a project, go to www.allpointspatchwork.com where Diane has collected links to tons of different patterns and organized them by category. Handy!)

Most of the projects shown are small, or are larger projects with smaller bits of EPP incorporated into them, like this quilt.

Colorful pentagon lap quilt with quilt block flower motifs for baby or home decor.

These are a few EPP appliqués added to a whole cloth quilt, and she also reminds us that we can add them to a store-bought blanket, or even use them as patches to give a second life to a stained or worn quilt. I love that!

But I also love this. . .

Colorful hexagon quilt with textured, vibrant design for quilting and craft projects.

It’s a feature of someone who actually made an entire hexie quilt – in less than a year! She shared exactly how she did it – a totally doable approach for anyone who wants to tackle a big project.

All Points Patchwork is a craft book designed for the way most of us actually use craft books. It’s got. . .

  • Instruction! All the information we need, and a lot we didn’t even know we needed – the kinds of tidbits that you pick up from your mother or grandmother, or from years of practice and trial and error.
  • Clear organization with a solid table of contents and index.
  • Beautiful illustrations – terrific photos for all the how-tos and clear diagrams for all the layouts.
  • Inspirational eye candy – also beautifully photographed, and with extra tips for how to take each project in your own direction.

I just finished my first EPP project – this doll quilt.

Colorful hexagon quilt showcasing modern patchwork design with black, pink, teal, and patterned fabrics.

It was so much fun to make that I already started a new project last night – and you can bet there will be more projects to come. I know I’ll be referring to this book again and again for years to come. It’s an incredible reference book for anyone – of any skill level – interested in EPP.

Get All Points Patchwork here. And get it now.

Happy sewing!

My Stitch & Stash Project Bag

I love, love LOVE my new project bag! It makes me smile every time I use it – and I’ve been using it steadily for about two months now.

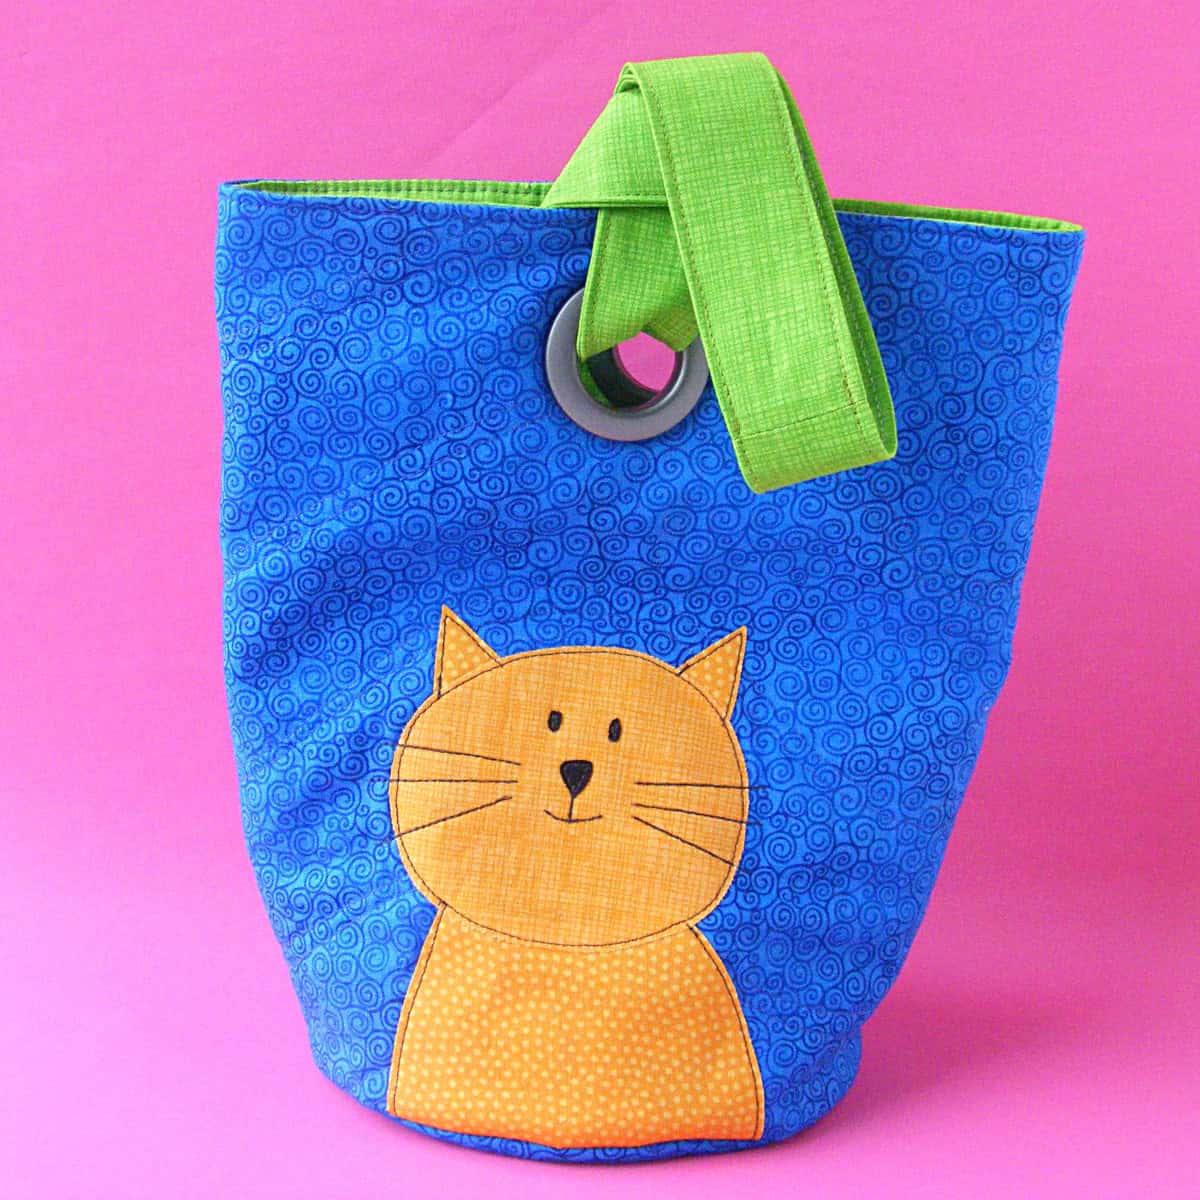
It’s made with the Stitch & Stash Project Bag pattern from Betz White – reversible, with no zippers or velcro to snag on my work, and with a handy pocket inside to hold my tools. Such a well-designed bag for crafters!

Of course, I had to add some appliqué to the front. Give me a flat surface in a pattern and I will add some appliqué. Guaranteed. 🙂

I only made a couple of simple changes to the project.

The original pattern has snaps on the sides, but I decided not to add them because I know I will never actually snap them and I like the shape without tucking in the sides.

I quilted the outer bag fabric instead of just staystitching the batting around the edges. I love the little bit of extra texture the swoopy quilted waves add to the front. I just quilted the batting to the main fabric – no need to add a backing fabric since the bag is lined. This is how I quilt all my quilts, too.

You might worry that that will make the seams too bulky, but if you use 100% cotton batting (I love Warm & Natural) and press the seams open, it’ll squish nice and flat.

Unfinished quilt with curved stitching and blue binding on beige fabric.

When I work with batting like this I also use sewing clips instead of pins. They’re great for holding bulky fabrics in place with no distortion!

Cloth in the hoop, ready for quilting or sewing project.

Of course, the main change I made was adding the cute kitty. 🙂

After I did the quilting, I appliquéd the cat in place with fusible adhesive and stitched around all the pieces with black thread. I love the cartoony pop that gives.

Here’s a video showing how I appliqué an image like this.

Bright blue quilt with an orange cat applique, whimsical and colorful for kids' bedding or decor.

The cat is one of the blocks in my Cuddly Cats quilt pattern, shrunk down a bit. I made the small bag and resized the cat image to be 5 inches tall and 4 inches wide. That left plenty of breathing room between the top of the cat and that awesome big grommet, and fit from side to side nicely. I wouldn’t go any bigger than that in either direction for whatever image you’re adding.

I love it! Mine is holding my current EPP project (to be shared soon – it’s almost finished!) and Jo has already requested a larger one with a monster on it, and a tall, skinny pocket inside especially for holding a few crochet hooks. My plan is to make a few more in different sizes (the pattern includes three sizes) to hold various works in progress and hang them on some hooks on my studio walls. Cute AND functional. I see a lot more of these in my future. 🙂

Get the bag pattern here.

Get the cat quilt pattern here.

Happy sewing!

Book Review – Stitch Love: Sweet Creatures Big & Small

Colorful felt animal plush toys featuring bears, cats, cows, and a giraffe from Shiny Happy World.

As soon as I found out that Mollie Johanson from Wild Olive was writing a book, I knew it was going to be wonderful. She’s incredibly talented and one of my very favorite designers. Everything she makes is just so amazingly CUTE!

This book is everything I hoped it would be – and more!

Let’s start with this line on the cover. . .

“Cute Kitties and Cows and Cubs and More. . . and a Yeti.”

Because Yetis! I love Yetis! I was excited before I even opened the book. 🙂

Inside there are terrific projects to sew and embroider – very simple projects that don’t require any advanced skills. I especially loved this rooster apron. . .

Colorful quilt with embroidery chicken pocket detail, perfect for sewing and quilting projects.

Look at the extra sweet detail of the footprints on the waistband!

And these reversible placemats are great!

Cute woodland animal plush placemats for kids, handmade from fabric with embroidery details.

On one side you stitch the cute critter – like that adorable bear. On the reverse you stitch what that critter likes to eat – that sweet smiling honey pot. What a cute idea! And lots of fun for kids. 🙂

I also loved this cute furoshiki – a Japanese-style gift wrapping cloth.

Embroidery-furushiki cloth featuring a cute mouse design for holiday gift wrapping.

And that mouse? He’s shown with a birthday hat and gift, but Mollie provides patterns for a whole bunch of different hats and things for him to hold, representing all the major holidays of the year. So clever!

I can’t believe I’m saying it, but one of my favorite projects was this possum.

Soft plush possum hanging sachet for nursery décor and baby gift.

I don’t like actual possums. We have a really persistent one right now who keeps getting into the chicken coop to eat their food. How do I know when he’s in there? Because the chickens go into absolute panic mode. (They’re such a bunch of. . . chickens.)

But this possum sachet is adorable! I love how you loop the tail around a hanger to hang it in your closet. It’s just – fun!

So all of the projects are great. Easily doable for beginners, relaxing and fun for more experienced stitchers. Exactly my kind of projects.

But the real gem of this book comes later – in the pages and pages and pages of embroidery patterns. Over a hundred of them! And every one of them is incredibly cute! Here’s just one page. . .

Giraffe, tiger, lion, and bird coloring illustrations for kids' activity book.

That tree sloth! And the baby elephant! And the orangutan! Mollie has them grouped by theme – wild animals, pets, farm animals, mountain and prairie, etc. so you really have every reason to use them in clusters.

Of course, my first thought when I see a group of cute animals is to make a quilt out of them. So that’s what I did!

I didn’t make a whole quilt – but I made a single block that can be used in a pillow, tote bag, T-shirt or anything else you want to add a dinosaur to. 🙂

Applique dinsoaurs from an embroidery pattern in the book Stitch Love by Mollie Johanson

What a cutie, eh?

I’ve got a tutorial here showing how to enlarge or reduce any digital pattern, and one here showing how to use an embroidery pattern for applique.

So if you get this book you not only get 25 sewing patterns and over 100 embroidery patterns, you also get a ton of applique patterns! What a deal! 🙂

I should also mention that the book has an excellent instructional section that details all the basic sewing and embroidery tools, illustrates the embroidery stitches used in the book and any sewing skills you’ll need for the projects. The templates for most of the sewing patterns are not printed at full size – which is usually an irritation for me – but there’s a link to get them all at full size online, which I’ll take over tracing any day! 🙂 It’s all in here!

The book is called Stitch Love and it’s terrific! Buy it! Make cute things with it! Give them to people you love and make them smile!

Happy stitching!

Best,
Wendi
Brightly colored fabric with playful patterns, perfect for making cheerful, DIY sewing projects.

Why I Use Wool Felt

Handmade felt badge holder with embroidered girl design for kids and adults.

This is why I use wool felt.

I designed the pattern for this little gizmo cozy (it’s free here) in February 2011. I’ve been using it to protect my MP3 player in my purse ever since.

That’s 3 1/2 years this little thing has been tumbling around in my purse and look at it! It still looks great!

Why I use wool felt - a side by side comparison

The photo on the left is from the day I finished it in 2011. The photo on the right is from today.

The corners have gotten a little smooshy and rounded. The threads of the embroidery are a bit more embedded in the felt. The edges of the applique aren’t as crisp. The big lazy daisy flower in her hair is definitely looking a little flattened.

But there’s no pilling! If this were made of cheap acrylic felt I would have thrown it away long ago because it would have looked so grubby and terrible.

How do I know this? Because when Jo was little I made her a felt board. Not knowing any better, I used cheap acrylic felt from the craft store. Honestly, I didn’t know there was anything else!

Jo wasn’t any especially grubby or rough kid, but within DAYS those felt pieces started to look terrible. They pilled awfully. They seemed to pick up and grab onto every speck of dirt or dust. And in no time at all they had lost almost all their cling. The feltboard quietly disappeared and I didn’t work with felt again for a long time. Why put a lot of work into a material that’s going to look awful almost right away?

And then I discovered wool felt. Online – of course – because there’s not a single brick and mortar store in my area that carries it. People wrote about how durable it was compared to the acrylic stuff. How it doesn’t pill. They didn’t mention how nice it feels in your hands, and how pretty embroidery looks on it, but I discovered that on my own pretty quickly. 🙂 I fell in love with felt! I couldn’t buy it locally, so I started carrying it in my shop.

I’ve made a lot more felt projects since then – so many things that I had to create a whole section in my shop for felt patterns! But it all started with this little gizmo cozy. 🙂

If you’ve never used wool felt before, give it a try! There are a bunch of free felt patterns here. Enjoy!

Happy stitching!

Best,
Wendi
That's me!


Zoom Loom Review

I knit. I crochet. I spin. I’ve tatted. I’ve tried almost every needlecraft I’ve ever heard of… except for weaving.

Why the gap in my fiber experience? I’ve always thought weaving was a little bit scary. There’s a warp, a weft and a lot of technique. It all seemed really complicated. And looms are usually big and non-portable.

That’s why I was super excited when I got a chance to try the Zoom Loom.

Schacht Zoom loom

The Zoom Loom is a portable weaving loom. It’s fitted with pins that (along with the instruction manual) tell you exactly how to wind your yarn and where to do the weaving.

Zoom loom progress

Look at me, I’m weaving!

Why I love the Zoom Loom

The instruction booklet that comes with the Zoom Loom is easy to follow, and I was super excited to weave an adorable little square on my first try!

zoom loom finished weaving

Isn’t it pretty?

The great features about the loom are:

  • it is small
  • the pins on the loom show you exactly where/how to do the weaving
  • each square requires a precise amount of yarn, meaning you can wind small balls in advance
  • the instructions are very easy to follow!

But… it’s not a complete substitute for a full loom

I enjoyed making my small square, and The Woolery’s webpage has suggestions for turning these squares into bigger projects.

However, the Zoom Loom isn’t a substitute for a full loom. Some things I noticed:

  • because the pins are fixed, each ‘weave’ is a fixed space apart. My piece made with sock-weight yarn feels a little flimsy, and I suspect a bulky would not fit.
  • if you’re looking for a project to throw into your purse, you might be disappointed. Although more portable than a regular loom, you cannot simply stop in the middle of winding the warp and head out.
  • you are limited to 4″x4″ squares. Although there are project suggestions, every project is composed of small squares.

Get yours!

Sound fun?

Go forth and start weaving!


disclaimer