One of the many things I love about felt ornaments is that they’re impossible to break. That makes them perfect to give to even the youngest kids! And I love, love, LOVE the way little felt toys look hanging on a tree. 🙂
The second ornament in the 2014 Christmas Club is a cute little dinosaur – very easy to make. He was so easy and fun to make that I’m tempted to make a whole bunch in a rainbow of colors. Wouldn’t that be fun?
Here are the first two ornaments in the Christmas Club collection.
You can still join at any time!
The club is closed now, but you can still get the patterns!
You know I love working with felt and designing things for kids – so that was an easy yes! 🙂
I love Christmas tree ornaments that also hold gifts! This mini stocking is about 6 inches tall – perfect for holding a gift card, some candy, a small toy, some jewelry, or any other little gift. Fun! It’s easy to make too! It’s all hand-sewing, so it’s perfect for toting around with you to stitch a little bit at a time. And the whole thing uses just one easy stitch – whipstitch. Ready to make it?
What you’ll need. . .
1/2 sheet wool-blend felt for the stocking. I used Babbling Brook from my shop.
scraps of wool felt for the reindeer. I used Tahitian Sunset for the face and ears, Sandstone for the antlers, and Barnyard Red for the nose.
embroidery thread to match the felt (I used DMC thread in 502, 3858, 3032, 816, plus black #310 for the eyes and mouth – also available in my shop)
small bit of baker’s twine or other yarn for the hanging loop
Instructions
Download the pattern here. Print or trace the pieces onto freezer paper. Fuse them to your felt and cut out the pieces. Leave a little extra seam allowance wherever the line is dotted (the base of the ears and antlers). That extra bit will tuck under other pieces for a neat finish.
Arrange the reindeer pieces on one stocking piece. The antlers and the ears should tuck behind the head just a bit.
Whipstitch the antlers and ears in place with 2 strands of matching thread. (Here’s a video showing how.)
Whipstitch the face and nose in place with 2 strands of matching thread. Using 4 strands of black thread, embroider the eyes and backstitch the mouth.
Use the baker’s twine to make a hanging loop in one corner. Done!
Like all Shiny Happy World designs – you’re welcome to sell items you make with my patterns, but please don’t sell or distribute the patterns themselves.
If you like this free pattern, sign up for the Shiny Happy News! Subscribers get a weekly newsletter full of sewing tips and tricks, free patterns, special discounts, and other things to make you smile. 🙂
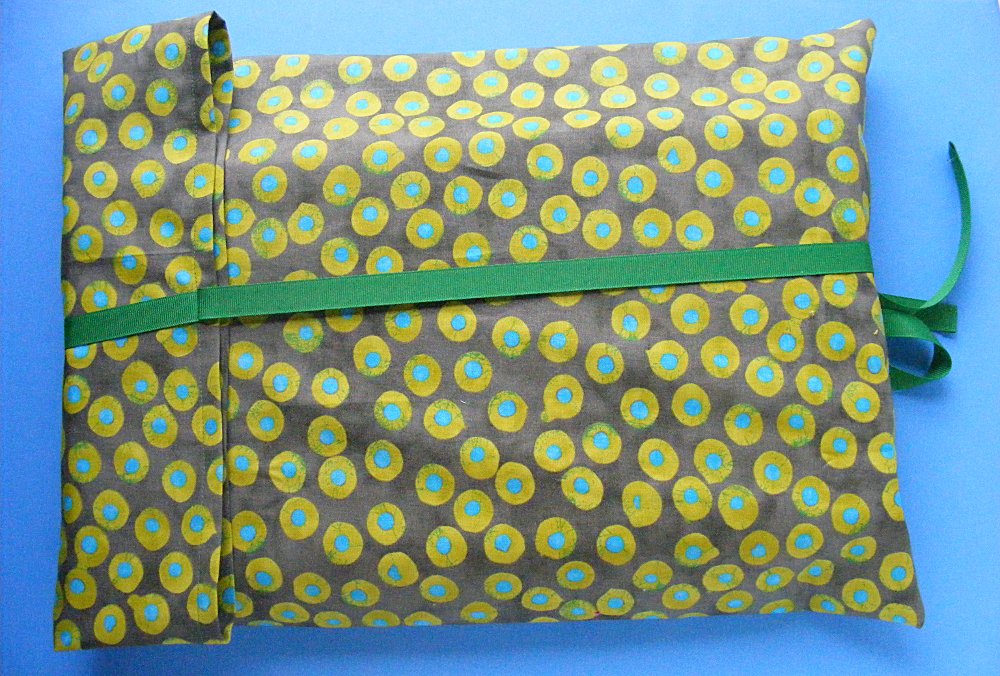
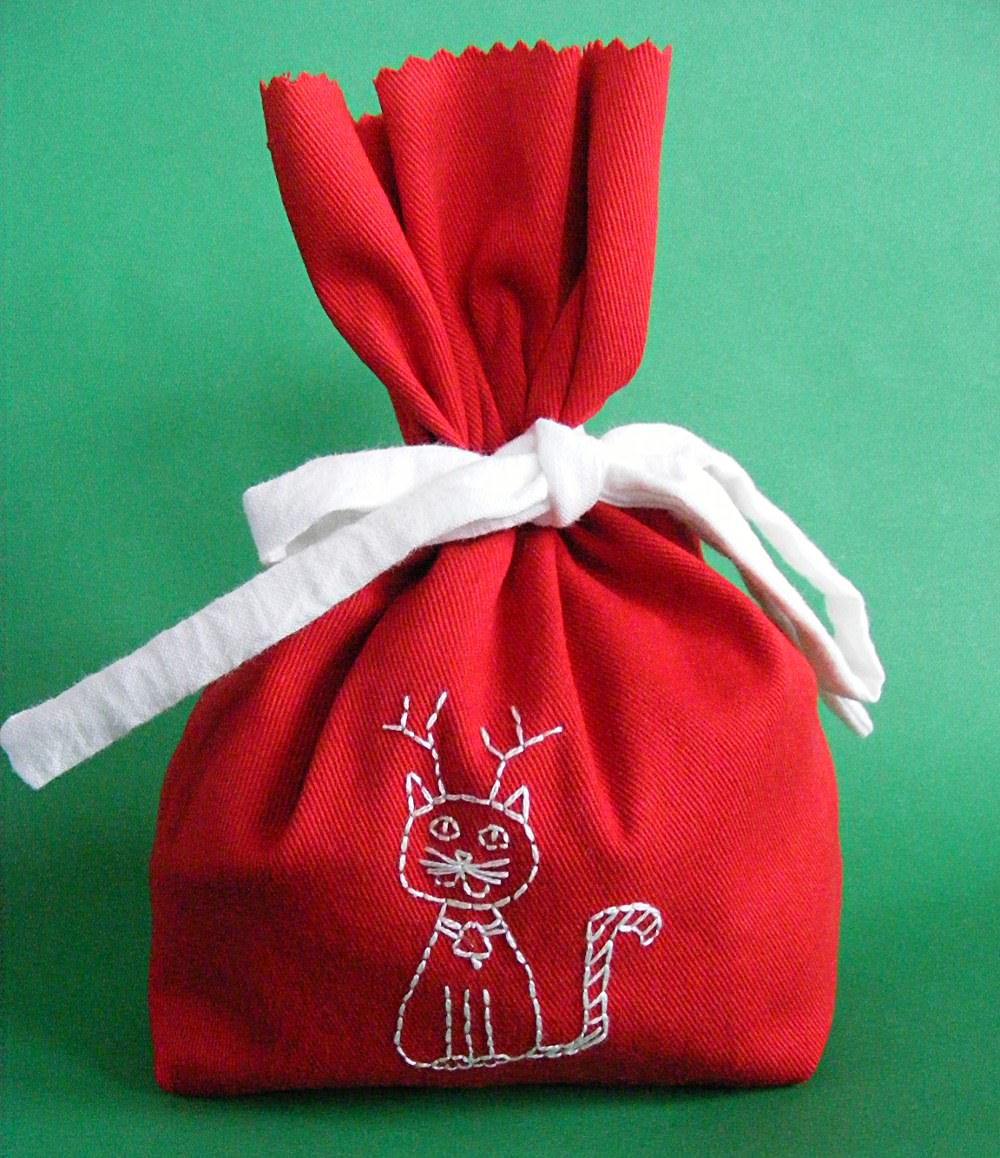
I don’t use paper gift wrap anymore. It’s expensive. It’s a pain to store. And the pile of it left after opening gifts always feels more than a little wasteful.
A couple of years ago I started making fabric bags for gifts. I love them! They’re so crazy easy to make – and they take no room at all to store when they’re not in use. Nice! Oh – and the ribbons are attached. No separate bows and no tape needed.
I make two different kinds. Ones that gather and tie at the top, like this one. . .
And ones that wrap around the gift and then tie, like this one. . .
Want to know how to make them? Be prepared for simplicity.
Cut two rectangles of fabric. Any size. I have a huge variety.
Sew them together around three sides (watch this video showing how to sew a straight line and turn corners if you’re a beginner). If you’re making the first kind of bag – the one that gathers and ties at the top – cut 1 yard of ribbon, fold it in half, and embed the fold in the side seam (video here), a few inches from the top of the bag. When you turn it right side out it will look like this. . .
If you’re making the second kind of bag, cut a ribbon 2 times the length of the bag plus an additional yard. Fold it in half and sew the fold at top of the bag in the center of one side. It should look like this. . .
Done!
Wrapping is easy. Pop in the gift. Fold the top of the bag over. Tie the ribbon. Here’s what it looks like from the back. . .
And here it is from the front. . .
I don’t stick to holiday-ish fabric – we use these for birthdays and other occasions too.
A lot of mine use grosgrain ribbon because I have a lot of it on hand from some aprons I used to make and sell. But sometimes I use pretty gauzy ribbon.
Any fabric. Any ribbon. It all works well, looks pretty and folds up to store easily. Love!
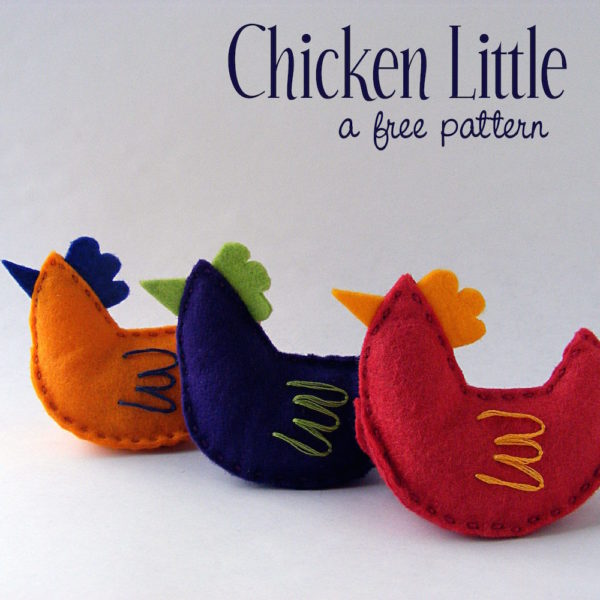
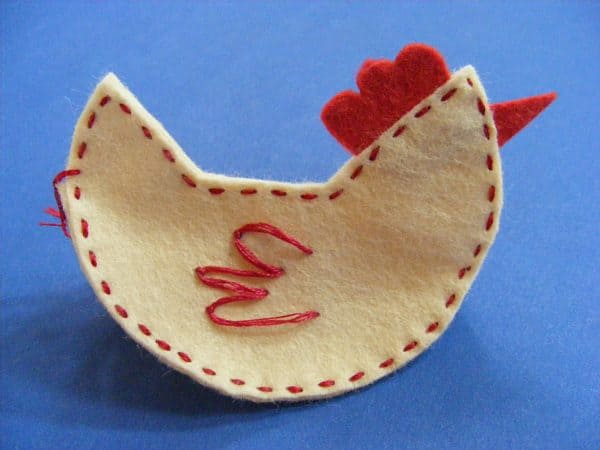
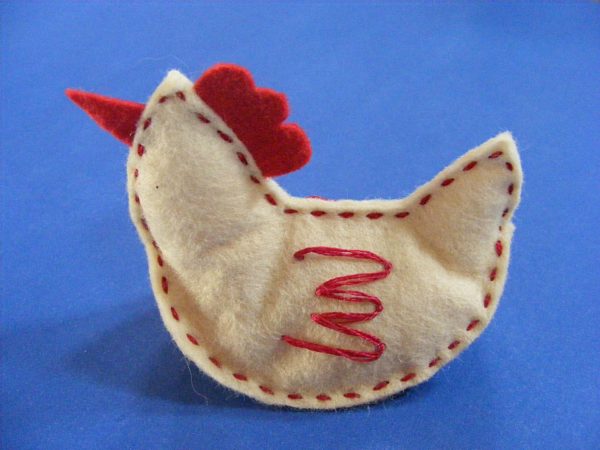
Make a sweet little softie with this free felt chicken pattern.
These simple little hens can be so many things!
Fill them with heavy aquarium gravel and you have some pretty dang fancy pattern weights.
Fill them with lightweight Poly-fil Stuffing and add a loop to the back and you have a pretty ornament for your tree.
Fill them with plastic pellets and you have a pocket-sized softie that sits in the palm of your hand.
These felt chickens are hand-sewn from scraps and a bit of embroidery thread and take about an hour to make. Want a little quiet handwork for couch-potato time? This is the perfect project. And it’s FREE!
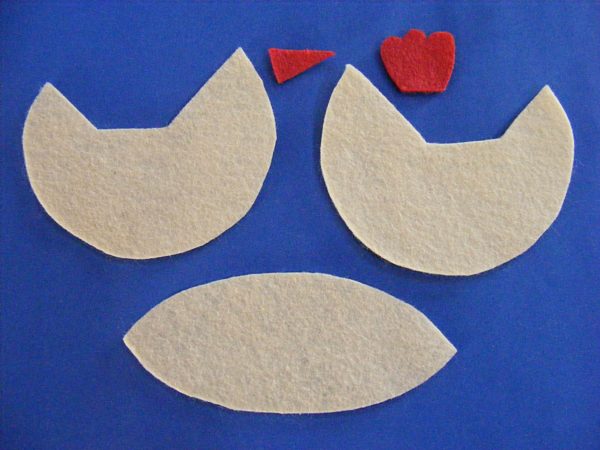
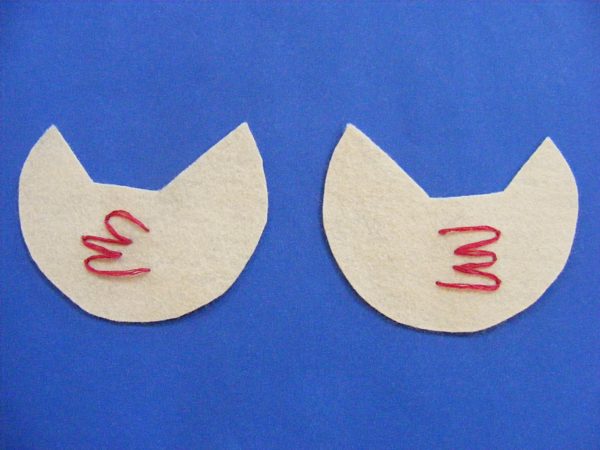
Cut out all the pieces. I don’t like to trace onto felt, because I don’t want even a tiny bit of that marking line to show on the finished piece. I trace or print my pattern pieces onto freezer paper, cut them out roughly, fuse them to the felt, and then cut around the edge.
It’s a nice way to cut clean, precise shapes.
Step 2
You’ll need two body pieces, one gusset, one beak, and one comb.
Step 3
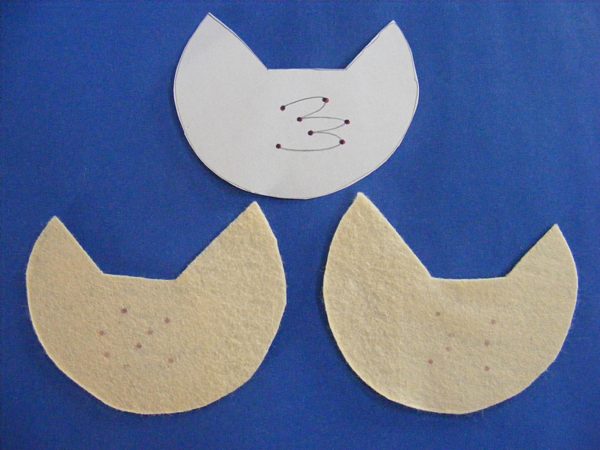
Transfer the dots you’ll use as guidelines for stitching the wings.
I don’t like to draw the whole wing shape because the thread of my Ustitches might not sit right on that line, so I just mark the dots where each stitch will start, stop, and be tacked down.
Step 4
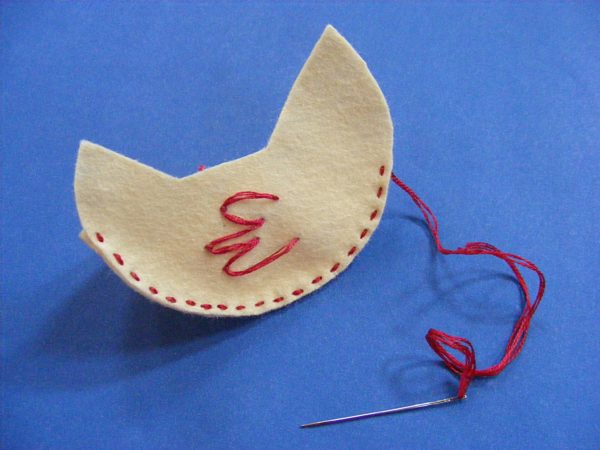
Stitch the wings in a contrasting color (I like to match the beak and comb color) using the U-stitchand four strands of embroidery thread.
If you want really precise lines you can use backstitch, split stitch, or stem stitch, but the tight curves at the tips of the wings won’t be loads of fun in any of those stitches.
Step 5
Lay the gusset along the bottom edge of one of the body pieces and stitch the two layers together using a running stitch and four strands of thread. If you use 36 inches of thread you’ll have enough to sew the whole hen without having to knot off and start a new thread. Sneaky. :)
I would normally use thread that matches
the chicken body. I used contrasting here
just so you could see it better.
You could use whipstitch instead of running stitch - choose the look you like.
Step 6
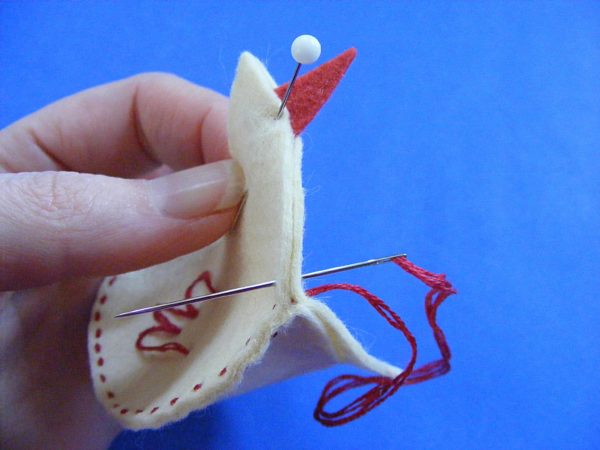
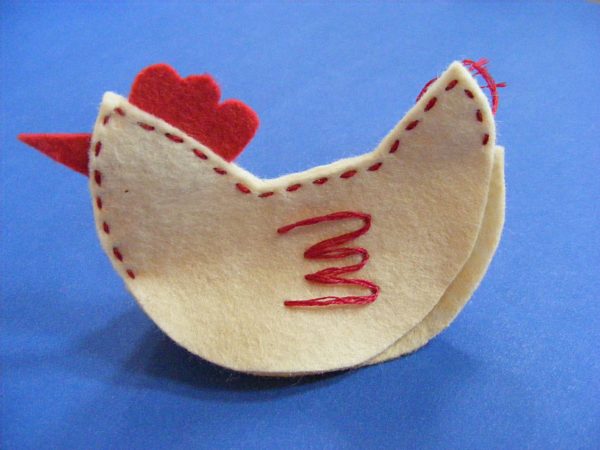
When you get to the end of the gusset piece, layer the second body piece with the first one.
Pin the beak between the two layers and start stitching your way up the front of the hen’s face.
Step 7
Stitch up to the top of the hen’s head.
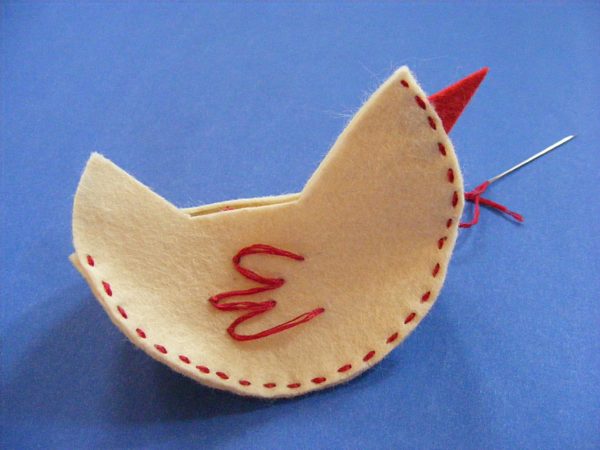
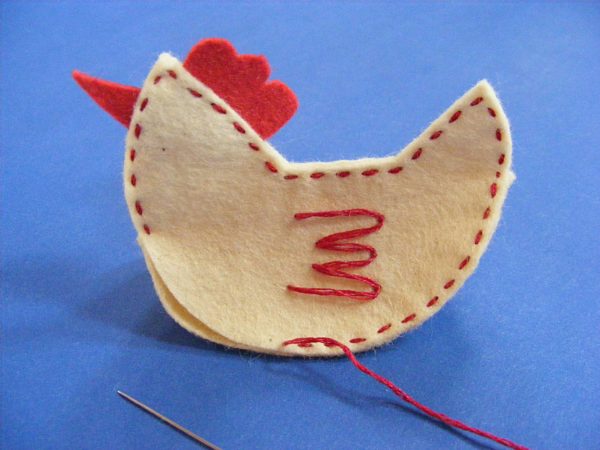
Step 8
Slip the comb in between the two layers at the back of the head and stitch the rest of the way across the top of the body.
A little felt chicken – all finished. Right? It looks like it’s done, doesn’t it?
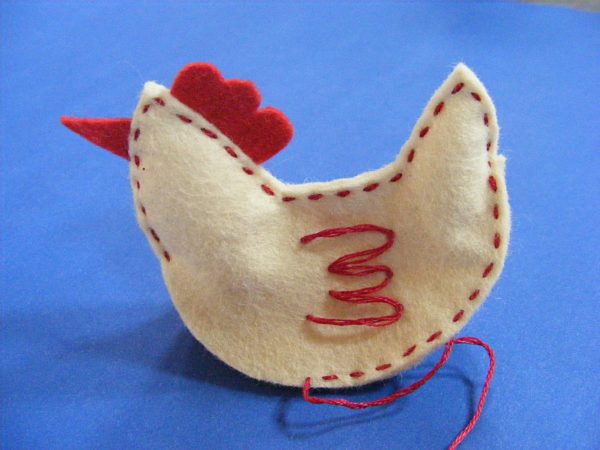
Step 9
Not quite. Turn it around and you can see that you still need to sew the bottom part of the other side of the body.
Line up the body edge with the gusset edge and keep stitching.
Step 10
Sew most of the way along the bottom edge.
When the opening is just big enough to slip your thumb inside, stop stitching but leave your thread tail there. I even leave it threaded on my needle.
Step 11
Tuck a tiny pinch of Polyfil stuffing in the head and another in the tail. Work it right up into the points.
If you’re making a tree ornament, fill the
whole body with Polyfil stuffing.
If you’re making a pattern weight, add two
tablespoons of aquarium gravel.
If you’re making a softie, add two
tablespoons of plastic pellets.
Step 12
Pick the needle and thread back up and finish stitching across the bottom of the chicken. Tie a knot and bury the tail inside the hen.
You’re done! Better make another - chickens don’t like to live alone. Now even felt chickens!
Happy stitching!
Play with some felt! Try the Oddballs – a fun pattern for silly monsters.
The Joel, of course, is Joel Henriques, the amazing dad who blogs at Made by Joel and author of Made to Play – a book showing you how to make tons of great, creative handmade toys.
Want to make a Christmas gift bag yourself? It’s easy!
They’re fun on their own, but look what you can do when you mix them together!
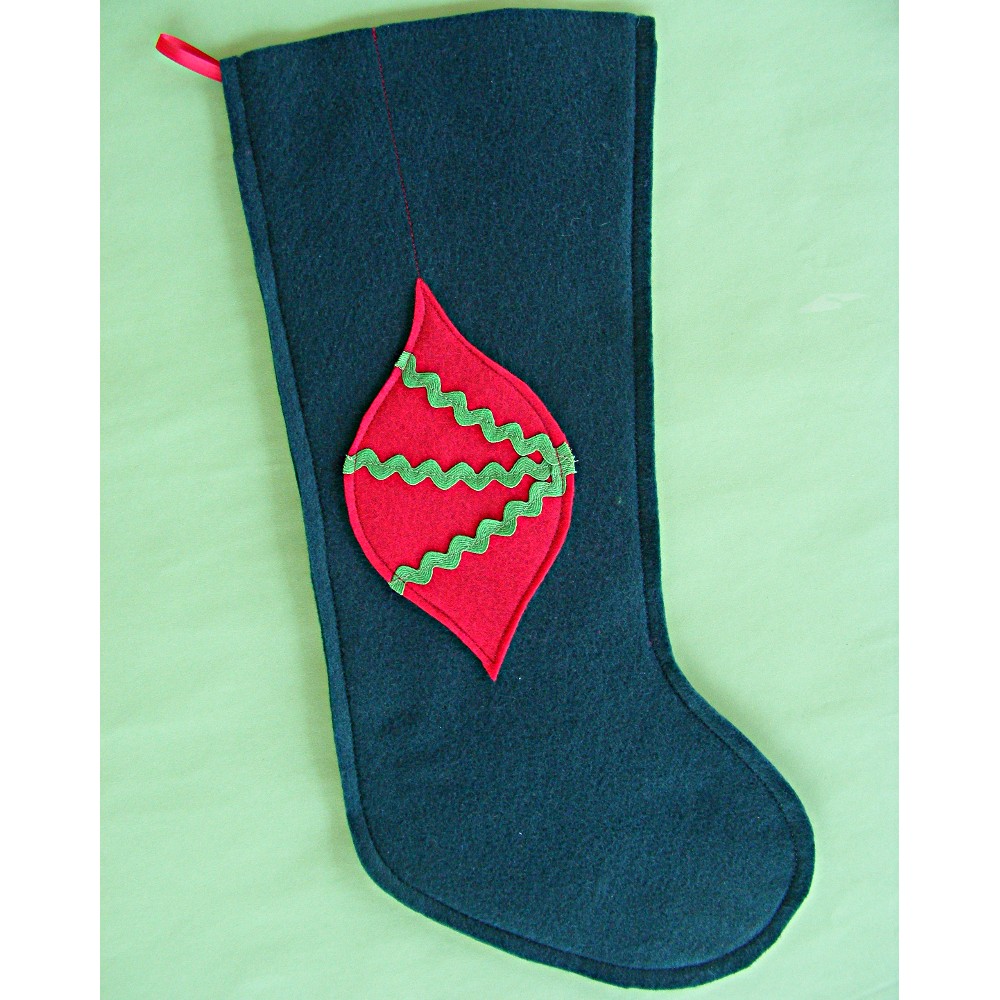
We’ll start simple. Sew some rickrack onto the ogee and sew the ogee to the stocking. If you want to get fancy you can run a line of stitching from the top point to make it look like it’s hanging. This stocking will take maybe 20 minutes to make and it’s very easy for a beginner.
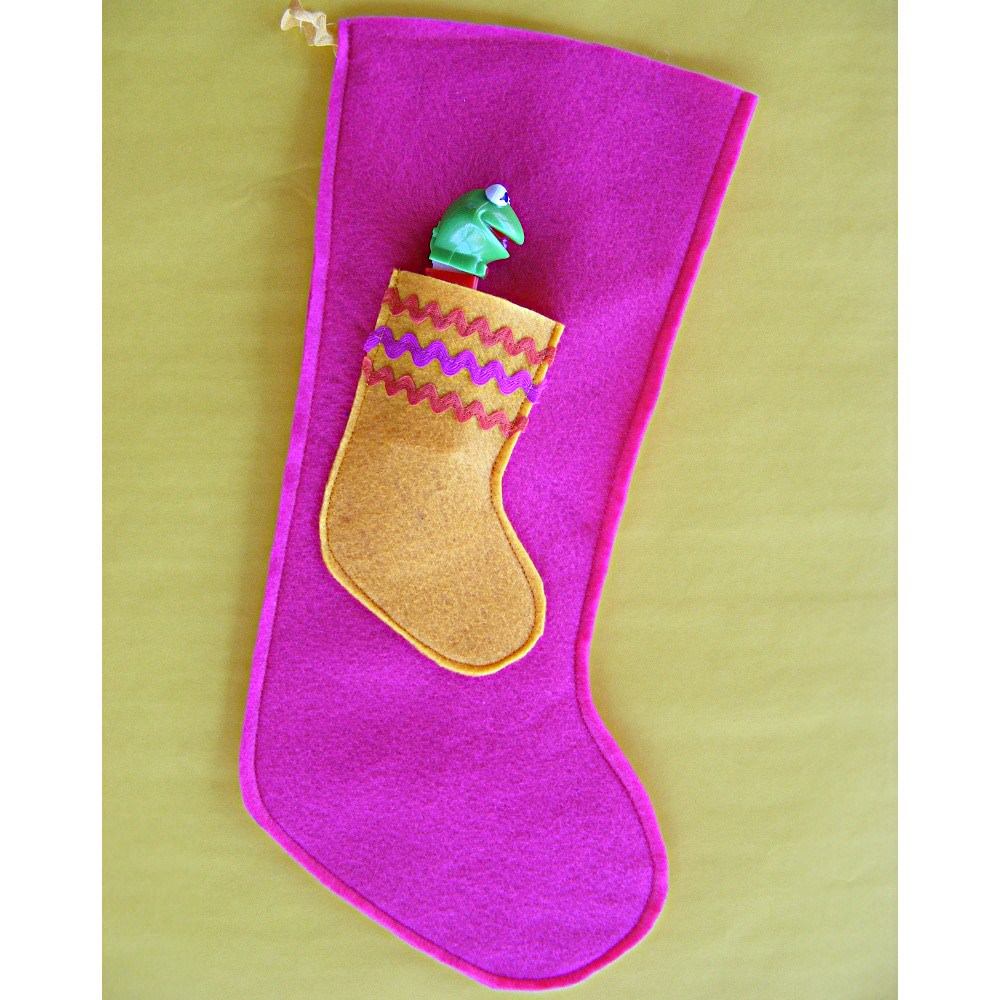
Here’s another super simple one – and one of my favorites. Stitch the little ornament-sized stocking to the regular sized stocking but leave the top unstitched. Now you have a stocking with a stocking-shaped pocket on it, perfect for holding a little Pez dispenser or a couple of lollipops or a small toy. Cute!
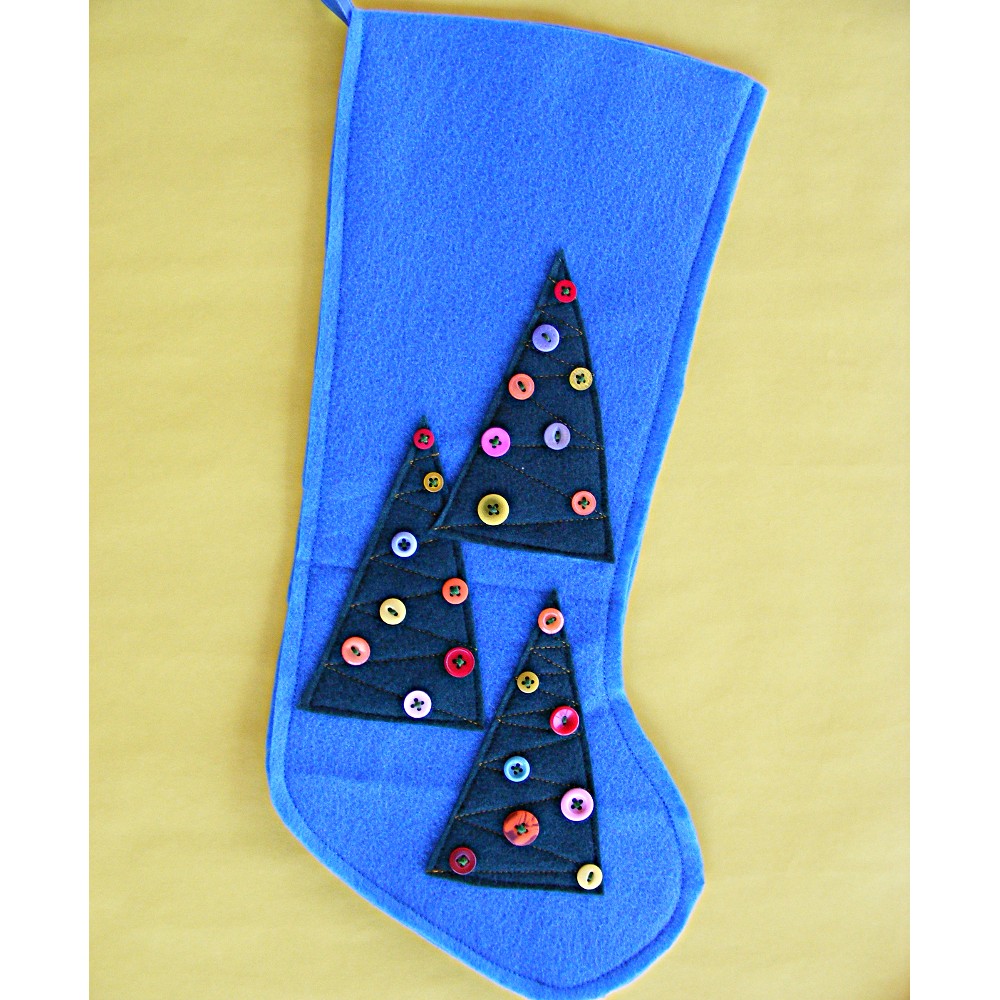
You don’t have to limit yourself to just one felt applique. For this stocking I cut out three tree triangles from the ornament patterns, stitched them to the stocking with a little swaggy zigzag action, then added random buttons. A forest of decorated trees!
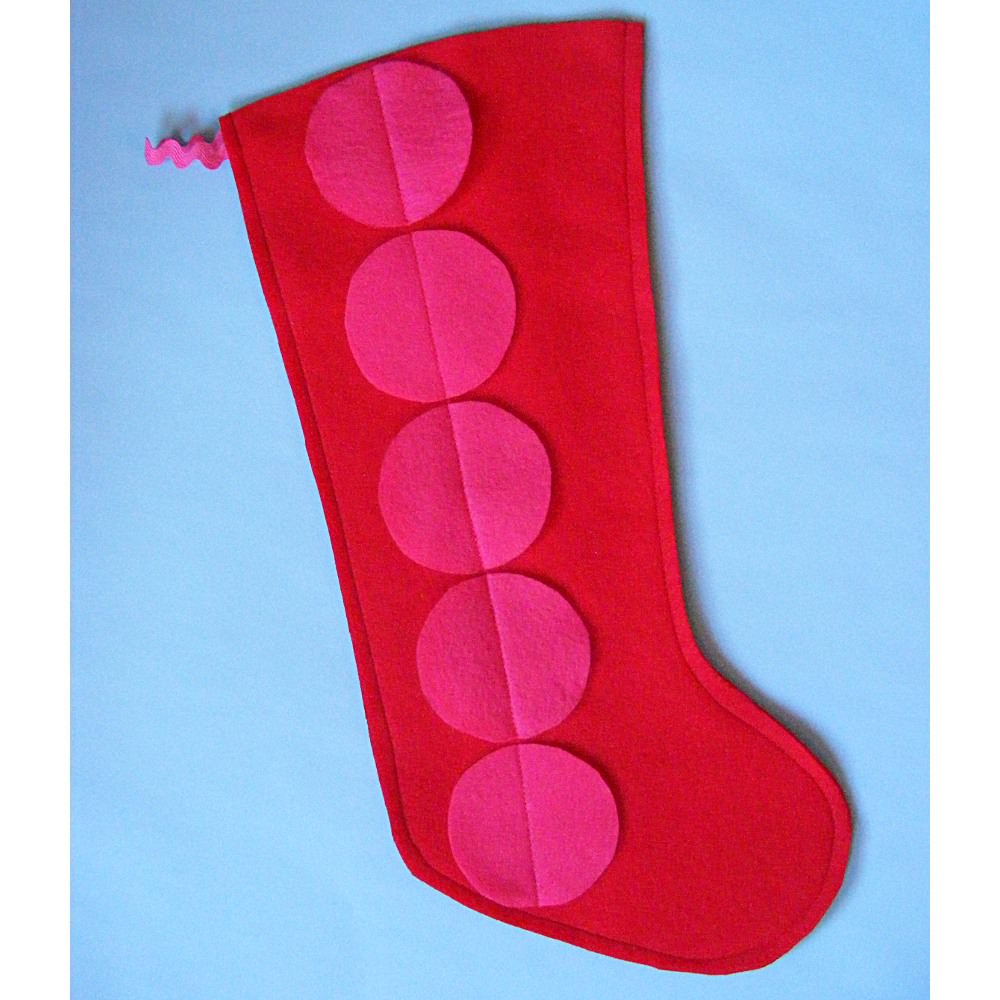
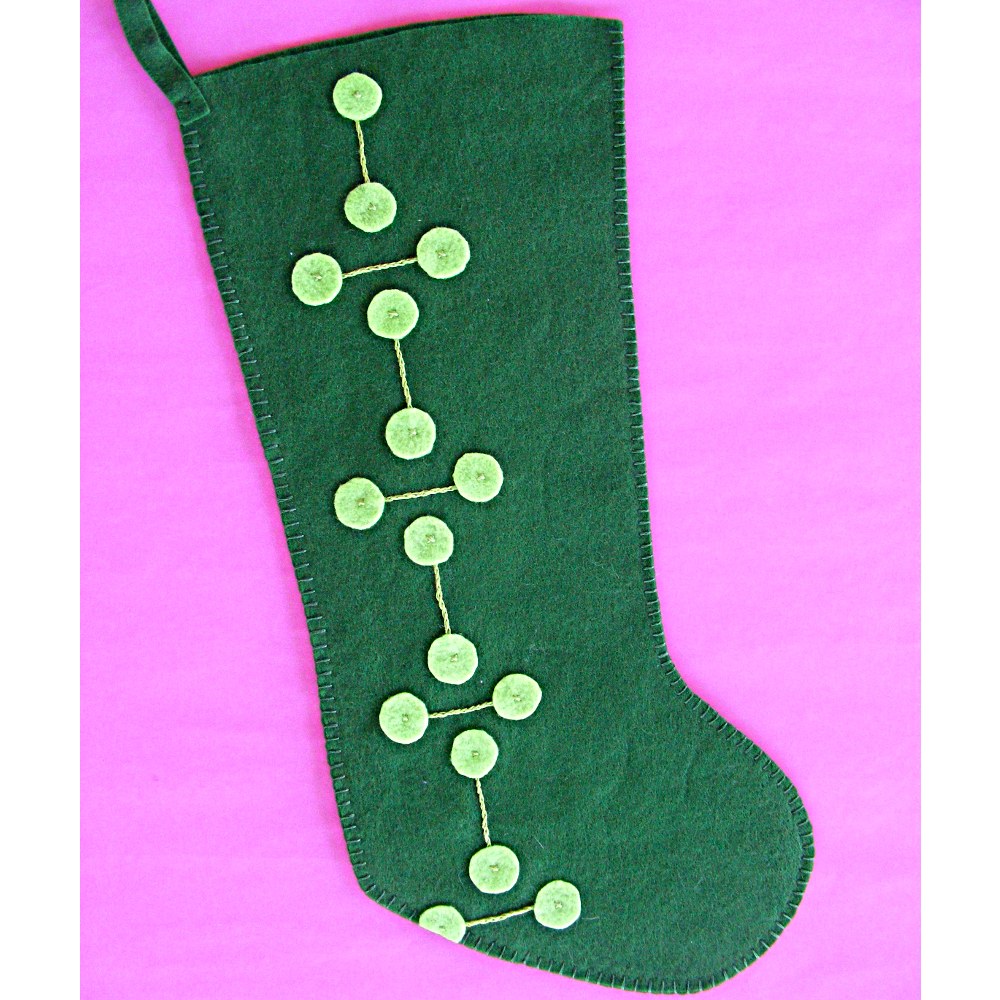
You can fit exactly five of the large ornament circles in a stack up the side of the stocking. Lay them in place, stitch one row of stitching up the middle, and you’re done.
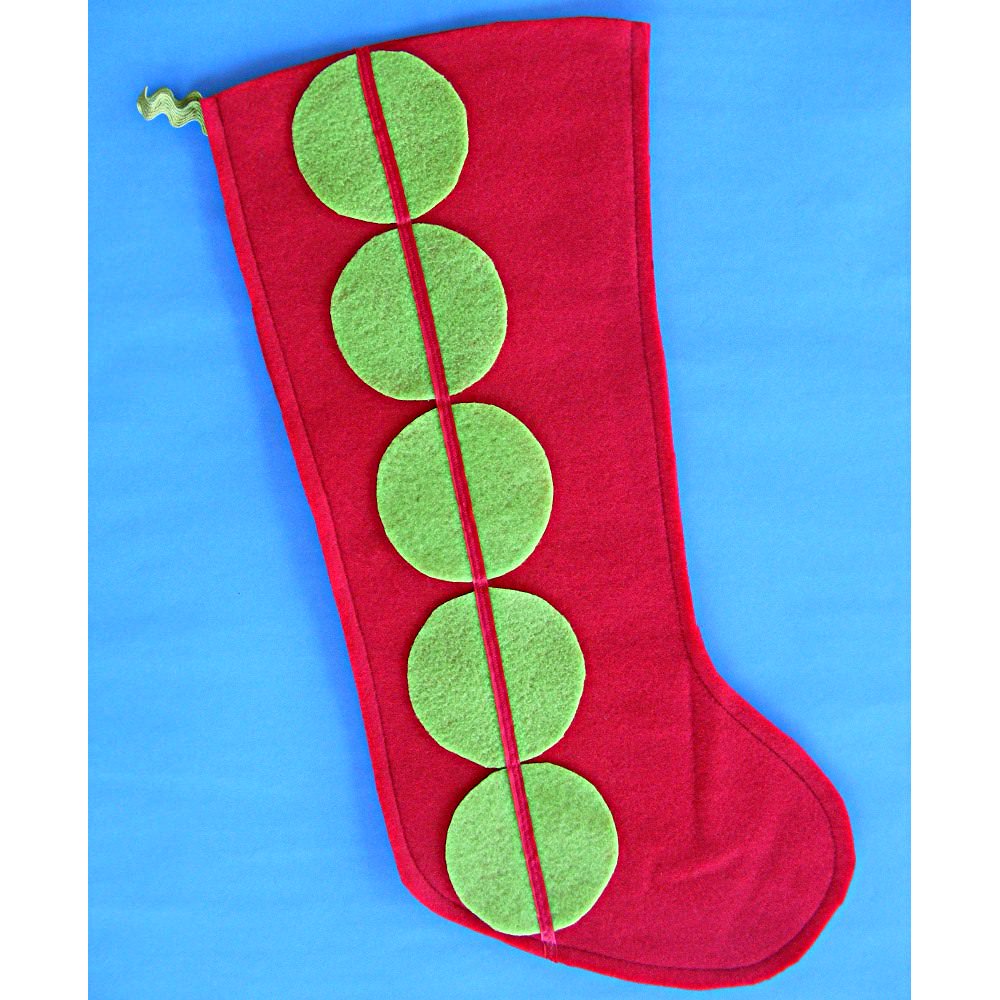
Here’s a variation with a more well-defined stripe. Instead of simply stitching up the middle of the dots, I laid a strip of satin ribbon down the center and then stitched over it. Easy peasy!
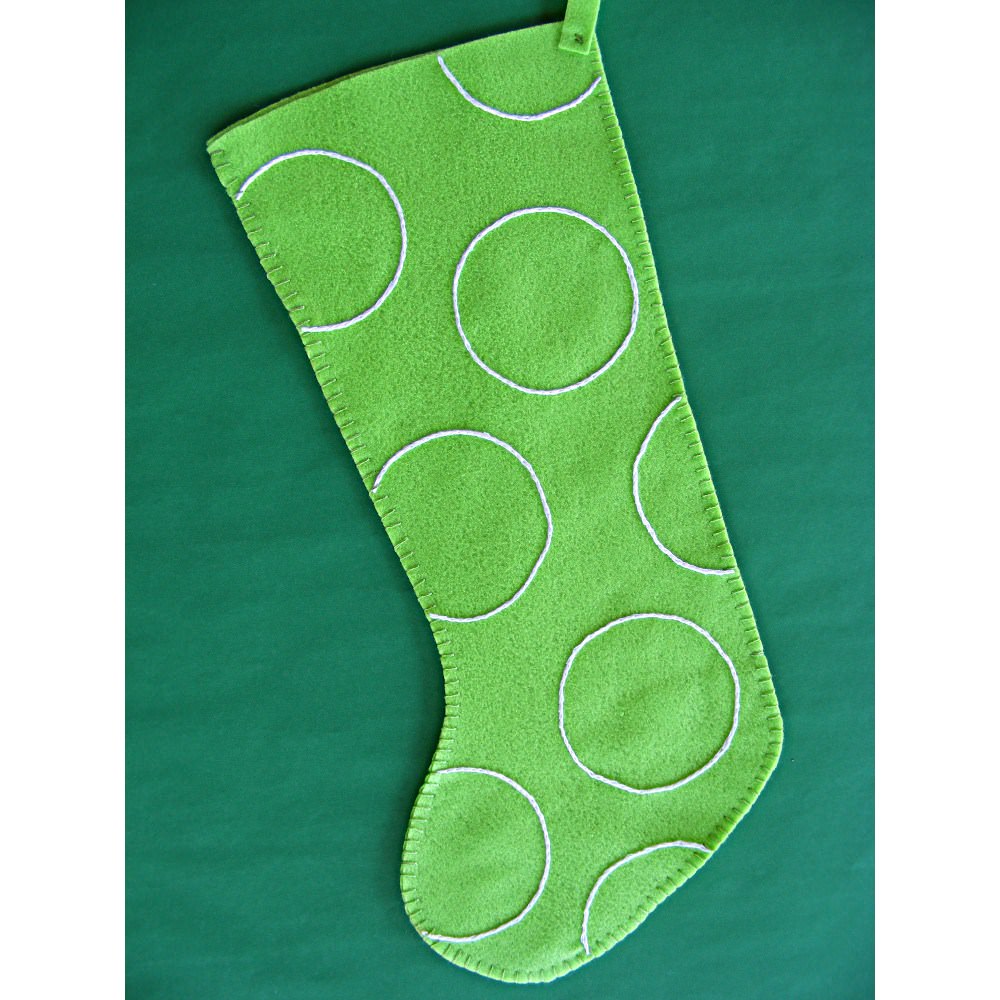
Forget about felt applique! For this one I didn’t sew down the big dots – I just used one as a pattern. I traced around it (randomly scattered over the stocking) and embroidered the circles with split stitch in white thread. Doesn’t it look minty fresh?
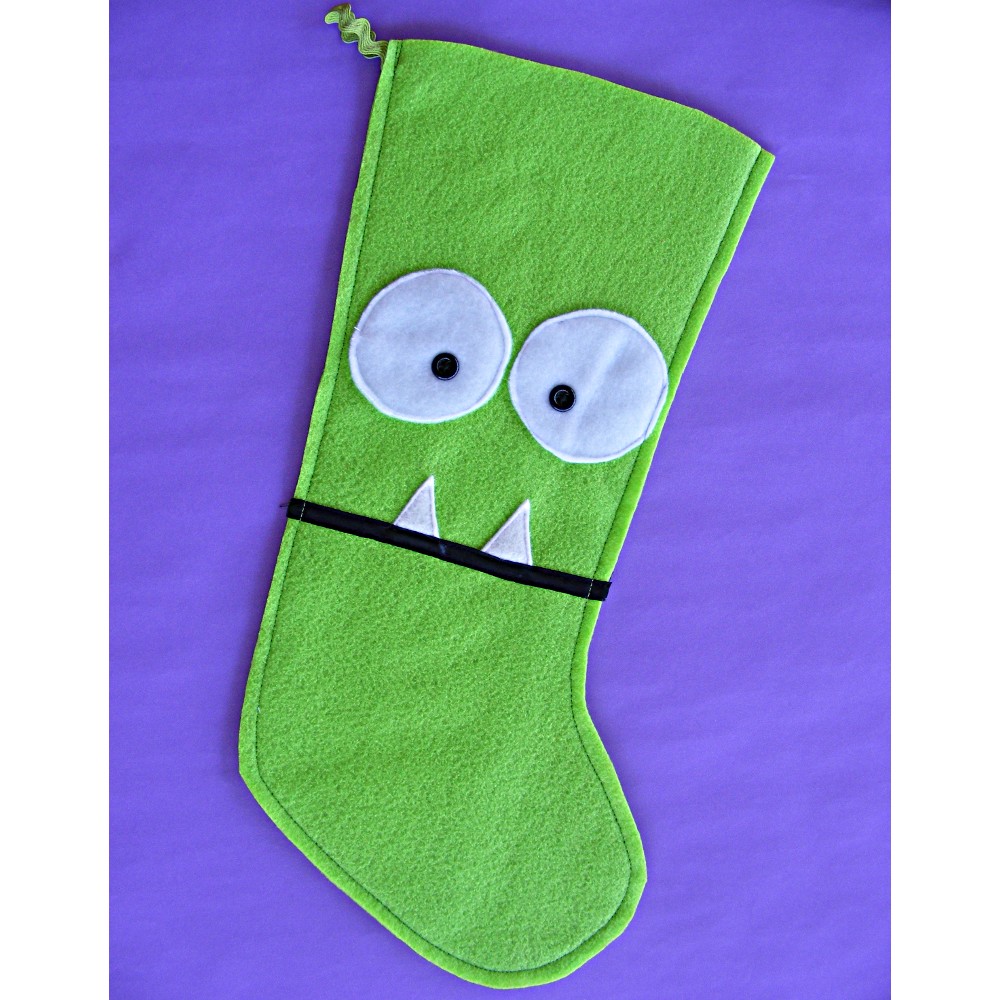
And then there’s this beauty! The big ornament circles make great eyeballs, no? The black strip for the mouth is a bit of satin ribbon, and the teeth are simply felt triangles tucked behind the ribbon before stitching.
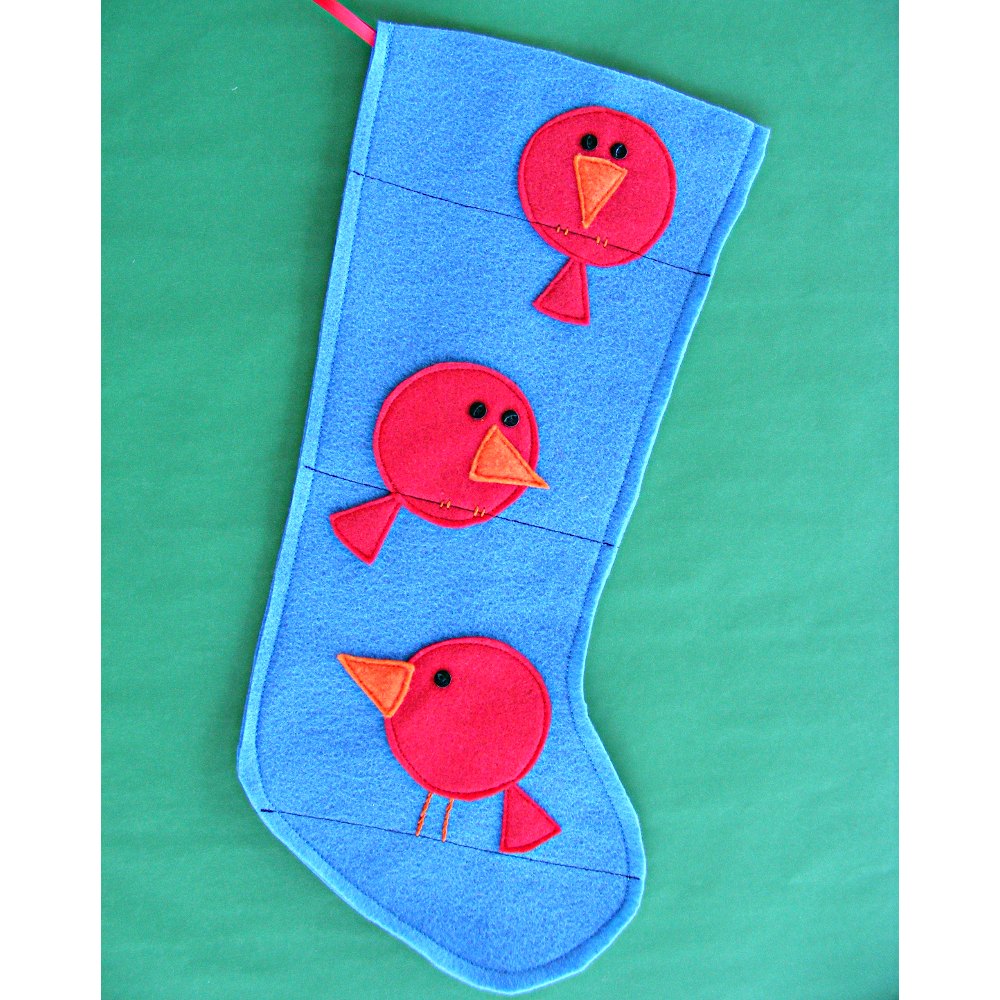
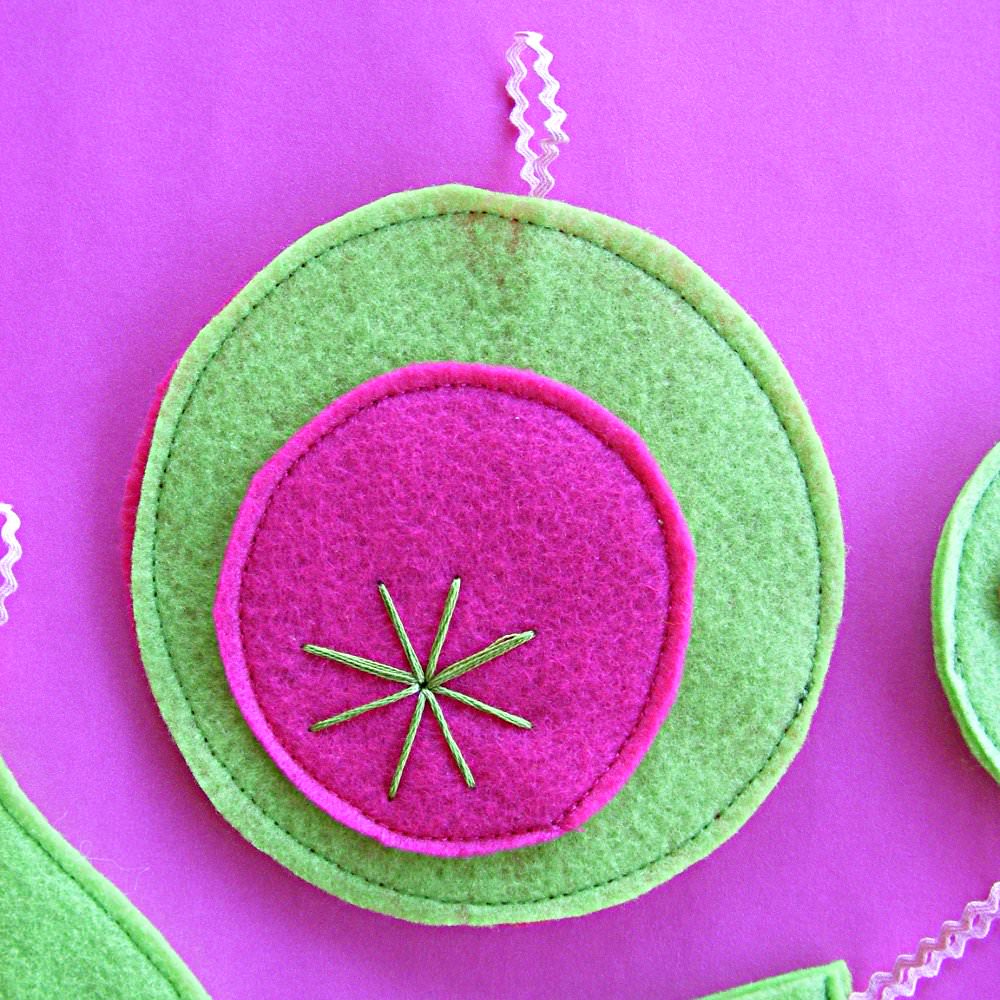
And now – my favorite. I used the big circles from the ornament pattern – and Ed Emberley’s Picture Pie: A Cut and Paste Drawing Book. Those three birds are straight out of the book – and it’s filled with other cool pictures too, all made from circles.
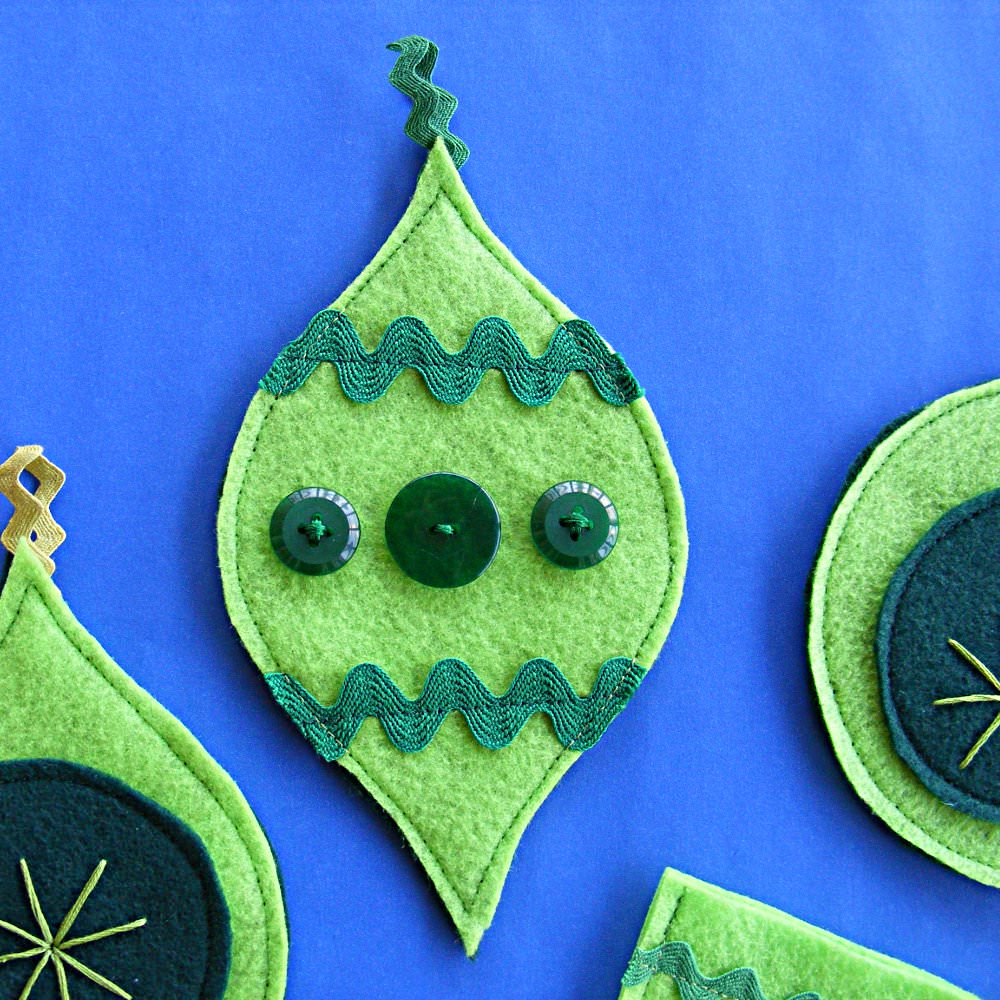
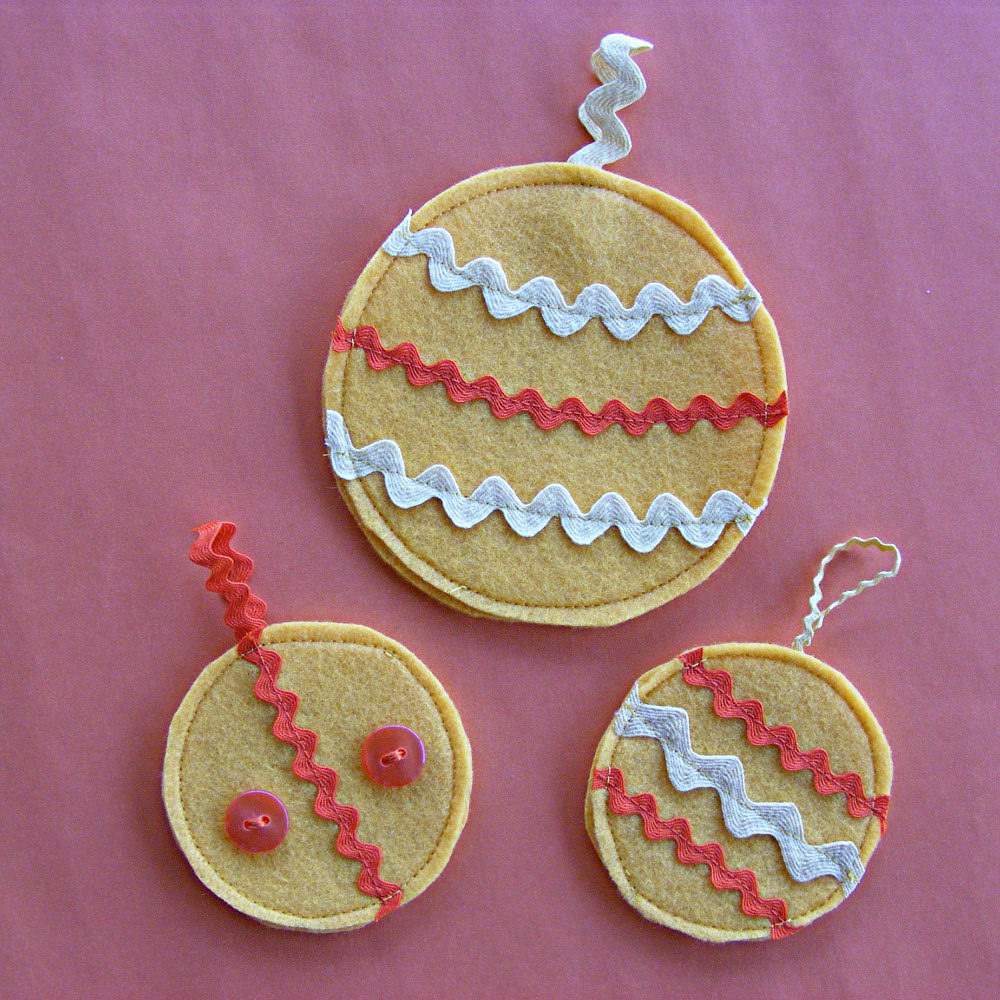
But now. . . ornaments. The pattern (click here to download) includes some really basic shapes – a tree, a stocking, an ogee, and two circles. The fun comes with what you do with these basics.
Add rickrack. (Boy – do I love rickrack or what?)
Add buttons!
Add fancy vintage trim!
Layer them together with a bit of really simple embroidery!
Don’t feel like you’re tied to traditional colors. I love these yellow and orange ones! (Especially nice too for folks who celebrate solstice.)
Download the free pattern. Gather up your tiny scraps of trim, your odd beads and buttons, your little bits of yarn – and have fun! These shapes are really simple and fun for kids to play with too. Put on some Christmas carols, serve up some cookies, and let them sew the rickrack on with the machine (nice easy straight lines). They – and you – will have a blast. I promise.
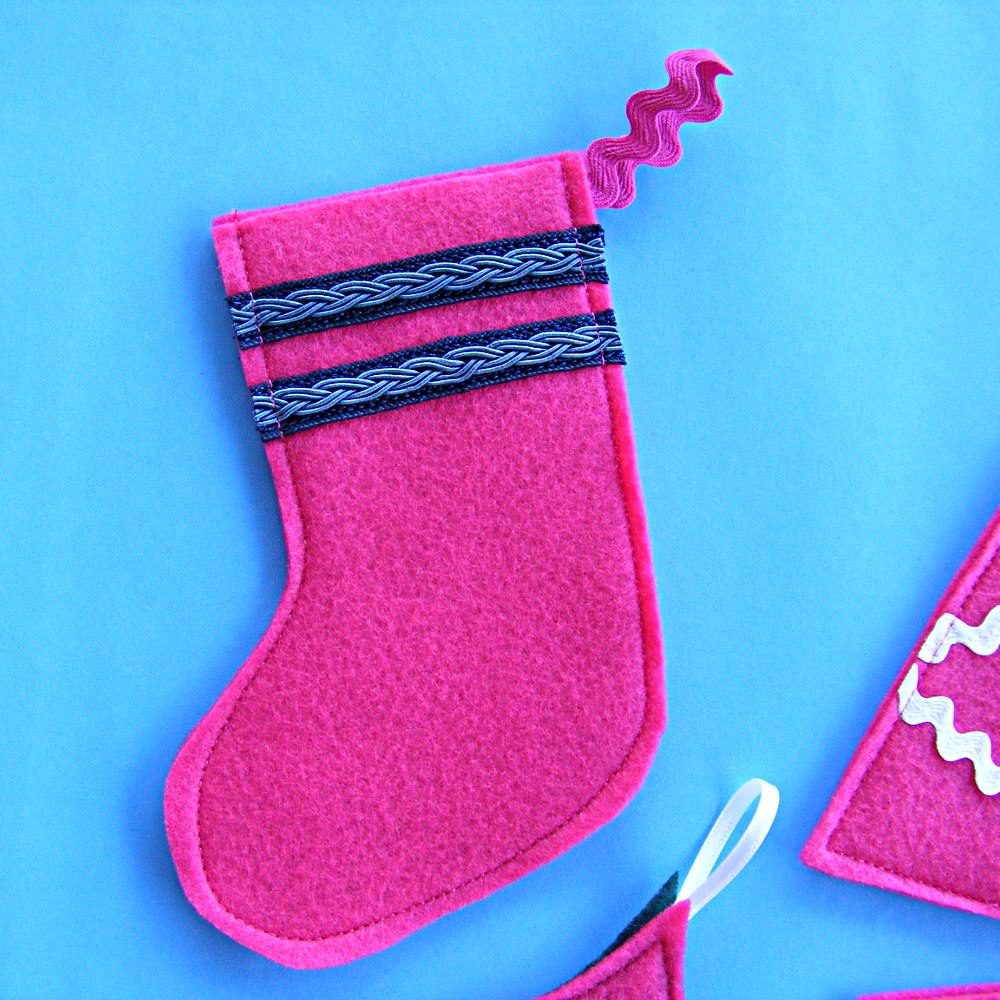
Planning to make any holiday stockings this year? Here’s an easy peasy pattern – and it’s free! Click here to download.
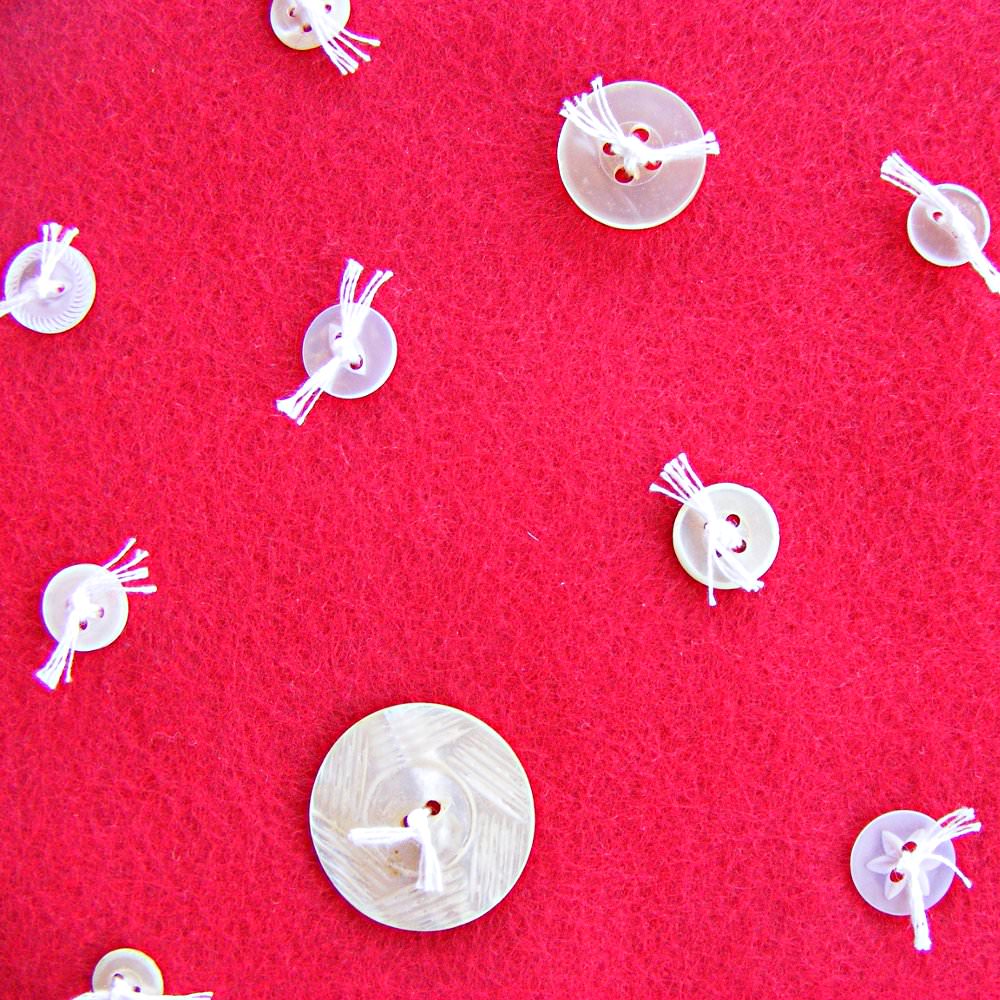
The pattern is for a basic stocking made from felt and takes less than an hour to make. But (of course) you’ll want to fancy it up a bit. 🙂 The one on the pattern cover just has a bunch of inexpensive pearly buttons stitched on it – with the thread tails visible.
See?
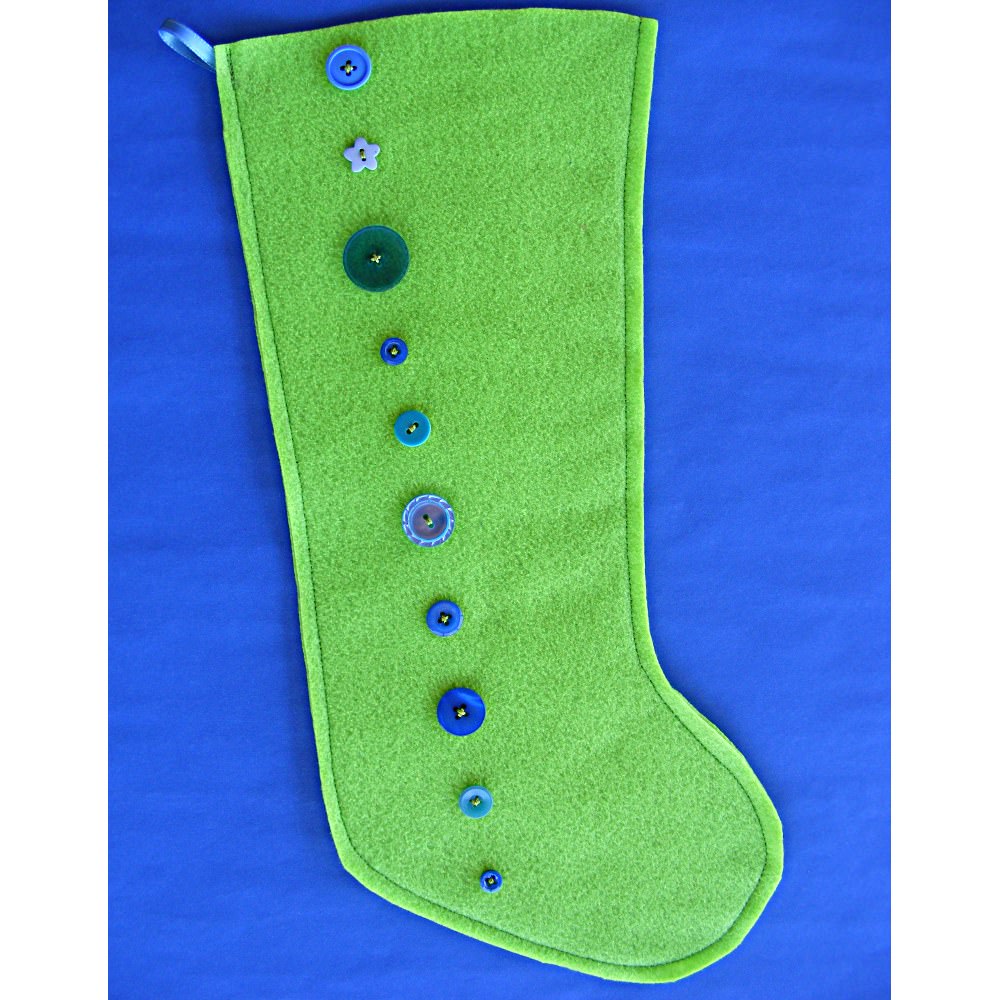
Or use just a handful of buttons in a vertical stripe.
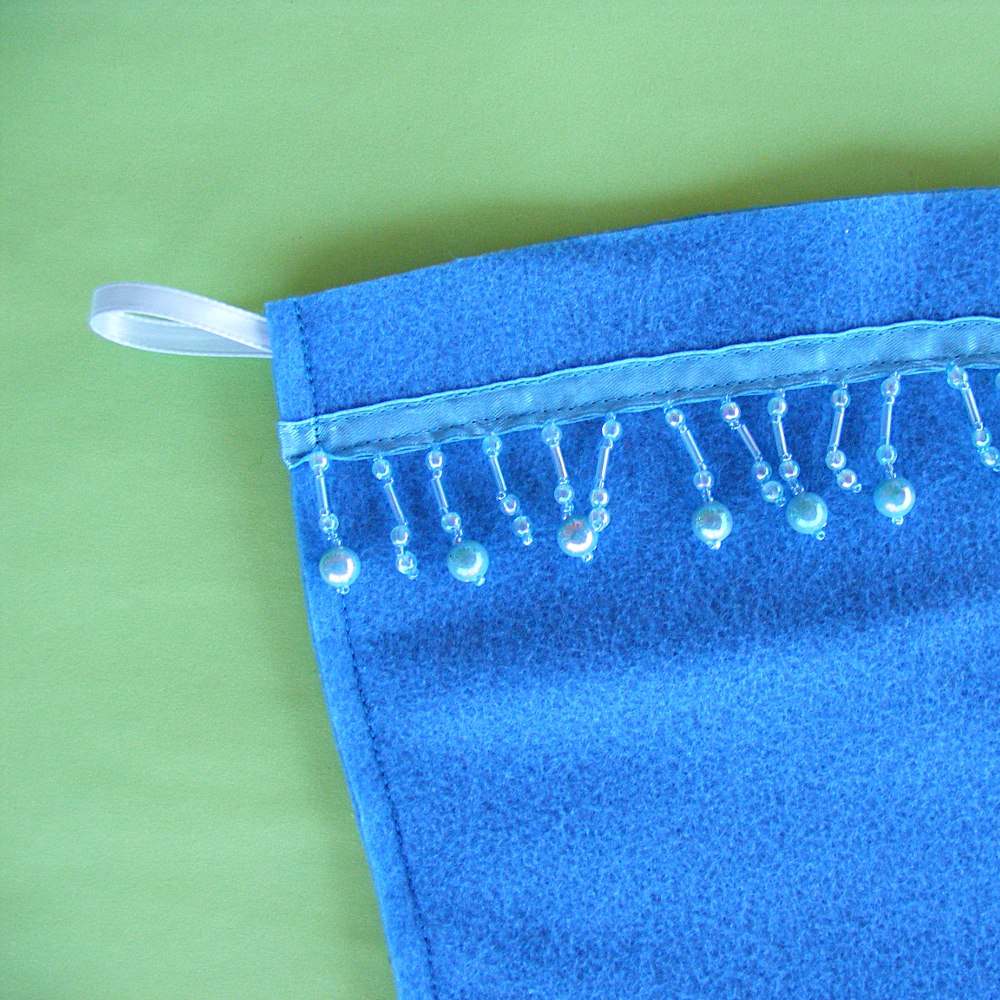
Beads are always nice – and beaded trim is super easy. You’ll still finish this one in under an hour.
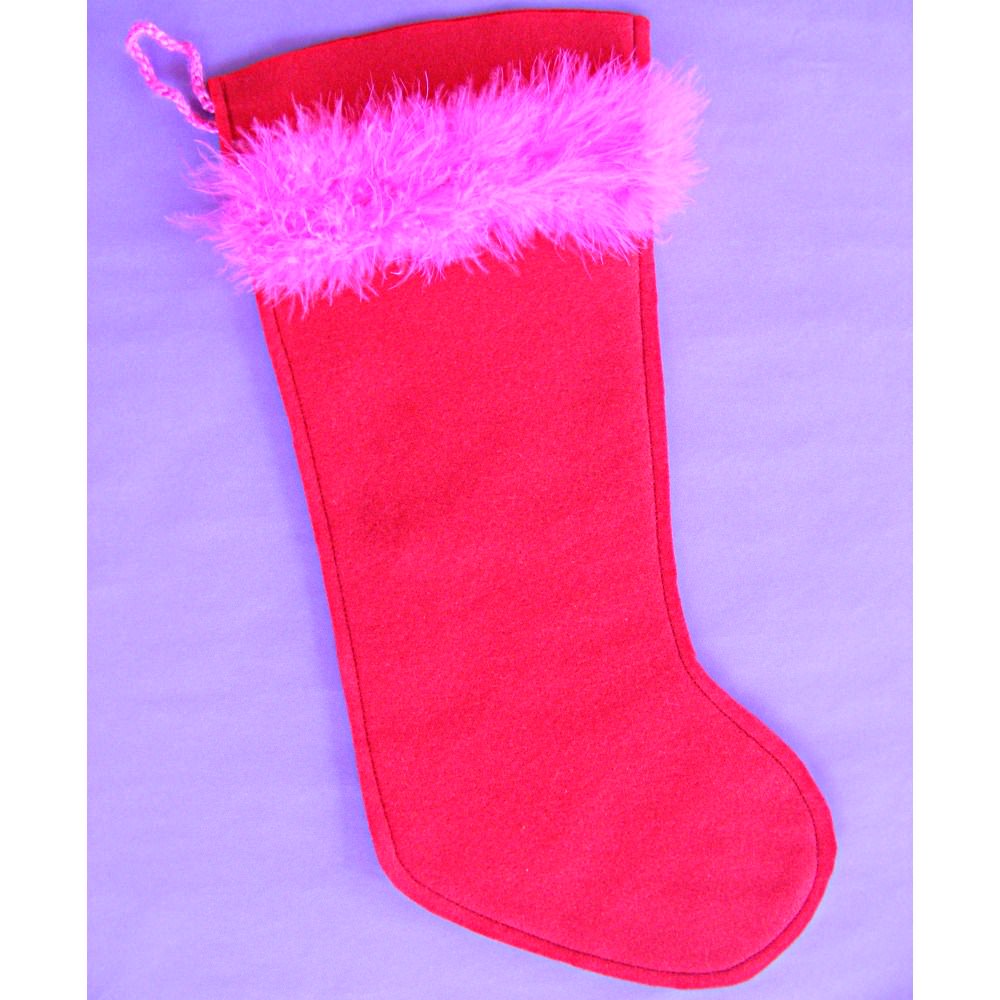
This one has a strip of feather boa across the top. Ooh la la!
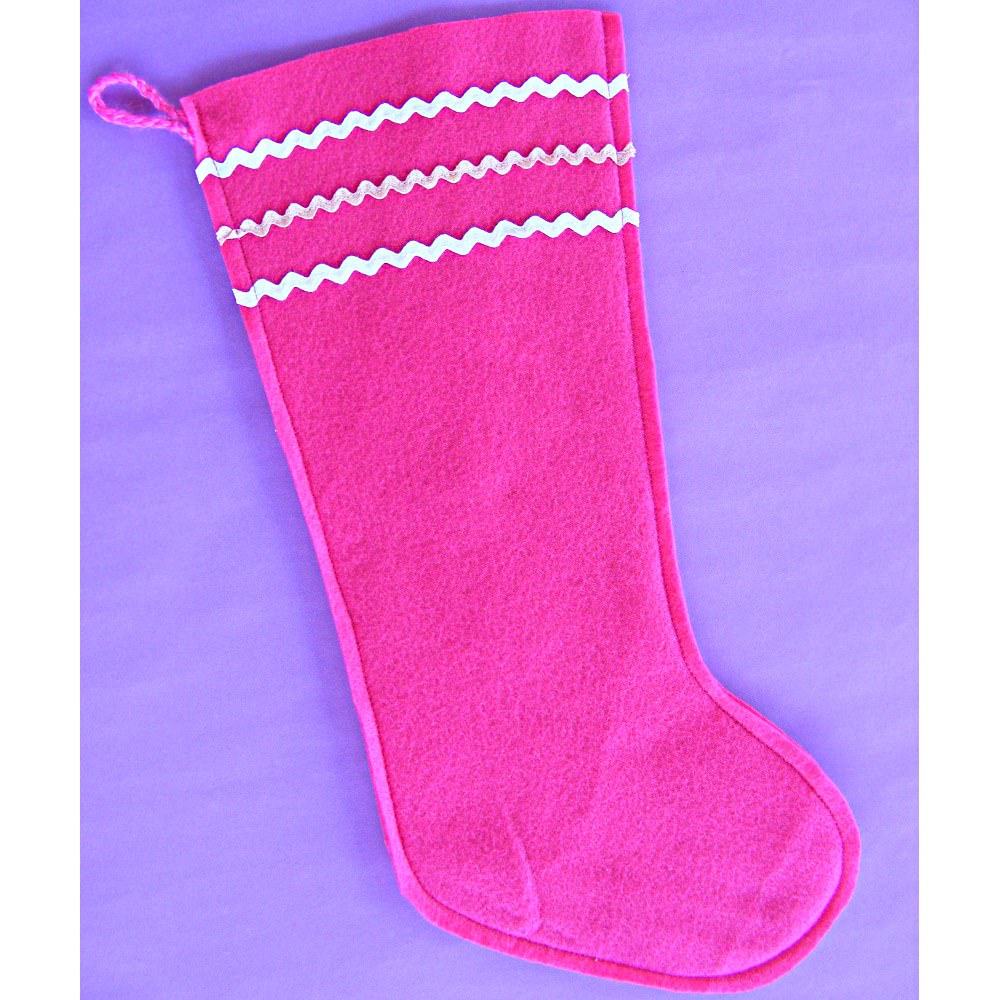
How about some rickrack? A couple of bands across the top are nice. . .
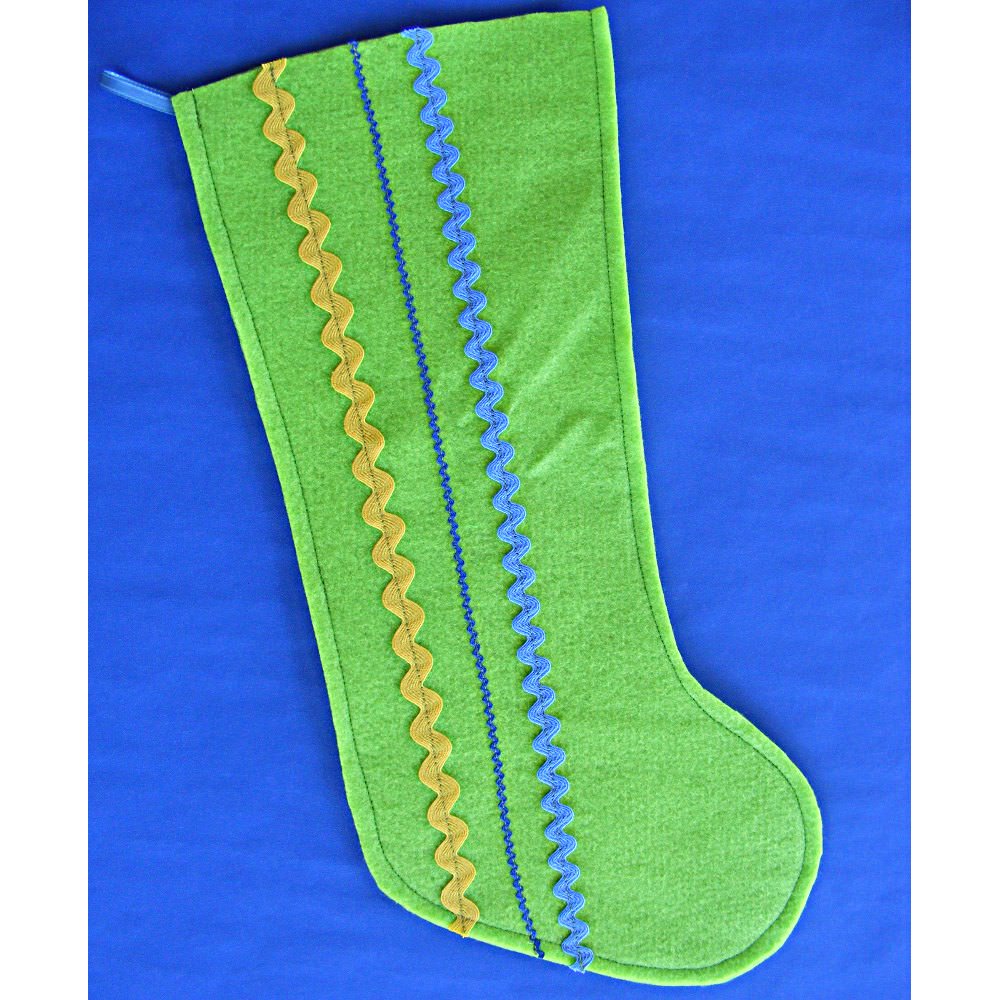
But vertical stripes are good too.
For this one I cut some dots out of felt (traced around a quarter for the size) and then laid them out and embroidered lines between them.
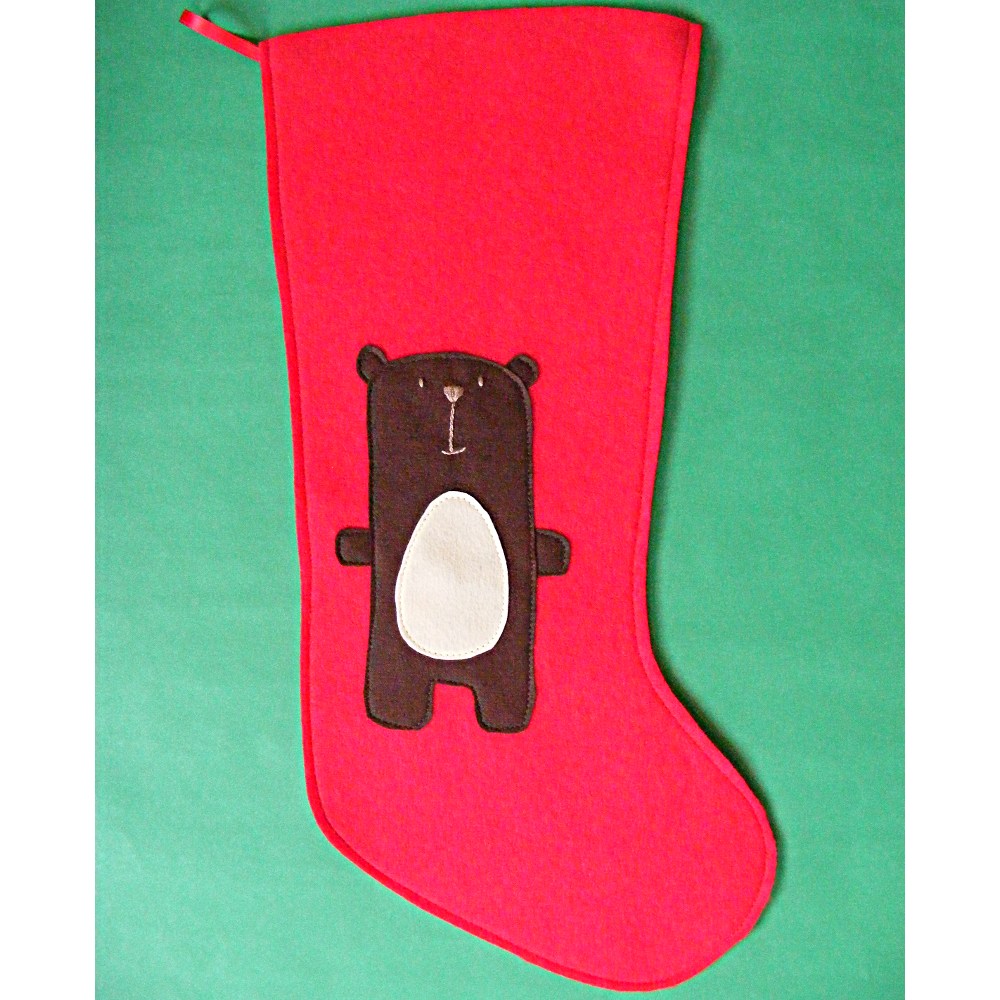
And here’s one with fancier applique (but still easy). You could do the same thing, using one of my appliqued animals quilt block patterns. How about embroidering on a stocking? One of the puppies or kitties would be really cute! So would one of the Rainbow Girls! Or one of the birds from the Bird Sampler! And did you know you can turn any embroidery pattern into an applique pattern?
The finished stocking is just a smidge over 17″ tall – a good basic size.
So there you have it – a bunch of swell stockings! Download the pattern and make one this year.


 Done!
Done!