


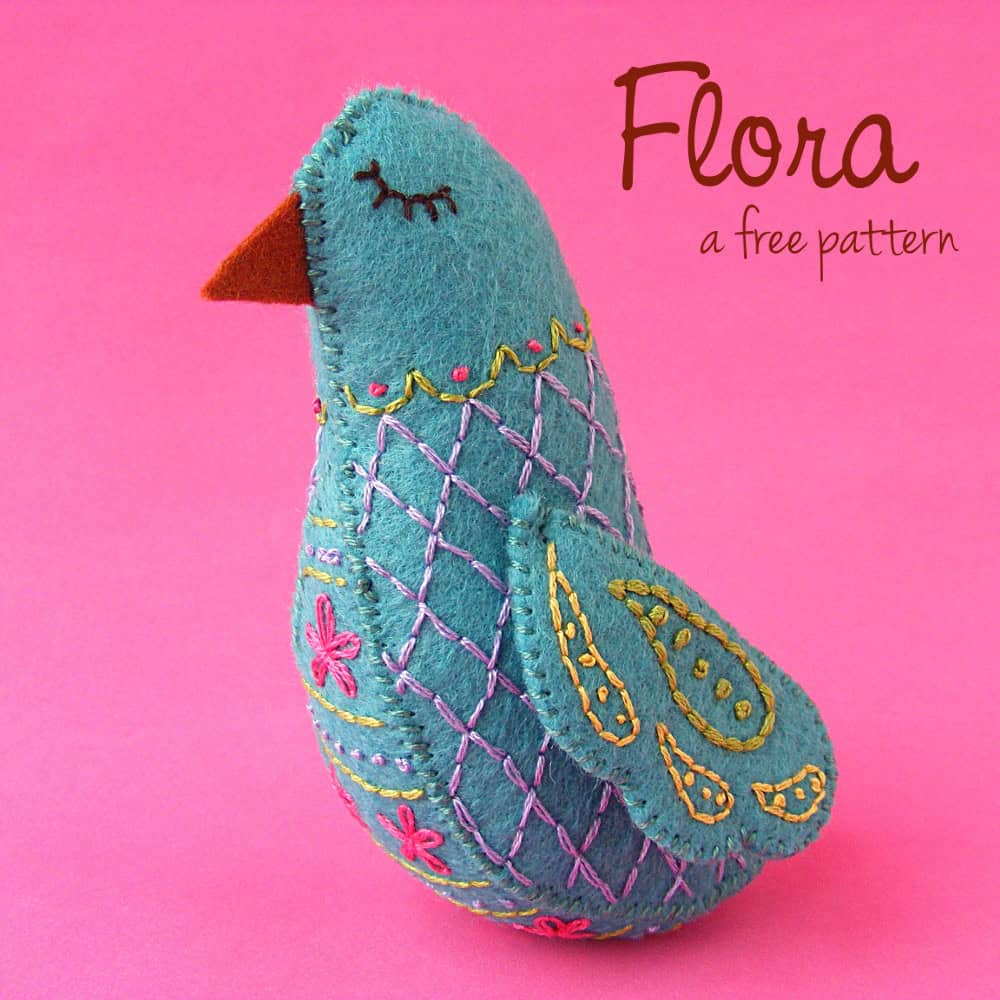
This little felt bird was such a delight to make! Seriously – I loved every minute of it. I want to make a whole flock of them in rainbow colors! And now you can make her too.
The embroidery is all easy – just three of the most basic stitches – backstitch, lazy daisy, and French knot.
Flora is all hand sewn from wool blend felt and colorful embroidery thread, making her an easy, portable project, perfect for carrying around in your purse.
Here’s what you’ll need:
- 1 sheet of wool blend felt
- A scrap of contrasting felt for the beak
- Assorted embroidery thread, including one color to match the felt (This embroidery thread exactly matches the felt colors I carry in my shop.)
- 1 sheet Sulky Sticky Fabri-solvy (optional, but strongly recommended)
- Poly-fill stuffing and a few largish nuts (from the hardware store) for weight
- Needle (I use a #8 embroidery needle for all felt work.)
- Pattern
Step 1
Download the pattern here.
Transfer the pattern to the felt. When I discovered Sulky Sticky Fabri-solvy it changed my life. I made a video showing how awesome it is here. I call it The Magical Embroidery Stuff and I use it for everything. Here I’ve printed the pattern directly onto the Sulky Sticky Fabric-solvy, roughly cut around each piece, and stuck it to my felt.

Step 2
Stitch the design. I used two strands of embroidery thread and the following stitches: backstitch for all lines, French knots for all dots, lazy daisy stitch for the flowers. (Those links all go to video tutorials for each stitch.)
Stitch right through the stabilizer and the felt.
Step 3
Cut out the shapes.
Step 4
Soak off the stabilizer and let the pieces dry.
I lay the pieces face down in a bowl of cold water and just let them sit there for about an hour. Longer is fine – I’ve forgotten mine and let them soak overnight with no problem. The soaking will make the stabilizer all mushy and soft. Rinse it off under cold water. Use a kitchen sprayer if needed to get off any stubborn bits, but try not to rub the surface of the felt. Lay them out on a towel to dry. Don’t wring them, twist them or even smoosh them – just lay them dripping wet on the towel and leave them alone.
Step 5
Time to start putting it all together! Use 2 strands of matching embroidery thread to whipstitch all the pieces together. (This video shows how to whipstitch pieces together.)
Sew one embroidered wing to one “naked” wing, all the way around the edge. Repeat for the second wing.
Step 6
Sew the belly to one side of the bird.
Start sewing at the tail of the bird, matching it to the wider end of the belly piece, and sew all the way to the top of the belly piece.
Step 7
Sew the other side of the belly to the other bird piece.
Start again down at the tail and sew all the way up to the top, but this time keep going past the belly, sewing the two sides of the face together.
Slip the beak between the layers of the face and keep stitching. Instead of whipstitching up and over the edges of the felt, stitch through the beak. (This video has help for catching the beak in that stitching.)
Step 8
Sew up the back, starting at the tip of the tail. Stop sewing about halfway up the back and stuff the tail. Mix a few large nuts (from the hardware store) into the stuffing to weight her bottom, otherwise she’ll tend to tip forward. Sew up a bit higher on her back and stuff in more stuffing. Finish sewing and stuffing until she’s nice and plump, and all sewn up.
Step 9
Pin the wings in place, one on each side of the body.
Use the grid pattern you embroidered to line them up exactly. Thread a long needle and knot the end. Starting sewing underneath one wing, near the top. Sew through the body and out the other side, through the opposing wing. Take a small stitch back into the wing, through the body and out through the first wing. Stitch back and forth like this a few times to secure the wings. Don’t pull the thread too tight or you’ll distort the shape of her body. Knot your thread underneath one wing and bury the tail.

She’s finished! don’t you want to sew a whole flock of these beauties?
Read more about working with felt in these posts.
Happy stitching!
Wendi, does the wool blend felt come out ok when you put it in water to dissolve the stabilizer?
Yep! I just make sure not to use hot water. 🙂 I tried using cold, but that made my hands hurt so now I use tepid to ever-so-slightly warm and it works like a charm – no shrinking or pebbling of the felt.
Wow! It’s so beautiful!
Thanks so much!
I love, love, love the Sulky “Magical Embroidery Stuff”. I had tried Transfer-Eze before and, while it worked, it seemed stickier and thicker and made my fingers really sore when I was embroidering. The Sulky was much easier to work with, and I am an “official” fan. One question, I soaked the pieces in lukewarm water and the sulky released very quickly — I left it about 10 minutes. Then, I rinsed each piece and placed it on a towel to dry. The dried felt was wonderfully soft and not ripply or anything, but the embroidered (the thread itself) feels really stiff. What did I do wrong?
Thanks, Judy
I’d recommend just soaking it a bit more. I’ve noticed a little stiffness in my threads occasionally – but I actually kind of like that. 🙂 Now I soak mine in a bowl for a bit, then rinse it off under running water, then soak it a bit more in clean water. I’m not getting the stiffness anymore.
Is there a kit for Flora? I tried to order woolfelt and DMC but couldn’t get it in cart. I really love kits. Don’t have to run around getting things. Thank you. Sharon
There’s not a kit for Flora yet – but I’m planning for one very soon. The Petal and Daisy kits have been really popular! Look for Flora probably early in September. 🙂
Do u give us it for free in the mail wendi
No – it’s a digital pattern. Click on the link to download it instantly. 🙂
The link is gone. Sew mama sew seems not to exist anymore! 🙁
Yes – Sew Mama Sew disappeared without a trace, and without any notice. I’ve been trying to recreate the instructions for all the free projects I had over there and I finally got to this one. Sorry it took so long!
I just fell in love with this the minute I saw it! Just WOW!! So simple, yet absolutely beautiful! Just stumbled upon this and I am so glad I did!! I cannot wait to make some for myself and for gifts!
Have fun with it! 🙂
Hi Wendi. Just wondering if we can sell finished projects (birds) or any finished projects made with your patterns? Thanks. 😀
Yes! you can sell anything you make with any of my patterns. 🙂
Pingback: 19 Free Bird Projects to Sew! | Jacquelynne Steves
Pingback: 32+ hand embroidery sampler patterns - Swoodson Says