


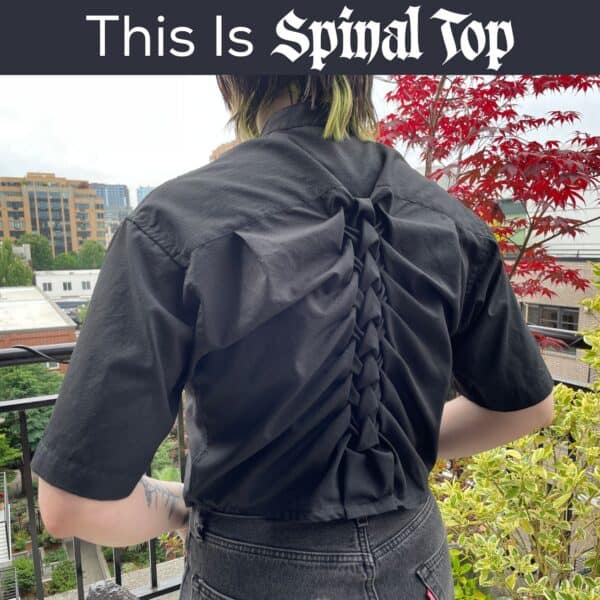
Since I’ve started re-vamping my wardrobe, I’ve been getting SOOO much smocking content on my Instagram. Smocking was never something I’d been interested in before, but I kept seeing videos of people using smocking to add a “spine” to the backs of button-downs. This post from purpleivvy on Instagram is an example of what I’m talking about. It seemed like it would be a quick, fun way to add a pop of excitement to a basic shirt.
I picked a shirt out of my wardrobe that fit, but was a little baggy. Honestly it made me look like a line-cook. In a true power-move, I forgot to take a photo of what the shirt looked like before. Please enjoy this photo from a website that sells black shirts for line cooks. It’s honestly a pretty perfect representation of what the shirt looked like.

With that out of the way, I started in on the smocking. I watched a couple short tutorials on Instagram to get me started. The one that I found the most helpful was this one by im.morii17. She has a bunch of smocking tutorials for various patterns. If you’re at all interested in smocking, I would definitely check her out.
The smocking process in this case is pretty simple. I drew a grid with chalk onto my shirt (and I of course drew it on the outside, which is the wrong side, so I had to redo it on the inside.) Then I drew lines on the squares that I needed to stitch through for the pattern I picked.
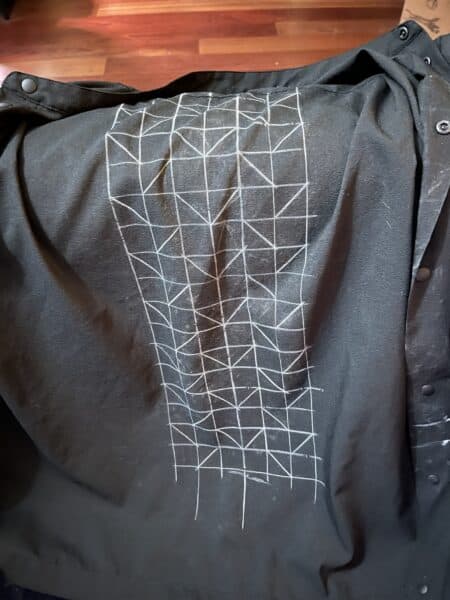
It’s a little brain-twisty at first, because the line is telling you which two corners are going to touch, not the line that the fabric’s going to fold on. I had to watch the tutorial a few times before I really got it.
Honestly, this part of the project was really quick. I watched a few episodes of tv, and then I was done. This is what it looked like right out of the dryer.
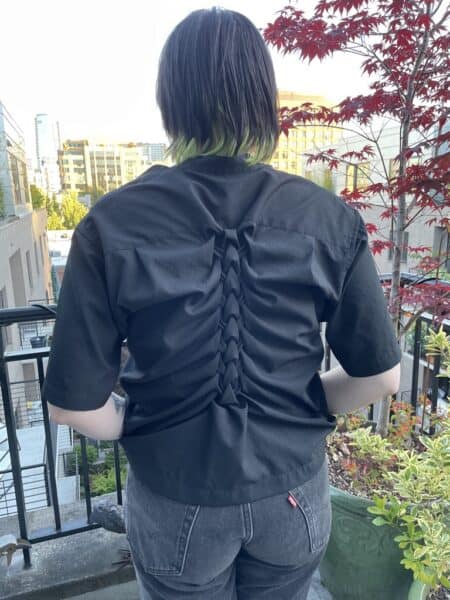
I ran it through the washer and dryer to get all the chalk off, and then it was time to hem it.
I’m not going to lie to you guys, this hem gave me SO much trouble.
The smocking really warped the back of the shirt. I expected that, but I didn’t expect just how hard that would make hemming it. I will also tell you at this point, that hemming it was such a frustrating pain that I didn’t take any photos until I was finally done.
Here’s a brief rundown on what I did.
My plan to just take a rotary cutter and omnigrid to the bottom of the shirt didn’t work out. Instead, I put the shirt on, and my mother marked my hemline all the way around. We couldn’t just measure up from the bottom, or down from the top because of all the warping of the smocking, so we had to eyeball it. I trimmed and hemmed to that length and then tried it on. It was too long, and I didn’t like the fit of it. It fit a bit like the Ivy Sweater that I made a while back that I also didn’t like the fit of. Go figure.
We tried taking in the sides to improve the fit, but that made it uncomfortable, and it made the smocking on the back pull more, which choked me a bit. So that didn’t work either.
We settled on something that was tedious, but worked. I unpicked the previous hem, and my mother pinned up a new hem while I wore it. We eyeballed it again, which ended up being the best option all around for this shirt. I basted the new hem down right on the fold line.
From the outside it looks like a perfectly normal hem, but look at it from the inside!

Totally irregular!
I trimmed out all the excess, and then did a standard ½ inch double fold hem.
After that, I was finally done! I think that hemming the shirt took longer than the smocking did.

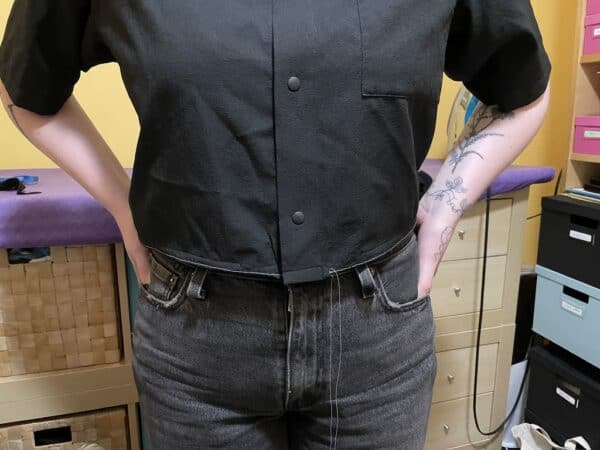
And here it is from the front.
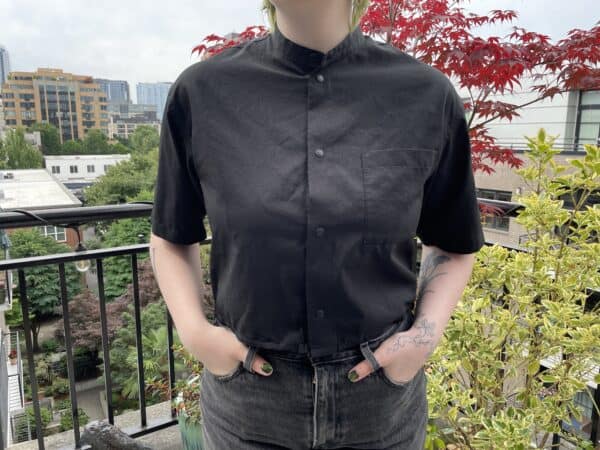
I’m happy with how this turned out in the end, but I definitely think there was an easier way to get there. I think that if I did this again in the future, I would do the smocking on a separate piece of fabric and then stitch it to the shirt. Doing it that way would give me more control over the fit of the shirt.
I am just 🤯 that this is done by hand – definitely brain-twisty. I think I’d have to start boxy too, cutting the blouse down until it was mostly fitted, and *then* doing the smocking, because I like the ones I’ve seen with a length of ruching extending all the way to the base of where one’s true spine would sit and I’d need more length (although how comfortable would that feel sitting down??? Hmmm). This looks so striking, Jo!