


Use all your favorite embroidery stitches to make mending patches prettier AND stronger. First watch the video for the how and why – and then scroll down for some detailed examples of finished patches from a pair of my jeans.
And now for the samples. These are all from one pair of jeans. 🙂
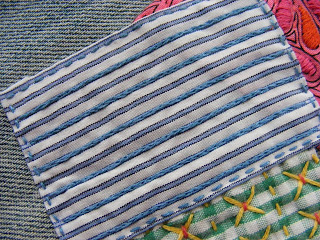
This one is super easy. I used a running stitch around the edge of the patch, and then I used split stitch over every other stripe.
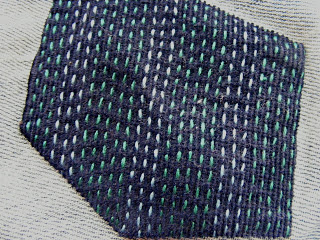
This is just running stitches – lots of running stitches. It’s stitched on corduroy so I was able to use the space between the ridges to as a guide to keep my rows of stitching straight and parallel. I used a two different shades of blue thread.
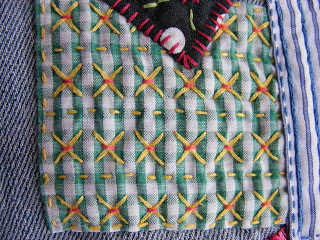
On this one I used the gingham print of the fabric as a grid to make nice, even cross stitches and running stitches. The stitches of my Xs were pretty big – possible to snag on things – so I took tiny little straight stitches in pink at each intersection to strengthen the whole thing and add a fun accent.
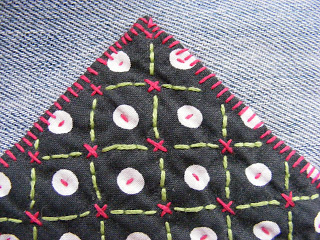
This started as a plain black fabric with white polka dots. First I took little straight stitches in the polka dots and made cross stitches in the spaces between them. That didn’t make the stitching as close as I wanted so I added a grid of backstitches in green.
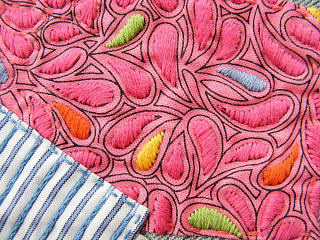
And finally – this one was a real labor of love. I satin stitched over each drop shape in the fabric print – matching the color of the printed drop. It took a long time but the texture is luscious.
If the tear is in a tricky spot – like when the rip is at the edge of a pocket – take a look at this post.
Have fun with some patches! Soon you’ll be looking for an excuse to mend!

Here are all the posts about finishing embroidery projects.
Basic Finishing
- How to Iron Embroidery without Smooshing the Stitches
- How to Frame Embroidery in a Hoop (with no glue)
- How to Hide the Messy Back of Hooped Embroidery
- How to Prep Embroidery for Framing
Other Ways to Use Embroidery
- How to Mend with Embroidered Patches
- How to Mend a Tear around a Pocket
- How to Embroider a Quilt Label
Return to the Learn to Embroider main Table of Contents.
Happy stitching!

I patch my boys’ knees way more than I’d like! Sometimes I make it look nice, and sometimes I just want to get the darn pants through the year. 😉 When I decided to learn embroidery, I started by chain-stitching a spiral onto a denim patch destined for my jeans. I get complimented on that patch all the time!
You should share a photo! Add it the embroidery group on Flicker. http://www.flickr.com/groups/1563199@N24/
This is wonderful! Having raised 6 children, I did a lot of patching. Probably the most creative thing I did was to use old jeans pockets as knee patches. But I certainly never embroidered patches. What fun! And the idea of covering a stain with embroidered patches… brilliant! Thanks, Wendi!
Thanks so much! 🙂
You gotta really love that pair of jeans to go through all that work, especially on the legs! I would like to see how you embroidered that corduroy patch though, since it didn’t start out with a pattern to follow, curious about what you did on it!
Hi, love these suggestions.
I’m looking for an article on mending the crotch of jeans. Have you got one or can suggest one?
Thanks, Sarah