


Here’s a free felt coaster pattern so you can stitch up some fancy floral finery.
Coasters are a bit of an issue for me.
I have a glass of ice water within reach all day long. I have a lot of potter friends – so most of my cups and glasses are lovely to look at and delightful to hold, but completely uninsulated so they sweat like crazy.
I’m always seeing pretty, pretty coaster tutorials online – and I’ve made a few. But the fabric ones (which are what I love to make) just catch the water and hold it in place. They usually soak completely through, so instead of getting a ring on my furniture – I get a big blobby smear.
Then I had a bit of an epiphany. Maybe everyone else has already thought of this – but none of the tutorials I’ve read mention it and it was a new idea for me, so. . . what if I put something waterproof inside a coaster – to block the moisture from soaking through to the bottom? Of course! *smacks forehead* I could make some very pretty – and also completely functional – felt coasters! Happy dance!
Fast forward to today. My felt coasters are finally finished – and I have a free pattern for you!

These are not hard to make – they only use very simple stitches – but they take a lot of time. Luckily, they’re small and easy to schlepp around for some portable handwork to pull out at the doctor’s office, the park, on long car trips, etc.
What You Need for This Felt Coaster Pattern
You can find links to sources for all my favorite tools and supplies here.
- 1 1/2 sheets wool-blend felt for the coasters (I used licorice)
- 4 squares of waterproof fabric for the inside of the coasters (I used scraps from some art aprons I used to make, but you could use anything waterproof like an old raincoat or shower curtain liner)
- small scraps of wool-blend felt in assorted colors for the flowers and butterflies
- embroidery thread in colors to match the felt
- Sulky Sticky Fabri-solvy (optional)
- freezer paper (optional)
- size 8 embroidery needle (optional)
- Thread Magic (optional)
So there you are! Download your patterns and gather up some felt and thread in pretty colors and start stitching! It’s fun – and the finished coasters are so, so pretty. 🙂
How to Make Them
Step 1
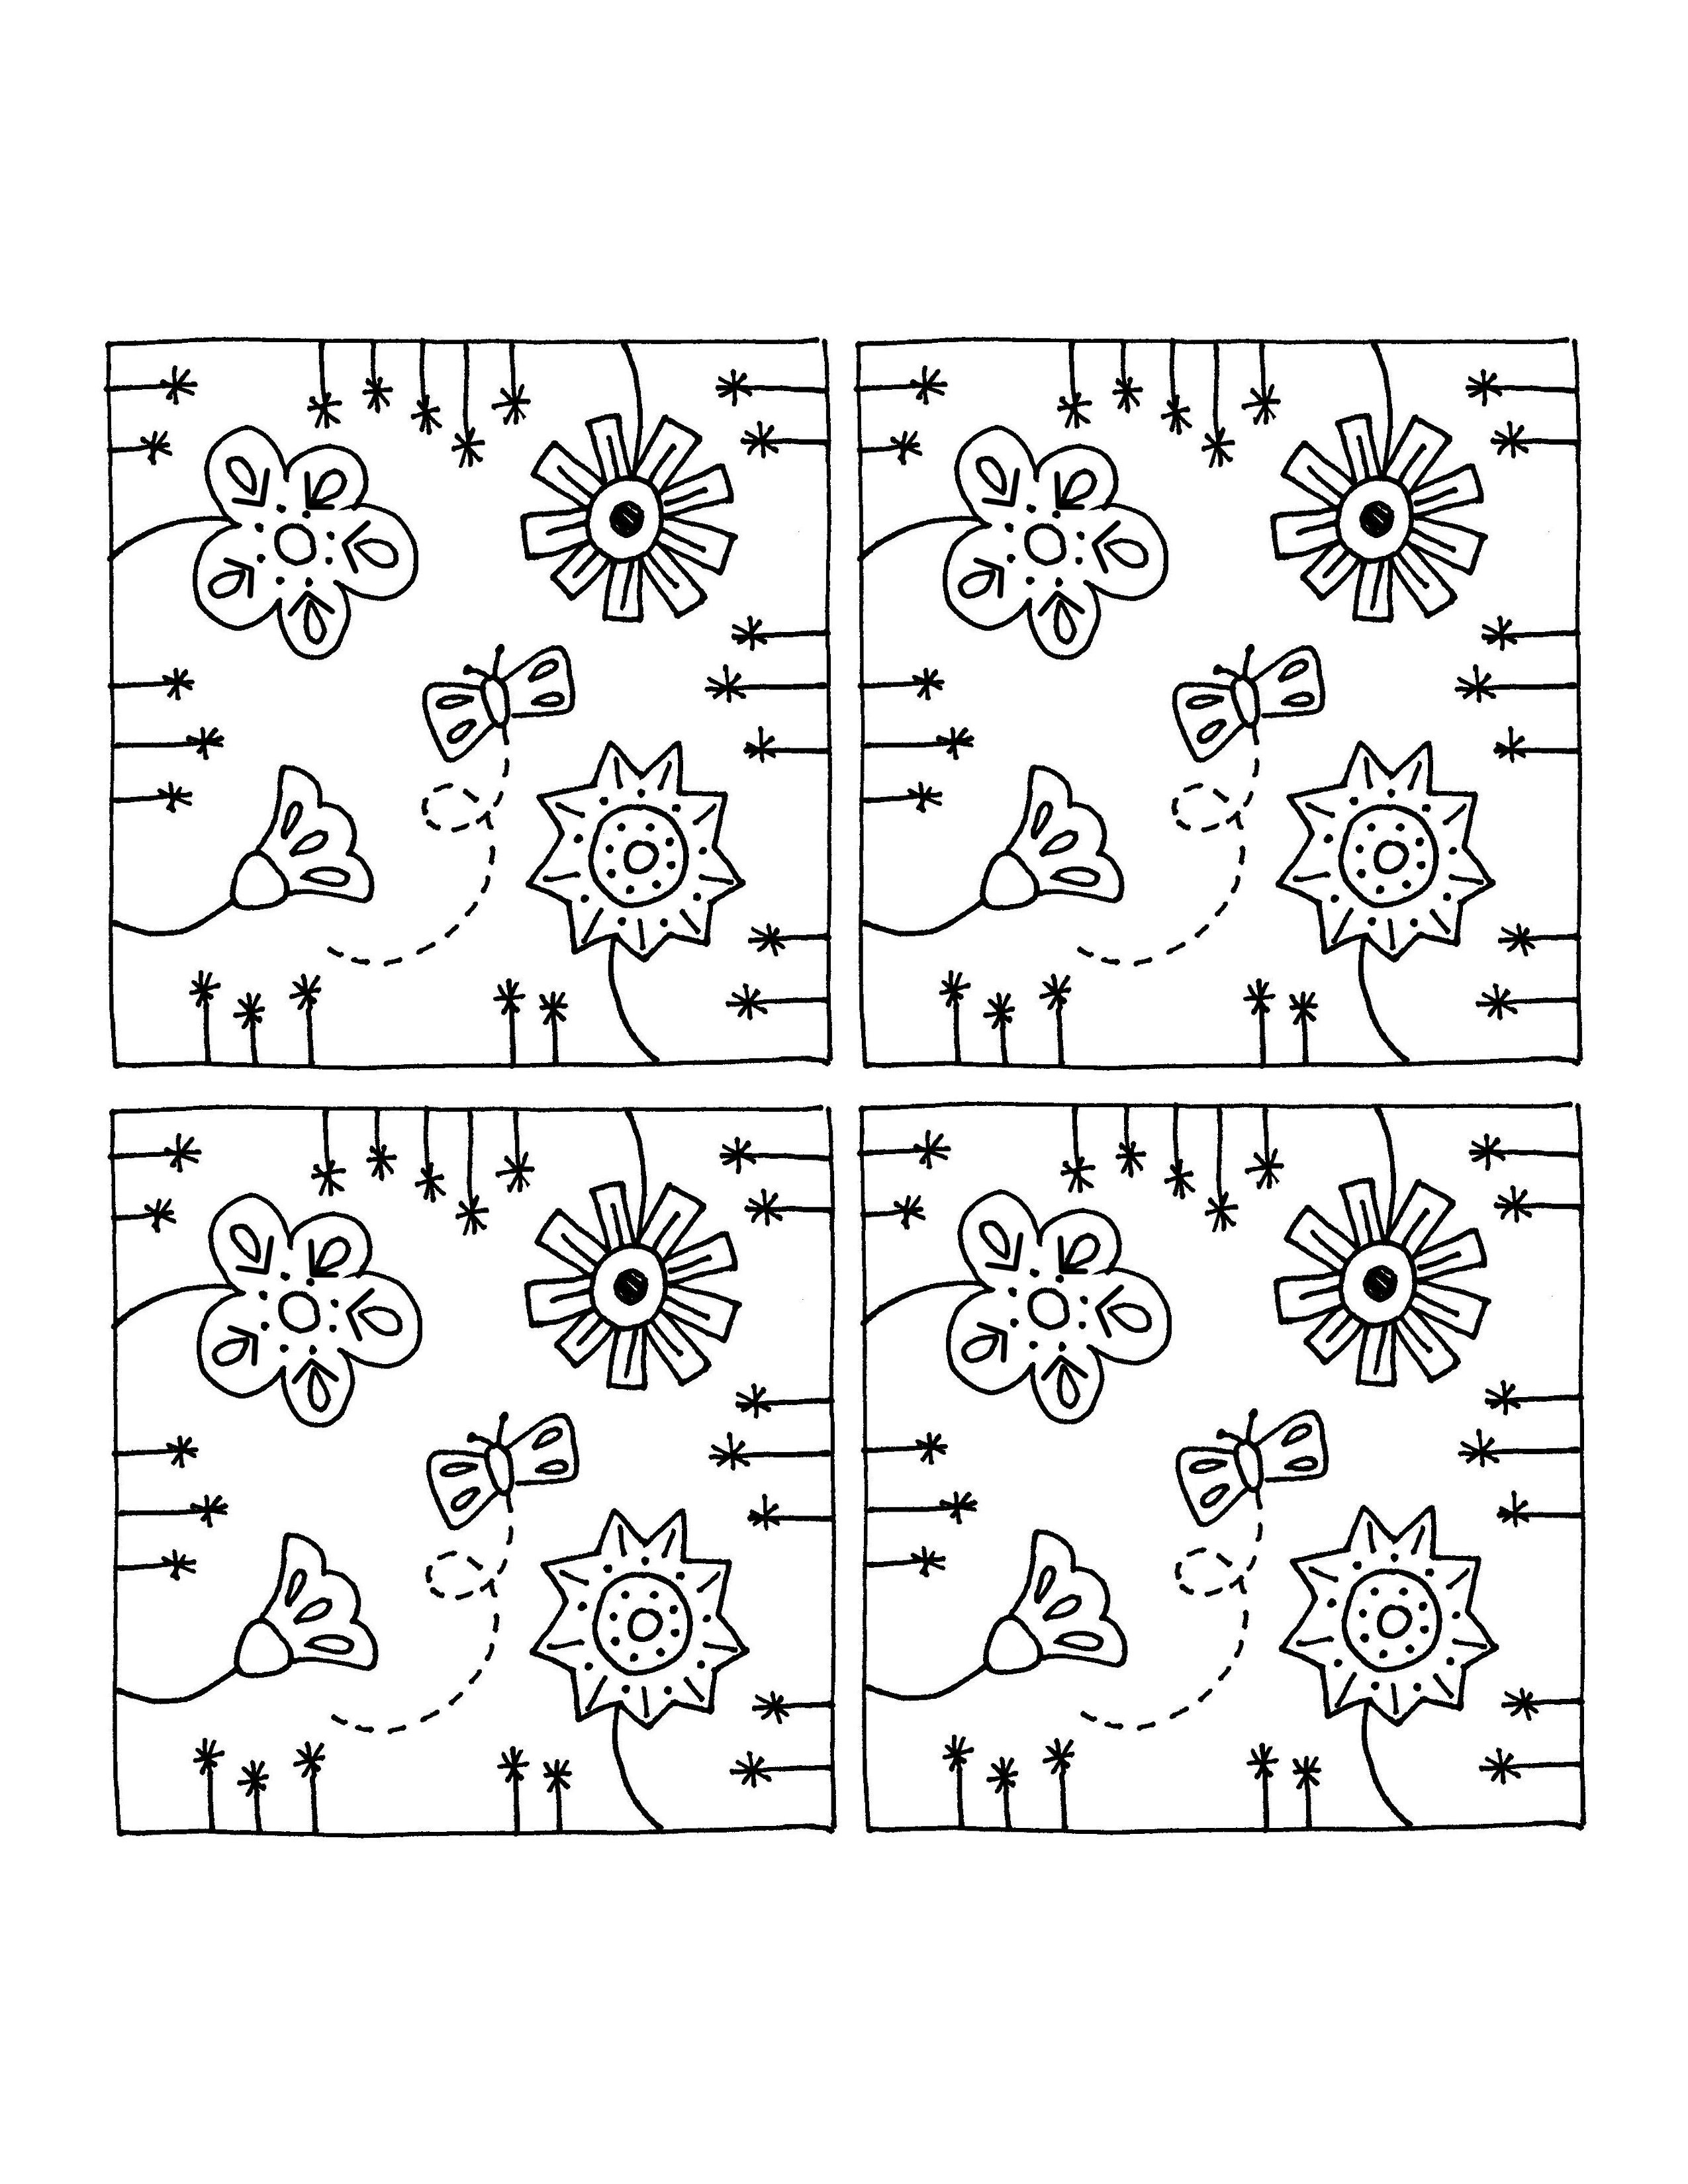
Download the base coaster pattern here and trace or print it onto a rough side of a sheet of Sulky Sticky Fabri-solvy. I use Sulky Sticky FabriSolvy every time I work with felt. I love it!
If you’re wondering how it works with felt, read this post.
Step 2
Cut the four squares apart (leaving a little extra room around each square), peel off the paper back and stick the film to a square of felt.
Step 3
Embroider the design right through the stabilizer and the felt.

I’m going to applique most of the flowers and the butterfly, so all I stitched here are the stems, butterfly trail, and the small flowers all around the edges.
I used backstitch for the stems of the applique flowers with four strands of green thread (DMC #522). I used running stitch for the butterfly trail with three strands of periwinkle thread (DMC #156).
For the star flowers around the edges I used two strands of green (DMC #522) and a single stitch for each stem, and two strands of fuchsia (DMC #601) for the flowers.
You have a couple of options when you stitch those star flowers.

In this first photo, I stitched the stem up to the base of the asterisk, then stitched the full asterisk for the flower.

In this second photo, I stitched the stem up to the center of the asterisk, then stitched the rest of the asterisk around it, skipping the bottom stroke of the asterisk so it looks like the stem goes up into the flower.
Which do you like better? That’s what you do for yours. :-)
Step 4
Trim around the edge of your stitched coaster, right on the line.
Soak out the Sulky Sticky FabriSolvy in cold water for at least an hour and rinse clean with more cold water. Hit any stubborn bits with a kitchen sprayer – don’t rub the surface of the felt.
Let the pieces dry flat. Don’t wring, twist or even smoosh them. Just set them on a towel and let them dry overnight.

You can see a coaster with the stabilizer removed at the bottom of the photo. Look! Now I know exactly where each applique piece goes. The stitched stems and flight paths are great guides!
Step 5
Applique and embroider the rest of your design.
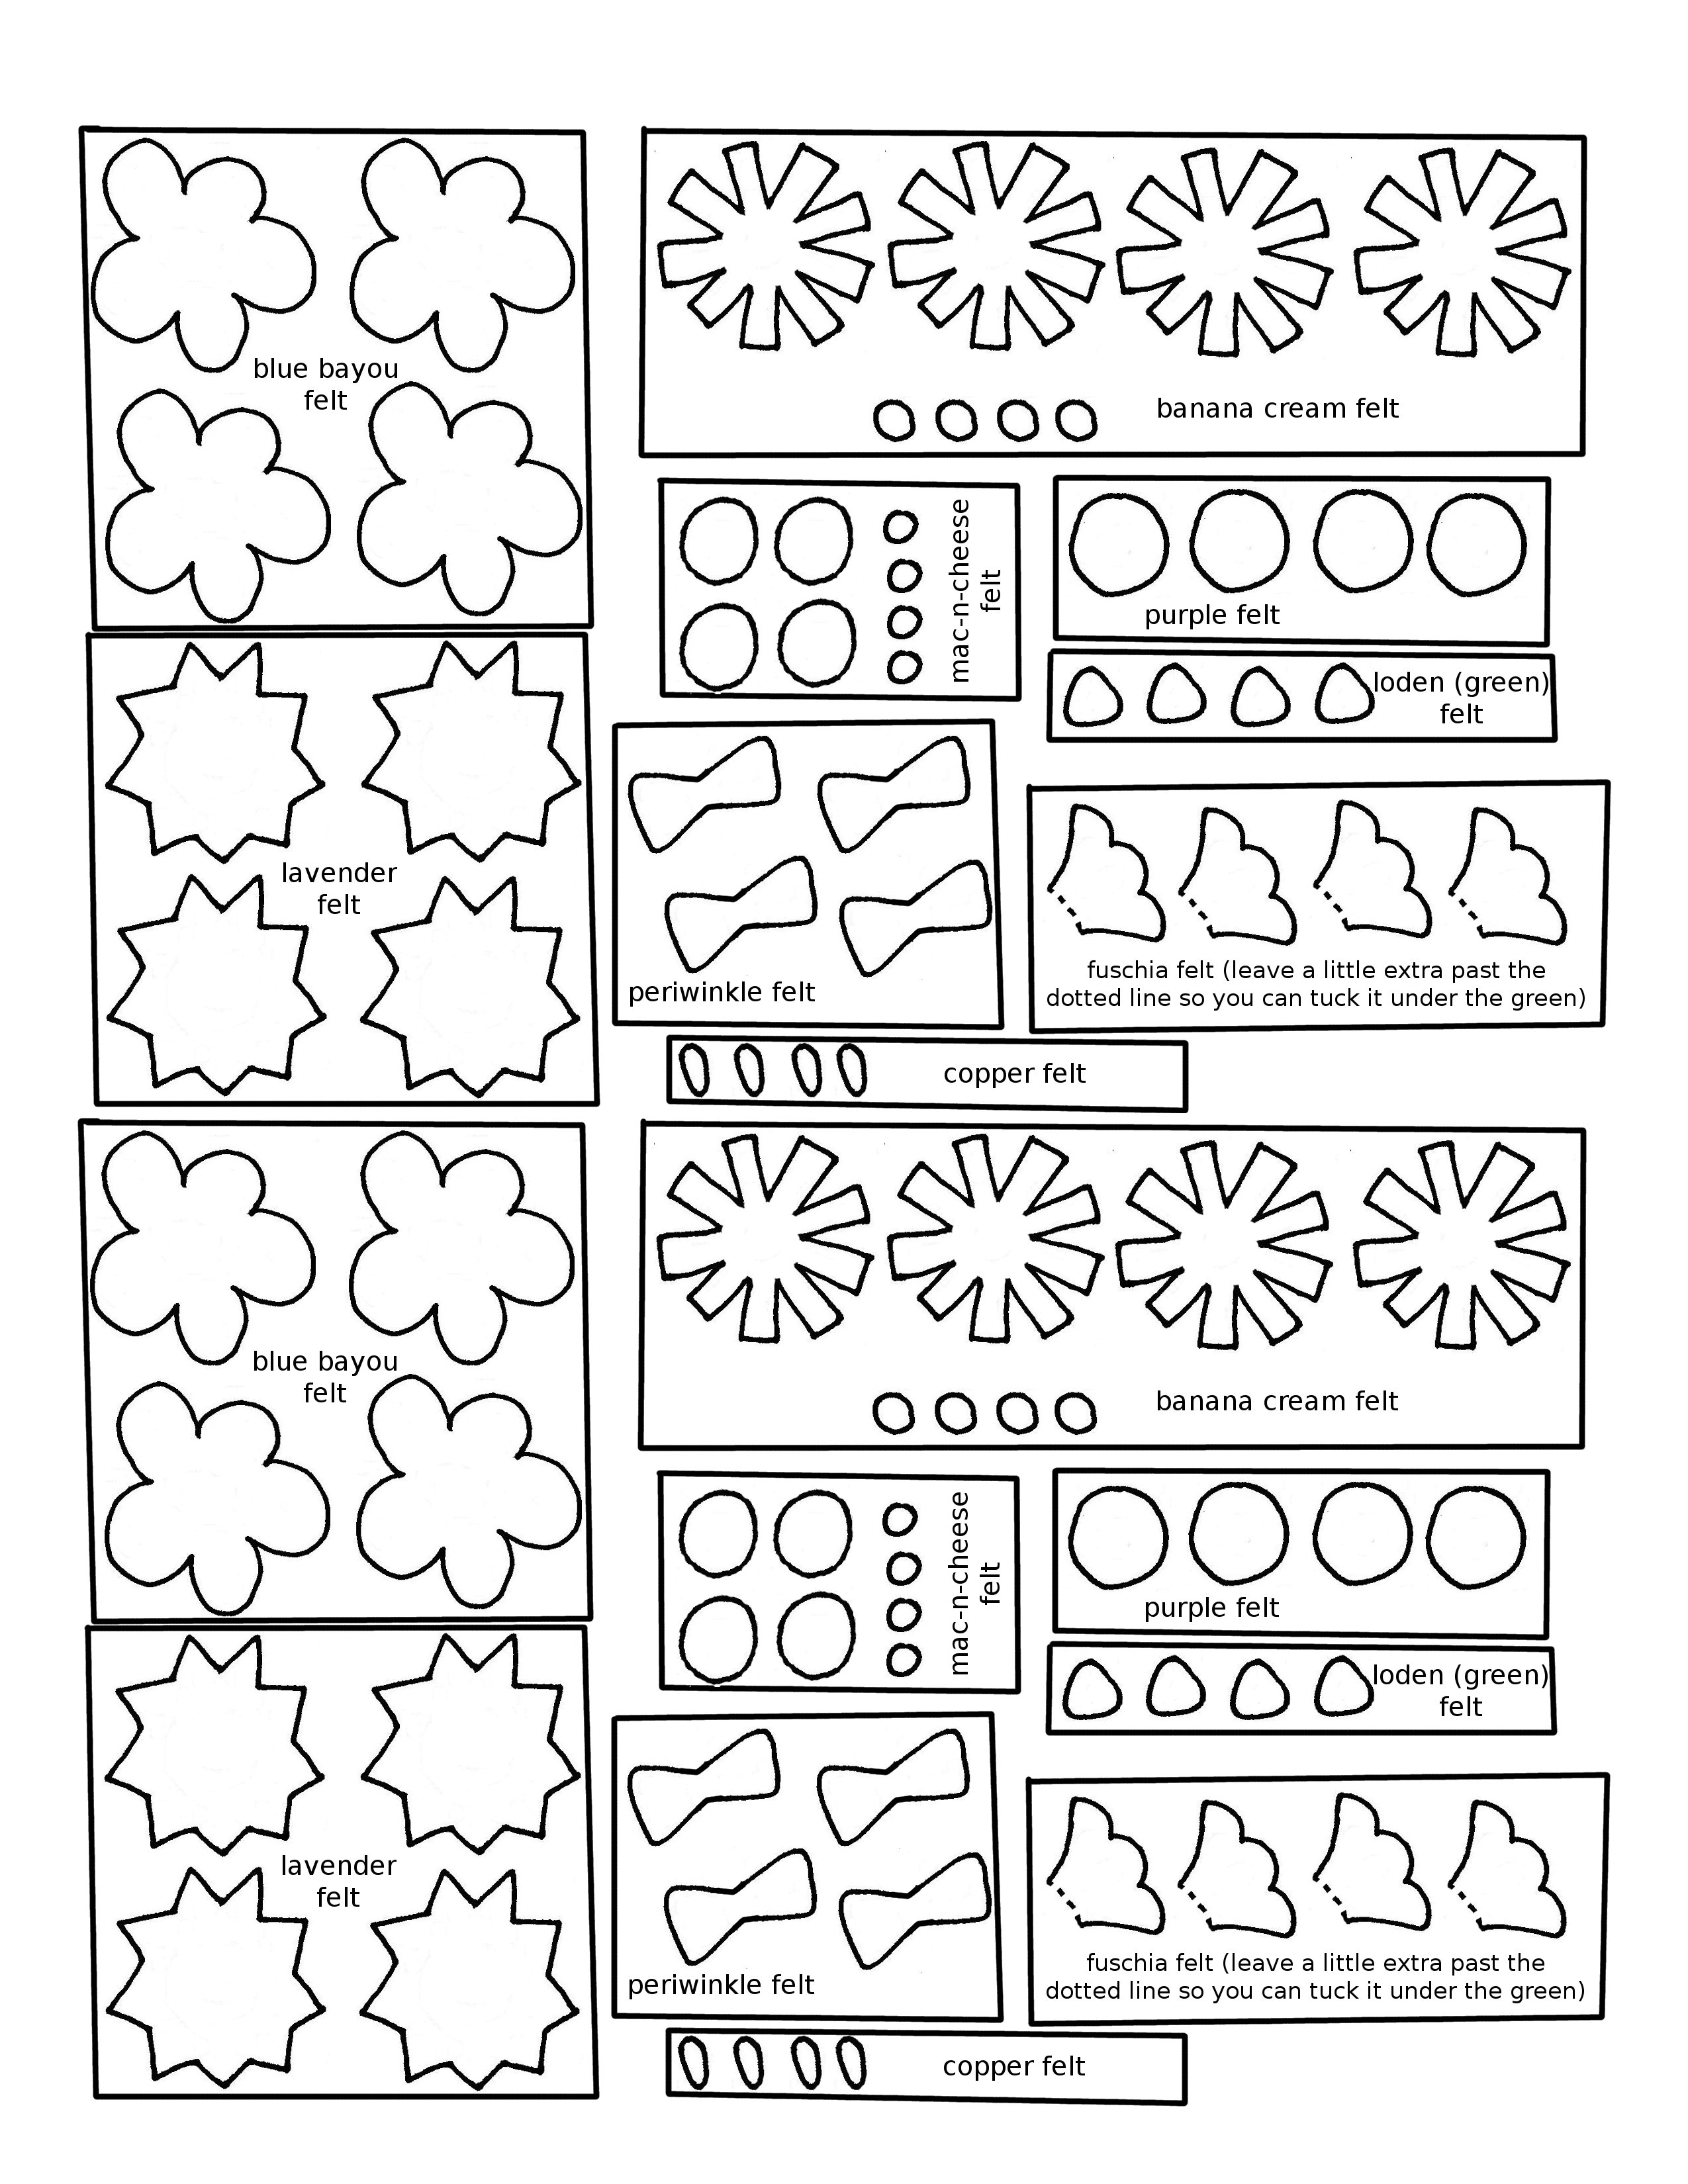
Download the applique patterns here and print or trace them onto the paper side of a sheet of freezer paper. One sheet has enough applique pieces for 8 coasters. Make a second set for a friend!
Iron the freezer paper to the felt and cut the small pieces out – cutting the freezer paper right along with the felt. That keeps your cutting accurate on such small pieces.
Peel off the freezer paper and use a swipe of glue stick to stick the flower where it goes on the coaster.
Use whipstitch and two strands of matching thread to applique each flower to the coaster, then add all the little detail stitches.
There’s a video showing how to applique felt with whipstitch here.
Here’s a detailed color and stitch guide and a super close-up photo of one finished coaster.

Oooh! Such a pretty felt coaster pattern!
Use two strands of thread for all stitching - the applique and the embroidered details.
Blue Flower
Whipstitch the flower with DMC #3846 and the center with DMC #726. French knots and lazy daisy stitches with DMC #726. Use straight stitches at the base of the lazy daisies with DMC #3746.
Yellow Flower
Whipstitch the flower with DMC #726 and the larger center with DMC #741. Satin stitch the small center with DMC #726.
Straight stitch the pink lines on the petals with DMC #601.
Purple Flower
Whipstitch the flower with DMC #3746, large center with DMC #333 and tiny center with DMC #741. The orange French knots in the purple center are DMC #741. The blue French knots and straight stitches on the outer ring of the flower are DMC#3846.
Pink Flower
Whipstitch the pink flower with DMC #601. Lay the green bit so it overlaps the base of the pink petals and whipstitch with DMC #522. The orange highlights on the petals are lazy daisy stitches in DMC #741.
Butterfly
Whipstitch the wings with DMC #156 and the body with DMC #920. The antennae are French knots with stems in DMC #920. The highlights on the wings are lazy daisy stitches in DMC #601.
Step 6
Cut a second piece of felt to match the first.
Sew the two layers together around two edges. I used whipstitch. Whipstitching felt edges is a tiny bit different from whipstitch applique. There’s a video here showing how.
You could also use blanket stitch, running stitch, or even sew it on the sewing machine.

Slip a piece of waterproof fabric (cut a bit smaller than your coaster) between the layers and keep stitching all the way around.
Done!
Now make three more so you have a pretty set! :)

Happy stitching!
Do you like making coasters? Apparently I love it – because I have three more free felt coaster patterns for you!
- Big Stitch Polkadot Coasters
- Cozy Bear Coasters
- this tutorial showing how to use your favorite quilt block patterns to make coasters
Sign up for my weekly newsletter so you never miss another free pattern like this one! You’ll also get new tutorials, sewing tips and tricks, fun videos, yummy recipes and special discounts. 🙂

Play with some felt! Try the Oddballs – a fun pattern for silly monsters.
These are great! I especially love the little flowers stitched around the edge.
Thanks! Those little stars were fun to stitch. 🙂
I Love these! Thank You! Boy I sure don’t know how you do it All!? And with your daughter going off to birding school soon! I don’t envy you that . My kids are 20 something’s with busy lives. And two years ago I moved three states away to marry the most Wonderful man and be close to my ailing father. But I miss my kids like Crazy!
You are a brave and Wonderful Mom! I know your daughter must really want this experience for you to be gifting it to her! I’ll keep you all in my prayers. And again Thank You for all the Awesome projects! I am So thrilled I stumbled on your videos and website! Sincerely, Wendy T
Thanks so much for the nice note! Jo is absolutely giddy (with just a touch of nervous) about starting school. It’s definitely easier on me knowing that she’s just 45 minutes away. 🙂
Oops! That auto correct! It was supposed to say boarding school of course!!! :0)
You are so wonderful and generous to supply us with these beautiful projects you design! I don’t have just tons of money (who does?), but your free patterns give me a way of making spectacular gifts without having to buy expensive patterns. You are also very kind to allow us to sell what we make 🙂 If most are like me, it will be hard enough to make all four for my gift, but it is lovely to know that if I ever did get the urge, I would be allowed to. You’re terrifically talented, I love your style. It really speaks to me, and I like your things immediately on sight Thank you again for supplying us with such exciting GIFTS, because that’s how I view the selection of freebies your offer!
Alice
Thanks so much! I’m glad you’ve been able to use so many of the patterns. 🙂
These are so cute! Thank you very much for sharing this pattern. Love them!
You’re welcome! 🙂
I am looking for a pattern using fabric or felt to make a coaster that fits my water glass base inside of the coaster. Do you know of such a pattern on line that I can download. I just need to make two for a friend who has to have her water to keep hydrated while getting chemo treatments. No stem glasses please. She likes her favorite water glasses. I thought having two would give her a change daily. I hope so much that you can help me finding such a pattern. Blessings for a wonderful Thanksgiving and upcoming holiday.
Sincerely, winnie Jackson
Sorry – I’m not sure I understand exactly what you’re asking. Is it that your looking for a bigger-than average coaster? You can always enlarge any coaster pattern on a copy machine or your computer. Since it’s flat and there are no seam allowances just enlarge or reduce to any size you like!
Pingback: The Best 50 Free and Cute DIY Felt Patterns -
Oh my gosh. This is such a comprehensive article. Thank you for your generosity in sharing. I have a pattern for a little Dumpling Purse. Did some funky cotton ones for kids but dreamed up a embroidery/appliqué project for special friends. I need some small handwork project and thought if I cut the dumpling pattern out of wool felt I could make really special gifts.
I’ve ordered the wool and am raring to go! Thanks so much!!
Thank you Wendy for posting the coasters, i bought this kit from you in 2016 lol. and i lost the instructions on how to put it togeather. so it has sat for ever now i can finish the project. Happy Happy Happy. Ive made several of your quilt patterns, dogs, cats, dinos, monsters, forest friends. loved them all so did my great grandbabies. Thank you for all you have done over the years
Pingback: Embracing Warmth: The Allure of Cozy Country Living Rooms Adorned with Patterned Rugs – elsesun