You get patterns for 25 mini stockings – just the right size to hold candy, small toys, gift cards and more. Open a stocking every night to count down the days until Christmas!
One of my favorite things about this pattern is that you’re getting 25 different repeat patterns that are very easy to stitch. (I only used the four most basic stitches – all of which are covered in my free Embroidery 101 class. The pattern also has links to the how-to videos for all of them.)
You can use these designs on so many other projects! I’ll be showing some samples of other things you can make in the weeks to come. 🙂
My other favorite thing is that you stitch the designs on a grid – which makes it so easy to get your stitches perfect! Here’s an example of what one stocking looks like all stitched up, before I soak away the Sulky Sticky Fabri-solvy.
See how easy it is to get the stitch length perfect and the spacing perfect?
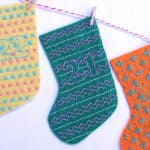
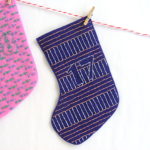
And here’s that same stocking after soaking.
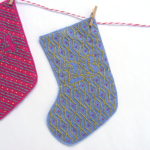
I just love how those thread colors glow against the dark purple felt!
I’ve been stitching away at the Mini Stockings Advent Calendar and I’ve been getting a lot of questions about it. I thought I’d pull together all of my answers in one handy place. 🙂
How big are the stockings?
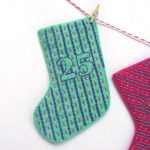
They’re definitely mini stockings. Each stocking is about 4 inches wide and 5 inches tall – at the widest and tallest points. The “leg” of the stocking is 3 inches wide. I made sure it was big enough to slip in a gift card. Maybe one of the goodies is a gift card for a movie night?
How long do they take to stitch?
It depends on the design. Some take me only an hour. Some take more like three hours. And I’m a fairly slow and careful stitcher.
How hard is the stitching?
Really easy. Even if the pattern looks complex, it’s actually made of very simple stitches. And the fact that they’re stitched on a grid makes it soooo easy to get perfectly spaced stitches – even if you’ve never embroidered before.
Yes – you’re getting a total of 25 different geometric patterns.
Why is there a sheet of plain grid paper in the pattern?
That’s so you can use the same geometric patterns in other designs. Like maybe stitch a monogram letter filled in with your favorite pattern? Or the silhouette of a favorite animal? Or trace a cookie cutter, use brown felt, and stitch the design in white thread like icing?
Do I have to stitch the numbers? I’d rather use the little stockings as gift tags/tree ornaments.
Of course not! The pattern also includes a page of three stocking with just the grid – no numbers.
Can I machine sew the stocking front to the back?
Yes! Just use a simple straight stitch and matching thread, and stitch really close to the edge.
Where did you get that red and white twisted cord?
I got it at Joann’s a few years ago and I use it for all my ornament hanging loops. It was in the section of cotton yarn – the stuff people use to knit or crochet dish cloths.
Can you show some examples of the designs in different colors?
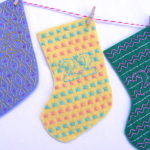
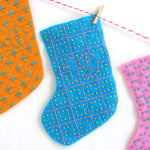
Sure. I’m using the Tutti Frutti felt and thread bundles for my samples, but I stitched up a couple of individual stockings in other colors for you to see.
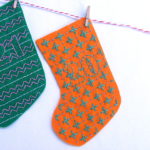
These two use felt from the Enchanted Forest felt bundle with white thread. I thought that would be a really nice “snowy woods” kind of collection. 🙂 And the first stocking (the white thread on Tahitian sunset felt) looks just like gingerbread to me. A whole set done as gingerbread stockings would be terrific!
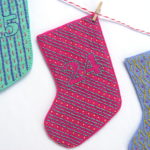
I also love these classic red and white stockings. Easy peasy! Red thread on white felt. 🙂
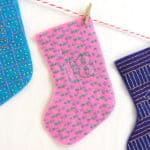
I haven’t had a chance to stitch up samples yet, but I also think these would look great in this Frosty Pastels palette.
What are some ideas to fill the stockings?
The sky (and three inches!) is the limit. 🙂 Candy or small toys would be great. A little note in each stocking with a favorite family activity would be fun. Maybe a little pack of cocoa and the name of a favorite Christmas book to read aloud. I’ll post this to the Shiny Happy People group and see if other have fun family traditions they can share.
I hope that answers all your questions! If you have any others, just ask and I’ll add the answers to this post. 🙂
I know it’s not even Thanksgiving yet, but I wanted to share this free reindeer applique pattern early enough that you would have plenty of time to make it before Christmas. 🙂
You won’t need much fabric – less than a fat quarter of everything, so you can probably find what you need in your scraps. Here’s what I used – all from Timeless Treasures. . .
Cut a piece of background fabric and a piece of batting each 11″ square. You’ll trim it down to 10 1/2” square later, so it doesn’t have to be exact. If you’re using Quilt As You Go, quilt your block now. The quilting wouldn’t really show up on the busy fabric I chose, so I just quilted a simple grid and show it here from the back (batting) side.
Trace or print the pattern onto the paper side of the fusible adhesive. I use printable Heat & Bond Lite fusible adhesive so I just print out the page. No tracing! The image has already been reversed, so just trace or print.
Step 3
Rough cut around each shape. Leave a little bit extra all the way around – a little extra extra (at least 1/4 inch) where there’s a dotted line. That’s the allowance that will tuck under other bits or into the seam allowance for a nice clean finish. Follow the package instructions and fuse each piece to the wrong side of the fabric.
Step 4
Cut out each piece neatly. Cut directly on the solid lines. Leave a little seam allowance past the dotted lines (like at the base of the antlers and the top and bottom of the shoulders). Cutting after you fuse ensures that the adhesive goes right up to the very edge.
Step 5
Trace any features onto the face. If you hold the piece up to a window, the light will make the lines very visible – even on dark fabric. I mark directly on any lines to be sewn (like the mouth) and inside the bits marking the appliqué position (like the eyes and nose).
Here it is after tracing so you can see the eyes, nose and mouth marked. I just use a fine Sharpie, but you can use something erasable if you’re worried about being able to stitch right over that line for the mouth.
Step 6
Peel off the paper backing, arrange the pieces, and fuse in place according to the adhesive product instructions. Remember – dotted line edges tuck behind other bits. The bottom edge of the shoulders should be lined up with the bottom edge of the block.
If you’re using Quilt As You Go, press your already-quilted block before adding the appliqué.
Step 7
Stitch all the edges down. You can use any stitch you like, in matching or contrasting thread. I really love the cartoony look of a simple straight stitch with black thread.
All my ornament patterns have solid felt backs – no applique or embroidery. That makes it the perfect spot to add a name or date using this free alphabet embroidery pattern!
In my family and in my husband’s family, it was a tradition to give handmade ornaments to the kids every year. Having our names on them somewhere was absolutely necessary since we both have siblings. 🙂
Now that I’m a grown-up with my own daughter it’s fantastic to have those dates too. She loves knowing how old we were when we got each ornament and who made them for us. 🙂
It’s easy to add a bit of embroidery to the back of your felt ornaments. Here’s how.
Download the free alphabet embroidery pattern I used here. You can also choose to type up your name and date and adjust the size and choose the font – but be sure to choose a font that’s mostly straight lines with minimal tight curves so it’s easy to embroider.
Now grab a piece of Sulky Sticky Fabri-solvy.
This is a great use for any small scraps you’ve saved. 🙂
Draw a straight line to use as a guide to line the letters or numbers up, then trace them onto the stabilizer.
Peel off the backing, stick the stabilizer to the felt, and stitch right through it.
I used backstitch with three strands of white thread.
I traced the date in pencil. It can be a bit hard to see, but there’s NO chance of it bleeding on the white thread. Most pens bleed a lot – test yours or use a pencil.
After you’re done stitching, soak off the stabilizer in cold water and lay the piece flat to dry.
The 2015 Christmas Collection is finished! All twelve fun and easy felt ornaments. 🙂
You’ll find two options for it in the shop. . .
The PDF pattern. All twelve patterns in one 85-page PDF. It has each pattern complete – plus the last few pages have all the pattern pieces for all the ornaments grouped for efficient printing. There’s one page to be printed on Sulky Sticky Fabri-solvy and six pages to be printed on freezer paper (grouped by color for easy ironing). Every single piece is labeled so it’s easy to group them back together again.
The PDF pattern + materials kit. It includes 10 sheets of my favorite wool-blend felt, 10 skeins of embroidery thread perfectly matched to the felt, all the pattern pieces printed out on Sulky Sticky Fabri-solvy or freezer paper (depending on what the pattern calls for), and the red and white baker’s twine I used for all the hanging loops. And, of course, you get an instant download of the entire PDF pattern. Handy dandy!
Cut a piece of fabric and a piece of batting 11″ square. Layer the fabric over the batting and quilt the two layers together.
Step 3
Roughly cut out all the pieces and fuse them to the wrong side of the fabric.
I used white felt for the snowman head, and Timeless Treasure prints for the rest of the fabrics: charcoal Sketch for the hat, red Pop for the ribbon, orange Sketch for the carrot, and solid black for the eyes.
Step 4
Hold the snowman face up to a window so you can see the face markings through the felt and mark the placement of the eyes, nose and the mouth.
Step 5
Cut out the pieces neatly on the solid lines. Where there’s a dotted line, leave a little extra seam allowance.
Step 6
Peel off the paper backing and layer the pieces on the background block. The bottom edge of the head should line up with the bottom edge of the block. The hat should overlap the top of the head.
Fuse the pieces in place.
Step 7
Stitch the edges of all the pieces down. I like to use a simple straight stitch and black thread.
Use this simple stocking pattern with whatever embellishment you choose. Or none at all! The lined construction is easy enough for beginners, and it works with any quilt, appliqué or embroidery pattern.
Throughout most of the instructions I’m using this free Santa appliqué pattern, but you can use any decoration you like. Here’s the exact same stocking made with three different cats from this quilt pattern.
Here’s how to make the stocking. . .
Step 1
Download the stocking pattern here. The pattern pieces print on two pages. Overlap them so that the heart and the edges of the stocking line up and tape them together. There’s more info on joining pattern pieces like this here.
Step 2
Cut two rectangles 9″ wide and 19″ tall from your main fabric, your lining fabric, and 100% cotton batting. My favorite batting is Warm & Natural.
Step 3
Layer one main fabric rectangle with one batting rectangle and quilt the layers together.
I’m showing this from the back so you can really see the quilting. Any design will do – it just needs to hold the two layers together.
Repeat with the other main fabric and batting rectangles so you have two pieces.
Step 4
Layer the two quilted layers and the two lining layers right sides together and cut four stocking pieces – two main and two lining.
Step 5
Decorate the front of the stocking however you like. I used my favorite appliqué with fusible adhesive method. You can see how I do that in this video.
If you’re doing floating heads (like the cats) no adjustment is needed. Just print the pieces out at whatever size you like.
If you’re doing a head that’s cropped off at the bottom (like the Santa) you’ll need to make some adjustments because the bottom of the stocking slants.
On the original Santa appliqué pattern, the beard is cropped off at the horizontal dotted line. For the stocking I left a lot of fusible adhesive below that dotted line and fused the whole thing to the fabric. That extra fabric will accommodate the slant at the bottom of the stocking.
Arrange the pieces on the front of the stocking. Let that extra beard fabric overhang the bottom edge of the stocking.
When you’re happy with the arrangement, fuse it down, stitch around the edges, and then trim off the extra beard. You can use this same technique for any animal bodies that you want to use on the stocking from any of my quilt patterns.
Step 6
Now time to start putting the stocking together! Layer the lining pieces right sides together and sew around the edges using 1/4 inch seam allowance.
Leave the stocking top open, and also a place on the back seam for turning. The turning hole needs to be big enough to fit your hand through it.
Step 7
Layer the main stocking pieces right sides together and sew them around the edge using 1/4 inch seam allowance – just like the lining. Leave the top open, but do NOT leave a turning opening.
Turn the lining right side out. Slip it inside the stocking (the stocking should still be inside out) and line up the side seams.
Sew the stocking to the lining all the way around the top edge using 1/4 inch seam allowance.
Step 9
Turn the stocking right side out. This can be confusing if you’ve never turned a lined thing right side out before.
Start by pulling the lining out of the stocking. Then reach into the turning opening, grab the toe of the stocking, and pull the stocking right side out through that opening.
Keep pulling and the lining will start coming through too – right side out. Turn the lining completely right side out. Sew up the opening using ladder stitch, and tuck the lining down into the stocking.
Step 10
You have two options for the top edge. You can work the lining and the stocking so that the seam between them is right at the top edge of the stocking. You only see the lining if you peek inside. Press with lots of steam to set the fold.
(If you want to add a hanging loop like on this cat stocking, cut a loop of ribbon and slip it between the stocking and lining layers before you sew them together in Step 8. Be sure to catch the ends of the ribbon in the stitching as you sew those layers together.)
If you want a little bit of the lining to peek out of the top, leave the batting inside standing up (don’t fold it down) and use that as a guide to fold the lining down over it. Press with plenty of steam.
Finished!
Here’s a quick list of links to all the patterns I used. . .
The free alphabet pattern is here. I printed it at 90%. You might need to go much smaller for a significantly longer name, or arrange the letters the long way.
You could make the stocking even simpler by just using a really fun Christmas fabric – no fancification needed! Try embroidering a design instead of using appliqué. Or use a couple of leftover pieced quilt blocks for the main fabric.
Play around with this pattern! It’s completely open-ended so you can do just about anything with it!
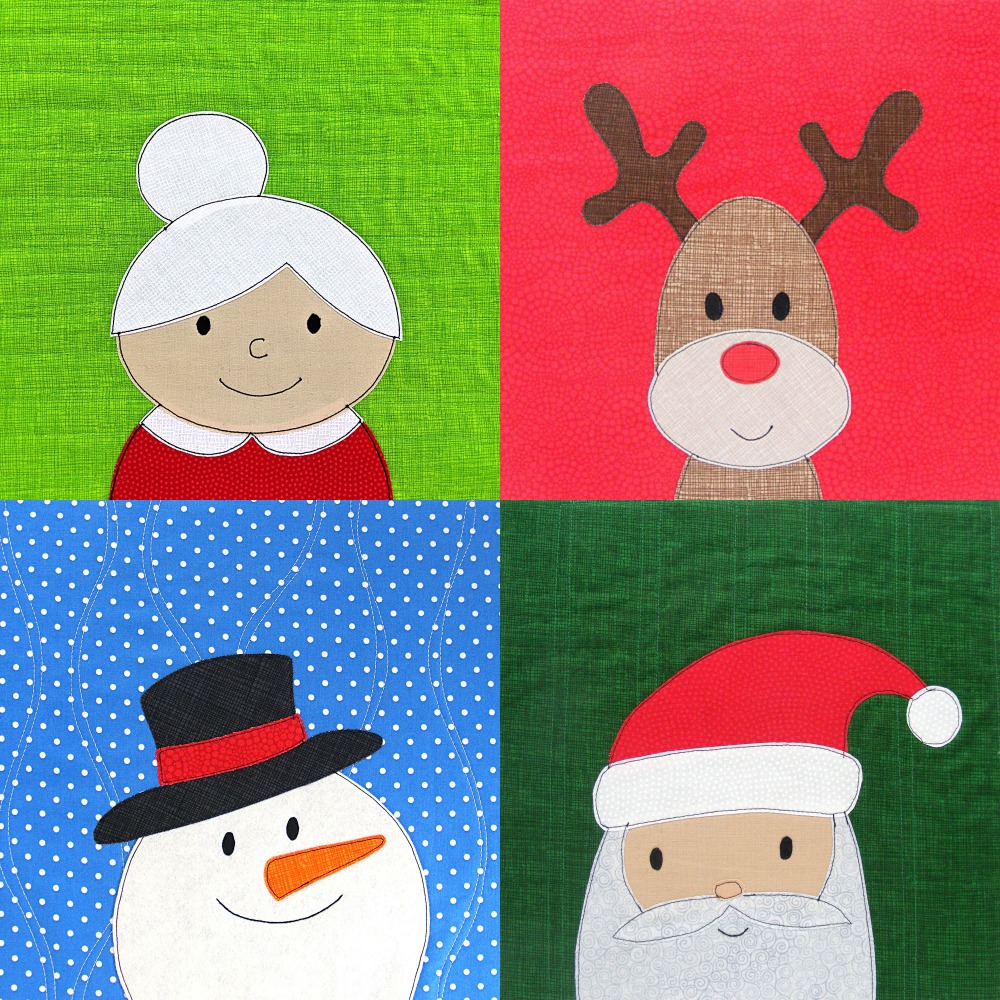
Here are several free patterns that work with my basic 10-inch applique squares – no resizing needed!
Here are several free patterns that work with just some simple resizing. This post about making coasters has info about resizing an applique pattern that can be applied to any of these projects.
Everyone in the Christmas Club received the pattern for ornament #3 this morning. Happy Monday!
I love the sweet smile on this teddy bear face. And I love that this is a pattern you can use all year! Wouldn’t it be cute to top a baby shower gift with this cutie? Or appliqué that little face on a baby onesie? Lots of possibilities for this guy. 🙂
Why are we doing Christmas patterns already?
I know it’s early – but the holidays can be such a stressful time of checking things off lists that we sometimes don’t have fun. Every year I hear from people who had planned to make a lot of handmade items, but just ran out of time. Or did it – but were completely stressed out by the whole process.
The idea behind the Christmas Club is that we’ll make a dozen handmade felt ornaments (at a relaxed pace so we really enjoy the process) before the holiday craziness really starts at Thanksgiving. No pressure. No sewing machine. Just a little time every week to put our feet up and enjoy hand stitching on some lovely wool felt.
Want to join us? It’s not too late! If you sign up now you’ll be able to download a PDF with links to the first three patterns, then you’ll get a new pattern by email every Monday morning.
The club is closed now, but you can still get the patterns!
The second pattern in this year’s Christmas Club went out this morning!
I must be on a bit of a sweater kick. The first ornament was a snowman sweater. This week’s is a cute dachshund wearing a candy cane sweater.
I’ve wanted to do this design forever! I’ve never actually seen a dachshund in a candy cane sweater – but I always thought that long body would be perfect for those spiraled stripes. 🙂
Why are we doing Christmas patterns already?
I know it’s early – but the holidays can be such a stressful time of checking things off lists that we sometimes don’t have fun. Every year I hear from people who had planned to make a lot of handmade items, but just ran out of time. Or did it – but were completely stressed out by the whole process.
The idea behind the Christmas Club is that we’ll make a dozen handmade felt ornaments (at a relaxed pace so we really enjoy the process) before the holiday craziness really starts at Thanksgiving. No pressure. No sewing machine. Just a little time every week to put our feet up and enjoy hand stitching on some lovely wool felt.
Want to learn the basics of hand embroidery with an easy online workshop – totally free?
Sign up for Embroidery 101 here. You’ll learn how to get started, the tools and supplies you’ll need, the four most basic stitches, how to transfer your pattern and how to display your work.
If you already know the basics – sign up for Embroidery 201. It’s also free! You’ll learn how to stitch on specialty fabrics like felt and stretchy T-shirts. Plus you’ll learn lots and lots and LOTS more stitches – all my favorites!
I love snow!
Especially when it’s big fat flakes coming down on a not-too-cold, not-too-windy day. 🙂
And I love snowmen too! Especially this snowman with his chubby face and stubby snowball arms.
This free snowman embroidery pattern is small – just 2 1/2 inches wide and a little over 3 inches tall.
You can see him above in a larger hoop for a wall hanging – with lots of snowy white space around him. But you can also put him in a smaller (4 inch) hoop to make a tree ornament, like this. . .
If you want to skip the hoop you can stitch him on a tea towel, a gift bag, a stocking, a T-shirt or baby onesie. Have fun with it!
It’s super easy – just a few of the most basic stitches! The pattern has links to videos teaching you all of them.
Want the pattern? Here’s the link to download it – free!