These little mushrooms used to be available only as part of the Woodland Critters pattern, but now they’re a free pattern that you can combine with any of your animal patterns.
Or just use them on their own! I’ve always thought they’d make fun placemats. (There’s a free pattern here.)
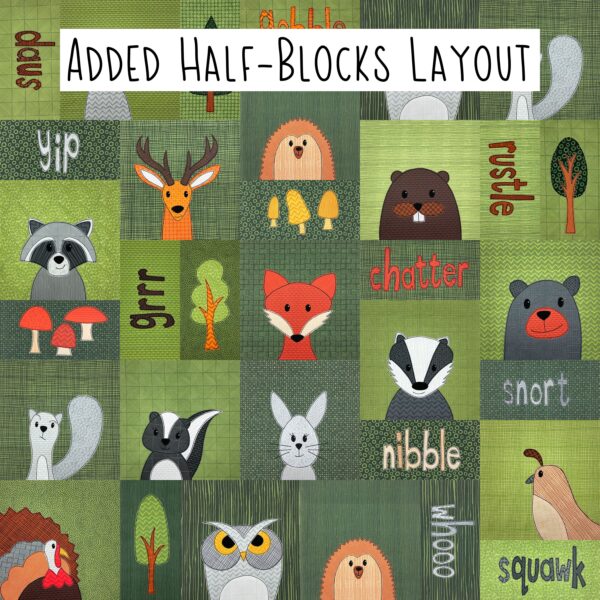
You could add more than one mushroom to a single square or to a double-size block. The samples you see above are made on blocks that finish at 5 x 10 inches – perfect for adding half-blocks to any of my patterns.
There’s a PDF here for Added Half-Block Layouts. I’ve done all the math for you – calculating yardage, providing cutting instructions and layout guides for six different quilt sizes, from Itty Bitty Baby to King Size. Here’s what that layout looks like.
And, of course, you could make an entire quilt full of nothing but mushrooms!
For this pattern I don’t provide as detailed instructions as usual. It’s just too simple a pattern!
If this is your first time doing applique with fusible adhesive, you’ll find detailed instructions here.
Here’s the nutshell version.
Print or trace the templates onto the paper side of paper-backed fusible adhesive. (I use Heat & Bond Lite for all my quilts.)
Roughly cut around each piece.
Fuse to the back of your fabric.
Cut the piece out neatly on the solid lines.
Peel off the paper backing.
Position a stem onto your block.
Position a mushroom cap on your stem.
Fuse in place.
Outline stitch around each piece.
Done!
Here’s a video showing me assembling both of my sample blocks.
You can use any stem with any cap. And feel free to get playful with your colors. Mushrooms come in every color of the rainbow! I saw a shiny purple mushroom once that looked like it was made of glass!
These simple trees used to be available only as part of the Woodland Critters pattern, but now they’re a free pattern that you can combine with any of your animal patterns.
Or just use them on their own! I’ve always thought they’d make pretty placemats. (There’s a free pattern here.) And I’d love to see a four seasons set! Just change out the fabrics!
You could add more than one tree to a single square or to a double-size block. The samples you see above are made on blocks that finish at 5 x 10 inches – perfect for adding half-blocks to any of my patterns.
There’s a PDF here for Added Half-Block Layouts. I’ve done all the math for you – calculating yardage, providing cutting instructions and layout guides for six different quilt sizes, from Itty Bitty Baby to King Size. Here’s what that layout looks like.
And, of course, you could make an entire forest quilt full of trees and nothing but trees!
For this pattern I don’t provide as detailed instructions as usual. It’s just too simple a pattern!
If this is your first time doing applique with fusible adhesive, you’ll find detailed instructions here.
Here’s the nutshell version.
Print or trace the templates onto the paper side of paper-backed fusible adhesive. (I use Heat & Bond Lite for all my quilts.)
Roughly cut around each piece.
Fuse to the back of your fabric.
Cut the piece out neatly on the solid lines.
Peel off the paper backing.
Position a tree top onto your block.
Position a set of branches on your tree top.
Fuse in place.
Outline stitch around each piece.
Done!
Here’s a video showing me assembling all four of my sample blocks.
You can use any tree top with any set of branches. You can even cut most of the branches off and just use the trunk. (If you do this, position the trunk piece behind the tree top piece.)
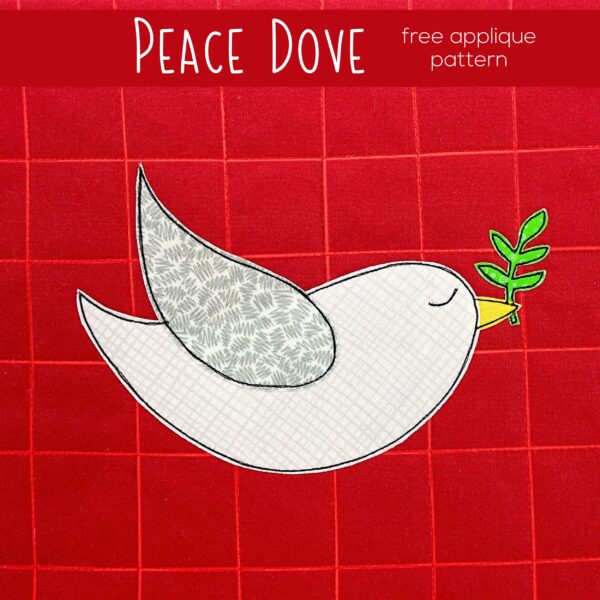
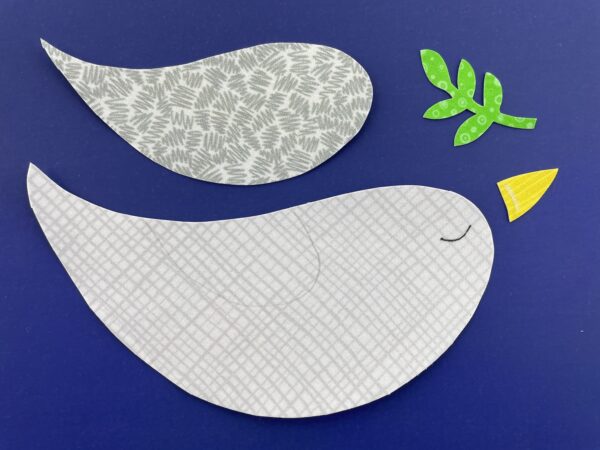
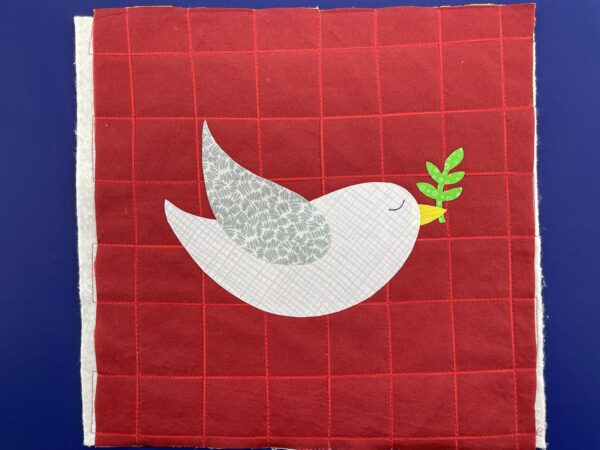
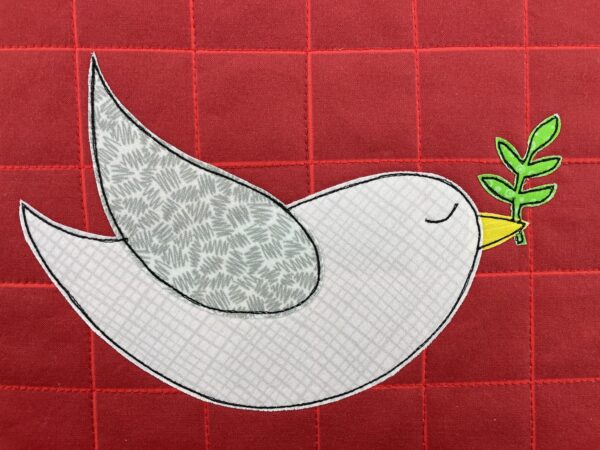
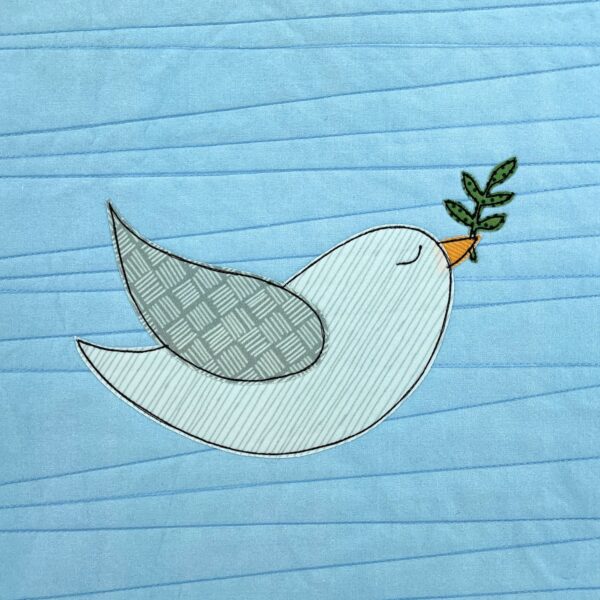
Use this free dove applique pattern to make all kinds of things!
Download the template pieces and placement guide here.
If you have an electric cutting machine, you can use it to cut your pieces. Download the SVG file here.
The dove combines with all the other free Christmas applique patterns so you can make a quilt, but there are so many other possibilities too! Here are just a few ideas (with links to free patterns) . . .
The dove is designed to make an applique that fits in a 10-inch square block. That makes it really easy to resize as needed. Do you want to make a 4 inch coaster? Print the pieces at 40% size. Do you want to make a tote bag that’s 17 inches square? Print the pieces at 170% size.
You can also easily use this pattern to make half-blocks to break up a standard grid. Just adjust the angle of the wing so it’s not tipped up so high and you’re all set – no resizing needed.
You can find yardage requirements and cutting guides for multiple layout possibilities (including a grid with half-blocks) here.
A Little Extra Help
If you’ve never made a quilt before, I recommend starting here.
If you’ve never done any applique before (or are new to my method) I recommend starting here.
There’s also a single video here that takes you through all the basic steps of my method.
You can find loads of single-topic tutorial videos here, and also by using the search box at the top of the page.
Prep Your Block
Cut an 11” square of fabric for the background, and an 11 inch square of batting.
Press the quilted block again (with steam) and let it cool.
This video has a general intro to my Quilt As You Go method, along with complete instructions for how to assemble the block. It’s a long video, but there’s timestamp info to help you skip to the specific instructions you want.
Cut Your Pieces
Download the template pieces and placement guide here.
If you have an electric cutting machine, you can use it to cut your pieces. Download the SVG file here.
The image in the SVG file is NOT reversed. If your cutting machine has you cut your pieces fabric side up, leave the orientation as it is. If your cutting machine has you cut your pieces fabric side down, you’ll need to flip the image horizontally.
Different cutting machine brands import the image at what seems to be totally random sizes. To fit the appliqué on a block that finishes at 10 inches square, check to make sure the small square in the image is one inch, and resize if necessary before ungrouping the pieces. Delete that square after resizing so your machine doesn’t try to cut it. 🙂
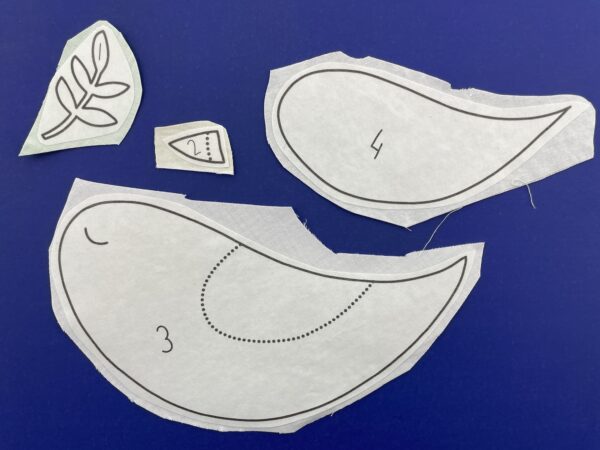
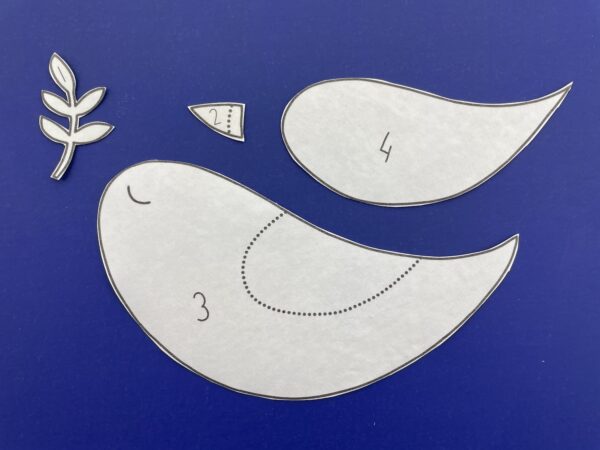
Print your templates.
If you’re cutting everything by hand you’ll need to print the reversed and exploded templates. If you’re using printable fusible adhesive you can print those pages directly onto the paper side of your fusible.
I hate to trace so I use printable Heat & Bond Lite for all my quilts – make sure whatever brand you choose is compatible with whatever type of printer you have.
If you’re using a light box you’ll also need to print the placement guide.
Roughly cut around each shape. Leave a little bit extra all the way around each piece.
Follow the package instructions and fuse each piece to the wrong side of the fabric.
Cut out each piece neatly, directly on the solid lines.
Cutting after you fuse ensures that the adhesive goes right to the very edge of the fabric.
Trace the dotted lines onto the fabric. If you hold the pieces up to a window, the light will make the lines very visible – even on dark fabric.
If you want to skip this step, this video shows how to use a light box. If you use a light box, you only need to transfer the eye.
Put It All Together
Peel off the paper backing and arrange the pieces on your background block. Fuse in place according to the adhesive package instructions.
This video shows the assembly with me explaining how I’m layering the pieces.
This video shows the same thing – but using a light box to guide placement.
Stitch all the edges down. You can use any stitch you like, in matching or contrasting thread. I really love the look of a simple straight stitch with black thread.
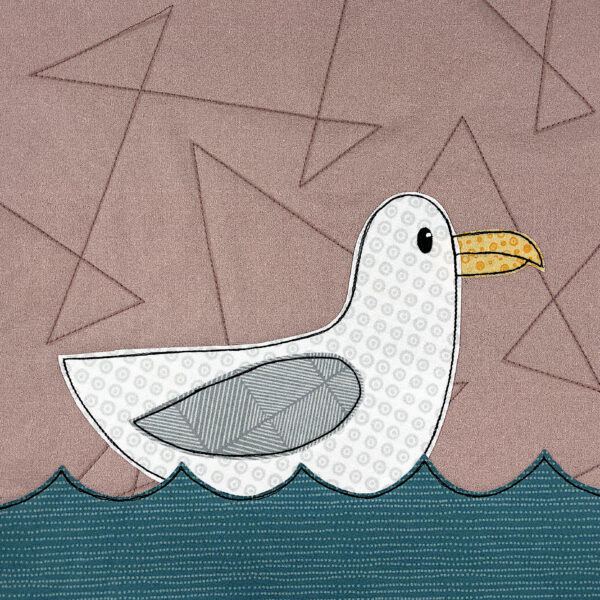
Add some waves to your quilts with this free applique pattern!
In addition to the wavy stripes you see in the top image, the free pattern also includes a template designed to use at the bottom of a block, in combination with an animal applique.
Here’s an example.
These waves will work particularly well with the following patterns:
People call them cloth books, quiet books, soft books – whatever you call them they’re easy and fun to make and a great way to get extra use out of your patterns.
The instructions below are for a 12-page book, 8 inches square, with flannel “batting” to make the pages extra soft and snuggly.
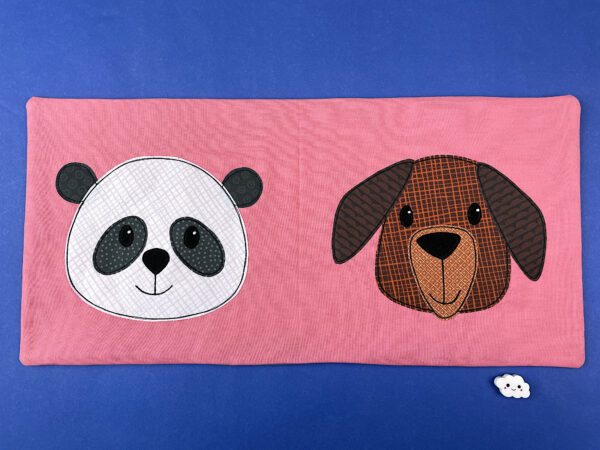
Here’s what mine looked like after filling it out.
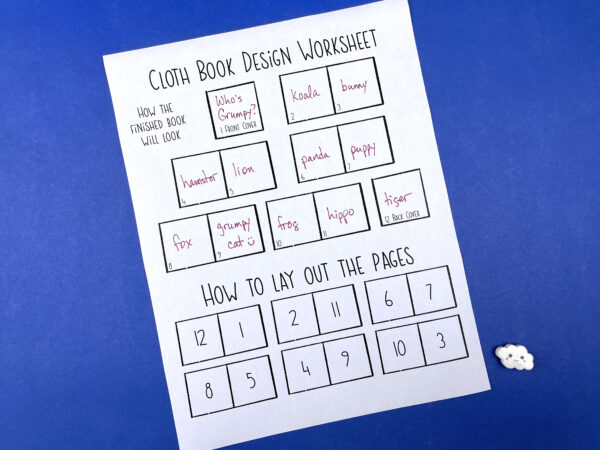
The top of the worksheet is your planning guide. It lays out what the pages will look like when you’re reading them.
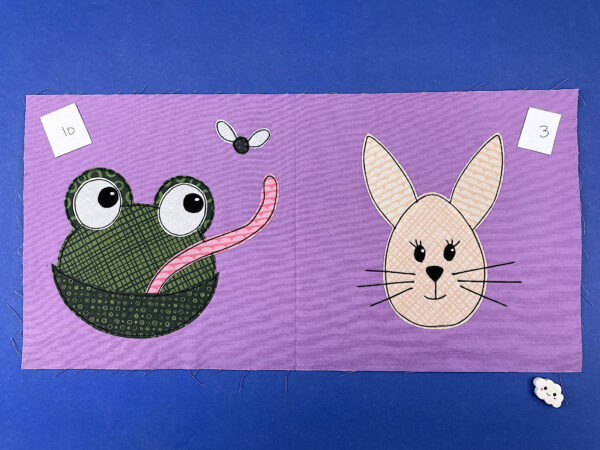
I decided to call my book Who’s Grumpy? I put one face on each page, including mostly smiling faces but one very grumpy cat. I deliberately placed the cat on an odd-numbered page so when someone is flipping the pages, that’s the immediate “reveal.” I’m imagining a kid pointing and calling out,”He’s grumpy!” as soon as you turn that page. 🙂
My book is a random collection of animals, but you can do anything!
Make a collection of a child’s favorite animals.
Make a souvenir of a visit to the zoo and the animals you saw there.
Make a collection of the animals native to your area.
Use this free ABC pattern to put an animal face on the even pages, and the sound that animal makes on the odd pages.
Make a Christmas book with the free patterns here.
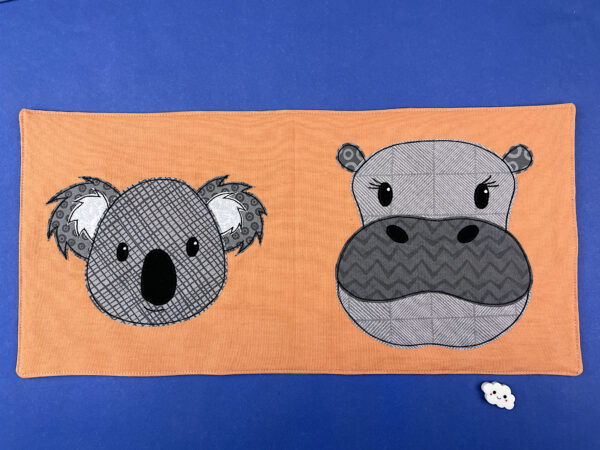
The bottom of the worksheet is your construction guide. It shows how you need to make the pages so that when you put them all together it reads like you planned in the top of the worksheet. So, for example, the animal for page two (the koala) needs to be on the same rectangle of fabric as the animal for page 11 (the hippo).
Materials
You’ll need 3/4 yard of fabric for your book, and 3/4 yard of flannel.
I recommend pre-washing both the fabric and the flannel, and I actually recommend washing and drying the flannel one extra time because that stuff has a tendency to shrink a lot.
You’ll also need fusible adhesive. I use Heat & Bond Lite for all my quilts.
Cutting Instructions and Applique Preparation
From the fabric, cut 6 rectangles each 8 1/2 inches x 17 inches.
From the flannel cut 6 rectangles each 8 inches x 16 1/2 inches.
Print or trace your applique templates. Since my book is 8 inches square and my patterns are all designed to fit in 10 inch squares, I printed all the template pages at 80% size. There’s more info about resizing patterns here.
Instructions
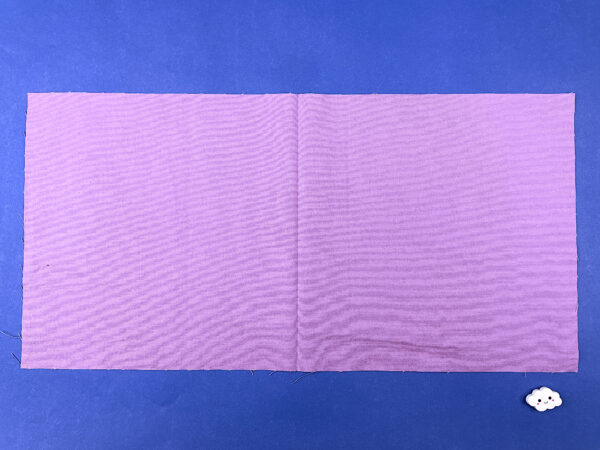
Fold your fabric rectangles in half and press the fold to mark what will be the spine of the book.
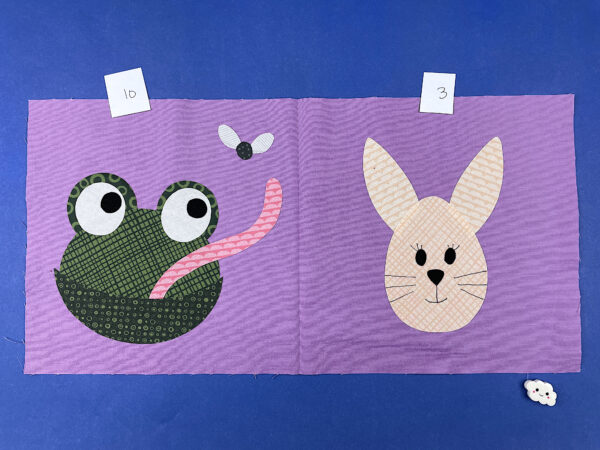
Fuse your appliques. (Those little cards with the numbers are my page numbers, just helping me to keep everything organized while I worked.)
I usually make my quilt blocks “snapshot style.” By that I mean I imagine that I’ve snapped a photo of the animal, zoomed way in on its face. Here’s an example.
I’m trying to make it look like she has a lower body – it’s just cropped out of the photo – and I achieve that effect by lining the cut edge of the bottom of the applique like up with the raw edge at the bottom of my block. You can do this in your soft book exactly the same way. Just line up the straight edge at the bottom of the applique piece with the bottom edge of the page so both raw edges get included in the stitching when you finish the page edges.
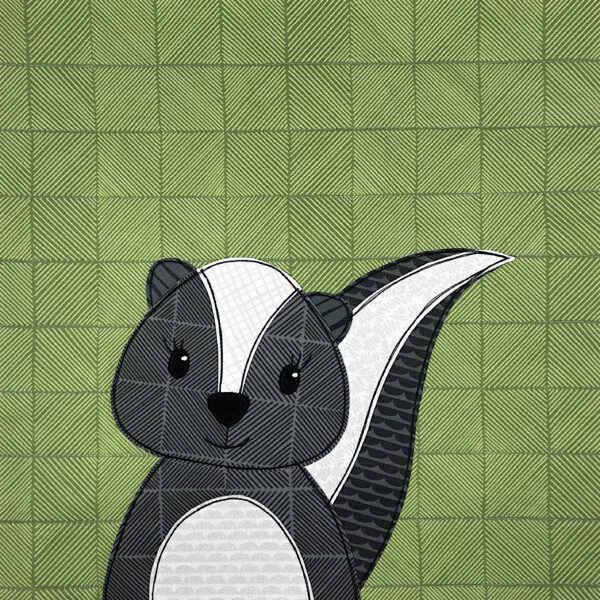
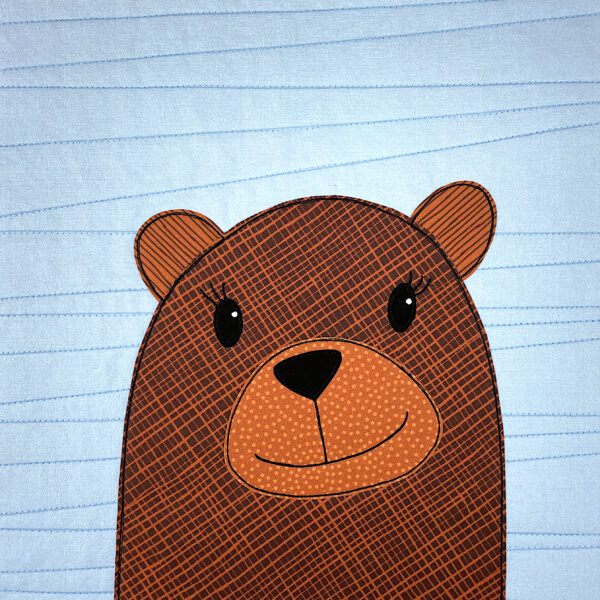
For my book I decided to float the heads in the middle of the block – what I call “emoji style.” When I do that, I just don’t use the shoulder or body pieces. That means I had to choose animals where the head and body are separate pieces, so I didn’t include anything like this bear.
See? No way to separate the head from the body.
That was a little design digression. Now, back to the instructions. 🙂
Center a flannel rectangle on the back of each page rectangle. I cut the flannel smaller than the fabric in order to de-bulk the edges of the pages.
I used spray adhesive because every few years I forget how much I hate it and I give it another try before swearing off it for another few years. It would have been a lot easier (and less messy) to just dab a little fabric glue stick in each corner and a swipe down the center. 😛
Outline the applique. I just use a simple straight stitch with black thread.
It all worked out fine, but since I used fabric paint for mine catchlights, it means for the rest of the process I had to be very careful not to iron over the eyes. It would have been easier to add the catchlights at the very end.
Now comes the fun part – finishing the pages.
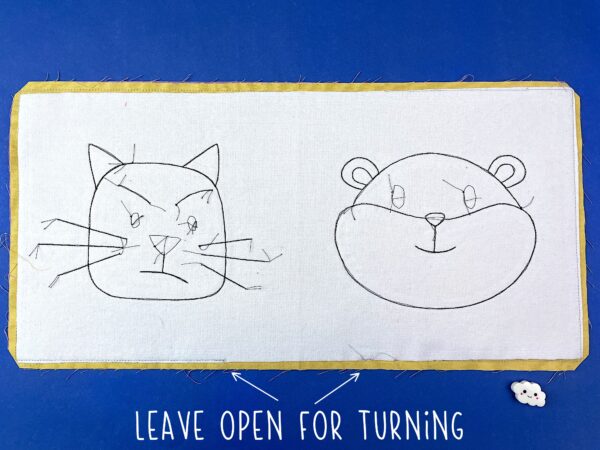
Sew pages 12/1 to pages 2/11, right sides facing, using 1/4-inch seam allowance all around. Leave a 4-5 inch opening for turning.
Repeat with pages 6/7 and 8/5.
Repeat with pages 4/9 and 10/3.
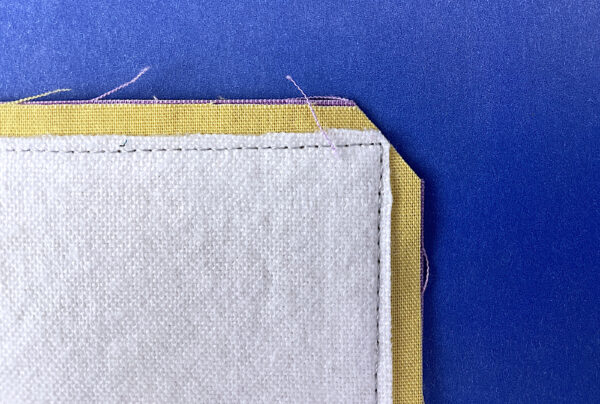
Clip the corners of each page and turn them right side out.
Here’s a close-up of the clipping. You want to get right up to the stitching without actually cutting the stitches.
Smooth all the edges, tuck the seam allowance in at the turning opening, and give it a good press.
You can close up that opening two ways.
Hand sew the opening closed using ladder stitch. This is slower, but completely invisible and results in the softest pages.
Topstitch the edges of the page all the way around, closing up the opening as you topstitch. This is faster, but results in a slightly stiffer page edge.
I chose option 2 – topstitching. I’m pretty sure the page edge will soften up over time, and even if it doesn’t it’s really not unpleasantly stiff. 🙂
Finally, stack the pages as follows.
Lay page 12/1 face down so that its back (page 2/11) is face up.
Over that lay page 10/3 face down so that its back (page 4/9) is facing up.
Over that lay page 8/5 face down so that its back (page 6/7) is facing up.
Sew the three layers together right down the spine of the book, using that pressed fold line as a guide. I stitched my spine twice for extra durability.
Close your book. You’re finished! Here’s my finished book. . .
Here are a bunch of additional ideas and links to further customize your book.
You can change the size of your book – just be sure to adjust the print size for your templates accordingly. I use 10-inches as the base for all my quilt blocks because it makes the math so dang easy. If you want a 9-inch book, print your templates at 90% size. If you want it to be 7.5 inches, print your templates at 75%. Easy peasy.
If you want to add or subtract pages, that will throw off the entire planning worksheet so you’d need to make your own. It also affects what batting you use in the pages. In my tests, even thin cotton batting was too puffy for a 12-page book, but it would probably work for an 8-page book. If you want to make yours longer than 12 pages, I’d recommend stabilizing the pages with interfacing instead of using the flannel.
Go crazy with fun special effects!
Maybe you want to use smooth shiny satin for your frog! Or fluffy fleece for your puppy. Or a little bit of white fur for the inner ears of the koala! This post will take you to the tutorial showing how to applique with satin, and at the bottom of that post there are links to tutorials for lots of other specialty fabrics.
Want to use an easy faux trapunto technique to give the koala a puffy nose?
Here are several free patterns that work with just some simple resizing. This post about making coasters has info about resizing an applique pattern that can be applied to any of these projects.
These instructions assume you’re already familiar with the applique method I use – Quilt As You Go and applique with fusible adhesive.
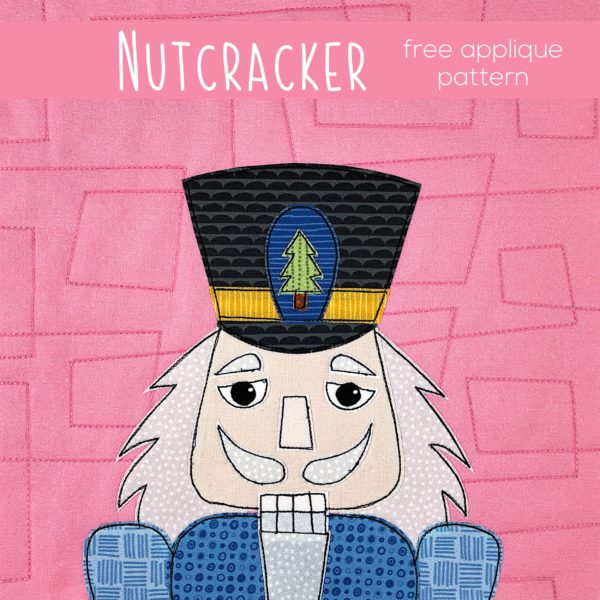
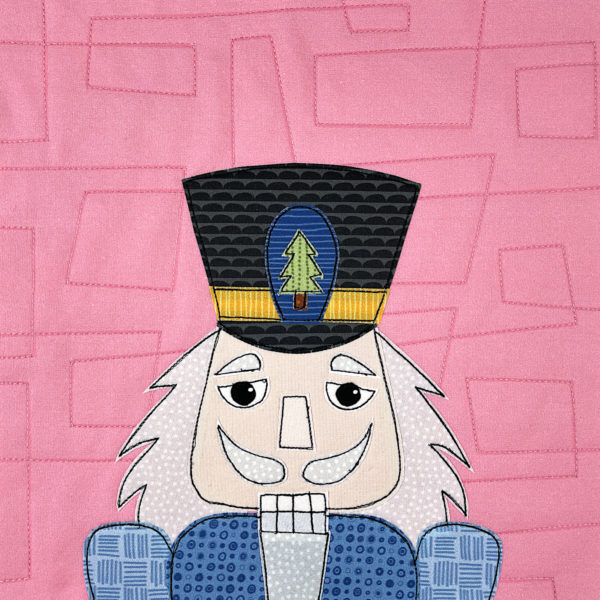
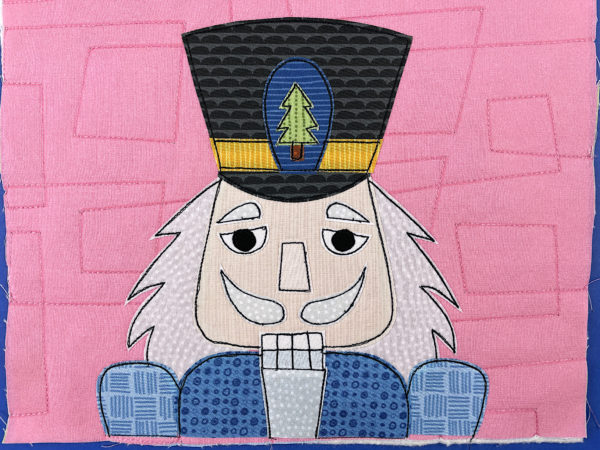
If you’re new to my patterns, there’s a detailed video workshop here that takes you step by step through the methods I use. It’s totally free, and you can work your way through the lessons using any pattern you like, including this nutcracker pattern!
Step 1
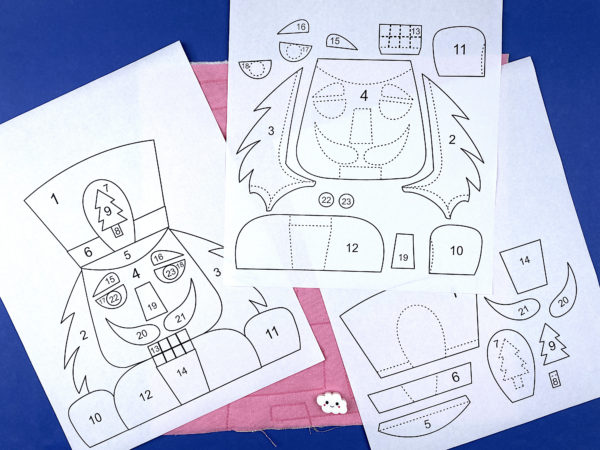
Download the template pieces. If you’re using paper-backed fusible adhesive and cutting by hand, use this link to download the PDF. If you’re using an electric cutting machine, use this link to download the SVG. On most computers that link will take you to a preview of the file. You’ll need to click on the down-arrow icon to actually download it to your computer.
If you’e using an electric cutting machine like a Cricut. . .
Upload the file to your machine.
Resize if needed. (The small square in the top left corner should be 1 inch.)
Ungroup the pieces and assign colors.
Cut.
Step 2
Trace or print the pattern onto the paper side of the fusible adhesive.
I use Heat & Bond Lite for all my quilts, and I love printable sheets because I’m lazy and hate to trace. 🙂
The image has already been reversed, so just trace or print. If you’re tracing, be sure to trace the lines separating the teeth too. You’ll need those for Step 5.
Step 3
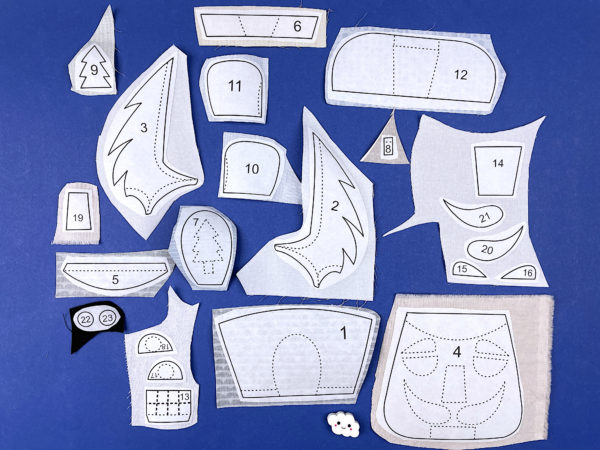
Whoa! That’s a lot of pieces!
It’s ok – the numbers tell you what’s what and there’s a video showing how to layer them up. 🙂
Roughly cut around each shape and fuse it to the back of your fabric.
Step 4
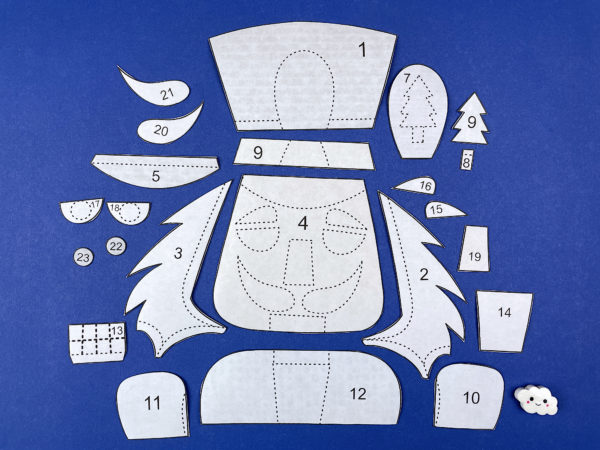
Cut around each piece neatly.
This time you’re cutting directly on the solid lines.
Step 5
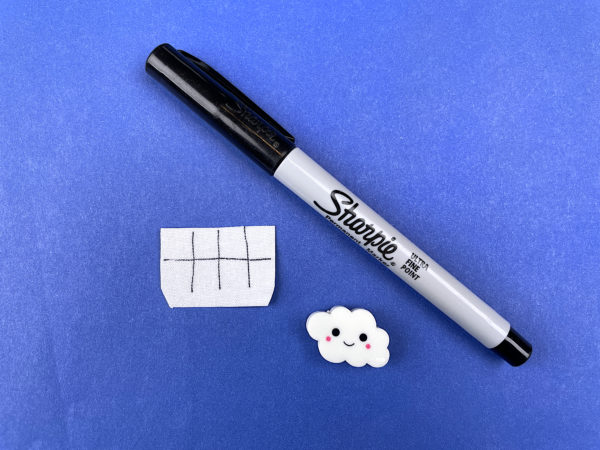
Remember back in Step 2 when I told you to make sure you traced the lines for the teeth? Now you’re going to use that. Hold the teeth up to a window so the light shines through it. You’ll be able to see all the dotted lines, and the adhesive will stabilize the fabric so you can trace on it without it crinkling up.
If you’re not using a lightbox (I am in my video), trace all the other dotted lines too using chalk or a pencil. They’ll help you position the pieces.
Step 6
If you’re doing Quilt As You Go (I did) then you can quilt your block before adding the applique. So easy!
Cut your background fabric and a piece of 100% cotton batting 11 inches square.
Layer the block with a piece of 100% cotton batting. Quilt any pattern you like!
I prefer to quilt my blocks before I applique. These posts show how I do that, along with lots more info. Start with them.
Some people prefer to quilt after they applique. This post features a gallery of lots of quilt patterns with video instructions showing you how to work those patterns around applique you’ve already done. Of course, you can also stitch these designs before you applique.
If you’ll do the quilting later, simply skip this step.
Step 7
Peel off the paper backing and arrange the pieces on a background block.
Fuse the pieces in place, following the instructions for whatever brand of adhesive you used.
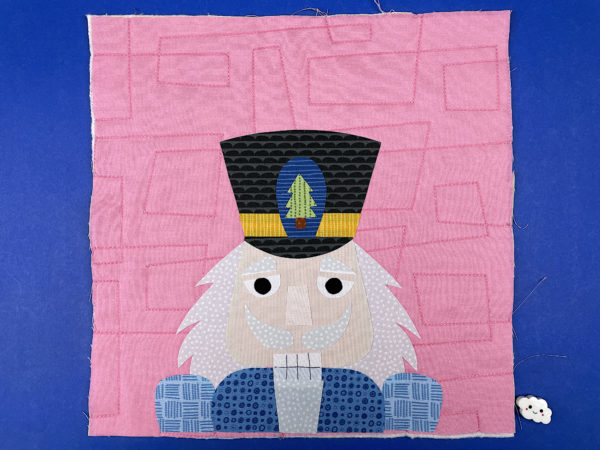
This video has detailed instructions for layering all those pieces and also shows the finished block.
Step 8
Outline all the pieces with black thread and a simple straight stitch – or choose your favorite decorative stitch.
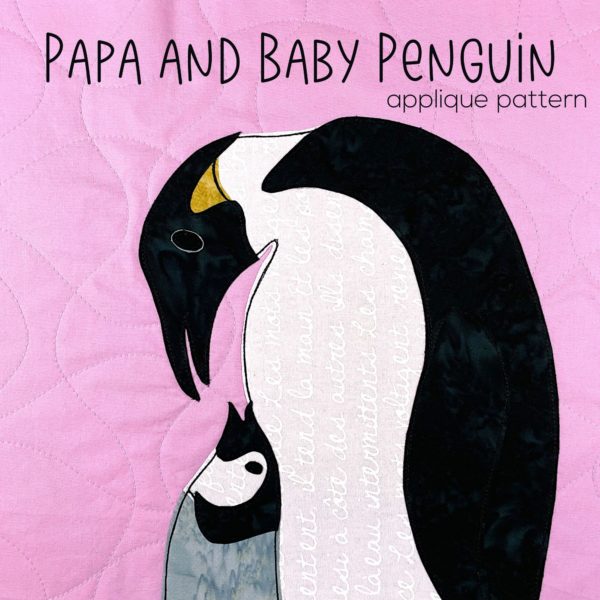
In time for Father’s Day next month – a Papa and Baby Emperor Penguin applique pattern!
Yep, the 15th of the month means it’s pattern release day in the Funny Faces Quilt Block of the Month Club!
We have a vote last month in the club to see what the next block of the month pattern will be – and this month the penguin pair were the winners – just barely edging out the dragonfly.
I can’t wait to see all the penguins you make! (Penguins are antarctic, rather than arctic – but they’d be a fun addition to all the cold-loving critters in the Arctic Chill quilt pattern.)
I’ve been making sample blocks for this quilt pattern for months now. This one was a doozy!
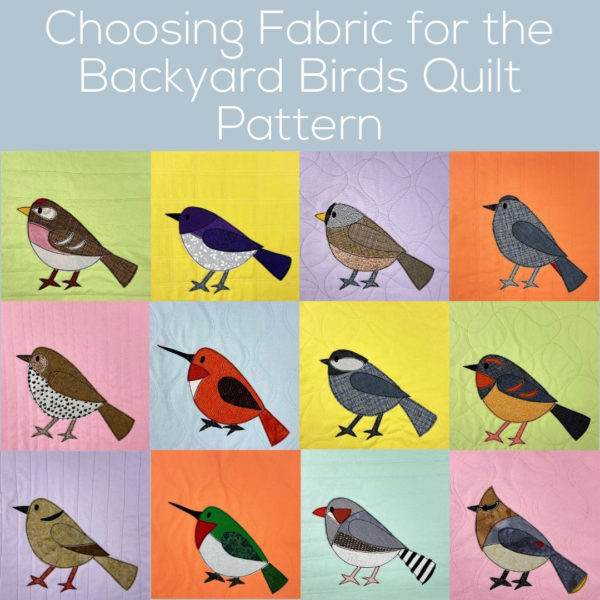
I’ve been getting a lot of questions from people who are starting to shop for fabric for their Backyard Birds quilts – wanting to know if there’s a list they can shop with.
Yes! Sort of. 🙂
Fabric Shopping List for the Backyard Birds Quilt Pattern
Please understand that this is by no means a definitive list! It really depends on what birds YOU want to make. I’m making sample blocks (and including instructions for) 100 birds, but there are THOUSANDS of bird species out there – and when you consider the fact that male and females of the same species often look very different. . . well, that’s a lot of variation.
I’ve designed the templates to be mix and matchable – so you can use them to go way beyond the 100 samples I made. That means you’ll probably also go way beyond the fabrics I used. BUT! I can give you some guidelines to create a really useful stash to start with. Just be aware that you may need to go searching for just the right fabric for some of the birds in your quilt.
Before I go into specific colors and patterns, I want to include just a couple of the “rules” I used for my sample blocks. I often decide on rules for a quilt before I choose fabrics. It helps me keep a cohesive look to a jumble of different blocks. For my bird samples, the only solid I used was solid black for the eyes. ALL the other fabrics are prints or batiks. I did this because even the smoothest-looking birds have some variation/texture in their feathers. So I used batiks for the very smooth, uniform-looking birds (less common) and other prints for the rest (more common).
I recommend choosing one color palette for your background blocks, but I’ll have more info about that (and lots of sample photos) at the end of this post.
Solid-ish Neutrals
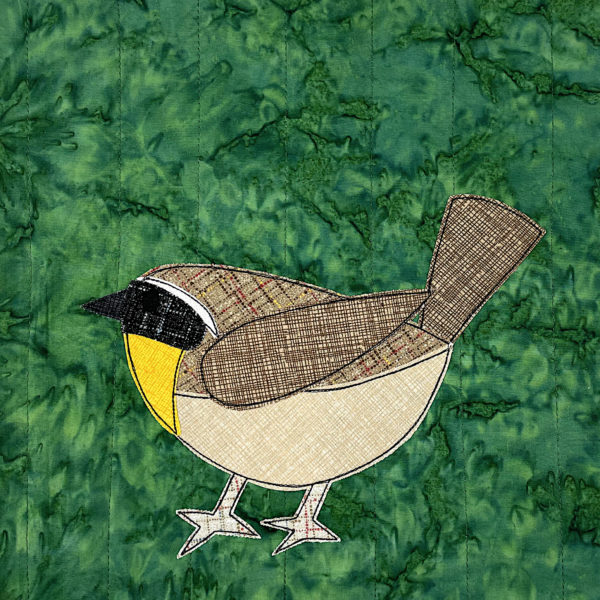
Not surprisingly, you’re going to need a lot of neutral fabrics. A LOT of backyard birds are colored to blend in with their backgrounds. The Animal Kingdom color collection is a great starting point. That contains multiple shades of grey (ranging from almost white to black), multiple shades of brown (again ranging from very light to very dark), a rusty brown and a golden color. Each of those colors is available in multiple prints, so you can find lots of variety there. You’ll definitely want more variety in the browns and greys – I often liked to use different prints of the same shade to get some contrast between different parts, like you see in this yellowthroat.
The wings, tail, and back of the bird are the same brown – but I used different prints to help create definition.
If that large collection is a bit much, you can shop by color here.
Here are some links to the colors you’ll use the most. . .
All of these that I’m talking about here are the tone-on-tone prints that read as solids.
Printed Neutrals
Now we’re talking stripes and spots. You actually don’t need many of these fabrics – but what you need is pretty specific. Here’s a list of the most common prints I used.
streaky brown – cream or tan with darker brown streaks or stripes
cream or tan with darker brown spots
brown with cream speckles
a darker brown and a lighter brown dappled print (all-over florals can work here)
brown stripes – medium brown with darker brown or black stripes
grey with black stripes
Of course, this is not comprehensive – but it’s a good start.
Black and White
You’re going to want some black and white prints.
wide black and white stripe – very useful for birds with black and white heads
white with black spots
white with black speckles
narrower black and white stripes (mainly for woodpeckers)
black and white check (also mainly for woodpeckers)
Blue. Lots of birds have some very bright blue. Get a couple of prints in the same rich shade for the definition I talked about in the neutrals section. The darker shades of these Blueberry blenders work well for iridescent and blue-black birds.
Red. Most red birds tend to be orangey red rather than blue-ish reds, so keep that in mind as you shop. These blenders are true red, and these have a touch of orange.
Pink. We have a lot of pink and pinkish-purple birds here on the east coast. You’ll find a pink with grey undertones (or even grey streaks) pretty useful, and also a bright mulberry shade for several finches.
Greens. Surprisingly, there aren’t a lot of green birds here in the US. You’d think that would be good camouflage. You might want to decide on your birds before you shop for greens, because you could need anything from emerald to olive.
Orange and dark purple. Again – these don’t come up as often, so maybe shop as needed.
Background Blocks
The fabrics you choose for your background blocks can affect the whole mood of your quilt.
For my quilt I chose realistic colors for all the birds, and I played around with several different background palettes using my fabric bundles. I recommend choosing either solids or batiks for your background blocks – but don’t mix them. Besides thinking about the overall look you like, think about the quilting here. Quilting will really show on solids, and will be almost invisible on batiks.
Here are the background palettes I’ve already experimented with.
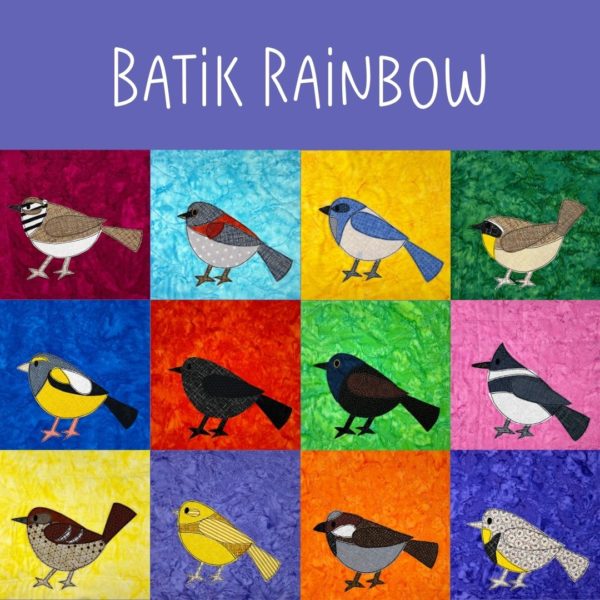
These bright batiks will give you very vivid background blocks with nearly invisible quilting. The background fabrics are as vivid as some of the most colorful backyard birds!
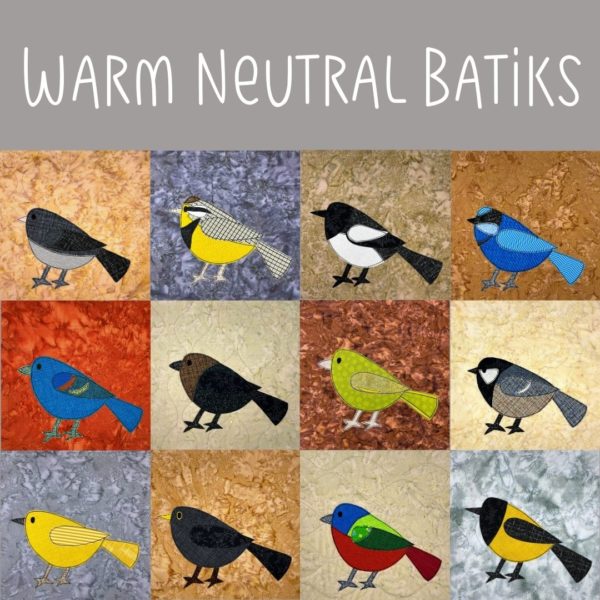
The neutral batiks will give you a more subtle, forest-floor background. The colorful backyard birds really pop against these neutral fabrics, but when you’re putting a brown bird on a brown block (or a grey bird on a grey block) you’ll need to be sure to get good light/dark contrast.
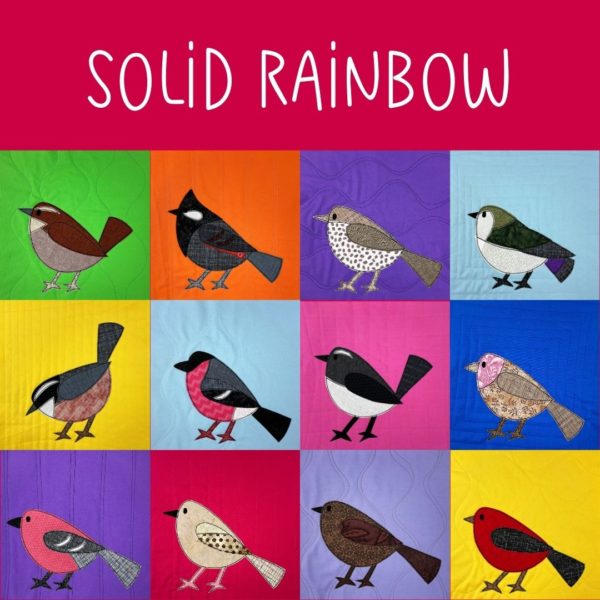
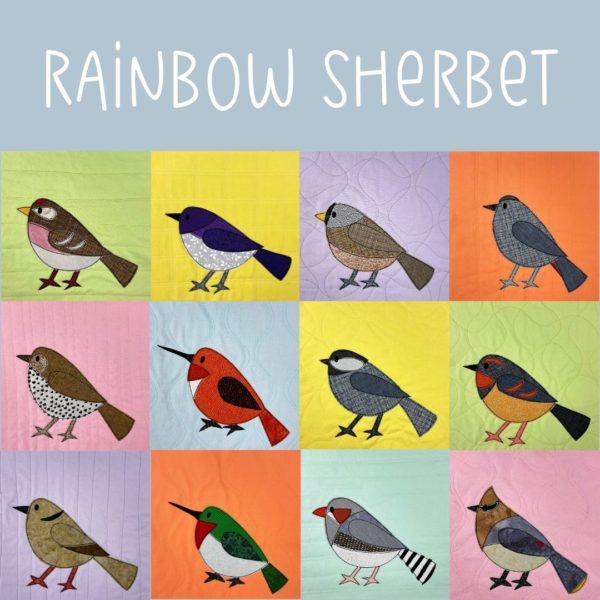
The solid background blocks in basic rainbow colors. Bright and cheerful.
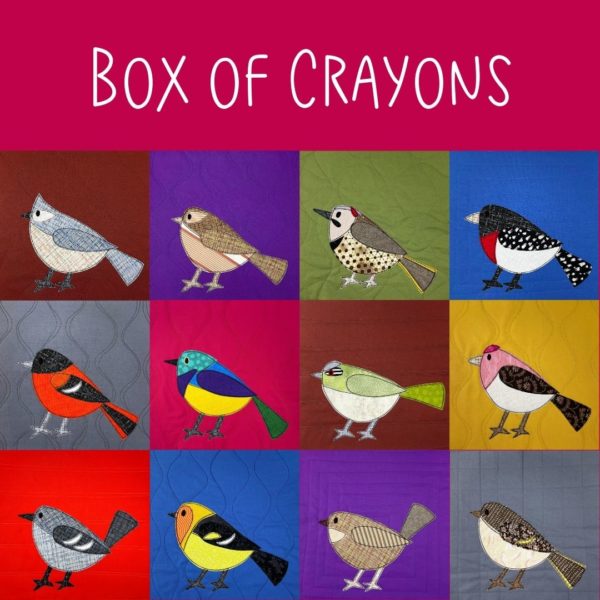
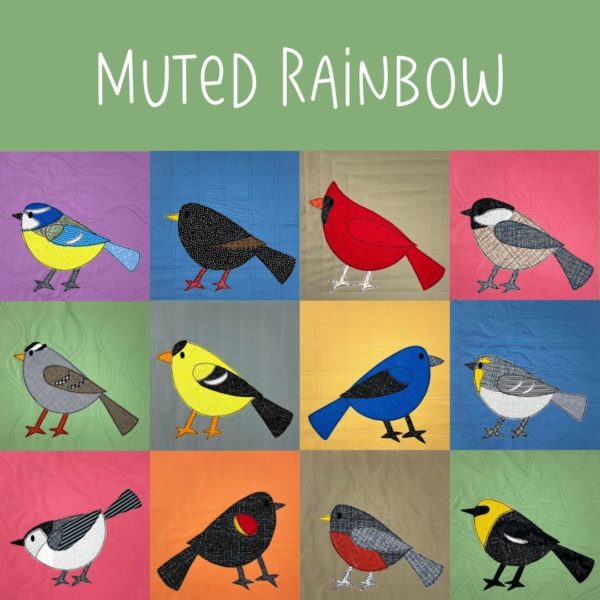
These are also solid backgrounds, but in a more grown-up rainbow. The colors are still intense, but a little more muted. The yellow is mustard rather than sunshine. There are also some neutrals (brown and a grey) in the mix.
More solids, but this time in soft baby colors. The birds really pop against those pale pastels.
A different kind of rainbow solids. The colors are still bright, but they have a chalkier look. This collection also includes a brown and a grey.
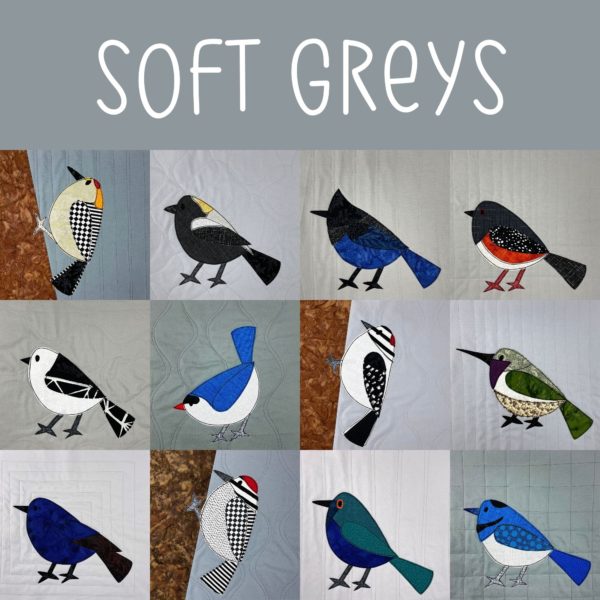
I also love this batch using shades of solid gray.
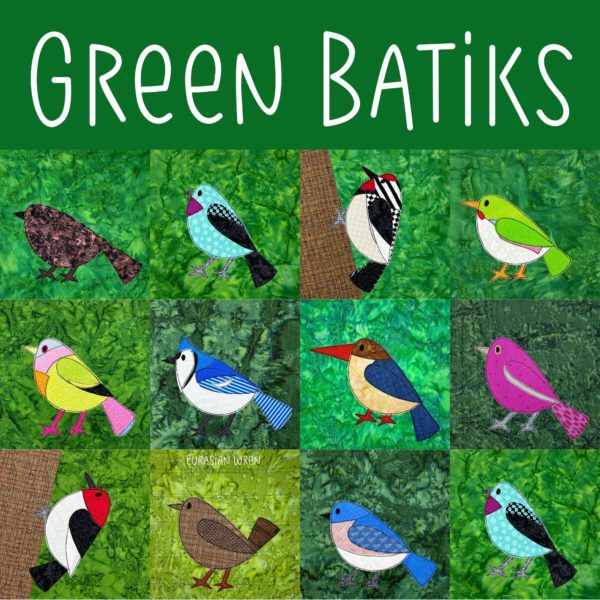
Green batiks can give you a very realistic background foliage kind of look.
Blue batiks would also work also really well – suggesting the sky.
Whew! That’s a lot of information! I hope it helps you shop for fabrics for your Backyard Birds quilt. Get the pattern here!
For the last few years I’ve participated in the 100 Day Project. Last year was the first year I actually finished it. 🙂
The 100 Day project is awesome. Participants decide on any creative activity they want to pursue for 100 days. It can be ANYTHING! A few that I remember off the top of my head are a jeweler who made 100 pairs of earrings, a potter who came up with 100 different handles, a baker who made 100 different pies, and an artist who designed 100 different alphabet fonts – the sky’s the limit!
Last year I designed a different repeat pattern every day – AND I used that pattern to mock-up a new applique design. Here’s just one example.
I hoped to have a fabric collection come out of it, but I got something else instead. SO MANY QUILT BLOCK IDEAS!
I love how it turned out – but it was relatively easy. Just design all the blocks, make a sample, record the video tutorials, and write the pattern!
But one of the ideas that the project sparked last year was a Mix & Match Backyard Birds pattern. As I was drawing some of the birds I see at my feeder, I realized that a lot of the basic parts are pretty much the same. I wondered if I could create some basic templates that could be used to applique just about any of those classic feeder birds. I noodled around with the idea for ten of my hundred days, and it seemed like it would work!
I’ve taken the months since then to draw up a bunch of templates and now I’m finally ready to test them – just in time for a new 100 Day Project!
The new tests won’t be mock-ups. They’re actually appliqued blocks that I’ll be able to join into a quilt. So exciting!
Here’s Day 1 – a black-capped chickadee, one of my favorite birds.
Will I be able to make 100 different recognizable birds using just a few pages of templates? We’re about to find out. 🙂
You can follow along with my progress on Instagram. And the applique pattern will be available at the end of the project – maybe even sooner if the testing goes smoothly and I don’t need to design too many additional templates. 🙂
Update! The project is finished and you can find the pattern here!
Want to join in the 100 Day Project? There’s more info here.