Wee Princess Pea – a purse-sized fairytale playset designed by Larissa Holland at mmmcrafts
This post contains affiliate links. That means I make a little commission if you buy something after clicking through. All affiliate links are marked with an *.
First of all – can I get an AWWWWWWWW?
How about an OH WOW!
I want to start adding the occasional pattern review to Shiny Happy World. Books get reviewed all the time. But lots of us like to buy individual patterns – especially PDF patterns – and reviews can be helpful for that, too. So as I find patterns I admire in my internet roamings – patterns that I think you all would enjoy – I’ll be dropping in an occasional review.
I’m starting with this one because it’s pure awesome. 🙂
I’ve admired Larissa’s Wee Mouse in a Tin House* before, but when I saw the level of detail and cuteness in her Wee Princess Pea Playset it totally knocked my socks off. Look at all the stuff you make! That’s a bed, a pillow, a stack of mattresses, a ladder (to climb to the top of the stack), a bedspread, a doll in a nightgown with a removable robe and crown, and a closet – with a hanger where you can hang the robe. All the little bits and pieces pack neatly into the two Altoids tins used for the bed and closet, and they tuck into a little drawstring bag (not pictured here).
WOW!
The pattern is amazing.
With something this small, that needs to fit into the two Altoids tins, precision is a must. Larissa’s pattern pieces are drawn beautifully and well labelled.
One of the things I love about digital patterns is that there’s no need to skimp on instructions or step-by-step photos. The pattern can be as long as it needs to be without the space considerations of a printed book.
Larissa takes full advantage of that. She writes very detailed instructions and includes plenty of very clear photos illustrating every step.
This was a new way of making pipecleaner people for me, and I never felt lost or even a tiny bit confused at any point. That’s my doll to the left. I switched thread colors when I got to her legs because I didn’t have enough of the skin color I used on the body and arms. I like how it looks like she’s wearing tights. 🙂
Jo loved that looooong hair.
Larissa is also very detailed in her materials list. I didn’t always have what she recommended on hand and had to make a few substitutions. I didn’t have any eyelet lace trim, but I had this sheer sparkly stuff that I used as my overskirt. And I didn’t have the right size ribbons for the shoulder straps and sash – but I did have a bit of old rhinestone trim that I’ve been looking for a way to use.
Overkill?
Maybe. But also totally fun. 🙂
One thing that I especially appreciated was her detailed information about what glue to use in what situation. I am NOT a glue person so it was really helpful that she didn’t just instruct me to glue pieces together. She said where I needed to use craft glue, fabric glue or hot glue – and why. Very nice!
The project is almost all hand work and glue, with a little bit of easy machine sewing for the mattresses, bedspread and drawstring bag.
The robe was intended to be a mix of hand and machine sewing, but you can’t expect me to make a teeny-tiny little felt robe and not blanket stitch around the edges.
I just had to!
And I love how it turned out. 🙂
Here’s the final scene I made. . . Want to make your own?
You can get the pattern here.* And take a look at everything else in Larissa’s shop* while you’re at it. In addition to adorable playsets, she also designs lovely felt pieces, super-cute dolls and softies, and a stunning 12 days of Christmas felt ornament pattern collection.
I adore Stephanie Dosen’s (aka Tiny Owl Knits) designs. She designs whimsical and fun knitting patterns… so I was really excited to see her book, Woodland Knits.
The book contains 21 adorable patterns, 10 of which are new designs for the book. The remaining 11 designs are well-loved favorites, like the deer with antlers hat, bo peep scarf and fawn poncho.
The book contains cute little notes and helpful tips throughout, but no introductory material. It’s 21 lovely patterns bound together in a book.
I was surprised to see that all of the patterns in the book are available for individual purchase as pdf downloads. At around $5 a piece, if you’d like to make a few, then $20 for the book is a great deal!
Besides the discount over purchasing 21 individual patterns, though, you don’t get much additional content to the book. So, I would recommend having a peek at the included designs (which is tricky, since only the new 10 designs are listed as patterns in the book on Ravelry), and deciding whether there are a few you’d like to knit.
The patterns are cute and the book is very pretty… so if you can find a few, then I’d say go for it!
I used to be a quilter – with a capital Q. I entered my quilts into shows and sold them in galleries. I liked making the quilts, but I hated everything else about the process. I hated writing Very Serious Artist Statements. I hated entering quilt shows. I hated worrying about how much time I was spending on a quilt, knowing that that was pushing up the price. I didn’t like thinking about my designs in that way.
So I stopped. And I started Shiny Happy World and I didn’t make a single quilt for a few years.
I started making cute toys instead of expensive quilts. And then I started designing patterns for those cute toys so other people could make them too. And that was awesome!
But then I made a quilt. I made the Buttonholes quilt and it was really fun to design a quilt pattern especially for beginners – with no places where the seams needed to match up and no stress whatsoever.
And then I made the Scary Squares quilt and had the Most Fun Ever. And then there were a few more quilts – including the Puppies quilt which I love, love love.
And all of a sudden I realize I have my quilting mojo back. And you know why? Because I’m making quilts that I LOVE. These quilts will never appear in any gallery. They’ll never win a prize in a show. But they make people smile and they keep people warm and they’re really fun to make. I’m not stressing about points or matching seams – I’m playing with color and shape and cuddly monsters and cute puppies. And I love it!
Why did this come as a revelation?
I reviewed Quilting Happinesshere, and in responding to some people’s comments about the book and the review, it really made me think about my own quilting journey. I feel like I fell into this trap of always pushing my skills – always making more and more complicated quilts – until I didn’t enjoy what I was doing. I was designing for the galleries and the judges and my own weird internal measuring stick.
It’s like I had to give myself permission to make quilts that were “below” my skill level. Where does that come from? I have the technical skills to make a mariner’s compass quilt. Or a Baltimore Album quilt. That doesn’t mean I HAVE to make one! Making one (for me) will be stressful and sweaty and I’ll probably say a lot of bad words. I can do it – but it won’t be fun. And I want my quilting to be fun, dang it!
I’m writing this because I know a lot of you have struggled with the same thing. I read it in a lot of private emails after I posted my Quilting Happiness review. You don’t need my permission – but I’m giving it here just in case hearing it from another source helps.
You do not need to challenge yourself with every project you make. If you want to learn a new skill – awesome! But don’t feel like you have to. It’s ok to just make things for the joy of it. You can make beautiful, stunning, gorgeous quilts for the rest of your life without ever worrying about chopping off points or matching seams.
There. I’m off my soapbox now. 🙂
And now that I have my mojo back, I’m planning a LOT of new quilt patterns for next year. Most of them will be of the easy peasy Buttonholes variety – with no fussy points and no seams to match. A few of them will be skill stretchers, like the Starry Night quilt. (Update – I’ve pulled the Starry Night pattern temporarily while I reformat it to be released as a regular pattern. Sign up for the newsletter to make sure you know when it’s in the shop.) I hope all of them will be fun – and that all of you will make things you love, whether those things are simple rag dolls or complicated quilts. Think about what makes you happy when you sew and follow that path!
Have a wonderful day!
Happy sewing! Or quilting! or stitching! Or whatever you love to do!
When I read a book to review it, I read it with a notepad next to me so I can capture my thoughts as I go along. My notes for Quilting Happiness – a terrific new book by Diane Gilleland and Christina Lane ended up being a long list of things I loved.
So let me tell you what I love about Quilting Happiness. . .
I love the title. My business is called Shiny Happy World. How can I not immediately pick up a book called Quilting Happiness?
I love the quote mentioned in the dedication. “You’ll never notice it on a galloping horse.” That – in a nutshell – sums up my quilting spirit. It’s something I often tell my students when they fixate on a tiny “mistake” in a big, beautiful quilt.
I love the list 5 Things About Quilting That Makes Us Happy.
I really connected immediately with both authors of the book – but especially with Diane’s last point. “Give me some hand quilting to do, a cup of coffee, and a Doctor Who marathon, and I’m one happy woman.” That’s exactly how I feel about all hand work – quilting, embroidery, finish work, etc. Although I’d also add in Sherlock, Downton Abbey, the Phryne Fisher Mysteries and lots of other favorite TV shows. 🙂
I love the many quizzes sprinkled throughout the book. They can help you articulate what kind of quilter you are – something I sometimes find difficult to do. And I love how the results of the quizzes point you to specific quilts in the book. It’s a fun “Choose Your Own Adventure” way to work your way through the projects.
I love that every single project has very specific suggestions for quilting each quilt.
So many books just say “quilt as desired.” That’s not helpful at all! And not only does the book have specific suggestions – it has multiple suggestions for every project! And they range from simple line stitching to more complicated free motion stitching and even some hand quilting and tying suggestions. That is fantastic – and very unusual!
I love that the instructions for each quilt are super clear – with excellent diagrams.
I love that there are detailed instructions for cutting the fabric. A lot of books will tell how many of each shape and size to cut, but leave it up to you to figure out the most efficient way to do that. This book breaks it down step by step. It tells you how many strips to cut of each size, then exactly what pieces to cut from those strips. Very nice!
I love this Crazy Strips quilt. I think it’s my favorite in the whole book. It’s pieced improvisationally, but within a structure. That helps keep things balanced and can be less overwhelming to someone just getting started with that kind of loose approach.
I love the range and variety of projects. There are bold, dramatic, modern quilts. There are traditional quilts made with vintage-style fabrics. There are quilts for beginners and quilts for more advanced stitchers. There are small projects like pillows and tote bags, and there are large bed quilts. This is an especially great book for beginners who know they want to try quilting, but maybe aren’t sure what kind of quilts they want to make. They can take some of the quizzes to get pointed in one direction, then stretch their skills as they learn.
I love the “Happiness Practice” exercise about Finding Inspiration Guides. It’s a great guide to studying a quilter you admire – breaking down just what it is about their quilts that really works for you so you can apply that to your own work without copying them directly. What a terrific exercise!
I love the general instructions at the end of the book. They’re very clear and cover all the basics – how (and why) to square up your fabric, piecing curves, basting and binding your quilt and more. It’s a great reference.
I love this Haphazard Chevron Pillow. It’s similar in many ways to the Crazy Strips quilt I mentioned above – in that it’s irregular piecing within a structure. But it’s a smaller project and one I could realistically tackle right now. So I decided to make one for myself!
I strayed a bit from the instructions (of course) – not because they were unclear – they’re terrific! But I have overflowing scrap bins, I knew my daughter would really like a rainbow pillow, and I wanted to try a quilt-as-you-go technique I’ve been toying with. So here’s my Scrappy Rainbow Chevron Pillow. 🙂
My pillow form was a bit larger than the one in the book, but I used the same suggested range of widths for the strips I cut so it would have a similar effect.
I love it! Thanks so much for the inspiration!
Are you ready for some Quilting Happiness of your own? Get the book here.
Being a knitting/crochet designer is kind of a weird job. Being successful means being part designer, part webmaster, part marketer and part photographer. And you can’t go to school for it. (okay, you can go to school to learn to design, but not do all the other stuff!)
I learned it through the grapevine…
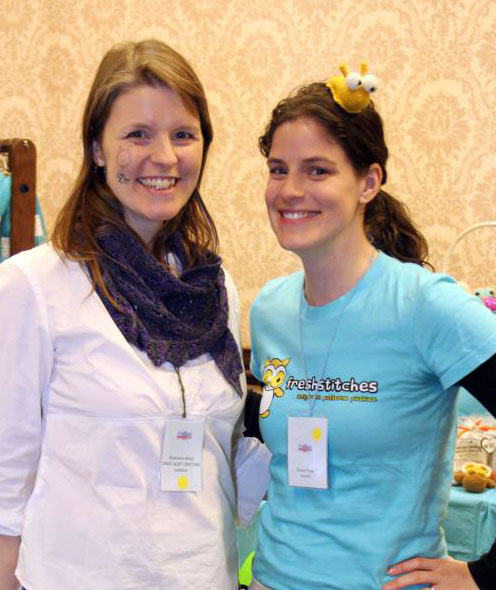
Most of what I know about ‘the biz’, I learned from other designers. Chatting on online forums. Talking in person at trades shows. It took me years to feel like I really got what was going on.
That’s me and Space Cadet pausing for a photo during a chat-session!
I can’t tell you how much I learned about marketing and my brand by chatting late into the night with other designers at conferences!
But now… the Reference Guide!
If you’re a newbie designer, you’re coming in at a great time! You don’t have to spend big bucks traveling to conferences to find out about the ins and outs of the industry… there’s a book about it!
Alex Tinsley (designer behind Dull Roar and also Designer Liason with Malabrigo) has just written an ebook that tells you (basically) everything you need to know to be a knitting or crochet designer.
I just read it. It’s awesome.
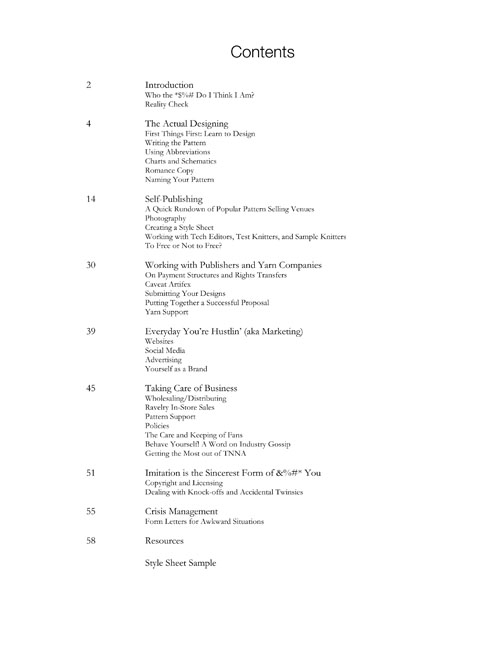
Not only is Alex hilarious, but the information in the book is dead-on. She gave me permission to post a looky-loo at the table of contents:
So You Want to Be A Knitting Designer covers how to write patterns, hiring a tech editor, photography, self-publishing, how to work with magazines, marketing, what to do if your idea is stolen, how to wholesale to yarn stores… you name it!
Is this book for you?
Alright, so let’s talk about what this book does and doesn’t do.
This book:
gives you real, authentic help for becoming a designer: including a pattern template, sample emails for sticky situations and advice about submitting proposals that you really need for real design life.
gives you a comprehensive list of resources for finding tech editors, hiring photographers and chatting with other designers.
walks you through the basics of the industry (including the dos and don’ts of asking for yarn support!) in a friendly and honest manner… from someone who’s worked in lots of different parts of the industry.
leaves you feeling confident about doing knitting design as a career (it’s hard, but not mysterious!)
Although the book has ‘knitting’ in the title, it’s equally applicable to crochet designers, too!
This book is intended to helping someone who’s seriously thinking of designing navigate the industry, and already has some knitting experience. It doesn’t contain lessons on how to design, detailed help with taking photographs or address the financial/tax/contract aspects of beginning a business.
Get it!
I would really recommend this book to anyone interested in becoming a designer (whether it’s part or full-time).
Not only does it distill lots of information that’s available in thousands of posts online into one fun & readable document, but it also contains a little bit of extra information that many designers aren’t always willing to post in a public forum (such as how much tech editors are usually paid and examples of email templates in sticky situations).
I’m so happy Alex wrote a book like this… the industry really needed one!
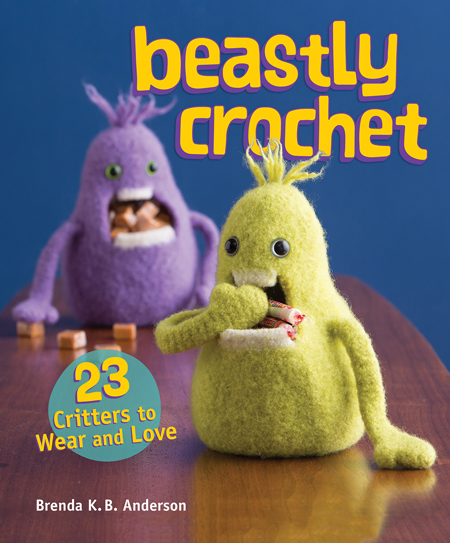
As soon as I saw the cover of Brenda Anderson’s new book, Beastly Crochet, I knew there would be some cuties inside:
But… I had no idea there would be so much other awesome stuff! Let’s peek inside, shall we?
The Beasties
You know me, I can’t resist a cute stuffed animal. (Are monsters really animals?!? Hmm… I digress.)
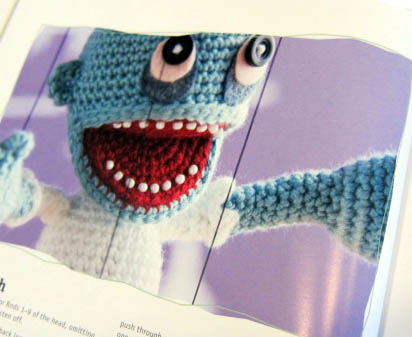
The thing I really love about the creatures in this book is that they feature a variety of crochet techniques. Check out ‘A Zombie named Skip’, a marionette who sports an open mouth with beads as teeth!
The other critters (including a Frankenstein & his bride and an adorable yeti-type monster among others) feature colorwork, textured stitches, appliques and even felting (the cuties on the cover!). While there are a few patterns suitable for beginners, this book is targeted at crocheters who are looking for innovative patterns and want to add a new skill or technique to their repertoire.
The Wearables
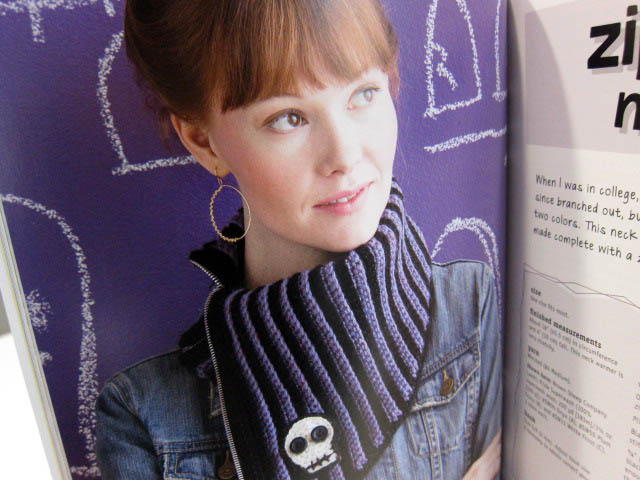
The ‘Beastly’ part of the book is broadly construed to include: zombies, monsters, skulls, robots and myths. I was really surprised by some of the fabulous wearables in the book:
This fun skull cowl is just one of many clothing patterns in the book. There are Sasquatch slippers, a couple great sweaters for kids as well as bibs and bags.
Seriously, how did Brenda fit all of this stuff in one book?
And more!
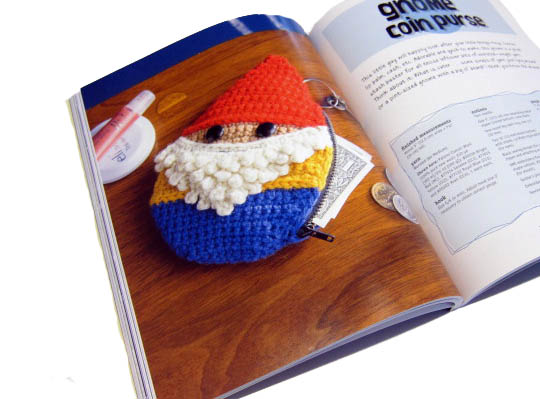
Look at that coin purse! Isn’t it ridiculously cute?
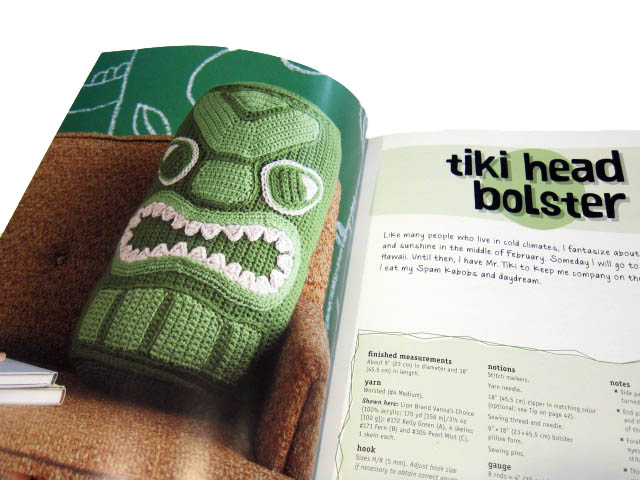
And this Tiki pillow:
So clever and fun!
I particularly love the book’s section on ‘Principles of Cuteness’, where Brenda talks about eye shapes and spacing, so you’ll get the maximally cute monster!
The Verdict
With Halloween coming up, the timing of this book couldn’t be better! It contains 23 fabulous projects for anyone who loves monsters/robots/fantasy.
This book is aimed at the advanced beginner/intermediate crocheter. It doesn’t contain a lot of introductory material (so, expect to learn how to single crochet elsewhere!), but it’s packed with patterns that have great assembly/finishing information. A crocheter with a standard cache of skills won’t get lost, and will learn a bundle of new techniques and methods.
As soon as I saw the name of this book I knew I had to have a closer look.
I LOVE softies that do something! And the toys in this book do the most clever things!
There’s a stacking tree that unstacks to make a forest of individual trees.
There’s a frog with an elastic tongue that can grab things.
There are cars with wheels that turn.
There are some trule amazing flip dolls. It’d be more accurate to call them reversible dolls – but that’s nitpicking. They’re incredibly fun and creative no matter what you call them! And she includes terrific instructions for a base doll to use to design your own. Score!
There’s a ukelele with elastic strings. Love! Speaking of ukeleles – here’s a link to my favorite ukelele video. Yes. I have a favorite ukelele video. Ukeleles are cool.
There’s a terrific crocodile with zipper teeth.
There are so many fun projects in here!
I asked my daughter which one she thought I should make for this review.
She flipped through the book – oohing and aahing a lot.
She tagged a ton of projects, including these incredibly cute turtles with removable shells.
So sweet!
She also really liked this horse with the button-on wings.
But I’ve been working on a removable wing thing of my own for a few weeks now and didn’t want to start looking at a whole other technique.
Plus, I’m not crazy about making standing stuffed animals like that. I know they’re great to play with – I just don’t enjoy making them and I’m ok with that.
Jo’s favorite toy in the whole book was Gulp the Whale.
But that pocket! When I was a kid my favorite teddy bear had a hole in her neck. I used to hide things in there even though it wasn’t a pocket and they sometimes got lost in the stuffing. In fact – my diary key is still in there somewhere. 🙂
Ever since I started making softies I’ve wanted to make one with a proper pocket for hiding secret treasures. I included one in the proposal for my book but ended up cutting it for space reasons before I actually made it. This is a project I’ve sketched out and made in my head a hundred times, but never actually made in real life.
The time had finally come!
So I made a doll with a pocket mouth using the construction technique in the book, but my own pattern. Laura’s technique was very similar to what I had envisioned, and her instructions were very clear with just enough illustrations. And she had a nice tip for stuffing the softie before tucking the pocket inside which really helped keep things nice and full and smooth.
Want to see a sneak peek at my guy?
Hi there! I’ll be a pattern soon!
I’m not happy with the antennae and – now that I’ve played with him a bit and have a better idea of his personality – I have an idea that I like better.
Oh yes, I played with him. 🙂 A lot. I wanted to make his limbs long enough to really be playful. What I didn’t anticipate was how expressive he would be!
I rarely make actual projects from the many (MANY) craft books I buy. They’re a source of inspiration and a way to learn new techniques – and Flip Dolls & Other Toys is all kinds of inspiring.
Maybe your kid isn’t into cars, but he LOVES windmills. Use the technique for spinning wheels from the book to make a windmill with spinning vanes!
Maybe your kid doesn’t care for robots (is that even possible?????) but loves those I Spy books. Use the very cool technique for the nuts & bolts robot to make pocket search games for the car. Or a little aquarium with fish that swim in and out of view!
That’s the thing about this book. The ideas are so clever and so fresh – the possibilities for spinning off the ideas are endless! For me that’s a great book – one that doesn’t just give me instructions for a handful of projects, but one that fires my imagination and gives me instructions for techniques I can use a lot of different ways.
For those who DO want to make the projects just as they see them in the book – here’s a little tip. The patterns all need to be enlarged. As someone who lives in a remote area a long way from a copy shop this is a real pet peeve. BUT! Lark now has full-sized templates on their website that you can easily download and print. Yay! Just save this link because I couldn’t find this nice feature or the link mentioned anywhere in the book itself.
Today I’d like to introduce you all to a fellow pattern designer who makes softie patterns I think you’ll love to make. Meet Abby Glassenberg! She’s the author of Stuffed Animals: From Concept to Construction. She blogs at While She Naps, and sells digital patterns for softies in her shop.
I started following Abby several years ago and I’ve loved watching her work evolve and her business grow. I can’t wait for you to meet her, so let’s jump right in!
Hi Abby! Thanks so much for spending some time with us here at Shiny Happy World!
Those of us who run solo businesses tend to wear many hats – and that makes it hard sometimes to tell people what we do. But that’s the first thing I’m going to ask you to do! Tell readers a little bit about you and your work. How do you introduce yourself and what you do to a stranger?
I’m a sewing pattern designer, craft book author, sewing teacher and craft blogger. I design sewing patterns for dolls and stuffed animals. My patterns help you create softies that are adorable and look professionally made. Each pattern includes step-by-step photos and clear instructions written in language you can easily understand. I love sewing toys and I want you to have a great experience, too!
I love that you think of designing patterns as helping other people have a great sewing experience too. That’s terrific! So – in a sea of patterns out there, what makes your work unique?
My stuffed animals are truly three-dimensional. I like gussets and darts! I love the puzzle of drawing flat pattern pieces so that when they’re sewn together you get an oval-shaped sphere, for example, or a curved horn. While you sew you’ll see how the language of softie pattern pieces works and perhaps you’ll be inspired to design toys yourself!
Tell me a little bit more about your latest pattern. What made you decide to make it and what were some decisions you made along the way in the design process?
My latest pattern is Emma the Doll. She’s a big doll at 20”, she’s entirely machine sewn and she’s made from fleece. I’m a mom of three young daughters, ages 9,7, and 2, so I have a good handle on how kids really play. A few weeks ago my kids spent the afternoon on the front lawn with a huge pile of toys having a funeral for a pink stuffed boar!
When I dreamed up this new doll I wanted her to be big and sturdy, to have jointed arms and legs so that she can be posed, and to be machine washable. Emma achieves all of these things, and with style.
I love the Emma doll pattern! She’s so totally kid-friendly! And I was completely captivated by this photo of her (smiling) in the washing machine. As a mom – that really says it all. 🙂
It’s ok! I’m just having a bath!
Emma’s a very playable doll, kid-friendly doll. But you started out making sculptural birds – definitely not toys. (Abby’s first book, The Artful Bird, teaches you how to make them.) What made you switch gears and move into stuffed animals designed to be played with?
I think my years designing and sewing birds were a great way to explore three-dimensional shaping in fabric. I learned how to control bulges and how to pull shapes inward in order to achieve the particular body shapes of each species. After I wrote my first book I felt free to delve into children’s toys and I’ve really enjoyed designing teddy bears and baby lovies, dolls and elephants, hobby horses and turtles, and everything in between!
So tell me about your new book. How did it come about? What was the most challenging part of writing it? What’s your favorite project from the book?
My new book is Stuffed Animals: From Concept to Construction and it was published by Lark Crafts in May. This book is all about designing your own stuffed animals and it’s perfect for beginners as well as those with more sewing and design experience under their belts. I actually thought of writing a book that would be a comprehensive guide to soft toy design like this one long before I wrote my first book, The Artful Bird. It took many years of research and experimentation to create a book of this depth and I’m really proud of it. I enjoyed every aspect of writing Stuffed Animals, even the tedious parts! It truly was a labor of love and a book that I felt I was made to write. My favorite project is the 16th pattern in the book – a dinosaur with a zippered mouth!
Roar!
I love this book so much! My “official” review is here.
What are your dreams for the future of your business?
My business is really two-fold: I design sewing patterns for toys, and I also write about running a creative business. I’d like to grow both sides of what I do. In the realm of sewing patterns, I’d like to teach an online class on sewing softies. I was a middle school teacher in my former career and I still really see myself as a teacher. And, of course, I have tons of ideas for new softie patterns. I truly feel that I could design stuffed animals and dolls for the rest of my life and never run out of ideas! In the realm of writing about running a creative business I will continue to seek out and speak with those in power about the craft industry and share my experiences running my own business. I love reporting about what’s going on in my niche and feel so thankful to have found a large audience who shares my interest.
Can you tell us about a typical day? Where do you work and what’s your routine like?
We wake up early in the Glassenberg household! I’m up at 6:10 every morning. I get the kids off to school and then I go running. I’m at my computer by 10:15 and I work until about 2:30. Those hours include a combination of writing blog posts and patterns, doing research, responding to emails, posting on social media, drawing, sewing, photographing my work, editing photos, and doing graphic design for my site and my patterns. Oh wait, there’s packaging orders and shipping, and sourcing supplies, too. Like most people who run a small business I do everything there is to be done, even the weekly bookkeeping. But I seriously do love it all. I also work in the evenings from 8-9:30pm.
What’s your favorite sewing tool?
Hemostats. I may have 12 pairs. Or 13. When I travel I panic that if my luggage gets lost I may be without my hemostats and that would be serious issue for me.
I should have known that’s what you’d say. 🙂 You rave about them so much that I finally tried a pair (you know that, I guess, since I bought them from you) and they really are a pretty awesome little tool. But 12 or 13 pairs?That’s true devotion.
What’s your most popular pattern? Why do you think it’s so popular?
The Lovey Dovey. It’s a great go-to project to make for a new baby and everyone wants to make something special to give as a baby gift.
This pattern comes with four variations (a bunny, a puppy, a bear, and a kitty) so you can customize what you’re making for each recipient. The pattern is also very approachable. You look at it and say, “Okay, I can handle that!” And it’s cute! You can’t deny the importance of cute when it comes to toys.
Imagine someone with no sewing experience. She just took her first sewing machine out of the box and figured out how to thread it. She’s eager to make something – but also a little bit scared. Which one of your patterns do you recommend?
I’d recommend Stella the Owl. She’s a very straightforward design, but still really clever! Her wings come together with a bit of Velcro so that she can embrace her little owlet.
She’s so cute! And I think it would be really fun to choose fabric for the contrasting wings.
What’s your very favorite pattern? Why?
I’m really fond of my plush Rubber Duck. He’s a bath time favorite in plush form!
This pattern includes several really cool, but easy, construction techniques and the finished softie looks really professional.
I think this pattern is a really nice representation of my design style.
Can you suggest another designer that beginning sewists might like to get to know better?
I’m a big fan of Raynor Gellatly, a Scottish plush pattern designer whose business is called Elf Pop. Her dolls and toys have a very sweet, innocent look and I think they are ideal for relatively new sewists looking to create toys that kids will immediately want to hug!
I’ve been looking forward to this book for a long time. Abby told me about it way way back in the early days when she was just starting to write it (it takes a long time for a book to come out!) and I’ve been following along with interest as she designed all the animals, took all the photos, and edited all the drafts.
And now it’s here.
And it’s fantastic!
In many ways it reminds me of Anatomy of a Doll – my very, VERY favorite doll-making reference book.
Like Anatomy of a Doll, the book is filled with detailed information showing the reader lots of different techniques (a variety of ways to attach a head, a ton of joint options, etc.). For each technique introduced, Anatomy of a Doll has loads of photos of finished dolls – showing you the many different ways that technique can be applied.
Stuffed Animals: From Concept to Construction goes one better and has a project! A project with detailed instructions and clear step-by-step photos showing you exactly how to do it so you can practice that new technique right away.
Brilliant!
As I said – I knew about this book long before I had a copy in my hands. As soon as I opened it up I knew I was in for a treat. People – the Table of Contents impressed me! I’m not kidding. Each chapter is the name of the animal you’ll be making, and below that is a list of all the lessons in that chapter.
In the Camel chapter (yes – there’s a very cute stuffed camel) you’ll learn. . .
How to Design a Jointed Animal
Thread Joints and Exposed Button Joints
Invisible Button Joints
Cleft Hooves
Eyelashes
Eyelashes! I love it!
I read the book from cover to cover and it’s simply terrific. Fun projects. Clear instructions. Good photography. Well organized. It’s all there!
Oooh – and here’s another nice feature. The pattern pieces are all (except one) full-sized. No enlarging needed! AND you can go to the website of Lark Books and download them so you have digital files – which would make it super easy to print them out on printable freezer paper. No tracing! (You all know how much I loathe tracing.)
Abby has written a book that will become a well-worn reference for both makers and designers. I love that she assumes from the beginning that readers will want to design their own softies at some point. 🙂
We all learn best by doing and Abby gives us 16 projects to make, with 52 lessons to learn. Those lessons are so well-explained that you learn why you do things a certain way to achieve a certain effect. You’ll become better at making softies from anyone’s patterns, and you’ll be on your way to designing your own creations.
I was going to make one of the projects from the book – but every time I opened it to decide what I wanted to make I kept being drawn to the interesting joint she teaches in the Kangaroo chapter. (Here’s a little video showing more about the kangaroo.)
I’ve never used it in any of my designs, and never run across it it any of the patterns I’ve sewn. I was intrigued! I decided instead of making one of the projects from the book, I’d use this technique to design a new softie in my own style.
I thought about making a remora (or suckerfish) attached to a shark, but then I realized very few people would actually want a remora-stuck-to-a-shark stuffed animal – and for the few kids who would want that, they’d want the remora to be removable.
So I decided on a caterpillar instead. 🙂
A cute, bendy caterpillar with very sturdy joints between all his segments. And easy to sew! (You can get his pattern here.)
It was so much fun trying out this new technique! It’s one that kind of twists your brain around, but Abby explained it so well that my prototype turned out perfectly on the very first try – which hardly ever happens. 🙂
Have I convinced you yet that you need this book? How about when I show you this?
My favorite project in the book. I love those droopy eyes!
Or this?
Look at those big puppy feet!
Or this?
You all know I love zipper mouths. . .
Seriously. This is the reference book on sewing stuffed animals. I’ve read (and I own) a lot of them and this is THE BEST.
Today’s guide to yarn stores in DC is written by Jennifer Crowley, the designer/teacher/blogger at www.tinkingturtle.com.
Jennifer Crowley is a knit and crochet designer who teaches up and down the east coast. You can check out her designs on Ravelry. Recent and upcoming publications include Sockupied, Knitpicks and Classic Elite Yarns.
When not knitting or crochet, she can be often seen zipping around DC and the surrounding area on her bike.
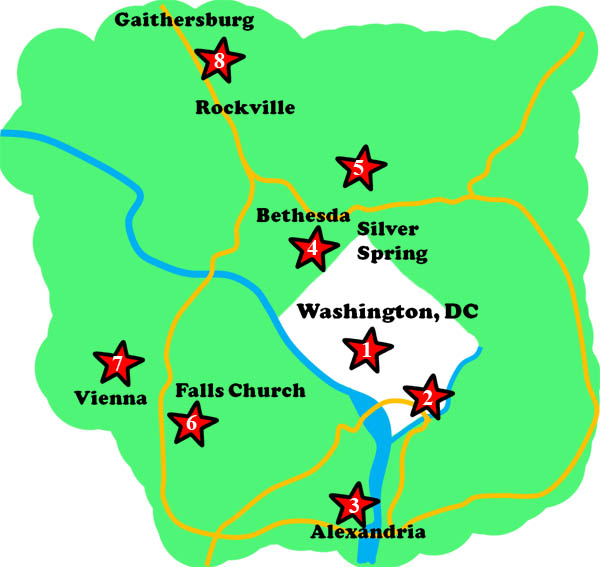
So you are planning a trip to Washington, DC, and you want to visit some yarn stores while you’re there? Well, you are in luck. In addition to being a city full of cultural attractions, there are a number of yarn stores in DC, accessible by a combination of riding the Metro, bus, or walking. If you are fortunate to have a car, the access to yarn stores improves even more. Recent changes have meant that old yarn stores have closed, and new ones are joining the group this year, so it’s a great time to go and check them out.
When I first moved to DC, I didn’t have a car, and was entirely dependent on my bike and public transportation. I have firsthand experience about what stores are the easiest to get to, and in this quick tour I’ll highlight the ones that are accessible by public transportation.
Disclaimer: I teach classes at Woolwinders, Fibre Space, and The Yarn Spot as a contract. I do not believe this influenced my review.
Looped Yarn Works
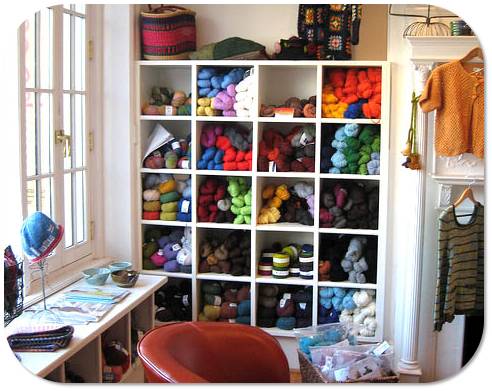
Looped Yarn Works (1) is located on the second story of a beautiful building near Dupont Circle Metro Station, about a 2 ½ block walk away. Looped offers a nice range of different priced yarns. One of the things I love about Looped is the amount of Natural light they have in the store. Susan and Janie, the owners, have put such careful work into making the space welcoming to customers, and are constantly featuring new activities, visiting authors and other events in the store.
How to get there: Looped is located on 1732 Connecticut Ave, NW #200 (remember, they’re on the second floor!) in Washington, DC. The best way to get there is by metro, as there isn’t that much parking in that area of town. Dupont Circle, located on the Red Line, is very close to the store.
The Knitting Loft
The Knitting Loft (2) is one of the newest yarn stores in DC, having opened in the Summer of 2013. As a new store, their selections of yarns are still expanding, but the staff couldn’t have been more welcoming when I stopped by over the summer. The great thing about this store, is they are wheelchair accessible and on the ground level. Located near the Eastern Market, the store is the perfect stop on a day of window shopping.
How to get there: The Knitting Loft’s address is 1227 Pennsylvania Ave Southeast, and is near both the Blue/Orange Line Metro. You can get to it from both the Eastern Market or Potomac Ave stops – both are about a 3 block walk away, though Potomac Ave is marginally closer. Parking, if you choose to drive, is a little bit easier to come by, but I think it’s still easier to metro in.
Fibre Space
Fibre Space (3) is the hip yarn store of Old Town Alexandria. They specialize in hand painted and hand dyed yarns, but have a good range of workhorse yarns too. Fibre Space offers a vibrant array of classes and great space to sit and knit. I always love checking out the window displays when I come to visit – they always have something creative put up! This last time I visited their window had a mannequin with a packed box of yarn – referring to the fact that in a few short weeks they’ll be moving around the corner to a new location that offers more space and versatility. It’ll be exciting to see how the store continues to expand!
How to get there: While technically in Virginia, Fibre Space is very accessible to DC and so it’s easy for tourists to visit. Fibre Space’s address is 102 North Fayette Street (for now) and is about 6 blocks from the King Street Metro. It’s a little bit of a walk, but under a mile, and it’s a pleasant walk at that, with lots of stores to widow shop. If you choose to drive, it’s easy to get off 495 and go straight up Route 1 (N Patrick St). You should consider parking along King, Prince, Duke or Queen Street, or any of the cross streets. Then walk to the store. Most parking is one or two hours – so be careful how much time you spend in any one place. If you are planning to make an afternoon out of looking around Old Town Alexandria, take the Metro and save yourself the worry.
The Yarn Spot
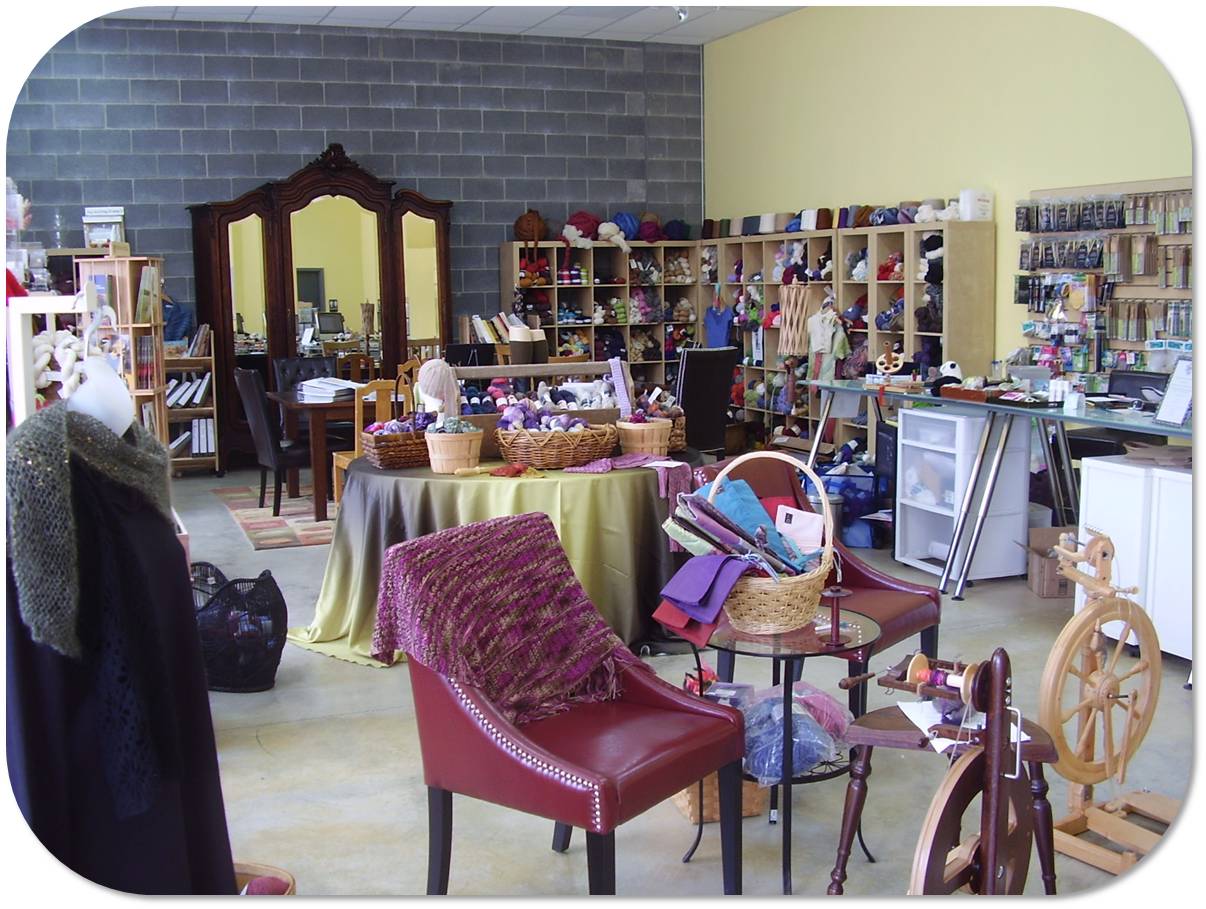
The Yarn Spot (5) is my personal “local yarn store” and until I moved this past year, I could easily walk to it in about five minutes. The Yarn Spot features two great places to sit and knit (a circle of couches and chairs and a table) and a friendly welcoming atmosphere. Yarn is arranged according to weight, with a middle section that rotates out different yarns that are being featured. They also have spinning supplies and fiber. With a knowledgeable staff – this is the perfect store to go to if you have a “knitting emergency” and need some help. They feature a wide range of yarns, from hand dyed yarns to workhouse yarns like Spud and Cloe Sweater and Encore.
How to get there: The Yarn Spot’s address is 11406a Georgia Ave, Wheaton, MD. Unfortunately, they are a bit hidden from the road, but if you look for “The Anchor Inn” sign, they are in the shopping center located behind the sign. The store has parking if you choose to drive, or it’s about a 1/2 mile walk from the Wheaton Metro to the store.
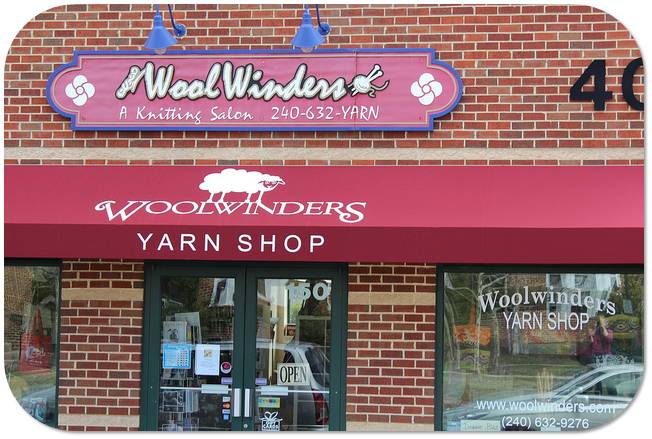
Woolwinders
Woolwinders (8) is one of my favorite yarn stores in DC for classes. They have very knowledgeable teachers and staff, and every time I go there I learn something new. They have a good selection of mid-range yarns, and highlight some really interesting higher range yarns. The last time I was there I appreciated their selection of Rowan Pattern books. I love how two of the walls of the store are windows, and how much natural light comes into the space. It really makes it easier to choose colors for my projects.
How to get there: Woolwinders is a brisk walk from Shady Grove Metro Station – just under a mile. Located at 404 King Farm Blvd in Rockville, MD, this is also a good store to drive to, with plenty of parking street-side or behind the store.
Knit & Stitch = Bliss
Knit & Stitch = Bliss (4) is one of my favorite stores to go to if I’m looking for patterns or books. They have a really good selection, and a nice area to sit down and flip through all the books and patterns as you are deciding what to work on. Yarn selection runs from midrange to some nice high priced yarns, and they have a great selection of needles and notions. Located near the heart of Bethesda, there’s great shopping and restaurants nearby if you wish to make a short trip of going to the store and picking up dinner or lunch.
How to get there: Knit & Stitch = Bliss is located at 4706 Bethesda Ave, Bethesda MD. If taking the metro, walk West down Rockville Pike until you turn right on Bethesda Ave. If driving, there’s plenty of street parking available, and a few different parking lots if you don’t relish parallel parking.
Aylin’s Wool Gatherer
Aylin’s Wool Gatherer and its compatriot, Uniquties, are both a bit harder to get to by public transportation, but still worth the visit.
Aylin’s Wool Gatherer (6) has the honor of being one of the longest running yarn stores in DC metro area, running upwards of 35 years. Specializing in offering a wide selection of mid-range yarns, including some nylon blends I haven’t noticed elsewhere, this store is a solid addition to the Metro DC Yarn stores. When shopping, prices are listed on sheets throughout the store.
How to get there: Aylin’s is a bit hidden from the street, being located on the third floor of a building (however, there’s an elevator!). Their address is 7245 Arlington Blvd, Falls Church, VA. However, when walking or driving to the store look for the Starbucks in Loehmann’s Plaza, and go around the corner. You’ll see a side entrance to the building; take the elevator to the third floor. The store is down the hall. If you have difficulty, call the store at 703-573-1900 – they are old hands at giving directions. As to transportation, this is one store where driving is definitely easier, though it is possible to take public transportation. If you ride the Metro to the Dunn Loring-Merrifield Station, you can then walk to the Temp Bay D (follow the signs). From there, you can catch the 1B bus towards Ballston Station. Get off at Arlington BV & Graham Rd, and walk towards Loehmann’s Plaza.
Uniquities
Uniquities (7) offers not only yarn to knitters and crocheters, but is one of my favorite stores to check out for their spinning supplies. One of the other things I love about the store is their separate class space, which makes taking classes very pleasant. I also love their yarn choices, with a stunning collection of sock and laceweight yarns, and a wide range of worsted and aran weights too. They carry some of my favorite yarn lines, like Mountain Colors, Blue Sky Alpacas and Manos Del Uruguay.
How to get there: Uniquties is also a store that is easier to drive to. They’re located at 421 Church Street Northeast, Vienna, VA. Driving, there’s a spacious parking lot to park at. If you are looking to take public transportation, take the Metro to the Dunn Loring-Merrifield Station, then walk to Bus Bay B. Take the 2T towards Tysons Corner and get off at R 123 Maple Ave & Beulah Rd. The store is a block away.
Want more stores?
While the eight yarn stores I’ve highlighted here are the easiest to get to via public transportation, there are a few others that deserve honorable mention.


 That’s a bed, a pillow, a stack of mattresses, a ladder (to climb to the top of the stack), a bedspread, a doll in a nightgown with a removable robe and crown, and a closet – with a hanger where you can hang the robe. All the little bits and pieces pack neatly into the two Altoids tins used for the bed and closet, and they tuck into a little drawstring bag (not pictured here).
 One of the things I love about digital patterns is that there’s no need to skimp on instructions or step-by-step photos. The pattern can be as long as it needs to be without the space considerations of a printed book.
 The project is almost all hand work and glue, with a little bit of easy machine sewing for the mattresses, bedspread and drawstring bag.
 Want to make your own?


 Today I’d like to introduce you all to a fellow pattern designer who makes softie patterns I think you’ll love to make. Meet Abby Glassenberg! She’s the author of Stuffed Animals: From Concept to Construction. She blogs at