How to Make Double Fold Binding

a close-up photo showing the end of double fold binding tape made with black and white striped fabric

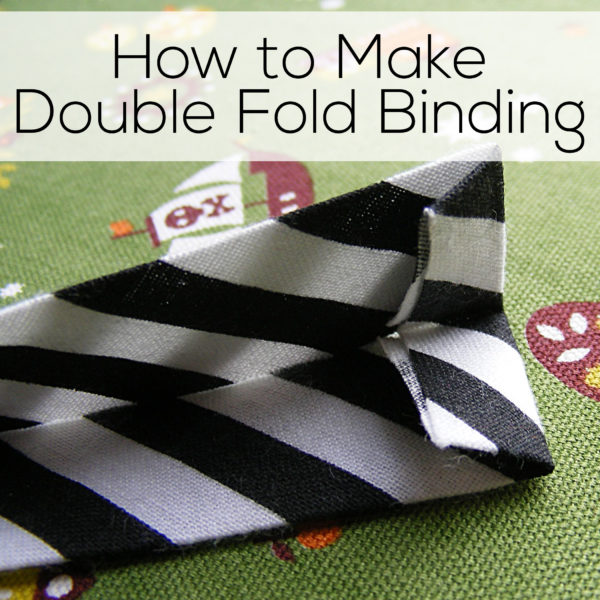
Double fold binding tape is so useful!

I use it to make straps, to bind the edges of pockets, pot holders and placemats, to make drawstrings, and more.

One quick note – you’ll also hear me use the term bias tape or double fold bias tape. Technically, I should only call it bias tape when the starting strips are cut on the bias instead of on the straight grain. I rarely use actual bias tape (you only need the bias when your binding tape needs to shape around curves) but all the packaged binding tape you buy ready-made at the store is bias tape – so I tend to slip and use that as a general term when I really shouldn’t. So – know going into this that the technique is exactly the same for both. The only difference is how you cut your initial strips.

Speaking of cutting your strips – I’ve shown you how to cut strips using basic rotary cutting tools in this video. In today’s video I’ll show you how to join those strips together and how to use an inexpensive tool to make your own double fold binding tape.

There are a few different brands of bias tape makers out there – you should be able to find them in any big box fabric store.

How to Sew Napped Fabric (Velvet, Corduroy, etc.)

How to Sew Napped Fabric - showing a close-up of magenta fabric with LOTS of pins holding the pieces together

Sewing with napped fabric can be a real pain.

It creeps like crazy!

I’m not kidding! The first time I worked with velvet I sewed a pair of pants for my young daughter. I treated it like normal fabric and by the time I got to the end of my first side seam, I still had INCHES left of one of the layers. It slid that much!

Way back at the beginning of the year I made a video all about choosing fabrics. I warned you to stay away from velvet and other napped fabrics because they can be tricky to sew. Well – no more! If you want to make a velvet bunny for Easter – here’s a video showing what you need to know.

First of all – what is napped fabric?

It’s any fabric that has a direction to it. I don’t mean the print on the surface of the fabric – I mean the actual weave of the fabric. Velvet, corduroy, fur – all of those are napped. If you’re not sure, try running your hand along the surface of the fabric. Does it feel “right” in one direction and “wrong” in every other way? That’s the nap. And when you layer two pieces of it together, the naps work against each other to make the layers walk apart as you sew. It’s maddening!

A walking foot helps, but what you really need are hundreds of pins. I show you all the details in this video.

Want to see that velvet bunny I mentioned earlier?

Here he is! His name is Bartholomew Bunny and he also has shiny tissue lamé ears. 🙂

Fancy Velvet Bunny - Bartholomew Bunny Pattern from Shiny Happy World

Have fun sewing with napped fabrics!

That's me!

Best,
Wendi

How to Sew Stretch Fabrics on a Regular Machine – video

How to sew Stretch Fabrics on a Regular Sewing Machine - a video tutorial from Shiny Happy World

Did you know that you can get an especially squishy softie by sewing it up out of an old T-shirt or other stretch fabric?

Did you know that you don’t need a serger to sew stretch fabrics?

In this video I give you some basic information about sewing stretch fabrics on a regular sewing machine. I show you what kind of needle you need to use and a couple of different options for the kinds of stitches to use – all the info you really need to get started.

If you want to learn about how to choose fabrics for your projects, start with this video where I cover the basics! 🙂

Want to practice?

Buck the super soft softie bunny

This is Bartholomew. He’s made using one of my very easiest patterns and an old T-shirt – worn to buttery softness. He’s soooooo soft and huggable! Click here to get the pattern.

I’ve got another post on a similar topic, showing how to sew squishy rag dolls out of stretch fabric.

Happy sewing!

Best,
Wendi
applique wendi

Using Buttons for Eyes

Using Buttons for Softie Eyes

If I’m making a toy that’s not for a baby, I sometimes like to use buttons for eyes. You can use buttons with four holes, like this. . .

original snake (1)

. . . but if you sew it on with your threads in an X it can make it look like your softie is dead.

I especially like using 2-hole buttons, because you can use the orientation of the holes to add some expression to the face. These two Blockheads have the holes in their button eyes placed up and down. I think it gives them an open, cheerful look.

Blockheads Beanbags sewing pattern

Placing the holes sideways made them look kind of sleepy. When I tried out the button eyes on the Snake Charmers (a free sewing pattern), I decided I wanted the sleepy look.

Snake Toy - free sewing pattern

My first thought was to place them up and down, so that the football-shaped divet in the middle of the button would be reptilian-looking. But when I tested them out that way he looked kind of menacing. Sideways (and maybe sleepy?) was much friendlier-looking.

So do use buttons for eyes, but don’t just stitch them on all willy-nilly. Use the button holes as a design element and try out a few different orientations to see what looks best.

If you’re trying to decide between button eyes, safety eyes, felt, eyes, and embroidered eyes, click over to this post for a good overview of your options.

Happy stitching!

Best,
Wendi
That's me!

How to Turn a Tube of Fabric Right Side Out – video

How to Turn a Tube of Fabric Right Side Out - video tutorial

If you need to turn a tube of fabric (especially a skinny one) right side out, it can be a real pain if you don’t have the right tools. There are a few options out there. I used to wrestle with a safety pin and yarn, and I’ve tried using hemostats – but I swear by my turning tubes. They’re inexpensive and they work like magic. Really! Just watch!

See how slick that is? They are the perfect tool. Want to order a set? You can find them here.

The most common time you’ll need to turn a tube of fabric is if you’re sewing clothing – especially anything with straps or bands or belts.

I usually use double-fold strips of fabric for tote bag handles – but a lot of other patterns will call for fabric tubes.

Once in a while I’ll use little tubes of fabric for 3D hair on a quilt – like this silly monster.

For each lock of hair I sewed a skinny tube, turned it right side out, and tied a little knot in the end before slipping it under the edge of the applique and stitching it down.

But I use fabric tubes most often for softies! Arms, legs, and tails are all just tubes of fabric.

Mischief of Mice - softie sewing pattern from Shiny Happy World

The tails on these mice are extra skinny tubes.

I love making softies with floppy arms and legs, like this Munch Monster.

Use stretchy knit fabric to make extra soft stuffed animals - tips and tricks from Shiny Happy World

Want to practice turning some tubes? These snakes are really fun to make.

finished snakes

And the pattern’s free! Get it here.

Happy sewing!

Tips and Tricks for Sewing Curves – video

How to Sew and Clip Curves

You can make an awful lot of stuff just sewing straight lines, but at some point you’re going to want to sew a curve.

Sewing a curved line isn’t really any harder than sewing a straight line – unless it’s a tight curve. And the tighter the curve, the tougher it is to sew smoothly. In the video I show you a couple of tricks for keeping things together when you’re sewing tight curves.

Even more important – I show you what you need to do to those curves after you sew them, so that when you turn you work right side out those nice smooth curves stay nice and smooth.

You can download the PDF of practice lines here. In the video I show you how to stitch right on those lines – but I advise you to print this page out a few times. Practice sewing on the lines until you have a feel for what your machine can do. Then cut a sheet apart along those lines and practice sewing with a 1/4 inch seam allowance along the cut edge of the paper. You can practice sewing with a 5/8 inch seam allowance too – but only practice that on the gentle curve. Keep practicing until you’re ready to try it out on fabric – then change your needle. It’ll be dull from sewing through the paper and you want a nice sharp needle for sewing through fabric.

Happy sewing!

Best,
Wendi
Applique Wendi (with fabulous hat)

Ladder Stitch – The Invisible Way to Stitch up Softies

How to Ladder Stitch - video tutorial - showing the back of a green stuffed mouse and the invisible stitching sewing up the stuffing opening

There are two common ways to sew up stuffed animal openings – whipstitch and ladder stitch.

Whipstitch is super easy – it’s what I do with the youngest stitchers, as young as four. Here’s a video showing how to whipstitch.

The drawback is that the stitching is visible.

Ladder stitch is preferable because it’s totally invisible.

It isn’t exactly tricky, but it does require a little more skill with the needle than the whipstitch method. So if you’ve never done much handwork, try the whipstitch a few times – until you get comfortable with it. Then give ladder stitch a try. It really is invisible and once you get the hang of it, it doesn’t take any longer than whipstitching the opening closed.

In the top photo (and in the video) you see what ladder stitch looks like when it’s used with woven fabric. Here’s a photo showing how it looks with fleece – which I use for a lot of softies.

the back side of a stuffed animal showing how invisible the ladder stitch is

See? Just about invisible!

Update – There’s an excellent question in the comments about when to iron. I iron after I turn it right side out and poke out the corners – but before I stuff it. It’s really easy to turn those raw edges in and press them nicely while the softie is still flat.

Ladder stitch is perfect for stitching up those stuffing holes. It also works really well for sewing up pillows, patching and mending clothes, sewing in linings, and more. I also use ladder stitch for the hand-sewing step every time I bind a quilt.

Give it a try. 🙂

Happy sewing!

How to Stuff a Pillow or Softie – video

How to Stuff a Softie - video

Stuffing a softie is a little more involved than you would think. It often takes me as long to stuff a softie as it took me to sew it! It’s not hard to do it right – it just takes some patience. And a TON of stuffing. Seriously!

The number one problem I see with handmade softies is not enough stuffing. Pack it in there people! And watch this video to see how to get it smooth and even and in all the nooks and crannies.

Happy stuffing!

Best,
Wendi
That's me!

How to Use a Seam Ripper – video

How to Use a Seam Ripper

If you’re going to sew, I guarantee there will be times when you need to “unsew.” If you’re anything like me – many, many, many times. Learn how to tear out stitches without tearing or distorting your fabric. Trust me. You’re going to need to know how to do this.

I keep one at my sewing machine, on at my ironing board, and one at my work table. That’s how often I need to rip out my work. 🙂

Happy sewing!

Best,
Wendi
That's me!