


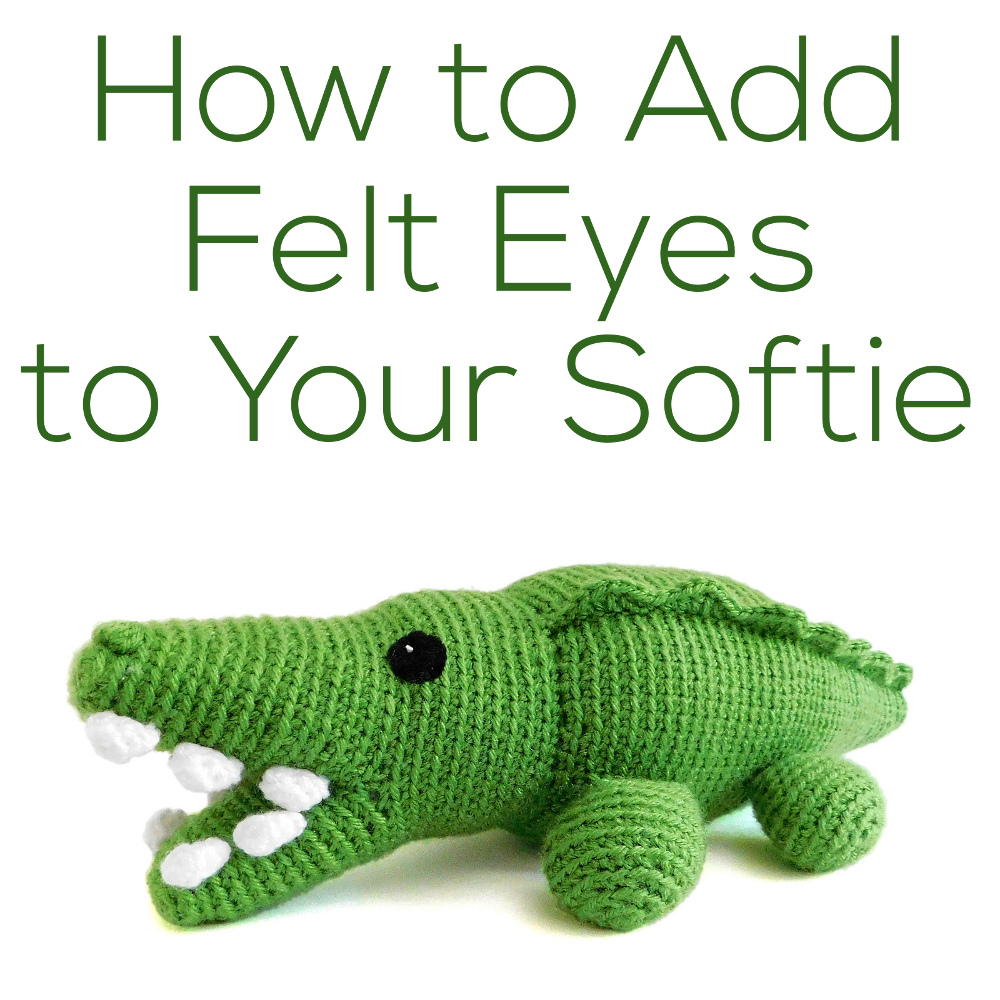
Today’s guest post is written by Alyssa, who has a gift for making fabulous felt eyes.
Today, she’s going to let us in on her secret… so we can make fabulous felt eyes, too!
(Alyssa wrote this specifically about amigurumi – but the technique works for any softies.)
Why use felt?
I like to use felt eyes as an alternative to other eye-making methods. Felt is safer to use than plastic eyes for toys that will be given to small children, but much more expressive than eyes that are made using yarn.

While Stacey has created a baby-safe crocheted eye that looks great, I could never quite get them to look right, and so I use this method instead. Attaching the felt is more time-intensive than any of these methods, but I think that it is worth it in the end.
Step 1: Gather Supplies

You’ll need:
- Finished Amigurumi (Mal the Tiny Duck, in this case)
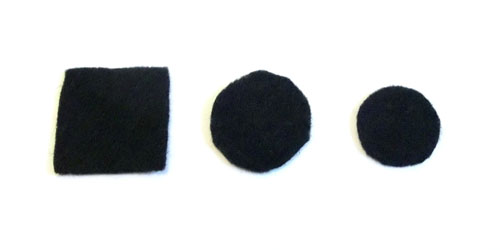
- Black craft felt, about 2″ square
- Black embroidery floss or sewing thread
- White Size 3 cotton crochet thread (or another thin white yarn)
- 2 different sized sewing needles (one for the floss and one for the crochet thread)
I find it easiest to attach the felt once the animal has otherwise been completed. That way, all of the features are positioned and the felt will not stretch out of shape when the piece is stuffed.
Step 2: Cut the Felt
I usually cut the felt into squares slightly larger than what I want to eye to be, then into rough circle shape, and then carefully trim the edges of these circles until they are completely smooth. The trick to good-looking eyes to take your time to get nice rounded edges. Using small, sharp scissors really makes a difference.
Cutting the felt, start to finish:
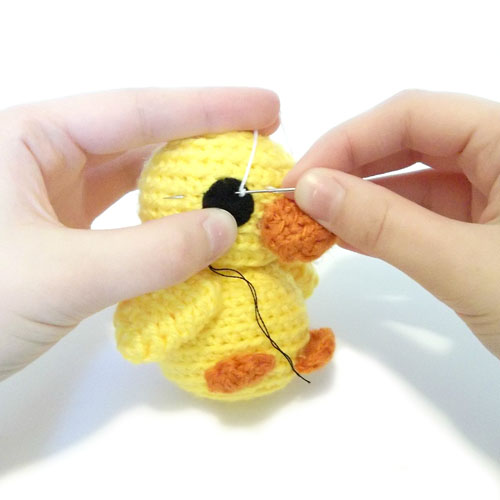
Step 3: Sew on the Eyes
Before you start sewing, you will want to position the eyes on the toy—play around with them until you are satisfied with the way they look and then pin them into place. I find it helpful to use a pin with a white head as it mimics the position and look of the eye highlight.
Use the smaller needle and a single strand of embroidery floss or sewing thread to attach the eyes. The felt will be sewn on using an applique stitch, which are small whipstitches made around the circumference of the eye. (Wendi has a video here showing how to whipstitch applique felt – it’s the same method.)

In the photo, the blue lines mark where I placed my stitches for Mal. The size of the animal and the eye will determine how many stitches you will need to securely attach it. For a small toy like Mal, I only use 6 stitches.
For a medium-sized toy (Most of the FreshStitches amigurumi), I would use 8. And for a large toy or one with large eyes (I like to give Nelson the Owl huge eyes), I might use upwards of 12.
Step 4: Create the Highlight
Play around with the position of the white pins to figure out where you want the highlight to be. The highlights themselves are simply French knots, with the yarn wrapped once around needle.
Wendi has a video here showing how to stitch a French knot.
Pull the ends of the white thread to snug up the knot. If you don’t like the way it looks, simply pull the knot out and try again with a new thread.
Step 5: Finish your Amigurumi
Once your eyes have been sewn on and the highlights look satisfactory, tie the ends together to secure them and use a needle to pull them through the stuffing to hide the ends. Snip off any remaining ends and congratulate yourself for finishing your new amigurumi!
Good news to share!
Want to squee along with me about some great news?!?

Crocheted Softies, my second book, has been reprinted! That means that so many have sold… that the publisher ran out and needed to print more! Hooray!
It’s also been translated into German… looks like folks are loving these cuties!
Thanks so much to everyone who’s made the book such a success!

Here are handy links to all the posts about amigurumi eyes. . .
- What Kind of Eyes Should I Use?
- How to Use Safety Eyes
- Tips for Dark Eyes on a Dark Softie
- How to Make Glitter Eyes
- Attaching Craft Eyes through Thick Layers
- How to Remove Safety Eyes
- How to Add Felt Eyes to Your Softie
Return to the main table of contents for Let’s Learn to Crochet Amigurumi.
Move on to the lessons for standing legs.
Happy stitching!

He is such an adorable little guy! 🙂
Thanks to Alyssa for the tutorial on her ami eyes. Another useful embellishment for our crochet softies!
And congrats Stacey on the re-printing!!
Crocheted Softies was on the display shelf in the craft section of my local Barnes and Noble- you know when it’s at B&N it must be doing well! congrats!
And I have been drooling over Alyssa’s eyes for a while- now I know the secrets! thanks 🙂
A great tutorial! I’ve been struggling with getting my doll’s eyes right and this just might be exactly what I was looking for and didn’t even know it! Thanks, Alyssa!
I bet this would be even easier with a felting needle… Hm.
A felting needle would work if you have 100% wool felt and 100% wool yarn. However, if you crochet with acrylic yarn or can’t find wool felt (the felt carried in big craft stores is acrylic), then felting with a needle won’t work.
Pingback: Are buttons baby safe stuffed animal eyes? - Shiny Happy World