


Today’s guest post is written by Nichole of Niccup Crochet.
I’m really excited about this post, because Nichole has come up with a solution (little did I know until she mentioned it!) that has been plaguing many crocheters. When attaching craft eyes (or ‘safety eyes’) to an amigurumi, it can be really tough to get the post through multiple layers.
Nichole is sharing her clever solution with us, today!
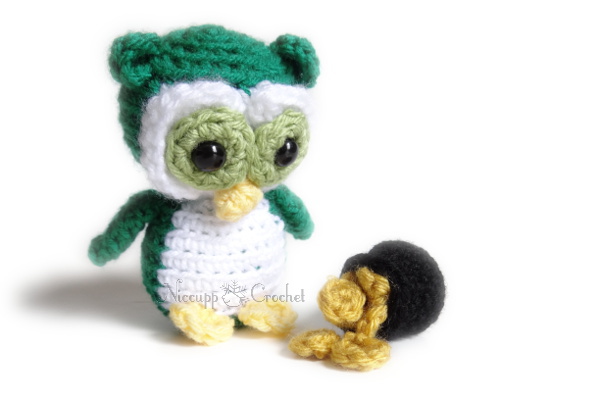
She’s demonstrating the technique on Nel the Tiny Owl, who she’s crocheted in a St. Patrick’s Day colorway. You can find instructions for the adorable pot of gold on Nichole’s blog!

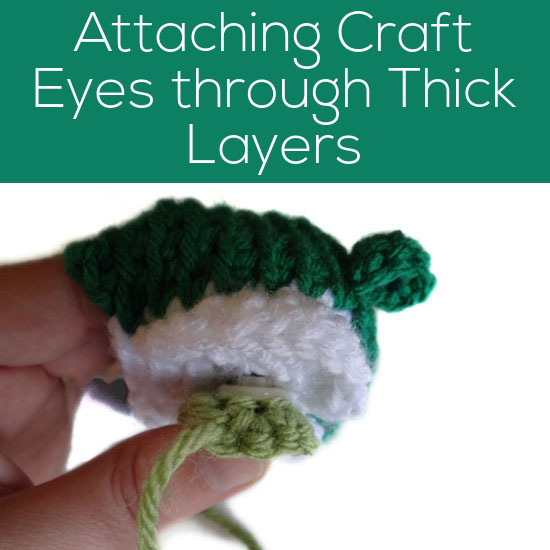
Crocheting Nel, the Tiny Owl, was a smooth-sailing until it came time to attach his eyes. Eeek! I could not get the safety eye attached securely (enough). The washer locked over the outer-most ridge of the safety eye and no amount of force could get it to lock any further.
The anatomy of the problem
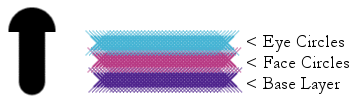
The post of the safety eye is only so long. It has locking points on the post and the washer slides over the ridges to secure the safety eye in place. The problem with Nel is that the safety eye has to be forced through three layers of fabric. Most of the post is surrounded by the fabric layers and very little is left sticking out the bottom where the washer needs to be secure.
Work Smarter, Not Harder
I attempted to secure his second eye with needle-nose pliers. That was a bad idea! The pliers slipped and I damaged poor Nel’s eye. No amount of force was going to work…the fabric was just too thick.
I took a step back and looked at all of the pieces involved. There just had to be another way.
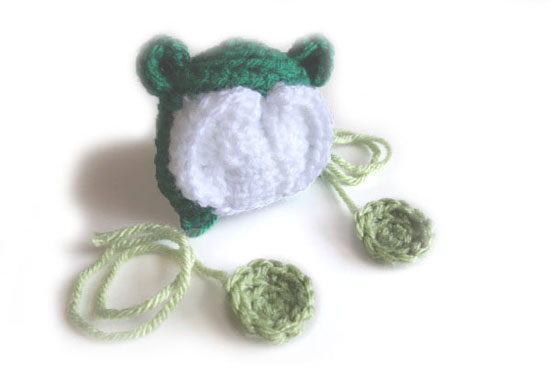
Then, it dawned on me: the safety eye can be attached to the eye circle before sewing the eye circle onto Nel’s head. Sometimes the best solution is the simplest one.
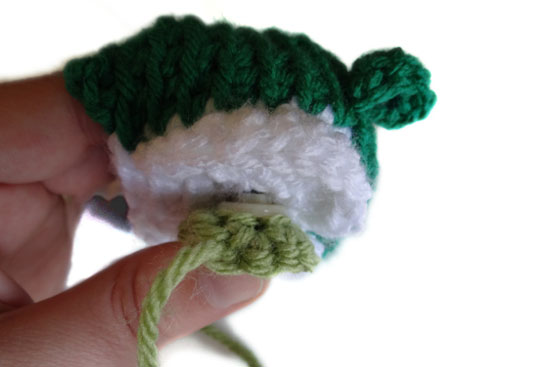
Attach the safety eyes through the middle of the eye circle.
Then, you will sew the eye circles onto Nel’s head. As you are doing this, make sure you force the post down through the other layers of fabric. This will keep the eye from bulging out.
I hope this helps you as you crochet your next Nel, Nelson or a few other FreshStitches patterns.

Here are handy links to all the posts about amigurumi eyes. . .
- What Kind of Eyes Should I Use?
- How to Use Safety Eyes
- Tips for Dark Eyes on a Dark Softie
- How to Make Glitter Eyes
- Attaching Craft Eyes through Thick Layers
- How to Remove Safety Eyes
- How to Add Felt Eyes to Your Softie
Return to the main table of contents for Let’s Learn to Crochet Amigurumi.
Move on to the lessons for standing legs.
Happy stitching!

I had that problem when I made my Nelson. I snuck into my hubby’s tool box to borrow some plyers to squeeze it together. Your solution is simple and functional! It made me say: “DUH!!!” Thanks again Stacey!
I use pliers normally (I find that for Nel the 3 layers is still too thick – and I use the above technique as well!) – but I have trouble with safety eyes period. My hands are too weak! So first I cover the safety eye with a plastic or cloth sheet and then use the pliers – the plastic protects the eye from damage!
Thanks for the tips!
I really like your little pot of gold! cute!
Would this technique work if you were wanting to indent the eyes. I’m working on a bison and the safety eye goes through an eye patch and head but the eye patch is sewn on first then the entire eye space is indented before putting the safety eye in place.
Any help is appreciated. I would like to make more than one bison but if I have to go through what I just did to attach the eye … well I don’t know if the bison will make it ; )
It depends on what materials/methods you’re using – but I think you could do it this way. You may want to snap off the excess post on the back after you get the washer on. I just use a pair of wire cutters and it snaps right off.