How to Applique Faux Fur – video

Applique with faux fur is the BEST!

Lots of people use fur to make stuffed animals – but did you know you can use it in quilts too?

Yes – you can!

Make shaggy dogs, fluffy cats, and furry monsters.

Or if you don’t want to make the whole critter furry, maybe just a few parts? Like some long, silky fur on a dog’s ears – or excessively shaggy eyebrows on a silly monster.

I’ve already shown you the basics for working with fur to make stuffed animals. This post shows you how to cut and sew faux fur, and this one shows how to applique regular fabric onto the fur. Today’s video shows you how to applique faux fur onto regular fabric. It’s crazy easy.

Oh – and in case you missed it – here’s info about my favorite source for faux fur.

And if you’re looking for some patterns to try it with, here are a few of my favorites.

  • Scary Squares is my simplest monster quilt pattern. It has lots of big, easy body shapes that would be easy to do with fur.
  • Mix & Match Monsters is a little more complex, with lots of additional parts (spots, stripes, horns, etc) where you could use smaller bits of fur.
  • Lovable Mutts is my easiest dog pattern – lots of big, simple shapes begging for fur.
  • Cuddly Cats is the equally simple cats pattern.
  • Bunches of Bears – one more super simple pattern that would work great with applique faux fur.
Vibrant handmade crochet toys and patterns from Shiny Happy World.

Here are links to all the posts about choosing fabric.

And here are links to posts about using specialty fabrics.

Finished with this topic?

Return to the Let’s Make a Quilt main Table of Contents.

Have fun with this technique!

Vibrant handmade crochet toys and patterns from Shiny Happy World.
Colorful quilt featuring adorable dog appliqué patterns for making plush dog toys.

How to Make Half Square Triangle Blocks – video

How to Make Half Square Triangles - a video tutorial

Yesterday I showed you what a half-square triangle block is (and some of the tools you’ll use to make them). Today I’m going to show you how to make one. Actually – two, because with this technique you make them two at a time.

There are a LOT of different methods for making half-square triangles. Some of them make a lot of blocks relatively quickly, but they have a lot of steps that don’t feel very intuitive to me. This method is fast, easy to understand (once you do it once you’ll never need to look at the instructions again), and makes a nice accurate block. That’s all I ask for. 🙂


Update – Ask and ye shall receive! Someone asked for a printable PDF with very basic instructions that she could follow along with away from her computer. What a great idea! I put together a handy dandy cheat sheet on just one page – with photos. 🙂 Here’s the link to download it.

One more thing. In this video I tell you to cut your initial squares 1 inch larger than the size of the finished block. Most instructions tell you to cut cut 7/8″ bigger and then sew with a scant quarter inch seam allowance. That makes me really nervous. How much smaller than 1/4 inch is a “scant” 1/4 inch seam? If I’m not scant enough my blocks will be just a smidge too small and then I’m SOL. No. I’d rather cut my initial squares 1/8″ bigger, sew with a real (measurable) 1/4 inch seam allowance, and then trim away the tiny bit of extra I end up with. It’s much less nerve-wracking – plus the math is easier. 🙂

The possibilities with just half-square triangles are incredible!

Happy quilting!

Best,
Wendi
Applique Wendi (with fabulous hat)

Intro to Quilting Triangles – video

Intro to Piecing Triangles - video

I’ve gotten a lot of emails asking for a help piecing triangles. Your wish is my command!

This video isn’t a how to – that’ll come tomorrow. This one walks you through the two kinds of triangles we’re going to learn – half-square triangles and quarter-square triangles. These are the most common triangles you’ll find in quilting – you could make gorgeous quilts for the rest of your life, never repeating a pattern and never moving beyond these two basic blocks. Learning them is like learning back stitch, split stitch, lazy daisy and French knot – you can embroider any design knowing these four stitches.

In addition to teaching you the difference between the two basic triangle units, I also show you a couple of tools it’ll be handy to have when you start piecing triangles. They’re inexpensive and easy to find and they will make your life sooooooo much easier. Get them.

Here are the lessons. . .

How to Make Half-Square Triangles

How to Make Quarter-Square Triangles

Happy quilting. 🙂

Best,
Wendi
Applique Wendi (with fabulous hat)


How to Applique ONTO Fake Fur – video


I love to use a bit of fake fur in my quilts and stuffed animals, but I get a lot of questions about how to make the eyes and other features work. How do you applique ONTO fake fur?

See the eye on the crazy blue bird monster, above? Or the giant eyeball on this monster made with the Eggheads softie pattern?

Hugh the Egghead Monster from Shiny Happy World

That’s the kind of thing people are asking about.

I get the same question about working with fleece, like the eye on this fleece bird/monster.

All of these use appliqué onto fake fur or fleece to sew on those eyeballs.

This video showed you how to cut faux fur without leaving your sewing space looking like a Muppet abattoir, and how to sew the pieces together so all the lovely fur ends up on the outside of your softie (without tedious seam-picking).

Now I’m showing you how to appliqué directly onto the fake fur. This is a good way to attach eyes, mouths, bellies, spots, stripes – any smooth surface you want on top of all that fur. It’s surprisingly easy!

Applique onto fake fur. Give it a try!

Then try this video to learn to appliqué faux fur onto regular fabric – great for bushy eyebrows. 🙂

Vibrant handmade crochet toys and patterns from Shiny Happy World.

Here are links to all the posts about choosing fabric.

And here are links to posts about using specialty fabrics.

Finished with this topic?

Return to the Let’s Make a Quilt main Table of Contents.

Happy sewing!

Vibrant handmade crochet toys and patterns from Shiny Happy World.

How to Applique Outside Points – video

Colorful applique project with a cute monster design on pink fabric. Step-by-step tutorial for applique and fabric craft.

It’s the last of the machine embroidery videos – covering the trickiest shape – outside points.

Outside points are tricky because you have so little space for your seam allowance to sit. The allowances have to be trimmed very close, and you often wind up with raggedy frayed threads at the tip. Yuck.

My technique won’t get you a perfectly perfect point, but it will eliminate those raggedy threads and give you a point that can stand up to machine washing. If you need a perfect point that doesn’t need to be super-durable, use needle turn applique. Click the link to watch a video showing how.


Free Freezer Paper Applique Workshop

For all the videos and tutorials teaching you the freezer paper applique technique, gathered up in one handy dandy post – go here.

Happy stitching!

Best,
Wendi
Applique Wendi (with fabulous hat)

How to Machine Applique Concave Curves – video

How to Applique Concave Curves with the Freezer Paper Method - video

Hello all! Here’s the third video in the machine applique series.

We covered convex curves in the very first video – the one that introduced the whole technique. Watch that video here. And we covered inside points in this video.

Now we’re tackling concave curves. Those are the ones that curve in (like a cave). The technique is easy – if you can do the inside points then you can definitely handle this.


I also cover using starch in this video. I had someone ask me about getting a really crisp edge on her applique pieces. The answer, my friends, is starch. Simple spray starch from the grocery store. I don’t use it much, but sometimes – if your fabric just won’t behave – it can make all the difference. If you’ve never used starch before – give this a look and see how easy it is. And watch the steam fog up the lens of the camera. 🙂

Free Machine Applique Workshop

For all the videos and tutorials teaching you the freezer paper applique technique, gathered up in one handy dandy post – go here.

Happy stitching everyone!
Best,
Wendi

How Do I Embroider on Quilts?

Blue and pink embroidery thread on cream fabric with needle, how to embroider on quilts.

Brightly colored quilt with playful patterns on a cozy bed.

Want to learn the basics of hand embroidery with an easy online workshop – totally free?

Sign up for Embroidery 101 here. You’ll learn how to get started, the tools and supplies you’ll need, the four most basic stitches, how to transfer your pattern and how to display your work.

If you already know the basics – sign up for Embroidery 201. It’s also free! You’ll learn how to stitch on specialty fabrics like felt and stretchy T-shirts. Plus you’ll learn lots and lots and LOTS more stitches – all my favorites!

Brightly colored quilt with playful patterns on a cozy bed. I have a question–I just bought your bird sampler pattern and I want to include them in pairs around a quilt that I am making.  I have the top finished and I was wondering–what do you recommend–embroidering before I make the quilt sandwich, and then do the actual quilting–stitch in the ditch etc, or do you think it is better to do the embroidering as actual hand quilting and pull it all the way to the back.  I am not sure, as I haven’t embroidered on any of the quilts I have made. The quilt is a combo of flying geese and Chinese coins patterns and the focus fabric has chattering birds on a telephone line–so I think random pairs of embroidered birds will be great.  Thanks for your help with this question!!

Sandy emailed me a while ago with this question. As is almost always the case – my answer is longer than you might expect. (I ended up doing a full-blown tutorial showing you how to start and stop without knots, hide your tails, and carry thread invisibly from place to place. Keep reading and you’ll get there.) I’ve actually done both methods – and like them both – but they do look very different. So. . . it depends. . .

It depends on what design you want to stitch, what stitch you’ll be using, and how much interior detail there is.

I thought the best way to illustrate this would be to show the backs of some of my embroidered pieces.

Cloud embroidery design with rainbow-colored rainbow threads, cheerful and playful pattern, perfect for children's clothing and accessories.

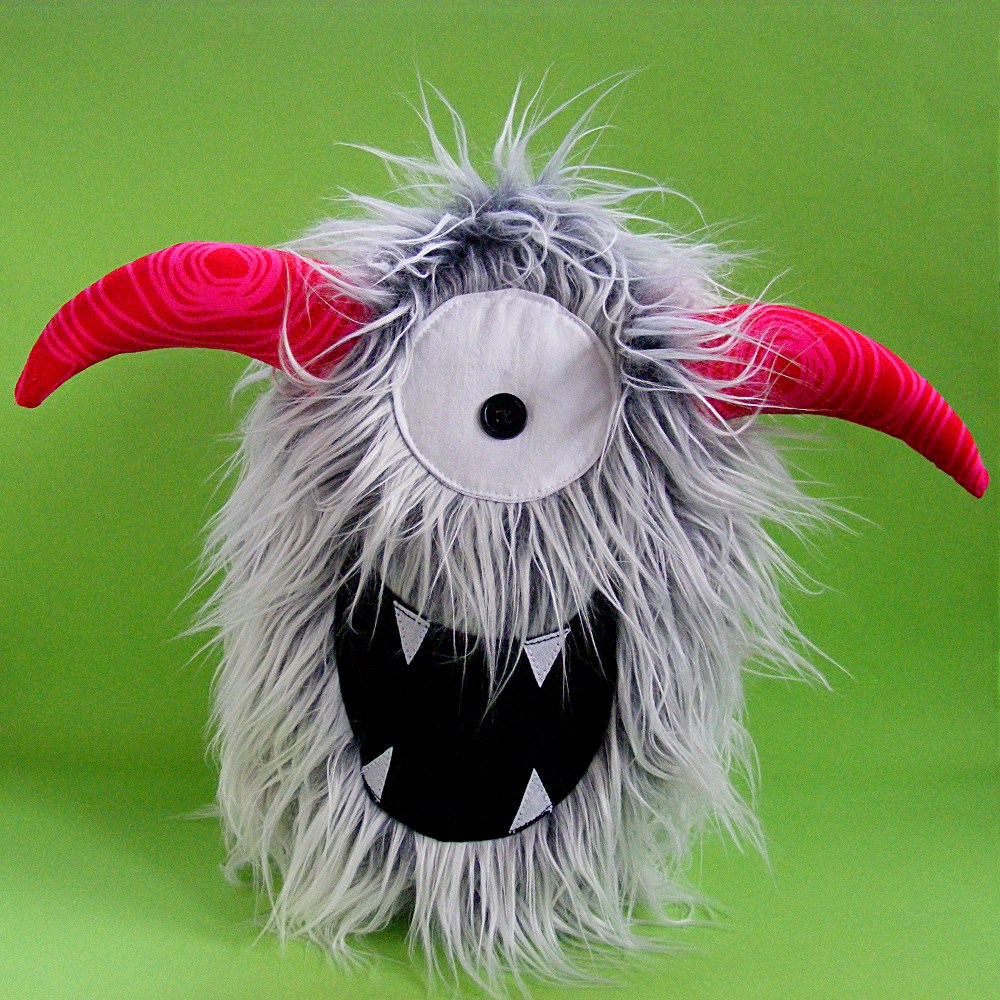
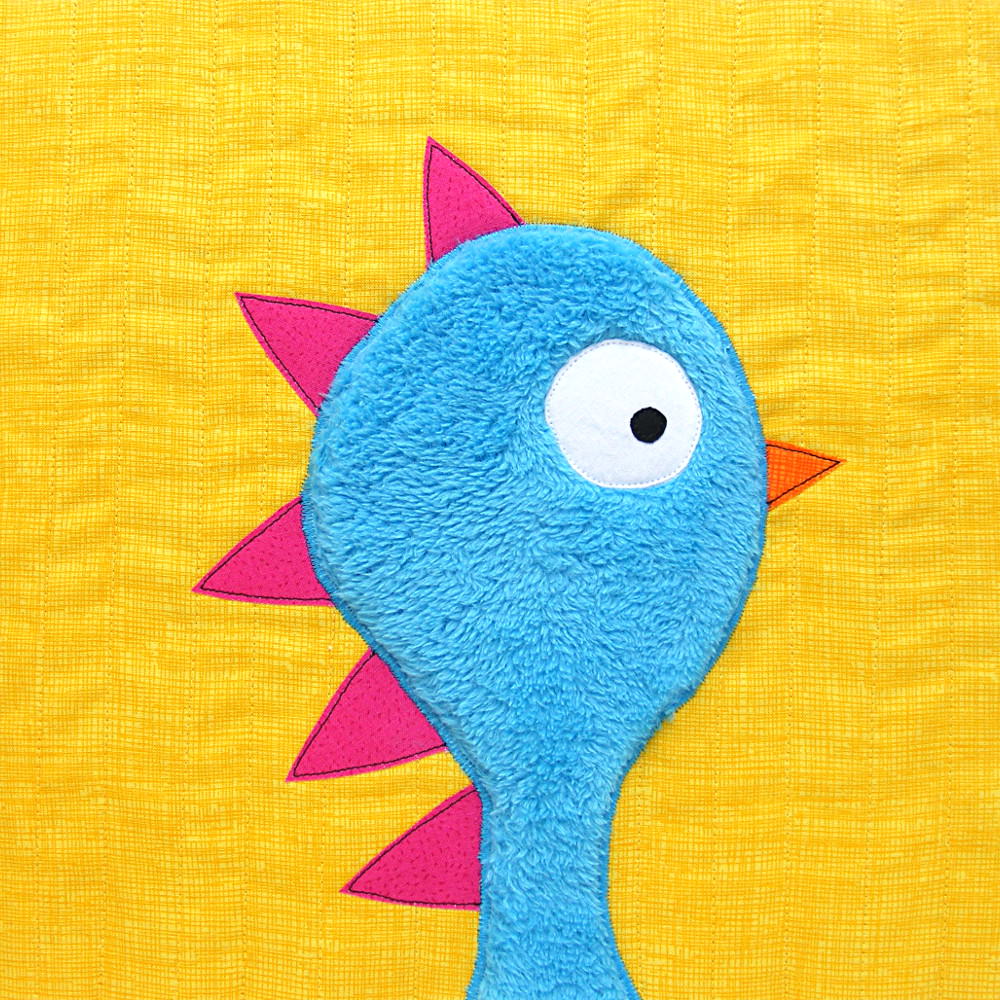
Running stitch looks the same back and front – so it’s a good candidate for something you’ll see from both sides. Read on and I’ll share a tutorial for hiding your threads when you carry from place to place (like between the eyes and mouth).

Backstitch doesn’t look bad either. It’ll be chunkier on the back than on the front, but with some care on your carrying and hiding thread tails, it can look pretty good.

Notice – what the image above has is nice, simple, open shapes. Not a lot of detail. Now for the opposite. . .

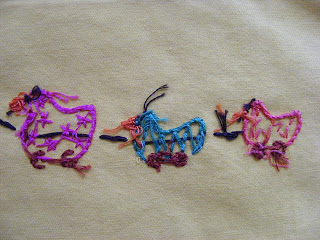
Aaaaack! Run away! This is quite ugly from the back – and that’s because the shapes are filled with cute chain stitches, French knots, and lazy daisies. Here’s another. . .

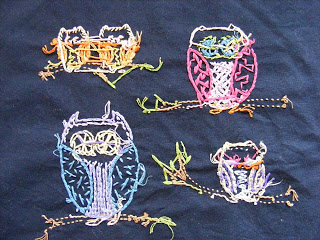
Again, this one has lots of detail inside the main shapes and it looks bad, bad, bad from the back.

So, quilting first and then embroidering through all three layers can be nice. Choose a nice, simple shape to stitch and stitch it in running stitch, backstitch, or split stitch. The quilt will “puff” nicely around the stitching and in the larger open areas of the design.

If you want to do some fancier embroidery – like the owls or the birds – embroider first and then layer and quilt. Otherwise the embroidery will be hideous from the back – and it will also compress the layers of your quilt too much and can distort the whole lay of things.

So – about that carrying? I said if you’re careful with carrying your thread and hiding your tails you can have something that looks pretty nice. Well, I ended up doing a full-blown tutorial on this.

 Here begins the tutorial

This is a quilt sandwich, ready for quilting. Instead of the usual quilting thread, I’m going to embroider one pink line with running stitch, and the other with backstitch and split stitch. I’ll use 4 strands of embroidery thread. I won’t use any knots, there will be no hanging tails, and you won’t see the thread carried from one line to the other. Ready to learn some sneaky magic?

Start by inserting your needle about an inch from where you want to start stitching. The needle goes in just through the top layer of fabric, then travels between the two layers of fabric (and the batting) until I bring it up where I want to start visible stitching. So if I flipped this over right now you wouldn’t see any needle (or thread) at all from the back.

Pull the thread until the tip of the tail just disappears into the starting hole your needle made. Careful! Don’t pull it all the way through!

Now – take a tiny stitch through all layers. This is going to secure the thread instead of a messy knot.

Bring the needle back up through the start of that tiny stitch. I should have photographed this better, but that needle is pointing up.

Now the thread is coming back up at the original desired starting point. There’s no knot, but that tiny stitch is holding it in place. You can yank really hard on this and it’s not coming loose. The tail of the thread is buried in the batting between the two layers of fabric. Neat!

OK. I stitched a whole bunch of running stitches and I’m ready to jump over to the other line. But I don’t want anyone to be able to see the thread between the two lines! So I get sneaky again and thread the needle between the two layers of fabric, right there in the batting. Easy peasy! The only drawback is that you can’t carry the thread any farther than the length of your needle. (Actually, there is a way. But I find it so tedious and irritating to do that I’d rather just tie off here and start over in the new space.)

OK. I did some more stitching. Some backstitches and then some split stitches. Now I’m ready to tie off. I take another tiny stitch. See how the needle is coming up really close to the end of that stitch? I’m talking that tiny of a stitch. Tiny is what makes it tight and work like a knot.

I put the needle back in at the end of the stitching (really close to where it came up – remember – tiny!) but only through the top layer of fabric. Carry your tail through the batting for about an inch, then bring the needle back up and out.

There’s the thread tail, veering up off the top, waiting to be cut.

Snip it off really close to the surface of the fabric. Careful! Don’t cut your fabric. It’s ok if a tiny bit of thread shows above the surface.

Rub your finger over it once and it will pop right into the batting and disappear from the front.

So here’s the finished stitching from the front. That’s running stitch on top, backstitch on the lower left, and split stitch on the lower right.

And here they are from the back. Again – running stitch on top, but now the back of the backstitch is in the lower right and the back of the split stitch is in the lower left.

No knots, no tails, and no thread carries. Neat and tidy. 🙂

Whew! That answer was even longer-winded than I expected. And I know how I can be. 🙂  I hope you all find it helpful!

Best,
Wendi
Brightly colored fabric with playful patterns, perfect for making cheerful, DIY sewing projects.

How do I rotary cut extra wide fabric?

A couple of months ago I made a video about cutting fabric with rotary cutting tools. I got an excellent question from an anonymous commenter. . .

Hi, I bought fabric for quilting and it is 51 inches selvage to selvage folded…..my question is how do I cut that? Neither my cutting mat or my ruler are long enough.

The answer here is easy to say – kind of tricky to do right. In the video I show you how to fold the fabric in half the long way to cut it. That works with my big mat and long ruler – but what if your tools are smaller?

Well – you fold the fabric in half the long way again. Easy, right? Yes. The trick is that you have to make your folds exactly parallel to each other, so that your cut across the fabric run perpendicular to both of them. Otherwise you’ll get annoying Vs at the folds. There’s no special skill needed for this – you just have to be fussy about getting everything lined up as best you can.

Happy Wednesday!

Best,
Wendi

Applique Wendi (with fabulous hat)

How to Machine Applique Inside Points – video

Applique notches with freezer paper method for sewing applique projects.

Brightly colored quilt with playful patterns on a cozy bed.

Want to learn how to make a quilt with an easy online workshop – totally free?

Sign up for Let’s Make a Quilt here. You’ll learn how to get started, the tools and supplies you’ll need, and how to make a quilt from start to finish using Quilt As You Go and applique with fusible adhesive.

It’s the easiest, most fun way to make an applique quilt. You can do it!

Brightly colored quilt with playful patterns on a cozy bed. I posted a video recently showing demonstrating the basics of an easy machine applique technique. That basic technique is good for gentle convex curves, but there are a few additional skills you’ll need to handle things like concave curves and points. In this video I tackle inside points – really easy to handle, once you know what to do. 🙂

Like the looks of the hippo block I use to demonstrate the technique? I hope so! She’s part of the Safari Quilt.

For all the videos and tutorials teaching you how to appliqué with freezer paper, gathered up in one handy dandy post – go here.

Happy stitching everyone!

Best,
Wendi
Applique Wendi (with fabulous hat)

When do you need to "true up" fabric?

Back in this video about cutting strips using a rotary cutter I showed folks how to “true up” the edge of your fabric. That is – make sure that you’re cutting straight strips with the grain of the fabric.

Loretta asked. . .

This makes sense for when you have a piece of fabric that you might get from the store that has selvedge edges. But what if you are using scrap fabric – like you are cutting up an old shirt or pair of pants to make bean bags? Do you need to make sure that your fabric is true?

Ooooh – good question! It’s really a judgement call and depends on what you’re making.

A good guideline is to ask yourself if the finished thing you’re making is going to hang – on the wall, in a window, on your body, etc. If it’s going to hang, you usually want to make sure you’re working on the straight grain. As it hangs, it stretches, and if it’s not cut on the straight grain it will stretch unevenly. Have you ever had a T-shirt that got all twisty over time? Where the side seams stopped running straight up the sides and instead kind of spiraled around your body? That means the grain was messed up. It can happen with pants too. So annoying!

For stuff that won’t hang it’s not as important. So for most softies and beanbags, most patches for scrap quilts, etc. just cut out your pieces to maximize the fabric you have, or to get the pattern to run in the direction you want.

For really precise pieced quilts (like super-fancy stars and things like that) the pattern will often include cutting instructions and a good pattern will let you know if the direction of the grain is important.

Got any other questions? Send them to me here.

Happy stitching!

Best,
Wendi
Applique Wendi (with fabulous hat)