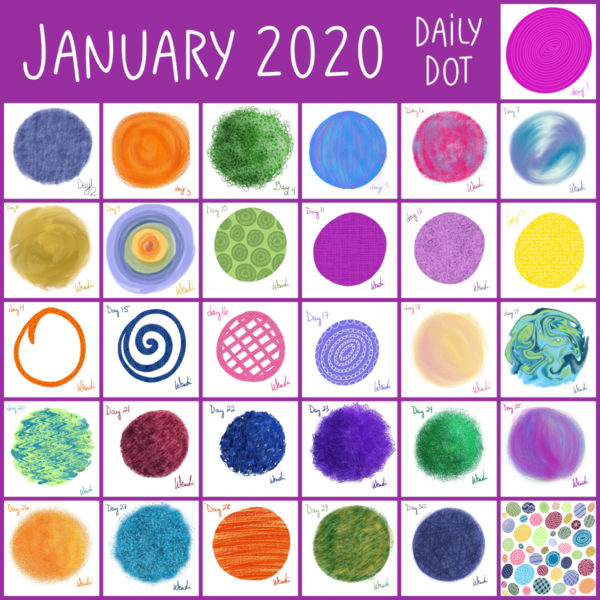
I decided that this is the year I really want to improve my drawing.
I used the Procreate app on my iPad to draw all the motifs in my book (How to Embroider Almost Everything) but that’s just black and white line drawings. I wanted to take it further. I especially wanted to learn how to add color and texture.
I also knew I needed to take small steps. I can’t get better at all the things all at once – so I’m setting my self small daily challenges, a new challenge every month.
I started in January with something really simple.
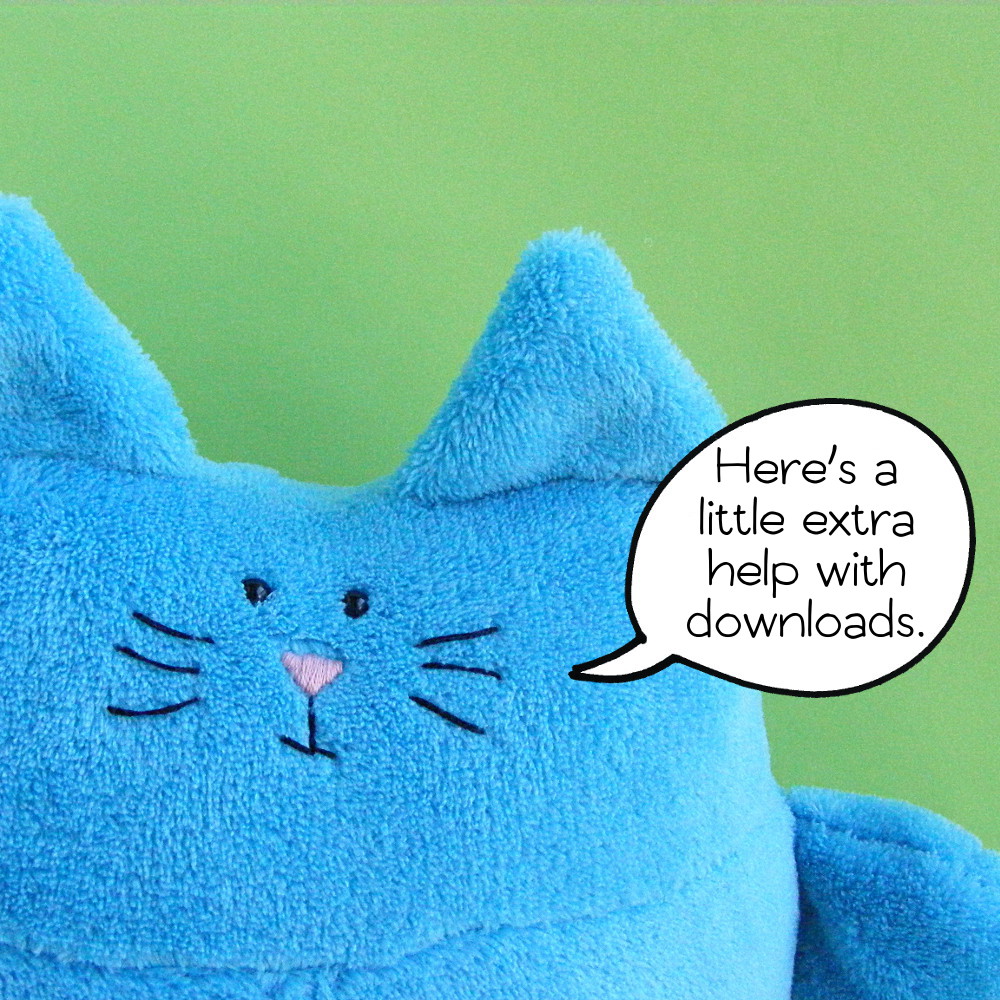
If you’ve been here for any time at all, you’ve heard me go on and on about how important it is to download your pattern files and save them to your own computer, and to back up ALL your files. It’s in every pattern delivery email and I do a PSA on social media about once a month reminding people to back up their files.
Well – I got an email from someone last week saying she wants to back her files up – but doesn’t know how. In my experience, when one person asks a question it means there are a bunch of other people who really WANT to ask the same question but haven’t done it yet.
So I just made two new videos to help out the folks who are super comfortable with a needle and thread – and less comfortable moving around digital files.
Here’s the first one. It shows (in a LOT of detail) how to download the patterns you purchase – and two ways you can easily back up those files.
See? It SHOULD be as easy as clicking on the download button.
But sometimes things go wrong – and that’s what this video is about. I share easy fixes to a few of the most common download problems.
These videos now live on my FAQ page, so they’re easy to find if you ever need them.
Just to be clear – I’m ALWAYS happy to help anyone who’s having technical difficulties. But I usually step away from my computer on weekends, which means your email asking for help can sit unanswered in my inbox for a couple of days. I’m hoping these videos will help you try some easy fixes yourself when that happens. 🙂
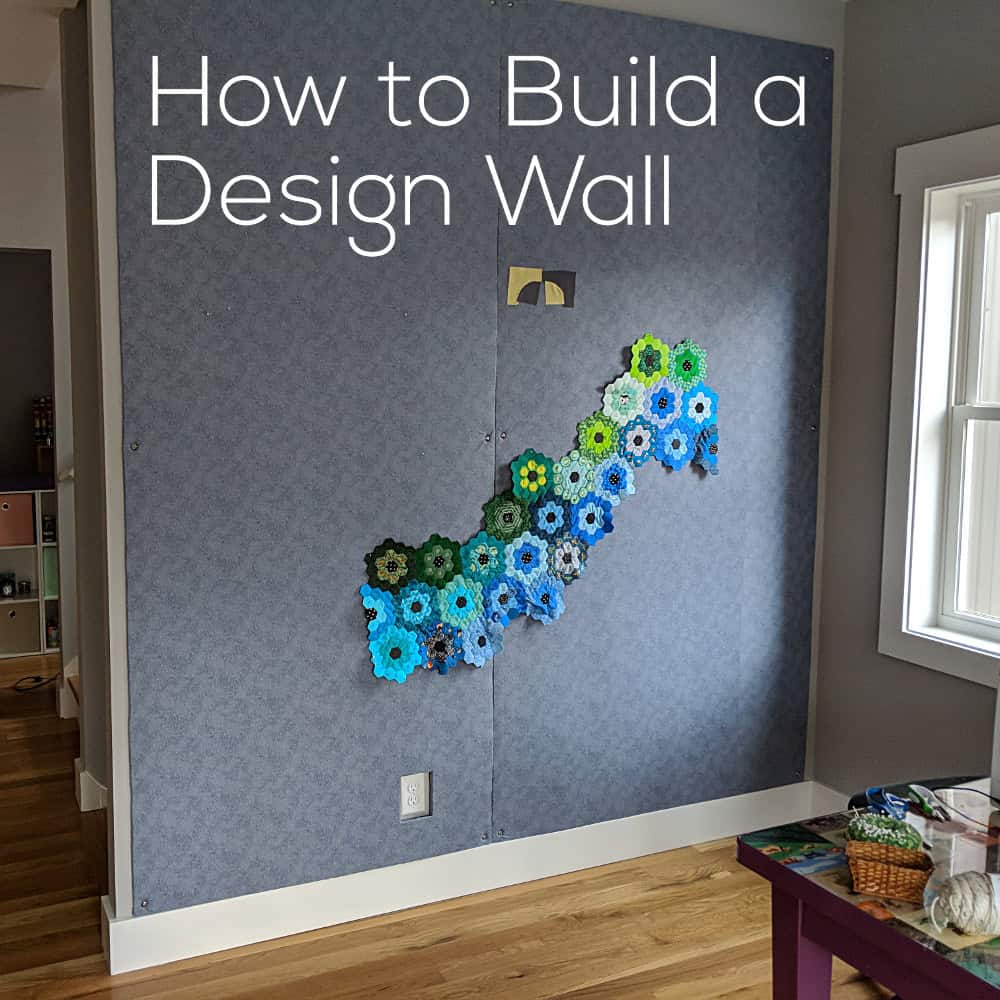
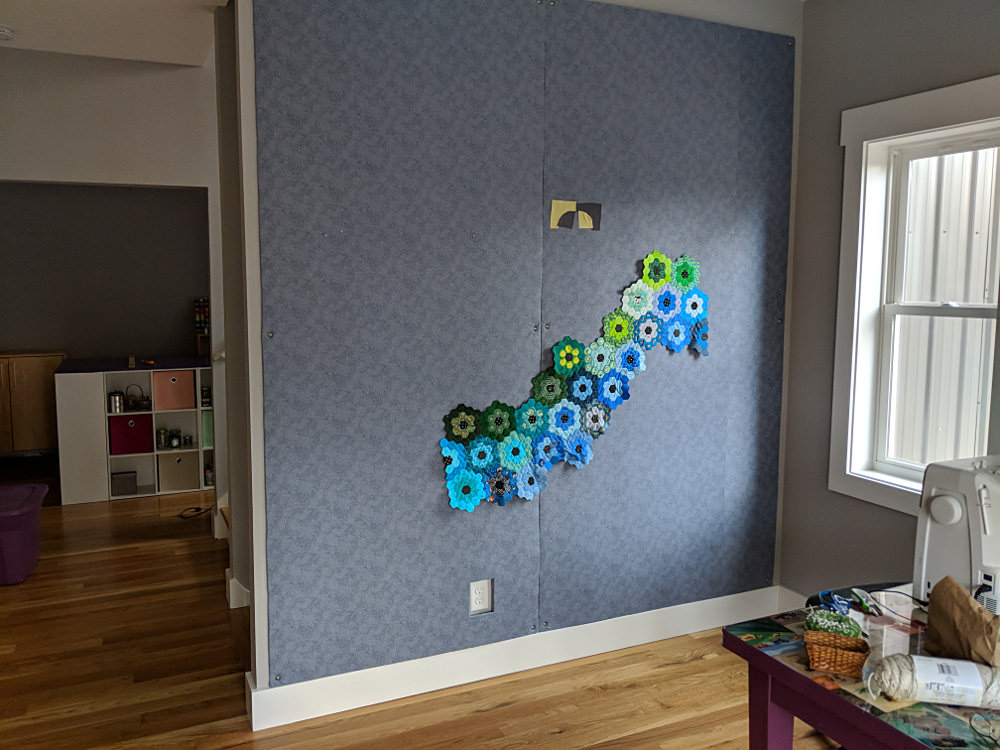
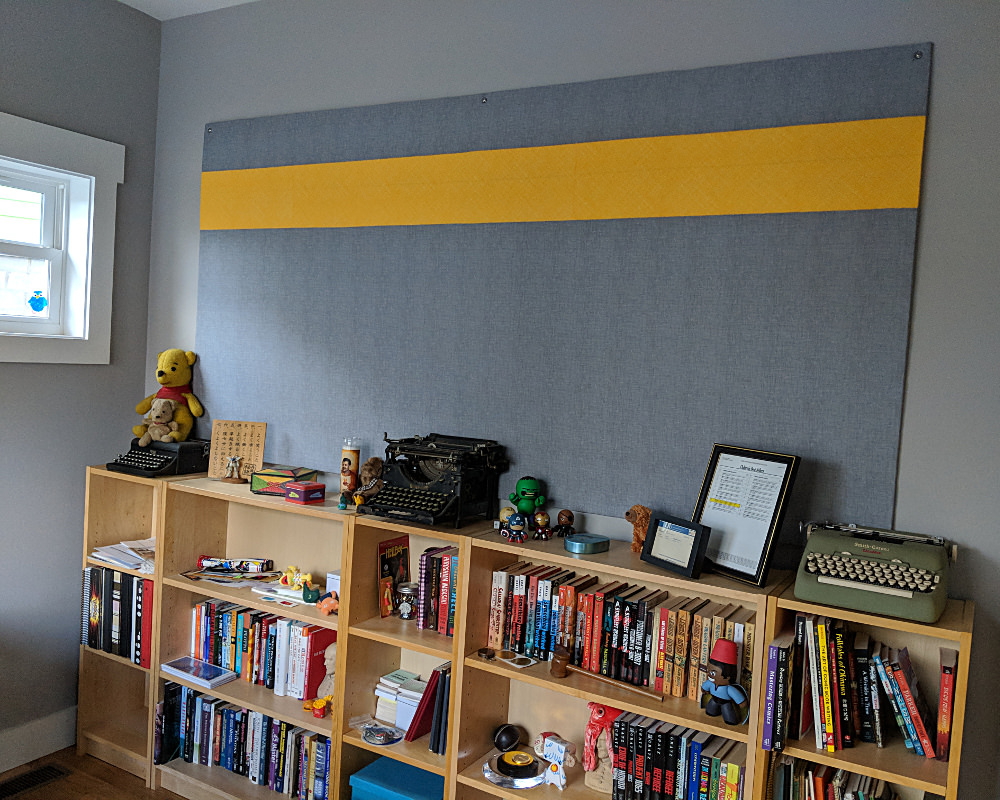
I finally have a quilt design wall in my new house and I’m so excited! There really is nothing like being able to step back and see an entire quilt like this!
And I’m going to show you (in excruciating detail) how I built mine – including the specific materials I used. I’ll also show you a bulletin board I made for my husband using the same method. I’ll even show you how to do that little cutout around the electrical outlet.
Ready?
Here we go!
To start with – I like to use foam insulation board. Styrofoam sheets are less expensive – but pinning into styrofoam gives me the willies. It’s a real nails-on-the-chalboard reaction so I don’t do it. Look for the 4 ft x 8 ft sheets of foam insulation board at your home improvement store. I like the ones that have a metallic foil material on one side.
I covered my board with flannel because I want to have both options – being able to pin into it but also being able to just smooth blocks up there and let them cling to the flannel.
Click through so you can see the flannel print close up. It’s a nice tone on tone print that looks interesting when there’s nothing on the board, but is subtle enough not to distract me from any design I’m working on up there. Later I’ll show you a different kind of option.
For my last quilt design wall I glued the fabric to the board – but that meant I couldn’t wash it, or easily change it if it got faded. This time I did the whole thing with pins.
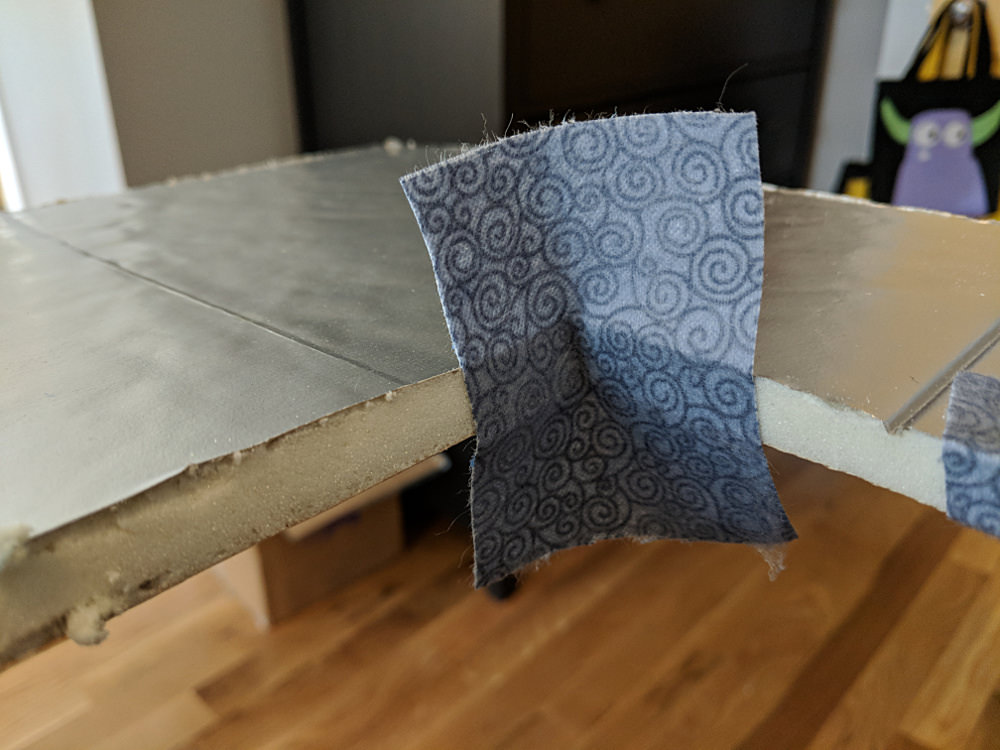
Start out by piecing together enough fabric to completely cover your board, and wrap around each side with a couple of inches to spare. Press everything nice and smooth.
Lay your insulation board foil side up and cover it with the fabric – getting the fabric as centered as possible.
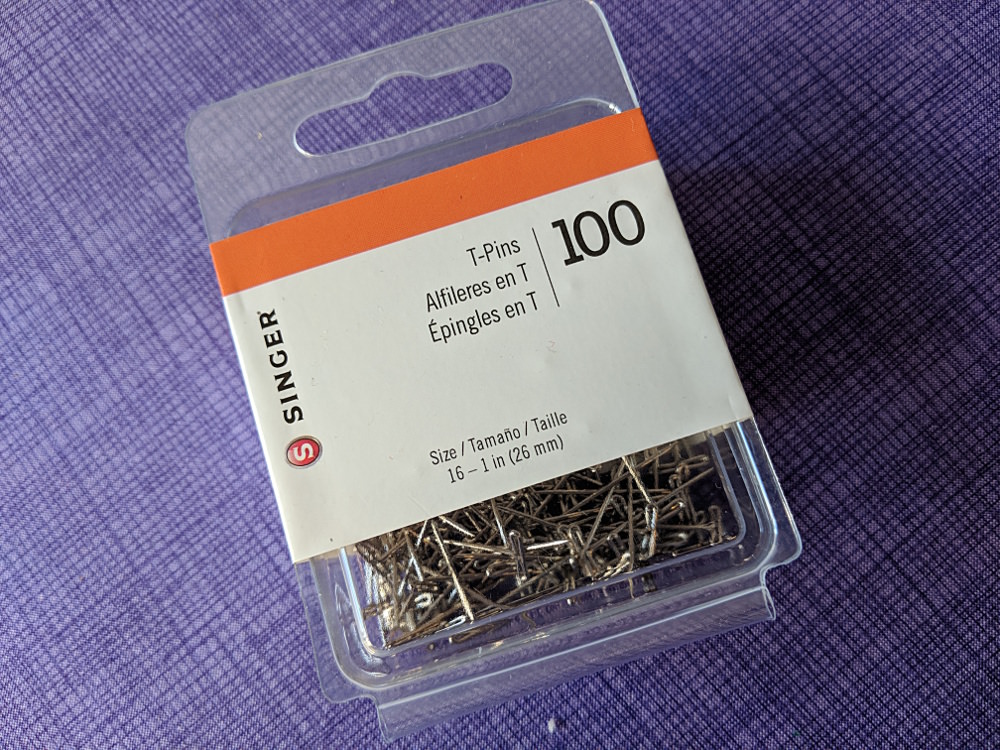
Start pinning your fabric into the sides of the insulation board. I used these 1-inch T-pins.
Basically – I used the exact same method I use to prepare fabric for framing – just on a larger scale. You can watch that video here.
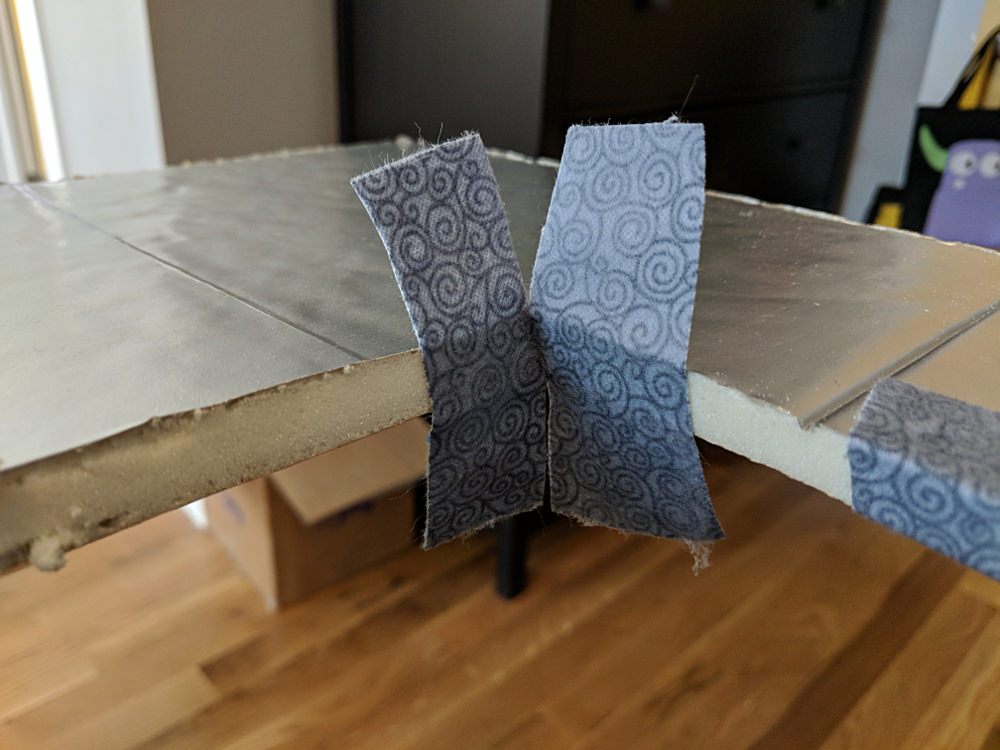
Keep adding pins, pulling the fabric smooth but not stretching it, until you have pins all the way around your board every 1-2 inches.
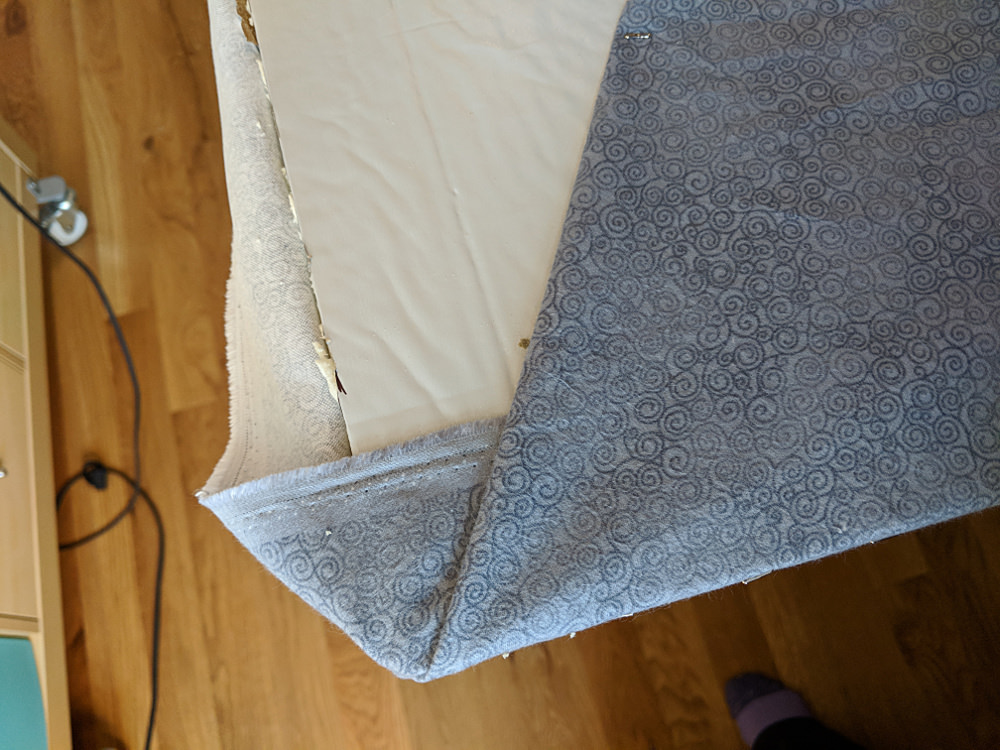
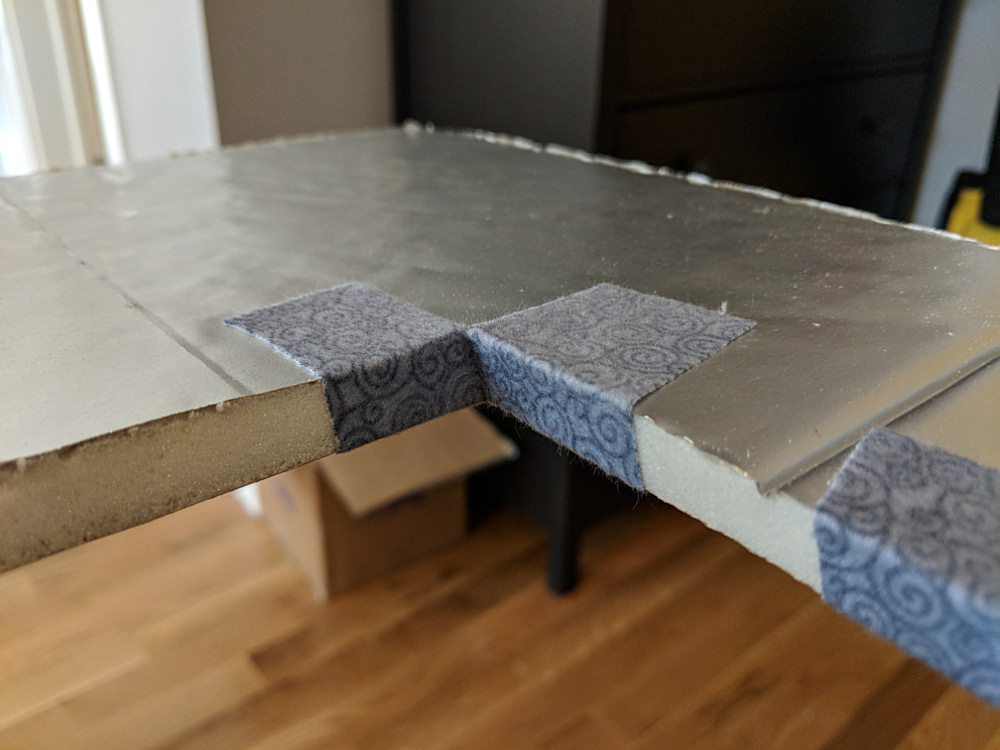
Flip your board over so you’re working from the back.
Fold in one corner, then fold in one side. Insert some of the T-pins at an angle so they hold the fabric flaps in place, but don’t poke through the front.
Fold in the other side. Now your corner is nice and neat!
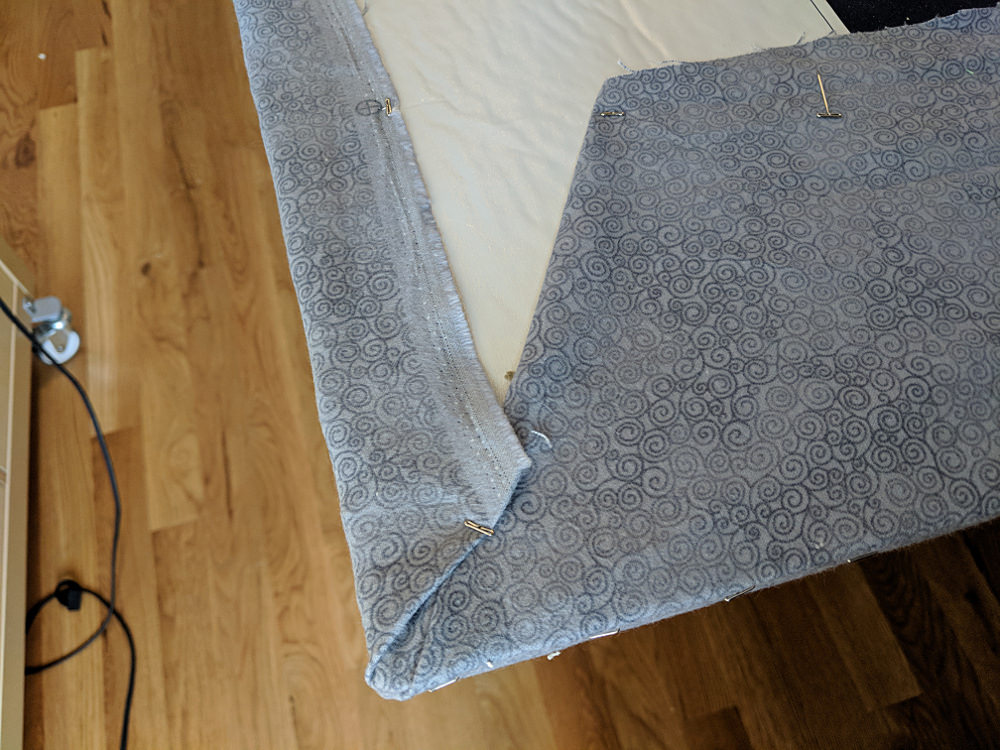
(See how pretty that tone-on-tone Jazz print is?)
Continue around the back of the board, securing the excess fabric with T-pins inserted at a slant. Remember – the side pins are the ones really holding the fabric in place on the front of the board. These are only holding the excess fabric in place, so you only need a pin every 8-12 inches or so.
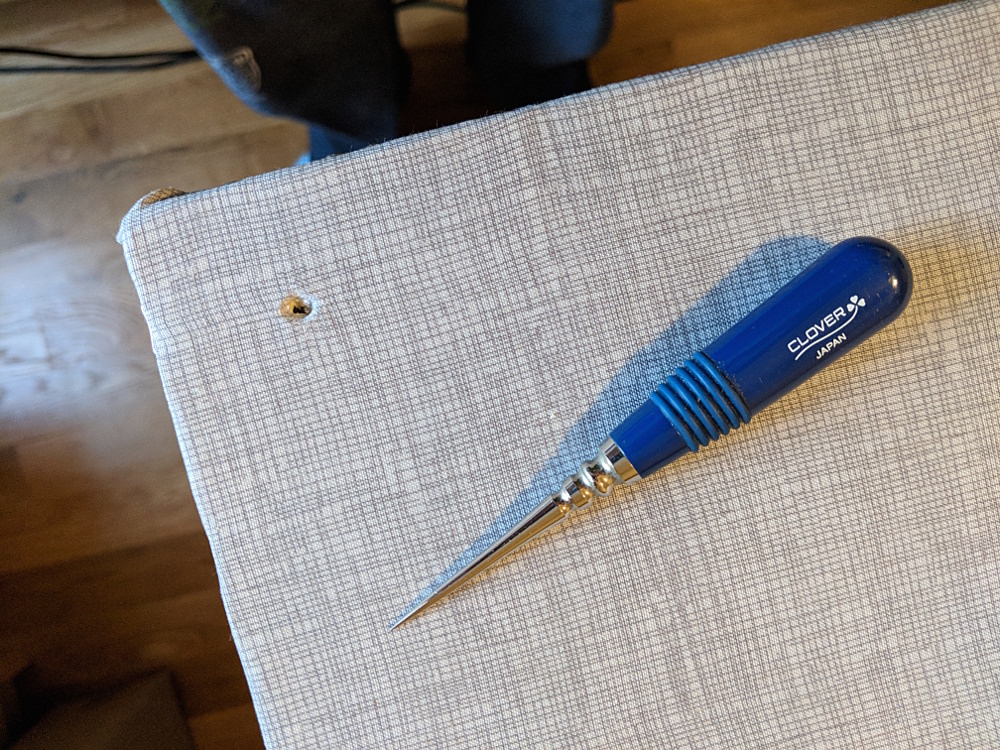
Use an awl or other sharp tool to poke a hole in each corner of the board (mine is 1 inch in from each edge) and one more in the middle of the longest edge.
This step is important! Don’t think you can just screw right through the fabric. The bit or the screw will catch the fabric and yank it into an awful twist, ruining all that work you did getting everything nice and smooth.
Hold the board just where you want it on the wall and mark through each of those holes with a pencil. Take the board away and insert a wall anchor at each of those spots.
Now screw the board into those wall anchors!
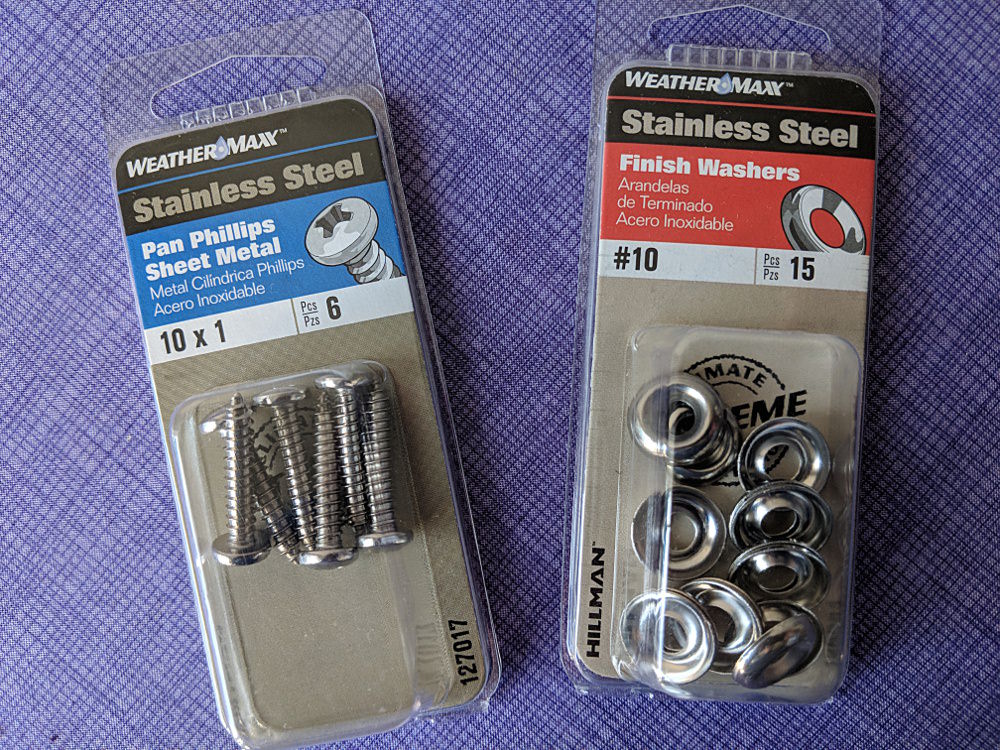
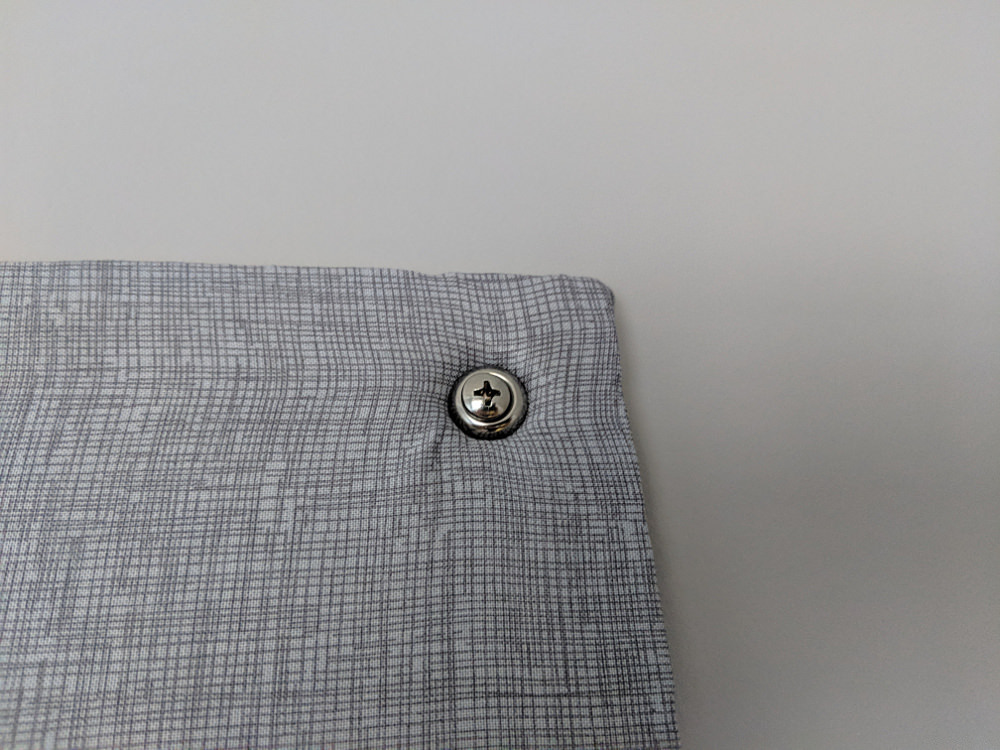
I used these nice stainless steel screws and washers.
You definitely need to use some kind of washer so that over time the head of the screw doesn’t just pull through the soft foam. See how nice these look?
I like to screw it in tight enough that it kind of dimples into the surface of the foam. That way I can skim quilt blocks right over the screws if I want to.
What About Electrical Outlets?
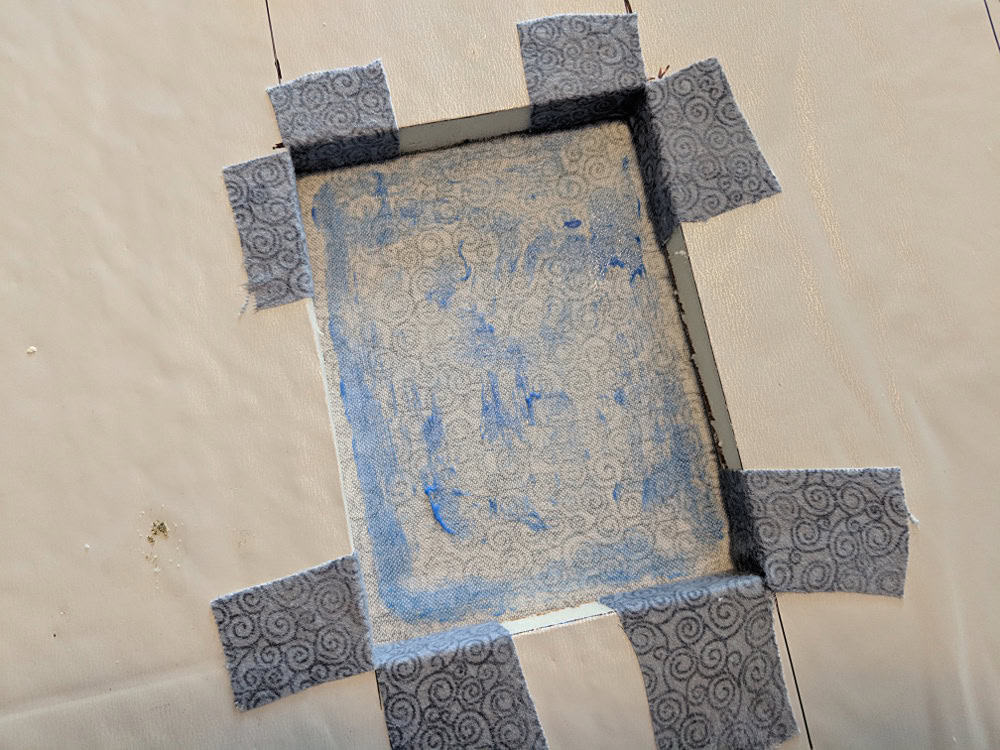
So my first board of my quilt design wall was easy – but the second one was going to go right over an electrical outlet. I wanted to be able to continue to use that outlet, so I needed to cut a hole in the board and finish those edges.
Don’t worry – it’s not hard!
Measure your space and cut a hole in your board just a little bit bigger than your outlet cover.
This stuff is easy to cut with a simple X-acto blade.
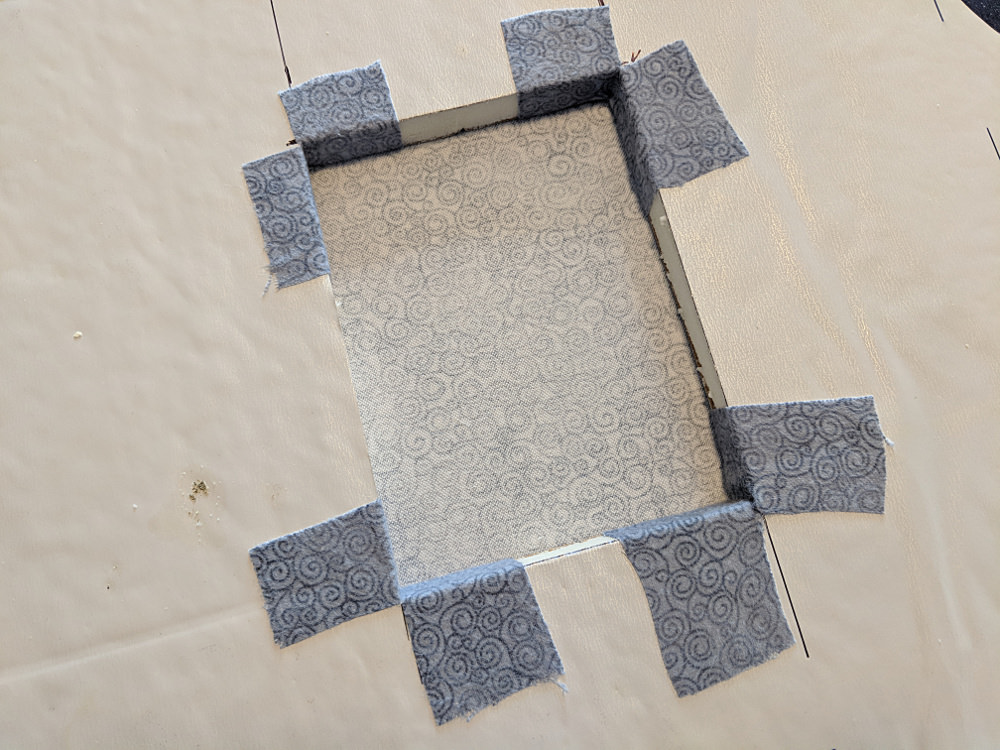
Now cut four squares of fabric roughly 2-3 inches square. It doesn’t not have to be exact – or even especially neat, as you can see with mine.
Cover the back of one square of fabric with glue.
I used a Uhu glue stick – not my fabric glue stick. I wanted a permanent hold here.
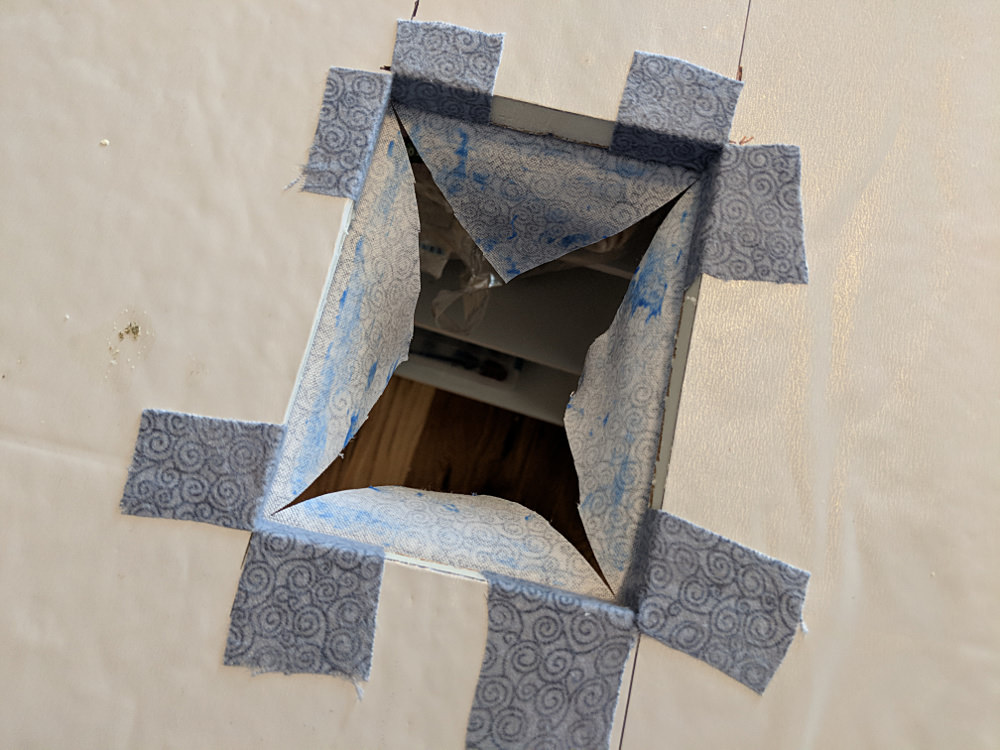
Stick the square right into one corner of your cutout and press it in place, as shown.
Now use a sharp pair of scissors to snip down from the top and up from the bottom – right on the fold created.
You want to cut very close to the surface of the board – with just a few threads to spare.
Now folds those flaps down and smooth them onto the front and back of the board.
Repeat for the other three corners.
Now just cover your board like a showed in the first part of the tutorial. Pretend that hole isn’t even there.
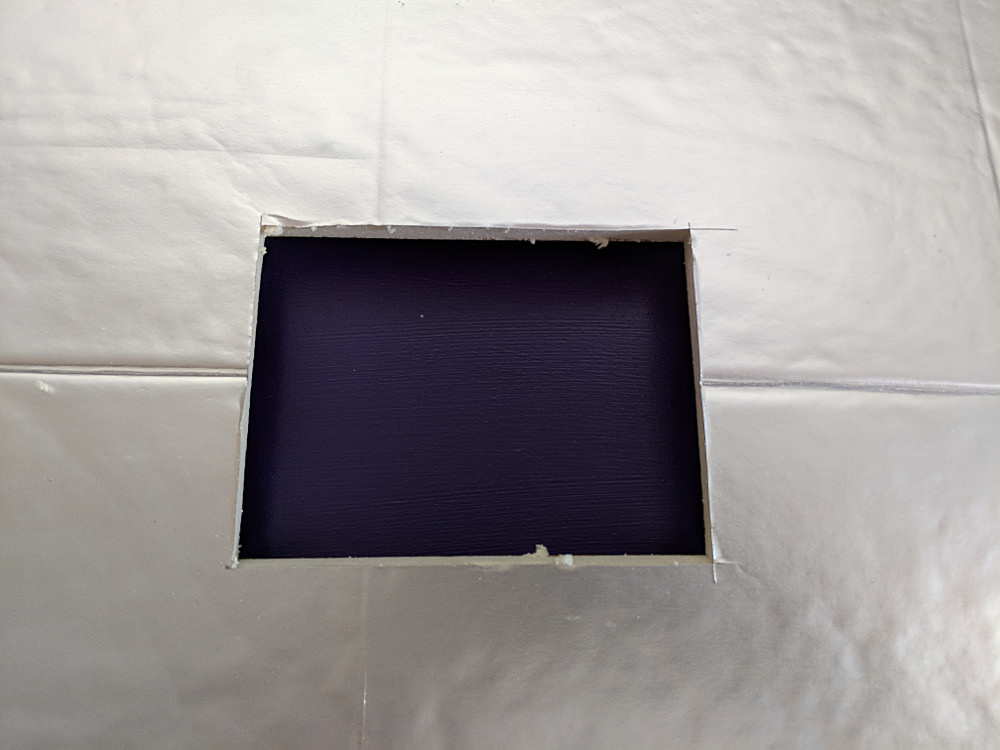
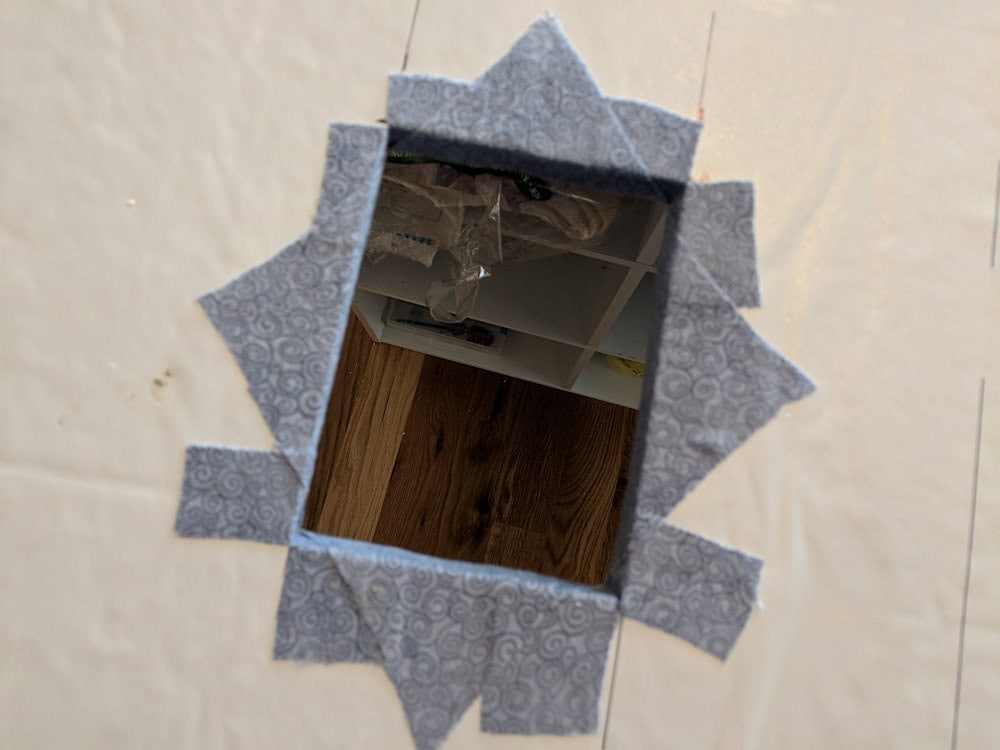
When you flip your board over, you’ll see the back of that fabric through the hole.
Make sure the board is on a flat surface (so you have something to press against) and coat all the fabric inside the cutout with glue.
Now use a pair of sharp scissors to cut an X in that fabric from corner to corner.
Pull those triangle flaps to the back side of the board and smooth them in place.
Sorry – I was using my camera’s autofocus and it focused on what it could see through the hole, instead of the fabric treatment around the hole. But I think you can still see what I did, blurry as it is. 😛
That’s it! This board is ready to hang, just like the first one.
Ta da! I have a quilt design wall!
Pieced Bulletin Board
I needed my board to be pretty simple so it wouldn’t distract from whatever I’m designing on it.
But my husband wanted a similar board to outline his next book on – and he wanted it to have a bit of design. Nothing too fancy – but just a little extra pizzazz.
Here are the fabrics he chose.
He doesn’t need fabric to cling to his board, so I just used regular quilting cotton instead of flannel.
And here’s his finished bulletin board.
It’s all ready for him to start hatching his next novel!
I love having a quilt design wall again! It makes it so much easier to really SEE the layout of a quilt in progress.
Here are handy links to all the posts about quilting tools and supplies.
I just haven’t sewn on enough different sewing machines to recommend one. Plus – a machine that’s perfect for me might not be perfect for you. It all depends on what you like to sew!
What I CAN do is tell you what I sew on and why it’s perfect for me. 🙂
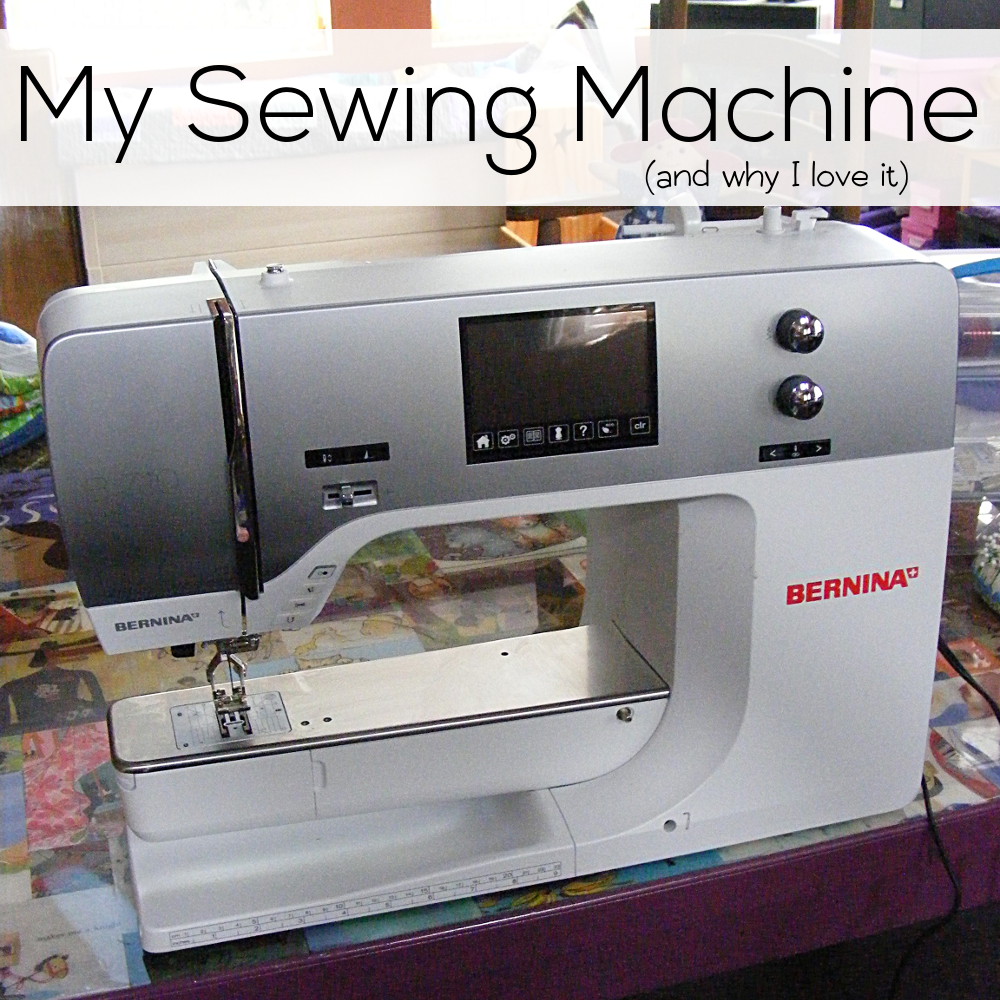
My current machine is a Bernina 710.
Before that I had a Pfaff Lifestyle (no longer made) that I really liked, but I went shopping for a new brand when we moved to the mountains and I was suddenly 3 hours from the nearest place that would service Pfaffs. So – number one – make sure whatever brand you buy is one you can easily get serviced. You should take your machine in once a year for a deep clean and you don’t want to have to drive for hours. 🙂
So – back to my Bernina.
I LOVE HER!
Here’s why. . .
I mostly sew quilts – and mostly applique – so these features knock my socks off:
I can set my machine to stop with the needle down and it automatically raises the presser foot halfway so I can pivot my work. This is my favorite feature!
My machine ties knots for me at the beginning and end of my stitching. And at the end of my stitching it also pulls the threads to the back and clips them. Magic!
I can adjust the amount of pressure on my presser foot – which is handy when I’m quilting really wavy lines without basting the layers first. This is also nice when I’m sewing softies and sometimes need to sew through 6 layers of cuddle fleece. 🙂
I love the built-in walking foot. I basically keep it engaged all the time.
It has a supersized bobbin which is great for quilting. Not as much running out of bobbin thread in the middle of a long line of stitching! (The next level up has an alarm that lets you know when you’re about to run out of thread – but I wasn’t willing to pay extra for that.)
It’s got a lot of general features that I really love too – not specific to quilting:
It’s quiet (for a sewing machine) and doesn’t shake the table too much.
It’s easy to change the needle and the feet.
It has a nice big slide-on table (not shown in the photo).
I don’t sew much clothing, but the free arm is great for sewing softie heads. (Most people use it for hemming pants and sleeves.)
It’s got a good strong light.
The controls are easy to use. (Though – honestly – it has a LOT of features that I never use.)
It handles any fabric I throw at it with no problems.
It does NOT have the built-in Bernina Stitch Regulator. I’ve tried it and think it’s pretty awesome, but I don’t do free motion quilting so I didn’t want to spring for that expense. I might try free motion in the future, though, so I made sure to get a model I could add that to at a later date.
My advice if you’re shopping for a machine is to test sew – a LOT. Do not be afraid to take up the people’s time at the sewing machine store! It’s a big investment and you should make sure you’re getting something that will work for you.
Bring in swatches of any specialty fabrics you like to sew with and make sure the machine you’re considering can handle them. I’ve heard several reports of Brother machines simply not feeding cuddle fleece through. We think maybe their feed dogs are less grippy than other brands? I LOVE using cuddle fleece for quilt backs so that would be a deal breaker for me – but it might not matter at all to you.
My last bit of advice is to ask other sewists. Nobody can recommend one machine above all others, but we can all tell you what we like and don’t like about what we use. The Shiny Happy People group is a great resource and I’ve seen many helpful discussions of different machines there. Hop in and ask about a machine you’re considering!
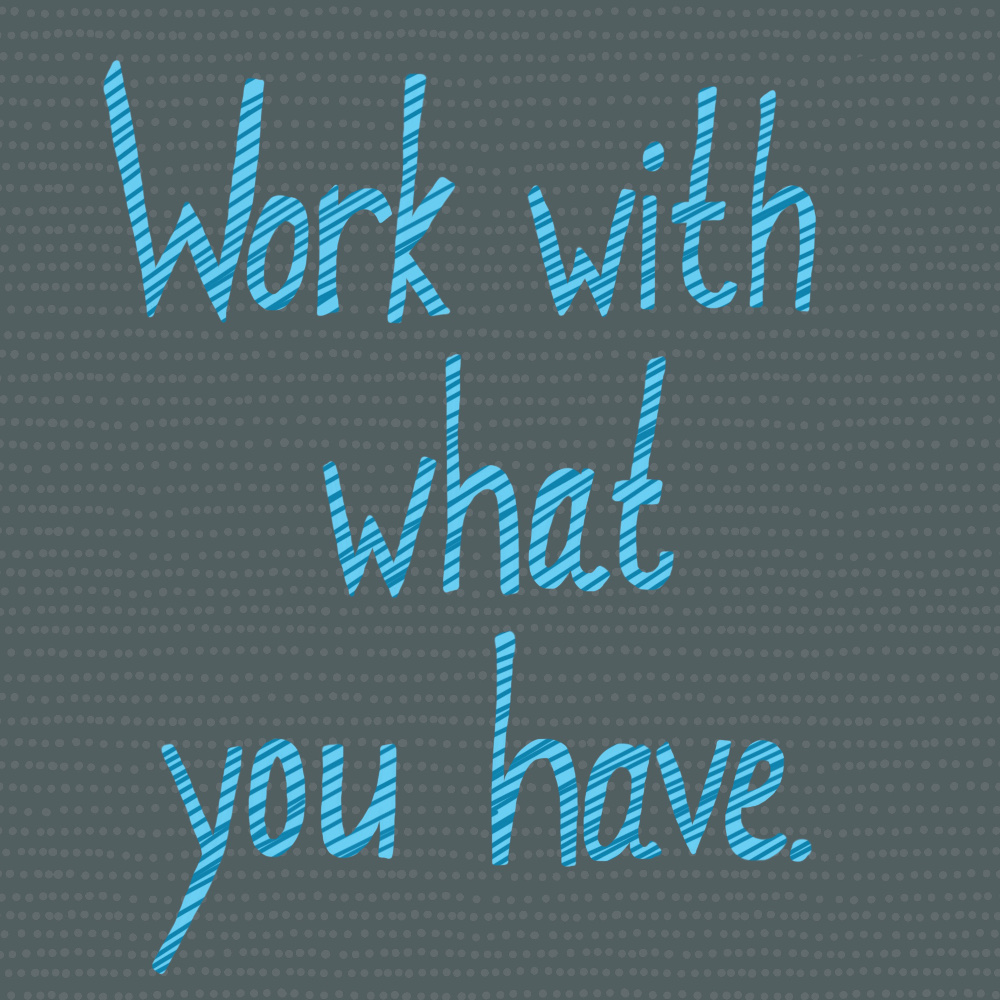
Sometimes working with limitations leads to awesome results – creative choices you wouldn’t have made if you had unlimited access to supplies.
Here’s one of my favorite examples.
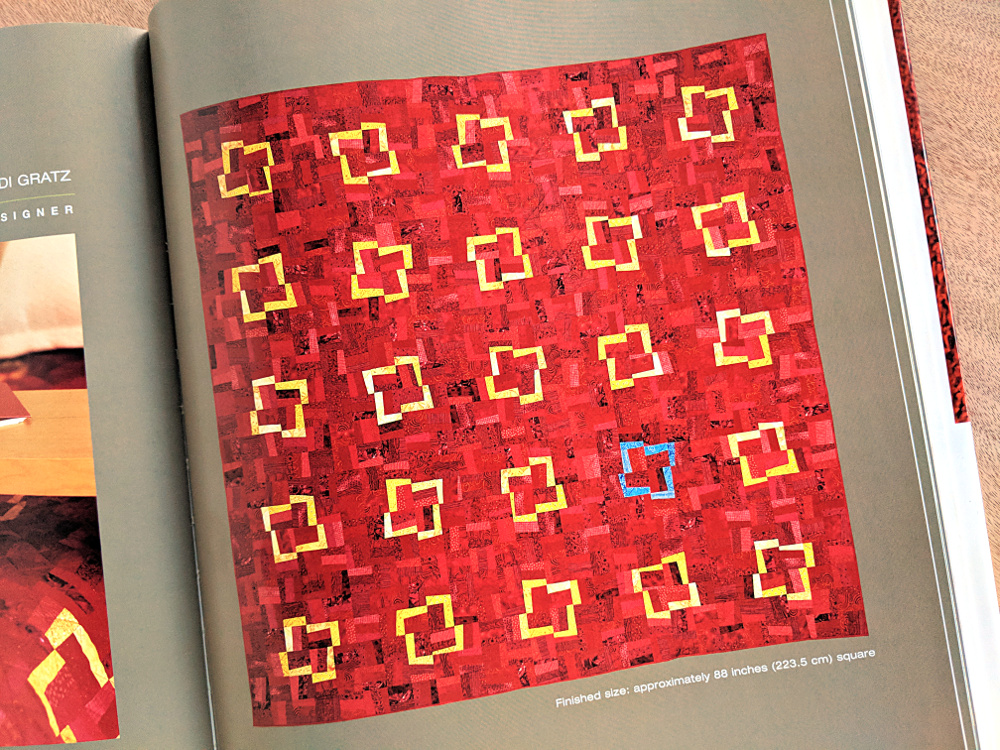
Many years ago I designed this quilt for a book called Simple Contemporary Quilts. I had already made a smaller, lap-sized version for myself, and that’s what I sent in for my pitch. They loved it and accepted it, but wanted a larger version for the book.
Here’s the thing – the smaller version was all yellow squares.
When I made the larger version I miscounted the yellow squares and ended up one short when it was time to sew the blocks all together.
And I was out of the mustard yellow fabrics.
And I was on a deadline.
I didn’t have time to go out and try to find more of the same yellow fabrics – so I decided to work with what I had. I made the last square lavender and LOVED IT. In fact, I think that lavender square is what makes this quilt.
(Luckily the editor of the book agreed.)
Give it a try sometimes. Make a small project using only what you already have on hand. Or work with what you have to solve a problem that crops up in the middle of a crafty project.
I’ve been trying to play around with lettering this year, and one of my goals is to make something new every week. I naturally gravitate toward stitchy letters, but this week I had no time. What I did have was an iPad, some patterns I had already created, and about an hour. Here’s the result – and I learned some new skills in the app (Procreate) I’m trying to teach myself.
Working with what you have doesn’t always result in a masterpiece – but it almost always pushes me to try something new. 🙂
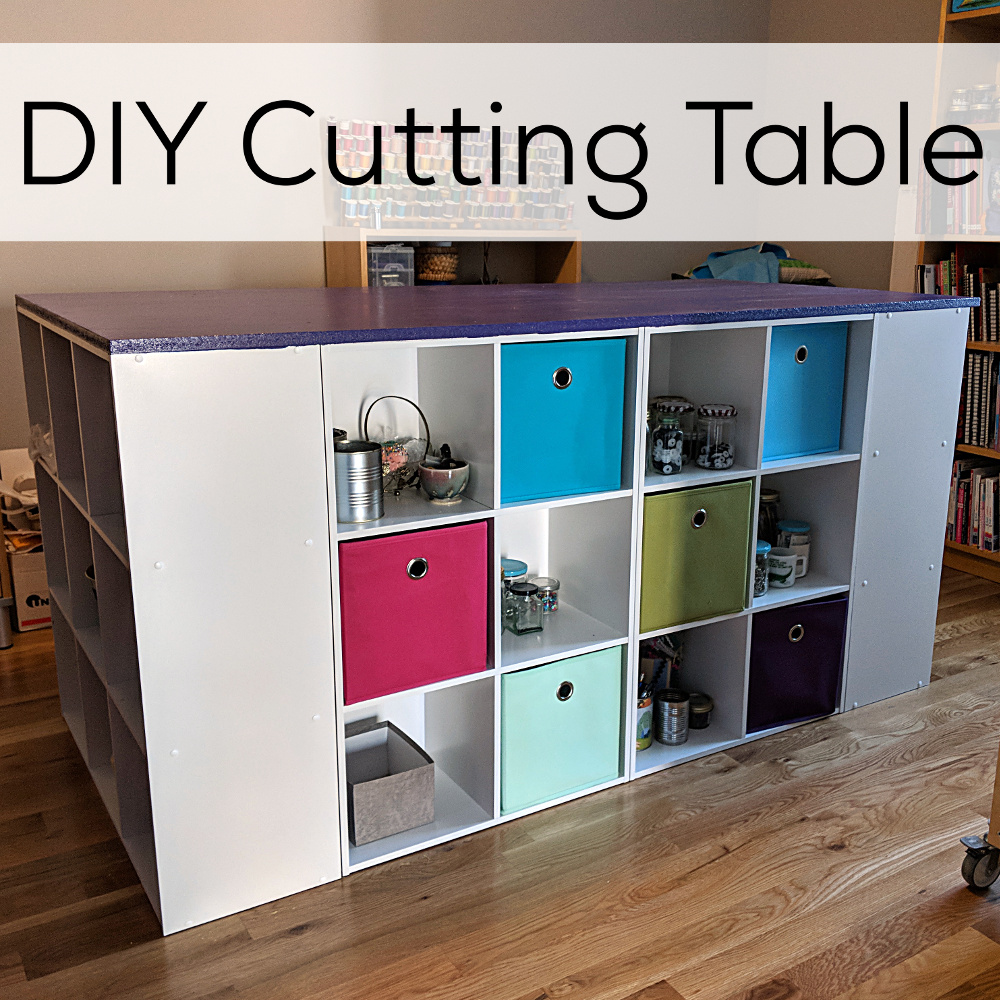
I cut a lot of fabric for bundles, so I really needed a large table at the right height for working while standing. Standing for hours at a dining table height surface will kill your back!
I used to have some good storage shelves that worked, but the bottoms of the legs got mangled in the move. The exact shelves weren’t made anymore (and the new version was much flimsier) so I needed to find something totally new.
I liked the look of an Ikea Kallax hack, but the height wasn’t right for me standing. I was going to go for kitchen base cabinets with a laminate top – but that was way (WAY) out of my price range. So I was walking around Lowe’s to see if there was anything that might work, and I stumbled across Cubicals from ClosetMaid.
They’re similar in look to the Kallax pieces from Ikea (though admittedly not as sturdy-looking) but the size is different. A piece 3 cubes tall was just the right height for me standing – and they made that configuration!
1 – 3 ft. x 6 ft. sheet of medium density fiberboard (you’ll need to buy a 4×8 sheet, but you can ask the folks at Lowe’s to cut it down to size for you)
1 piece of trim 1 1/2 inches wide x 3 feet long x 3/8 inch thick (optional – for cutting guide)
2 elevator bolts to hold the cutting guide in place (optional)
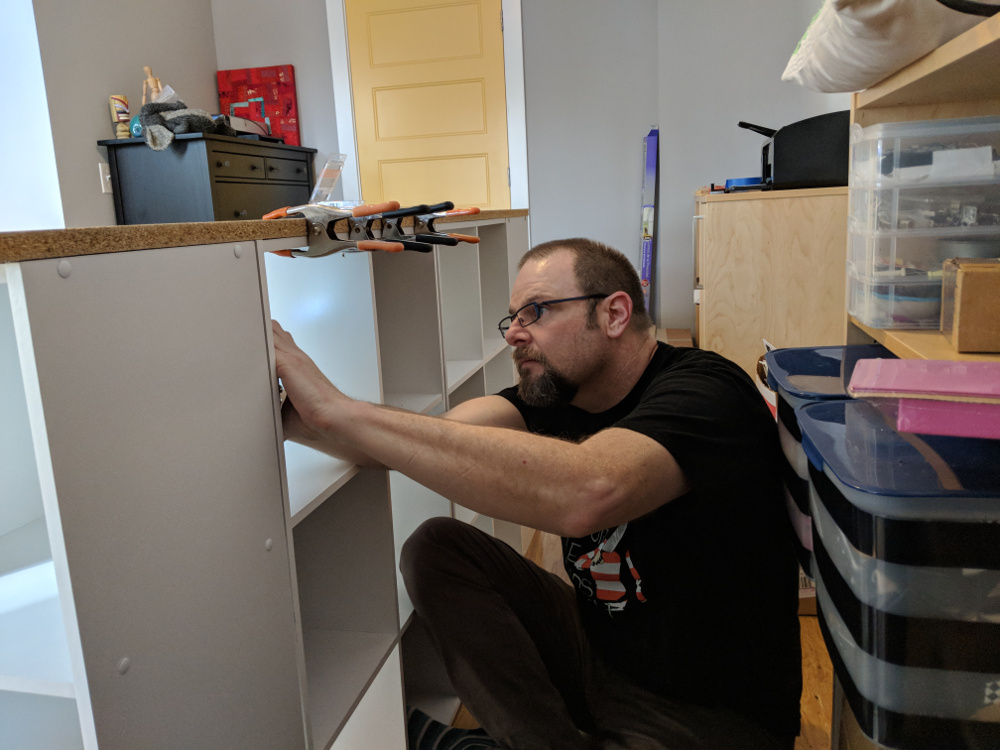
Assemble all the Cubicals cabinets.
Stand them in a rectangle with the cubes facing out. The two 3×3 cabinets are on the ends. There are two 2×3 cabinets (standing tall, not wide) on each side between each of the end cabinets. There’s some empty space in the middle.
Get everything lined up neatly – exactly where you want it because this is NOT movable) and set the big MDF sheet on top. Drilling up from underneath the table (up through the top of the cabinets) screw the table top into place. We used 1 inch wood screws and put some tape on the drill bit to make sure we didn’t drill all the way through to the top of the table.
That’s pretty much it – except for a special feature I added to the top for cutting fabric bundles. I don’t know how many of you will need this feature – but you can see it in action in this video.
I sanded the sides and just barely rounded the top edge, and added several coats of pretty purple paint. Those colorful fabric drawers that fit right in the cubes are fun – but Lowe’s doesn’t carry many colors. You can find a bigger selection at Target.
One more thing. They make Cubicals with two different size cubes. These are the smaller ones (each cube is 11 inches). The cabinets with the larger cubes look and feel more sturdy (and more polished), but they won’t work for a table like this because they’ll end up way too tall for most humans. These smaller cubes feel a little less sturdy until they’re all assembled and now it seems pretty super strong.
Make sure you’re getting the right size. 🙂
Here are handy links to all the posts about quilting tools and supplies.
Every once in a while a fabric company asks me to work with them on a project – usually for a booth at Quilt Market. When it’s the right company and the right project these collaborations can be really fun. Every once in a while lightning strikes and they’re so perfect that it’s almost magical.
Be sure to listen with the sound on for maximum cuteness. 🙂
I’m in the middle of another magical partnership – this time with Michael Miller Fabrics.
Maybe you saw some of their posts tagged #mmfpets during Quilt Market?
I had SO MUCH FUN making these guys!
Did I mention they’re BIG?
Really big.
Each block is about a yard wide!
When Michael Miller approached me about the project and shared a sketch of their booth, I actually squealed out loud. The concept was just so cute!
They had a bunch of BIG paper doll blocks, with outfits made in soon-to-be-released fabric collections. I would be making their pets – also in brand new fabrics. 🙂
It’s so much fun (and feels so sneaky) to play with new fabrics before they’re even released! Here are some of my favorites from this project. Each image links back to the Michael Miller site if you want more info. (Maybe you want to ask your local fabric store to be sure to bring in your favorite.)
So the whole booth concept was super cute, the fabrics were super cute, and their idea to incorporate my applique patterns was super cute. Of course I said yes!
Before I even started the project, I was already thinking of ways that YOU might want to use some big applique patterns. My plan was just to tell you to enlarge the blocks and then make some suggestions for what you could do with those supersized cuties.
But once I got into actually making the blocks, I realized it wasn’t quite as simple as that. It’s still pretty easy – and boy do they come together quickly! But there were a few Problems To Solve and Quirks To Work Out – so I decided to put it all together in a new online workshop.
No – those aren’t miniature scissors. Those are my regular shears, put in there for scale. 🙂
The class isn’t ready yet – but it’s going to be awesome. In addition to general tips and tricks and instructions for working with giant applique, there will be four (FOUR!) projects with all the patterns and instructions included. I’ll have more info soon as I start recording the videos.
Since the purpose of the blocks was to show off new fabrics, I needed to add some extra doodads and accessories for the pets. That way I could incorporate more fabrics!
That was so much fun that I KNEW you guys would want to play too.
I decided to create a new applique pattern with loads of different hats and eyeglasses and bows and mustaches and speech bubbles and more. I just finished my drawings and I’m going to start making up some sample blocks soon so you can see how they work with all the applique patterns you already have.
So there it is. A perfect partnership – one where every step of the process is a joy and takes me in directions I never even thought of – including back to you. Many thanks to Michael Miller Fabrics for making it fun!
Want to learn the basics of hand embroidery with an easy online workshop – totally free?
Sign up for Embroidery 101 here. You’ll learn how to get started, the tools and supplies you’ll need, the four most basic stitches, how to transfer your pattern and how to display your work.
If you already know the basics – sign up for Embroidery 201. It’s also free! You’ll learn how to stitch on specialty fabrics like felt and stretchy T-shirts. Plus you’ll learn lots and lots and LOTS more stitches – all my favorites!
You know how I talk ALL THE TIME about how much I love handwork because it’s so portable?
Would you like to see just what I keep in my handwork bag? I’ll show you what tools are inside and how I keep everything organized so I can pull out my work whenever – and wherever – I have a few minutes to stitch.
All right then!
I’m currently working on two projects – hand quilting the Controlled Chaos quilt (not portable – I do this on the sofa)
The quilt won’t fit in it 🙂 but the 7 inch hoop does. I work on both projects on the sofa – but I also carry the hoop with me for random moments of handwork.
I love having a metal tin so I can store sharp objects inside without fear of them poking me or poking through my bag. Here’s what’s inside the tin. . .
My bag is always packed and sitting at my sofa spot, ready to grab and take along in case I’m going anywhere I might have a few extra minutes for some handwork.
I’m happy to share! Especially because this time I feel like I finally got it right. 🙂
Sure, I’ve “decluttered” before – but only with moderate success. This time I swore things would be different – and they were!
The number one change in my approach was a change in my attitude. Instead of asking “What can I get rid of?” I asked “What do I want to keep?”
On the surface that seems like it’s really the same question – but the subtle difference was key for me. First, let’s look at a before photo. It’s not taken from the same angle (it’s actually from the other side of the room) but it’ll give you a pretty clear picture of what things looked like.
And this was a good day! Every horizontal surface is full of stuff. There are plastic tubs stacked under my sewing table and in front of my storage shelves. There are permanent piles of stuff stacked on the corners (out of the way, right?) of my work tables. There is stuff everywhere – and I wasn’t using even close to half of it.
No more!
Here’s what I did. . .
Start with one thing. The experts say to do one room at a time – but even that was too much for me. I tackled one piece of furniture at a time.
Remove everything from that piece of furniture. Stack it on the floor, pile it on a table – whatever you have to do to get down to an empty piece of furniture. As you unload, you’ll spot some things you know you need to get rid of. Bag them up if they’re trash, box them for donating – go ahead and get rid of them now. But know that this is the easy stuff – things like the jar of bobbins that went to a sewing machine I got rid of over ten years ago, or the water damaged tablet of nice drawing paper. This is where I’ve stopped before – the things with an easy reason to get rid of them. This time I went deeper.
Clean it. Clean it really well. Dust it, polish it, vacuum out all the weird nooks and crannies full of Cuddle Fleece fuzz. Make it look (and feel) like a new piece of furniture.
Now – start “shopping” in that pile of stuff. Pull out the things that you actually WANT. The knick-knacks that make you really happy when you pick them up. The supplies that you love to use. I used the word shopping very deliberately. If you were strolling through Joann’s and you saw this stuff – how much of it would you actually put in your cart and buy today? Probably not much.
The best example of this was when I went through my yarn bin. I don’t use much yarn. I’ll crochet something every once in a while, and sometimes I need yarn for hair or a tail – but that doesn’t add up to much. You wouldn’t know that from looking at the huge (overflowing – the lid wouldn’t fit on it) bin of yarn I had. I called Jo in (because she crochets sometimes) and we dumped it out on the floor. We very quickly picked the 5-6 skeins of yarn we actually liked – and got rid of everything else. Yarn in ugly colors, scratchy yarn, fluffy yarn that I loathe crocheting with – it all went away. And I breathed a huge sigh of relief!
Don’t ignore the emotional difficulty. Decluttering like this can be hard because it often means letting go of dreams. I had kept a bunch of small skeins of eyelash yarn (given to me by someone who was decluttering – ha!) because I thought I might someday use them in amigurumi. They’d be cute manes or tails, or be great for little hedgehogs or porcupines. The problem with that is that I don’t crochet amigurumi. I could learn – and I’d like to – but the realistic side of me knows that I probably won’t. Or – to be more precise – I will definitely NOT take the time to learn every single craft I’ve hoarded supplies for for the last two decades. I already sew, quilt, and embroider – I’m very unlikely to also learn amigurumi, knitting, jewelry-making, garment sewing, printmaking, watercolor painting, acrylic painting, and all of the other kajillion crafts I was storing supplies for, just in case I decided to try them out. And if I really do decide to crochet a cute little hedgehog, I will go out and buy the single skein of grey eyelash yarn I will need. None of the 20 skeins I had were grey anyway. 😛
Put the things you really want back where they go. Make sure they’re stored in a way you can easily access them – both to get them out when you want them, and to put them away again when you’re done. No storing things stacked on top of other things!
Move on the the next room/piece of furniture.
I did this over and over again, touching every single thing in my studio. And I mean every single thing. I went though my pencil cups and got rid of the hard pencils, the pencils with hard erasers, the pencils that were too short to get out of the cup without digging. I touched every single thing in the room and asked myself if I really wanted it. Not if I could think of a reason to keep it – you can always think of a reason to keep something. The question is – Do you really want it?
Two more decluttering tips for you. . .
Be fast. You know in your gut if you really want something. As soon as you touch it – pay attention to your gut. Do not start listening to your head. Your head will start telling you, “Well – you could use it for this or that or some other thing.” That’s what you told yourself when you picked it up at a rummage sale 10 years ago and you haven’t used it yet. You’re probably not going to. Get rid of it! If you find yourself dithering, you don’t really want it – but for some reason you feel bad about getting rid of it. Which brings me to. . .
Be ruthless. Some of your best decisions will be the hardest. Letting go of some things means letting go of dreams or might-have-beens. Sometimes there’s a lot of guilt attached – money spent on supplies for a craft you ended up not enjoying, time and money spent on a partially-finished project that’s been sitting on the corner of your sewing table for years. Sometimes people you love give you things you don’t like very much, but you feel like you need to keep them. It’s all hard – but I feel so good about every tough decision I made! Especially getting rid of the things that had guilt attached to them – talk about burdens lifted!
And now – I work in a lovely, inviting space that I’m not embarrassed to show you. My supplies are easy to reach and easy to put away. I don’t have to clear off a corner of my table to work on a project.
I have never experienced this before. Never!
But I love it – and I find that it’s spreading. I recently started on my kitchen – one cabinet at a time – and the results are fantastic. I can’t wait to finish that room and move on to my closet! I’ll have to move more slowly – decluttering my studio was basically a full-time job for a week – which means the results aren’t quite as dramatic, but they’re soooo satisfying. 🙂
So there you have it – my tips for how to declutter a craft room. Have fun!
Here are handy links to all the posts about quilting tools and supplies.
I have three pincushions I use all the time. I keep one at my sewing machine, one at my ironing board, and one at my work table. The ones at my ironing board and work table tends to empty as I work, and the one by the sewing machine tends to fill up, so I just switch full ones for empty ones as needed. And by having several pincushions at all the places I pin and unpin, I’m never looking for pins or letting them pile up on the table.
The needle cushions are another of my favorite things. I keep one with commonly used needles at my work table, one with weird needles at my sewing table, and another one with commonly used needles downstairs by the sofa where I do a lot of hand work.
I used to have a bad habit of sticking needles into the arm of the sofa (and leaving them there), sticking needles into my clothing (and leaving them there) and occasionally mistaking my thigh for the arm of the sofa and sticking them there. No more!
And that’s it! My favorite solutions for common craft supply storage issues. I hope you enjoyed the tour through my studio this week! I’m back from vacation on Monday and I can’t wait to get to work in my awesomely tidy space!