A BIG Embroidery Project – Cat Among the Flowers

A BIG embroidery project! This cat surrounded by embroidered flowers is in an 18 inch hoop!

Now that Quilt Market is over I can finally share details about some of those BIG embroidery projects I was working on back in April. 🙂

This post is all about how I made this cat surrounded by lots and lots of embroidered flowers. It’s in an 18-inch hoop!

I started out by enlarging my favorite cat (Maurice) from my Cats Quilt pattern and appliquéing it on a big square of fabric. I enlarged him just a bit (printed the pattern page as big as I could and still get it to fit on a single page) and used my normal fusible adhesive method.

First I appliqued the cat to the background fabric and stitched down the edges.

I stitched down all the edges, but I did NOT stitch the whiskers yet. They’re just drawn in for now with a fine-tip Sharpie.

Then it was time to add the flowers. It doesn’t matter that the full piece is bigger than a single sheet of paper because the Continuous Stitching pattern is a seamless repeating pattern. See how you can overlap the edges for a continuous pattern? That means you can make BIG embroidery. As big as you want!

Continuous Stitches is a seamless repeating pattern, so you can cover as much area with pretty stitched flowers as you want!

It took me several sheets of Sulky Stick & Stitch (the new – and much better – name for Sulky Sticky Fabri-solvy) to cover the whole hooped area.

It took 5 sheets of Sulky Stick & Stitch to cover my hooped area. Such a big embroidery project!

I just stuck the sheets right over the cat. So many flowers!

I don’t normally have problems with the Sulky Stick & Stitch pulling loose, but I don’t usually stitch this large, so I started stitching in all the overlapping areas first, just to keep things secure.

I don't normally stitch projects this big, so I started with all the overlapping pattern areas.

I used one or two strands of Sulky Petites 12 wt. thread for all the stitching.

So many pretty threads!

So many pretty colors!

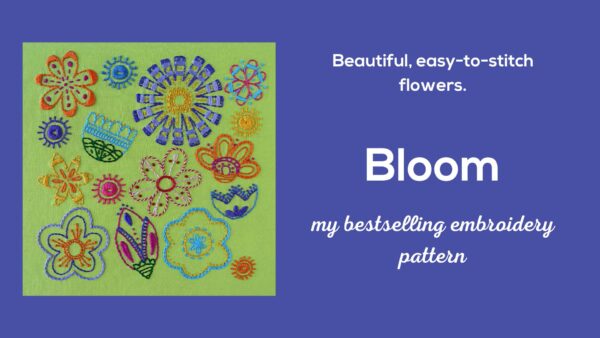
Here are some details of the different kids of flowers. . .

Lots and lots of pretty embroidered flowers!

One of the things I love about working with Sulky Stick & Stitch is that I can change my mind about things partway through stitching. All the markings will wash away, so I don’t really have to stick with my original drawing. Take these tulips. . .

Pretty embroidered tulips.

Those little purple dashes were supposed to be dots, but when I got to them I changed them to dashes. No big deal.

All the stitching is finally finished! I just skipped right over that applique cat – it was easy to see him through the stabilizer.

Finished stitching! That's a lot of flowers. :-)

Here it is having its soak.

Soaking off the Sulky. Almost finished!

Yep – that’s the messy back. Here are some more shots of the back of the piece.

The messy back of my embroidery. :-)

I do NOT believe that that back of your work should be as pretty as the front. 🙂 I’m a thread-carrier and it would drive me batty to tie off my thread after each individual flower!

But – recognizing that I’m a thread carrier means I do something a little different with pieces like this. See how dark green that fabric is? That’s not the same lime green you see on the front of the piece! That’s because I backed the piece with a second layer of darker fabric behind the main fabric. It keeps my thread carries from showing through to the front! Tricky. 🙂

I soaked the piece for about an hour in cold water, sprayed off the bits of mushy stabilizer, gave it another quick swish in clean water, then ironed it dry. One more step before finishing. . .

Ready to stitch the whiskers. . .

Remember how I didn’t stitch those whiskers when I appliquĂ©d the cat? Time to do it now. I waited because I wanted the black whisker lines to go over the embroidered flowers. This part was totally nerve-wracking, but it did just fine. 🙂

Finished kitty whiskers!

I hooped the finished piece in a quilting hoop using this method. No way was I letting glue anywhere near a piece that took this long to stitch!

A BIG embroidery project! This cat surrounded by embroidered flowers is in an 18 inch hoop!

Finished!

That is one BIG embroidery piece!

I’m super happy with this piece! Sulky had it hanging in their booth for Quilt Market and they’ll be exhibiting it at a few more shows, but Jo has already claimed it for her room when it comes home. 🙂

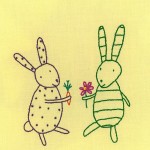
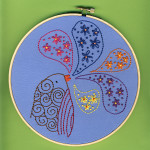
Here are the other BIG embroidery pieces I stitched for the same project.

Primavera – an Embroidered Springtime Girl

Embroidered Mandala Sun

April Showers

Happy stitching!

It’s Raining Rainbows – a free embroidery pattern

smiling raincloud with rainbow raindrops - a free rainbow embroidery pattern

This adorable rainbow embroidery pattern is perfect for beginners. It uses just one (ONE!) easy stitch. And it’s free!

Download the rainbow embroidery pattern here.

My favorite way to transfer embroidery patterns is to use Sulky Sticky Fabri-solvy. You can see some other embroidery transfer methods here.

I used running stitch for the whole thing – learn how to stitch a running stitch here. It’s the easiest embroidery stitch there is – the first one I teach to beginners.

You don’t have to use just one stitch. It would be adorable to use the lazy daisy stitch for the raindrops. Or maybe rows of French knots. Have fun with it! (Those links go to how-to videos.)

You can use any thread colors you like.

You don’t have to stitch it on white fabric. I love the “Lite-Brite” effect I got when I stitched it on a black T-shirt for my daughter.

Rainbow T-shirt - stitched with the free Raining Rainbows embroidery pattern from Shiny Happy World

Find tips for embroidering T-shirts here. Again – Sulky Sticky Fabri-solvy is my favorite product for that. It transfers the pattern and stabilizes the stretchy fabric in one step – and washes away completely. That stuff is magic!

The image is 6 inches wide, but you’ll find instructions for how to enlarge or reduce a digital pattern here. Stitch it anywhere you like!

Have fun with the rainbow embroidery pattern. I’d love to see what you make with it! You can share photos in the Shiny Happy People group. 🙂 And you can sign up for the newsletter here. Never miss a free pattern!

Happy stitching!

Easter Craft Ideas – Free Embroidered Felt Egg Pattern

Easter Craft Ideas - make a pretty embroidered felt egg with this free pattern

Looking for some easy and fun Easter craft ideas?

You (yes, you!) can stitch up a lovely felt egg just like this one. What do you need? Some felt. Preferably wool felt. It’s dreamy to stitch on and you can find it in hundreds of gorgeous colors.

You’ll need embroidery thread. Use any colors you like – either an assortment of colors like the sample above, or one color for a very simple, classic egg.

You’ll need a needle. I stitched my sample with three strands of thread – for that I recommend a #5 or a #8 embroidery needle.

You’ll need the pattern – of course. Download that here. It’s full-sized, so no enlarging needed.

You’ll need a bit of stuffing. A handful of cotton balls will do the trick.

Finally, there are a couple of optional items that I strongly recommend to make your stitchy life better. Sulky Sticky Fabri-solvy is fantastic for transferring patterns to felt (as you’ll see below) and Thread Heaven just makes your thread behave really nicely.

You can find a list of my favorite tools and supplies (with links to sources) here.

Do you have questions about working with felt? I answer a bunch of common questions here – including info about how to transfer an embroidery pattern to felt.

Here’s how to make it. . .

Step 1

Download the pattern here. Print or trace the pattern pieces onto Sulky Sticky Fabri-solvy. (Learn more about how to use this fabulous stuff here.)

Step 2

Rough cut around each piece and stick it to the felt.

Step 3

Embroider the design. You’ll be stitching right through both the stabilizer and the felt. I used a combination of the following stitches – the links below take you to videos teaching you how to do them if you’re new to embroidery.

Easter craft ideas - free tutorial to make a pretty embroidered felt egg

I used three strands of thread for all my stitching. It’s all white thread on Norwegian blue felt. The top sample used straw felt.

Repeat for all four wedge shapes.

Step 4

After you’re done with all the embroidery, cut the four pieces out neatly on the outline.

Easter craft ideas - make a pretty felt Easter egg

Step 5

Soak off the stabilizer. This is the magical part! Drop the pieces face down in a bowl of cold water and let them sit there for about an hour. The stabilizer will get all mushy and soft. Rinse it off under cold running water. If any bits are stubborn, just hit them with a kitchen sprayer and that should do the trick. Don’t rub the surface of the felt – just let the running water do its thing.

Easter craft ideas - pretty felt egg pieces waiting to be stitched together

Set them flat on a towel and let them dry. Don’t wring them out, twist them, or even smoosh them. Just lay them sopping wet on a towel and let them dry.

Step 6

Place two egg pieces wrong sides together and stitch them together along one edge. I used running stitch, which leaves a nice ridge that I like along the seams of the egg. If you want a smoother finish you can use whipstitch instead.

Easter craft ideas - two embroidered egg pieces stitched together

Repeat for the second pair of pieces.

It’s easy to mix up the ends – one is a little pointer than the other and has a bit more lattice. Make sure you put matching ends together.

Step 7

Put your pairs together (make sure the matching ends are together) and sew the last two seams. Leave a couple of inches of the last seam open for stuffing.

Easter craft ideas - embroidered egg is almost finished

It will be easiest to sew your egg together if you let it collapse into a deflated football kind of shape.

Step 8

Stuff your egg and finish sewing up the opening.

Easter craft ideas - free tutorial for a pretty embroidered felt egg

You can totally make this!

Looking for more Easter craft ideas? Click here for all kinds of Easter crafts – sewing, quilting, crochet and embroidery. 🙂

If you like this free pattern, sign up for the Shiny Happy News! Subscribers get a weekly newsletter full of sewing tips and tricks, free patterns, special discounts, and other things to make you smile. 🙂

Happy stitching!

Easter Crafts You Can Make – Sewing, Quilting and Embroidery Patterns

Easter crafts - easy (and sometimes free!) sewing, quilting and embroidery patterns from Shiny Happy World

Easter is early this year – March 27 – so it’s time to start thinking about your Easter Crafts. What do you want to make?

I could just link to the Easter section of my shop – but then you wouldn’t see all the fun free patterns that are available!

(And there are a lot of them.)

So I created this handy dandy round-up post with all the patterns for all my favorite Easter crafts. Just click on the image to go to that project!

Easter Stuffed Animals

Some are big and huggable. Some are small and pocketable. They’re all easy and fun to make.

Easter Felt Projects

Spend a lovely spring afternoon stitching one of these by hand.

Easter Quilt Blocks

Make a kajillion bunnies with a fun mix & match pattern.

Easter Embroidery patterns

Stitch them on tea towels, baby onesies and more.

Other Easter Sewing Patterns

Including Dress Up Bunch dolls and clothes!

Of course, there are lots of spring-themed patterns too – but I stuck to Easter crafts for this post. 🙂

So whether you like to sew, quilt or embroider – stitch by machine or by hand – I’ve got an Easter craft pattern for you. Have fun with them and be sure to share what you make in the Shiny Happy People group on Facebook!

Happy Easter! Happy spring! Happy stitching!

Best,
Wendi
That's me!

Easter crafts - easy (and sometimes free!) sewing, quilting and embroidery patterns from Shiny Happy World

Free Easter Embroidery Pattern – Little Chick with Big Feet

Little Chick with Big Feet - a super easy and cute Easter embroidery pattern free from Shiny Happy World

Here’s a super simple Easter embroidery pattern – easy enough for even the littlest kids to stitch.

I originally published this back in 2011 – but now it’s updated with new images and links to video tutorials. I can’t wait to see the new chicks you make!

Back when I released the chickens embroidery pattern, people said they especially liked the little egg-shaped chicks with big feet.

I told you they’d be back again and here one is – sized a bit bigger – as a free pattern. 🙂

Click here to get the free Easter embroidery pattern.

It’s lots of fun to decorate that egg-shaped body for Easter!

Of course, you can fill in the shape with all kinds of stitching in any design you like – but there are a couple of other options that are a lot faster.

You can add a little fusible applique to the project and then just stitch the outline. This video shows how easy it is to use applique as a sort of fill stitch. That’s how I made the sample you see up top.

For a really fun option, you can color the egg with colored pencils before you stitch. There’s a video here showing that technique in complete detail. In a nutshell, fuse some freezer paper to the back so the fabric behaves better, then color it in just like paper. If you’re going to hang the finished chicks on the wall you don’t need to worry about heat setting the pencils or anything like that. Stitch the outline after you’re done coloring and hoop it up for framing.

Look at the cute little Easter chicks my daughter made that way! (The other two chicks are from the chickens embroidery pattern.)

Little Chick with Big Feet - a super easy and cute Easter embroidery pattern free from Shiny Happy World

I love framing each tiny chick in its own hoop. They make a really cute Easter decoration hanging in a cluster.

Remember – it’s a cute Easter embroidery pattern – but chicks are cute all year long! You can stitch this to a baby onesie, applique it to a receiving blanket, stitch it on a tea towel or baby bib and more. Have fun with it!

Sign up for the weekly newsletter so you never miss out on free patterns like this one!

Happy stitching!

Book Review – Stitch Love: Sweet Creatures Big & Small

Stitch Love by the awesome Mollie Johanson

As soon as I found out that Mollie Johanson from Wild Olive was writing a book, I knew it was going to be wonderful. She’s incredibly talented and one of my very favorite designers. Everything she makes is just so amazingly CUTE!

This book is everything I hoped it would be – and more!

Let’s start with this line on the cover. . .

“Cute Kitties and Cows and Cubs and More. . . and a Yeti.”

Because Yetis! I love Yetis! I was excited before I even opened the book. 🙂

Inside there are terrific projects to sew and embroider – very simple projects that don’t require any advanced skills. I especially loved this rooster apron. . .

Rooster Apron from Stitch Love by Mollie Johanson

Look at the extra sweet detail of the footprints on the waistband!

And these reversible placemats are great!

Reversible Placemats from Stitch Love by Mollie Johanson

On one side you stitch the cute critter – like that adorable bear. On the reverse you stitch what that critter likes to eat – that sweet smiling honey pot. What a cute idea! And lots of fun for kids. 🙂

I also loved this cute furoshiki – a Japanese-style gift wrapping cloth.

Mouse Furoshiki from Stitch Love by Mollie Johanson

And that mouse? He’s shown with a birthday hat and gift, but Mollie provides patterns for a whole bunch of different hats and things for him to hold, representing all the major holidays of the year. So clever!

I can’t believe I’m saying it, but one of my favorite projects was this possum.

Possum Hanging Sachet from Stitch Love by Mollie Johanson

I don’t like actual possums. We have a really persistent one right now who keeps getting into the chicken coop to eat their food. How do I know when he’s in there? Because the chickens go into absolute panic mode. (They’re such a bunch of. . . chickens.)

But this possum sachet is adorable! I love how you loop the tail around a hanger to hang it in your closet. It’s just – fun!

So all of the projects are great. Easily doable for beginners, relaxing and fun for more experienced stitchers. Exactly my kind of projects.

But the real gem of this book comes later – in the pages and pages and pages of embroidery patterns. Over a hundred of them! And every one of them is incredibly cute! Here’s just one page. . .

adorable embroidery motifs from Stitch Love by Mollie Johanson

That tree sloth! And the baby elephant! And the orangutan! Mollie has them grouped by theme – wild animals, pets, farm animals, mountain and prairie, etc. so you really have every reason to use them in clusters.

Of course, my first thought when I see a group of cute animals is to make a quilt out of them. So that’s what I did!

I didn’t make a whole quilt – but I made a single block that can be used in a pillow, tote bag, T-shirt or anything else you want to add a dinosaur to. 🙂

Applique dinsoaurs from an embroidery pattern in the book Stitch Love by Mollie Johanson

What a cutie, eh?

I’ve got a tutorial here showing how to enlarge or reduce any digital pattern, and one here showing how to use an embroidery pattern for applique.

So if you get this book you not only get 25 sewing patterns and over 100 embroidery patterns, you also get a ton of applique patterns! What a deal! 🙂

I should also mention that the book has an excellent instructional section that details all the basic sewing and embroidery tools, illustrates the embroidery stitches used in the book and any sewing skills you’ll need for the projects. The templates for most of the sewing patterns are not printed at full size – which is usually an irritation for me – but there’s a link to get them all at full size online, which I’ll take over tracing any day! 🙂 It’s all in here!

The book is called Stitch Love and it’s terrific! Buy it! Make cute things with it! Give them to people you love and make them smile!

Happy stitching!

Best,
Wendi
That's me!

Free Snowman Embroidery Pattern

Free snowman embroidery pattern from Shiny Happy World

Want to learn the basics of hand embroidery with an easy online workshop – totally free?

Sign up for Embroidery 101 here. You’ll learn how to get started, the tools and supplies you’ll need, the four most basic stitches, how to transfer your pattern and how to display your work.

If you already know the basics – sign up for Embroidery 201. It’s also free! You’ll learn how to stitch on specialty fabrics like felt and stretchy T-shirts. Plus you’ll learn lots and lots and LOTS more stitches – all my favorites!

I love snow!

Especially when it’s big fat flakes coming down on a not-too-cold, not-too-windy day. 🙂

And I love snowmen too! Especially this snowman with his chubby face and stubby snowball arms.

This free snowman embroidery pattern is small – just 2 1/2 inches wide and a little over 3 inches tall.

You can see him above in a larger hoop for a wall hanging – with lots of snowy white space around him. But you can also put him in a smaller (4 inch) hoop to make a tree ornament, like this. . .

free snowman embroidery pattern from Shiny Happy World

If you want to skip the hoop you can stitch him on a tea towel, a gift bag, a stocking, a T-shirt or baby onesie. Have fun with it!

It’s super easy – just a few of the most basic stitches! The pattern has links to videos teaching you all of them.

Want the pattern? Here’s the link to download it – free!

Download the free snowman embroidery pattern here.

If you like this pattern, sign up for the Shiny Happy News! Members get a weekly email full of sneak peeks, free patterns, discounts, and happiness. 🙂

Happy stitching!

Best,
Wendi
That's me!

Fancy Schmancy Felt Garland – free pattern

I’m going to be honest, you guys.

This project is insane!

I mean – it’s lovely. A paper-chain inspired garland of hand-embroidered felt rings with hook & loop closures so you can store them easily. It’s sooooo beautiful and looks so warm and cozy and wintry. I’m absolutely enchanted with how it turned out!

But seriously. Hand-embroidered felt garland rings? Twenty-four of them? This is hours and hours and hours (and hours!) of hand embroidery. Of course, I enjoyed every minute of it. But I’d be the first to admit that I’m a little crazy about hand-embroidery on wool felt. This is a project that will keep your hands busy for a LOT of cozy evenings.

If I haven’t talked you out of it yet, here are the instructions. . .

The pattern includes six different band decorations and they all fit on one piece of Magical Embroidery Stuff (aka Sulky Sticky Fabri-solvy). So I did six bands each of four different felt colors for a total of 24 rings. That made a chain 42 inches long. For the materials below I’ll assume you’ll do the same crazy thing. 🙂

What you need

  • wool-blend felt – 2 sheets of each color you plan to use (I used grape jelly, babbling brook, denim, and ruby red slippers)
  • embroidery thread in matching and contrasting colors (I used DMC #550, 502, 336, 600, 3746, 522, 726 and 3846)
  • 2 feet of hook & loop tape
  • the pattern (download it here)
  • Sulky Sticky Fabri-solvy (optional, but very strongly recommended)

You can find a list of my favorite supplies (with links to where to buy them) here.

Throughout the pattern, the links go to video tutorials teaching that skill. If it’s a new stitch or technique for you, just click through to see how to do it!

Here’s how to make it. . .

1. Print the pattern. You can download it here. Print the pattern at 100% size onto four sheets of Sulky Sticky Fabri-solvy (aka The Magical Embroidery Stuff).

Fancy Schmancy Felt Garland - free pattern from Shiny Happy World

2. Peel the backing off and stick the stabilizer/pattern transfer onto the felt.

Cut the pieces out on the lines.

Embroider the designs right through the stabilizer.

I didn’t embroider the designs the same way every time – preferring instead to just play around. You should play too! You can find tutorials for plenty of stitches here. . .

For the lines I used. . .

For the dots and flowers and leaves I used. . .

By all means – don’t be limited to these stitches! They’re just what I used. You can find lots more stitch tutorials here.

http://wendigratz.wpengine.com/category/embroidery/embroidery-videos/fill-stitches

3. Soak off the Sulky Sticky Fabri-solvy. I soak mine in cold water for at least an hour, then rinse off the mushy stabilizer under cold running water. Don’t rub it to remove any stubborn bits – just hit them with a kitchen sprayer if needed.

Lay the pieces flat on a towel to dry. Do not wring, twist or even smoosh them. Just set them sopping wet on a towel and let them be. I promise they’ll dry. 🙂

(If you’ve never used Sulky Sticky Fabri-solvy before, I ramble on endlessly about how awesome it is and why I love it so much and how I use it here.)

http://wendigratz.wpengine.com/category/embroidery/embroidery-videos/fill-stitches

4. Finish the bands. Cut second piece of felt for the back of the band. I just laid the front band down and cut around it so the back would match the front exactly.

Sew a small piece of hook & loop tape to the blank end of the top of the band, and to one end of the back of the band.

I used a sewing machine, but you could do it by hand if you prefer. I left enough space on the embroidered side to use the narrowest big-box-store hook & loop tape (like you see on the top band) but if you order one of my kits you’ll get the special less-bulky skinny hook & loop tape I prefer (like you see on the bottom band).

Put the front and back together so that the hook & loop tape is on opposite ends of the band and sew the pieces together around the edge. I used whipstitch, but you could certainly use a sewing machine – especially if you want to finish before the end of the year. 🙂

Fancy Schmancy Felt Garland - free pattern from Shiny Happy World

5. Wrap them into rings and build your chain.

In the photo above you see the six designs in the pattern, stitched up on purple felt.

Finished!

*happy sigh*

I do so love handsewing felt. 🙂

Happy stitching!

If you like this free pattern, sign up for the Shiny Happy News! Every week I send out things to make you smile – free patterns, new tutorials, recommendations of patterns by other people, fun videos, yummy recipes and special discounts. 🙂

Best,
Wendi
That's me!

Free Thanksgiving Embroidery Pattern

Enough is as Good as a Feast - free embroidery pattern from Shiny Happy World

It’s beginning to look a lot like Thanksgiving!

Time to remind everyone about this free embroidery pattern. It’s one of my favorite reminders, and hangs on my studio wall all year. 🙂

It only uses basic embroidery stitches. So it looks complicated, but really it’s just slow.

As in, park yourself in a warm place for a few hours and savor every stitch. That kind of slow. 🙂

Download the free Thanksgiving embroidery pattern here.

Happy stitching!

Best,
Wendi
That's me!

Free Pirate Poster Embroidery Pattern

Pirate Wanted Poster - a free embroidery pattern from Shiny Happy WorldTalk Like a Pirate Day is coming up soon – September 19th!

To celebrate, I’m taking my favorite pirate embroidery pattern and giving it away for free. Free!

Stitch up a fun Wanted: Dead or Alive poster. I include a Peg Leg Pete pattern with an image of a boy pirate and also a Hurricane Hattie pattern with an image of a girl pirate. There were lots of female pirates out there – this is a great book about some of them.

You can even personalize the poster with your own pirate’s name!

What You Get

  • Full-sized patterns for small (6 x 7 1/2 inch) and large (8 x 10 inch) images and alphabets – no enlarging needed
  • Reversed patterns for use with iron-on transfer tools
  • Complete color and stitch guide
  • Instructions for personalizing with a custom pirate name
  • Links to videos teaching all the stitches used

What You’ll Need

  • Fabric to be embroidered (I used unbleached muslin, soaked in hot tea for about half an hour to stain it)
  • Your favorite tools for transferring the pattern (you all know I swear by Sulky Sticky Fabri-solvy)
  • Embroidery needle, thread, and hoop

Difficulty

Easy! The whole pattern uses just 3 simple embroidery stitches – and there are links to videos teaching all three.

It’s easy – but all that fill stitching does take a lot of time. Expect to spend several evenings on this one.

Download the pattern here.

Have fun with it!

If you like this free pattern, sign up for the Shiny Happy News! Members get a weekly newsletter full of sewing tips and tricks, free patterns, special discounts, and other things to make you smile. 🙂

Happy Friday!

Best,
Wendi
That's me!

Â