Tips and Tricks for Working with Cuddle Fleece

Soft plush bunny toy with cuddle fleece ears for children’s comfort and sensory play.

I loooove using Cuddle Fleece for making softies!

I discovered it at Quilt Market last year and fell in love – and then couldn’t find it in any shops. It was even hard to find online! So I ordered a few bolts to carry in my shop and I’ve been using it for softies and quilt backs ever since.

Update – I’m not able to carry Cuddle Fleece in the shop anymore, but I found a good substitute! More details here.

It’s mostly very easy to work with – similar to polar fleece – but I do get some questions about it. Here are the answers to the most frequently asked questions. . .

It’s so shifty! How do you keep the layers from moving around?

The layers come in two times in the process – when you’re cutting and when you’re sewing. I prefer to cut mine one layer at a time instead of folding and cutting through two layers. That way I get the most accurate cut possible. Do be sure to flip the pattern pieces for the second cuts so you’re still getting one reversed!

When you’re sewing two layers together you have to deal with layers. There’s no way around it. That’s when I use Wonder Clips. You can use pins instead, but Wonder Clips handle the fat fabric really well and without distorting the layers at all. You can clip them really close together (every inch or so) and just sew slowly, unclipping each one as you get to it.

It’s so fat! Do I have to do anything special to sew through it?

Cuddle Fleece shares one of the same challenges as polar fleece.

It’s fat.

The thickness of the fabric can make the layers shift while you’re sewing – especially when you’re sewing through two layers plus the additional layers of an arm or leg in there. There’s a video showing how I deal with the fatness here. It’s specifically about polar fleece, but all those tips also apply to Cuddle Fleece.

Do I need a special needle?

I sew mine with a basic universal needle and have no problems. If you find your machine is skipping stitches I recommend switching to a stretch needle.

If you have a walking foot – use it!

If you don’t have a walking foot – pin like crazy.

Which is the right side of the fabric?

Soft plush teddy bear with fuzzy texture on bright pink background.

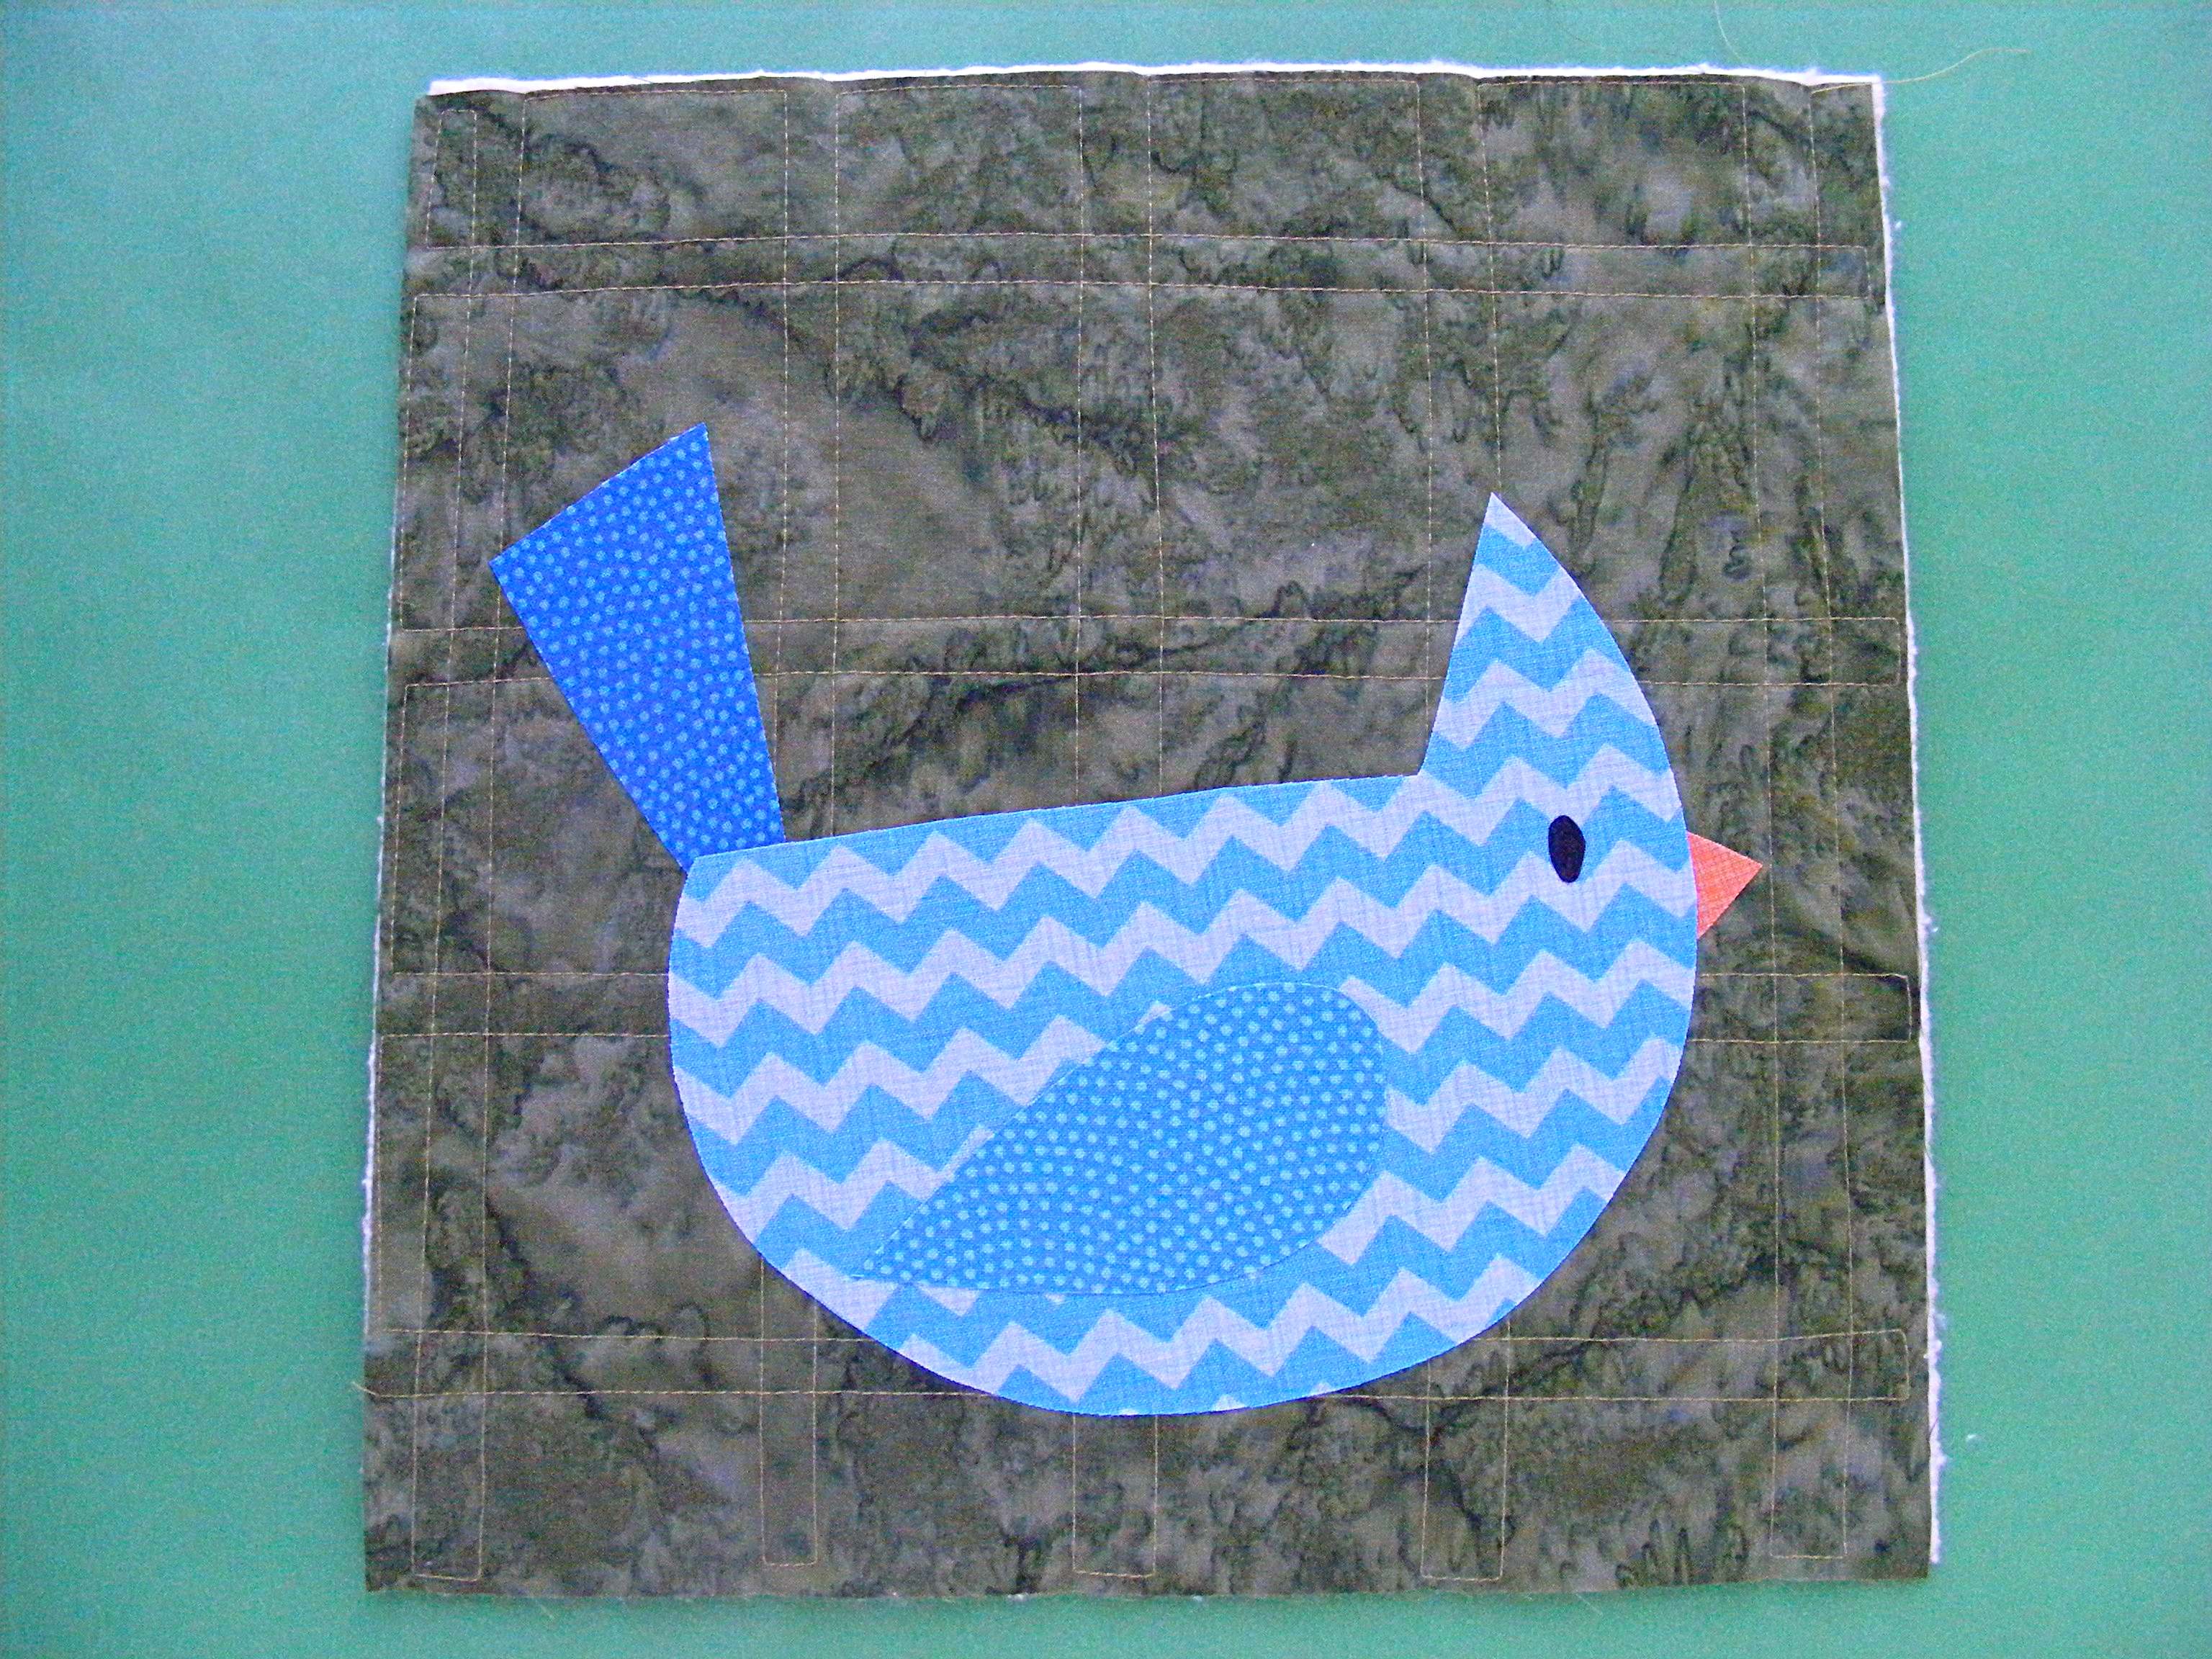
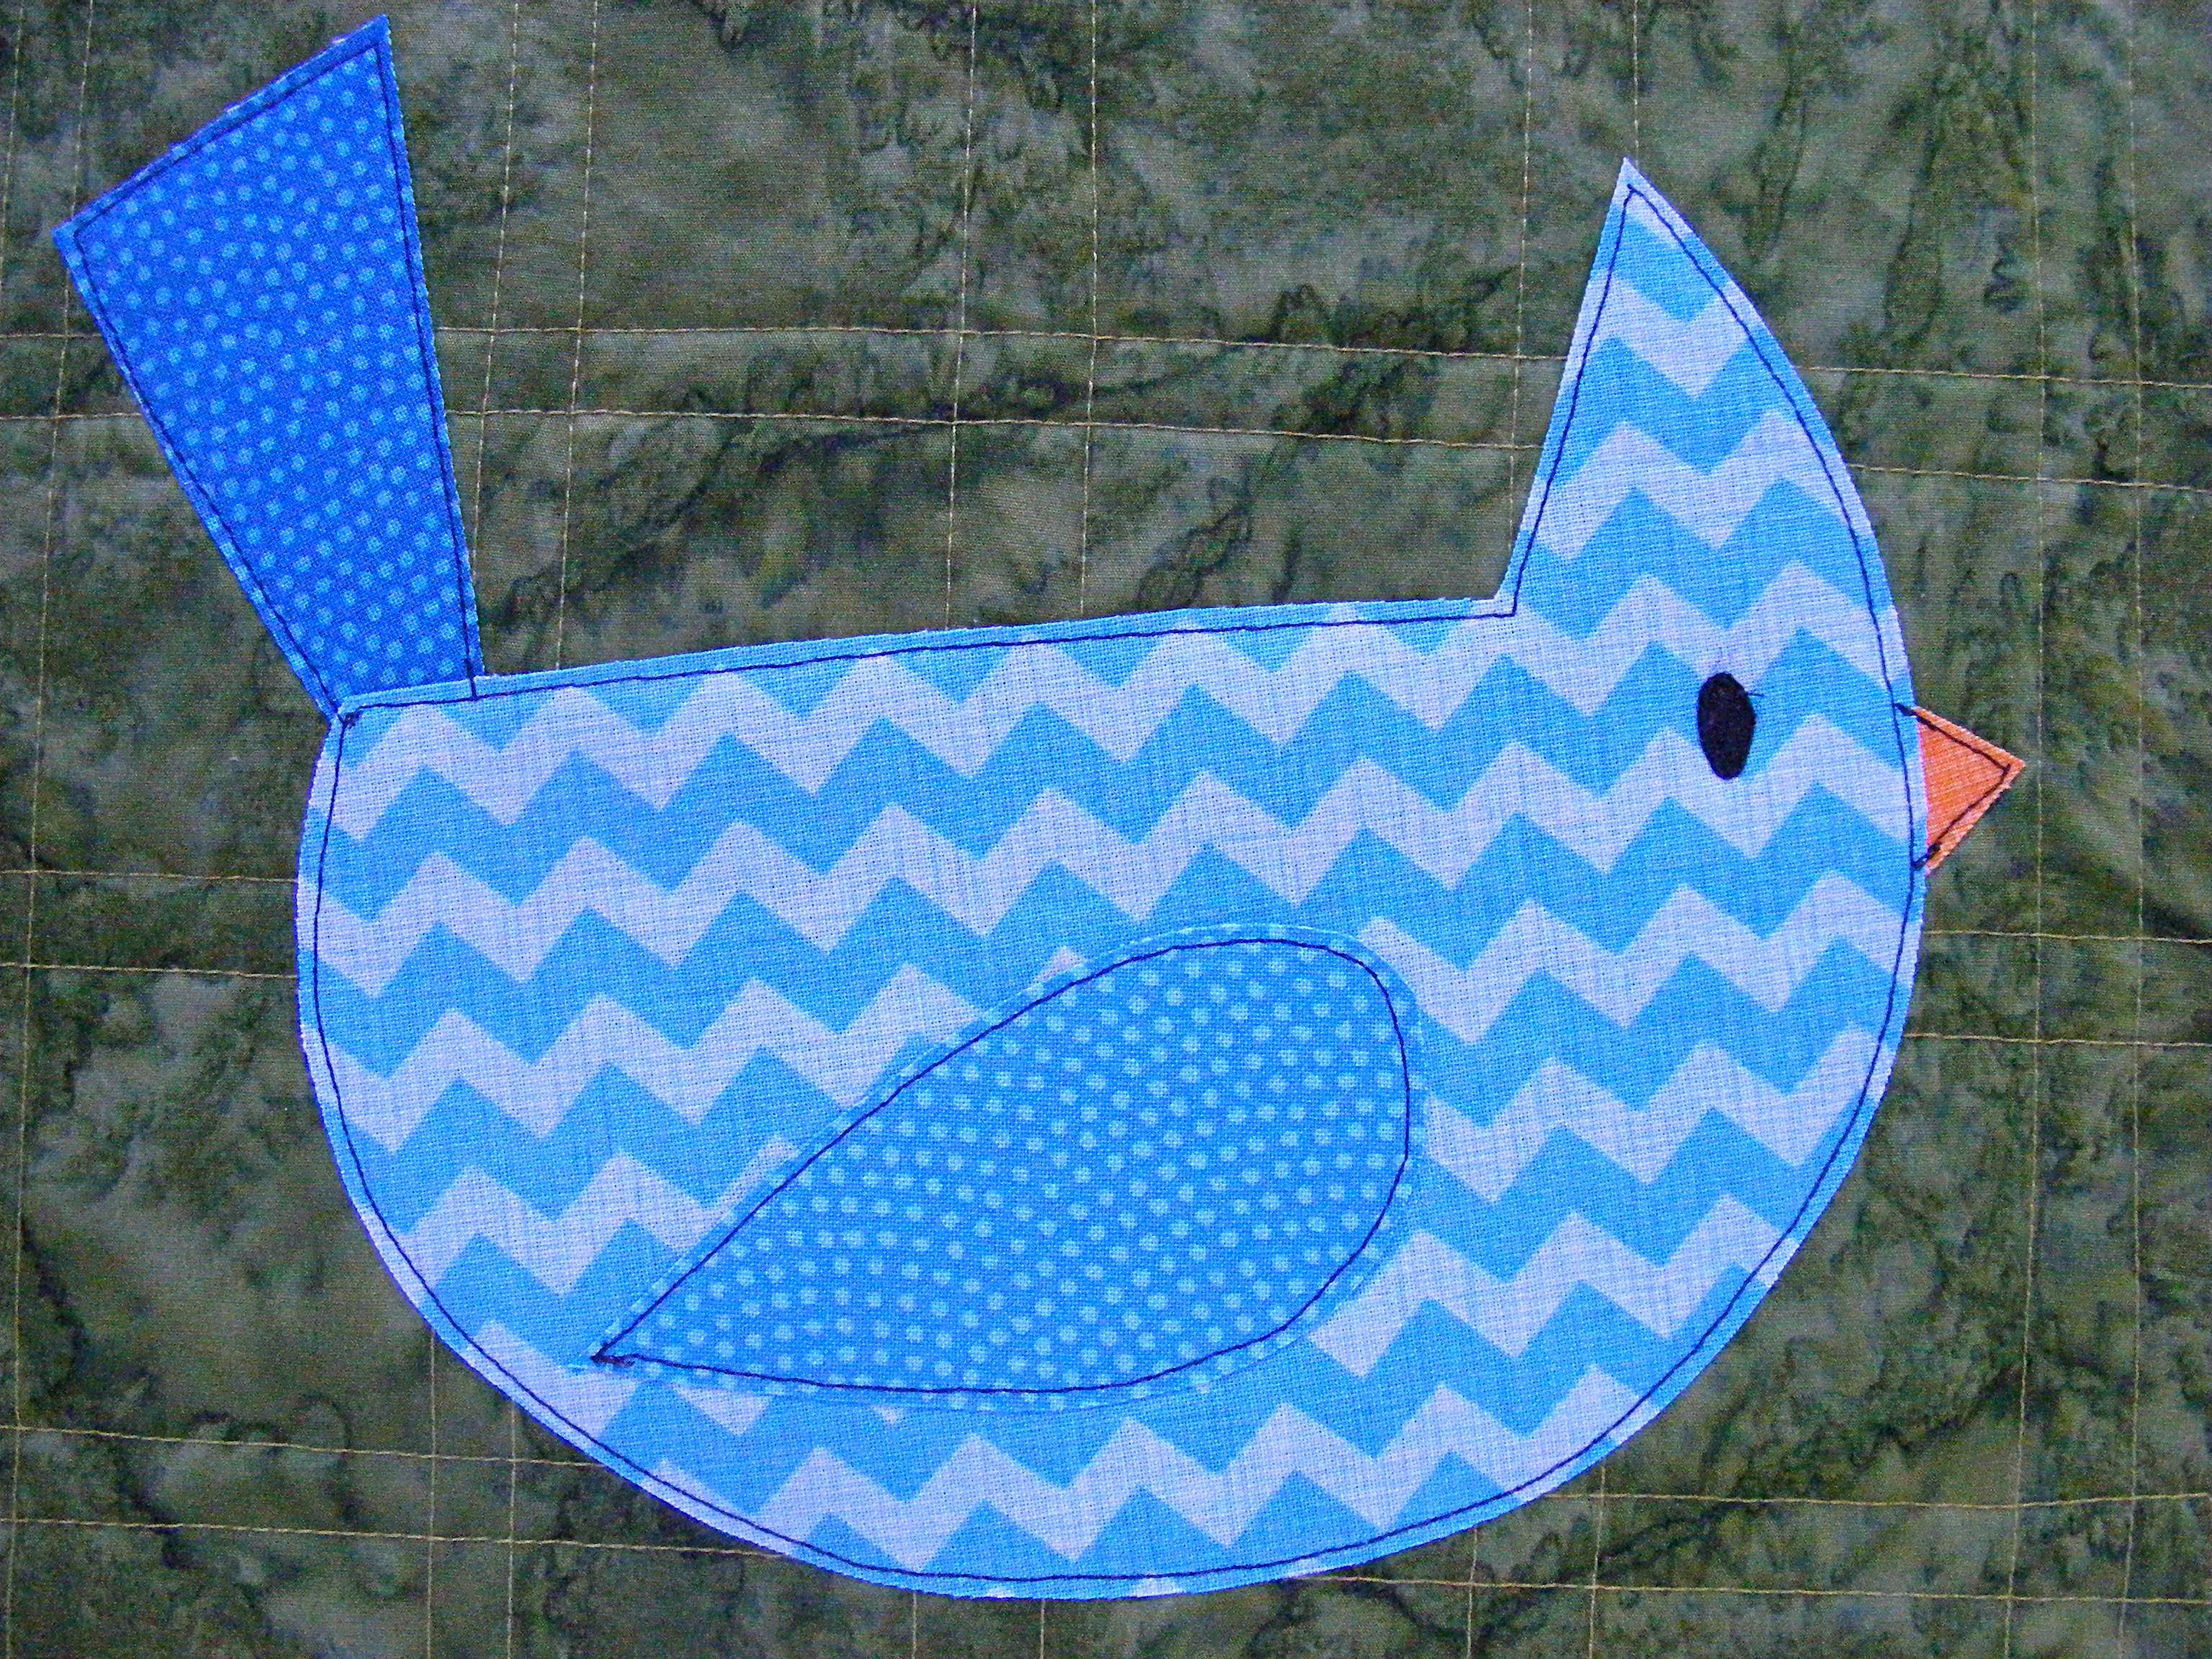
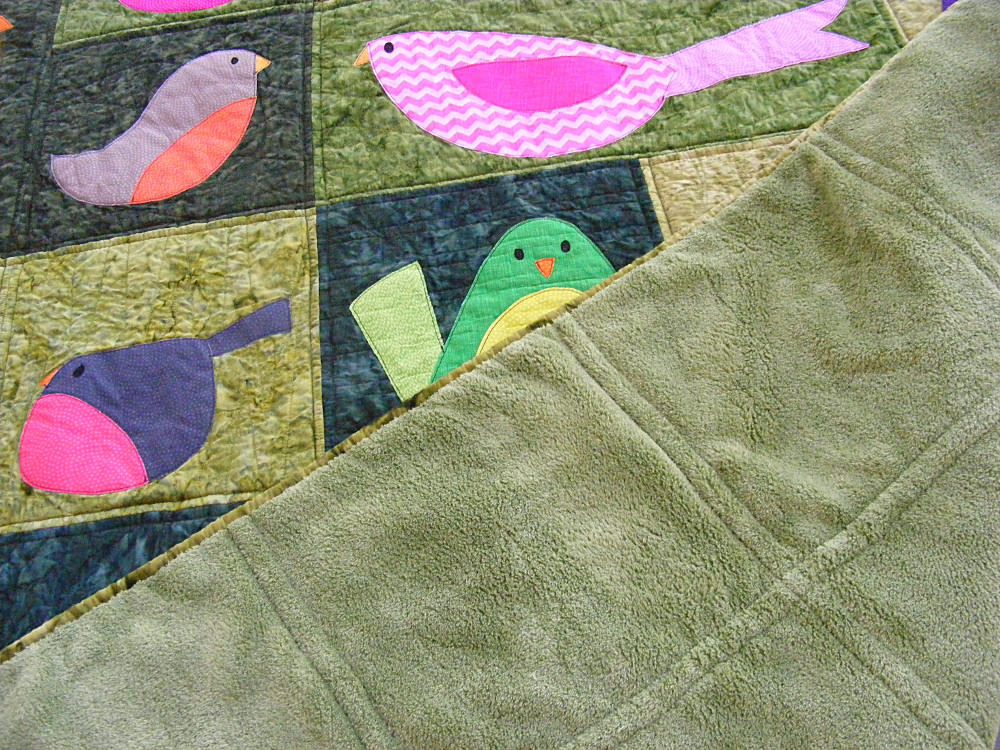
They’re both good – but they are different. You just have to choose what works best for you for a particular project. One side has a shorter, smoother pile. That’s the one I often choose as the “right” side. It’s what you see on the bunny up there.

The other side is a little shaggier looking. The pile is a bit longer, and a teeny bit more irregular. Use this as the right side when you want a rougher look.

You can also combine the two textures in one softie like I did with that green Bailey Bear. I used the shaggier side on his belly patch.

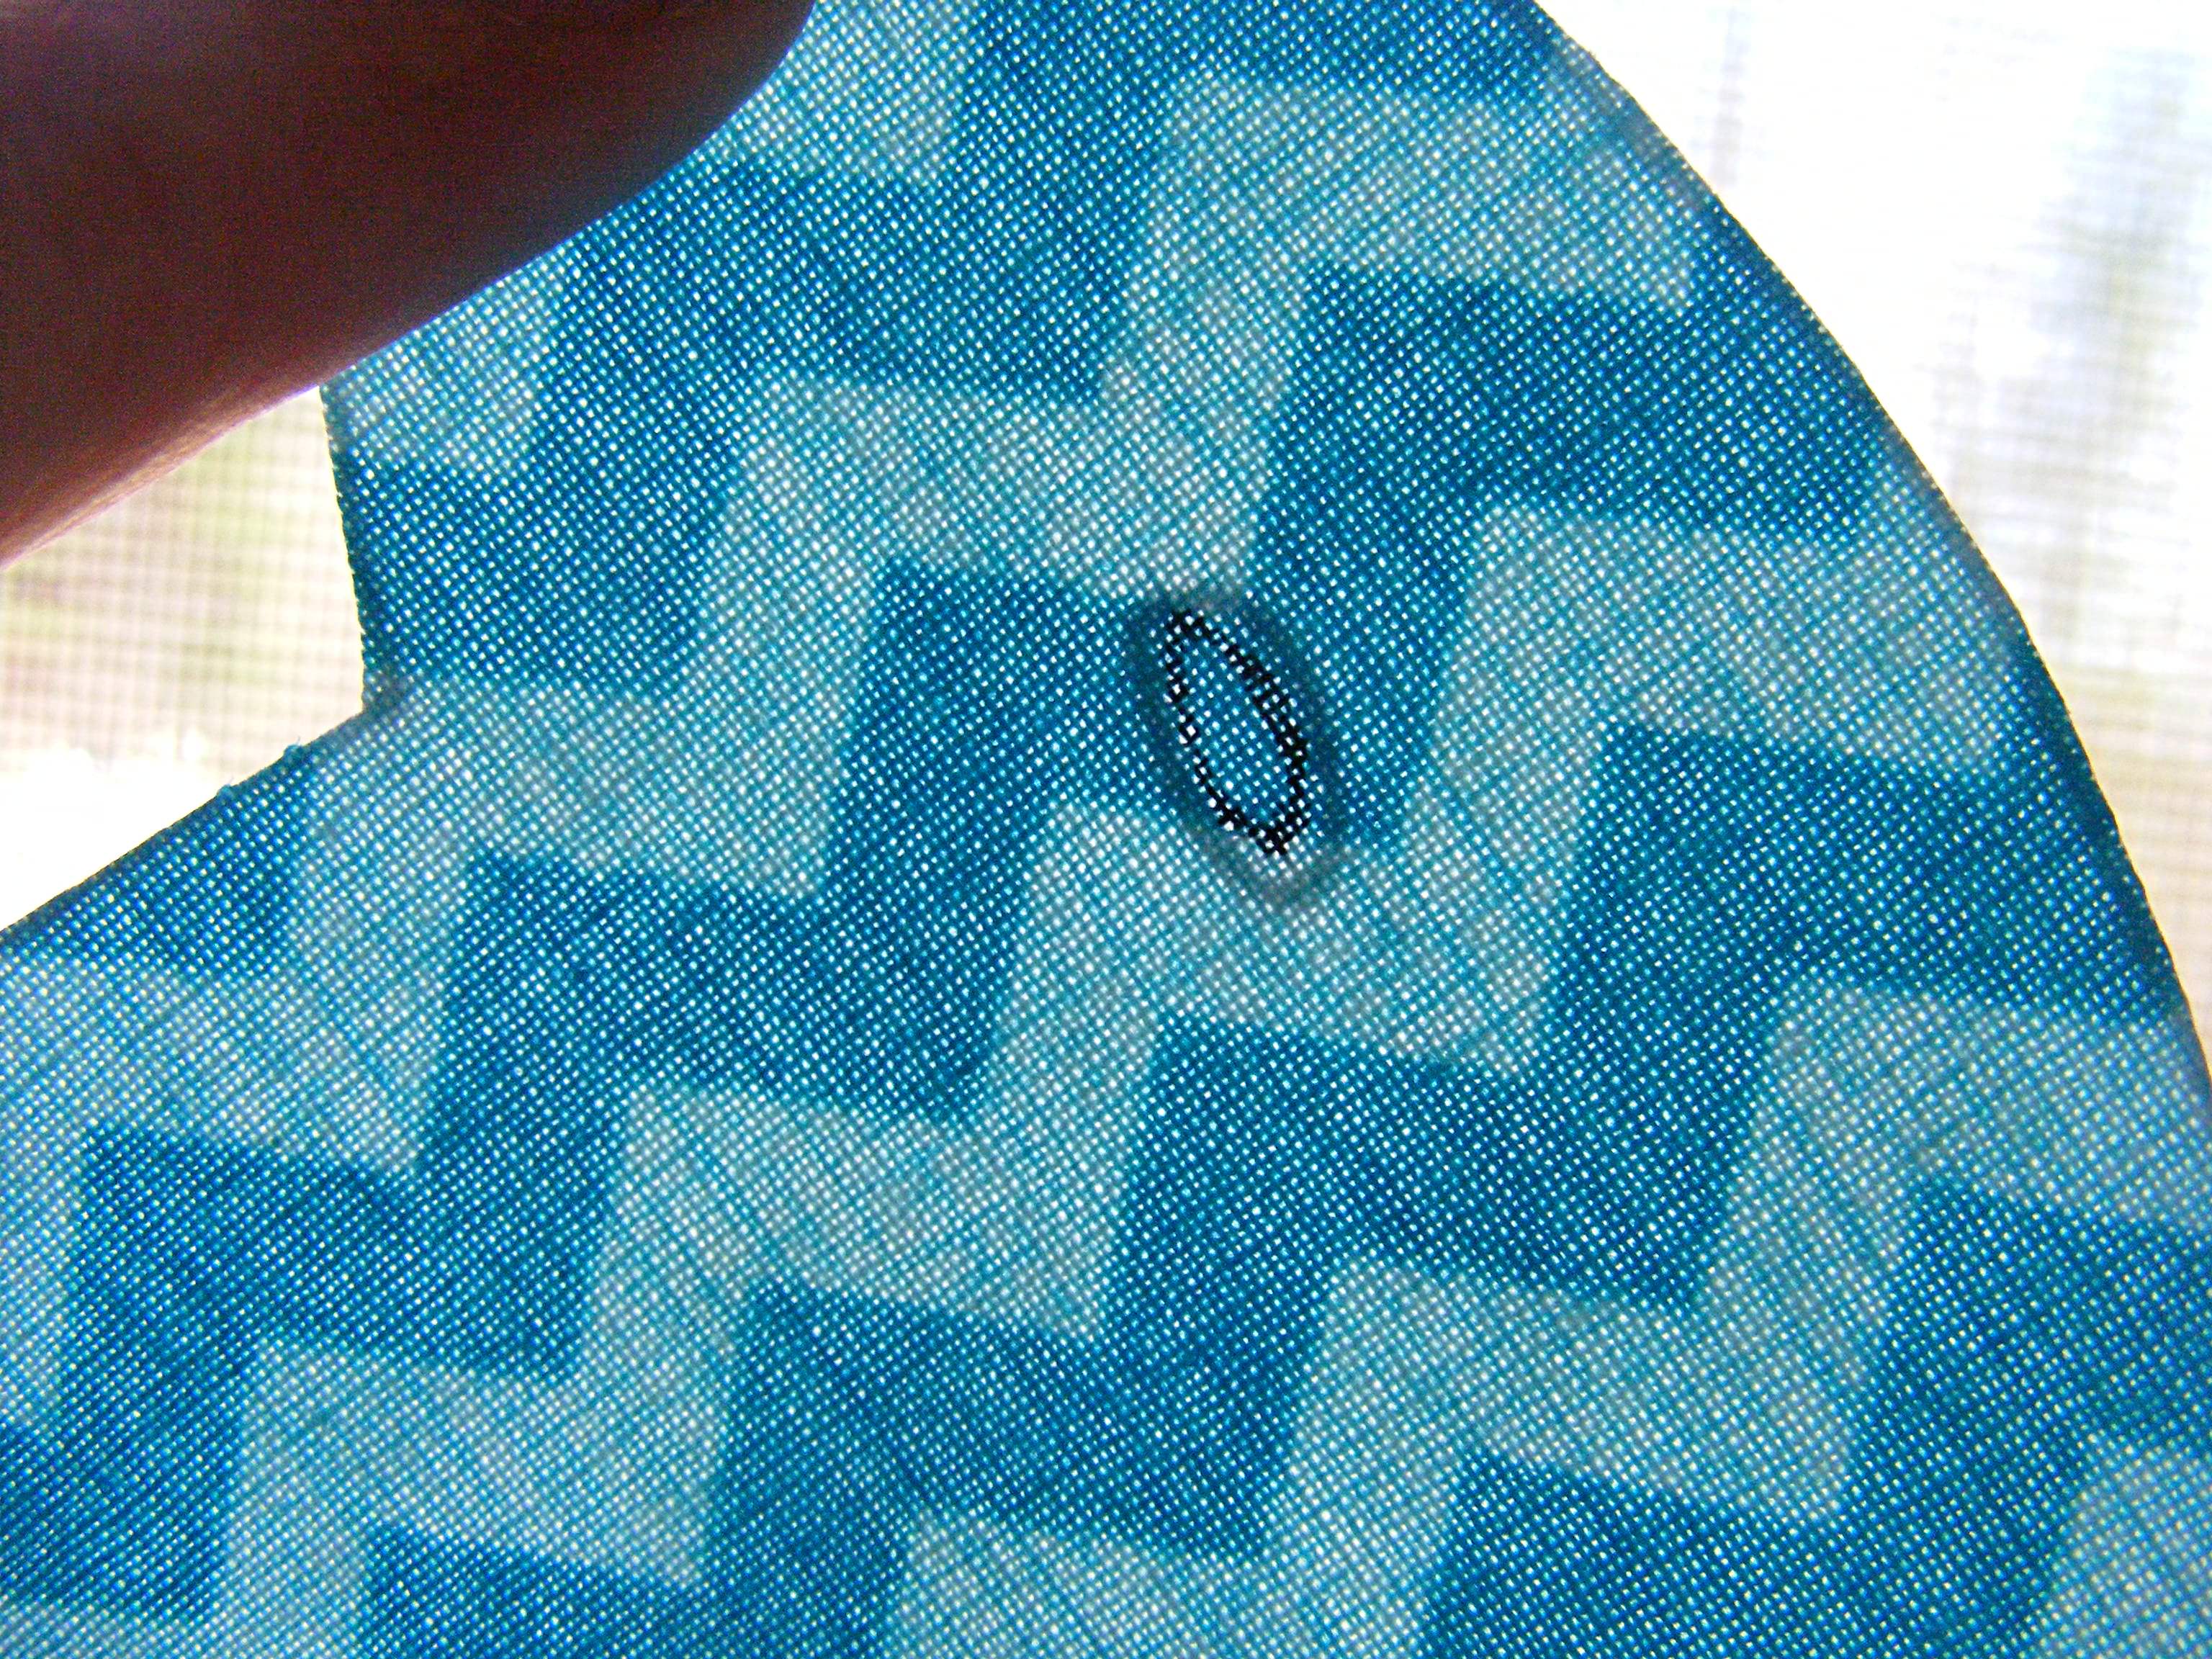
How do you mark on it?

Cuddle Fleece, like polar fleece, can also be difficult to mark on. With polar fleece the problem is that it’s basically made out of plastic, so markers tend to bead up on it, take a long time to dry, and smear easily when wet.

The problem with marking on Cuddle Fleece is that it has a bit of a nap to it.

Marking eyes is easy – I just punch holes in my pattern piece and then mark through the holes with a fabric marker.

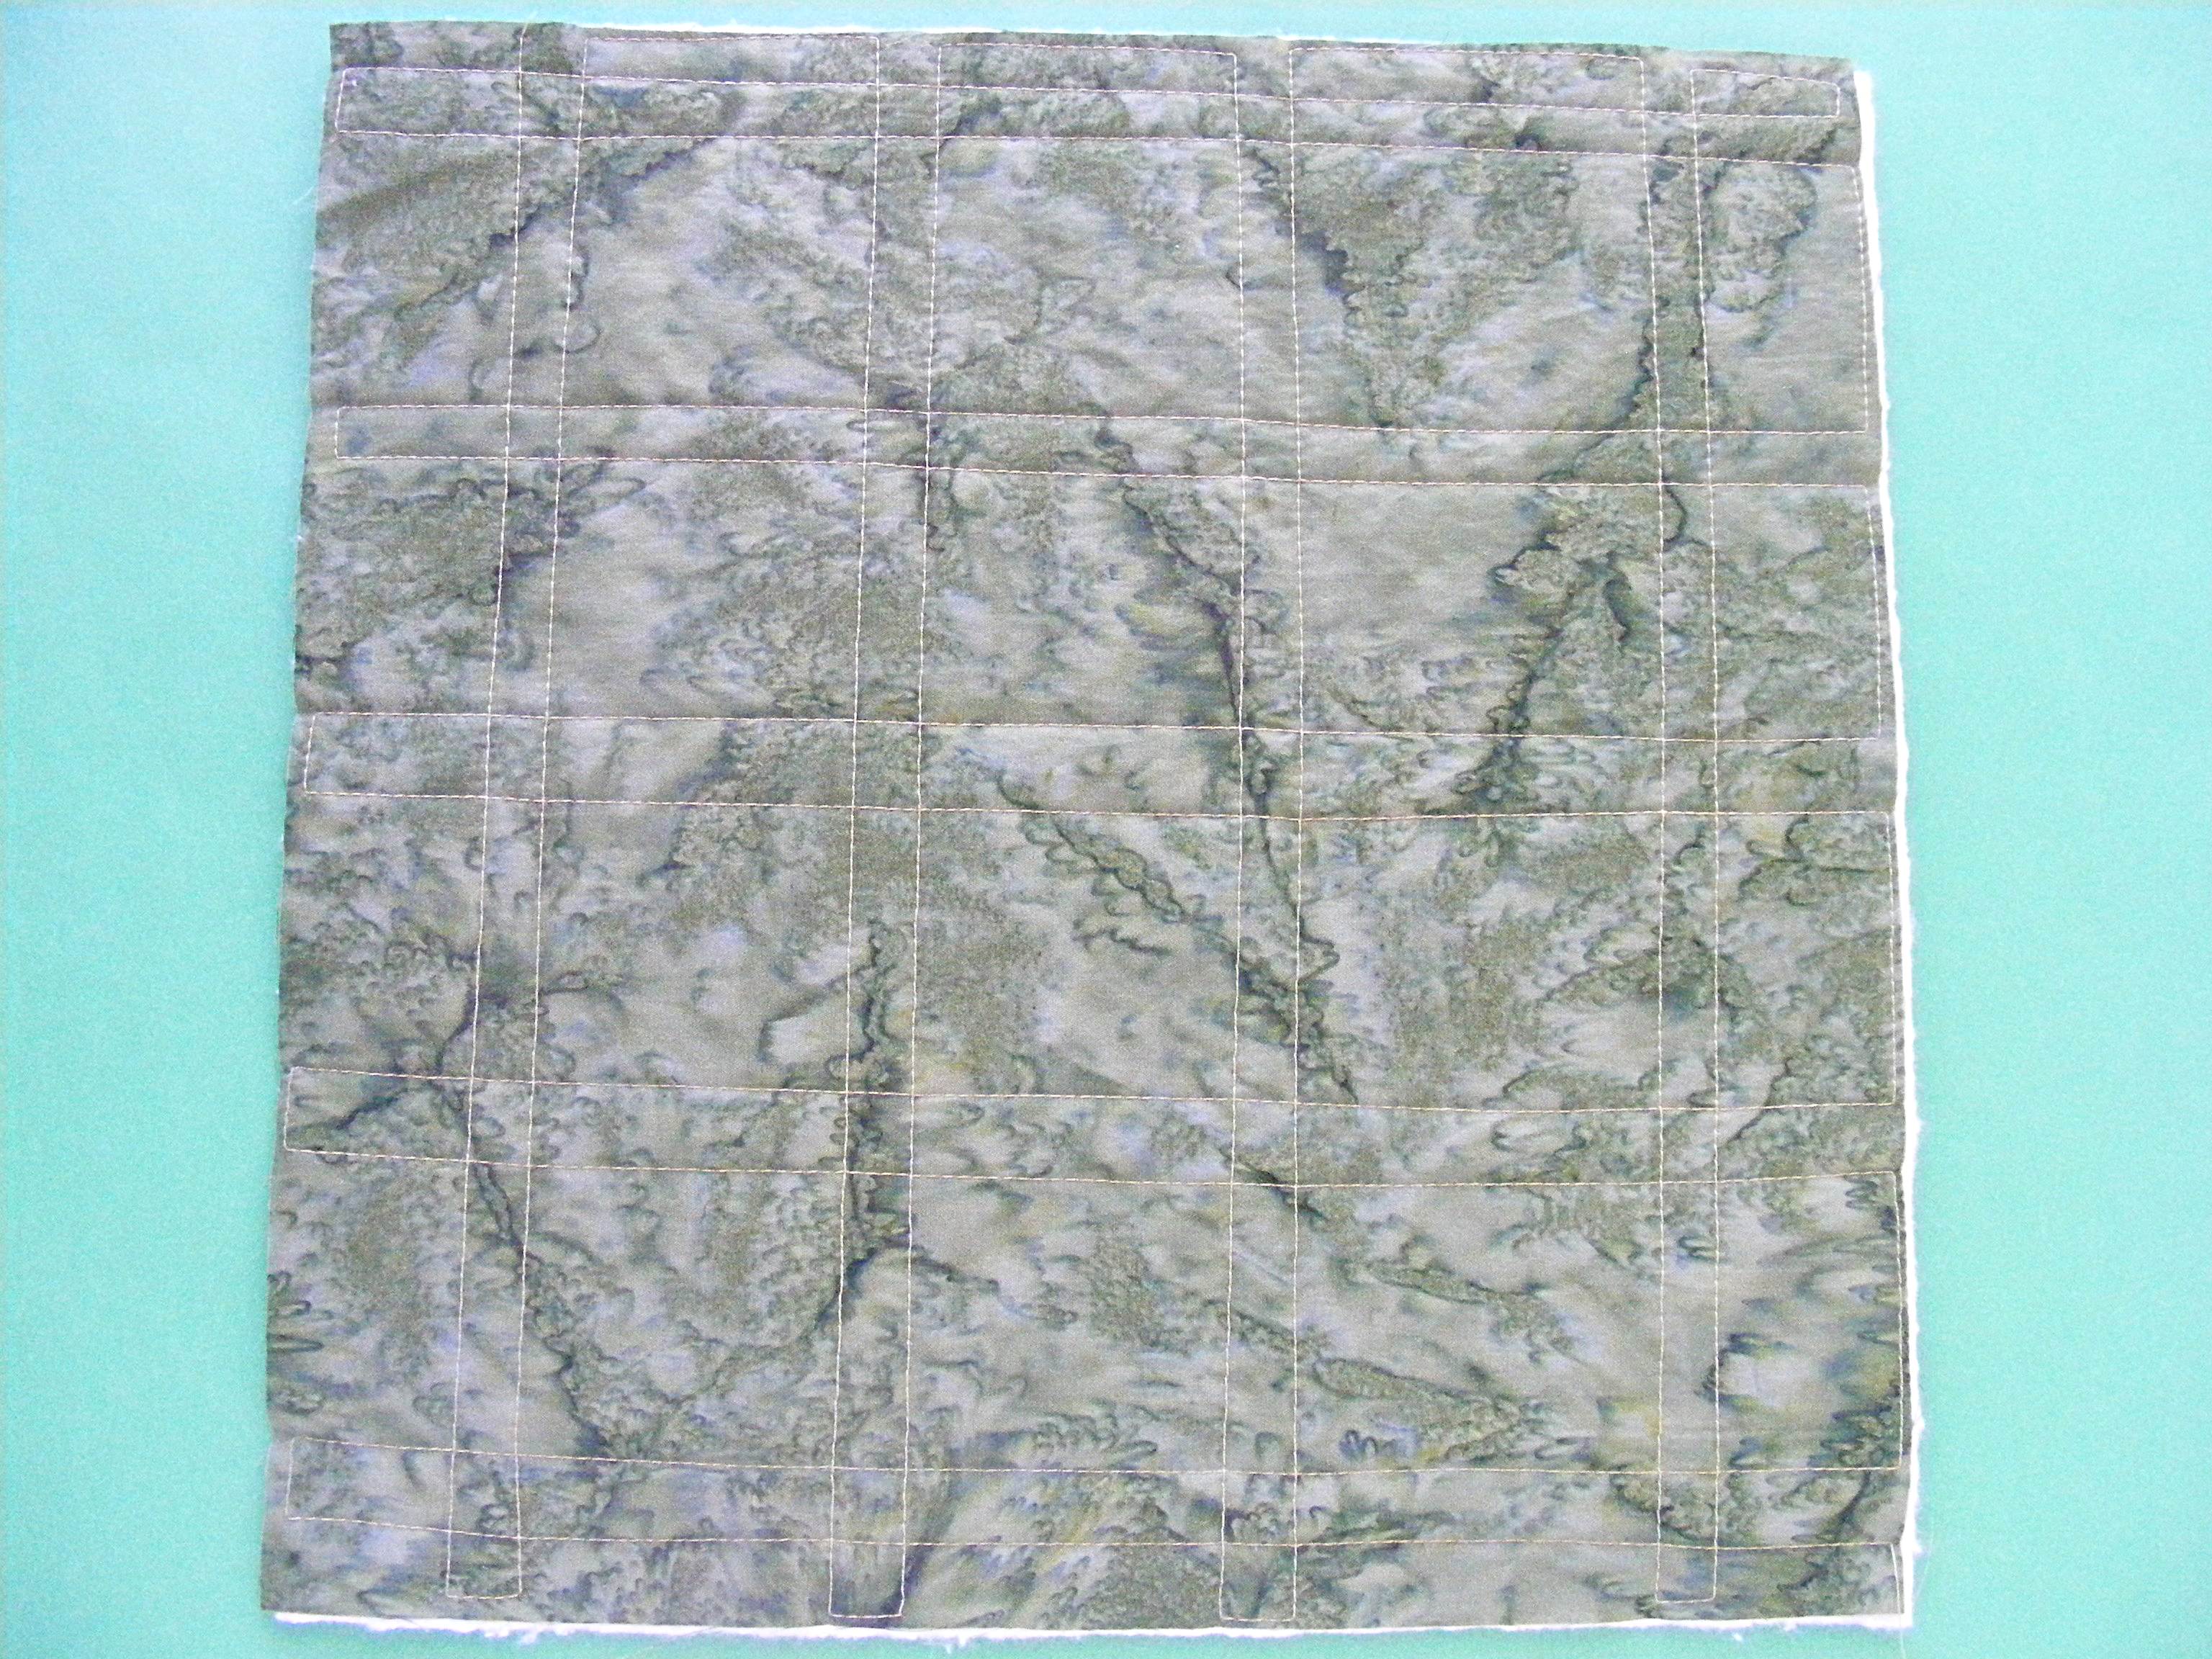
Marking lines is a bit trickier. For them I turn to The Magical Embroidery Stuff (aka Sulky Sticky Fabri-Solvy).

Seriously – is there anything this stuff isn’t good for?

For the bunny you see at the top of the post I marked the eyes as mentioned above. I could have eyeballed the nose and mouth, but I wanted to make sure I got those whiskers balanced. That meant sticking to my pattern piece exactly as drawn. 🙂

I traced the entire face on a scrap of Sulky Sticky Fabri-Solvy and then stuck it down to the fabric, using those eye markings to guide my placement.

Yes – it sticks just fine to the Cuddle Fleece. It’s amazing stuff!

I embroidered right through the stabilizer, then soaked it away in cold water and tossed it in the dryer for a quick dry and fluff.

Soft beige cat face rug with embroidered whiskers and nose on a blue background.

Perfect! And since I used a fabric marker to mark those eyes, the dots are still there after rinsing The Magical Embroidery Stuff away.

The fluff! Is there any way to keep the fluff under control?

That’s the most common question people have. Cuddle Fleece is fluffy and soft – and when you cut it that fluffiness can go everywhere!

When I cut pieces to make a softie, I walk them straight to the dryer and toss them inside. I tumble it all with no heat for about 10 minutes. When I pull them out – all the fluff is gone. The edges won’t fray after cutting, so once you get that initial cutting fluff off, you can continue work on the rest of the project with no more shedding.

Awesome!

If you have any other questions about this lovely fabric, just let me know in the comments. I’ll either update this post or (if there are enough additional questions) I’ll do a follow-up post.

Here’s one of those follow-up posts. 🙂 A video answering lots of reader questions about using cuddle fleece for quilt backs. Watch it here.

Happy sewing!

Vibrant handmade crochet toys and patterns from Shiny Happy World.
Bright blue stuffed monster toy with a pocket mouth, soft plush fabric, and playful design.

Buzz – a Free Bird Applique Pattern

Here’s a free bird applique pattern for you to play with!

The Chirp Quilt pattern has thirteen different applique birds in it.

I usually do twelve, but this time I added one more because I wanted to balance out right, left and forward facing birds.

So I decided to make one of the blocks available as a free bird applique pattern – and I let you all choose which one would be free!

Thanks so much to everyone who voted!

The winner was Buzz, this cardinal-ish, blue jay-ish bird. 🙂

Here’s how to make him. (This video shows all the steps for working with fusible adhesive – if you’ve never done it before you’ll find it helpful.)

Step 1

Download the template pieces here.

Step 2

Trace or print the pattern onto the paper side of the fusible adhesive.

I use this printable fusible adhesive so I just printed out the page. No tracing!

The image has already been reversed, so just trace or print. If you’re tracing, be sure to trace the eye too. You’ll need that there for Step 6.

Step 3

Rough cut around each shape.

Leave a little bit extra all the way around ­- a little extra extra (at least 1/4 inch) where there’s a dotted line ­- the base of the tail and the edge of the beak.

Step 4

Fuse each pattern piece to the wrong side of the fabric.

Step 5

Cut around each piece. Cut directly on the solid lines.

Leave a little seam allowance on the dotted lines ­- the base of the tail and the beak will tuck under the main body piece.

Step 6

Remember when I told you to make sure you traced the eye in Step 2? Now you’re going to use that. Hold the face up to a window so the light shines through it. You’ll be able to see the eye, and the adhesive will stabilize the fabric so you can trace on it without it crinkling up.

I traced just inside the eye.

This eye is pretty small. You can absolutely do it with applique, but if you prefer, you can use fabric paint or markers. This post has more info.

Step 7

If you’re doing Quilt As You Go (I did) then you can quilt your block before adding the applique. So easy!

Cut your background fabric and a piece of 100% cotton batting 11 inches square.

Layer the block with a piece of 100% cotton batting. Quilt any pattern you like!

Find all the Quilt As You Go tutorials here.

If you’ll do the quilting later, simply skip this step.

Step 8

Peel off the paper backing and arrange the pieces on a background block. Tuck the tail and beak behind the body.

Remember -­ all the dotted lines indicate where pieces tuck behind other pieces.

Free Buzz the Bird applique pattern from Shiny Happy World

Fuse the pieces in place.

Step 9

Stitch around all the pieces.

Free Buzz the Bird applique pattern from Shiny Happy World

I just did simple straight line stitching in black thread. I love the cartoony effect. This video has some tips for outlining those tight curves.

Done!

One bird applique pattern – complete!

If you’re making a one-block project, go ahead and finish it up.

If you’re making a bunch of Buzz blocks to join into a quilt -­ have fun!

What can you do with just one block pattern? Tons of things! Check out this page I’ve been slowly building – 100 Things to Do with an Applique Pattern. 🙂

Have fun! And share a photo of what you make! You can share it in the Shiny Happy People group or tag it with #shinyhappyworld on Instagram.

If you like this free pattern, sign up for the Shiny Happy News! Subscribers get a weekly newsletter full of sewing tips and tricks, free patterns, special discounts, and other things to make you smile. 🙂

Happy sewing!

Vibrant handmade crochet toys and patterns from Shiny Happy World.

Getting the Eyes Just Right

An easy tip showing my favorite way to transfer those dots on the pattern making the position of the eyes.

Last summer I wrote a post about how I design softie faces.

The face is really important, and I usually spend a lot of time on it, trying a lot of variations until it feels just right.

I always try things out on an already-stuffed softie. That does two things.

  1. I don’t have to visually erase the seam allowance. Even when I draw the sewing line on my pattern pieces, I think it’s hard not to see that extra bit all around the edge and place features accordingly. When the softie is already stuffed, that seam allowance is gone.
  2. I can account for the curve of the finished softie. Let’s say I place the eyes, nose and mouth up high on the softie (that can often make it look extra-plump). That might look super cute on the pattern, but once I stuff it, the face is actually on the curve facing up instead of facing out. That’s no good.

I’ve found I get the best results when I draw my face on the finished prototype, then pick it apart and trace it onto the pattern piece.

So what’s the best way for you to transfer that face to your own softie piece?

It’s all about the eyes.

You can play around a bit with the placement of the nose and the mouth, but I really recommend putting the eyes right where the pattern tells you to.

And the easiest way to do that is by punching holes in your pattern piece. I know this is crazy obvious to many of you – but it took me a long time before the light-bulb went on. 🙂

This is the pattern I made when I taught a recent softie-making class to a bunch of kids. They made Warren the Charity Bear.

Cardboard bear cutout for DIY craft projects, friendly animal shape for kids.

I used a hole punch to punch holes right at the pattern markings for the eyes. That way the kids could just pop in a couple of dots with a marker while they were tracing around the pattern. Easy peasy!

For my own use I don’t bother with cardboard and I don’t trace the pattern pieces – I use pattern weights and just cut around the piece. But I still punch holes where the eyes go so I can mark them very easily and very precisely.

If the eyes are too far from the edge of the pattern piece to reach them with a hole punch, I just punch a messier hole with my awl. You could also cut them with an X-Acto knife. Whatever works best for you – just make a hole in the pattern piece so you can easily mark dots exactly where the eyes go.

This works with any kind of fabric and you’ll always get the eyes just right. 🙂

Happy sewing!

Best,
Wendi
Brightly colored mushroom appliqué on navy fabric, crafting details.

Choosing Fabrics for the Bird Quilt

Colorful fabric bird and animal appliqué patches for children's clothing and accessories. Choosing fabric for a quilt is one of my very favorite parts. It’s so much fun to play with the colors – trying this and that until you get a combination that really sings.

But sometimes choosing colors can be hard – and a lot of people feel unsure about whether they’re doing it “right.” Every time I release a new quilt pattern I get a ton of emails asking me about the fabrics. . .

  • What did I use?
  • Is it still available?
  • Is it hard to find?
  • Can I send a list?

I’ve started including links to all the fabrics I used in each pattern, but I think it’s also useful for share why I chose the fabrics I did. So that’s what I’m doing here. 🙂

Pink bird appliqué on green quilt background, colorful and whimsical sewing project. Background Fabrics

First – let’s talk about the background fabrics.

The illustration style of my quilts is all very similar. I like big cartoony shapes with smooth curves that are easy to applique and don’t have too many tiny bits.

But I don’t want all my quilts to look exactly the same – so I like to mix things up with the fabrics I choose. For the Safari Quilt and the Peekaboo Bear Quilt I used a mix of prints for the background, with solids for all the faces. For the dog quilt and the cat quilt I did just the opposite – solid backgrounds with prints for the faces.

For the bird quilt I decided to use prints everywhere – but I still wanted a clear distinction between the background and the birds. I wanted all these wild and crazy colored birds to look like they were sitting in an almost-real tree or hedge – just a smear of varied greens in the background.

When I’m going for a dappled smear of color I always choose batiks. Timeless Treasures has a great line of batiks with all kinds of beautiful patterns – but I stuck to the Tonga Java Blenders – those delicious smears of color without any clearly defined pattern.

I looked at all the greens. (They have a lot – did you know that the human eye can distinguish more shades of green than any other color? That’s part of the reason why green is such a hard color to match.) I decided to stick with earthy, natural greens – nothing too bright or with too much yellow. I ended up choosing six colors – mostly medium shades – but with a couple of darker and one lighter one thrown in. I wanted most of the blocks to kind of blur together, with sharper lines between some of them.

Update – I now sell a bundle of green batiks perfect for backgrounds. I keep it updated with a nice mix and specific colors come and go. You can get it here.

The Bird Fabrics

Here’s where you can really play around! Birds in nature come in so many different colors – it’s hard to do anything that looks really wrong. To keep things from getting too crazy, for most of the birds I chose various shades of just one or two colors. They’re mostly brights – but I threw in a few neutrals too, just to give your eyes a rest every once in a while. 🙂

I wanted the texture of the birds to really contrast with the background so I didn’t choose anything dapply or irregular. I went with tone-on-tone prints from a few different collections. . .

Colorful bird applique quilt block for kids' sewing projects.

Sketch is a great collection of crosshatching. I think this is my favorite basics collection of them all – it has such a nice hand-drawn quality to it. Buzz here uses Sketch in purple for the body and tail.

Cute blue bird applique on dark fabric, decorative quilting.

Ziggy is the texture of Sketch – but with zigzags. Love! Floozy here uses Ziggy in aqua for her body.

Stitched bird applique for kids' quilting or sewing projects.

Dream is a new collection with small-scale polkadots arrayed in gentle curves. I love that it has a little bit of direction to it, rather than a totally random polkadot. It’s subtle and terrific. Arizona here uses Dream in taupe for the body.

Bright yellow bird applique on a quilted fabric background, showcasing sewing and embroidery skills.

Rain is a really dense tiny raindrop print. It gives a slightly different effect depending on which way you turn the fabric and I like that a lot.

Dixie here uses Rain in yellow for the body, Sketch in daffodil for the tail, and Dream in lemon for the belly.

Most of these collections are out of print now, but I keep fat quarter bundles up to date as collections come and go. The Rainbow Brights collection is all brights, and the Warm Neutrals collection is all browns, creams, greys, rusts, and golds.

That mixing and matching between collections is one of the things I really enjoy about working with fabrics from one company. I live in a remote rural area, which means I choose a lot of my fabric online. It’s almost impossible to get an accurate color on a computer screen. You can easily get an idea – but an accurate enough picture to match colors is hard. That’s why I sell fabrics in bundles – so you know everything in the bundle will work together.

But What About the Back?

Chirp - a bird quilt pattern from Shiny Happy World

For the back I went in a whole different direction.

My daughter Jo is crazy about this Cuddle Fleece. At her request I used it for the back of the Cat Quilt.

She loved it – and asked for it again for the back of these birds. I think this is going to live on our couch where I’ll wrap up in it more than she will – but I love the Cuddle Fleece too – so I said yes. The olive green was a perfect match for all of those batiks on the front.

I didn’t want any kind of border or frame effect, so I bound the quilt in leftover strips of all the green batiks.

So that’s it! How I chose all the fabrics for my newest quilt. 🙂 You can get the Bird Quilt pattern here. You can get one of the bird applique patterns for free here.

You can read about how I chose the fabric for the Cat Quilt here.

Happy quilting!

Best,
Wendi
Brightly colored mushroom appliqué on navy fabric, crafting details.


How to Applique with Fusible Adhesive – video

I’ve been doing a lot more applique with fusible adhesive lately (now that I’ve discovered some products I really like) and I’ve been getting requests for some more tutorials for it.

Ask and you shall receive.

I’ve already got a basic applique with fusible adhesive video here, but it only shows fusing down one piece – not the multiple pieces and layers you often use for cute quilt blocks. Do watch it, though, if you want tips on outlining your applique pieces with zigzag or satin stitch.

I’ve got a non-video step-by-step tutorial here. That has all the steps I’m going to demo in this video – just not in video format. I’ve had some requests for a video, so here it is. . .

See how easy it is and why I’ve grown to love it so much?

In the video I said I’d share a photo of the finished block – nice and big so you can zoom in close. Here it is – just click on it if you want to see it even bigger.

Hazel - a block from the Chirp quilt pattern from Shiny Happy World

Find the Chirp bird quilt pattern here.

Vibrant handmade crochet toys and patterns from Shiny Happy World.

Here are links to all the posts showing how to applique with fusible adhesive – my favorite method. It’s fast and easy and (with the right materials) it holds up beautifully to rough use and repeated washing.

Here are links to special posts about eyes.

Here are links to some extra fun things you can do with your applique.

Other Applique Methods

Finished with this topic?

Return to the Let’s Make a Quilt main Table of Contents.

Move on to the lessons about outline stitching.

Happy quilting!

Vibrant handmade crochet toys and patterns from Shiny Happy World.

Warren the Charity Bear – a free teddy bear pattern

Charity Bear felt teddy bear pattern, easy DIY craft, pet toy, children's gift, sewing tutorial.

I designed the free Warren pattern especially for people who want to make bears for donations. I had a few goals in mind as I worked on his design. . .

  1. He had to be easy to make. Easy enough for kids to make.
  2. He needed to be a good, huggable size.
  3. I wanted him to have mix & match parts – so you could make a hundred of them and never get bored.
  4. He needed to be pretty foolproof – it doesn’t matter if his features are precisely positioned. It’s ok if he’s stuffed a little loose or a little tight. It’s all good. 🙂
  5. He needed to work well with easy-to-find polar fleece – but also work well with fancier fabrics like minky and cuddle fleece.

Jo and I tested this pattern a LOT – and then I used the pattern to teach softie-making to a bunch of kids – and then Jo and I made a bunch more. And now he’s ready to share. I can’t wait to see the bears that YOU make with him!

One note – I designed this pattern especially for charitable giving – but of course I’m giving it to you with no strings attached. Make bears for yourself and your kids and grandkids. Use the pattern when you teach. Sell finished bears. The pattern is yours! Make whatever you want with it! If you want to make bears to donate, I suggest the following places. . .

  • homeless shelters
  • battered women’s shelters
  • fire departments
  • police departments
  • children’s hospitals (check first to see if they have special requirements about the materials they’re made with)
  • Please suggest other places in the comments!

Here’s how to make him!

Prepare the Pattern

Download the pattern here. Print it out at 100%. Layer the two pieces together, overlapping so the edges of the pattern and the little hearts line up. Tape the pieces together into one large pattern piece and cut it out. I like to punch holes where the eyes are to make marking their placement easy.

Cut Out the Body

Lay the pattern on the fabric so the stretch of the fabric goes across the bear’s belly. You want him to stretch wide – not tall. 🙂

Cut two body pieces.

Felt bear head cutout for kids craft and sewing projects.

Mark the placement of the eyes on the front piece.

Applique Any Parts

Cut any muzzles or belly pieces you want to use out of felt and applique them in place. Just stitch them close to the edge with a basic straight stitch. Nothing fancy. If you have trouble on the tight curves of some of the smaller pieces, watch this video for help.

Colorful felt bear stuffed toys with expressive faces on bright backgrounds.

There are two different muzzle patterns so you can give your bear a wide muzzle, a tall muzzle or no muzzle. You can see the three nose sizes in these photos too. 🙂

Fluffy bear plush toys in green, blue, and red with cute embroidered faces and hearts, perfect for kids' plush gifts. You can also give him a belly patch, a heart patch, or no patch.

Embroider the Mouth

Felt dog nose applique tutorial steps for sewing and embroidery.

Thread a needle with a full six strands of black embroidery thread and knot the end. You’ll embroider the mouth in three stitches, always coming up at point A and going down at point B. If the A’s on the second and third stitches are above the B, your bear will be smiling. If the A’s are below the B he’ll be frowning. Don’t worry about making the sides exactly even. Crooked smiles are sweet. 🙂

Pop in Some Safety Eyes

I carry several sizes of safety eyes and three work well for these bears.

Felt bear plush toys with colorful felt details and embroidered features for kids. The small ones are 6 mm, the medium are 9 mm, and the large are 12 mm.

There are more eye options too. . .

Colorful plush bear pillows for kids crafted from soft felt fabric. If you want to use black eyes on black fabric, you might want to back them with a circle of colored felt so you can see them.

Mismatched eyes are always fun.

And even if the eyes don’t go exactly where they’re supposed to, the results are cute. 🙂

If you’re making your bears for kids under three, you’ll want to embroider the eyes instead of using safety eyes. Here’s a tutorial showing the stitch I use.

Sew Up Your Bear

Layer your bear front and bear back pieces right sides together and pin or clip the layers in place.

Sew around the edge using 1/4″ seam allowance, leaving a stuffing opening on the side of one leg.

Soft white polar bear stuffed animal with embroidery details, perfect for children's toys.

If you’re using a fabric that has no stretch, you’ll need to clip into all the concave curves. Watch this video for the why and how. Polar fleece, minky and cuddle fleece don’t need this step – they have a natural stretch that will allow the curves to turn smoothly without clipping.

Finish Your Bear

Turn your bear right side out and stuff it.

Make sure you get some stuffing in his ears and arms before you fill up the big body – once you block access to those bits it’s hard to get back in there. Watch this video for some stuffing tips.

Here’s a review of my favorite stuffing. I like Fairfield Brand Poly-fil Supreme Fiberfill – it really does make a difference.

Sew up the opening. Ladder stitch is totally invisible on fleece – here’s a video showing how to do it.

Warren the Charity Bear - a free teddy bear pattern from Shiny Happy World

Done!

If you like this free pattern, sign up for the Shiny Happy News! Subscribers get a weekly newsletter full of sewing tips and tricks, free patterns, special discounts, and other things to make you smile. 🙂

Happy sewing!

Best,
Wendi
Brightly colored mushroom appliqué on navy fabric, crafting details.

How to Measure Yarn

Last week, I showed you how to calculate how much yarn you’ll need for a project.

How much yarn do I need crochet

But calculating the yardage is only half of the story. Getting an accurate measurement of your stitches is a crucial, as this is the measurement that you’ll be using for all of your calculations!

Today, I’ll share with you some tips for measuring your yarn.

Crochet your sample

As we talked about last week, you’ll want to measure your yarn for your particular yarn, hook and stitch pattern.

crochet circle

What’s most important is that you crochet several stitches that are not interrupted (for example, by a turning chain). In this example, I’m measuring single crochet, and working in the round is a great way to get an undisturbed run of stitches.

Start and stop at the right place

To measure, you’ll want to unravel some of your stitches and measure the length. It’s important to measure in complete stitches.

I like to hold my thumb immediately next to my work (as pictured), preserving the loop that you removed the hook from:

start of crocheting

Then, count the number of stitches as you unravel. You will want to end your measurement directly next to your work, with the loop still intact.

final crochet piece

How to measure

Now that you know where to start and stop your measurement, it’s important to talk about how to hold the yarn while measuring.

You want to pull the yarn straight, but not stretch the yarn. Most yarn is slightly elastic, and it’s possible to pull it so much that you will get an inaccurate measurement.

How to measure your yarn

See how the bottom measurement contains a full extra inch? That’s a lot of stretching!

Now calculate!

Now that you’ve measured properly, you can do your calculations accurately!

There’s more… you can weigh it, too!

Do you have a bunch of yarn that you need to measure? And a ruler seems too tiring?

digital scale

Well, then, you’ll want to read my post on how to calculate yarn length from weight!

Best,
Stacey

How do you tell if something’s worth doing?

Last week, I wrote about How to Say ‘No’ (and rescue your schedule). I’m so happy to hear that so many of you loved the post! I was thrilled to read so many comments!

One question that popped up in the comments was, “How can you tell if something is worth your time?” It’s an amazing question, and one I’ve been thinking about a lot.

let go of tasks that don't serve you

Not everything will be fun…

The tricky thing about this question is that the answer isn’t obvious.

“Only do things that are fun” is bad advice. I mean, you should go to the dentist, right?

“Only do things that are good for you” seems similarly misguided… in real life, it’s okay to have an ice cream sundae once in a while!

sundae

The truth is somewhere in between. Something can be worth your time for a variety of reasons, but it’s important to make sure the cost to yourself is not too steep.

Here are a few questions to ponder when considering whether something is worthwhile for you to tackle:

  • Are you the only person who can do it?
  • Is the benefit that comes from you doing it greater than the mental/physical cost to you?
  • Is it fun? And relatively harmless?
  • Is it good for you?
  • Would you feel relieved if you did it?
  • Do you think life would overall be better if you do it?
  • Can you do it without causing immense distress to your own life?
  • Would the cost of outsourcing the task be too high?
  • Is it something you could be proud of doing?

These are really great questions to ask yourself… and I’m sure you can come up with a few questions of your own.

Questions in action

Let me give you an example. This week, I did my taxes. They’re really boring and awful, and there are about a million things I’d rather be doing than my taxes.

woman looking at clock

But, because I run FreshStitches, I’m literally the only person in the world who can accurately compile the numbers for my business. Only I know where the relevant spreadsheets, receipts and forms are in my office. And, really, once I got it done, I felt proud and satisfied. And it only took me a full day to do, which is worth it considering the cost and hassle it would have taken to hire the task out.

What’s a task that I turn down? I’m often asked to design a custom pattern. I know doing so would take more than 25 hours, and involve even more time when you account for emailing sketches back and forth, making changes, etc. It’s not a task that can fit into my schedule without having massive disruption. And I’m not the only one who can do it… a customer has a very high chance of finding another willing designer!

Are you guilty of accepting tasks you shouldn’t?

Or, do you have a really great question you ask yourself when deciding whether something’s worth your time?

I’d love for you to share your experiences!

Best,
Stacey

How to Turn Any Embroidery Pattern into an Applique Pattern

Colorful girl embroidery with bird pattern and appliqué design for kids clothing or decor.

Brightly colored quilt with playful patterns on a cozy bed.

Want to learn the basics of hand embroidery with an easy online workshop – totally free?

Sign up for Embroidery 101 here. You’ll learn how to get started, the tools and supplies you’ll need, the four most basic stitches, how to transfer your pattern and how to display your work.

If you already know the basics – sign up for Embroidery 201. It’s also free! You’ll learn how to stitch on specialty fabrics like felt and stretchy T-shirts. Plus you’ll learn lots and lots and LOTS more stitches – all my favorites!

Brightly colored quilt with playful patterns on a cozy bed. I’ve been getting a lot of requests lately for specific applique patterns – owls, robots, horses, peace signs and more.

I add a lot of these ideas to The List – but for someone who’s looking to make an owl crib quilt for a baby due next month, The List isn’t going to cut it.

So today I’m going to show you how you can turn any embroidery pattern into an applique pattern.

I have TONS of embroidery patterns – and a lot of those have multiple images that you could use as quilt blocks to make a full quilt.

So let’s jump in!

The specific instructions here are all for applique with fusible adhesive – my new favorite method now that I’ve discovered this stuff. You could easily adapt the idea to work with needle-turn applique or freezer paper applique or whatever your favorite method is.

Step 1: Size and Print Your Image

Cute children's drawing of a girl with pigtails wearing a flower dress, on white paper with a blue background.

I chose to applique one of the Rainbow Girls. The embroidery patterns are about three inches tall – so my first step was to make that a LOT bigger.

I’ve got a tutorial here showing how to resize any embroidery pattern.

Print your image out at exactly the size you want it to be. I enlarged my girl to be about ten inches tall.

I’m not going to use the big flowers – I’m just going to choose a pretty fabric that needs no fancification – but I’m not going to bother to erase them. I’ll just ignore them.

I did add a little line separating the legs from the feet. I want my applique girl to have striped tights and solid shoes, so those will be two separate pieces.

Step 2: Reverse, Explode and Trace

Outlined paper pattern for making a fabric fox face and mask, perfect for children's craft projects.

Next you need to get your image onto some fusible adhesive.

You’re going to trace the reverse of your image onto the paper side of your fusible adhesive, and you’re going to explode the pieces as you do it.

This is the part of the instructions most likely to make your head hurt – but it’s really not that hard. Just don’t think about it too much. 🙂

Tape your image face down in a window. The light will shine through so you’ll still be able to see the image clearly through the back of the paper – but now you’ll be tracing a mirror image. Easy!

Put your fusible adhesive up there so you’re tracing on the paper side. The adhesive side is usually kind of bumpy – it won’t be hard to tell the difference.

Now you’re going to trace an exploded view of your image. That sounds violent, but all it really means is that you’re going to trace each shape separately and leave a little space between them.

Click on the Step 2 image up there and you can see what I did. The dress is one shape. The face is one shape. The hair is one shape. Each pigtail is a separate shape.

This is also the stage where I start thinking about how I’m going to put it all together – what pieces will be tucked behind other pieces. I trace those tucked-behind edges with a dotted line: the top of the dress, the top of the head, and the tops and bottoms of the legs.

Step 3: Rough Cut the Adhesive

Colorful paper doll craft for kids, perfect for sewing and educational activities.

Now cut all those pieces out – but not right on your tracing lines!

This is a rough cut.

Cut a little bit outside all your lines.

You don’t have to be too fussy about it and it doesn’t have to be super even – just leave a little extra all the way around the edge.

Step 4: Fuse to the Fabric

Colorful fabric felt pieces for DIY craft projects on a blue background, including pattern templates for making clothing and accessories.

Now comes the fun part.

Fuse all your pieces to your fabric.

Lay them paper side up (adhesive side down) on the back side of your fabric.

If your fabric has a print, make sure it’s running the way you want.

I made sure the stripes were running across the tights, and that I liked the way the birds were arranged on the dress.

Iron in place following the instructions on your fusible adhesive – every brand is different so you need to read the instructions.

Step 5: Cut Out the Pieces

Colorful paper craft of a smiling girl with purple hair and striped green pants, perfect for children's art projects.

Now is when you’re going to do your careful cutting.

Remember how you traced some edges of your pieces with a dotted line back in Step 2? That’s going to be useful now.

Cut each piece out right on your solid lines.

Leave a little extra overhang where you have dotted lines – that will give you a bit of fabric to tuck under the adjoining piece.

If you click on the Step 5 image you can see what I’m talking about. I left the dress piece flipped over so you can see the dotted line at the top. That bit of extra fabric extending past the dotted line will tuck behind the head.

One more thing to do on this step – trace any features that need embroidering. In this case that’s the eyes and mouth. I included them when I traced the head back in Step 2, so now all I need to do is put the face piece fabric side up in a window. With the light behind them, the eyes and mouth will show right through the fabric. Just trace them on the fabric with a fine marker. Make sure you do this before you peel off the paper backing in the next step!

Step 6: Arrange and Fuse

Colorful fabric doll with a smiling girl wearing a dress decorated with bird illustrations, striped leggings, and pigtails. Perfect for sewing crafts and children's toys.

This is my favorite part – putting it all together!

Peel off the paper backs and arrange all the pieces on your background fabric.

(I went ahead and quilted my pink background block to some batting first – this might end up being a quilt block.)

Take the opportunity now – before it’s all stuck down – to play around with the arrangement of the pieces. Adjust the tilt of her head, the angles of her pigtails, etc. I decided to make one leg stick out a bit like she’s getting ready to dance. Have fun!

When you’re happy with how everything looks, carefully fuse it all into place with your iron. Again – read the instructions on your brand of fusible adhesive. And remember that the temperature and steam setting for the final fabric-to-fabric fuse are often different than for the initial paper-to-fabric fuse.

If you want to see all these steps in video form – watch this video showing how I use fusible adhesive for all my quilt blocks.

Step 7: Stitch the Edges

And now for the final step – stitch down all the edges. Some people like to use a heavy satin stitch. Some use a zigzag stitch. I like to use a simple straight stitch in black thread. It’s a cartoony outline effect that really suits the loose style of my designs.

Colorful girl's applique art with whimsical bird pattern and striped leggings, on bright pink background. I stitched over her eyes and mouth twice with the machine. I could have chosen a heavier thread instead – or done bit of hand embroidery – but I was already at the machine so I just did it there.

That’s it! Now go look at all your embroidery patterns with fresh eyes. 🙂

Happy sewing!

Best,
Wendi
Bright red mushroom with white spots on a dark blue background.

How much yarn do I need?

How Much Yarn Do I Need - how to calculate yarn needed for any crochet pattern

It’s a question every crocheter asks… how much yarn do I need? And what if I change the thickness of yarn?

Today, I’ll show you how to calculate how much yarn your project will need. No more guessing!

crochet hooks and yarn

Discover your yarn + hook combo

The only way to know for sure is to calculate how much yarn each stitch (using your yarn and hook) takes. Using some yarn and hooks I had on hand, I did few examples:

How much yarn do I need crochet

As you see, the thicker the yarn (and the bigger the hook), the more yarn you’ll need.

How much yarn you need crochet

Your calculations may be different depending on your exact yarn and gauge… but this should give you an idea! This tutorial will show you how to calculate how much yarn you use for each stitch.

How to calculate the total for the pattern

To find out the total amount of yarn you’ll use for your project, multiply the number of stitches in your pattern by the number of inches each stitch uses.

Let’s take Jay the Bird as an example. The pattern contains the stitch count at the end of each line.

stitch count in crochet

Adding those up gives me a total of 1656 stitches.

How much yarn do I need if I want to crochet him in a fingering weight yarn?

how to calculate how much yarn you need

46 yards! That’s less than the 85 called for in the pattern because fingering weight yarn is smaller, and the project needs less!

Calculate away!

Using this method, you can calculate how much yarn a project will require with any weight yarn and hook! No more guessing!

Vibrant handmade crochet toys and patterns from Shiny Happy World.

Here are handy links to all the posts about yarn. . .

Return to the main table of contents for Let’s Learn to Crochet Amigurumi.

Move on to the lessons for the basic crochet stitches.

Happy stitching!

Vibrant handmade crochet toys and patterns from Shiny Happy World.