Well – I finally opened the box of my new Cricut Maker.
So exciting!
But I’ll be honest – we got off to a bit of a rocky start.
The Design Space app didn’t install automatically and the link to click to continue the installation was a dead end to a nonexistent page. Not a huge deal – I know how to find my files and install them myself, but it’s the kind of thing that really frustrates a person who’s not super comfortable with technology so I thought it was worth mentioning.
They include some materials for your first project (a card) which is great. It let me walk through all the steps of making (not designing) and actual thing.
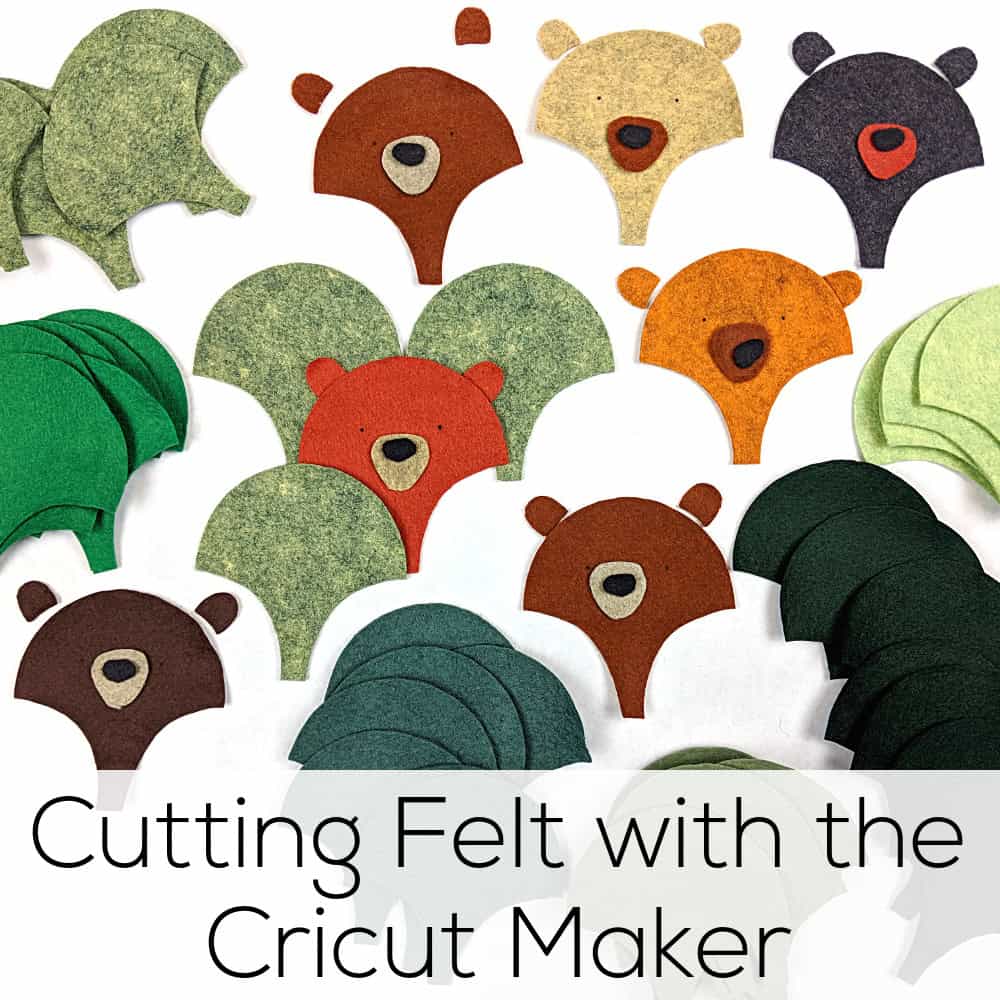
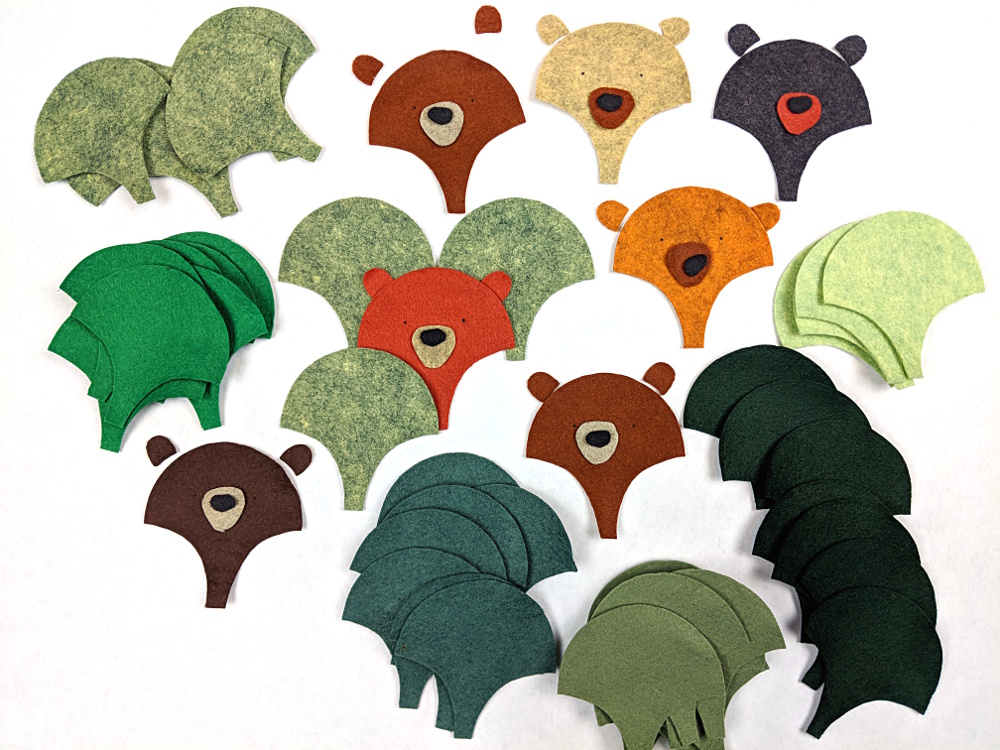
Designing was TRICKY. That’s going to take some practice – but I managed to get my first project (those bears in the hills) all set up and ready to go.
Time to cut some felt!
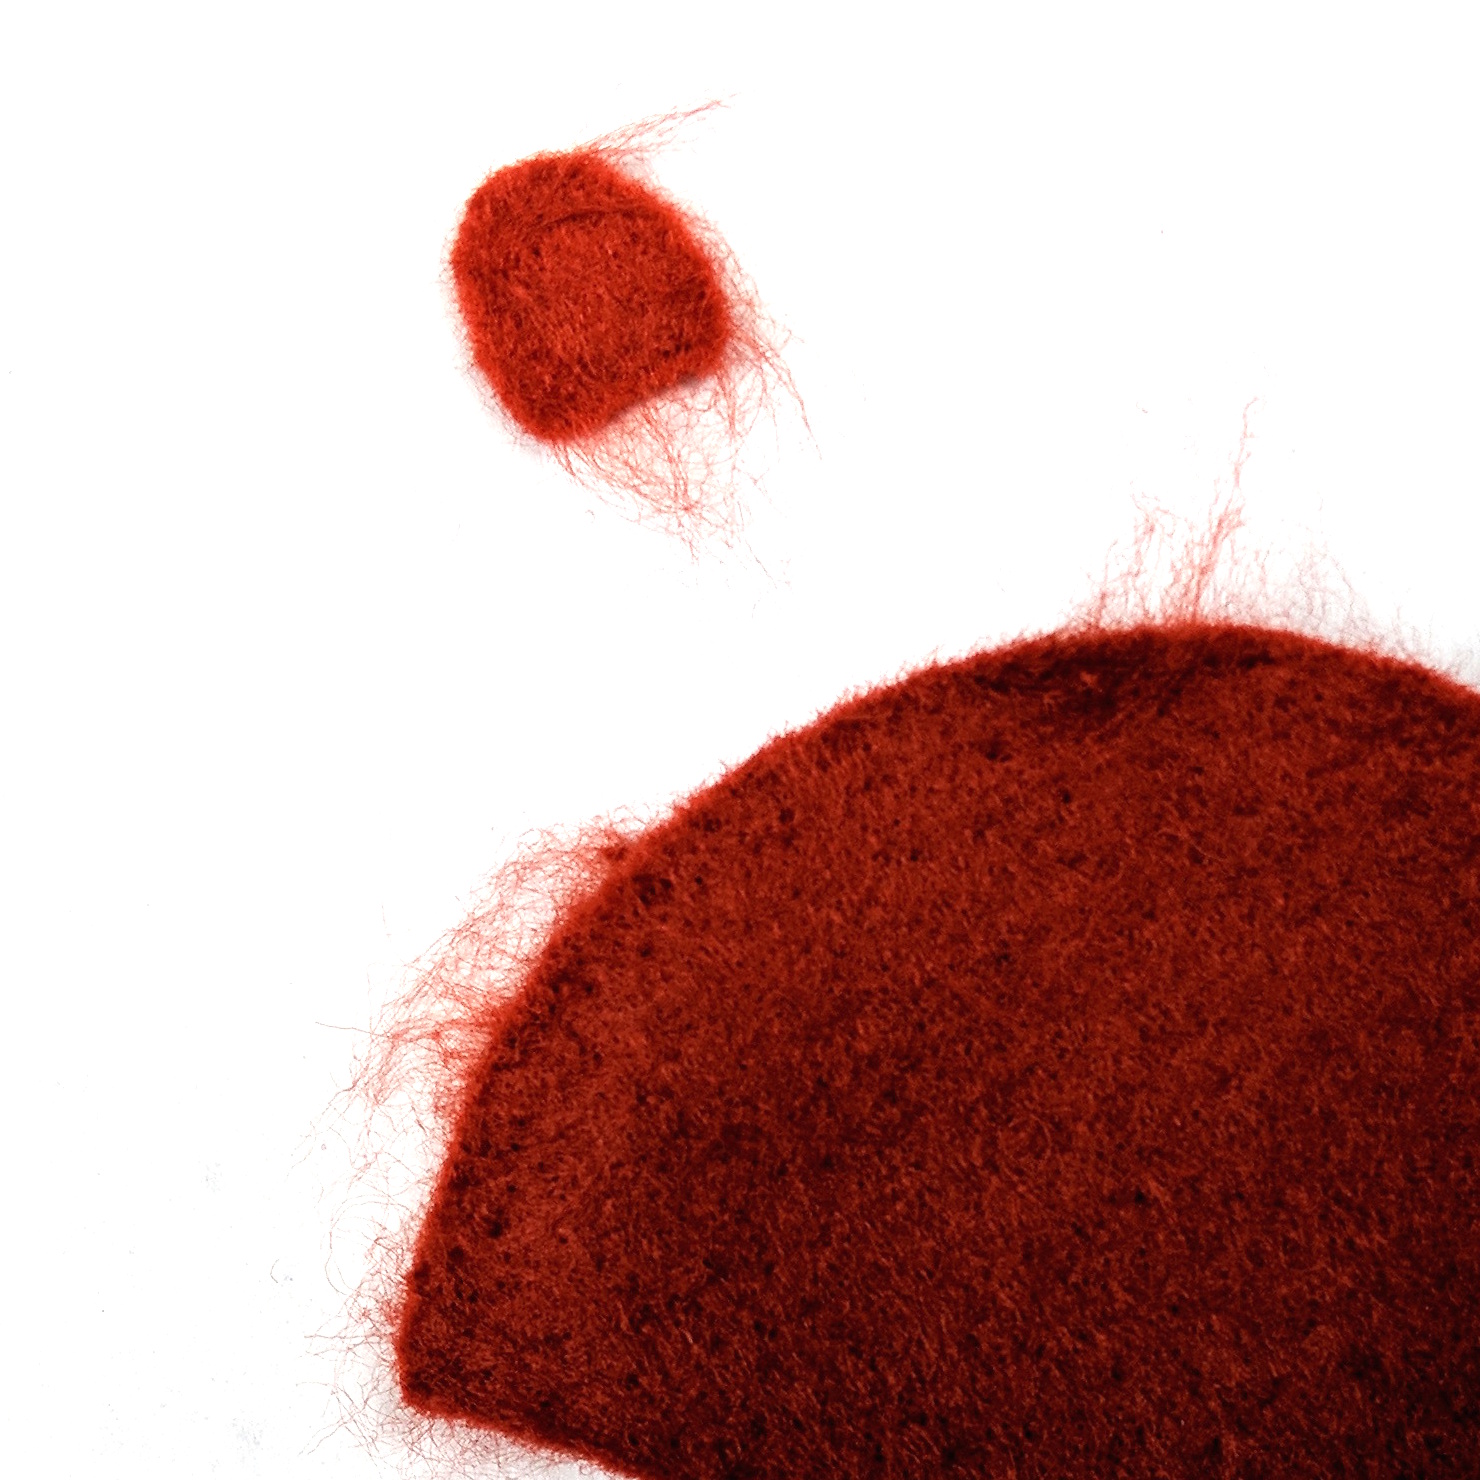
Uh oh. That does NOT look good.
I cut it on the felt setting and this was actually the second try with increased pressure. The first try just roughed up the surface of the felt without actually cutting anything.
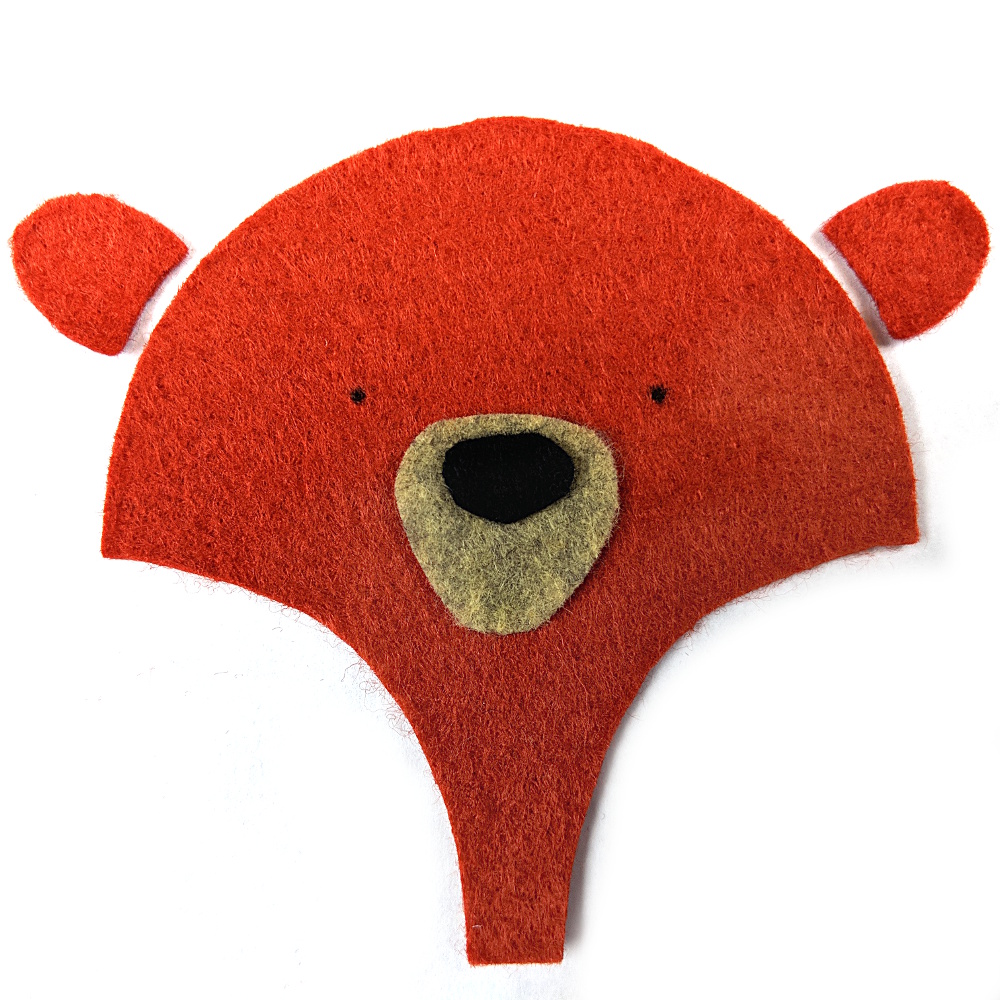
I decided to lie to the machine and tell it I was cutting heavy fabric like denim. That prompted me to change it to the teeny tiny rotary blade instead of the knife blade.
Much better!
Look how clean the cuts are! And see the eye markings? The machine did that too with the pen attachment. So handy!
After I got the settings figured out I was on a roll. 🙂
I cut all the pieces for my new Bears in the Hills in about an hour – while I was cleaning my studio. 🙂
Next week I’ll have a video showing you how to layer all these guys up and prep for stitching.
I can’t wait to try the Cricut on regular fabric for applique quilt blocks – that’ll be my next project with the machine.
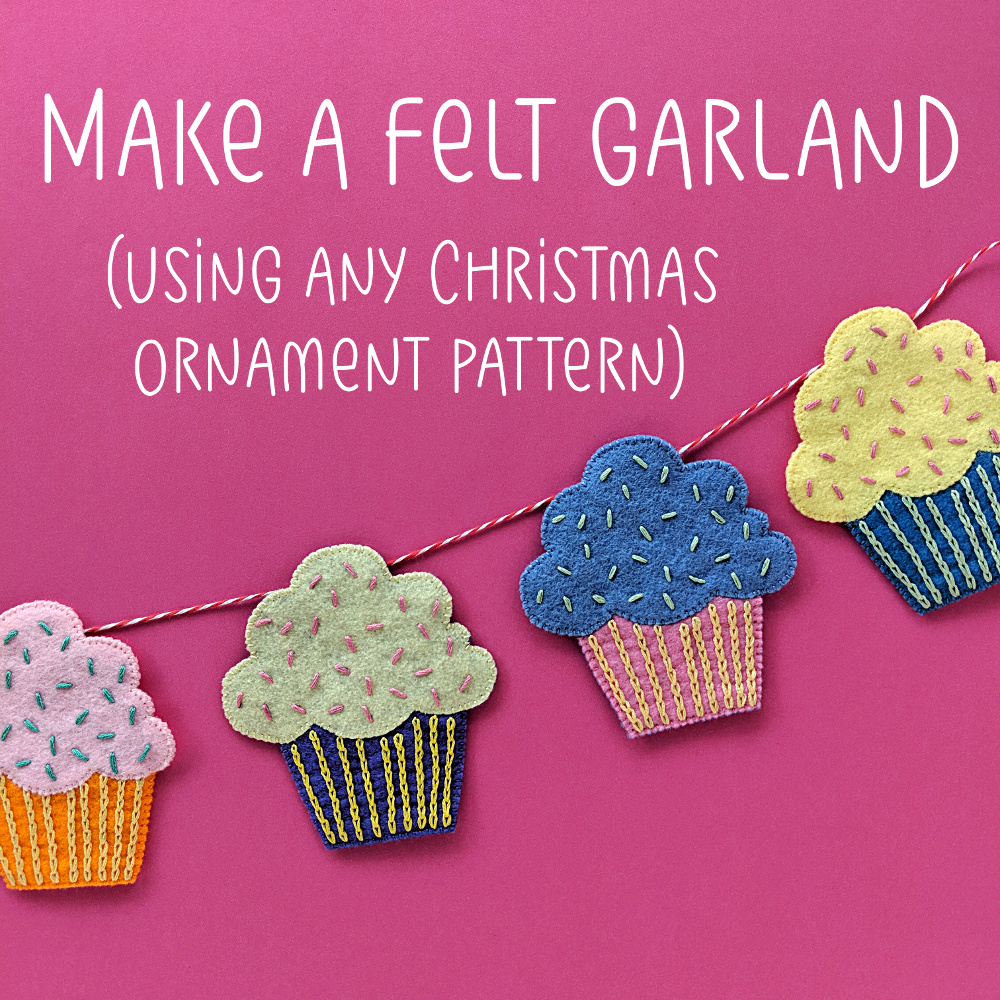
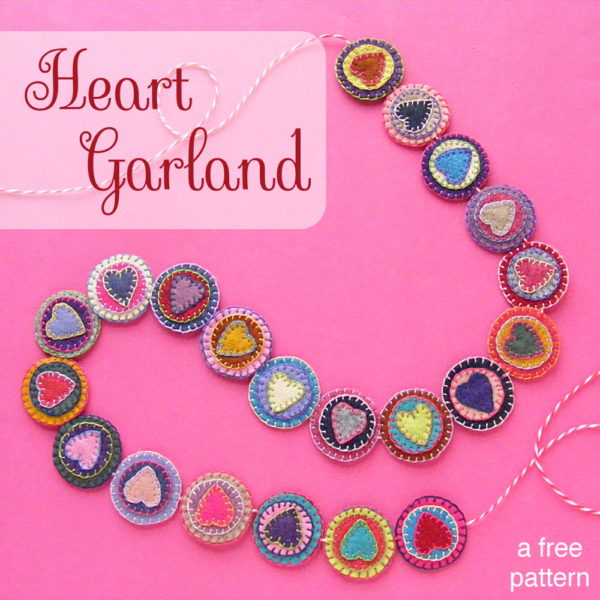
Some of them are Santas and trees and things specific to the holiday – but a bunch of them are just cute everyday items that are fun to hang on your Christmas tree. I wanted to come up with another way to use those fun everyday patterns, so I decided to make an easy felt garland.
I picked the cupcake pattern – because I love cupcakes and it was my birthday and I thought it would make a really cute party decoration that could be used year after year.
Stitch up however many you want, in whatever colors you like.
I made a dozen cupcakes in all different colors (using up a bunch of my felt scraps – an added bonus.)
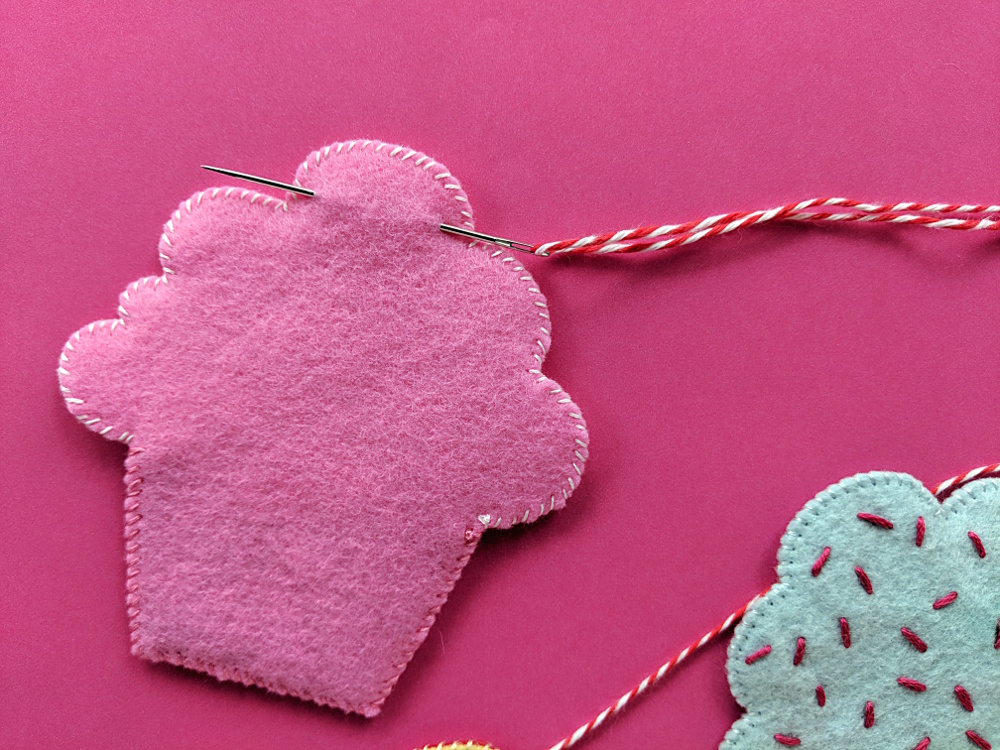
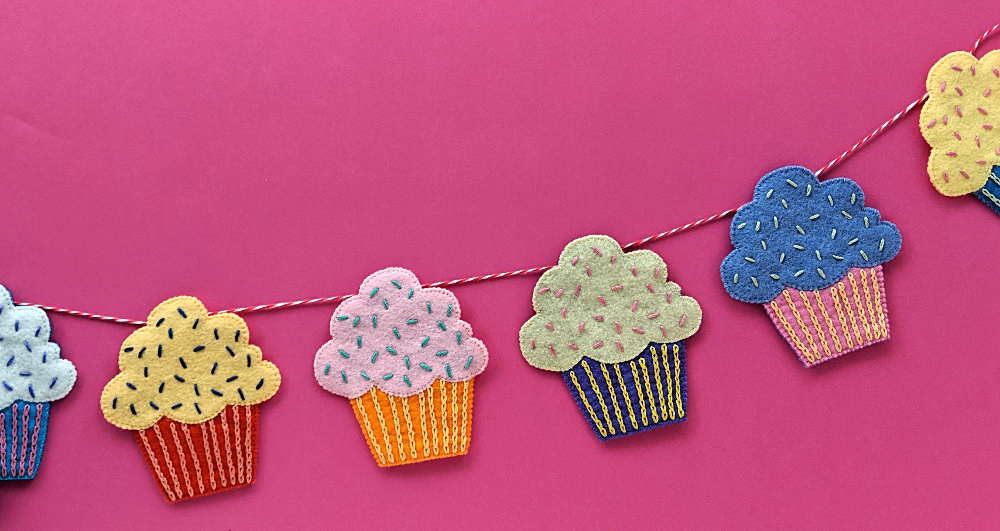
Then you just string them together!
Cut a length of thin cotton yarn (make it a lot longer than you think you need) and thread a big-eye needle with it. Run the needle through the back layer only of your ornament. Make sure to pick a spot near the top of your ornament so the piece doesn’t tend to flip upside down when you hang it. It will always want to hang heavy-side-down.
Finished!
Don’t tie any knots or anything – that way you can slide the ornaments along the string as needed to fill any space.
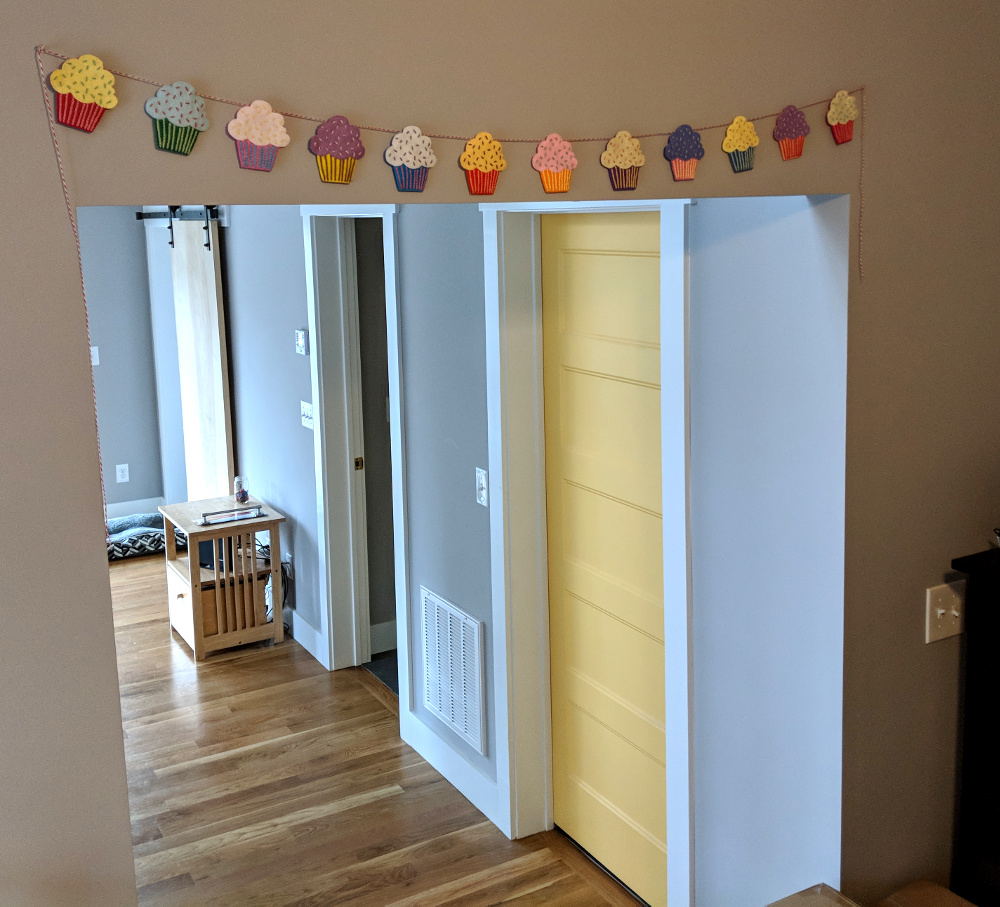
I like mine so much I decided to keep it up all year! I hung it across the opening to my studio so I see it every day. 🙂
Make a party garland! Decorate a nursery or a child’s room! Or make one for yourself. 🙂
I LOVE working with felt! The edges don’t fray, it’s delightfully warm, it takes embroidery beautifully, and it comes in the most luscious colors.
But it’s different than regular fabric.
These tips will make it super easy to work with.
Why wool felt?
It’s way more durable that the cheap acrylic stuff you can buy at any craft store! I wrote a post about the difference here.
One important thing to know – it doesn’t need to be 100% felt to get that quality boost. The main thing is that it’s NOT acrylic. That’s what makes cheap craft felt pill. The felt I use is only 20% wool and 80% rayon and it’s lovely. If you have allergies and can’t work with wool, try bamboo felt instead. It can be harder to find, but it’s WONDERFUL!
How to Mark on Felt?
The trickiest thing about wool felt is that it’s hard to mark on it. It’s so thick that you can’t trace a design through it, and drawing on the felt tends to lift the fibers and make it look messy. I use two products that really help – freezer paper and Sulky Sticky Fabri-solvy. There’s a video here talking about both – but here are the details in a nutshell.
Freezer Paper
I use freezer paper when I just want to cut out small shapes. Trace or print the templates on the paper side of freezer paper, fuse it to the felt with an iron, and then cut the pieces out through the paper and the felt together. Peel the freezer paper off and it doesn’t leave even a trace behind. It’s the perfect way to cut out small shapes very precisely!
If I need to mark dots (usually for eyes) I punch a hole in the freezer paper before I fuse it down, then mark through the hole for very precise placement.
Sulky Sticky Fabri-solvy
If I need to transfer anything more complex than a dot I use Sulky Sticky Fabri-solvy. I love this stuff so much! You print or trace onto the stabilizer, peel off the paper back, and stick it to the felt. Stitch right through the felt and stabilizer and then rinse away the stabilizer. Every trace dissolves in water and you’re just left with beautifully stitched felt. I show a lot of process photos demonstrating this in action in this post.
I can’t say enough how much I love this product. It has opened up a whole world of possibilities!
Whipstitch
I mostly use whipstitch to applique on felt and to sew felt pieces together. It’s called whipstitch for both uses – but the stitch actually looks a little different for the two applications.
This free felt coaster pattern is a great way to get started working with felt. You’ll do a little applique and a little embroidery and you’ll end up with a pretty set of coasters.
If you’re got a lot of random felt scraps, try this free felt garland pattern. It teaches you a different way to applique and join pieces together – the blanket stitch.
Turkey work is an unusual embroidery stitch that gives you a special effect. If you make long loops you can get a hairy or fringy look. Shorter loops can be trimmed to look like the pile of a rug or shorter hair.
Neat!
Turkey work stitching isn’t difficult, but it does require a bit of focus so you don’t lose track of what you’re doing. I tend to mumble to myself while I do it. . . flat stitch, loopy stitch, flat stitch, loopy stitch. . .
Here’s what I’m talking about.
See what I mean?
You can work this stitch on flat embroidery – you’ll often see it as the center of flowers, for example.
But I use Turkey work most often on little felt softies. It opens up a whole range of possibilities for hair, manes, tails, bushy eyebrows and more. 🙂
There are a lot of different stitches to choose from when you applique felt – buttonhole stitch and running stitch are especially popular. But my very favorite stitch to use is whip stitch.
It’s fast.
It’s easy.
I love the way it looks.
Want to learn how? Here’s a video!
See how easy?
I stitched the whip stitch sample in the video with contrasting thread so you could really see the stitches, but usually I use thread that matches the applique pieces, so mistakes and uneven stitches won’t be very visible. (Sneaky.)
Applique with wool felt is one of my very favorite things to do!
It’s all done by hand, so it’s work that’s easy to carry around with me for quick stitching in free moments here and there. And the wool felt and smooth embroidery thread feel so nice in my hands! Plus the colors are so rich and pretty!
Give it a try with this fancy felt coffee sleeve. It uses whip stitch to applique all the felt pieces, and blanket stitch to sew the edges of the sleeve.
Using a button joint allow your softies to sit, stand, wave, and be posed in other fun positions. Here are a few examples.
Here’s Rhonda Rhino, carrying a pretty balloon to a birthday party.
You can just barely see one of the buttons on her shoulder.
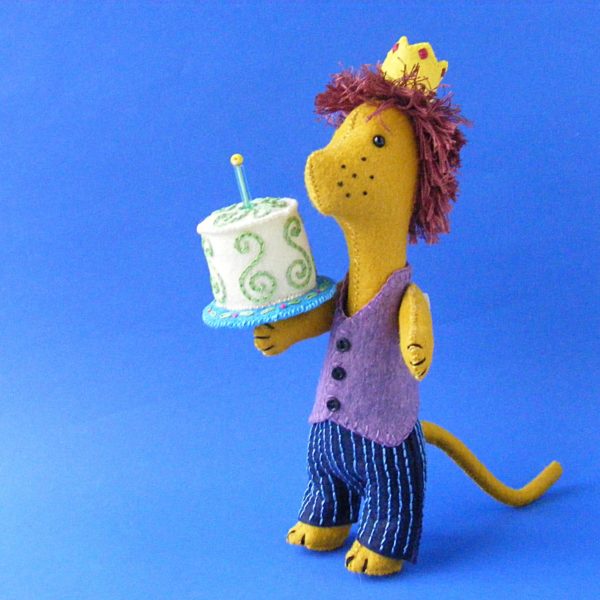
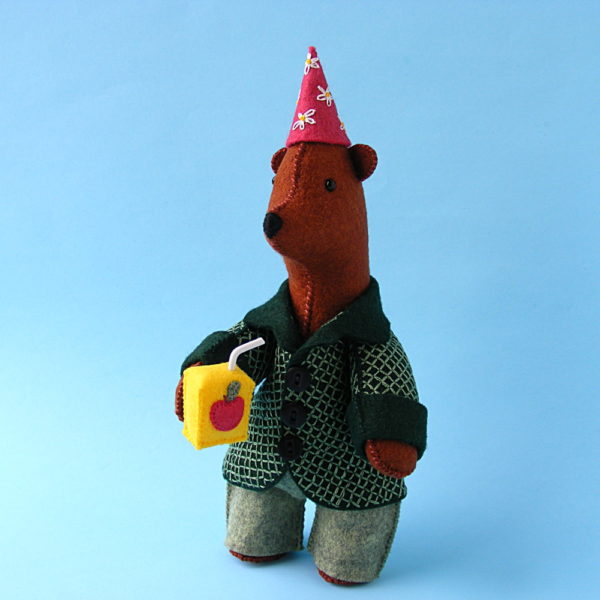
Benedict Bear‘s buttons are almost completely covered by his fancy coat – but they’re there.
They’re what allow him to raise that adorable felt juice box to take a sip.
You can see the button joints much more clearly here on Carlisle Crocodile.
All those button joints are not hard to do! Watch this video and see how. . .
See how easy the button joint is? It actually makes the construction of the rest of the animal super easy – most of the parts are just two pieces sewn and stuffed! the feet usually have a flat part added at the base that makes them easy to stand – but that’s easy too. There’s a video here showing how to give softie feet flat bottoms.
Seriously – every time I try this stuff on something new I’m even more impressed with it.
Here’s the scoop on using it with wool felt. . .
Print your pattern onto the stabilizer. Stick it to the felt. Rough cut around each piece.
See? It’s easy to transfer your pattern. And it sticks very well to the felt.
Stitch right through the felt and stabilizer. (Don’t zone out and stitch the outside lines – those are your cutting lines. Not that I’ve ever done that. ahem.) You don’t need a hoop for this – the felt is sturdy enough to stitch through without it. After you’re done stitching, cut the pieces out on the cutting lines.
See? Beautiful stitching and nice, accurate cutting.
Soak off the stabilizer.
See? Not a trace of stabilizer and no ugly marks. All ready to sew!
The soaking. I know this is the part that you’re worried about. Normally I soak it off in a bowl of warm water, then rinse it under running water. I do the same thing for felt, only the water is cold. I don’t want to pebble the surface of the felt by getting too warm with it. I fill a bowl with cold water, then drop the embroidered felt in face down and let it sit for a long time – sometimes as much an an hour or more, depending on what else I get busy with. When I come back the stabilizer is all swollen and mushy and, depending on how much stitching there is, kind of clinging to the felt. Time to rinse.
I rinse it under running water – again cold. The stuff does cling a bit more to fuzzy felt than it does to smooth cotton, but the running water takes it off pretty well. It comes off really fast if I switch my kitchen faucet to the sprayer, but just regular running water will work in time.
After all the gunk comes off, just lay it on a dry towel. For the best results I don’t wring it, twist it, or even press it. Just set it sopping wet on the towel and leave it alone. It will dry – I promise. And look how pretty the results are!
I left the picture nice and big – click on it to really zoom in and look at the texture of the felt. No pebbling! No stray marks!
So – no more frustration transferring your pattern to lovely-to-stitch-on but impossible-to-trace-through and difficult-to-write-on fuzzy felt. Use Sulky Sticky Fabri-solvy and feel only peace, joy and felty happiness. 🙂
Howdy everyone! This is the last video in the little felt mini-series I’ve been running. In this one I show you how to attach limbs to your felt softie.
I demonstrate it with an arm, but you could use the same technique to attach a beak, antennae, tentacles – anything that might be growing out of your softie.
You can also use ladder stitch to attach things like this, but I like the look of the whipstitch here.
You might be a little daunted at sewing a flat bottom to what is essentially a tube of fabric – but it’s really not that tricky.
There are two techniques – one for use with larger pieces going through the sewing machine, the other for smaller, hand sewn felt softies. I’ve got a photo tutorial for the first one and a video for the second one – because the second method involves faith and I know some of you won’t believe it until you see it. 🙂
Sewing a Flat Bottom With the Sewing Machine
Cut your round foot and sew your leg or body into a tube. Do not freak out when you think about putting them together. We’re going to break it up into sections and take it one section at a time.
Fold the round part in half and put a pin in the fold at each side. Open it up. Fold it in half the other way, so the pins match up, and put pins in the two new folds. You’ve divided the circle into perfect fourths without using a protractor. 🙂
Now we’ll divide the leg into fourths. Fold it in half so the seam is at one fold. Put a pin in the opposite fold. Now refold it so the pin and the seam match up and put two pins in the new folds. See? Perfect fourths – no measuring.
Put the two pieces together, matching pins.
Now take it just one quadrant at a time, fitting the curve of the round piece to the edge of the tube. Add more pins as needed. Fleece (like I’m using in this photo) is a dream to do this with. The fleece just stretches right into the curve and doesn’t need many pins. Non-stretchy fabrics might need a few more. I like to divide the quadrant in half and put in a pin. Then if it needs more, divide each half in half and put in a pin. Keep going until you feel like it’s all held together neatly – then run the thing through the sewing machine. I like to sew with the flat part down so I can see (and control) the excess fabric in the tube.
Sewing a Flat Foot by Hand
For smaller, hand sewn felt softies it’s even easier – but you do need to have faith in your pattern designer. It looks like there’s NO WAY this the little round bit will fit on the tube – but it will. I show you the whole process in one shot from start to finish.
See? That flat bottom fits right on there – almost like I used math or something to calculate the exact size needed. Which is exactly what I did – and then I tested it a couple of times to make sure I did that math right. 🙂
(In case you’re curious, that’s whipstitch I’m using to sew the foot on. There’s a tutorial here showing how to do it.)
Ready? Go give your softies some flat feet and cute sittable bottoms. 🙂
When you’re working with felt, the basic mechanics of how to whipstitch are the same. But felt is a little different than regular fabric – it’s thicker and you don’t have to turn the edges under. These make it a delightful fabric to work with (especially wool felt) but they also mean that there are a couple of new things to think about when you whipstitch on it. That’s what I show you in this video.
Now here are a few examples so you can see it in use. . .
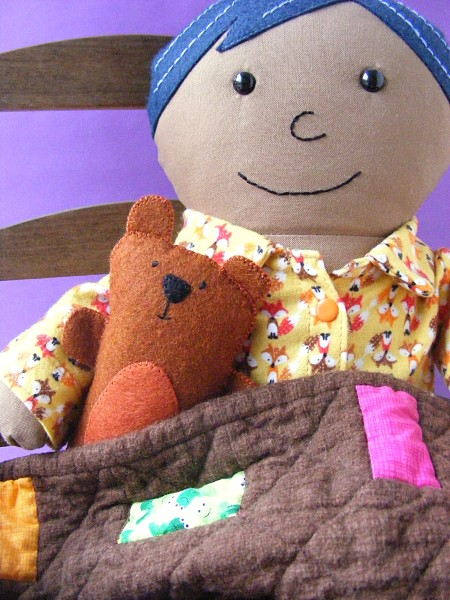
See that teddy bear that Bean is snuggling? He’s made entirely by hand with whipstitch – including the applique for his belly and nose.
That’s Freddie the tiny teddy bear and you can get his pattern here. It’s super simple – really easy for beginners to make and a great first felt project.
Want a fancier bear? This guy is also made almost entirely with whipstitch.
The only place I used different stitches are the flowers on his hat and the grid on his coat.
His name is Benedict and you can get his pattern here. He looks really complicated, but he’s also really easy to make. Once you’ve made Freddie, you can easily move on to Benedict.
You can see lots more felt patterns here – all hand sewing and almost all made with easy peasy whipstitch.
Happy stitching!
Play with some felt! Try the Oddballs – a fun pattern for silly monsters.