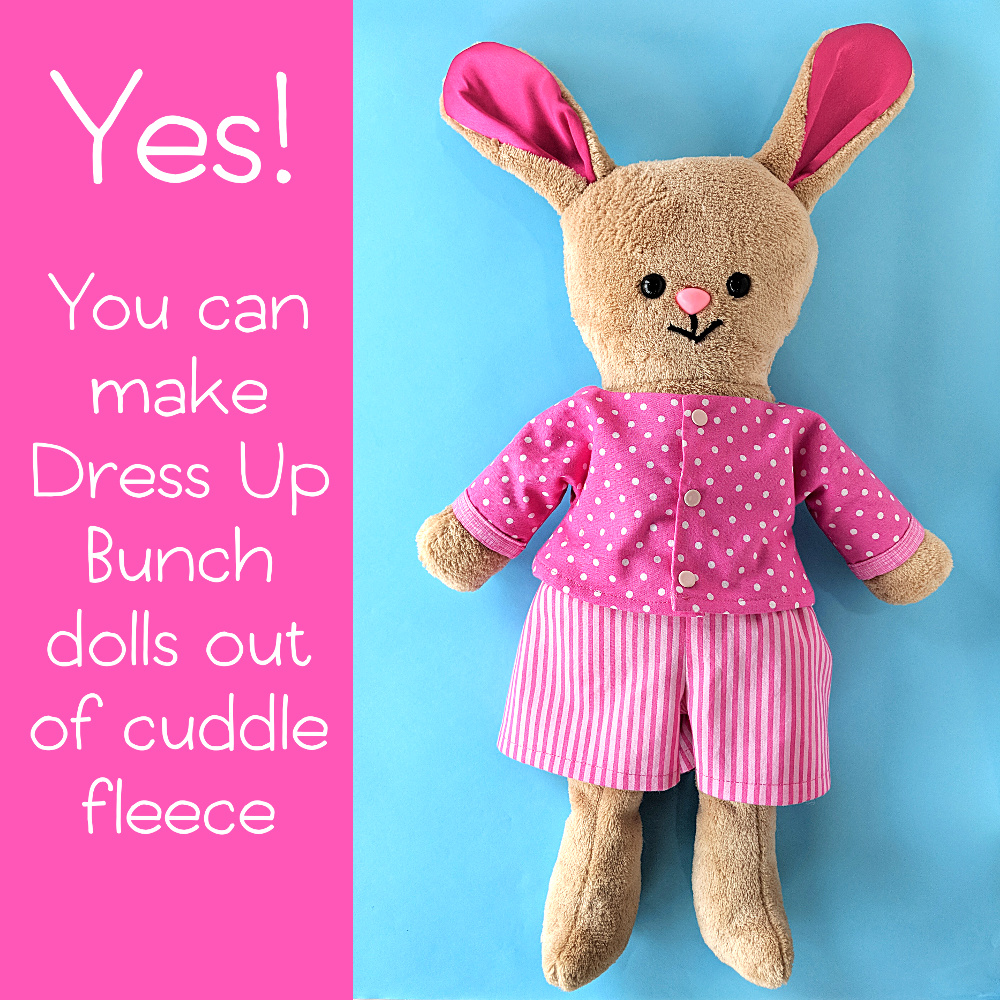
I’ve received a couple of emails lately asking if you can use cuddle fleece to make Dress Up Bunch dolls.
Yes you can!
Update – the cuddle fleece I used to carry has been continued. You can find more info here (including a link to a good substitute). You can also use polar fleece. If you go with polar fleece, I STRONGLY recommend getting the no-pill kind.
This is actually a really versatile pattern and I’ve used all kinds of different fabrics for it!
Just to test the fleece I made the Beatrice Bunny you see in that top photo. 🙂
I used camel cuddle fleece and the resulting bunny is super cuddly and soft. The slight stretch of the fleece makes a bunny that’s exceptionally squishy. 🙂
A couple of things I did different with the fleece. . .
Use bigger eyes – the pattern calls for 9 mm safety eyes but I used 12 mm. The slight pile of the cuddle fleece tends to enclose the edges of safety eyes making them look smaller – so going up a size is generally a good idea.
Use thicker thread to embroider the mouth – the pattern calls for embroidery thread but I used thin cotton yarn. The reason is the same as the bigger eyes – I didn’t want the thinner embroidery thread to get lost in the pile of the fleece.
I used an 18 mm pink triangle safety nose. No special reason – I just didn’t even know about the noses when I designed the original doll. I wanted to try it here and I love it!
Be careful not to overstuff your softie! The slight stretch of the cuddle fleece allows you to pack in more stuffing – enough that the clothes will be too tight.
What other fabrics have I used?
I’m glad you asked!
Quilting Cotton
I’ve used quilting cotton for most of the samples. It works just fine.
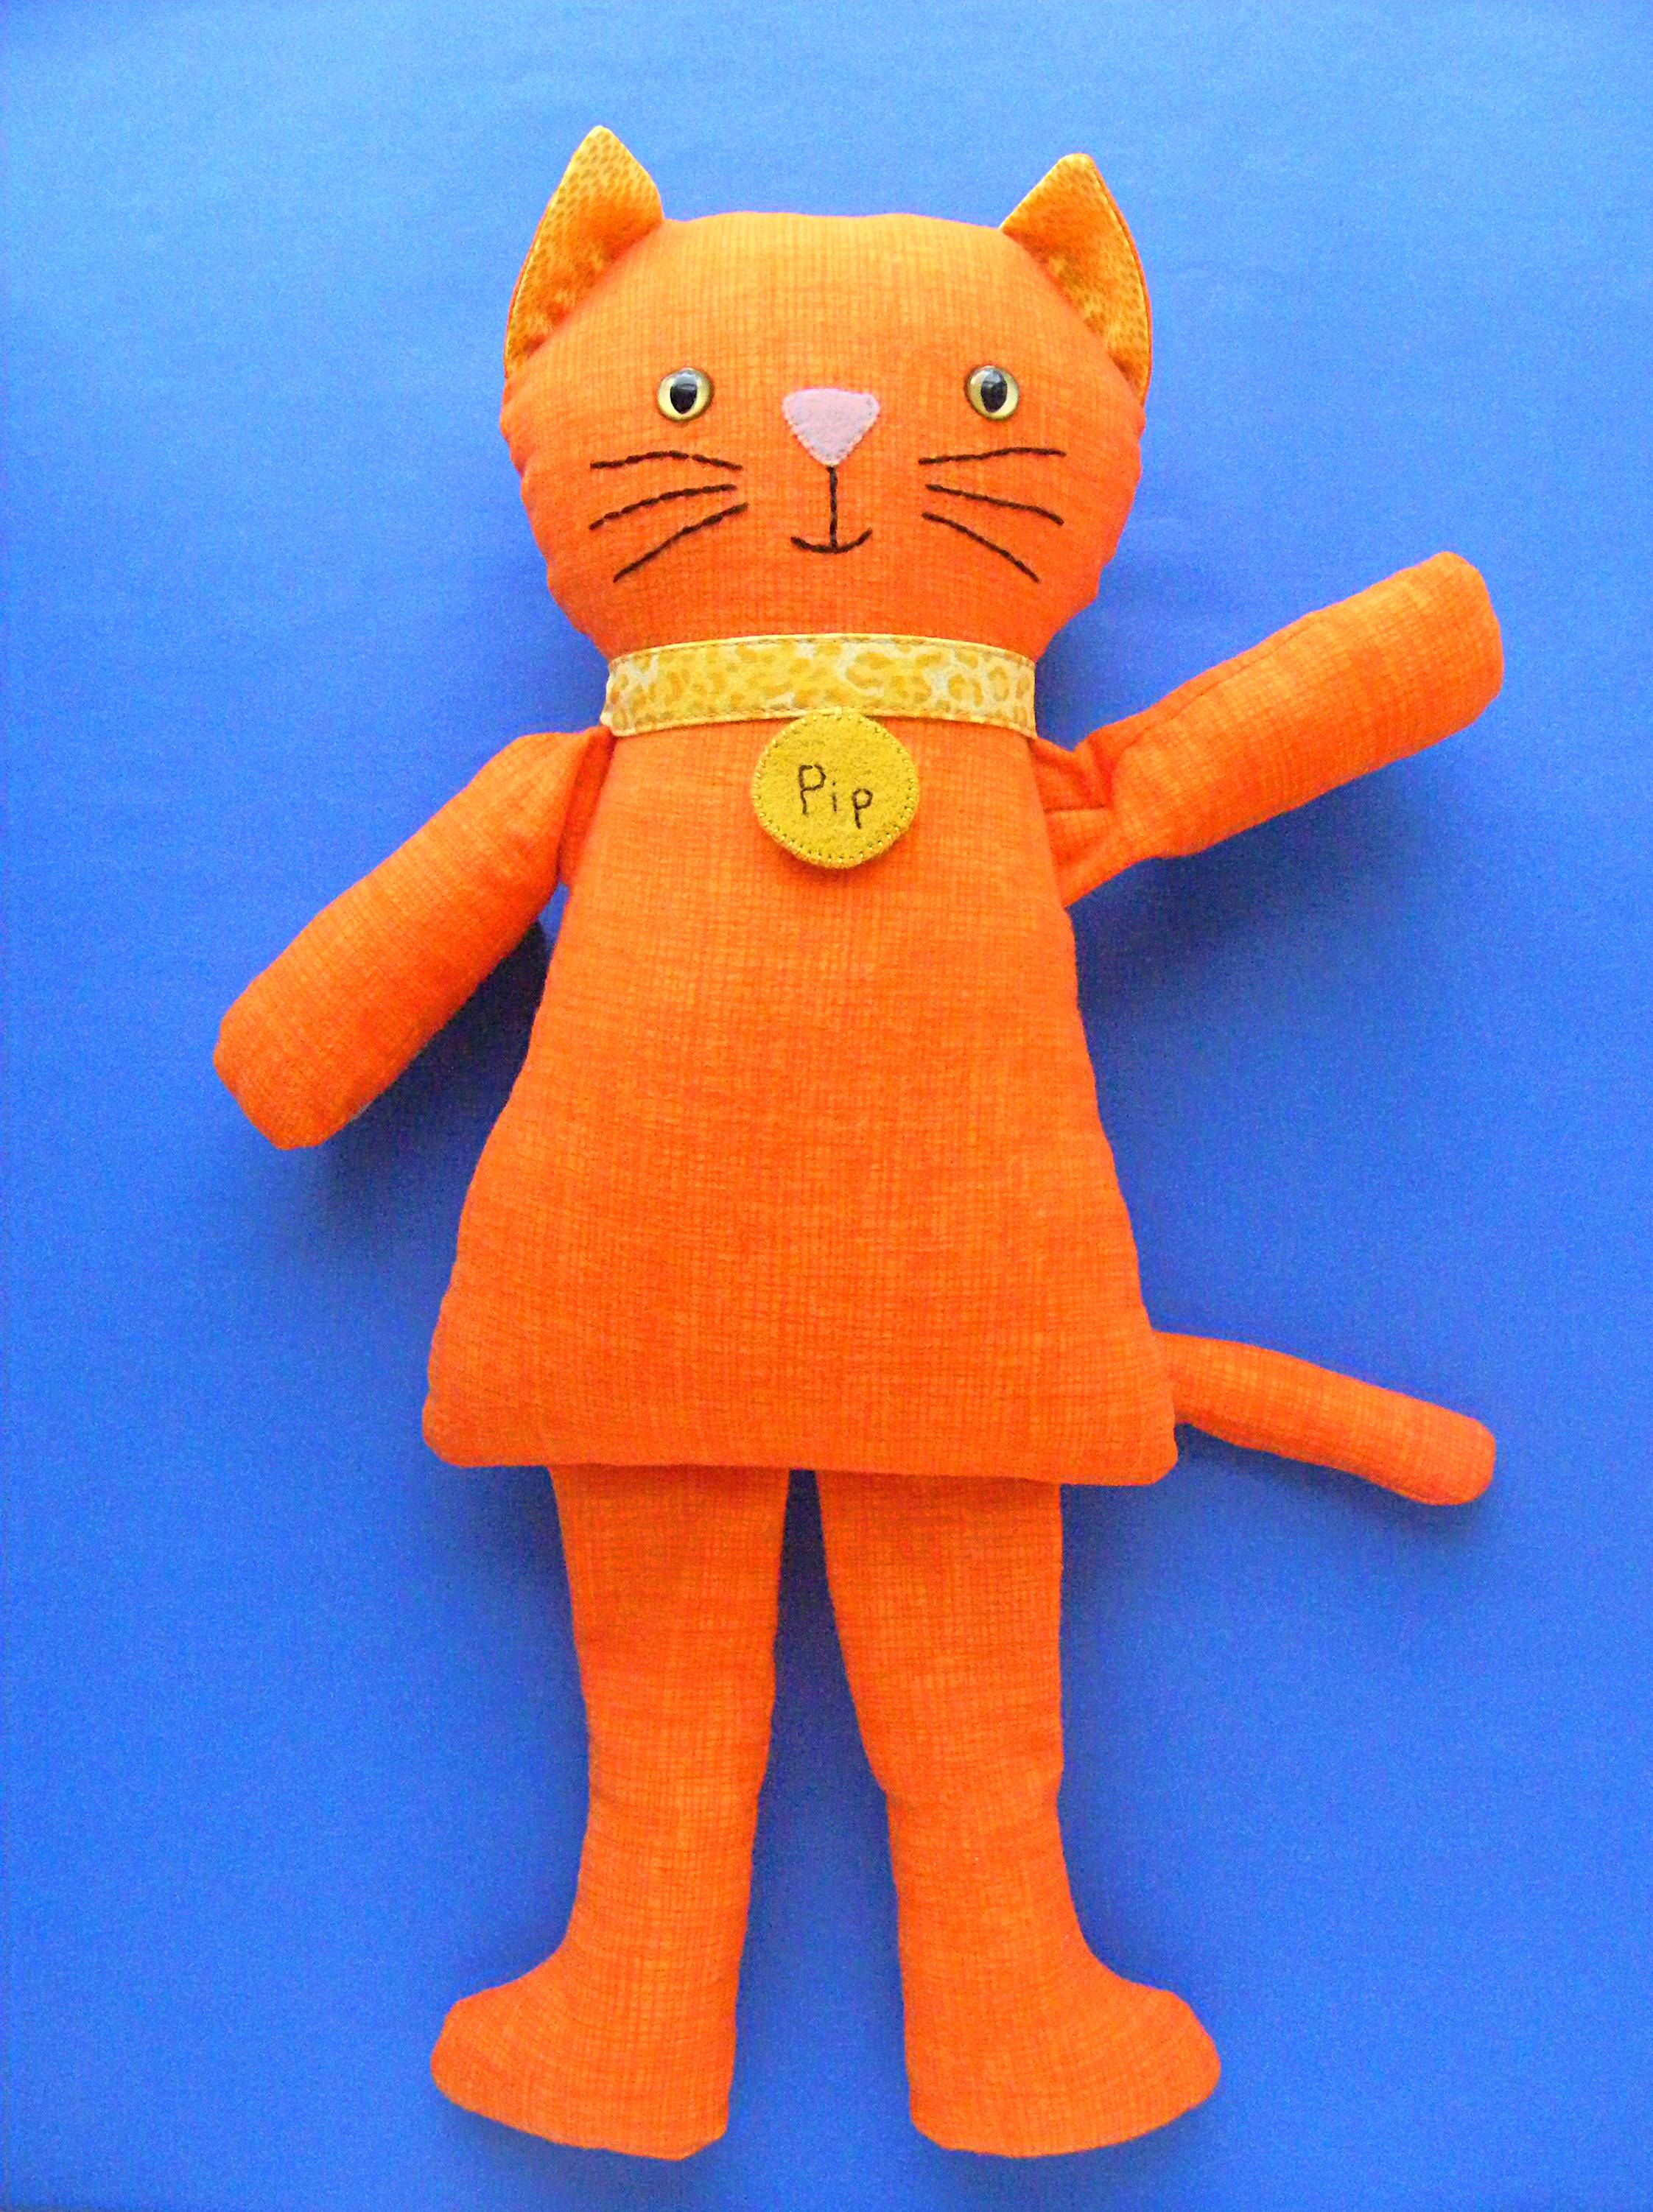
I used flannel to make my Pip the Cat and I love how he turned out!
Be sure to use good quality flannel so your doll doesn’t pill after just a few snuggles.
Stretchy Knit Fabric
Yes – you can use stretchy knits too.
That requires a little special handling – mostly using a stretch needle and being careful not to overstuff your doll so she still fits into her clothes. 🙂 I share all the tips in this post – plus a link to a source for special “doll skin” fabric used for Waldorf dolls.
Faux Fur
Yep – you can use faux fur too!
Here’s Spot the Puppy made in some really spectacular faux fur. I love this guy and named him Rumples.
One caution when using fur – the furrier the fur, the bigger it makes the doll. It might make the regular clothes not fit anymore.
Rumples is stuffed pretty tightly into his Play Clothes.
So there you have it! Lots of great fabric options for making Dress Up Bunch dolls!
Happy stitching!
Best, Wendi
The Dress Up Bunch is a collection of adorable rag dolls with a wardrobe better than mine! All the dolls can wear all the outfits for terrific play value! Shop the pattern collection here.
One of my favorite Dress Up Bunch patterns is this one for a witch costume.
As I was making it, I kept thinking that it could easily be converted to a princess costume – just change to a sparkly princess fabric and make a tiny change to the hat.
Here’s exactly what I mean by “a tiny change to the hat pattern.”
The witch hat is a simple cone with a brim added. For the princess hat (a hennin) you just leave off the brim and add a pretty little fall of fabric to the top.
Take a look at the scraps you have left over after you make the dress. I had a long strip 6 inches wide. From that I cut 3 pieces, each 6 inches wide and 12 inches long. You could use a couple of 12 x 12 squares, or several skinnier strips, or make them longer than my 12 inches, or add some pretty ribbons. Just play around and see what you like the look of.
Grab your fabrics at one corner, bunch them up as small as possible, and sew them into the top of the cone when you sew the hat seam.
See the little bunch sticking out from the top of the cone? The rest of the fabric will be inside the cone (as shown) while it’s inside out.
Make sure you go over that little bunch a couple of times with your stitching. I backstitched over mine a few times. Princess fabric tends to be fragile and you want it to be securely attached. 🙂
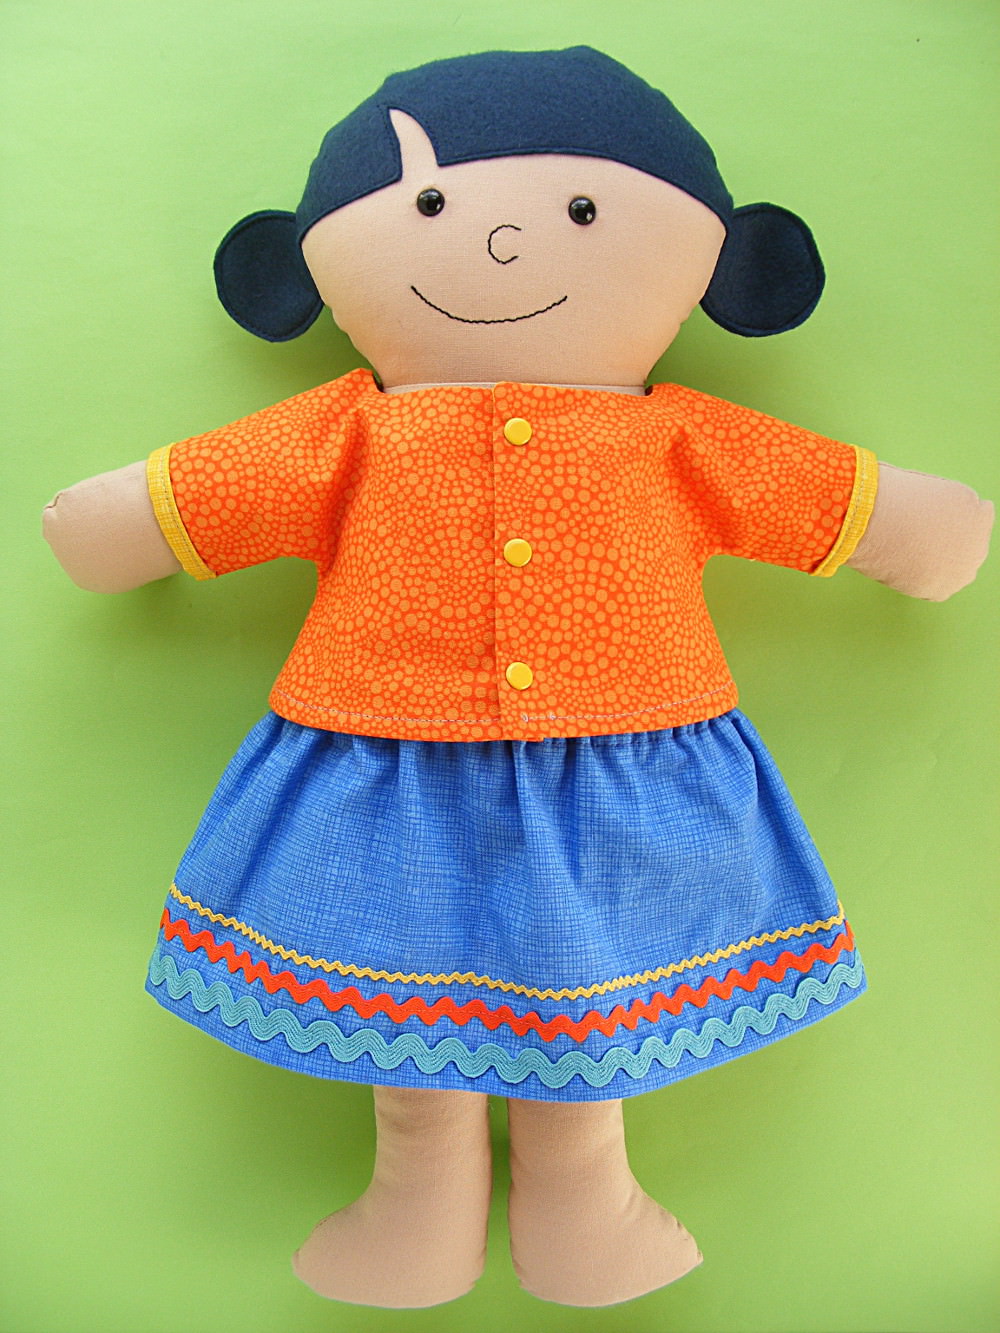
I usually use wool blend felt for the hair on my Dress Up Bunch dolls. It’s durable, easy to work with, and relatively inexpensive and it has a nice, classic look – even when I use non-traditional hair colors.
But you don’t have to use felt.
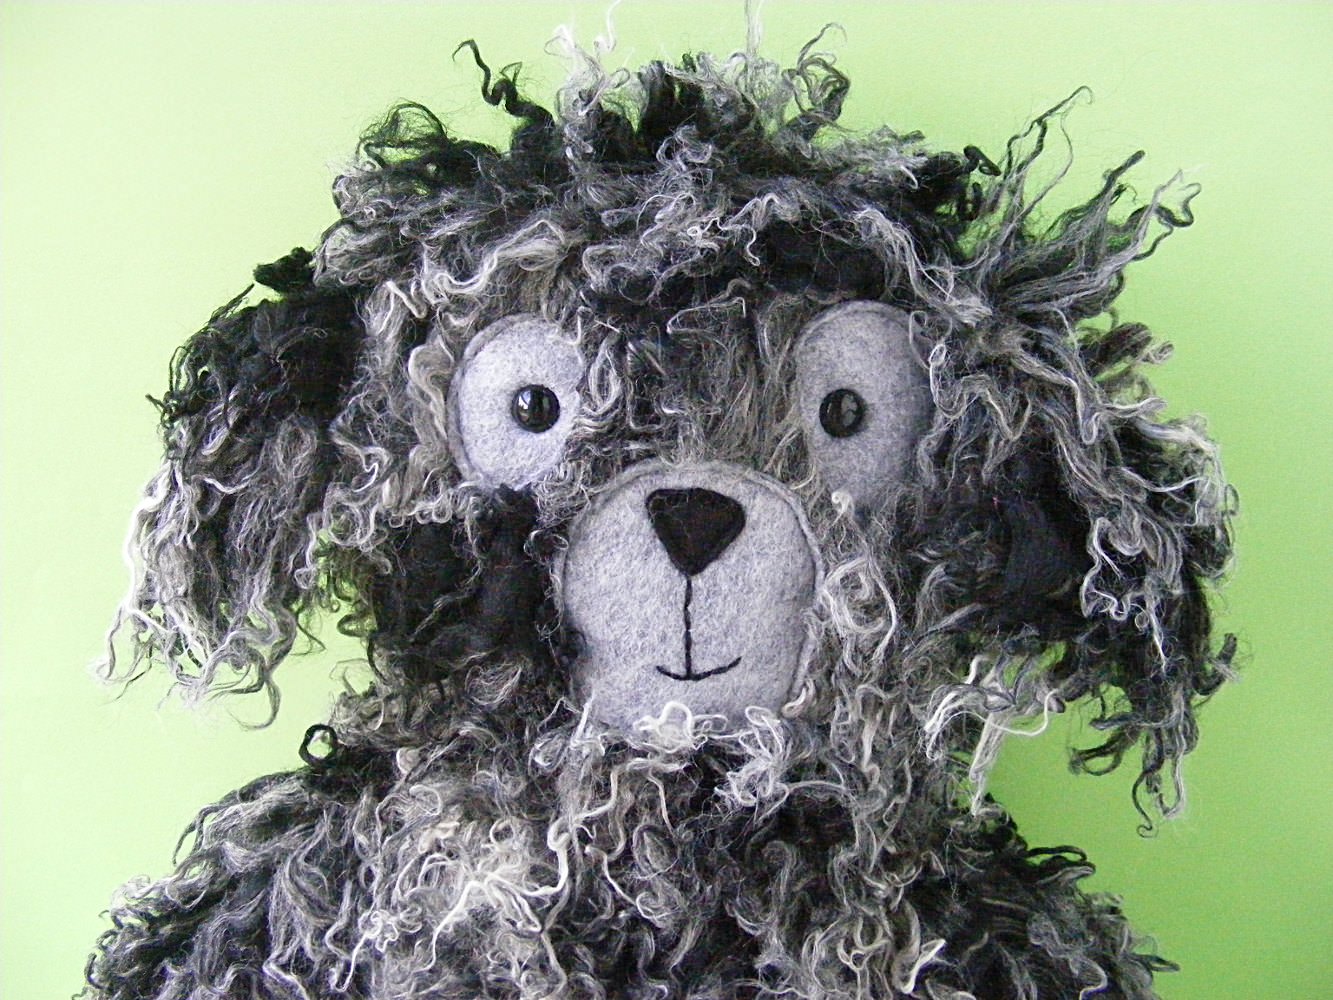
If you scroll through some of the photos in the Shiny Happy People group on Facebook you’ll find adorable dolls made with printed cotton fabric hair and cuddly fleece hair – but you can also use fun faux fur!
If you use a regular “hair-colored” fur you can make a doll with pretty realistic hair. If you use a more wild and funky fur (like the one I used) you can make a fun pixie. 🙂
Here are some tips to help you out. . .
Cut out the fur just like you would cut out the felt. Make sure the nap of the fur is running in the correct direction. To minimize flying fur bits, cut just through the fabric backing, as shown in this video – Intraux to Working with Faux Fur.
I stuck the fur piece for the bangs down to the top of the head using a glue stick, then appliqued the bangs edge with a wide and fairly open zigzag stitch.
After you get the bangs sewn in place, sew up the doll just like normal. You just need to make sure to smooth the fur into the seams. Here’s what the back of the head looks like – the fur is smoothed down between the back of the head piece and the back of the body piece.
Here’s how it looks when you clip the doll front to the doll back.
The fur on both pieces is smoothed between the layers.
Fur can be fat and difficult to pin. Sewing clips work really well with it.
And here’s my finished wild-haired pixie. 🙂
A couple more things. . .
I used Poppy’s bangs with this doll and they come down pretty close to her eyes. If you’re using a very long fur you might want to choose a doll with a higher hairline.
I skip the pigtails or the buns when I work with fur. They just don’t work very well with that fabric.
New easy (and free!) doll clothes patterns for the Dress Up Bunch!
I redesigned the Play Clothes pattern for the Dress Up Bunch to get rid of the set-in sleeves and fussy collar facing on the shirt. Yay! The new shirt is so much easier to make!
These are the basic doll clothes patterns that are included with all of the human dolls so I was looking at replacing it in Every Single Doll Pattern – which would take forever. Instead I decided to just make it free for everyone!
Use 1/4″ for all seam allowances unless otherwise noted.
Doll Shirt Pattern
Step 1
Join the 2 shirt pattern pieces into one and cut it out. Place the shirt and shirt lining fabric right sides together and cut the single shirt pattern piece out of them at the same time. That way the pieces lines up perfectly. 🙂 .
It’s a weird-looking pattern. Here are some quick labels to help you make sense of it.
Please note! This pattern only works with non-directional fabric. Since it’s all one piece, whatever is right side up on the front will be upside down on the back – so choose something that looks good both ways. Those fizzy, swirly polkadots are from the perfectly-named Pop collection from Timeless Treasures, and the shirt lining and shorts are in my favorite Sketch.
Step 2
Sew the main shirt and lining (right sides together) up one front side, around the neck, and down the other side. Clip the curves and corners.
Carefully smooth out the curve around the neck, poke out the corners, and press. From this point on you’ll treat the two layers of fabric as one.
Step 4
Hem the sleeves. Turn up the raw edge 1/4” and press. Turn it up another 1/4” and press. Stitch the hem in place.
You can hem to the outside, so the contrasting lining shows (like I did) or hem to the inside for a more traditional finish.
Here’s a closer look at one of my sleeve hems.
Here’s a little trick so you don’t have to measure that skinny 1/4 inch. Sew the two layers together 1/4” from the raw edge. Use that stitching line as a guide for turning up the first 1/4.” No measuring! Then turn the second 1/4” and stitch.
Step 5
With the shirt inside out, sew the underarm/side seam.
Start sewing at the armhole so that edge is perfectly lined up and finish at the shirt bottom. Any unevenness there will be hidden once it’s hemmed. Clip the seam allowance in the curve.
Step 6
Turn the shirt right side out and press.
Almost finished!
Step 7
Hem the shirt bottom the same way you did the sleeves in Step 4.
Sew the center back seam using 1/4″ seam allowance.
If you want critters with tails to be able to wear the shorts, leave the tail opening (as marked on the pattern piece) unstitched. Make sure to backstitch at the top and bottom of the opening.
Step 3
Press the center back seam open.
If you are leaving a tail opening, stitch a box around the opening to stabilize it.
Step 4
Start to make the casing for the elastic. Turn the raw edge at the top of the shorts down 1/2″. Press. Turn it down another 1/2″. Press.
Don’t sew this yet. It’s just easier to measure and press when it’s one flat piece.
Step 5
Unfold the casing creases you made in Step 4.
Match up the center front edges and sew, using 1/4″ seam allowance.
Step 6
Refold the casing creases and stitch it down almost all the way around the top of the shorts.
Leave a couple of inches open at the center back seam so you can get the elastic in.
Step 7
Cut a 12″ piece of 3/8″ elastic and thread it through the casing. Overlap the ends of the elastic 1 inch and sew them together. Slip the stitched elastic up into the casing and finish sewing the casing closed.
Sew up the inseam/crotch of the shorts using 1/4″ seam allowance.
Press anything you can get to with the iron. 🙂
Finished!
And here’s a view from the back.
It’s Spot the Puppy wearing these and he likes to have room for his tail to wag. 🙂
So there you have it – three basic doll clothes patterns – all super easy and free. The shirt, skirt and shorts will fit any of the Dress Up Bunch dolls.
Happy sewing!
Best, Wendi
The Dress Up Bunch is a collection of cute and cuddly rag dolls. Get patterns for the dolls, plus all their fun outfits and accessories!
There’s a new outfit available for the Dress Up Bunch – a doll raincoat pattern!
It’s still snowing here, but soon it will be rain showers and flowers! Your dolls need to be ready for those rainy days so they can splish splash in puddles!
Of course you don’t just get a raincoat pattern. Let’s look at all the parts. . .
A new dress! It’s a short-sleeved dress with three front snaps and some optional fancy trim around the bottom hem. That butterfly print is perfect for spring!
Here’s a view of the raincoat from the back – with the hood down.
It’s a nice roomy hood – easy to make and easy for little hands to flip up and down over that big Dress Up Bunch head. 🙂
Want a closer look at those adorable boots?
They have a little flap on the front with velcro to make them easier for little hands to put on without any help. Plus the little bugs and caterpillars are so cute. I want boots like these!
You can use laminated cottons for the outer shell of the raincoat and boots – but I really wanted to use these prints so I laminated them myself using Pellon Vinyl Fuse. It’s easy – just follow the directions on the package and then treat it like regular fabric. Just don’t try to iron it! And clips are better than pins because pins will leave permanent tiny holes.
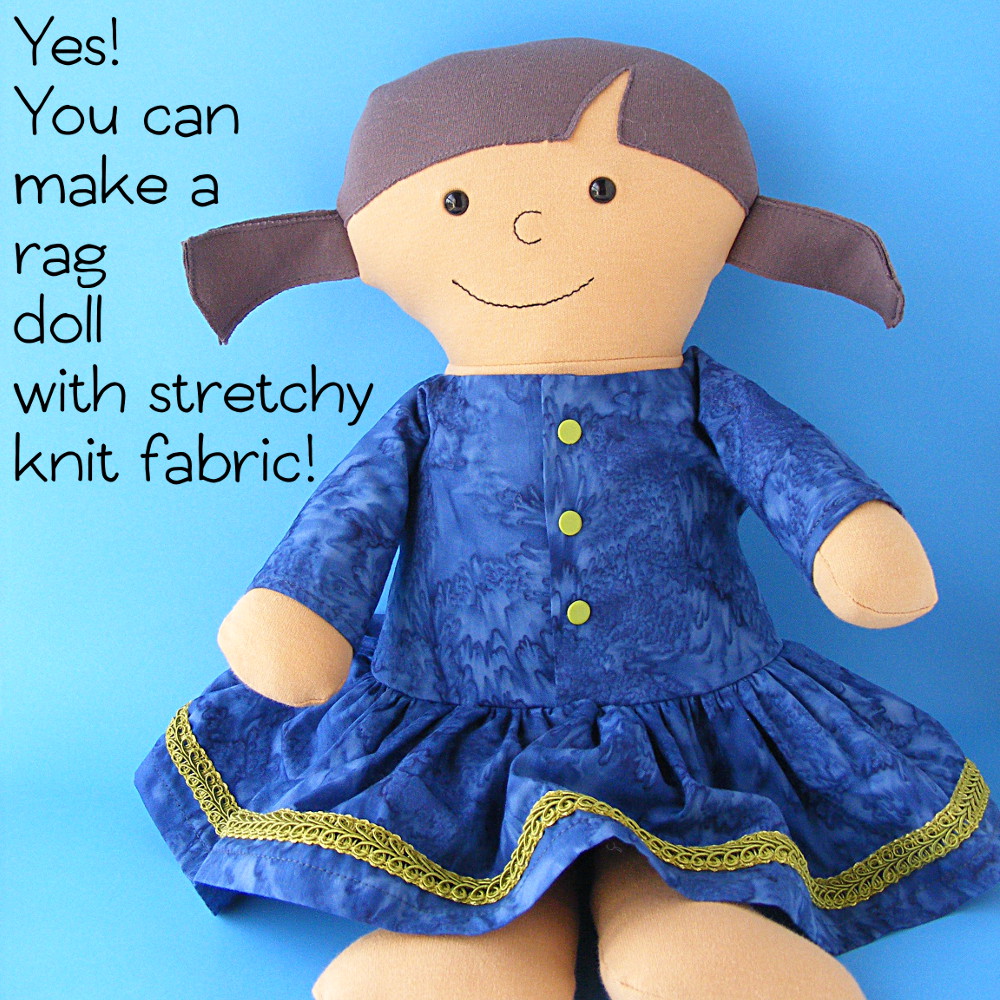
As soon as I wrote this post about sewing softies with stretchy knits, I started getting questions about using knits to make Dress Up Bunch rag dolls. I decided to give it a try and the answer is YES!
With a couple of caveats. 🙂
Everything in the post about stuffed animals applies to rag dolls.
Test your fabric with a universal needle and prepare to switch to a stretch or ballpoint needle if needed.
Do not overstuff.
The Do Not Overstuff rule is especially important for rag dolls. If you stuff them too fat, they won’t be able to fit into the regular Dress Up Bunch clothing patterns!
The knit fabric will change the proportions of your doll a bit – she’ll be a little wider. You can see the difference here between the knit Poppy (purple hair) and the woven Poppy (copper hair).
I was super careful not to overstuff, but you can see that the knit Poppy still has a slightly wider head.
The other thing to keep in mind is that you’ll also want to use a knit fabric for the hair. If you use felt hair with the knit skin, the hair will not stretch but the face will and it will look like her face is bulging out from under her hair. Not cute. 🙁
So you need to be extra careful with the stuffing, but the finished doll is incredibly soft and cuddly in a way that you can only achieve with knit fabric. Give it a try!
Most of the Dress Up Bunch dolls are human, but a few of them are critters with tails. And those tails need wagging room! Here’s how to add an opening to any pants or skirt pattern for the Dress Up Bunch dolls.
Cut out all the pieces as normal.
When you come to the part of the pattern where you sew the center back seam, jump in with these steps. . .
Measure down the center back seam 2 inches and mark with a pin.
Measure down 1 3/4 inches from that pin and mark with another pin.
Sew from the top to the first pin with a normal stitch length. Sew the space between the pins with a longer stitch length – the longest you can set on your machine. Switch back to the regular stitch length and sew the rest of the seam.
Make sure you backstitch (with the normal stitch length) a bit at the top and bottom of the section of long stitches. You’re going to cut those big stitches and this will keep the rest of the regular stitches from unraveling.
Press the seam allowance open.
Sew a tiny little rectangle around the section of long stitches to reinforce that opening.
(You’ll want to use matching thread, of course.)
Use a seam ripper to cut the large stitches inside that reinforced rectangle.
And voila! You have an opening for the tail! Continue with the rest of the pattern instructions.
This works for pants and shorts (as shown above) or with a skirt.
If you’re making Pip the Cat, Squeak the Mouse, or Spot the Dog this is a method you can use to adapt any of the clothing patterns to fit their tails. Have fun with it!
My initial thought was to make a sleeping bag almost exactly like a “real” one. The zipper was going to go down the side and across the bottom, so that you could open up the sleeping bag entirely. Here’s my first prototype. . .
And here it is zipped up. . .
Looks pretty good, right?
I loved the look of it – but sewing the zipper around the corner was not fun. Like – really, really unfun.
I try to make my patterns as easy and fun as possible – so I wanted to fix that.
I tried rounding the corner more and more, through a few different tries, but it was still pretty dang hard to wrangle. And it was starting to look ugly and not as sleeping-bag-ish.
Back to the drawing board.
Sewing a zipper around a corner was out, so I tried just a zipper going down the side.
My first attempt at sewing it inside out was kind of a mess because I didn’t use a separating zipper and I needed to sew it in a tube and it was hard to sew from top to bottom that way.
Next I tried a separating zipper so I could sew the two sides separately.
Much, MUCH easier!
I sewed it flat and sewed all the way around (leaving a little opening for turning) and it looked awesome. And then I zipped it up and realized I had made a nicely finished tube. 🙂 The bottom wasn’t closed!
Forehead smack.
I picked the bottom open and realized now I could sew the top and sides without needing any hand-sewing. The whole bottom became the turning opening.
Score!
I folded the sleeping bag closed and sewed up the bottom.
Terrific!
But then I realized it was impossible to zip it up. With the sleeping bag sewn up it was pretty much impossible to start the separating zipper. Just about impossible for me – definitely impossible for any kids trying to work it.
Aaargh.
Oooh – but then I realized that I could zip it closed first and then sew up the bottom. Now the zipper is together and it can’t come apart – a terrific bonus because separating zippers can be tricky for some little kids. I had planned to hand stitch the zipper permanently together as the final construction step, but now that wasn’t necessary!
Done! (Almost.)
I added a couple of elastic loops so it could be rolled up and secured without having to tie anything, and the design is finished!
Sometimes I get a design right on the first prototype, but usually it works like this – a series of attempts and revisions that get closer and closer to the final design – one that looks good AND is easy to make. 🙂
Sprinkles is a doll quilt pattern I designed especially for the rag dolls in The Dress Up Bunch – but it’s also just the right size for American Girl dolls and lots of random teddy bears and stuffed animals.
Look at Bean – all ready for bed in his flannel jammies, cozily tucked in under his brand new quilt.
He’s ready for his bedtime story!
The quilt (and the name) are inspired by a river of hot fudge covered with brightly-colored sprinkles. That’s sure to bring him sweet dreams. 🙂
It’s super easy to make – comes together in just a few hours. You can make it during a naptime or two!
If you’ve never made a quilt before, this is a great one to start with. I designed it to be especially easy! The blocks are easy to cut, they go together without any fussy seam intersections, and the quilting is easy.
Here’s how to make it!
Materials
1/2 yard chocolate brown fabric
1 fat quarter backing fabric
small scraps for the sprinkles (less than 1/4 yard total)
Chocolate brown fabric Cut 4 strips 2 1/2″ wide, the full width of the fabric. From those strips cut the following. . .
4 rectangles, each 2 1/2″ x 14″
17 squares, each 2 1/2″ x 2 1/2″
18 rectangles, each 2 1/2″ x 1 1/2″
Cut 2 strips 2 1/4″ wide for the binding
Sprinkles fabrics Cut 18 rectangles, each 2 1/2″ x 1 1/2″
Backing fabric 1 fat quarter, uncut
Step 2
Join your smallest rectangles into squares. For each square join 1 brown rectangle with one sprinkle/colored rectangle. Sew them together with a 1/4″ seam allowance (I very strongly recommend using a 1/4″ foot on your sewing machine for accurate piecing!)
Press the seam allowance flat. It doesn’t matter which way you press it - this quilt has no nested seams. I usually press toward the darker fabric, but in this case, the brown flannel was thicker than the sprinkles fabric so I pressed it toward the thinner fabric.
Repeat with the remaining small rectangles until you have 18 squares.
Step 3
Join all the blocks together as shown in the diagram.
First sew the blocks into rows, alternating brown blocks with the pieced brown/sprinkles blocks you made in Step 2. Press all your seams flat.
Then sew those rows together with your long rectangles between them. Press your seams flat.
A small doll quilt pattern like this is also a great opportunity to give Big Stitch Quilting a try.
I quilted this top in two steps. First I quilted around each sprinkle. Then I quilted across the surface of the entire quilt with diagonal lines that went corner to corner on all the squares – skipping over the sprinkles.
The squares are small enough that no marking is needed - just eyeball it. You can see the quilting in these photos of the front and back of the quilt.
Dress your doll in their favorite jammies, read them a story, then tuck them in under their cozy new quilt. Then brag a little! Or a lot. :-) You just made a quilt! Pat yourself on the back. Call everyone you know. Take photos and share them in the Shiny Happy People group. Share them other places too – but tag them #shinyhappyworld so I see them too. 🙂
If you like this pattern, sign up for the Shiny Happy News! Members get a weekly newsletter with sewing tips and tricks, links to free patterns, special discounts, and more.
The Dress Up Bunch is a collection of cute and cuddly rag dolls. Get patterns for the dolls, plus all their fun outfits and accessories!
I’ve been getting a lot of requests lately for a pattern for a topsy turvy doll.
Weird. I have no idea what has prompted the sudden influx.
I’ve had a topsy turvy doll on my Big List o’ Things to Make for a long time now, but the number of requests recently made me move it to the top of the list.
As soon as I mentioned it to Jo, she was full of IDEAS. She immediately started lobbying for a day and night doll. Not an awake and sleeping doll, but a doll with one girl all sunshine and bright, and another girl all deep indigo and starlight. She specifically asked for the night doll to have “dark blue hair – the darkest blue felt you have – sprinkled with tiny little embroidered stars in pale yellow.”
OK then. I can do that!
Instead of creating a pattern especially for one topsy turvy doll, I thought it would be more fun to show you how to turn any of the Dress Up Bunch dolls into topsy turvy dolls. You can apply the same basic technique to work with any rag doll pattern.
Fun!
So here we go. . .
To make a topsy turvy doll you’ll need to make two identical doll tops and no legs. The body will need to be chopped off at the waist so you can sew two bodies together.
Prep the Pattern
Measure down 4 1/2 inches from the top of the body front and body back pattern pieces of any Dress Up Bunch doll pattern. Draw a line parallel to the top of the pattern piece and cut off the bottom of the pattern. (if you’re using another pattern you’ll need to figure out where the “waist” of the body piece is and add 1/2 inch seam allowance before you make your cut.)
Cut Your Fabric
Cut out all the pattern pieces for two dolls except the legs. I usually use skin-colored fabric for the body, but I don’t like having to put a shirt on a topsy turvy doll so I cut the body pieces from fabric to match the dress. Only one doll half needs to have a stuffing opening, so cut a total of 3 doll front pieces and 2 doll back pieces.
Cut two pieces of fabric for the reversible skirt – each 10 1/2″ tall and 30″ wide. (You’ll need to calculate your own measurements if you’re using a different rag doll pattern.)
Leave One Stuffing Opening
Sew the two body back pieces together leaving almost the entire seam open for turning and stuffing. Don’t skimp on the size of the opening! You’ll be pulling a lot of fabric through here! I only sewed about an inch at the top and an inch at the bottom.
Press the seam open, then sew it to the back head piece. I stuck my turning stick through the stuffing opening so you can see it.
Sew Two Doll Tops
Follow the regular pattern instructions to make two doll tops, leaving the bottom open.
Man – these dolls look so creepy from the inside!
The second doll (the one without the stuffing opening) will use body front pieces on the front and back.
Make the Skirt
Fold one skirt rectangle in half so the short ends are lined up, right sides together, and sew those short ends together with a 1/4″ seam allowance. Press the seam open. That makes one (ungathered) skirt.
Repeat for the second skirt.
Turn one skirt tube right side out and put it inside the other tube, lining up the seams you just sewed. Now the right sides are together. 🙂 Sew the two skirt tubes together around the bottom of the skirt using 1/4″ seam allowance.
Flip the skirt so it’s right side out and press that bottom fold nice and flat.
Oooh! It’s looking nice! Both sides of the skirt are the “right” side. For now make sure it’s turned so that the fabric on the outside is the one matching the doll with the stuffing opening.
Gather the Skirt
I’ve got a video tutorial here showing how to gather. For this project I used the “old-fashioned” method of sewing two rows of basting stitches around the top (raw edge) of the skirt – sewing through both layers as if they were one – then drawing up the bobbin threads to gather up the fabric.
Fold the top of the skirt in half and half again and use pins to mark the four equal sections.
Fold the center front of the doll with the stuffing opening and mark the center front point. (The sides and center back are already “marked” with seams.)
Gather up the fabric of the skirt and stuff the skirt inside the doll with the stuffing opening, matching the center back seam of the skirt with the center back seam of the doll. Match the remaining pins to the remaining seams on the doll. Adjust the gathers so that the top of the skirt fits the bottom of the doll, adding additional pins as needed.
I’ll be honest. This part isn’t much fun. It’s not hard, but it takes some patience and fiddling.
Sew the top of the skirt to the bottom of the doll using 1/4″ seam allowance.
Add the Second Doll
You’re almost done! Turn the second doll right side out and stuff it inside the first doll and skirt. Make sure the back of the head is on the side where the stuffing hole is, and line up the side seams.
Sew around that same opening, this time 1/4″ from the first seam you sewed joining the skirt to the first doll. That means your seam allowance this time is 1/2 inch. This way you double-sew the skirt (extra-strong!) and also make sure all your basting stitches from gathering are well-hidden.
Turn Everything Right Side Out
You can do it – just be patient and go slowly. First pull the second doll outside of the first one, then pull the skirt through the stuffing hole and keep going until everything is right side out.
Finished!
Stuff the doll, sew up the opening as instructed in the pattern, and you’re done!
Normally the Dress Up Bunch dolls are very easy patterns. Turning them into topsy turvy dolls bumps them up a notch in difficulty. It’s not hard – it’s more about patience than actual skill – but I do NOT recommend this as a first project. Make a regular doll first, then start practicing radical, Frankensteinian surgery. Ok? 🙂