Jack the Tiny Pumpkin – free crochet pattern

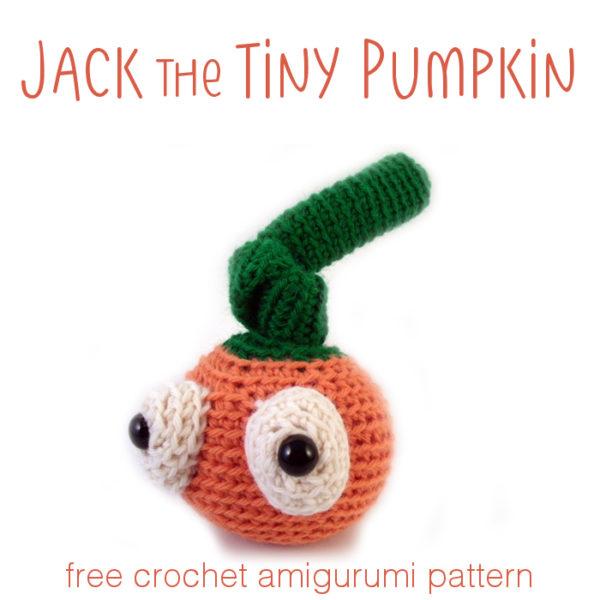
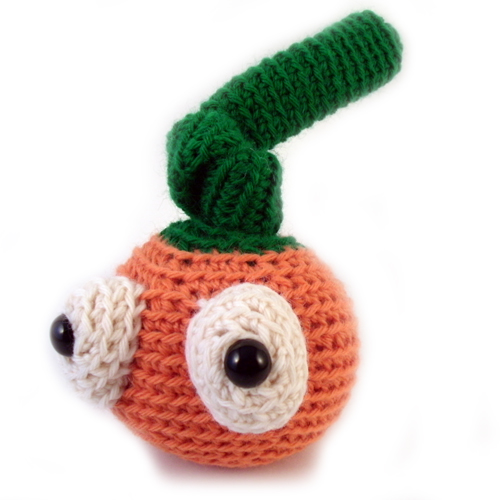
Make an adorable tiny pumpkin to celebrate Halloween or Thanksgiving!

It would also be adorable stitched up in red to be a cherry. 🙂

Here’s how to make it!

The skills you’ll need for just about any amigurumi are. . .

You can go through all those posts now, or just hop to them as you get to those points in the pattern – whatever works best for you!

Yarn

This pattern can be used with any weight yarn. The sample is crocheted with worsted weight yarn to make a 3-inch tall pumpkin with a 10-inch vine. You can use thicker yarn/a bigger hook to make a bigger pumpkin, and thinner yarn/a smaller hook to make a smaller pumpkin.

Materials

Stitch into the Back

All stitches in this pattern (that are worked in the round) are worked through the back loop only, unless otherwise directed. Look at this picture.

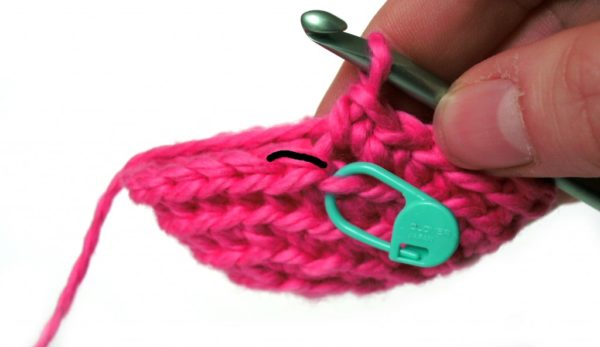
See how one loop is highlighted in black? This is the back loop, and it’s what you’ll stitch into. Stitching into the back loop creates ridges on the right side of the piece.

Want to see crocheting through the back loop in action? Check out this blog post. It talks all about why Stacey crochets through the back loop and even has a handy dandy video showing how to find that loop. 

Abbreviations

  • ch: chain
  • sc: single crochet
  • sc2tog: single crochet 2 stitches together
  • st(s): stitch(es)

Ready? Let’s jump in!

We’ll start with those googly eyes in white yarn.

Ch 2 (I like to start with a sloppy slip knot. This video shows how. And this video shows how to chain.)

Round 1 sc 6 in 2nd ch from hook (6) This post will help you find that second chain from the hook.

Round 2 sc twice in next st (12) This video will help you if you find it tricky to start the second round.

Round 3 [sc twice in next st, sc in next st.] 6 times (18)

Round 4 sc in each st. (24)

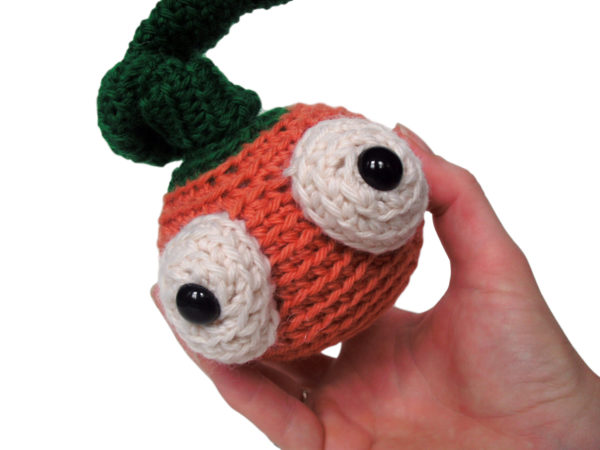
Fasten off with a long tail. Insert a 12 mm eye into the center of the bowl shape. Repeat to make a second eye.

Now for the body. Use orange yarn for the pumpkin. Ch 2.

Round 1 sc 6 in 2nd ch from hook (6)

Round 2 sc twice in next st (12)

Round 3 [sc twice in next st, sc in next st.] 6 times (18)

Round 4 [sc twice in next st, sc in next 2 sts.] 6 times (24)

Round 5 [sc twice in next st, sc in next 3 sts.] 6 times (30)

Round 6 [sc twice in next st, sc in next 4 sts.] 6 times (36)

Round 6 [sc twice in next st, sc in next 5 sts.] 6 times (42)

Round 8-13 sc in each st. (42, 6 rounds)

Round 14 [sc2tog, sc in next 5 sts.] 6 times (36)

Round 15 [sc2tog, sc in next 4 sts.] 6 times (30)

Round 16 [sc2tog, sc in next 3 sts.] 6 times (24)

Round 17 Change to green yarn for the pumpkin top and vine. This post shows you how to get a clean color change. [Sc2tog, sc in next 2 sts.] 6 times (18)

Remove hook, but do not fasten off. Stuff the eyes and attach them to the body, as pictured.

Stuff the body and continue crocheting.

Round 18 [sc2tog, sc in next st.] 6 times (12)

Round 19-54 (or until vine is about 10 inches long) Sc in each st. (12, 36 rounds)

Round 55 [sc2tog] 6 times (24)

Close up the tip of the vine using the drawstring method (there’s a video here) and bury the tail.

Tie the vine in a loose knot.

Done!

Make some more – enough to fill a whole pumpkin patch! They’re so much fun to make!

Happy stitching!

Best,
Wendi

Free Trick or Treat Bag Tutorial

Trick or Treat Bag - a free pattern from Shiny Happy World

Need to whip up a super easy trick or treat bag for Halloween this year?

Then I have the pattern for you!

It’s fully lined (which actually makes construction easier), requires no hand sewing, can be made with any of my square quilt block patterns with no resizing – and you can make it in an hour or less. 🙂

This project will work with any of my square applique patterns. If you’re using someone else’s pattern, you may need to resize it to fit a 10 inch square.

I’m using two monsters from the Scary Squares monster quilt pattern.

If you have a witch who needs a black cat, you could use the free Spooky Cat applique pattern.

If you have a farmer who needs a few farm animals, you could use any of the blocks in the Noisy Farm pattern.

If you just want to customize it with a name or Halloween greeting, use a fun Halloween print fabric and this free alphabet applique pattern.

The sky is the limit!

What You’ll Need

  • 1/2 yard medium weight fabric for the main bag (I used black cotton twill)
  • 1/2 yard light weight fabric for the lining (I used a Halloween novelty print)
  • fusible adhesive (I recommend Heat & Bond Lite)
  • fabric for your applique (I used prints from the Rainbow Brights and Little Stripes fat quarter bundles – plus a bit of black and white solid)
  • black thread
  • applique pattern of your choice

Cutting Instructions

  • Cut two 11″ x 11″ squares from the main fabric.
  • Cut two 11″ x 11″ squares from the lining fabric.
  • Cut two 14″ x 4″ rectangle from the main fabric for the handles.

Put It All Together

Step 1

Applique the main fabric squares with the design of your choice. If it’s one of my portrait designs, make sure the cut edge of the body is lined up with the bottom edge of the square.

Trick or Treat Bag - a free pattern from Shiny Happy World

If you’ve never done applique with fusible adhesive, it’s super easy! You’ll find instructions with video links in any of my patterns, and there’s a general video tutorial here.

Step 2

Fold the rectangles for the handles into double-fold strips and press.

There’s a video here showing how to do that if it’s new for you.

Stitch through all the layers down each long edge.

Trick or Treat Bag - a free pattern from Shiny Happy World

Set the handles aside.

Step 3

Layer the two lining pieces right sides together. Sew down one side, across the bottom, and up the other side using 1/4″ seam allowance.

Trick or Treat Bag - a free pattern from Shiny Happy World

I clipped the corners here out of habit, but you don’t need to do that. They’re about to get chopped off in the next step.

Repeat for the two main trick or treat bag pieces.

Step 4

Box the corners  of the lining so the bag is 1 inch deep

Trick or Treat Bag - a free pattern from Shiny Happy World

If you’ve never sewn boxed corners before, this video will show you how.

Repeat for the main bag.

Step 5

Fold the bag in half to find the center of the top edge.

Pin the handles to the bag so that the inside edge of the handle is 2 inches from the center pin, and the raw edge of the handle is lined up with the raw edge of the bag.

https://wendigratz.wpengine.com/2014/07/video-sew-boxed-corners.html

Pin the handles in place on both sides of the main bag. You can baste them in place if you like, but I usually just hold them with pins for the next step.

Step 6

Leave the main bag right side out, and the lining inside out.

Slide the lining over the main bag, so that the right side of the lining is facing the right side of the applique, and the handles are sandwiched between the two layers. Match the side seams and centers and pin the two bags together around the top edge.

Sew around the top edge of the bag using 1/4″ seam allowance and leaving an opening on one side between the inside edges of one of the handles.

Trick or Treat Bag - a free pattern from Shiny Happy World

This is easiest if you start sewing right at the inside edge of one handle. Sew through that handle, around the side seam, through both handles on the other side, around the second side seam, and through the last handle. Stop as soon as you sew over the last handle (remember to backstitch!) and you’ll have an opening about 4 inches wide.

Step 7

Turn the bag right side out. This step is a little mind-bendy if you’ve never done it before, but it’s actually really simple.

First pull the main bag out of the lining so that both parts are inside out.

Trick or Treat Bag - a free pattern from Shiny Happy World

Now reach into the opening, grab the main bag and pull it through the opening so that it’s right side out. Keep pulling and the lining will follow – also right side out.

Trick or Treat Bag - a free pattern from Shiny Happy World

Now just tuck the lining down inside the bag. 🙂

Step 8

Smooth and press the top edge of the bag.

Fold under the seam allowance from the turning opening and press that as well.

Edgestitch all the way around that top edge. This will finish your bag, sew up the turning opening, and reinforce the handles – all in one step. 🙂

Trick or Treat Bag - a free pattern from Shiny Happy World

Finished!

Trick or Treat Bag - a free pattern from Shiny Happy World

Now go out and fill your trick or treat bag with lots of yummy candy. 🙂

For a slightly smaller tote bag, made with the same method, head over here.

Here are several free patterns that work with my basic 10-inch applique squares – no resizing needed!

Here are several free patterns that work with just some simple resizing. This post about making coasters has info about resizing an applique pattern that can be applied to any of these projects.

Return to the main Let’s Make a Quilt Table of Contents.

Happy Halloween!

Turn a Witch Hat into a Princess Hat – Easy Peasy

Turn a Witch hat into a Princess Hat - an easy peasy tutorial from Shiny Happy World

One of my favorite Dress Up Bunch patterns is this one for a witch costume.

Dress Up Bunch doll Halloween witch costume

As I was making it, I kept thinking that it could easily be converted to a princess costume – just change to a sparkly princess fabric and make a tiny change to the hat.

Here’s exactly what I mean by “a tiny change to the hat pattern.”

The witch hat is a simple cone with a brim added. For the princess hat (a hennin) you just leave off the brim and add a pretty little fall of fabric to the top.

Turn a Witch hat into a Princess Hat - an easy peasy tutorial from Shiny Happy World

Take a look at the scraps you have left over after you make the dress. I had a long strip 6 inches wide. From that I cut 3 pieces, each 6 inches wide and 12 inches long. You could use a couple of 12 x 12 squares, or several skinnier strips, or make them longer than my 12 inches, or add some pretty ribbons. Just play around and see what you like the look of.

Grab your fabrics at one corner, bunch them up as small as possible, and sew them into the top of the cone when you sew the hat seam.

Turn a Witch hat into a Princess Hat - an easy peasy tutorial from Shiny Happy World

See the little bunch sticking out from the top of the cone? The rest of the fabric will be inside the cone (as shown) while it’s inside out.

Turn a Witch hat into a Princess Hat - an easy peasy tutorial from Shiny Happy World

Make sure you go over that little bunch a couple of times with your stitching. I backstitched over mine a few times. Princess fabric tends to be fragile and you want it to be securely attached. 🙂

Turn the hat right side out and. . .

Turn a Witch hat into a Princess Hat - an easy peasy tutorial from Shiny Happy World

Pretty!

Turn a Witch hat into a Princess Hat - an easy peasy tutorial from Shiny Happy World

Mollie approves. 🙂

Get the witch pattern here. It will fit any of the dolls in the Dress Up Bunch.

Happy sewing!

Best,
Wendi
Wendi Gratz from Shiny Happy World


The Dress Up Bunch is a collection of cute and cuddly rag dolls. Get patterns for the dolls, plus all their fun outfits and accessories!

Fussy Cutting and Broderie Perse – Fancy Applique Tutorial

Broderie perse applique tutorial from Shiny Happy World


There are two kinds of applique that rely on the print of the fabric you’re using – fussy cutting and broderie perse.

A lot of you have probably done fussy cutting without even realizing it has a name. It’s when you carefully position your applique template to incorporate images printed on the fabric.

I did it on this Paper Doll quilt block to make sure the top T.A.R.D.I.S. was centered on the V-neck and the bottom ones were lined up with the hem.

example of fussy cut applique for a tutorial from Shiny Happy World

I also did it on this haunted house quilt block, to make sure there was a bat flying in the center of each window, and the skull was centered on the door.

example of fussy cut applique for a tutorial from Shiny Happy World

Fussy cutting is easy. It just means paying attention when you position your templates. You can hold your fabric and templates up to a window so you can see really well where your outlines are falling.

Broderie perse is similar, in that it uses motifs printed on the fabric. But with broderie perse – the images ARE the templates. You’re cutting out the images on one fabric and appliqueing them to another. It’s traditionally done with flowers – but you can do it with anything you like!

Heres how I used broderie perse to add a couple of cute trick-or-treaters to one of my Shiny Happy Houses quilt blocks – designed especially for Halloween.

You have to start with adorable fabric. I’m using two fabrics from Dear Stella that are designed to work together.

Fun fabrics to use for Broderie perse applique technique - tutorial from Shiny Happy World

Bundle Me Up is the fabric with the sweet animals faces, hands, and feet – but no bodies. Costume Party is the fabric with all the fun costumes for those critters to wear. So clever!

Broderie perse applique tutorial from Shiny Happy World

Roughly cut out the image you want (like the fox in this picture). Back it with fusible adhesive, and then cut the image out neatly (like the dress and crown).

Broderie perse applique tutorial from Shiny Happy World

The dress in this example already has little slippers attached, so when I cut out the fox neatly I decided to cut away the lower part of the body. It would have been hidden anyway and this makes assembly easier – I don’t have to line things up as perfectly.

I’m such a lazypants. 🙂

Broderie perse applique tutorial from Shiny Happy World

After that it’s applique as usual.

Position the critter first, then the costume and fuse it down with everything else in your block.

I stitched around all my pieces in simple black thread for a nice cartoony look. I added a couple of pumpkin buttons for their trick or treat pails, and – of course – some spider buttons on all that magnificent glow-in-the-dark spiderwebbing. 

Have fun with broderie perse! It will make you look at your fabrics a whole different way. 🙂

Here are links to all the posts showing how to applique with fusible adhesive – my favorite method. It’s fast and easy and (with the right materials) it holds up beautifully to rough use and repeated washing.

Here are links to special posts about eyes.

Here are links to some extra fun things you can do with your applique.

Other Applique Methods

Finished with this topic?

Return to the Let’s Make a Quilt main Table of Contents.

Move on to the lessons about outline stitching.

Happy stitching!

Shiny Happy Haunted Houses

Haunted Houses - quilt pattern from Shiny Happy World

If you have the Shiny Happy Houses quilt pattern, you can use it to make a whole different quilt just by switching out the fabrics. Make a fun haunted house quilt!

For this block the arch templates that I usually use for doors and windows became fun tombstones! I used ghost and creepy eyeball buttons for extra Halloween fun. And of course – the Halloween-themed fabrics make it easy. 🙂

There’s a tutorial here showing how to do some fussy-cut applique.

Shiny Happy Haunted House with fussy cut trick-or-treaters. Fun!

That’s how I made these adorable trick-or-treaters!

It’s Haunted House Week here at Shiny Happy World. The Shiny Happy People group on Facebook is already on board – I’ve seen two awesome haunted houses over there already!

Happy Monday!

Best,
Wendi
Wendi Gratz from Shiny Happy World

Tutorial: Gnome Costume

Happy Halloween!

Maddie decided that she wanted to be a gnome for Halloween… and I thought it was a good excuse to put my craftiness to good use. This is a great costume to make! It’s adorable, and you only need to make a few components. Combined with store-bought clothes, it looks amazing!

Baby gnome costume

If you’re wondering why these photos are so cropped, it’s because I let Maddie play with the November Kit Club sample- she just loves it! But, it means that I needed to crop it out to avoid a major spoiler!

Let me give you a quick run-through all of the components!

Knitted Hat

There are loads of pixie-style patterns on Ravelry. You can follow one of those, or modify a normal hat pattern.
baby pixie hat, knitted
To do this, work two plain rounds in between every decrease round of the crown. That’s how you make the point! This technique works for knitting or crochet!

Crocheted Beard

I followed the Bobble Bearded Beanie pattern. It’s a great pattern, and comes in adult sizes, too!

Sewn Belt

To make the belt, I cut a piece of belting (yes, that’s actually what it’s called! You can find it by the yard in the notions section of a craft/sewing store) to length. I sewed snaps to each end to fasten it on.
belt_closeup
I cut a square of felt (about 2″ longer in each dimension than the width of the belting) and cut two slits in it so I could run the belting through. Easy!

Clothing

I bought red pants and a blue cardigan from Primary (the Baby Pants in Cherry and the Baby Snap Cardi in Pool). I bought the cardigan one size too big, which gives the outfit a cute, oversized gnome look!

Happy Halloween!

I hope you have a blast today! And you might want to download my free pumpkin pattern for a fun little project! Or crochet a sweet gnome!

EEP! It’s an EPP Halloween Blog Hop!

Halloween Hexies

I’ve really been having fun playing with English Paper Piecing (EPP) ever since I got Diane Gilleland’s All Points Patchwork and made my very first EPP project.

I reviewed that book here. In a nutshell – it’s absolutely fabulous.

Every time I look at a hexie template – especially when it’s solo and surrounded by other fabric – I see an eyeball. 🙂 So when Diane asked me to participate in a Halloween EPP Blog hop I leaped at the chance.

The design is super easy. Make a bunch of hexies and then start playing around with them.

Halloween Hexies

I made 96 black hexies using all the black-on-black fabrics in my scraps, and 14 green hexies, two each of all my acid green scraps.

Then I started playing around with the arrangement and joining them together.

Halloween Hexies

I put the matching eyes together in pairs, and then added 1/2″ felt circles. If you make them “look” in the same direction, they’ll look like pupils to the eyes.

Halloween Hexies

Frame your eyeballs in a hoop using this method.

Done!

You could make just a single pair of eyeballs for a fast little project in a small hoop, or a whole bunch of eyeballs for a bigger piece.

How many eyeballs do you want to sew?

🙂

Happy Halloween!

Best,
Wendi
That's me!

Spooky – a free cat applique pattern

Spooky - free cat applique pattern from Shiny Happy World

You can add this free cat applique pattern to your Cuddly Cats quilt pattern if you like. I designed it especially to have really terrific eyes for a black cat – but you can make it any color you like.

I love black cats! I grew up with two of them – Nasty and Gandalf. But it can be tricky to applique the eyes on a black cat. Almost all of my animals in all of my applique patterns have simple black oval eyes. That helps give all my designs a cohesive look – and they’re also simple to applique. But what if the animal you’re making is black? Black bears, black panda eyes, black raccoon eyes, black penguin eyes, and, of course, black cat eyes.

This post shows you a quick and easy trick to applique dark eyes on dark faces. But I really love black cats and I really wanted to make a free cat applique pattern with big, glowy cat eyes.

So I did!

Especially for Halloween, I created this spooky black cat applique – a single block applique pattern – with huge luminous green eyes. I love her! And the pattern is the same size as the blocks in the Cuddly Cats quilt so you can mix and match if you like. 🙂

There’s a tutorial here with instructions for making a hanging sleeve so you can make your block into a Halloween wall decoration. It’s easy!

Here’s how to make the block. (This video shows all the steps for working with fusible adhesive – if you’ve never done it before you’ll find it helpful.)

Step 1

Download the template pieces here.

Step 2

Trace or print the pattern onto the paper side of the fusible adhesive.

Spooky - free cat applique pattern from Shiny Happy World

I use this printable fusible adhesive so I just printed out the page. No tracing!

The image has already been reversed, so just trace or print. If you’re tracing, be sure to trace the facial features too. You’ll need those for Step 5.

Step 3

Rough cut around each shape and fuse it to the back of your fabric.

applique pattern pieces cut out - from the Spooky free cat applique pattern from Shiny Happy World

Leave a little bit extra all the way around ­- a little extra extra (at least 1/4 inch) where there’s a dotted line, like the top of neck shoulders and the base of the ears.

Step 4

Cut around each piece neatly. Cut directly on the solid lines.

Spooky - free cat applique pattern from Shiny Happy World

Leave a little seam allowance on the dotted lines ­- the top of the neck and the base of the ears will tuck behind the head.

Step 5

Remember when I told you to make sure you traced the facial features in Step 1? Now you’re going to use that. Hold the face up to a window so the light shines through it. You’ll be able to see the lines, and the adhesive will stabilize the fabric so you can trace on it without it crinkling up.

Spooky - free cat applique pattern from Shiny Happy World

Since this is a dark fabric, I traced with a white chalk pencil.

Here you can see all the tracing I did – without the light shining through.

Spooky - free cat applique pattern from Shiny Happy World

I traced the whiskers and mouth exactly, since I’ll be stitching over those lines. I traced the nose a little smaller, and just marked the corners of the eyes to help me position the applique pieces later.

Step 6

If you’re doing Quilt As You Go (I did) then you can quilt your block before adding the applique. So easy!

Spooky - free cat applique pattern from Shiny Happy World

I used a bunch of orange scrappy strips all sewn together for a super textured background, but you can use just one solid square.

Cut your background fabric and a piece of 100% cotton batting 11 inches square.

Layer the block with a piece of 100% cotton batting. Quilt any pattern you like!

Find all the Quilt As You Go tutorials here.

If you’ll do the quilting later, simply skip this step.

Step 7

Peel off the paper backing and arrange the pieces on a background block. Tuck the ears and the neck behind the head.

Spooky - free cat applique pattern from Shiny Happy World

Remember -­ all the dotted lines indicate where pieces tuck behind other pieces.

Fuse the pieces in place.

Step 8

Outline all the pieces with black thread and a simple straight stitch – or choose your favorite decorative stitch.

Spooky - free cat applique pattern from Shiny Happy World

This video has some tips for outlining those tight curves.

Done!

One free cat applique pattern, all finished!

If you’re making a one-block project, go ahead and finish it up!

If you’re making a bunch of cats to join into a quilt -­ have fun!

Please share a photo of what you make! You can share it in the Shiny Happy People group or tag it with #shinyhappyworld on Instagram.

Happy stitching!

A Not-So-Itsy-Bitsy Spider – a new handsewing pattern!

I originally designed this spider as a best friend for Nellie the Pig. She was made of light grey felt with a friendly smiling face – not scary at all. This is the perfect little spider to send up the water spout when you’re singing The Itsy Bitsy Spider with a group of preschoolers. 🙂 You can see that spider here.

I named her Aranea after one of Charlotte’s daughters who decided to stay behind with Wilbur.

However – I decided that a spider pattern just wouldn’t be right without a slightly spookier version. I wanted to show you another version that would be perfect for Halloween decorations – something you could scatter around a table. 🙂 This version skips the embroidered face and uses Licorice felt for a slightly-hairy-looking, almost-black spider.

This is definitely NOT the spider to use with your preschool class. It’s surprisingly realistic looking! Jo suggested adding a hair clip to the bottom of the body for a spooky barrette.

And now the pattern is available in the shop! It’s a PDF pattern, so it will be delivered instantly by email.

Get the felt spider pattern here.

There are also materials kits available in both colors. Choose the kit option from the drop down menu above the add to cart button.

This will only take an evening to stitch up and it’s all hand sewing so you can take it anywhere.

Happy sewing!

Best,
Wendi
That's me!

One Technique – A Kajillion Costumes – No Pattern Needed – video

One Technique One Kajillion Costumes - No Pattern Needed - video
Way back this summer when I taught Harry Potter Camp I promised you I’d make a video showing how to make these easy Harry Potter cloaks – without a pattern. I didn’t forget! And for those who joined us after this summer – I had 20 kids in the class (ages 7-12) and they all made these cloaks in less than an hour.

The great thing about this technique is that you can use it for all kinds of costumes – knights, thieves, princesses, wizards, jesters, and so much more!

Here’s the video – but be sure to scroll down for more photos of samples and links to other techniques you’ll be able to use in your costuming.

See how easy that is?

I breezed right through a couple of techniques because I already have separate videos for them, with the demos designed to be easy to see. I especially recommend the one on using elastic with a casing. If you’re wondering what the heck I was doing with the clipping into the armpits, take a look at this video. With a lot of costumes I skip the whole hemming and finishing thing, but if you want to hem yours, here’s a video that will help. And applique with fusible adhesive is great for Halloween costumes. If you’re new to sewing (and this site) be sure to check out all the links to how-to videos gathered together on the Sewing Lessons page. And if you’re sewing with kids – here’s a post with some specific tips for them.

And now here’s a look at some costumes I made with this technique.

I used it to make this princess gown for Jo.

This took me exactly one hour to make – and I sewed it three times in that hour. Jo has gotten pretty opinionated about the fit of her clothing and I took this in a few times to be more fitted in the top, but keep the drapey arms and the width of the skirt. I just kept sewing the body narrower and narrower until she was happy with it.

This is made of stretch panne velvet – really easy to sew and comfy to wear. And since it’s a knit, the edges won’t fray even though I didn’t finish any of them. I used a stretch needle in my regular machine with a regular straight stitch. Easy peasy. No serger needed.

I used some of the scraps to make a matching dress for one of Jo’s dolls.

The belt is made of binder rings (available at any office supply store) all linked together.

I wanted to show you something less flowy too – something a boy could wear. I talked about the possibility of a Robin Hood/Peter Pan tunic in the video and then decided to make one up for real.

I used regular embroidery thread to lace up the slit at the neck.

Finally, I wanted to show you a patchwork girl. Jo just read A Little Princess and wanted Princess Ivy to have a rag dress too. I didn’t sew the patches together – this is some old cheater cloth from my stash. I cut the sleeves and hem all raggedy and used some beading hemp for a rope belt. I turned this dress around so the neck slit is in the back. I just added a little hook and eye to hold it closed.

So there you go! Lots of costume possibilities!

Happy sewing!

Applique Wendi (with fabulous hat)

Best,
Wendi