Well – I finally opened the box of my new Cricut Maker.
So exciting!
But I’ll be honest – we got off to a bit of a rocky start.
The Design Space app didn’t install automatically and the link to click to continue the installation was a dead end to a nonexistent page. Not a huge deal – I know how to find my files and install them myself, but it’s the kind of thing that really frustrates a person who’s not super comfortable with technology so I thought it was worth mentioning.
They include some materials for your first project (a card) which is great. It let me walk through all the steps of making (not designing) and actual thing.
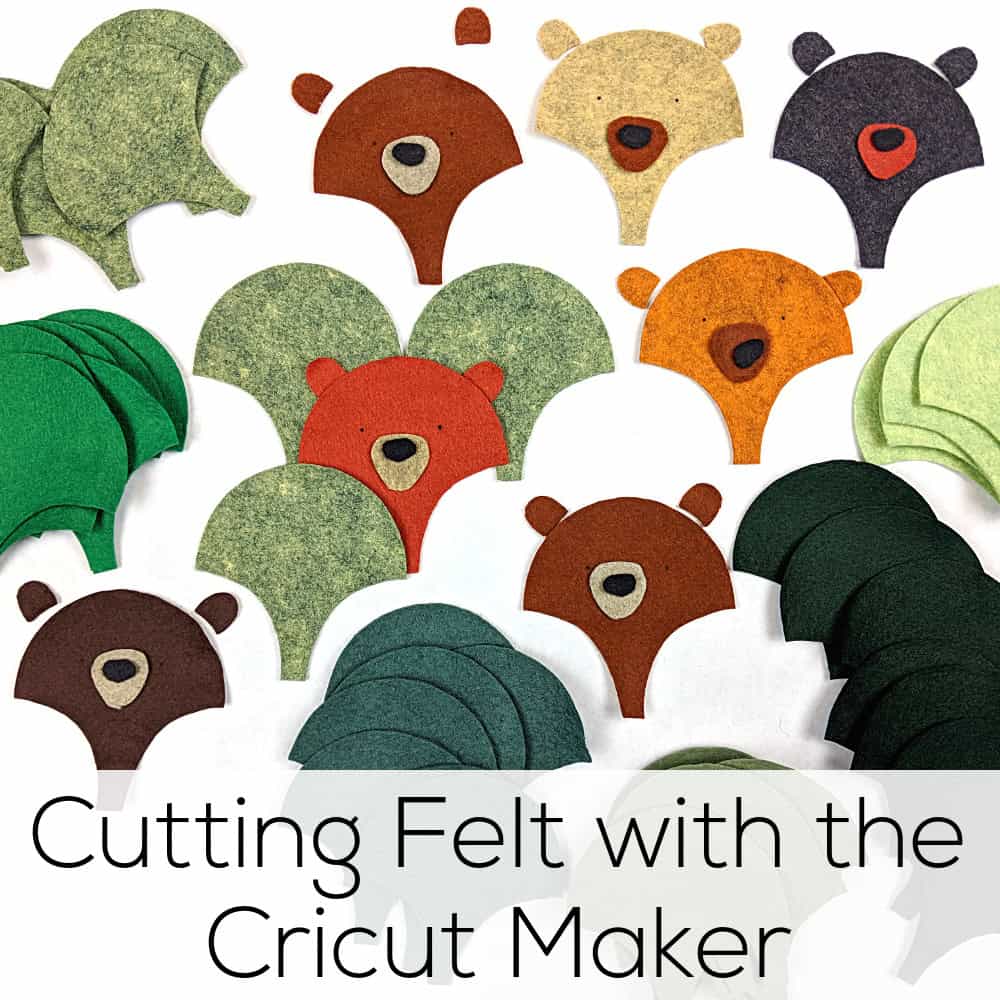
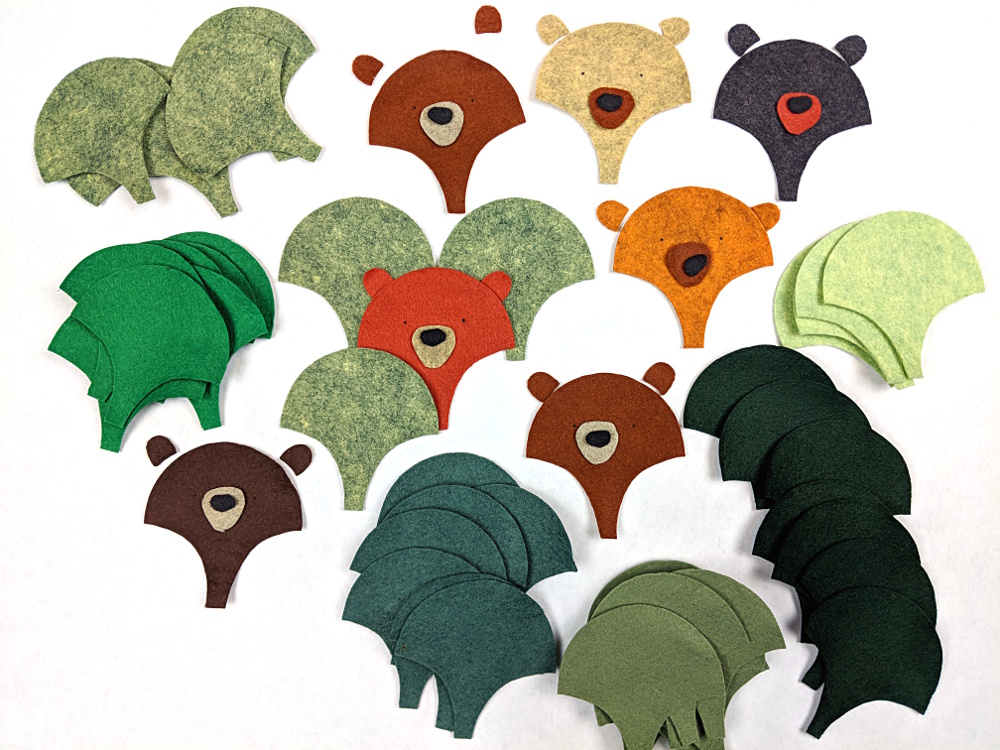
Designing was TRICKY. That’s going to take some practice – but I managed to get my first project (those bears in the hills) all set up and ready to go.
Time to cut some felt!
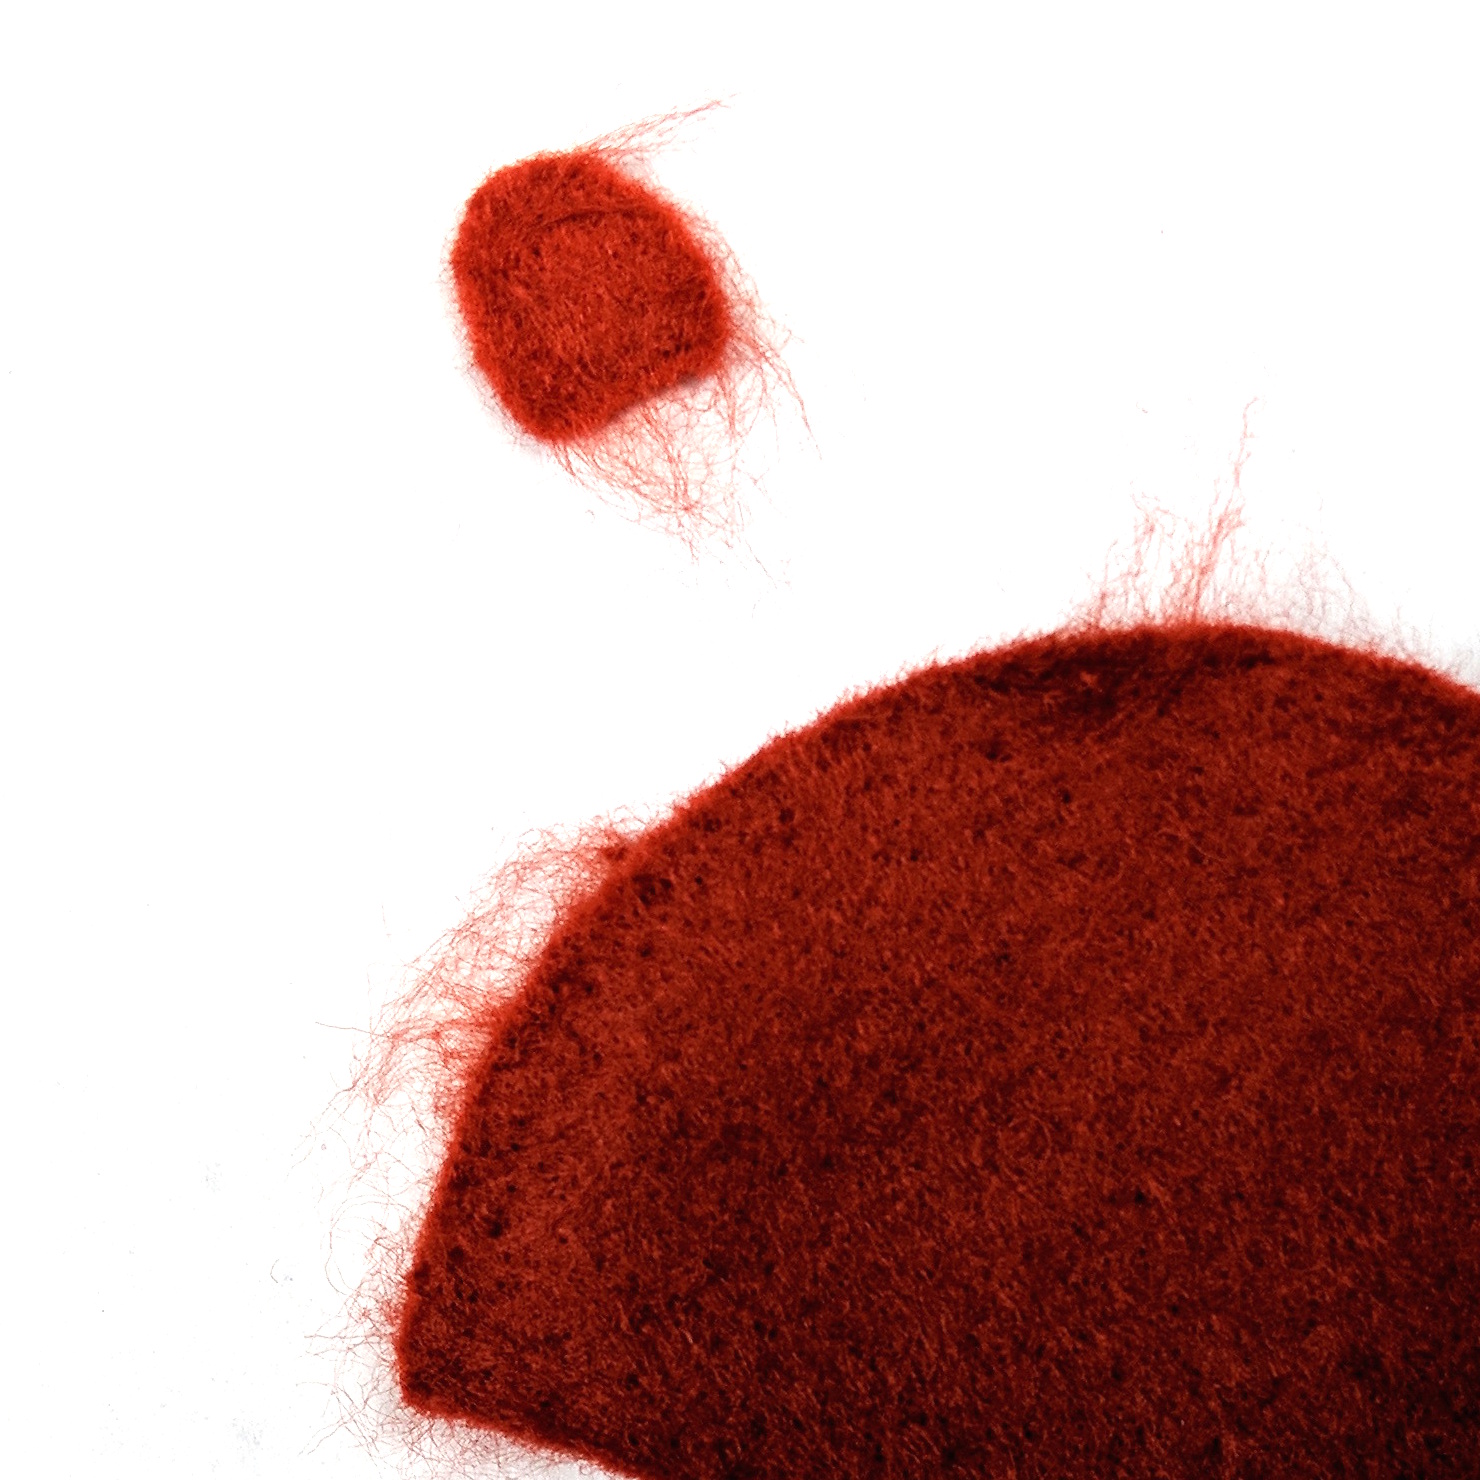
Uh oh. That does NOT look good.
I cut it on the felt setting and this was actually the second try with increased pressure. The first try just roughed up the surface of the felt without actually cutting anything.
I decided to lie to the machine and tell it I was cutting heavy fabric like denim. That prompted me to change it to the teeny tiny rotary blade instead of the knife blade.
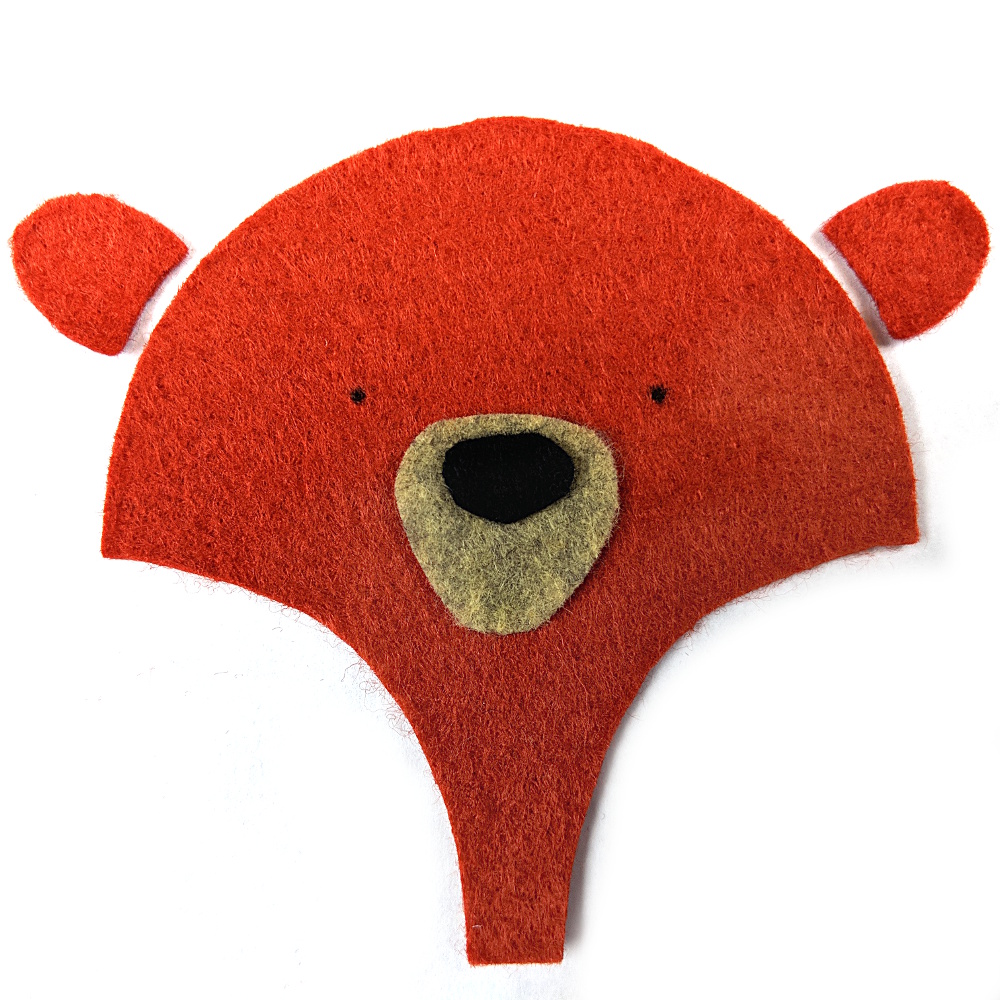
Much better!
Look how clean the cuts are! And see the eye markings? The machine did that too with the pen attachment. So handy!
After I got the settings figured out I was on a roll. 🙂
I cut all the pieces for my new Bears in the Hills in about an hour – while I was cleaning my studio. 🙂
Next week I’ll have a video showing you how to layer all these guys up and prep for stitching.
I can’t wait to try the Cricut on regular fabric for applique quilt blocks – that’ll be my next project with the machine.
Using a fabric glue stick to hold appliqué pieces in place while I sew has been one of my best discoveries ever.
Maybe a bunch of you do this already?
I have a very fraught relationship with glue. There are the glues that make your paper bubble and warp. The glues that seep beyond where you put them on fabric. The glues that stick your fingers together. The glues that don’t really stick like they should.
But last year I started using glue to hold my appliqué bits in place and I fell in love!
Let me count the ways. . .
Fabric glue sticks are designed for use with fabric. They don’t seep through, and they’ll soften up after washing. They’re perfect for a temporary hold.
They work really well on slightly napped fabrics like velvet and cuddle fleece. The beaver bits on that face you see above didn’t shift a smidge while I sewed them on with the machine.
I especially love using fabric glue for hand appliqué. Pins distort the fabric and – even worse – my thread was constantly getting hung up on them. With the fabric glue stick I can position all the pieces right where I want them, stick them in place, and then whipstitch away. Everything stays perfectly flat and I never catch my thread on a pin. Joy!
I tried a few brands and they all worked well, but I’m carrying this one in my shop because it works well and is a great price. 🙂
If you have ways that you use fabric glue sticks, I’d love to hear them!
I rely heavily on three products/stabilizers for the work I do.
Freezer paper
Sulky Sticky Fabri-solvy
Heat & Bond Fusible Adhesive
(You can find links to sources for all of these – and all my other favorite tools and supplies – here.)
I recently had someone ask when I use each one – and that’s a great question.
Here’s the rundown. . .
Freezer Paper
Freezer paper is an excellent stabilizer.
I use it most often to cut out felt pieces. I print the pattern pieces directly onto the freezer paper. (You can trace if you’re not as lazy as I am.) I iron the paper to the felt and then I cut the pieces out – cutting through the felt and the freezer paper at the same time. Since I label all my pieces it means I have a nice pile of labeled felt pieces, cut perfectly accurately, waiting for me to stitch them together. Awesome!
Freezer paper also works this way when cutting out regular fabric, but I only use it on fairly small pieces – so small that I can’t use pattern weights. I use it for ALL my felt cutting.
Freezer paper is also excellent for fusing to the back of any fabric that you’re going to draw or paint on. If you’ve ever tried to do that without a stabilizer, you know that the pen or marker will tend to drag the fabric along with it. It can be really hard to keep it flat and smooth. Freezer paper makes the fabric act like paper. Handy!
Finally, people use freezer paper for this appliqué method. That used to be my favorite method – until I tested some of the new fusible adhesives out on the market and found a new favorite. 🙂
In all cases – the freezer paper will peel right off when you’re done. It doesn’t leave any residue behind, and you can reuse it a LOT of times before it loses its ability to fuse.
You can find rolls of freezer paper in the grocery store, or shop for printable sheets.
Fusible Adhesive
Fusible adhesive is what I use in all my appliqué projects. That’s mostly quilts, but also T-shirts, tote bags, pillows and more. Unlike the freezer paper – which sticks temporarily to the fabric – the fusible adhesive is a permanent glue.
So the only time I use this product is when I want to permanently stick one piece of fabric to another.
I LOVE LOVE LOVE using Heat & Bond Lite fusible adhesive in printable sheets, as opposed to the stuff you can buy by the bolt. It’s more expensive – yes – but it lets me skip over the tedious tracing step and jump right to the fun part of my appliqué project. That’s worth money to me. 🙂
I use it to transfer embroidery patterns to EVERYTHING. There are other products you could use to transfer a pattern to light-colored, smooth, woven fabric – but Sulky Sticky Fabri-solvy makes embroidery on every surface possible. And it makes stitching on smooth woven cotton easier and better.
With this stuff you can embroider stretchy fabrics like T-shirts and baby onesies (no extra stabilizer needed). You can embroider dark fabrics. You can embroider nappy fabrics like velvet and terrycloth and fleece. You can embroider felt. Oh! How I love embroidering on felt!
I use it to stabilize stretchy fabrics when I appliqué on them. It just washes away – leaving no itchy stabilizer behind.
I freehand all my quilting designs – but if I did anything fancy I would print or draw it on this and stitch through it, then soak it away later.
Freezer paper vs. Sulky Sticky Fabri-solvy
I think this is where most people get confused, because I use both of them extensively when I work with felt.
If I’m just cutting the shape out – I use freezer paper. It’s cheaper and doesn’t require soaking to remove.
If I’m embroidering something on the shape and then cutting it out – I use the Sulky Sticky Fabri-solvy. Sometimes you’ll see me recommend both things in one project – like this snowman ornament.
The hat, hat band, and carrot nose have no embroidery on them. Neither does the back of the ornament. I cut all of those pieces out with freezer paper.
The snowman front and the scarf both have embroidery on them, so for those I printed the pattern on Sulky Sticky Fabri-solvy, stuck it to the felt, embroidered the details, cut it out on the lines, and soaked off the stabilizer. (You can see how this works in this post.)
All of my patterns tell you which product to use where.
I hope that answers your questions about which product I use in which situation! Let me know if you have any other questions about any of them. I love them all and I’m always happy to share info about products that make your crafting easier and more fun. 🙂
These links go to all my posts about quilt supplies.
I designed the pattern for this little gizmo cozy (it’s free here) in February 2011. I’ve been using it to protect my MP3 player in my purse ever since.
That’s 3 1/2 years this little thing has been tumbling around in my purse and look at it! It still looks great!
The photo on the left is from the day I finished it in 2011. The photo on the right is from today.
The corners have gotten a little smooshy and rounded. The threads of the embroidery are a bit more embedded in the felt. The edges of the applique aren’t as crisp. The big lazy daisy flower in her hair is definitely looking a little flattened.
But there’s no pilling! If this were made of cheap acrylic felt I would have thrown it away long ago because it would have looked so grubby and terrible.
How do I know this? Because when Jo was little I made her a felt board. Not knowing any better, I used cheap acrylic felt from the craft store. Honestly, I didn’t know there was anything else!
Jo wasn’t any especially grubby or rough kid, but within DAYS those felt pieces started to look terrible. They pilled awfully. They seemed to pick up and grab onto every speck of dirt or dust. And in no time at all they had lost almost all their cling. The feltboard quietly disappeared and I didn’t work with felt again for a long time. Why put a lot of work into a material that’s going to look awful almost right away?
And then I discovered wool felt. Online – of course – because there’s not a single brick and mortar store in my area that carries it. People wrote about how durable it was compared to the acrylic stuff. How it doesn’t pill. They didn’t mention how nice it feels in your hands, and how pretty embroidery looks on it, but I discovered that on my own pretty quickly. 🙂 I fell in love with felt! I couldn’t buy it locally, so I started carrying it in my shop.
I’ve made a lot more felt projects since then – so many things that I had to create a whole section in my shop for felt patterns! But it all started with this little gizmo cozy. 🙂
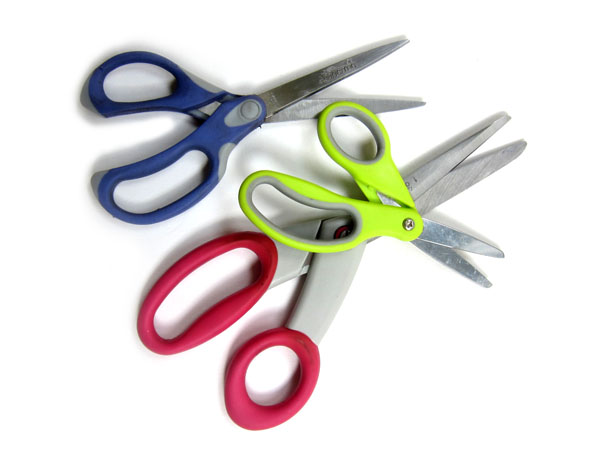
I have three pairs of scissors: a pair for cutting fabric, a pair for cutting tape and an all-purpose pair (that happen to be child-safe so I can use them for travel).
Having different pairs for different craft purposes allows you to keep them in tip-top-shape, and makes your crafting easier! Here are some tips I have for keeping your scissors healthy.
Mark your Scissors
Do you have a family member who might be tempted to use your fabric-only scissors for cutting construction paper? Add a label to them! And consider keeping your special scissors away with your fabric stash.
Clean Scissors with Rubbing Alcohol
I have a pair of scissors just for cutting packing tape. Because tape leaves a residue that makes scissors icky!
When mine get too icky, I use rubbing alcohol and a cotton ball to clean the blades. The sticky comes right off!
Get them Sharpened
Many craft stores have an occasional sharpening service. Just like nice knives, it pays to get your scissors sharpened!
Any tips to share?
How many scissors do you have? And what types are they?
Well, partly because Sulky Sticky Fabri-Solvy is quite a mouthful. 🙂 But mostly because I use it for absolutely everything I stitch and it’s absolutely magical. It really is one of my favorite products ever.
(You can find links to sources for all my favorite supplies here.)
I’ve written a lot about it in a lot of different posts, so today I’m bringing all that info together in one handy-dandy place.
What is it?
It’s a printable wash-away embroidery pattern transfer and stabilizer. Yes – it does all of that in one easy product! In a nutshell. . .
You print your pattern right on the sheets. You can print them with an inkjet or laser printer, or photocopy onto it. You can also trace onto it – but I hate tracing.
Peel off the paper back and stick the stuff right to the surface of what you’re embroidering.
Hoop it up and start stitching. You stitch right through the stuff.
Soak it in water and the stuff dissolves away like magic.
I use this on everything I embroider. EVERYTHING. But it’s especially useful on problem fabrics. You know what I’m talking about – the ones that are really hard to transfer an image to.
dark fabrics
napped fabrics like velvet, terry cloth and cuddle fleece
plasticy fuzzy fabrics like polar fleece
thick fabrics that you can’t see through to trace – like felt
stretchy fabrics like T-shirts
It’s awesome on everything!
Look! You can stitch right through the stuff onto fluffy cuddle fleece.
I never ran into problems with stickiness until I left a project sitting in a hot car one summer afternoon. The next time I picked that project up (even though it wasn’t hot anymore) I found that I was getting a sticky residue on my needle. Not fun!
And then I discovered Thread Magic. I was using it to solve another problem and discovered by accident that it totally eliminated any sticky needle problems. Fantastic! Especially since I love to carry my embroidery around with me and there was an excellent chance it would get left in a hot car again. Now I don’t need to worry about that!
Does the ink bleed?
It depends on the ink. I usually photocopy my projects or print them on my laser printer and those have never been an issue for me. But a couple of people reported the ink from their inkjet printers bleeding a bit when they rinsed off the stabilizer. Every brand is different so test the ink from your printer if you want to be sure! If you run into bleeding, try printing it out in draft mode – that uses a lot less ink.
The good people at Sulky let me know that one person had an issue with her laser printer. She said it didn’t actually bleed when she rinsed it, but it left little black specks all over her work. Yikes! The good news is that she sprayed it with Shout, washed it on the gentle cycle of her washing machine, and it came out as good as new. So if you run into laser printer problems, there’s an easy fix. 🙂
This isn’t a bleeding-ink issue – but it’s related. One customer reported that the ink wasn’t coming out of the centers of flowers where the stitching was the most dense. It wasn’t bleeding, but it’s like it was stuck there. She has very hard water and reported that a second long soak in distilled water took it out.
T-shirts
I want to add a special note here about T-shirts. I love embroidering on T-shirts, but it can be kind of fussy. You have to stabilize the fabric so it doesn’t stretch while you’re stitching. With traditional stabilizers you have to remove it after stitching. And stretch knits aren’t a treat to transfer the pattern to. All of these issues magically go away with Sulky Sticky Fabri-Solvy. Since it’s a pattern transfer and stabilizer all in one, you take care of both of those steps. And since it rinses out after stitching, there’s no fussy (and potentially destructive) removal of the stabilizer afterwards. It’s perfect!
That’s embroidered! 🙂
Now you know why I call Sulky Sticky Fabri-Solvy The Magical Embroidery Stuff. I love it!
I’ve heard that people use it for all kinds of other things too – like transferring complex patterns to a pumpkin for carving! If you’ve come up with an unusual use for it – let me know. I’d love to hear!
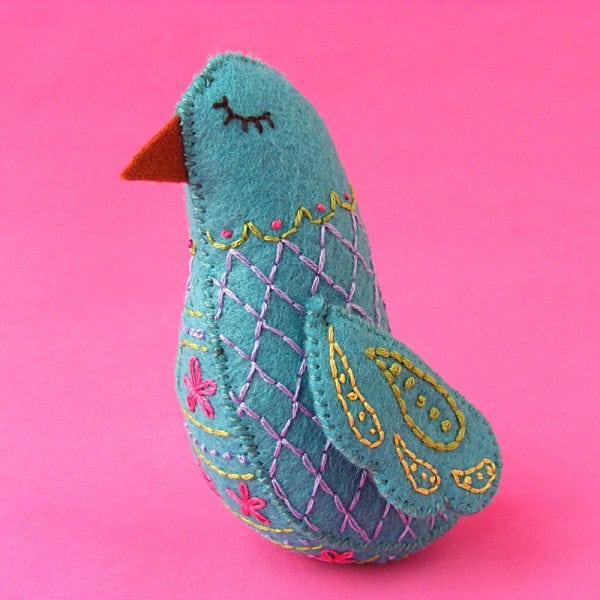
You all may have noticed that I love a little felt embroidery. 🙂
I love how portable it is. I love the way the thread looks on the wool felt. I love the way it feels in my hands. It’s all so yummy!
The only part of the whole process I don’t enjoy is choosing matching thread colors.
I’m not talking about choosing thread colors for the design. That part is fun!
I’m talking about choosing embroidery thread that perfectly matches the felt color for sewing around the edges. Like sewing up this bird. (It’s a free pattern here.)
It’s important to get a good match – but the process is boooring. Try this thread. Nope – but close. How about this one? Ugh – definitely not. This one? Yes. It’s not a creative decision in any way. It’s just finding the best match. *yawn*
Every single time I do it I think to myself that I ought to write it down when I find the perfect match – so I don’t have to do it again for that color.
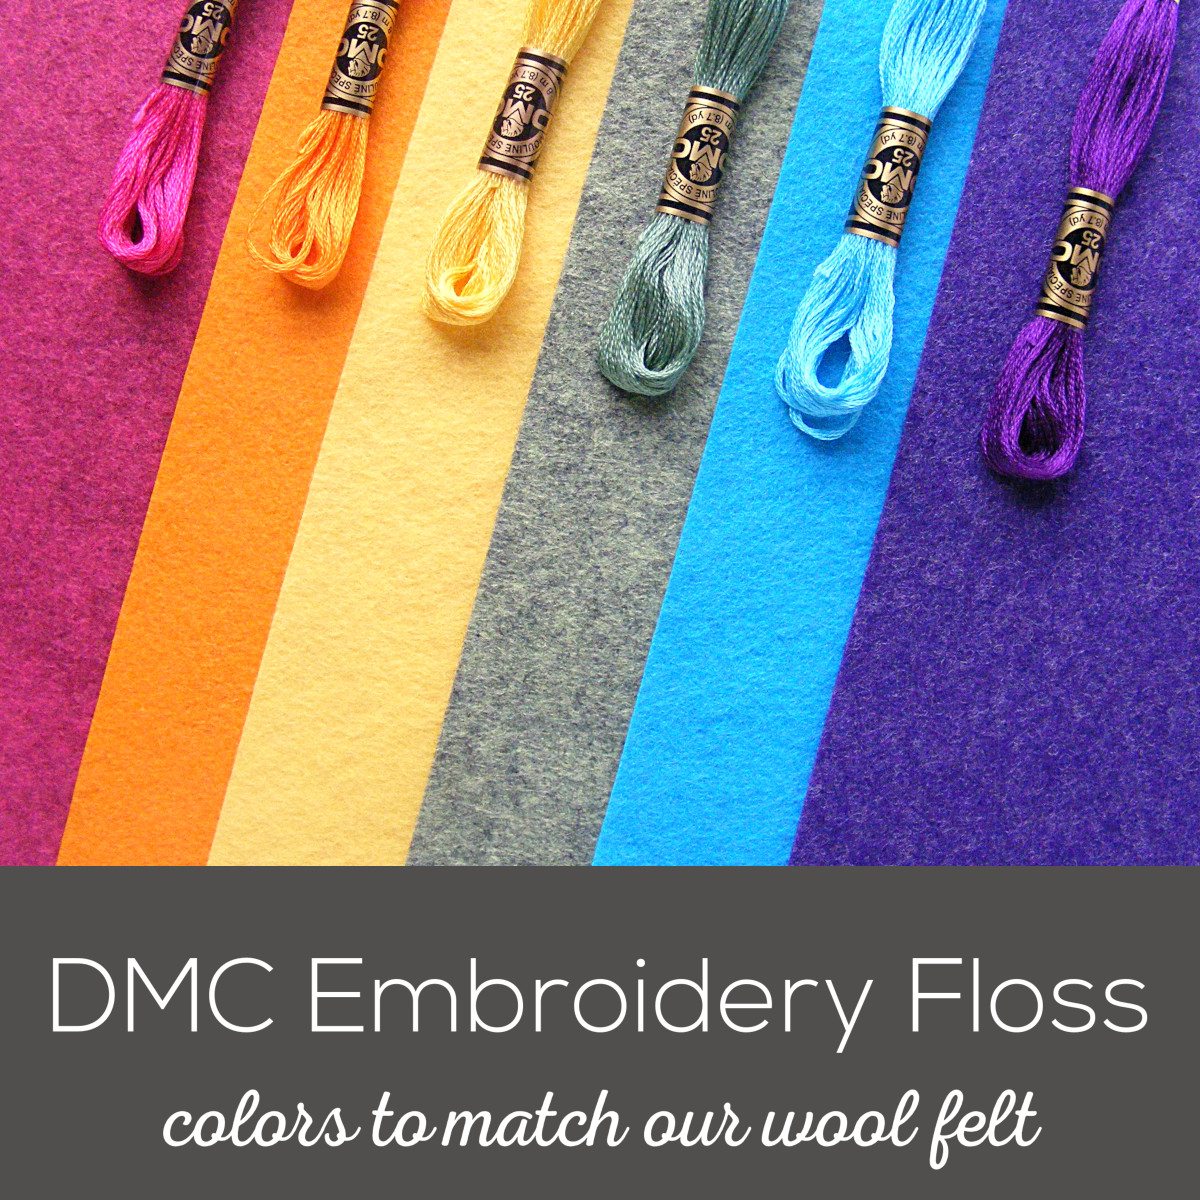
Then I started thinking I should have a master list of all the thread colors that match all my felt colors. That would be handy!
Update! Ask and you shall receive. A few people asked for a printable list of the matching colors – so I made one! You can download it here.
Then I started thinking I should make that master list and actually carry the thread in my shop, so you can buy the matching thread when you buy your felt. Now that would be super handy!
So I did it. I waited for one of those perfect-light days and pulled out all my felt and my DMC thread card and I found the perfect match for every color felt I carry. Then I ordered in all the thread and added it to the shop.
Seriously – every time I try this stuff on something new I’m even more impressed with it.
Here’s the scoop on using it with wool felt. . .
Print your pattern onto the stabilizer. Stick it to the felt. Rough cut around each piece.
See? It’s easy to transfer your pattern. And it sticks very well to the felt.
Stitch right through the felt and stabilizer. (Don’t zone out and stitch the outside lines – those are your cutting lines. Not that I’ve ever done that. ahem.) You don’t need a hoop for this – the felt is sturdy enough to stitch through without it. After you’re done stitching, cut the pieces out on the cutting lines.
See? Beautiful stitching and nice, accurate cutting.
Soak off the stabilizer.
See? Not a trace of stabilizer and no ugly marks. All ready to sew!
The soaking. I know this is the part that you’re worried about. Normally I soak it off in a bowl of warm water, then rinse it under running water. I do the same thing for felt, only the water is cold. I don’t want to pebble the surface of the felt by getting too warm with it. I fill a bowl with cold water, then drop the embroidered felt in face down and let it sit for a long time – sometimes as much an an hour or more, depending on what else I get busy with. When I come back the stabilizer is all swollen and mushy and, depending on how much stitching there is, kind of clinging to the felt. Time to rinse.
I rinse it under running water – again cold. The stuff does cling a bit more to fuzzy felt than it does to smooth cotton, but the running water takes it off pretty well. It comes off really fast if I switch my kitchen faucet to the sprayer, but just regular running water will work in time.
After all the gunk comes off, just lay it on a dry towel. For the best results I don’t wring it, twist it, or even press it. Just set it sopping wet on the towel and leave it alone. It will dry – I promise. And look how pretty the results are!
I left the picture nice and big – click on it to really zoom in and look at the texture of the felt. No pebbling! No stray marks!
So – no more frustration transferring your pattern to lovely-to-stitch-on but impossible-to-trace-through and difficult-to-write-on fuzzy felt. Use Sulky Sticky Fabri-solvy and feel only peace, joy and felty happiness. 🙂
Howdy everyone! This is the last video in the little felt mini-series I’ve been running. In this one I show you how to attach limbs to your felt softie.
I demonstrate it with an arm, but you could use the same technique to attach a beak, antennae, tentacles – anything that might be growing out of your softie.
You can also use ladder stitch to attach things like this, but I like the look of the whipstitch here.
I love working with wool blend felt – and I’m going to be doing more of it this year so I finally started carrying it in the shop. Lovely, luscious wool blend felt in 48 gorgeous colors! It feels so nice in the hands, it embroiders beautifully, and it’s so nice for hand sewing small softies. And wool felt wears so much better than the icky acrylic felt that you find in the big box craft stores. It’s just lovely!
Not so lovely is the trick of transferring an embroidery pattern to it and cutting out fussy small pieces. There are a couple of tricks and products that make these things so easy – and that’s what I’m sharing with you today.
Let’s take embroidery first. You can’t trace the pattern – the felt is too thick to see through. You don’t want to simply draw on it – that lifts the fibers on the surface. But there is a magical solution!
For all stitching on felt I use Sulky Sticky Fabri-solvy. Yes – it works beautifully on felt too! Just make sure to soak it off in COLD water. Hot (or even very warm) water will pebble the surface of the felt and shrink it a bit. I don’t use ice cold water, but I definitely stick to tepid or cold. Just let it sit in the bowl for a good bit and it will dissolve away nicely – then rinse off the clingy bits under running water. DON’T wring it out. DON’T twist it. Just take it out of the water, set it on a towel and walk away. It will dry – I promise. The Magical Embroidery Stuff also works great on darker colors. You can see it in action in this video.
What about cutting small felt pieces for patterns? Pinning little pieces distorts the felt, making it hard to cut out small shapes nicely. You can’t use pattern weights – they’re too big for small pieces. I use freezer paper. Trace the pattern pieces to freezer paper, iron to the felt so they stick in place with no shifting, cut them out and peel off the paper. Magic! Except for the tracing bit. I’ve been known to print out my pattern pieces and then glue the pages to freezer paper so I don’t have to trace. I hate it that much. The last time I was doing that I thought to myself, “Wouldn’t it be nice if I could print the pattern directly onto freezer paper? I wonder if anyone makes printable freezer paper?” Well, guess what? THEY DO! I’m in love! And I bought some for my shop so you can fall in love too. 🙂 You can find it here.
What if you’re embroidering and cutting out pattern pieces? For that I go back to The Magical Embroidery Stuff. Man – that stuff really is magical. 🙂
I show you how to use both the printable freezer paper and Sulky Sticky Fabri-solvy with felt in this video – including talking a bit about which product is better in different situations. (That monster pattern is Byron the Oddball. I love him.)
So – enjoy the felt! Enjoy the new I’ll-never-trace-again product! And happy stitching!