I love skirts made out of T-shirt fabric. How can you go wrong with soft, stretchy knit? They’re easy to make, easy to wear, and easy to fancy-up a bit.
Over the next few weeks I’ll be sharing a few tutorials for dressing up the hem of this plain skirt. I’m starting with the easiest method this week – using some of the scraps from your T-shirt fabric to add a bit of ruffle to the hem.
I added just one demure little ruffle to the hem of this skirt for me. Jo wanted two rows on her skirt.
This is SO easy – and a great way to use up those last few scraps from turning a T-shirt into a skirt. Here’s the video showing how.
If you knit/crochet a lot (or embroider!) . . . chances are you suffer from some achy wrists! I know that during last week, when I was crocheting up a storm, I certainly did!
Here are a few exercises that I do to relieve my sore wrists. Try to give these a whirl every hour or so while you’re working.
1. Swirl your wrist around! I don’t even know if this counts as an ‘exercise’… but moving your wrist in all sorts of directions (especially the directions it doesn’t move while you’re knitting/crocheting) really helps it out.
2. Prayer position. This is a little move I picked up from yoga class… it’s just like prayer position, but you’ll want to raise your elbows a little (while keeping your wrists still) to get a nice stretch in your wrist area.
3. Reverse wrist stretch. This one is the opposite of the stretch in point 2. Lay the back of your hand on a table, and press down lightly with your arm.
4. Rub those wrist bones! Use your thumb and massage all those little bones and tendons (and whatever else) that are in your wrist.
5. Squeeze. With your opposite hand, just squeeze your wrist. This gets all of your joint fluid flowing around.
Update! Stacey added a video showing some of these stretches here.
Every week I get questions from all of you. Good questions! And I try to answer them as quickly as I can. But I figure for every one of you that actually sends a question – a bunch of other readers have been wondering the exact same thing. So I’ll still answer your questions directly – but I’ll also pick some of them to answer here on the blog too.
I’m starting out with a question I hear a lot. . .
What kind of fabric can/should I use for embroidery?
If you’re just starting out, I recommend a smooth, woven (non-stretchy) fabric. It’s easiest to transfer your pattern to light fabric, but there are tricks to working with darker fabrics. Watch this video.
I said non-stretchy, but you can embroider stretchy fabrics too. It just takes an extra step in preparation – you have to stabilize the fabric. I show you how in this video.
I love stitching on velvet and other napped fabrics (those are fabrics with a pile like a rug – velvet, corduroy, terry cloth, etc.) Stitching on them is easy, though you may need to use an extra strand or two in your thread so your stitching doesn’t disappear into the pile of the fabric. The real trick is transferring your image. I have used Sulky Solvy Water Soluble Stabilizer in the past. It’s a water-soluble translucent film. You draw your image on that, then hoop it together with the fabric and stitch through both layers. Swish your finished embroidery in some water and the film just melts away. Easy peasy! I show you this stuff in action in this video.
Update: Since writing this post I discovered what I like to call The Magical Embroidery Stuff. Its real name is Sulky Sticky Fabri-solvy. It’s a pattern transfer tool AND stabilizer that works on dark fabrics, stretchy fabric, and napped fabrics. I use it now for EVERYTHING! Watch this video to see it in action.
If you want to stitch on some very fine, thin fabric, I recommend stitching through a double layer. You can also fuse some lightweight interfacing to the back. It helps keep your threads in the back from showing through to the front.
Want to stitch something extra thick like paper or leather? I have some earrings that I embroidered on metal! Poke your stitching holes first and then stitch. I show you how to stitch paper in this video. The process is the same for anything thick.
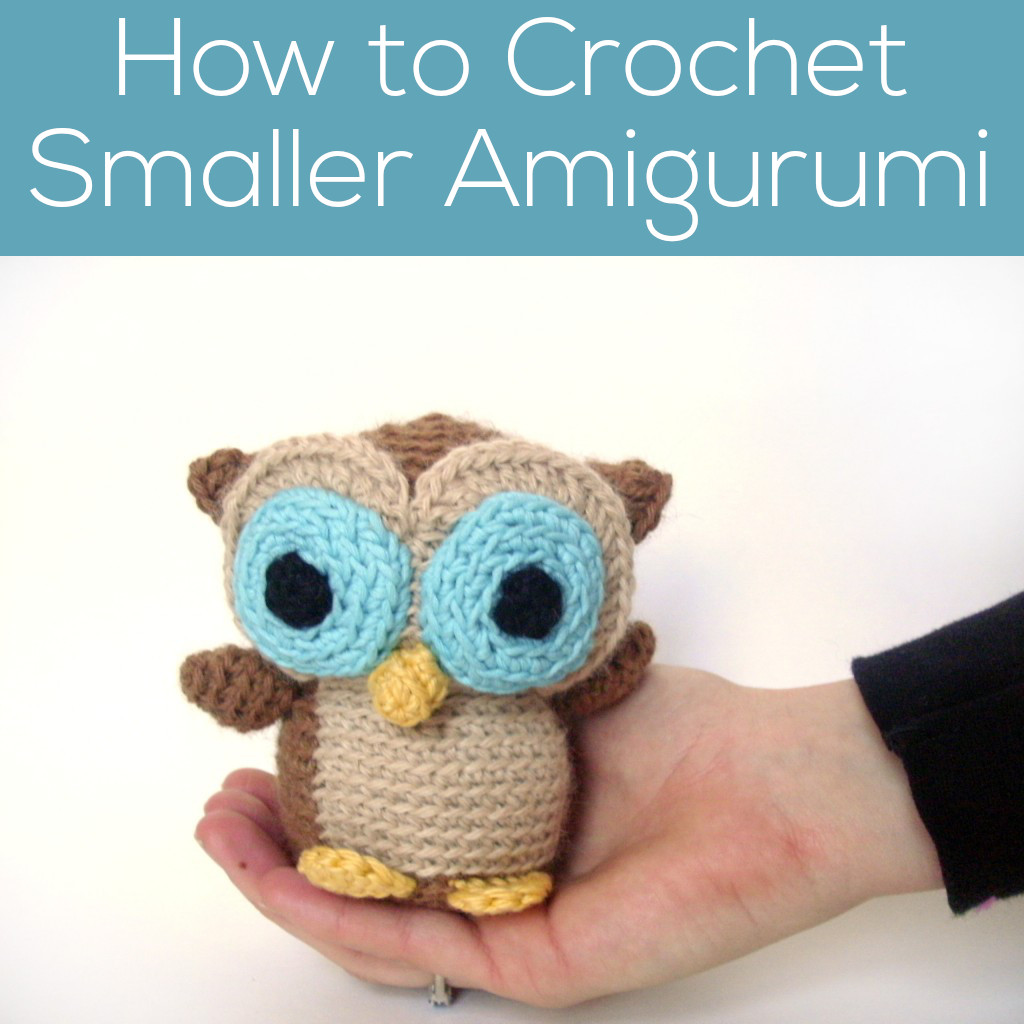
The easiest way to make a smaller amigurumi is to use thinner yarn and a smaller hook. You can even use embroidery thread!
But if you want to use regular yarn, there’s still a way to do it!
You’ll need to do some figuring on your own, but altering existing patterns is the first step to designing your own… so give it a try!
As an example, I’m going to talk about how to make any size Mike the Microbe, from my book Crocheted Softies. Feel free to try it out with any pattern!
Identify the parts of the Pattern
Have a good look at your pattern, and try to identify big chunks of the pattern.
When you have a look at the small microbe’s pattern, you’ll notice that rounds 1-9 are increase rounds (rounds where you add stitches), followed by 7 plain rounds (where no increasing or decreasing occurs) and 8 decrease rounds (rounds where you decrease stitches).
Start crocheting… with fewer rounds!
Mike the Microbe is adorable as is… but how do you make him smaller? Crochet fewer of all kinds of rounds!
I crocheted one baby microbe by crocheting 5 increase rounds, 3 plain rounds and then 5 decrease rounds to finish.
After the end of 5 increase rounds, I had 30 stitches… so when it was time to decrease, I started at round in the decrease instructions that had 30 stitches. Who knew so many instructions were built into the pattern?
Make features smaller, too!
Follow a similar logic for making smaller features… working fewer increase and plain rounds. Above, I decided to omit the buggy eyes- they were too hard to make smaller!
I also made a microbe adding the eyes that were in the pattern without modification- notice that they’re proportionally bigger on the body… but I think that’s cute, too!
So tiny and so cute!
Try it on everything!
Once you’ve tried ‘shrinking’ a simple pattern like a microbe, it’s time to this trick with other amigurumi! I crocheted a tiny version of Nelson the Owl by crocheting 5 increase rounds and 5 plain rounds instead of the 10 called for in the pattern.
I worked fewer increase rounds on the wings and eye circles… and it’s important to keep in mind that it’s okay if the smaller version doesn’t look exactly like the bigger version. As long as it’s cute, you’re doing great!
Hope you give ‘shrinking’ some amigurumi patterns a try!
Here are handy links to all the posts about crocheting stuffed animals in different sizes. . .
I get asked this question via email quite often, so I figured it was time to answer it in a blog post!
The short answer is: no.
But leaving it there would make a very boring blog post, wouldn’t it? So, here’s a bit more info about how yarn weights are labeled!
What does ‘weight’ of a yarn mean?
‘Weight’ refers to the thickness of a yarn. Yarn can be very skinny or very bulky, and everywhere in between.
Knowing the thickness of your yarn is crucial when you’re trying to follow a pattern or figure out which hook/needle size to use, because the yarn’s thickness (largely) determines the gauge that you will get in your knitted/crocheted piece.
American and British Yarn weight terms
Worsted weight yarn is the American term for yarn that you might spy in Australia or the UK as ’10 ply’ yarn. It’s the most common yarn weight that you’ll find on American shelves… and if you shop in Big Box stores, you might see it labeled as a “medium weight yarn.”
8 ply is the yarn that you’ll find most easily in Australia (which I know from personal experience), and I’ve heard that it’s pretty standard in the UK as well. It corresponds to what is called ‘dk’ weight in the US.
Help! How do I follow a US pattern with 8 ply yarn?
If you’re knitting/crocheting a garment, then there’s a slightly long and complicated answer about getting proper gauge and such when you substitute yarns.
However, the reason I get this question so often is because folks in the UK and Australia want to crochet an amigurumi pattern (which calls for worsted weight yarn), but they can only find 8 ply yarn. . . and then the solution is easy-peasy!
If you’re making amigurumi, what’s most important is that you use the right sized hook for your yarn. So, if you’re using an 8 ply yarn, select a hook size that gives you a nice-looking fabric that stuffing won’t show through.
Your finished piece will be an eensy bit smaller than one crocheted with thicker yarn… but it’s easier than ordering yarn from overseas!
So there you have it… worsted weight and 8 ply yarns aren’t the same… but you shouldn’t let that stop you from making an awesome amigurumi!
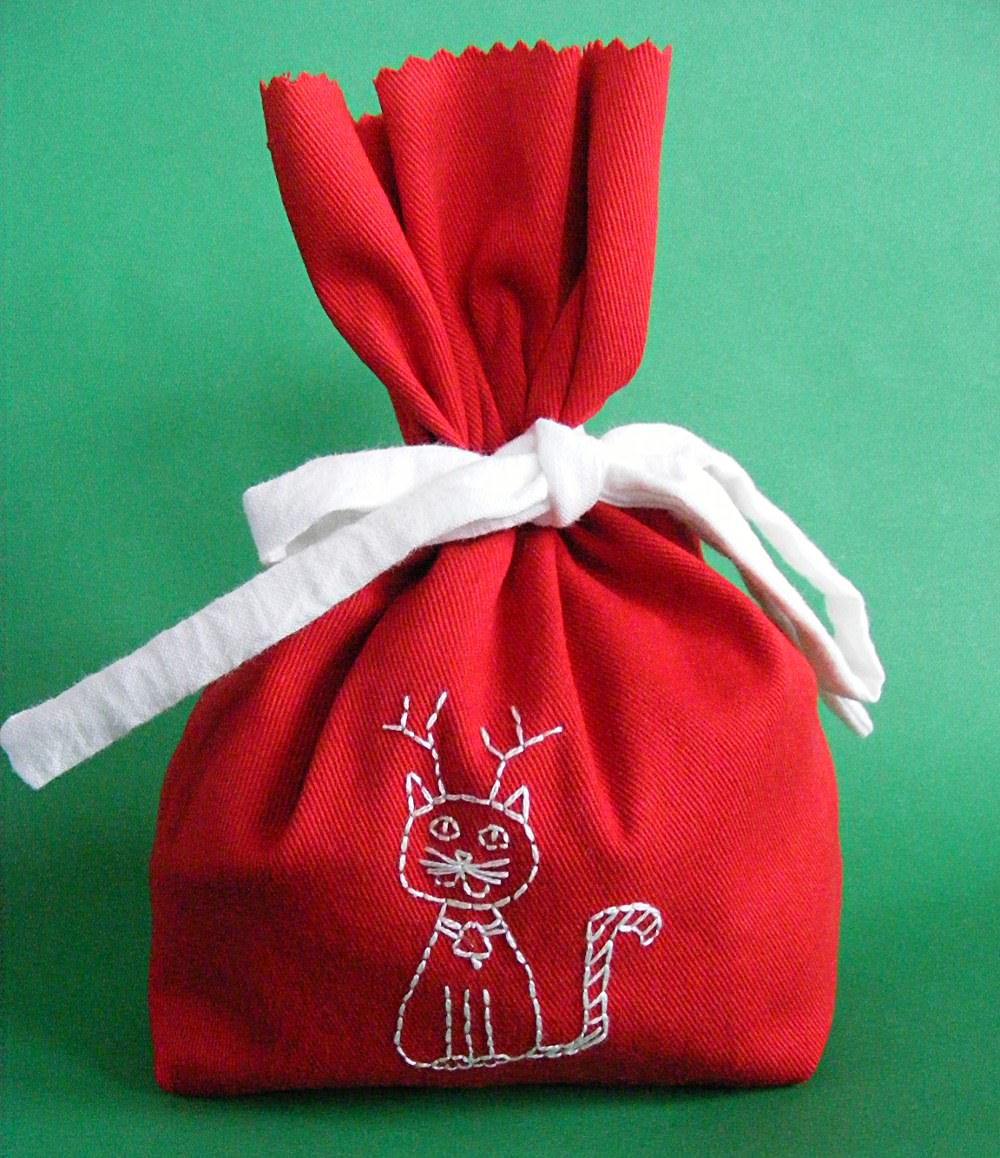
The Joel, of course, is Joel Henriques, the amazing dad who blogs at Made by Joel and author of Made to Play – a book showing you how to make tons of great, creative handmade toys.
Want to make a Christmas gift bag yourself? It’s easy!
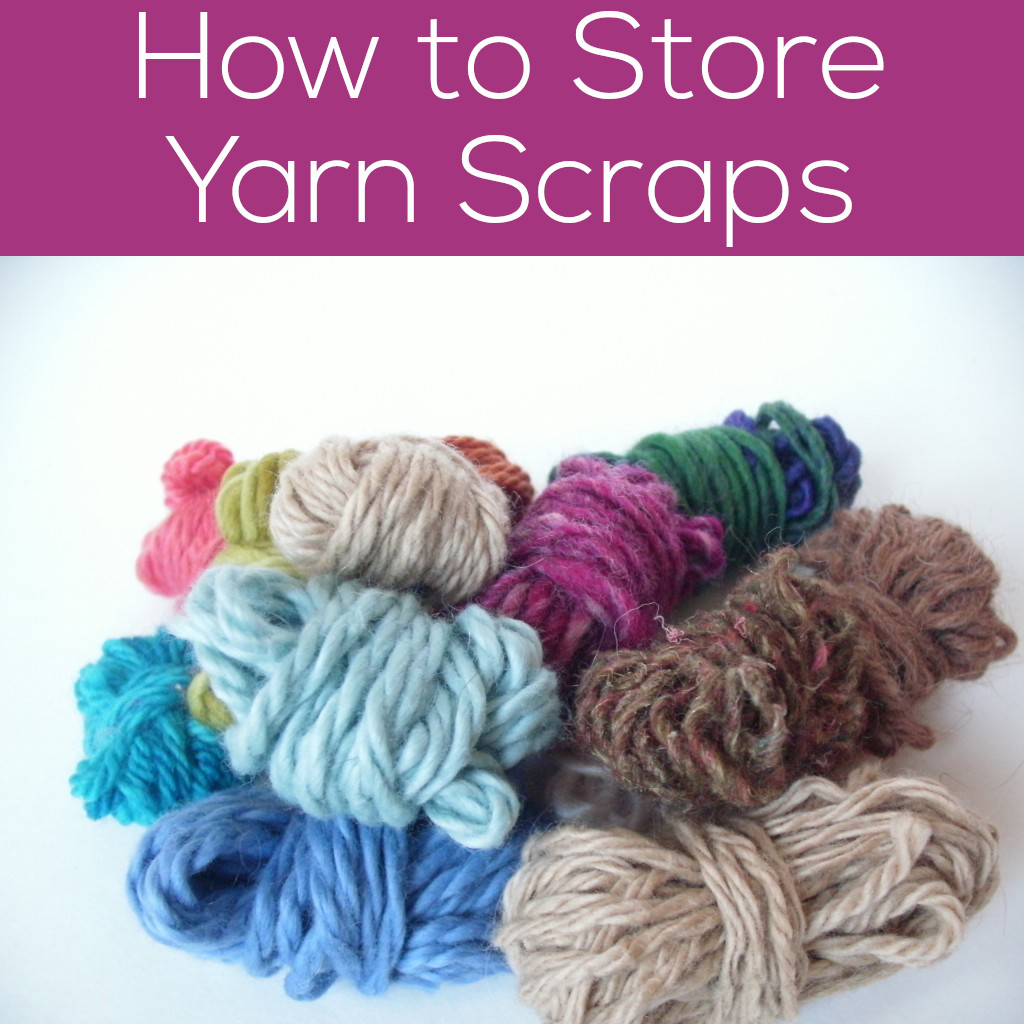
After you knit or crochet your first project, you’re immediately faced with an organizational problem: weird bits of leftover yarn. The more projects you do, the more these scraps build up.
And, if you don’t organize your scraps well, they have a habit of tangling themselves together into one giant knot. Not good.
So, even though it may seem a little obsessive… I wind each one of my leftover yarn bits into a nice little ball, and tuck them into my ‘scrap box’.
The Box
My box is just an ordinary copy-paper-turned-shipping box that I got in the mail one day. It’s sturdy, has a lid, and fits nicely on a shelf on my yarn bookshelf. Nothing fancy.
The big leftovers
My favorite kind of scrap yarn is the ‘big leftover’. You know what I mean… it’s a quarter to a half of a skein of some yummy yarn left over from a project. Since these guys are pretty substantial in size, I wind them with my ball winder. I make sure to tuck the end in the ball so that there’s no danger of them becoming unraveled.
Little Bits
Little leftover bits of yarn are trickier… I’m not even sure why I keep them. Maybe one day, I’ll just need 10 yards of bright orange for some project or another…
I just wind these guys around 2 fingers (it’s much too little amount for the winder), and then tie them around the center. Just like the big leftovers, you’ll want to make sure the ends are fastened so they don’t get the chance to become a giant knot in your scrap box.
What to do with the scraps…
Hmm… for now, mine live happily together (and neat) in their box. Sometimes I grab a ball if I need a little bit of a color… but no serious plans yet.
So, tell me… how do you organize your scraps? Any plans for them?
They’re fun on their own, but look what you can do when you mix them together!
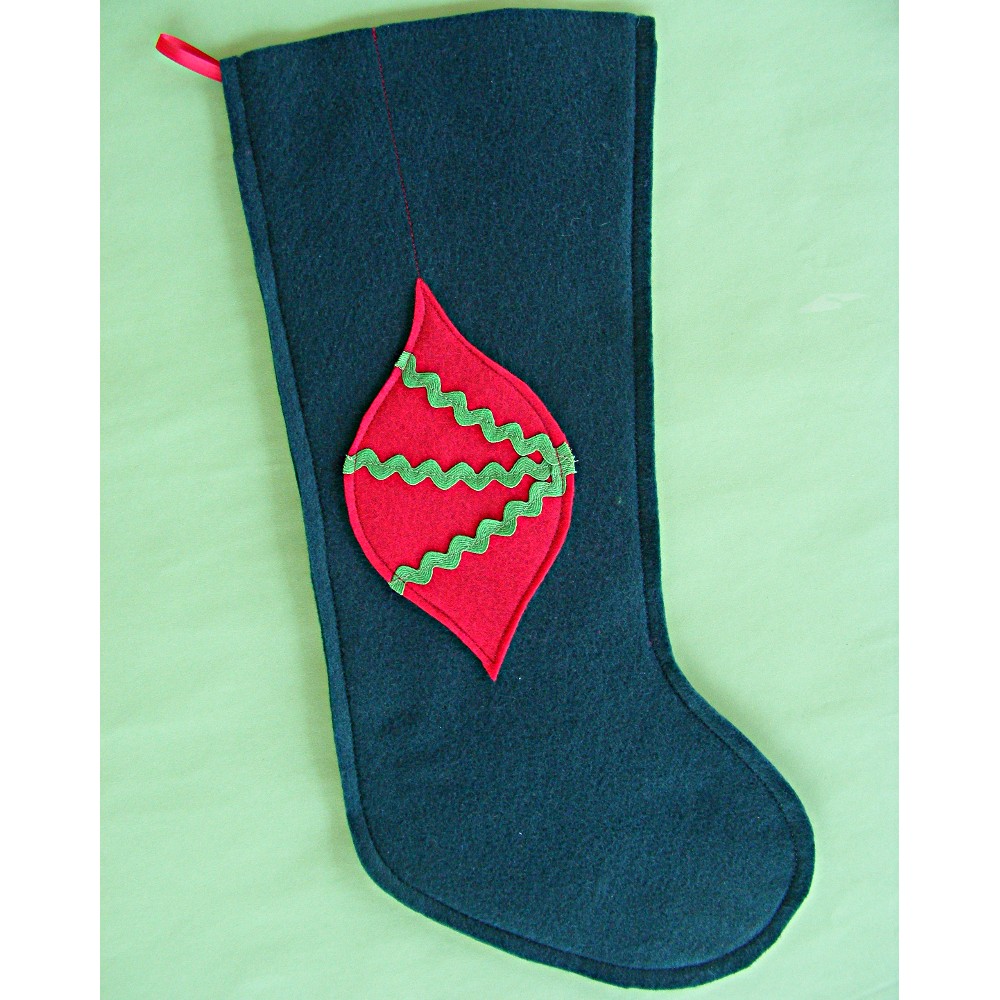
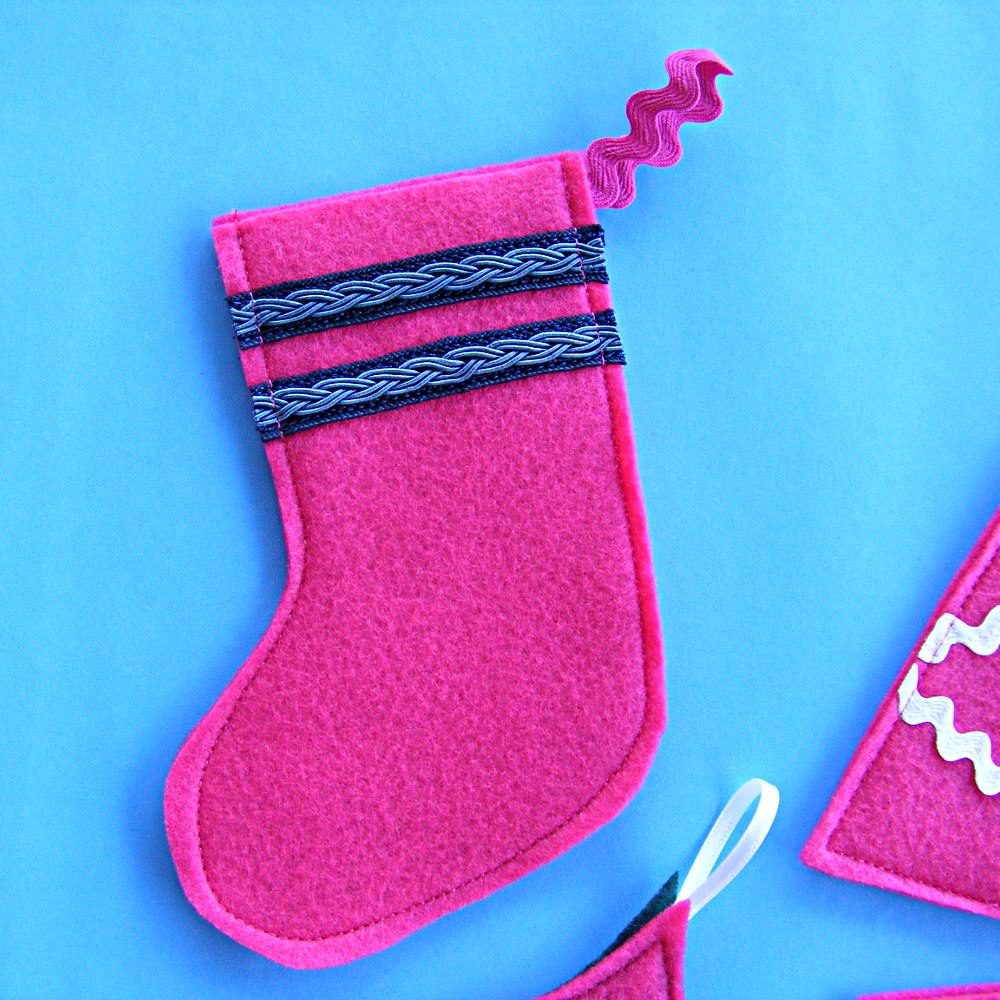
We’ll start simple. Sew some rickrack onto the ogee and sew the ogee to the stocking. If you want to get fancy you can run a line of stitching from the top point to make it look like it’s hanging. This stocking will take maybe 20 minutes to make and it’s very easy for a beginner.
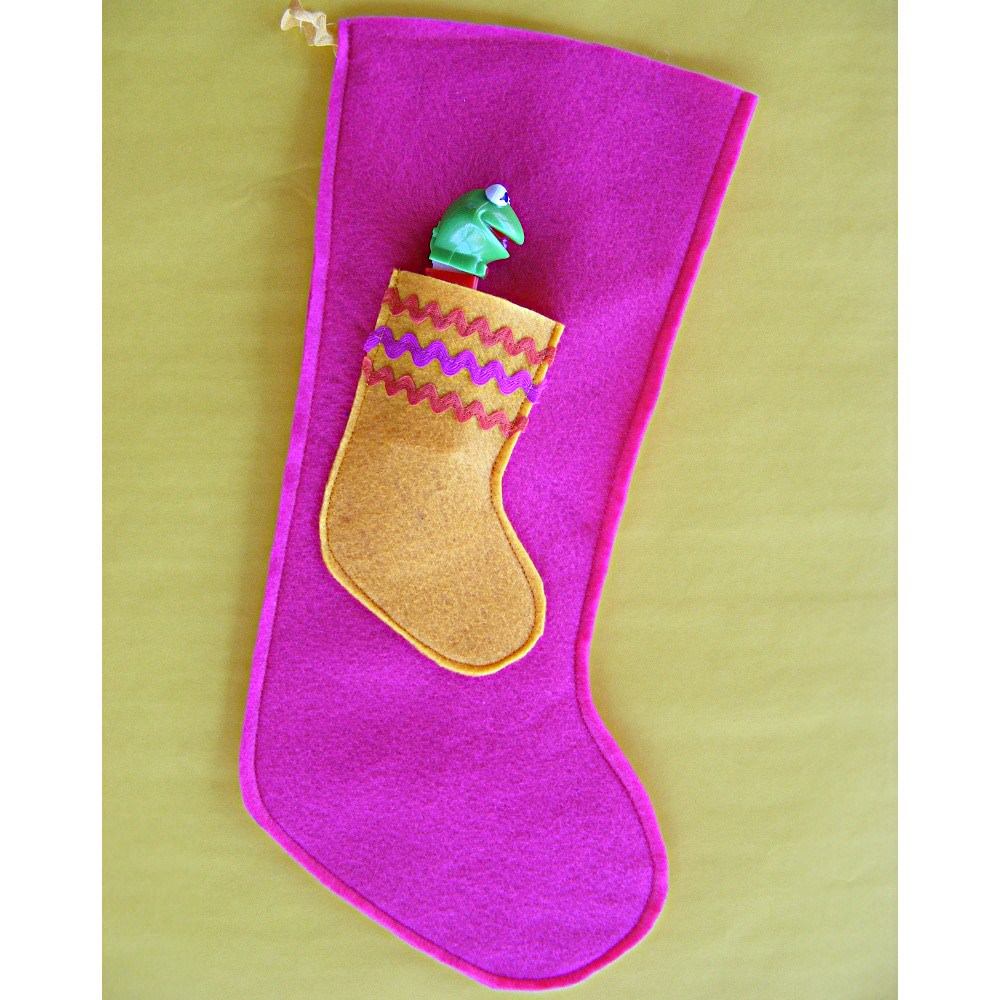
Here’s another super simple one – and one of my favorites. Stitch the little ornament-sized stocking to the regular sized stocking but leave the top unstitched. Now you have a stocking with a stocking-shaped pocket on it, perfect for holding a little Pez dispenser or a couple of lollipops or a small toy. Cute!
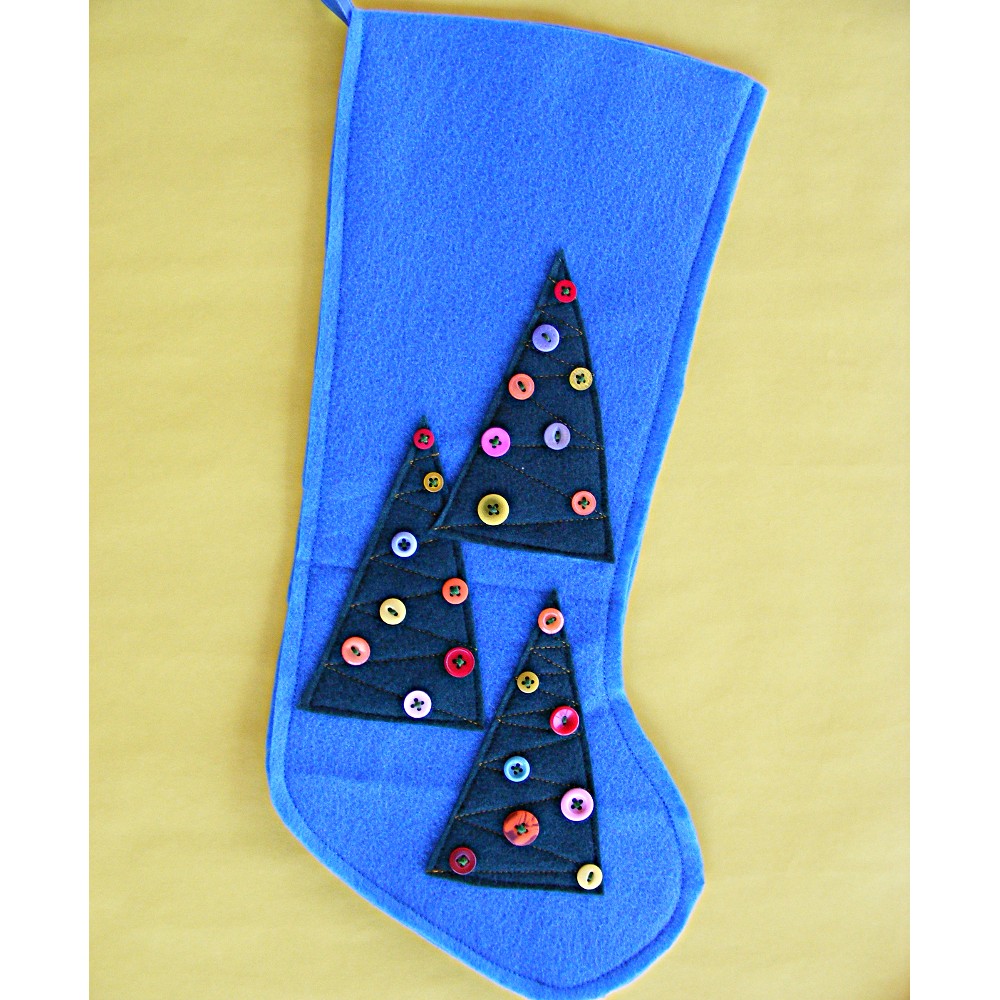
You don’t have to limit yourself to just one felt applique. For this stocking I cut out three tree triangles from the ornament patterns, stitched them to the stocking with a little swaggy zigzag action, then added random buttons. A forest of decorated trees!
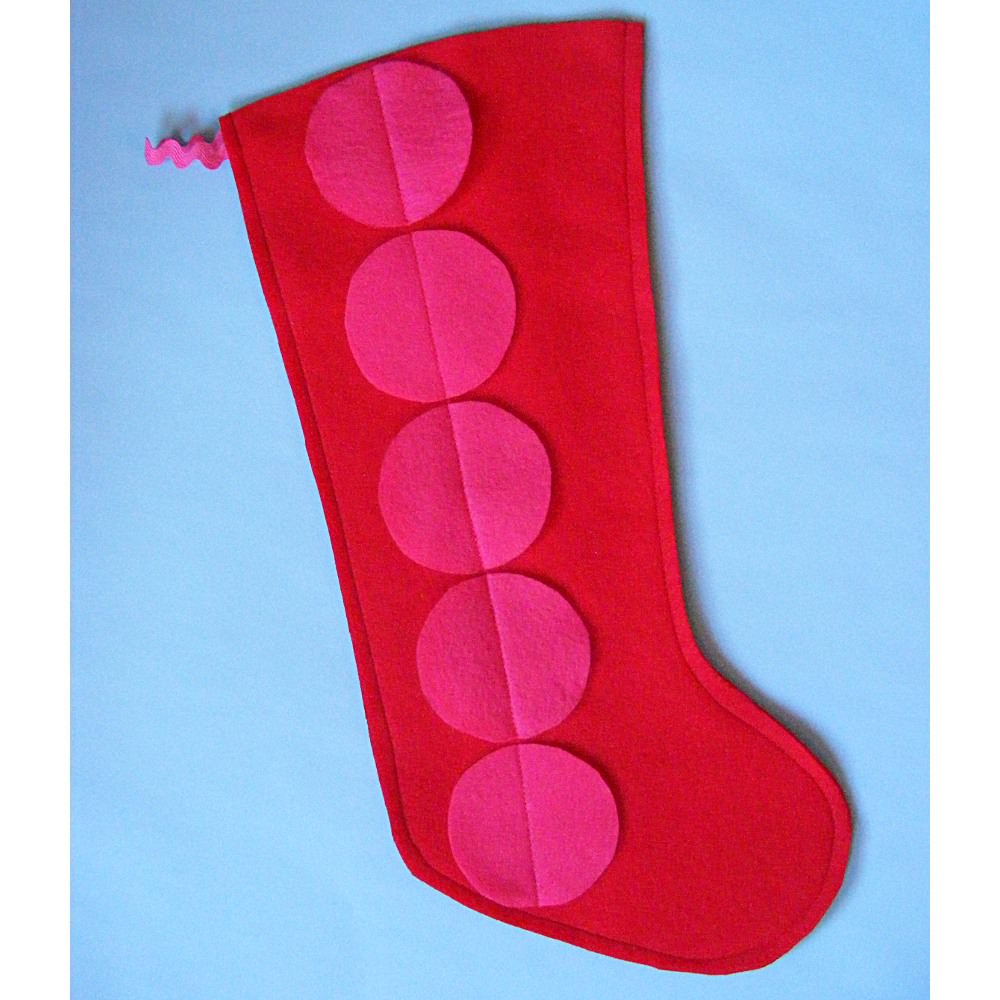
You can fit exactly five of the large ornament circles in a stack up the side of the stocking. Lay them in place, stitch one row of stitching up the middle, and you’re done.
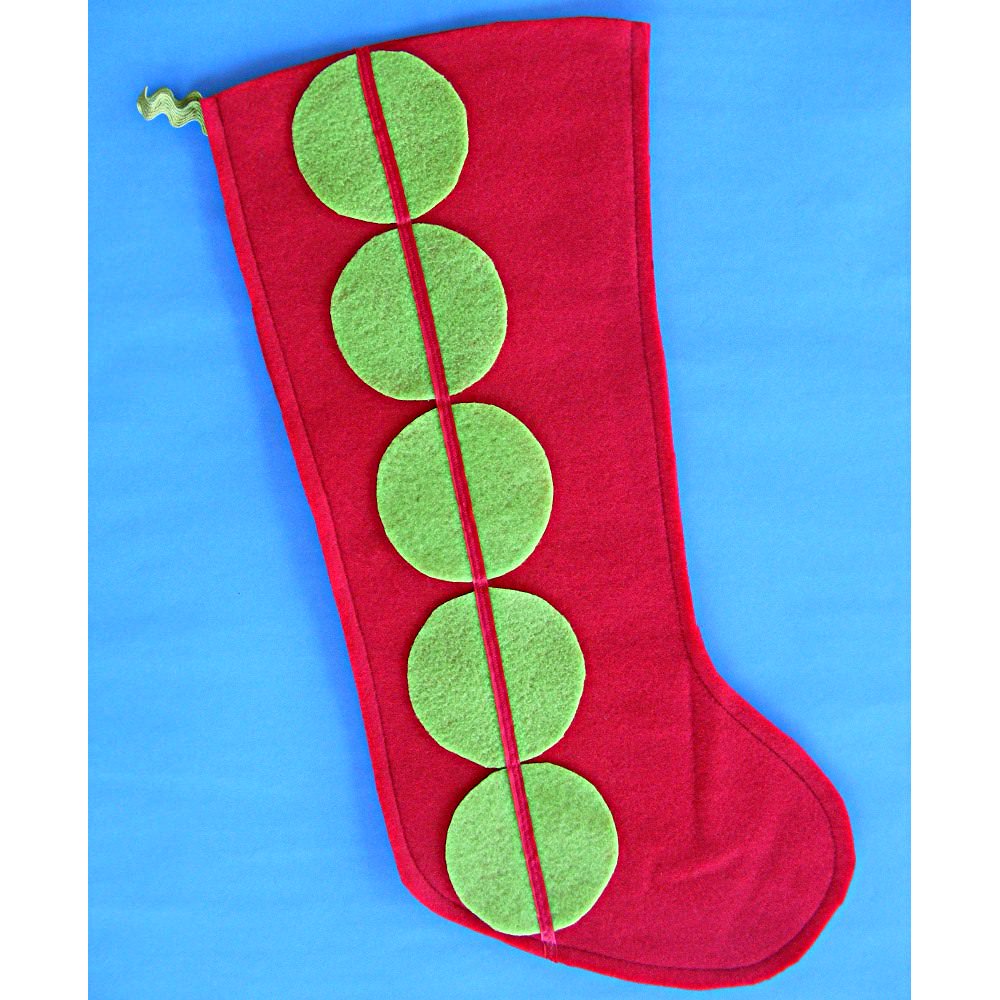
Here’s a variation with a more well-defined stripe. Instead of simply stitching up the middle of the dots, I laid a strip of satin ribbon down the center and then stitched over it. Easy peasy!
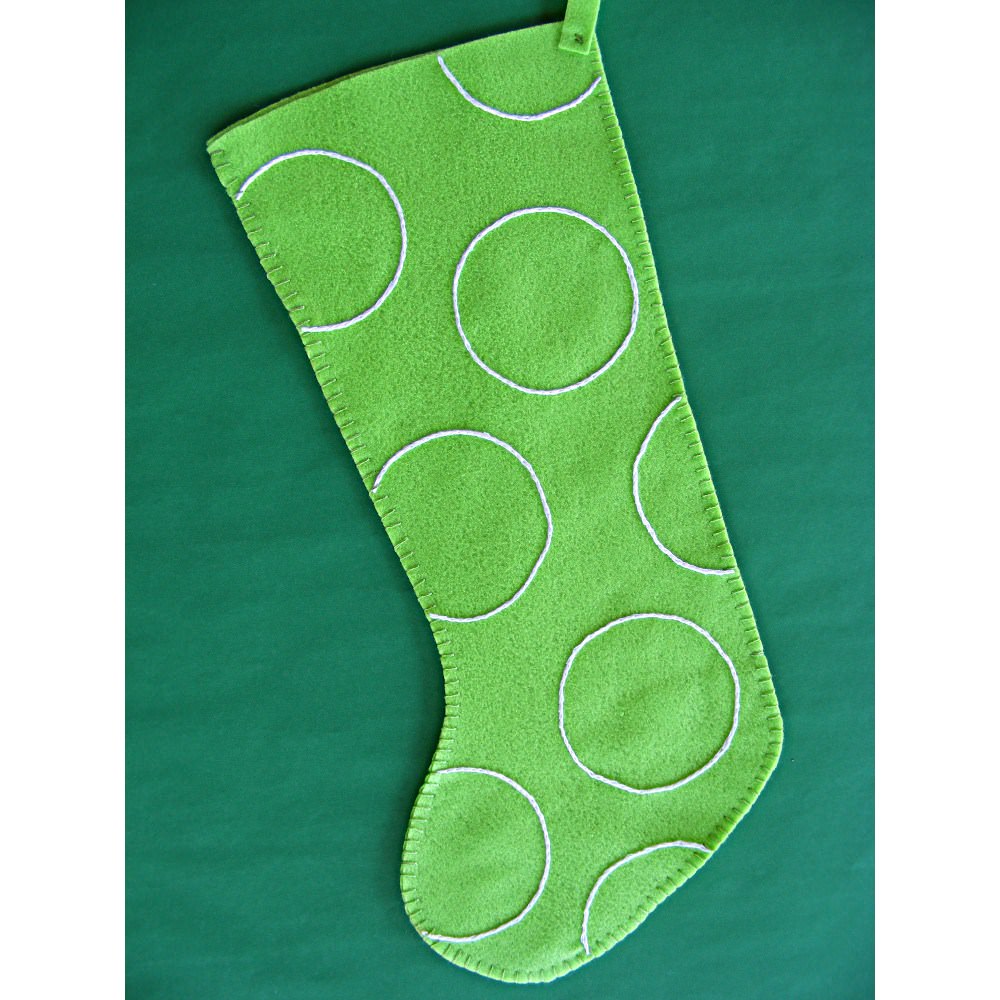
Forget about felt applique! For this one I didn’t sew down the big dots – I just used one as a pattern. I traced around it (randomly scattered over the stocking) and embroidered the circles with split stitch in white thread. Doesn’t it look minty fresh?
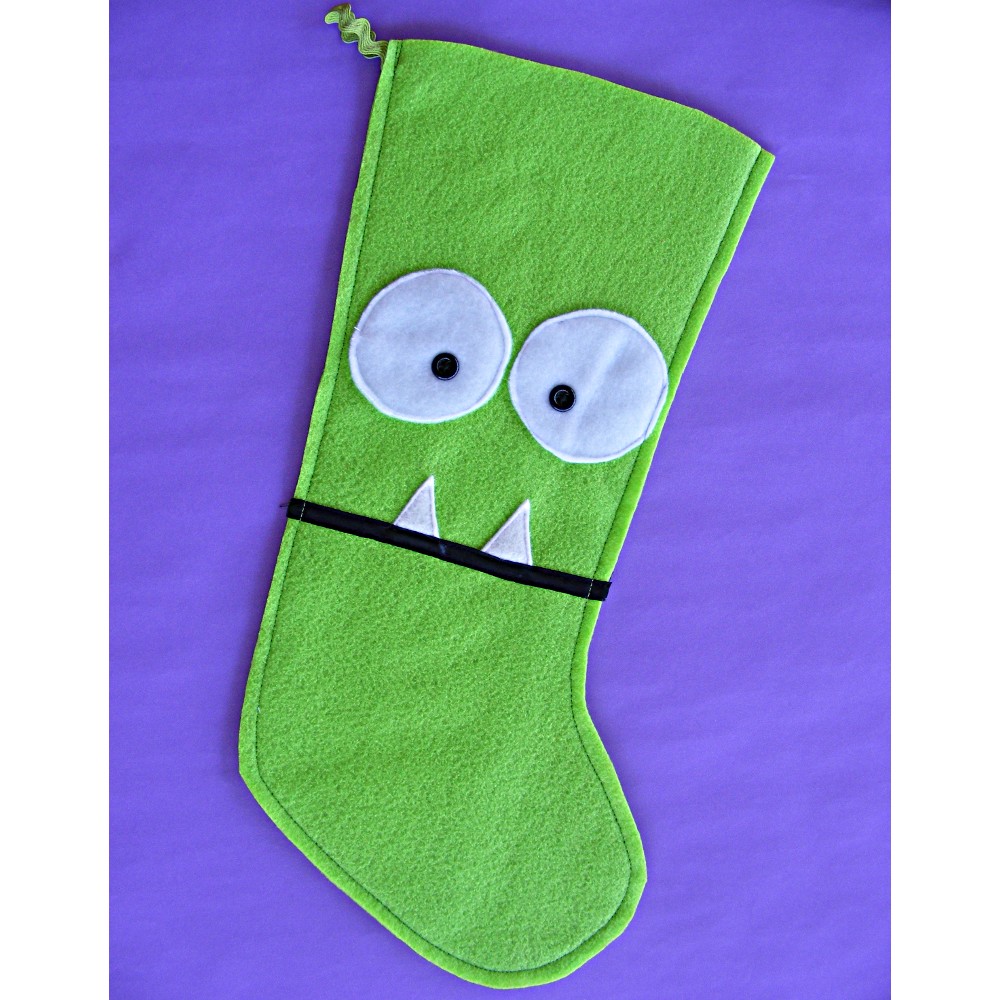
And then there’s this beauty! The big ornament circles make great eyeballs, no? The black strip for the mouth is a bit of satin ribbon, and the teeth are simply felt triangles tucked behind the ribbon before stitching.
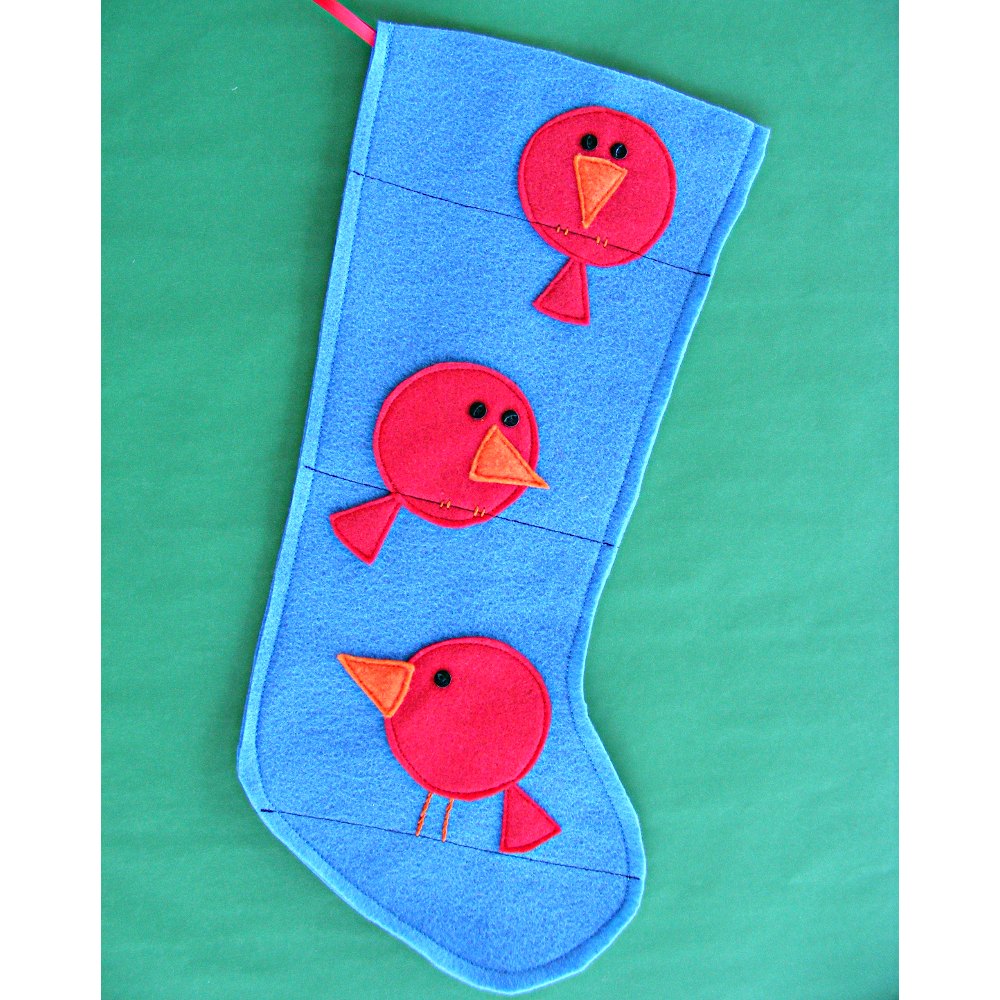
And now – my favorite. I used the big circles from the ornament pattern – and Ed Emberley’s Picture Pie: A Cut and Paste Drawing Book. Those three birds are straight out of the book – and it’s filled with other cool pictures too, all made from circles.
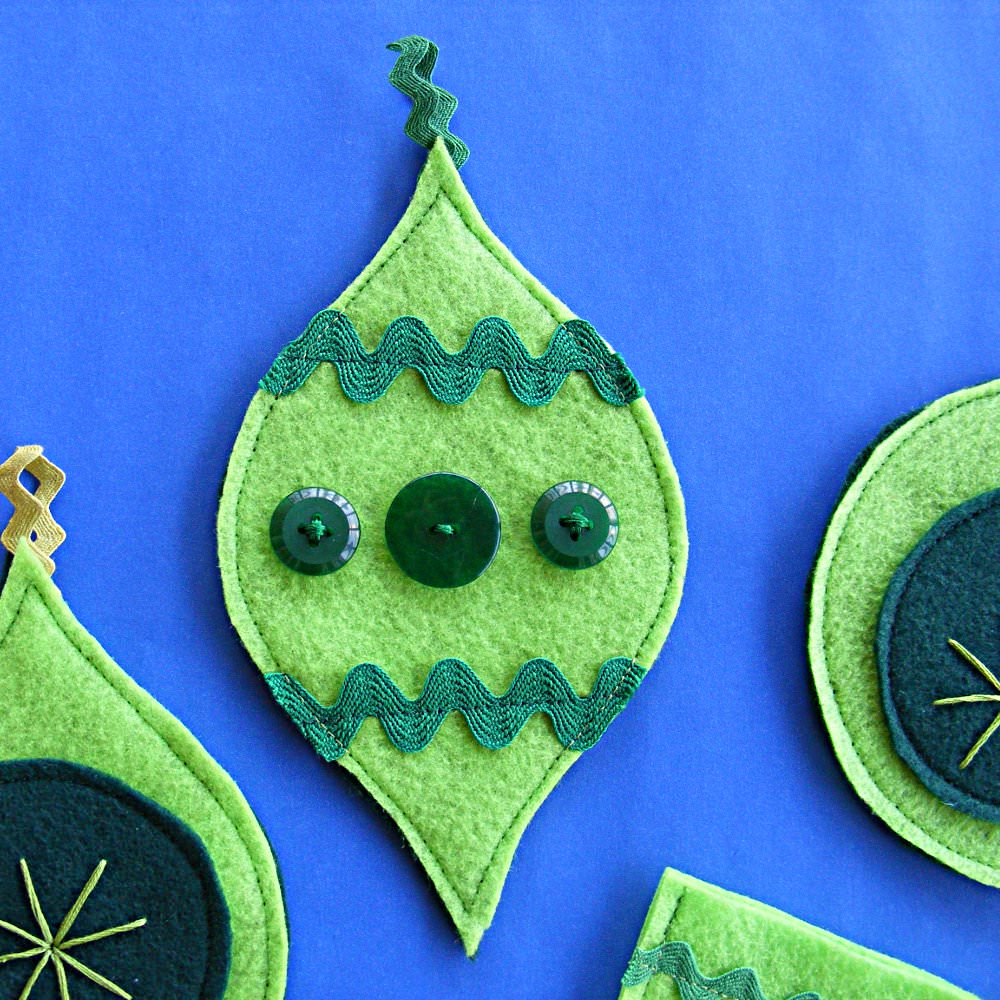
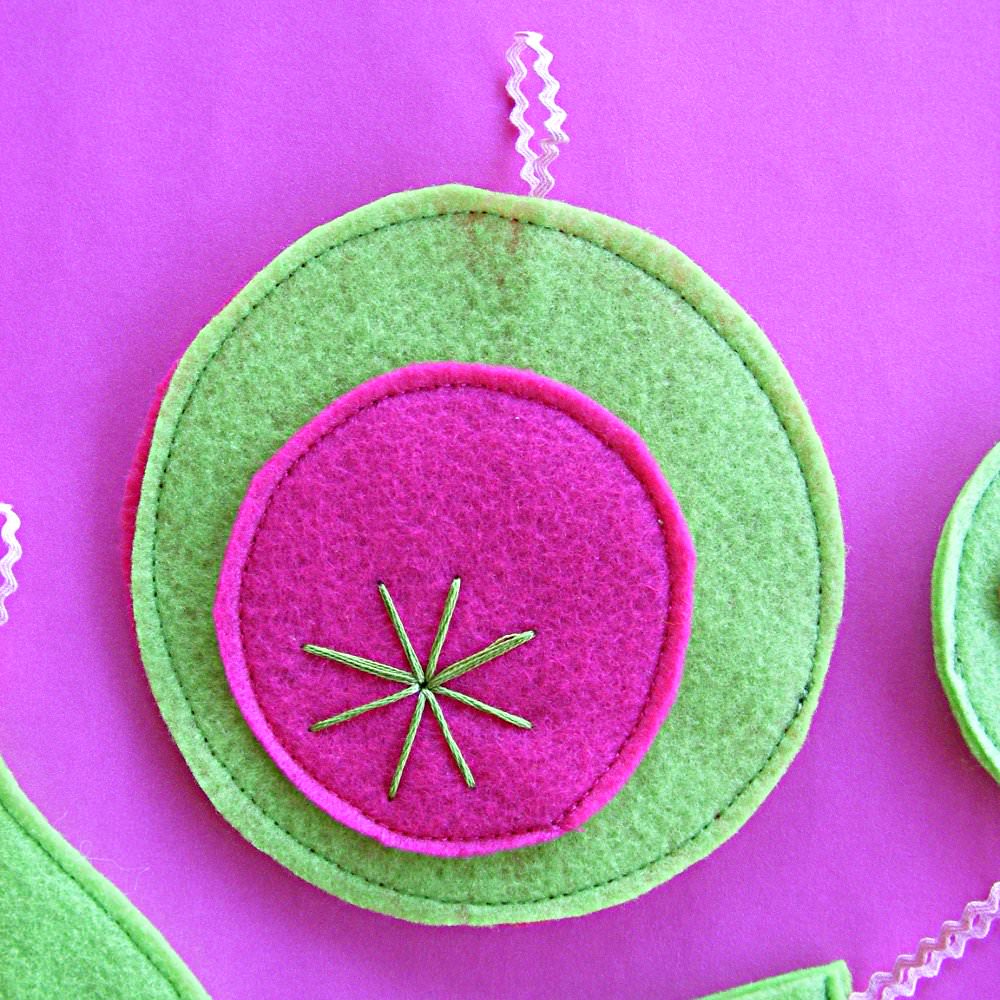
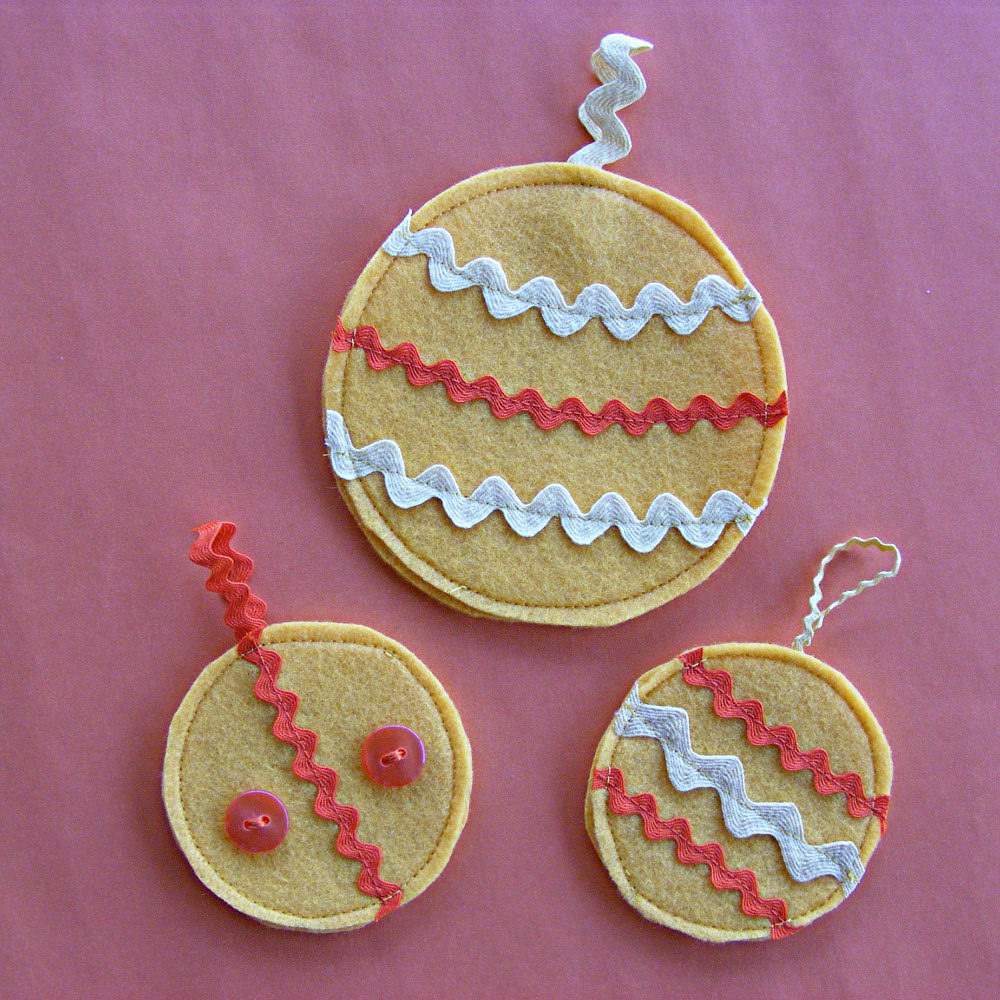
But now. . . ornaments. The pattern (click here to download) includes some really basic shapes – a tree, a stocking, an ogee, and two circles. The fun comes with what you do with these basics.
Add rickrack. (Boy – do I love rickrack or what?)
Add buttons!
Add fancy vintage trim!
Layer them together with a bit of really simple embroidery!
Don’t feel like you’re tied to traditional colors. I love these yellow and orange ones! (Especially nice too for folks who celebrate solstice.)
Download the free pattern. Gather up your tiny scraps of trim, your odd beads and buttons, your little bits of yarn – and have fun! These shapes are really simple and fun for kids to play with too. Put on some Christmas carols, serve up some cookies, and let them sew the rickrack on with the machine (nice easy straight lines). They – and you – will have a blast. I promise.