![]()
Four years ago I posted a tutorial showing how I make reusable fabric gift bags. We don’t use any gift wrap anymore at the holidays – just these bags.
This was a really popular tutorial and people loved the bags – but I had a lot of people ask how we stuck tags to them.
I’m finally getting around to that post!
For a while we just used paper tags tucked into the ribbon – but that didn’t always stay in place, so a couple of years ago I made a bunch of felt tags and they’ve been AWESOME.
First – a note. Mine is a small family – just three of us – and we all have different initials. So for us it worked really well to just have tags with a first initial. You may need to adapt the idea a bit to work for YOUR family, but the basic technique can be used a lot of ways. 🙂
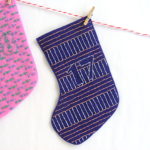
First cut a 3 inch square of felt.
Why 3 inches? It’s a number that allows me to get 12 squares out of a single sheet of felt with no waste. 🙂
Cut out the felt letter you need. I used this free alphabet pattern.
It’s easy to cut shapes like those letters if you use freezer paper.
- Trace the letter onto the paper side of the freezer paper
- Fuse the shiny side of the paper to the felt.
- Cut out the letter – cutting through the felt and the paper at the same time for super accuracy
- Peel off the paper and use it again.
Stick the letter to the felt square with a dab of glue stick. Sew around the letter using a simple straight stitch on your sewing machine. You could also hand sew the letter in place using fancier stitches, but I wanted to make a big stack of these in an afternoon. (Keep reading for a no-sew option.)
Cut a slit in the felt on each side of the letter.

I don’t measure these or worry too much about precision – most of the slits are about an inch tall, and roughly half an inch from the edge of the felt.
Done!
Now – here’s how I use them.
I make two kinds of bags. The main kind – the ones I use most often – have the ribbon sewn to the top edge of the bag. They’re designed for the ribbon to wrap all the way around the gift, like this. . .

For those I just slide the tag onto the ribbon anywhere on the front of the package. It looks like this. . .

This is a gift for Jo. 🙂
The other kind of bag I make has the ribbon sewn into a side seam near the top of the bag. Those bags are meant to gather up at the top like a classic Santa sack, with the ribbon tied around the neck of the bag – not the gift itself.
For those I thread the tag onto one of the loops before I finish tying the bow. Here’s what it looks like.

Another gift for Jo! 🙂
Both ways are super easy, and post-gift-opening cleanup is a breeze. The ribbons are attached to the bags, so I just fold up the bags, and make a little stack of the tags. The bags and the tags all fit in one small plastic tub – maybe the size of two shoe-boxes. 🙂
Here are links to everything you need. . .
- Fabric Gift Bag Tutorial (free)
- Alphabet Applique Pattern (free)
- felt (I like wool blend felt because it doesn’t pill and will look nice for years)
- freezer paper
- glue stick
I like the way the stitching looks, but you could make a completely no-sew version using Heat & Bond Ultrahold fusible adhesive. Remember – this is the heaviest weight they make and you should NOT sew through it. (It will gunk up your needle.) If you use this option, you’ll need to fuse a little hotter/longer than the package directions say in order for the heat to fully penetrate the thick felt and melt the adhesive. Everyone’s iron is a little different, so just experiment with temperature and time until you get a solid fuse.
Happy crafting!
Best,
Wendi