Everything You Need to Know about Working with Felt

Fanned stack of felt in pretty colors, with threaded needle. Text reads: Everything You Need to Know about Working with Felt

I LOVE working with felt! The edges don’t fray, it’s delightfully warm, it takes embroidery beautifully, and it comes in the most luscious colors.

But it’s different than regular fabric.

These tips will make it super easy to work with.

Why wool felt?

It’s way more durable that the cheap acrylic stuff you can buy at any craft store! I wrote a post about the difference here.

One important thing to know – it doesn’t need to be 100% felt to get that quality boost. The main thing is that it’s NOT acrylic. That’s what makes cheap craft felt pill. The felt I use is only 20% wool and 80% rayon and it’s lovely. If you have allergies and can’t work with wool, try bamboo felt instead. It can be harder to find, but it’s WONDERFUL!

How to Mark on Felt?

The trickiest thing about wool felt is that it’s hard to mark on it. It’s so thick that you can’t trace a design through it, and drawing on the felt tends to lift the fibers and make it look messy. I use two products that really help – freezer paper and Sulky Sticky Fabri-solvy. There’s a video here talking about both – but here are the details in a nutshell.

Freezer Paper

I use freezer paper when I just want to cut out small shapes. Trace or print the templates on the paper side of freezer paper, fuse it to the felt with an iron, and then cut the pieces out through the paper and the felt together. Peel the freezer paper off and it doesn’t leave even a trace behind. It’s the perfect way to cut out small shapes very precisely!

If I need to mark dots (usually for eyes) I punch a hole in the freezer paper before I fuse it down, then mark through the hole for very precise placement.

Use a hole punch to mark precisely on felt. - Handy tip from Shiny Happy World

Sulky Sticky Fabri-solvy

If I need to transfer anything more complex than a dot I use Sulky Sticky Fabri-solvy. I love this stuff so much! You print or trace onto the stabilizer, peel off the paper back, and stick it to the felt. Stitch right through the felt and stabilizer and then rinse away the stabilizer. Every trace dissolves in water and you’re just left with beautifully stitched felt. I show a lot of process photos demonstrating this in action in this post.

I can’t say enough how much I love this product. It has opened up a whole world of possibilities!

Whipstitch

I mostly use whipstitch to applique on felt and to sew felt pieces together. It’s called whipstitch for both uses – but the stitch actually looks a little different for the two applications.

This video shows how to use whipstitch for felt applique. I love doing this so much!

This video shows how to use whipstitch to sew felt edges together.

You can find all my other felt tutorials here – but those are the two main ones.

Free Felt Patterns

Want to give it a try? You can find a whole bunch of free felt patterns here. Baby booties, coasters, garland, softies – there are lots of different designs to choose from.

Here are a few of my favorites. . .

set of pretty felt coasters with flower applique and embroidery - a free pattrn for a great way to learn about working with felt

This free felt coaster pattern is a great way to get started working with felt. You’ll do a little applique and a little embroidery and you’ll end up with a pretty set of coasters.

Baby Bear Booties - a free pattern from Shiny Happy World

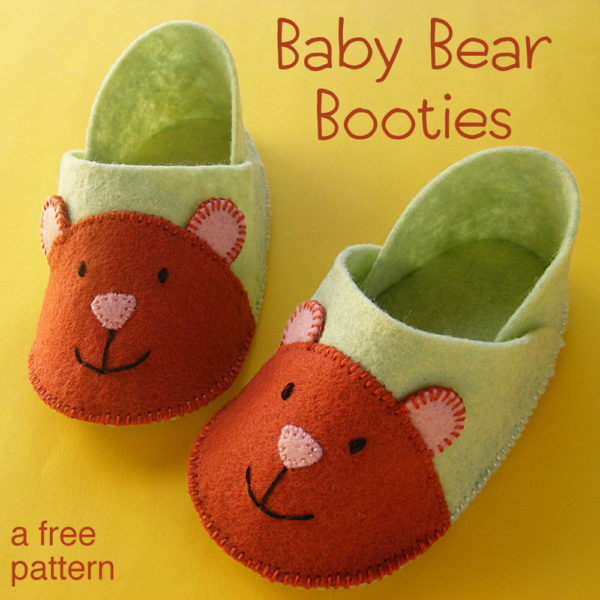
These baby bear booties are just too adorable. This is a terrific first not-flat project.

Felt Heart Garland - a free Valentine's Day pattern from Shiny Happy World

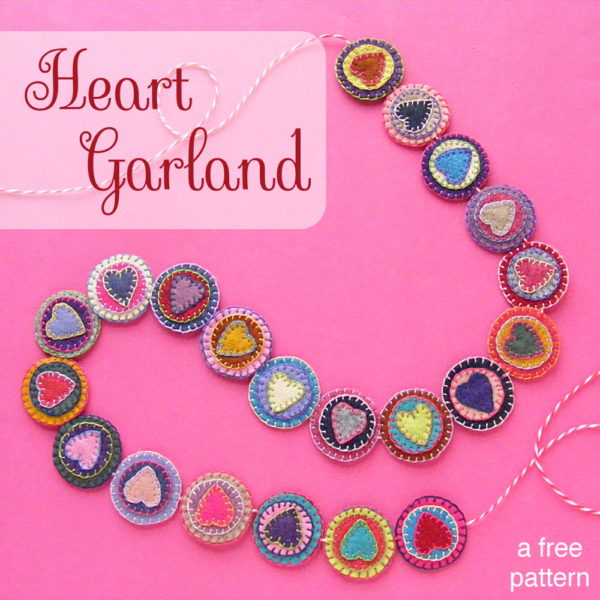
If you’re got a lot of random felt scraps, try this free felt garland pattern. It teaches you a different way to applique and join pieces together – the blanket stitch.

Have fun working with felt! It really is delightful. 🙂

Happy stitching!

Wendi Gratz from Shiny Happy World

Best,
Wendi

Play with some felt! Try the Oddballs – a fun pattern for silly monsters.

Everything You Need to Know About How to Applique

Everything You Need to Know About How to Applique - terrific info from Shiny Happy World

This one post will give you all the links you need to get to all of my different posts (and there are a lot of them) about how to applique. I love applique!

First, there are three major applique techniques.

Needle Turn Applique

This is beautiful and soft and lovely – but it’s a hand technique so it’s sloooooow. It’s still doable though! My very first quilt was enormous and full of needle turn applique.

This video shows how to applique with the needle turn technique.

You can see my first quilt here. 🙂

The only tools you need are a washable marker and a needle and thread.

Freezer Paper Applique

This is also beautiful and soft and lovely, but it’s a machine technique so it’s much faster than needle turn.

There are four videos for this technique, because you use different techniques for different shapes. I’m listing them here in order from easiest to hardest.

Those points can be a real bear and lead to burned fingers. 🙁

You’ll need freezer paper. I also think it’s handy to have some spray starch.

Applique with Fusible Adhesive

This is my favorite way to applique! It’s fast, fun, easy, and durable.

If you want to give this method a try, I recommend signing up for Let’s Make a Quilt!

Let's Make a Quilt! - a free video class from Shiny Happy World teaching you everything you need to make a quilt using Quilt As You Go and applique with fusible adhesive

It’s a free online video class and you can use any pattern you like as you work through the lessons.

Or you can use the links below to jump to any tutorials you need.

There’s a photo tutorial here showing how, and there’s a video tutorial here showing the same thing.

There are lots of different brands of fusible adhesive. My favorite is Heat & Bond. I use the Lite weight for all my quilts. There’s also a super strong version called Ultrahold that is a nice option for tiny eyes and other small pieces you might not want to have to sew.

Speaking of sewing – this post has info about how to stitch around the pieces – especially how to figure out what order to stitch in.

I usually sew around my pieces with a simple straight stitch, but some people prefer to use a zigzag or satin stitch. This video has some tips for zigzag stitching the edges.

I get a lot of questions from people asking how durable the applique is if you just use straight stitching. I answer that here – showing some close-up photos of a quilt that my daughter has been using for some time now. That means it’s been washed and dried a lot. 🙂

If you want a thicker line with that straight stitch, you can just use a thicker thread. Easy peasy! I show some samples here. This is the thread I use for a thicker line.

This post has tips for stitching around small pieces, like eyes and noses.

Applique Extras

You can add fun 3D bits to your applique – ears or tongues that are flappy, hair that dangles, etc. This post has more info.

It’s fun to play with with faux fur – but you can’t use fusible adhesive for that because it will melt the fur. Here’s how to applique a faux fur piece. And here’s how to applique regular fabric (like eyes or a mouth) onto a fur background.

Finally – here’s a fun post about how to turn any drawing, embroidery pattern or clip art into an applique pattern using fusible adhesive. This is such a fun way to use a child’s art!

Quilting

One more thing! You’ll notice in a lot of the videos that I quilt my blocks first and then add the applique over the quilted block. It’s so easy this way! You can see a gallery of my favorite designs (with instructions) here.

I hope you have fun trying out some of these techniques! It allows you to achieve certain shapes in your quilts that you just can’t get with piecing. Plus it’s incredibly easy and fun! You can see all of my quilt patterns here and there are some free quilt patterns to play around with here.

Happy stitching!

Everything You Need to Know about the Controlled Chaos Scrap Quilt


Controlled Chaos - a free scrap quilt pattern from Shiny Happy World

I’m completely in love with the Controlled Chaos scrap quilt!

A lot of you are too, because I’ve been getting a lot of emails asking about it lately. 🙂 It’s about time to put all the links together into one handy place!

I’m still working on the quilting, so this is a work in progress. I’ll update it with new info as I get closer to finishing and post more details. 🙂 Read all about the finished quilt here!

The Blocks

Click on the image to jump to the instructions for that block.

The Quilting

I used Big Stitch Quilting for this quilt, all by hand.

Controlled Chaos - a free scrap quilt pattern from Shiny Happy World

I find it helpful for a project like this, where every block will be quilted a little differently, to establish “rules” for the overall quilt. For this quilt, my stitching within each block runs parallel to the edges of the block. My quilting in the sashing is zigzag angles. I think it helps set that sashing off as different, so it frames the blocks better.

The Tutorials

These are all general tutorials you can use for any quilt project, but they’re especially helpful for the Controlled Chaos quilt.

Choosing Colors (part of the Block #3 instructions)

Cutting Small Squares from Scraps

How to Chain Piece

How to Join Pieced Strips

How to Add Sashing to a Quilt

How to Layer and Baste a Quilt

Big Stitch Quilting

How to Bind a Quilt

There it is! Everything you need to make your own Controlled Chaos Quilt! Of course yours will look totally different because your scrap bins are filled with your favorite colors – the ones you go to again and again. Sew them up into a beauty like this! 🙂

Happy quilting!

Best,
Wendi
Wendi Gratz from Shiny Happy World