Eep! There’s a knot in my yarn! Help is here…

What to Do When You Find a Knot in Your Yarn - tips from Shiny Happy World and FreshStitches

Yippee! Another Tip Tuesday, where I share (what I hope is) a super-helpful crocheting tip. Today, I’m going to talk you through what to do when you arrive at an oh-so-pesky knot in your yarn.

Knots in yarn are a part of life. Even in commercial yarns, knots occur when the manufacturer needs to join two (very long) lengths of yarn together. Unfortunately, that knot has to go somewhere – and sometimes it’s your skein! But fear not- I’ll show you a couple ways of handling it.

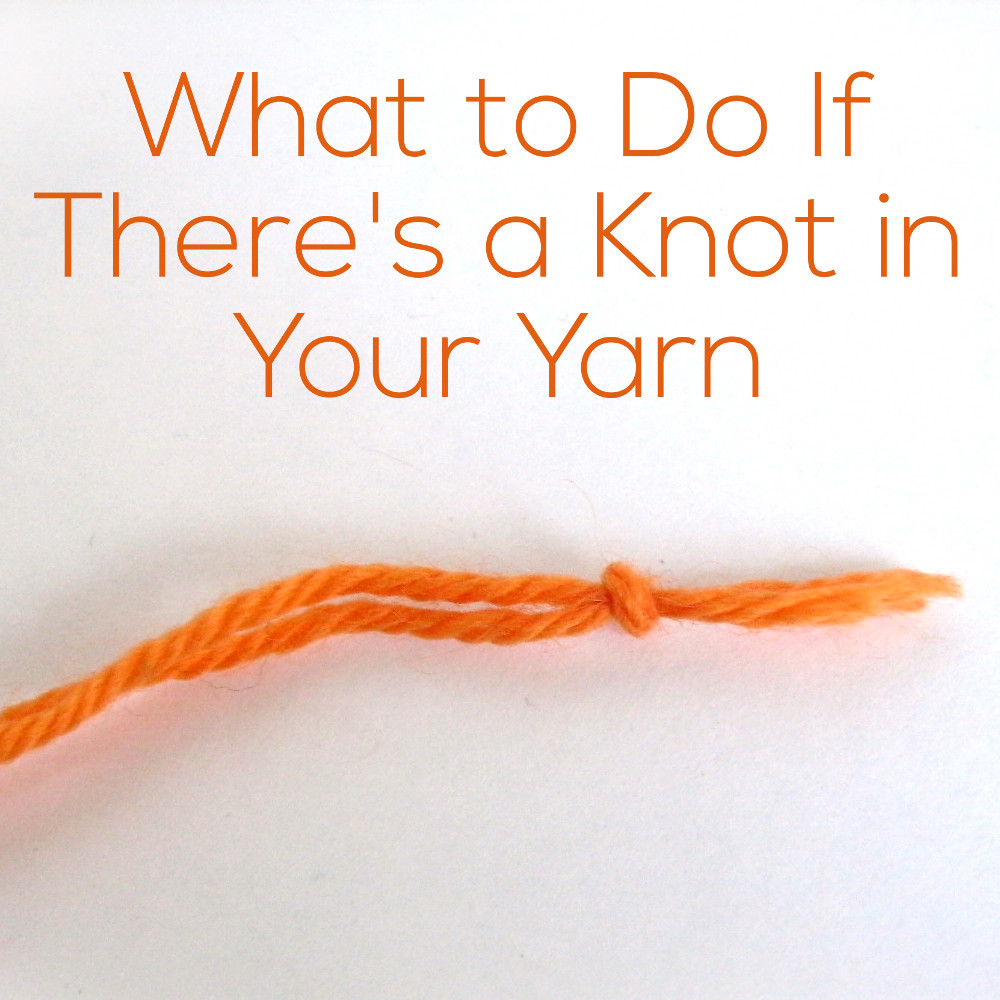
Option 1: Check if the yarn is actually broken

Sometimes, there’s a knot in your skein because the yarn has gotten a bit tangled.

I’m not sure if you can tell from the photo, but this knot is just a tangle- there’s no break in the yarn. Gently work to untie the knot, and you can just keep on crocheting! Like nothing ever happened!

Option 2: Continue crocheting with the knot in place

What if you’re not so lucky and there is actually a break in your yarn?

Sometimes, you can keep right on crocheting! You can see here, I’ve crocheted until I’m at the knot:

Can you tell that the knot is very close to my hook? That’s a good sign! It means that I’ll be able to crochet right over the knot, and just push the knot to the wrong side of my work.

To do this, I continue crocheting- coaxing the knot to stay on the wrong side of my work:

And the right side looks marvelous!

Crocheting over the knot only works if:

  • The knot happens to fall in the right place while crocheting. A centimeter further along, and it might end up smack in the middle of your stitch. Bleh.
  • You don’t mind having a knot in the back of your work. I make a lot of stuffed animals, so I don’t mind (the inside gets stuffed). But if you’re making a shawl, this may not be ideal.

So what if crocheting over the knot doesn’t work? Onto option 3…

Option 3: Cut the knot

If the knot happens in a funny place (so that you can’t hide it on the back of your work) or you don’t want a knot, then you’ll need to cut the knot.

To do this, stop crocheting a few inches before you get to the knot, and cut the knot off:

Now you have no knot, but two pieces of yarn. From now on, you’re going to work as if you’re changing colors… but you’re really just changing yarns!

As if you’re about to change colors (check out this video on color changes if you’re unfamiliar), begin working with your new yarn:

and continue working with the new yarn.

You’ll have 2″ or so of tails (one from each piece of yarn) on the wrong side of your work… and you’ll want to handle them the way that suits your project best. For a stuffed animal, I would tie a knot:

If you’re making a shawl or another piece where you don’t want a knot, you’d want to weave the tails in to secure.

And that’s it! No matter where the knot turns up, now you know how to tackle it!

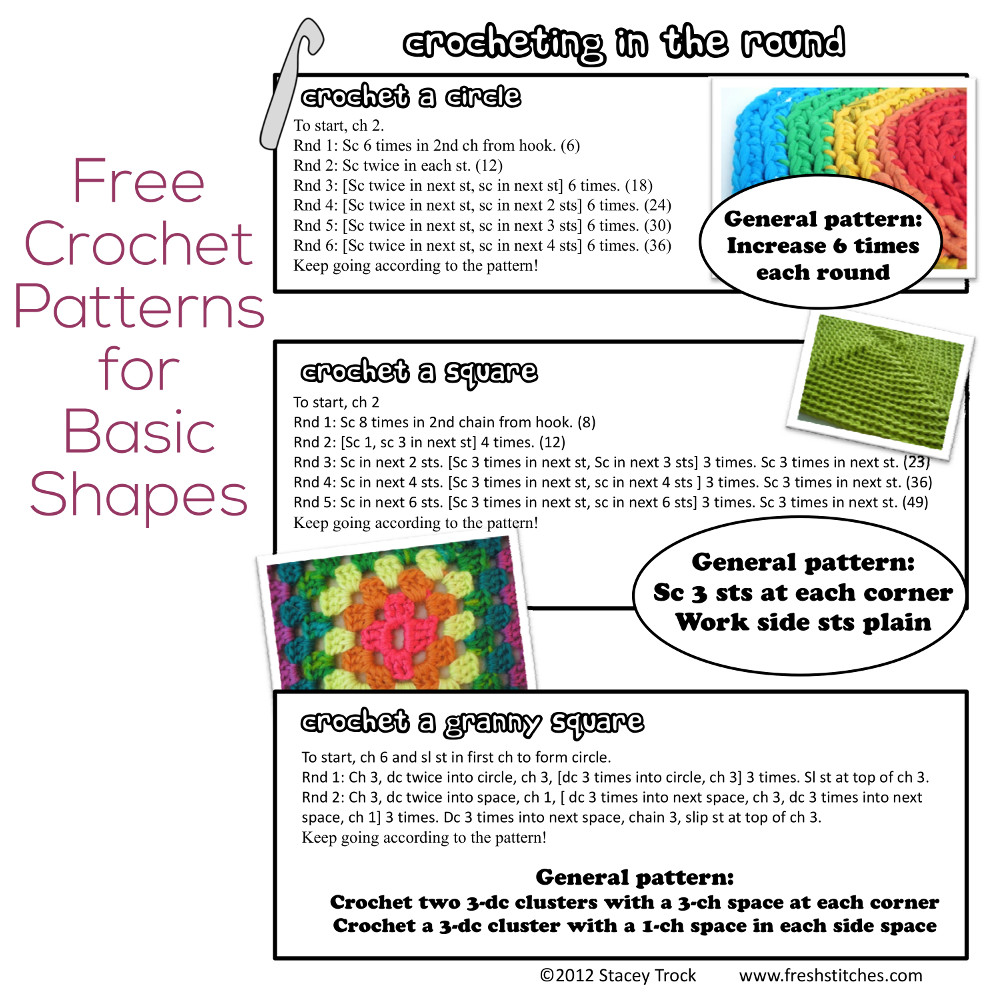
Here are handy links to all the posts about yarn. . .

Return to the main table of contents for Let’s Learn to Crochet Amigurumi.

Move on to the lessons for the basic crochet stitches.

Happy stitching!

Crocheting in Rounds: free download

Crochet in the Round - free patterns for basic shapes from Shiny Happy World

I love crocheting in the round! It’s easy to crochet circles… but also squares! I’ve put together this easy reference guide to get you started crocheting circles, squares and granny squares:

Download the pdf version of the guide by clicking here.
What can you actually do with these patterns? Lots! Here are a few ideas:

  • Crochet a hat. Make a circle, and continue increasing until the circumference of the circle is about the circumference of your head. Work plain rounds until it’s long enough to be a hat!
  • Crochet an awesome rainbow rug. Pick a super-bulky yarn (or fabric strips) in bright colors. Crochet a circle, changing colors every few rounds. Continue until it’s the size you want!
  • Crochet a washcloth. Pick a cotton yarn. Crochet a square, and keep going until it’s a handy washcloth size.
  • Make a pillow. Use either the square or granny square patterns to make 2 equal-sized squares. Stick a pillow insert between the two squares, sew up around the edges- and you have a great pillow!
  • Crochet an afghan. Work the granny square pattern until it’s the size you like for a blanket.

These are just a couple of ideas… the possibilities are endless!

How to get an even stitch and gauge in crochet

Happy Tip Tuesday! Today, I’m going to share my trick with you for getting a lovely, even gauge when you crochet.

Grab your yarn and hook, and follow along!

Step 1: Make sure your loop is on the shaft of the hook. This is where the hook size is measured, so it’s where you’ll want to put your yarn to get the appropriately-sized stitch.

Don’t know where the shaft is? Don’t worry! Check out this crochet hook anatomy lesson! It’s basically the even cylinder above the handle. If you pull your loop tight around the throat (the skinny part near the hook), you’re going to get too-tight stitches.

Step 2: Look for the teardrop-shape. What teardrop shape? Take a look at your hook head-on. The loop should look like an upside-down teardrop that fits snugly around your hook.

Do you see it?

Why is the upside-down teardrop shape so important? Because you’ll need that point to slide the hook through while stitching!

See how my hook is sliding through? If your loop is a perfect circle (strangling the poor hook!), then your hook is probably going to get caught on your loop as you try to pull yarn through- making crocheting very frustrating!

Step 3: Check for the teardrop at every step. Look at me! I’m single crocheting!

Now, take a look at my loops… still in the teardrop shape! To get a nice, even gauge, you’ll want to check these loops to make sure they are the right shape at every step. A lot of beginning crocheters let their stitches get super huge (a non-snug teardrop) while they’re in the middle of the stitch, which leads to very loose stitches.

Follow these three steps, and you’ll get beautiful, even stitches every time! Rock on, teardrop!

A Crocheter’s Guide to Pattern Reading- free download

How to Read a Crochet Pattern - from Shiny Happy World and FreshStitches

Do you know how to crochet, but feel like patterns are a foreign language? You’re not alone!

Many of us crocheters learn how to do the stitches from a family member or friend, and don’t learn to read the patterns until much later. And it’s true, reading a pattern can be scary… but well worth learning how! Once you can read crochet patterns, you’ll be able to make anything!

The patterns you find here at Shiny Happy World are written in a little more “plain English” than you may see elsewhere – but we still use abbreviations and common conventions. I’ll walk you through the instructions for making Howie the Penguin’s wings below. (Howie is a free pattern you can find here.)

The instructions are in regular black text. The “translation” is below it in pink. 🙂 If there’s a link in the translation, that’s taking you to a tutorial demonstrating that skill.

Wings

Make 2.

This is just telling you that you need to make two wings. Make one from start to finish – then make a second one just like it.

With MC, ch 2

With the main color of yarn, chain two.

Round 1 sc 6 times in 2nd ch from hook (6)

The instructions number each round in the project. Single crochet 6 times in the second chain from the hook. The 6 in parentheses tells you that there are 6 total stitches in this round.

Round 2 sc twice in each st (12)

Single crochet twice in each stitch (that’s an increase), for a total of 12 stitches in round 2.

Rounds 3-4 sc in each st (12, 2 rounds)

This line of instructions applies to two rounds. Single crochet in each stitch for a total of twelve stitches, and repeat for a total of two rounds.

Round 5 [sc twice in next st, sc in next st] 6 times (18)

These brackets look scary, but they’re actually easy. They just tell you that everything in the brackets will be repeated. So for round 5, single crochet twice in the next stitch, then single crochet one in the next stitch. Repeat that sequence [single crochet twice in the next stitch, then single crochet once in the next stitch] for a total of 6 times. It will be a total of 18 stitches in the round.

Rounds 6-9 sc in each st (18, 4 rounds)

Single crochet in each stitch for a total of 18 stitches in the round. And repeat that round for a total of 4 rounds.

Round 10 [sc2tog, sc in next st] 6 times (12)

Single crochet 2 together (that’s a decrease), and then single crochet in the next stitch. Repeat that sequence for a total of 6 times. There should be 12 stitches total in the round.

Fasten off with long tail.

You’re done! Fasten off, but don’t cut your yarn short. Leave a tail of at least a foot.

That one little pattern for a wing includes most of the major conventions you’ll run into in patterns. It has starting, fastening off, increasing, decreasing, repeating sections, and repeating rows. Beyond that – or for patterns from other companies who abbreviate a bit more or use different abbreviations – this tip sheet will help you out a lot.

Click here to download this page as a pdf (much better resolution)!

Now that you can read crochet patterns, what are you going to make?

Here are handy links to all the posts about working with crochet patterns. . .

Return to the main table of contents for Let’s Learn to Crochet Amigurumi.

Move on to the lessons for working the first round of your crochet pattern.

Happy stitching!

Mosman Needlecraft: Sydney, NSW, Australia

  • store: Mosman Needlecraft
  • address: Shop 3, 529 Military Road, Mosman, NSW 2088 Australia
  • website: www.mosmanneedlecraft.com.au/
  • date of visit: January, 2012

If you’ve read my previous posts about Australian yarn stores, you have probably heard me lament that they aren’t quite the same as American yarn stores. A typical Aussie ‘wool shop’ (and trust me, relatives have sent me to many of them!) has: no table for knitting, scratchy yarn with a limited selection and owners who look at you as if you have two heads if you mention ‘Ravelry’. Sigh.

With that as background, I have to announce: I love Mosman Needlecraft! The store is beautiful and spacious. They’re stocked with beautiful and amazing yarns… even hand-dyed yarns! There’s even a table where you can come in to sit and knit!

The owners are super-friendly, love their yarn and are on Ravelry! They’re up to date with the latest patterns! They even ask what yarn interests you and look into ordering it! Swoon…

You’ll find pretty much everything you could be looking for: Berocco, Claudia Handpainted, Debbie Bliss, Jade Sapphire, Madeline Tosh, Malabrigo, Rowan… I could keep going. They’re also fully stocked with pattern booklets and books.

Of course, I’m selling the store short by focusing so much on yarn. Mosman Needlecraft is a full needlecraft store, with supplies for cross stitch and embroidery in addition to knitting. I know very little about those things- but the displays looked nice!

It can be tricky to find a rockin’ awesome LYS in Australia… so if you’re in Sydney, be sure to stop by Mosman Needlecraft! It’s the best source of yarn I’ve found in the city!

What does the number in parentheses mean in a crochet pattern?

Have you ever looked at a crochet (or knitting) pattern and wonder what those numbers at the end of the line are?

numbers in parentheses in crochet knitting patterns

Those numbers are the stitch count for that line of the pattern… in other words, how many stitches you should have in that row/round (6 stitches in the above example).

Sometimes a pattern may be more explicit and say “6 sc” (meaning there should be 6 single crochet stitches), but often the type of stitch is left out, leaving just a number.

So, fear not- it’s not some crazy instruction telling you to do more stitches… it’s just meant to help you out!

Lessons on how to wear a long scarf

How to Wrap a Long Scarf

As you may know, I’ve spent this weekend at the Pittsburgh Knit and Crochet Festival… and I’ve been having a great time. I’ve learned a lot… but do you want to hear the most exciting thing I’ve learned all weekend?

I learned a super-awesome new way to wear a long scarf!

If you’re like me (well, at least the me a few days ago), your standard way to manage a long scarf is to fold it in half, and tuck the ends through the loop. Easy, but leaves a giant bulge around your neck. But, Steven Be, fiber stylist extraordinaire, taught me a new way to wear a long scarf! Squee! And I’m so excited about sharing it with you that I took photos of how to do it in the hotel lobby!

Super-stylish way to wrap a long scarf

First, fold your scarf in half:

And then put it around your neck (so far… just like the old way!)

Now, here’s where it gets new! Pull only one tail through the loop:

Now, scoot that tail up a bit, and twist the loop once. The first tail should be above the twist. Pull the second tail through the loop you’ve just twisted:

Pull it all snug… and ta-da!

It looks like an awesomely-intricate knot… and lies really nice and flat. Look how nicely it fits under my coat:

Hooray! I’m wearing my scarf like this every day!

Do you have any cool ways of wrapping a scarf to share?

Guide to Crocheting Dog Toys

Tips for Crocheting Dog Toys - from Shiny Happy World

If you have a dog, you probably think of him as a member of the family… so wouldn’t you want to crochet him a sweet toy?

When crocheting for a dog, safety is the top priority! It’s a lot like crocheting for a baby, with a few extra considerations to keep in mind.

Don’t use buttons or plastic parts!

Some dogs are avid chewers, and even ‘safety eyes’ can come off when the fabric they’re attached to has been chewed through. I don’t need to give details about the digestion distress a swallowed eye can give your pup… so just avoid them!

dogs and plastic eyes

For any plush, you can easily add baby-safe crocheted eyes instead of plastic ones.

Select a Sturdy Yarn

Linen would totally rock, but so would wool or cotton. Nothing too soft (no merino!), because you want it to hold up. Even the gentle-est dog will have the toy in its mouth!

You can also look at thin rope in the hardware store. It’ll be sturdy and strong – you’ll just need to do some experimenting to find the right hook size.

Don’t forget to also select a machine washable yarn… because you’ll probably want to wash it!

Crochet a tighter gauge than usual

I used a size G hook on a worsted weight yarn- giving me a very stiff fabric. This will help almost any yarn last longer and stand up to more chewing.

Keep it Safe

Don’t make a super-tiny toy. I don’t know what the exact minimum size is, but make a toy that’s about the size of the toys you see sold in shops- that way you know you’ll be safe.

If you follow these tips, you can crochet an adorable toy that your pup will love… and will last through lots of playing!

Are crochet hooks allowed on planes?

This question came up recently, and I since I have a lot to say on the topic (because I travel oodles), I thought it’d make a good blog post!

The short answer- in US and Australia

The quick and easy answer is “Yes, crochet hooks are allowed as carry-on items in planes in the US, Australia and lots of other countries”.

In my personal experience, I’ve carried crochet hooks on board planes in the US, England, France, Switzerland and Australia without any problems. The photo below is of my ‘hippo’, the case I carry around with me at all times while traveling.

Yes, I travel with metal crochet hooks (as pictured), and I have even brought steel crochet hooks (the tiny, pointy ones) with me. (For the tiny crochet hooks, I was questioned in Paris about what they were, but they weren’t taken away). I often hear people say that ‘wood is allowed, but metal isn’t’, and as far as I know- at least in countries that permit crochet hooks- there’s no difference between the materials.

And (at least in the US), child-safe scissors (that is, blunt-tipped and with blades shorter than 4 inches) are allowed on board as well (and is stated so in the TSA Regulations).

The Caveat

Of course the disclaimer is this: any TSA agent (or their analog in another country) may confiscate something if they feel it is a threat. Ultimately, the agents are permitted to make judgement calls- and of course, you’ll hear stories about someone who had their hook taken away.

Also, there are countries where crochet hooks aren’t permitted on board (in fact, Australia was one of them until 2009). So, when you travel, always check the local regulations.

Tips for traveling with hooks

I’ve said that hooks are allowed… but that a guard could take them away from you if they are deemed dangerous. So, how can you feel confident bringing your hooks? Here are some tips:

  • Bring yarn along with your crochet hooks. Better yet, be in the middle of a project. It’s much easier to explain what you’re doing (and that it’s a handicraft and not harmful) if there’s evidence of what you’re working on.
  • Use a pencil case. If you’re not in the middle of a project, throw your hooks in with some pencils and pens in a pencil case. Especially if your hooks are wood, they’re unlikely to be noticed.
  • Don’t bring anything irreplaceable. Actually, this rule applies to more than just crochet hooks! There’s always a tiny chance your hook can be taken away, so don’t bring your grandmother’s ivory hook- it’s just a risk you don’t need to take!

I’m not trying to help you sneak on anything that’s not allowed… crochet hooks are permitted on planes. But the truth is that sometimes you’ll run across an agent who either doesn’t know what a crochet hook is or doesn’t know that they’re allowed. And, it really makes for a nicer plane ride if you can have your hooks with you!

A shortcut for crocheting stuffed animals more quickly!

crochet own stuffed animal

It’s Tip Tuesday! Today, I’m going to share my trick for cutting down on the crochet-time of an adorable stuffed animal!

We’ve all been there before: you have a baby shower/birthday party/event to go to this weekend, you want to crochet an adorable stuffed animal, but you don’t have a lot of time. What can you do?

You can slash your crocheting time with a combo approach: use a bulky yarn and downsize the pattern!

I do this all the time… and it cuts my crochet time by about 30%, and you still get a great result! Let me walk you through it.

The side-by-side comparison

Here is an owl that I crocheted following the pattern exactly (using a worsted weight yarn):

Now, here is an owl that I crocheted using a bulky yarn and a ‘downsized’ pattern:

Can you see a big difference? Probably not! They’re both 8″ tall… but the second one took me far less time to crochet! And you can do it, too!

The trick

The pattern I’m using is Nelson the Owl, but this trick will work on almost any amigurumi pattern.

My owl pattern calls for a worsted weight yarn, and tells me to do work 10 increase rounds for the head & body. So, here’s what I do to speed up the process: I use a bulky-weight (thicker) yarn and tweak the pattern to crochet a smaller amigurumi, basically working fewer increase rounds than the pattern says to.

You’ll want to read this blog post for details on how to crochet a smaller amigurumi… why smaller? Well, because you’re using a thicker yarn- you’ll end up with the same sized owl, but with less crochet time!

You ready to try it?

For my quicker owl, I worked 7 increase rounds on the head and body and crocheted the other features as written in the pattern. This means that the features (eyes, feet, ears) will be slightly proportionally bigger than on the original owl… but that doesn’t bother me! In fact, I think it’s a little extra-cute!

So, are you ready to give it a try? It takes a little bit of experimentation (to get the hang of making a smaller amigurumi pattern), but once you’ve got it… you can save oodles of time!

Here are handy links to all the posts about crocheting stuffed animals in different sizes. . .

Return to the main table of contents for Let’s Learn to Crochet Amigurumi.

Move on to the lessons for crocheting more advanced shapes.

Happy stitching!