When I hear folks complaining about the USPS, it makes me a little sad. Because I adore the postal service.
The US postal service provides an amazing service and isn’t in as much financial trouble as the rumors report.
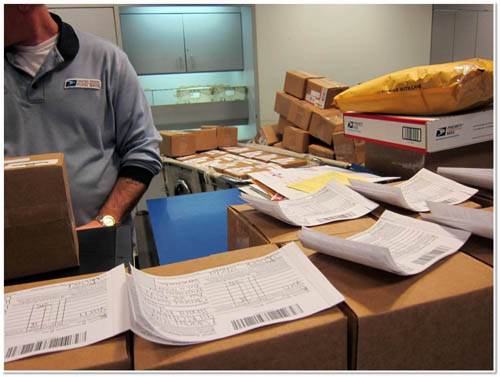
My postal carrier delivers mail to my doorstep 6 days a week. He picks up packages from my door to take back to the postal office. And USPS will hold or forward my mail if I go on vacation or move.
Isn’t that amazing?
If that strikes you as ‘same old, same old’, then let’s chat about the postal service in other countries:
In Australia, the postman does not pick up letters from your door. Or deliver on Saturdays.
Some countries do not offer a hold on mail, so you are responsible for managing your own packages while on vacation. Other countries charge a fee.
The Canada Post had a 12 day strike in 2011, leaving many people (and businesses!) unable to conduct their normal business. Can you imagine?
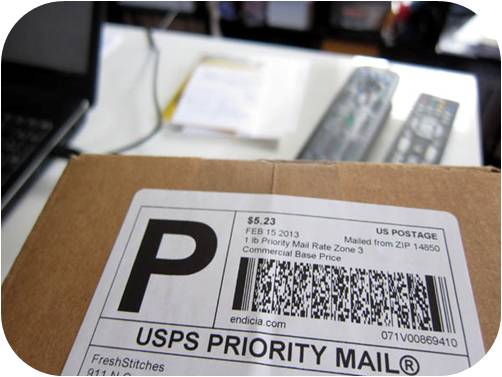
The USPS cost of shipping a package is much cheaper than in many other countries!
We receive continuous service for a low price (even despite last year’s price increase). And USPS does it all without any taxpayer money (unlike Britain’s post, where low prices are a result of heavy subsidies)!
You may have heard that the post office is experiencing financial difficulties, which is true. It’s happening all across the world as people send fewer letters.
My mailman is a ‘substitute’, since a hiring freeze leaves them unable to hire more permanent carriers. But he still his job amazingly, even bringing me bags (for my outgoing boxes) without me even asking.
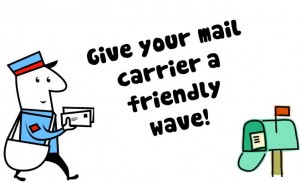
Your carrier is probably stressed during this busy season, and the negative sentiment going around about the post office can’t be lifting his spirits. So, next time you see your mail carrier, give him a friendly wave! Say hi! Tell him you appreciate him.
I don’t use paper gift wrap anymore. It’s expensive. It’s a pain to store. And the pile of it left after opening gifts always feels more than a little wasteful.
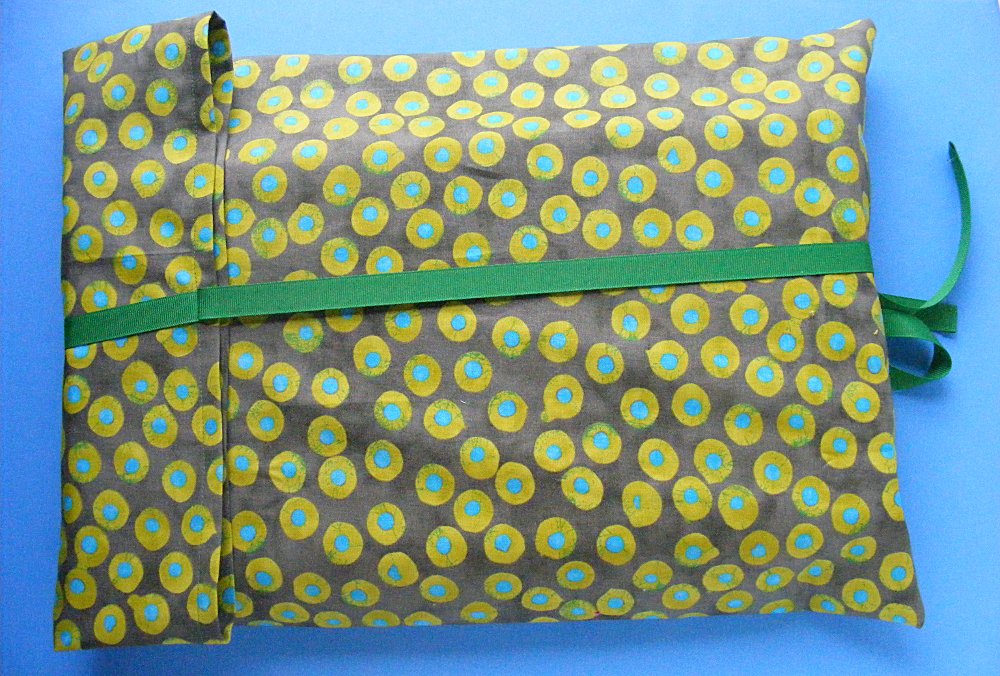
A couple of years ago I started making fabric bags for gifts. I love them! They’re so crazy easy to make – and they take no room at all to store when they’re not in use. Nice! Oh – and the ribbons are attached. No separate bows and no tape needed.
I make two different kinds. Ones that gather and tie at the top, like this one. . .
And ones that wrap around the gift and then tie, like this one. . .
Want to know how to make them? Be prepared for simplicity.
Cut two rectangles of fabric. Any size. I have a huge variety.
Sew them together around three sides (watch this video showing how to sew a straight line and turn corners if you’re a beginner). If you’re making the first kind of bag – the one that gathers and ties at the top – cut 1 yard of ribbon, fold it in half, and embed the fold in the side seam (video here), a few inches from the top of the bag. When you turn it right side out it will look like this. . .
If you’re making the second kind of bag, cut a ribbon 2 times the length of the bag plus an additional yard. Fold it in half and sew the fold at top of the bag in the center of one side. It should look like this. . .
Done!
Wrapping is easy. Pop in the gift. Fold the top of the bag over. Tie the ribbon. Here’s what it looks like from the back. . .
And here it is from the front. . .
I don’t stick to holiday-ish fabric – we use these for birthdays and other occasions too.
A lot of mine use grosgrain ribbon because I have a lot of it on hand from some aprons I used to make and sell. But sometimes I use pretty gauzy ribbon.
Any fabric. Any ribbon. It all works well, looks pretty and folds up to store easily. Love!
Needles and thread When I sew with kids I use Size 5 embroidery needles for just about everything. They have a bigger eye, which makes them easier to thread.
Fabric Get a couple of fat quarters of fun prints – and maybe some of this fabulously soft cuddle fleece. Or get them a gift certificate to your local independent fabric store so they can choose their own!
Thread Get a spool each of black and white, plus another fun color or two. Don’t worry about getting thread to match a particular fabric. In my experience kids ALWAYS want to use contrasting thread in a favorite color. Get a skein of black embroidery thread too, for stitching on faces.
Patterns! I have lots of free patterns here. Print a couple out and include them with some supplies. I especially recommend this one. 🙂 It’s perfect for beginners. And, of course, my book Creature Camp is packed with kid-tested softie patterns. Read some reviews of it here and here. And get a signed copy here. I’ll draw a picture in it for you! 🙂
Extra Doodads Fill up some ziplock baggies with assorted buttons, rick rack, ribbon, beads, safety eyes, feather boas, yarn and other fun stuff for hair, eyes, scales and other add-ons.
Well, usually when you applique, you sew the fabric bits in place around all the edges.
But sometimes it’s fun to make them flappy. 🙂 It’s a way to add a playful element to your applique!
If you look closely at the spikes on that monster above, you’ll see that they’re only attached at the base. That gives them some fun dimension – and makes them fun to play with.
I did the same thing with the teeth on this monster.
Today I’m going to give you some general instructions you can use with any applique pattern.
I’ve been working on refreshing the Peekaboo Bear quilt pattern and decided I needed to take new step-by-step photos. I didn’t want to make a whole new quilt, but Jo asked for a new pillow and that was just right.
I decided to make the ears flappy – with satin linings on the front. Oooh! Satin! Fancy! This would be especially fun to do on a baby quilt where that satin can be a soothing sleepytime thing. 🙂
Here’s what you do. . .
Cut out the freezer paper pattern as usual.
Fuse it to the back of a piece of fabric, as usual. But don’t cut the pieces out!
Instead, layer that piece of fabric with another one, right sides together. Sew around the freezer paper piece, leaving unsewn where it will tuck under another applique piece. In this case, I sewed around the tops of the ears and left the base unsewn. I removed the second freezer paper ear so you could see the stitching more clearly.
Now cut out the ears, leaving a little less than 1/4 inch seam allowance all around the shape.
Turn the ear right side out and press it flat.
Voila! You have a finished shape, ready for applique!
Tuck the shape in place and stitch it down. You’ll sew the larger piece (in this case the head) in place, right over the base of the ear. Since the rest of the ear edges are all finished, they don’t need to be stitched down.
You have a flappy cute ear!
I use this 3D applique technique most often on ears, hair and teeth, but it’s great for any little flappy bit. How about a lolling tongue on a puppy dog? Or a collar on a shirt? Or the wing of a bird? Or flower petals?
If you want to make a larger piece that’s flappy, but not floppy, you can use some soft foam inside. I give instructions for that here.
Have fun with it!
Here are links to all the posts showing how to applique with fusible adhesive – my favorite method. It’s fast and easy and (with the right materials) it holds up beautifully to rough use and repeated washing.
Whether you celebrate the American holiday or not, I want to take today to tell everyone how very grateful I am for you – who allow me to do this job I love so much.
Feast is one of my favorite embroidery patterns, and I’ve decided to make it free. You can download it here.
It’s a good message for Thanksgiving, but mine hangs on my studio wall all year long.
The stitching on this is easy – no tricky or advanced stitches – but it will take some time. It’s the sort of thing that’s a delight to pull out every night and stitch a little bit at a time in front of the fire.
When was the last time you walked into a store and saw an appealing stuffed animal sewn from quilting cotton? Dolls yes – the smooth fabric makes it easier to dress and undress a doll. But cuddly stuffed animals? They’re ALWAYS made from softer stuff.
And they’re almost always made from fabric that you can’t buy at your regular fabric store. Super soft stuff that’s made especially for these toy companies.
I would dearly love to find a source for the fabric Jellycat uses in their Cordy Roys collection!
Polar fleece and minky fabrics are usually as close as home sewists can come – and it’s just not the same.
But I found a source!
When I was at Quilt Market last spring I met with a company (Shannon Fabrics) who makes amazing plush fabric. They sell to a few specialty fabric stores, but none of the big box stores. They mostly sell to manufacturers.
I knew as soon as I touched their fabric that this was what I had been looking for to take my softies to the next level. I touched every kind of minky and fleece they made (and they make a lot!) and I kept coming back to something called Cuddle Fleece. It was amazing! Super soft, slightly stretchy, with a nice drape. I knew it would make terrific stuffed animals – and also blankets and quilt backs.
I searched for a few months, but I had a heck of a time finding reliable sources for anything but their dimple minky. I wanted cuddle fleece and I wanted to buy it by the yard!
You know what I do when I can’t find the materials I want to use? I find them at wholesale and add them to my shop. I figure if I’m having a hard time finding them, then so are you.
So I rearranged my studio, hemmed and hawed over color choices, and bought six enormous bolts of fabric. Now I’m going to have to rearrange my studio again because they. . . ummmm. . . don’t fit in the space I had made for them. 🙂
But they are here! And they’re available for you to make the most amazing softies ever!
Over the next few weeks I’ll show you some of my favorite patterns made up in these fabrics. I can’t wait to play! And Jo is already claiming the samples. 🙂
I’m convinced that the fabric is the key to a sensational stuffed animal – but there are a few other materials that play a strong supporting role.
Safety eyes make your handmade softies look really special. I love the way the light glints off those shiny black domes – it makes the whole face come to life!
I don’t make a lot of baby toys – but Abby Glassenberg at While She Naps is a master at it. Most store-bought baby toys have extra interactive bits: rattles, music buttons, squeakers, etc. Did you know you can add those to your handmade softies? I’ve never seen any of these components in a brick & mortar store, but Abby carries a few special supplies in her shop. Give some of these a try the next time you’re making a gift for a baby!
High end mass-produced stuffed animals are made pretty much the same way you make yours at home. Yes – they’re made assembly-line style by low-paid workers in a factory, but the process of sewing and stuffing is essentially the same. They just get softer results because they’re using softer materials. Materials not readily available to home sewists. Until now. 🙂
Two is the size. I can iron an entire piece of fabric – selvedge to selvedge – on this baby – with room to set my iron on the board too.
Please admire the vastness. 🙂
Three is the storage underneath.
I never take my ironing board down – so the easily collapsible X bottom was just a waste of space for me. This ironing board sits on some handy dandy Ikea Expedit shelving!
Here’s how I made it. . .
1. Start with your shelves. I was going to use a different piece from Ikea. When we went they had plenty in stock, but they were all on the top shelves of the storage area and they said they couldn’t get them down until after hours and we’d have to come back the next day. The Ikea is 2 1/2 hours away. Coming back the next day wasn’t an option – so we went with two of these instead, laid them on their sides and screwed them together in the back. It’s even longer than I had planned – but that’s ok with me! (Edited to add: Ikea no longer stocks the Expedit shelving. Their replacement is the Kallax, which would also be suitable for this project.)
I also added the wheels to the bottom for easy moving and vacuuming.
2. Now measure the top of your shelves. Find some small L-brackets and measure them too. You’re going to cut a piece of plywood big enough to hang over the edge of the shelf on all sides by the width of a bracket. These next pictures will make it clear.
Here’s a bracket (the ones I found were 1 1/2 inches) attached to the edge of the plywood. It’s attached to what will be the underside of my ironing board.
In this photo I’ve flipped my board over. It’s resting on the top of the shelving unit and the brackets are holding it in place so it doesn’t slide around. You could screw the brackets to the shelving unit too, but I wanted the whole top to be easily removable and I found that six brackets around the edge (two on each long side and one on each short end) held it in place nicely.
I wrapped the lower (not screwed in) part of the brackets with a layer of masking tape so they wouldn’t scratch the surface of the shelving unit. You never know – I might take this whole thing apart at some time in the future and use the shelves in another way.
Here’s the wooden top seen from above, before adding padding and the cover. Yes – that’s a seam down the middle. No – I don’t recommend doing the top in two pieces. I had a bunch of kids with me in the car the day I bought the wood and I couldn’t put the back seat down to accommodate a larger piece of plywood. I should have waited.
I rounded the corners of the wood just a tiny bit. I set a can of spray paint on the corner and traced that curved edge to use as a guide. This isn’t necessary – but I’m going to use a drawstring cover and it will wrap more neatly around a curve.
Now I’m ready to add some padding and the cover.
I covered the top with six layers of white cotton terry cloth. I usually use cotton batting, but I think this terry cloth might hold up better (compress less) over time. Cut the terrycloth so it hangs over the edge of the tabletop by 1-2 inches. Smooth out any folds or wrinkles.
Round the corners of the terrycloth too.
Now it’s time to add the pretty! A good selvedge on fabric makes me happy in the same way that good endpapers in a book make me happy.
Cut the fabric to cover the top plus 1-2 inches all around the edge – just like the terry cloth. Round the corners of the top fabric, too.
Sew bias tape all around the edge of the new cover. Use that bias tape as a tube and thread it with a long piece of cord. I like using a smooth nylon cord – it draws up easily.
Center your cover over your ironing board. Draw up the drawstring and use a toggle to hold it in place.
Ta daaaa! I love my new ironing board!
Here are handy links to all the posts about quilting tools and supplies.
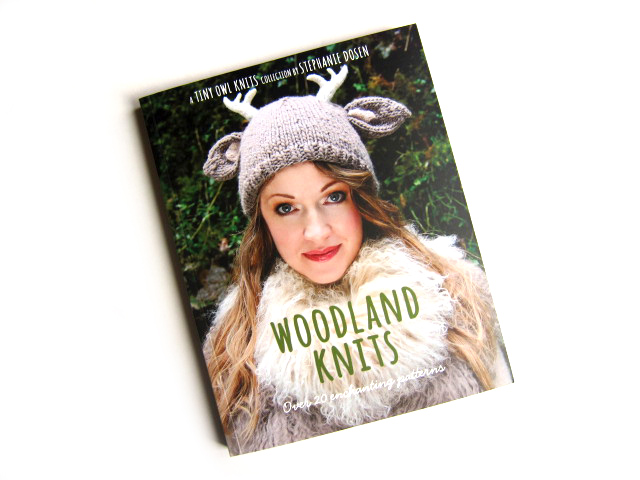
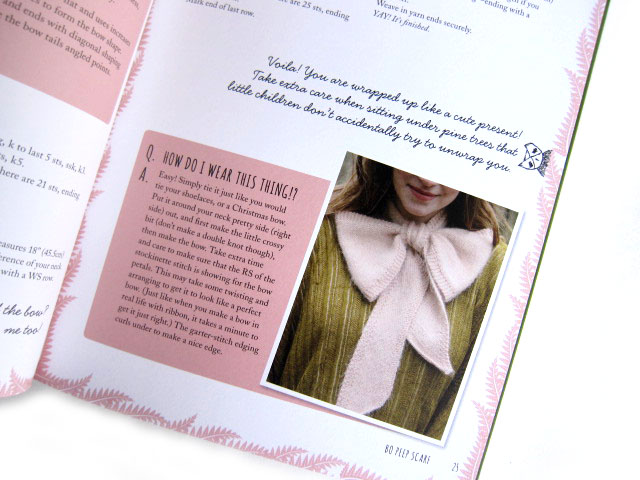
I adore Stephanie Dosen’s (aka Tiny Owl Knits) designs. She designs whimsical and fun knitting patterns… so I was really excited to see her book, Woodland Knits.
The book contains 21 adorable patterns, 10 of which are new designs for the book. The remaining 11 designs are well-loved favorites, like the deer with antlers hat, bo peep scarf and fawn poncho.
The book contains cute little notes and helpful tips throughout, but no introductory material. It’s 21 lovely patterns bound together in a book.
I was surprised to see that all of the patterns in the book are available for individual purchase as pdf downloads. At around $5 a piece, if you’d like to make a few, then $20 for the book is a great deal!
Besides the discount over purchasing 21 individual patterns, though, you don’t get much additional content to the book. So, I would recommend having a peek at the included designs (which is tricky, since only the new 10 designs are listed as patterns in the book on Ravelry), and deciding whether there are a few you’d like to knit.
The patterns are cute and the book is very pretty… so if you can find a few, then I’d say go for it!
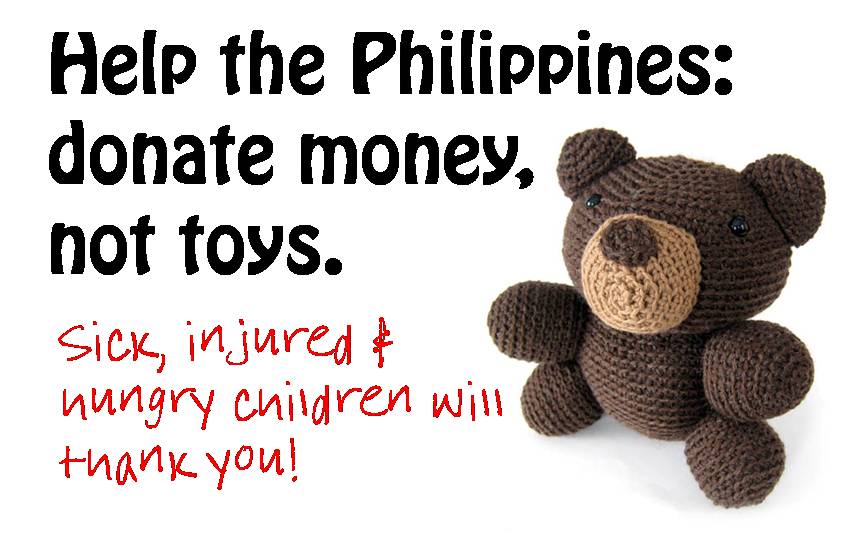
I was going to show you how I made my monster skirt today… but I’ve postponed it a little because there’s a topic weighing heavily on me that I want to talk about.
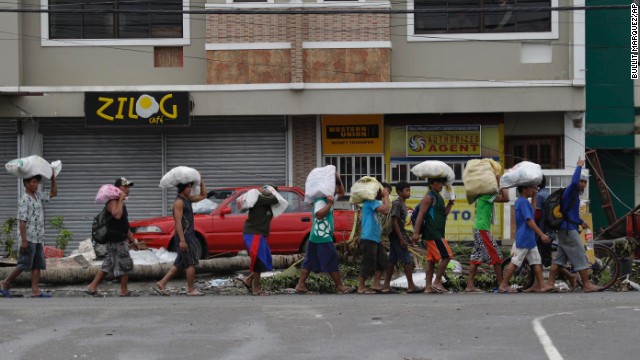
By most reports, the typhoon that struck the Philippines is the worst tropical storm to make landfall. The death toll is over 3,000 and some estimates predict it will reach 10,000.
What I’m about to say may be controversial, but please hear me out.
Please do not send stuffed animals to the Philippines
The victims of the Philippines typhoon do not have food, drinking water or medicine. They don’t have enough personnel to move debris to search for survivors, or enough well-bodied people to bury their dead. It is a catastrophic situation that most of us find hard to imagine.
As crafters, we want to help. Our first instinct is to make/sew something to send to people in need.
This is a great instinct, but we need to use our judgement. We need devote our crafting energy towards causes where we can make the greatest impact.
And right now isn’t the time. Let me tell you a little about what we learned from Newtown…
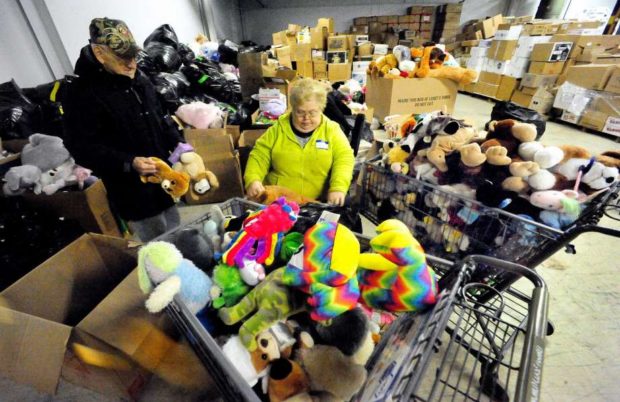
I was devastated to find out that what we thought was a great idea turned into a burden. The town was overwhelmed with stuffed animals, requiring countless volunteers and warehouses.
It breaks my heart to say that many of those animals never made it to children. There were just too many.
Do what is most needed
I love stuffed animals (trust me!), but we need to make sure we are doing what is best for the disaster area. The people in the Philippines need water and relief workers, and right now, the best way to get that help to them is to donate money to a relief organization.
Sending a stuffed animal to the Philippines won’t calm the grumble of a child’s hungry tummy and it takes up valuable shipping and distribution resources that are needed for essentials. The shipping cost, alone, would provide food for a family for days.
Use the tragedy to inspire your charity crafting
I know that in horrible times such as this, your fingers get itching to make something… that’s wonderful! You can still help! Maybe you make animals and sell them, donating the profits to the relief effort.
Or maybe you feel inspired to make animals… but save them and donate them to your local fire department, to calm a local child after a scary incident.
Crafters are an amazingly caring group of people. Please continue the tradition of caring by doing what’s best for the disaster-struck region. Send money. Save your stuffed animals for where they’re needed.
I’ve been working on some cat applique blocks for a kitty quilt that matches these puppies. I’ve been posting some of the blocks as I finish them – and I’ve been getting some questions about them.
All of the blocks so far use fusible adhesive. It’s so quick and easy and I LOVE using the printable sheets. They’re worth every penny (in my tracing-hating opinion). I use Heat & Bond Lite weight for all my quilts.
All of the stitching is done by machine. Every bit of it. The eyes and nose are appliqued on and stitched in black thread – just a simple straight stitch. I stitched around the edges in a simple straight stitch too – in black thread for a loose, cartoony effect. I love it!
And then there’s the big question from the folks who are clearly zooming in on the image for a closer look.
How are you getting a thicker line on the face and whiskers?
Very observant, my friends!
I’ve been doing some experimenting and I’m getting the thicker line in two ways. Sometimes I stitch over the same line three times. And sometimes I use thicker thread. I’m demonstrating both with these Oscar blocks.
In the brown cat I used thicker black 12 weight thread for all the stitching. In the orange cat I used regular all-purpose thread once around the body, then three times for the whiskers and mouth.
You can’t just change the thread weight all willy-nilly. In my very first sewing project I used some really thick stuff called buttonhole twist and had all kinds of problems with it. I had just grabbed it because it was a small spool and I liked the color. I didn’t know there were different kinds of threads!
Now I know – and I did some deliberate experimentation with some spools in different thread weights I brought back from Quilt Market. Here are the results. . .
This is a really big photo I loaded up, so you can click on it to zoom in super close.
Just like needles, thread sizes get smaller as the numbers get bigger.
50 wt
This is crazy fine thread – noticeably thinner than the basic all-purpose stuff you can get at any of the big box stores. Use a thinner needle with it (I used a Microtex/Sharp size 80/12). You’ll get a nice, subtle thin line of stitching. This would be great with thinner fabrics or subtle quilting – like stitch in the ditch where the thread won’t be so much in the spotlight.
40 wt
A little bit heavier than the 50 wt, this feels like the most “normal” thread in the bunch. I used the same needle as the 50 wt.
28 wt
This one was noticeably thicker than the others – and is where I started having trouble with a couple of skipped stitches. It turns out I just needed to sew a little slower which, frankly, I’d be doing anyway if I was stitching around an applique shape instead of just zipping down a quick row of straight stitches to see what it looked like. I did an extra couple of rows of stitching here to get the hang of it and you can see the results – no more skipping.
For the 28 wt I used 50 wt in the bobbin and a new needle – a topstitch size 90/14. I like it. But I love the next one.
12 wt
This is the equivalent in thickness of two strands of embroidery floss. If I were hand-embroidering these faces it’s what I’d use – but I didn’t know you could use such thick thread in the machine. What a revelation!
Just like the 28 wt – use lighter weight thread in the bobbin and a topstitch needle size 90/14. You’ll probably need to play with the tension just a tiny bit since the top and bobbin threads are so different. Stitch up a quick sample using the same weight batting you’ll be using and different color threads in the top and the bobbin. Adjust the tension as needed until the bobbin thread doesn’t show on the top and the top thread doesn’t show on the bottom. In this sample you can see the tiny green specks of bobbin thread showing on the top. It’s easy to fix. Make a note of the new tension and use that every time you’re topstitching with your heavy threads and you won’t need to test it again.
So which one is better – thicker thread or more passes?
I think this is totally a matter of preference. Scroll back up to the two cats side by side. Click on the image to see it bigger and zoom in. Which do you like better?
For me it will probably vary from project to project. The heavier thread weight is certainly faster – you’re only sewing everything once. But I also really like the slightly sketchy look of sewing the same lines more than once. It’s impossible to get them perfectly lined up all the time, so the final result really looks a lot like my sketchbook. There’s a post here with more information about how to deliberately get that sketchy line.
I think they’re both going to have a place in my bag of tools. And now they’re in yours, too!
Here are links to all my posts about outline stitching.


 Done!
Done!