Ultimate Crochet Hook Review: the review!

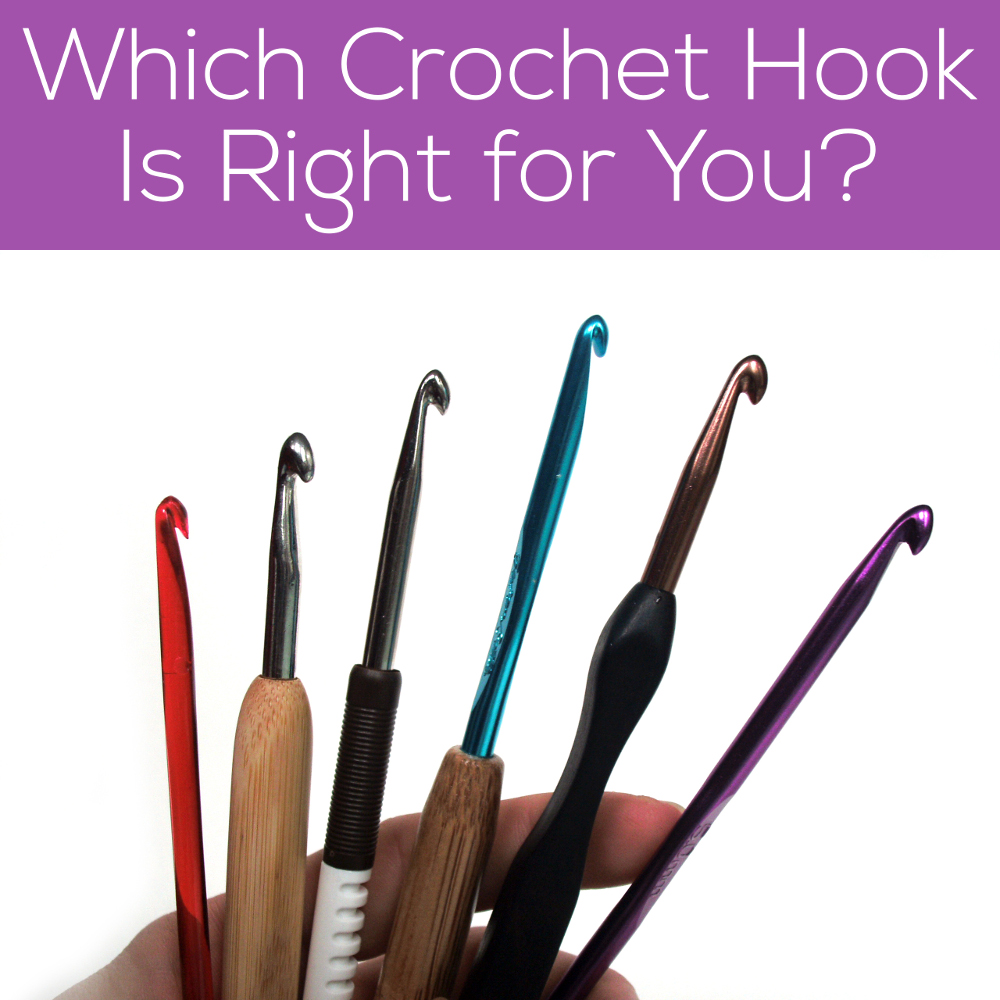
As I said before, there’s no such thing as a perfect hook. What works well for one person may be a disaster for someone with a different crocheting style. The best thing that I can do, as a reviewer, is tell you the pluses and pitfalls of various crochet hooks. What you end up loving is going to be dependent on your style! On Wednesday, you learned what kinds of hooks suit your particular crochet style (if you weren’t here on Wednesday, no worries… go do it now!).

There are oodles of crochet hooks on the market, and I didn’t have the time to review them all! And, to be honest with you, I’m not sure you’d be interested in reading all of them. I mean, lots of companies make a bamboo hook… and the differences between them are pretty minimal. So, in this review, I’ve focused on hooks that are different from the rest!

They each have pros and cons… and only some will be suited for your particular crochet needs. Let me know which ones work for you!

Addi Swing

The Addi Swing is the ‘most ergonomic’ hook that I’ve tried: it really is made to fit perfectly in the palm of your hand. It also has some flexibility (the actual handle is some type of plastic, without the metal hook penetrating into the handle), so it’s very comfortable on your hands.

And the hook is made from the same high-polished chrome as the Addi knitting needle (my personal favorite needle), making for low-friction and speedy crocheting.

Even though I love holding the hook, I don’t love actually crocheting with it. Perhaps my hands are too small? I can’t pin it down exactly, but something about the design of the hook forces my palm to be further from my thumb than I like it to be. Despite giving it a fair go, I just can’t get used to it.

Pluses: The handle is super-comfortable, the head is quick and the hooks are clearly labelled for size.
Pitfalls: Because the hook is made to fit the hand, it might not be perfect for everyone’s hand or crocheting style.
Verdict: Totally worth giving a try if your hands are a bit achy. Although, I might try to find a friend with one to test out before splurging.

Kollage Square Crochet Hook

The square handle was invented by Kollage… so it’s completely unique to the brand. The package claims that the hook decreases stress and strain, and is perfect for those who have arthritis or carpal tunnel syndrome.

I have the same general comment with this hook as the Addi… it feels fabulous! But, I have trouble crocheting with it. Maybe it’s me! The Kollage hook has the thumb rest 1″ lower than the Susan Bates or Addi Premium hooks, which for me, is just too far away. However, I think there are oodles of people out there who would love this hook.

Pluses: The handle is super-comfortable and isn’t as ‘hand-specific’ as other ergonomic hooks.
Pitfalls: The thumb rest is much lower than other hooks, which may require some adjustment for folks.
Verdict: Feels lovely, but like other ergonomic hooks on the ‘nice’ side, I’d try to touch one in person before committing.

Susan Bates Bamboo Handle

This hook sports the ‘standard’ Susan bates hook, with a bamboo handle below the thumb rest.

Because the handle is below the thumb rest, using this hook feels a lot like crocheting with a Standard Susan Bates hook. The advantage is a slightly bigger handle to hold on to.

Pluses: The bamboo handle may feel more comfortable for some crocheters.
Pitfalls: Since only the handle (below the thumb rest) is bamboo, the design may not be sufficiently ‘comforting’ enough for those with pain to experience relief.
Verdict: If you’re in love with Susan Bates hooks, and are looking for a step up, give this one a try.

ChiaoGoo Comfort Grip

This hook features a sleek metal head with an oval-shaped bamboo handle, laser-etched with the hook size information.

The bamboo on this hook is super-smooth… I just love touching it! The handle is also very comfortable: fits nicely in your hand without being over-shaped.

Pluses: The hook feels wonderful, and gives a nice handle for someone who wants to hold onto wood, but crochet with metal. Unlike other comfort hooks, the handle begins comparatively high up the shaft, making this hook comfortable for those with smaller hands.
Pitfalls: This hook is about 1/2″ shorter than other hooks, so it may not be comfortable for those with bigger hands.
Verdict: If you have arthritis (that’s helped by working with wood over metal), this hook and the Kollage are two hooks on the market that still allow you to crochet with the speed of a metal head. This hook may not be for you if you have larger hands, but see if you can try it out in person. This hook feels amazing to the touch.

Addi Comfort Grip

This hook features the same head as the Addi Swing (above), but with a much simpler handle. The handle is slightly thicker than normal hooks, and provides ridges for better grip.

The hook is marked only with ‘5’ (it’s a 5.0mm size H hook), which might not be convenient for those who haven’t fully gotten the hang of the metric system. The handles, though, are also color-coded, which is useful for picking the right size out quickly from a whole assortment.

Pluses: This hook gives you a bit more to hold onto than a plain hook, and the ridges will be welcome to people who find metal hooks too slippery. (yes, one side-effect of crocheting too speedily is sweaty hands!)
Pitfalls: There isn’t much ‘comfort’ to this hook except that the handle is thicker than an average hook.
Verdict: If you find an average hook too skinny, this handle will be a welcome improvement for you. I’m not convinced it’s the best hook for those looking for comfort in the sense of ‘lessening aches in hands while crocheting’.

Furls hand-carved hook

This hand-carved hook is a fabulous piece of artistry. I can’t believe someone out there has the talent to make these… but obviously, the folks at Furls do!

The hook is absolutely beautiful, feels incredibly smooth and has a medium-pointy point. The shaft on the hook is tapered, which means that there isn’t a part of the hook that has a resting place for the stitches (perhaps there’s a centimeter where it isn’t tapered? It’s hard to tell.). This feature will probably make it difficult for many crocheters to obtain an even gauge… although maybe it just takes practice.

Pluses: This. hook. is. stunning.
Pitfalls: The tapered shaft is a sticky point. In practice, my loop slides way too far down the handle, giving me bigger stitches than I’d wanted.
Verdict: With practice, you could probably develop a rhythm that will give you even stitches. Functionality aside, this hook is beautiful, and makes an amazing addition to any collection.

Susan Bates SmartGlo hooks

These hooks really do glow in the dark!

I tried these hooks out during my 36-hour power outage (courtesy of Hurricane Irene), and although they really glowed, they’re not meant to actually let you crochet in the dark. These hooks would be beneficial if you’re working on very dark yarn or if your eyes need extra light as you work (as so many of us do as we age).

Pluses: They’re fun! They glow… that’s kinda cool.
Pitfalls: They aren’t a replacement for a lamp.
Verdict: Being a youngster with great eyes (I’m actually light-sensitive, so I’m rarely seeking out more lighting) who works at home (where I can turn on a lamp if I want), I probably wouldn’t use these. But, if you work on-the-go in places where the lighting isn’t great (the subway comes to mind), these might give you the boost you need!

Ultimate Crochet Hook Review Wrap-up

Phew! That’s a lot of hooks! There’s even more on the market… there’s too many to get them all!

I really hope you’ve enjoyed all of this information and maybe you’ve spied a new hook you want to try!

I’d love to hear in the comments about your favorite hook! What’s the one you love using now? Are there any you’re inspired to try? Let me know!

Ultimate Crochet Hook Review: Susan Bates controversy

A few weeks ago, one event rocked the crochet world.

Okay, maybe I’m being a bit dramatic… but when word spread that Susan Bates had changed its hook design, there was a whole lotta chatter about it!

Susan Bates (aluminum, size H) has always been my absolute favorite crochet hook. And, not because it’s cheap (even though it is). I loved the little-bit pointy point and deep groove. It just fit me.

What’s the new design like?
The new design features a rounder point and a shallower groove (although, the shallower groove seems to be the result of a smaller head, not of a change in the depth of the groove, per se).

Front view: old hook, left and new hook, right

Side view: old hook, left and new hook, right
I contacted Coats and Clark (the makers of Susan Bates hooks), and received this response:

The rounded head on the Susan Bates crochet hook is actually the original design for this product. Over the years, many of our long-time consumers have told us how much they prefer the original head as it doesn’t split the yarn the way the more pointed head does. When we were given the opportunity to return to that design, we took it.

Please note that the inline feature of our crochet hooks remains the same; the hook is the same size from the throat of the head to the thumb rest, ensuring a consistent size to all your stitches.

The new, rounded head resembles the head available in Boye, Addi and many other crochet hook brands. However, Susan Bates is keeping its signature inline throat, which is a comparatively unique feature among hooks.

Which hooks are affected?
Most of the Susan Bates hooks are being revised according to the new design. However, I discovered that a Luxite hook I recently received had the design I know and love. I emailed Coats and Clark to find out if it was a remnant, or if the design will remain unchanged. I received this response:

The Luxite hooks up to size P have a typical Susan Bates In Line head. The Q hook has an A Line head. They have not changed.

For now, it seems, the Luxite hook is keeping the old design. However, I could not get any comment on whether this design is be the permanent Luxite design, or if it is scheduled to be redesigned in the future.

Moving forward…
If you were in love with the old Susan Bates design, you have a couple of options: you can switch to the Luxite hook (which, for now, isn’t changing in design) or scope out yard sales for some older hooks.

The Susan Bates hooks are keeping their signature inline hooks… a feature I know many folks appreciate!

Ultimate Crochet Hook Review: which hook is right for you?

There’s no such thing as the perfect crochet hook. There may be a perfect hook for you, but not all hooks work for all people.

Yesterday, you learned all about the differences between different styles of hooks. Today, you’re going to learn how to pick a hook that’s right for you.

Finding the right hook for you takes some trial and error, but you can narrow down your search by paying attention to your crochet habits. Here’s a little quiz that will help you out:

Do you roll your hook? When you’re crocheting, do you roll the handle around in your hand? Or do you like to keep your thumb firmly planted? If you’re a roll-er, then you’d do best with a hook without a thumb rest.

pictured: Susan Bates Bamboo Handle

Hooks to try: ChiaoGoo Bamboo, Addi Bamboo, Addi Comfort Grip, Clover Takumi, Etimo Cushion Grip.

Do you crochet tightly? If you tend to crochet very tightly, a hook with a tapered throat will probably only make the problem worse (as you’re tempted to pull the yarn tightly around the thinner parts of the throat). Try a hook with an inline throat.

Hooks to try: Susan Bates (all models), any hook made from Bamboo (because of the way tapered hooks thin at the top, most wooden/bamboo hooks feature inline throats for strength).

Are you always splitting your yarn? If so, you probably need a hook with a rounder (rather than a pointier) tip.

Hooks to try: HiyaHiya, Addi Comfort Grip, Susan Bates (Bamboo, Quicksilver and Aluminum), Boye crochet hook, Kollage Square Hook, Addi Swing, ChiaoGoo Bamboo Handle.

Do you find it difficult to insert your hook into the next stitch? Then you’re a candidate for a pointy crochet hook!

pictured: ChiaoGoo Premium Bamboo hook

Hooks to try: Almost any wooden/bamboo crochet hook sports a pointy tip, including: Addi Bamboo, ChiaoGoo Bamboo, Clover Takumi, Brittany

Do you toss your hooks into one bag and then forget what size they are? You need a hook that has the hook size permanently etched/carved into the hook. Otherwise, you’ll be stuck pulling out your gauge every time you need to crochet!

Hooks to try: Addi Comfort Grip (color-coded handles), Susan Bates (raised lettering on all models), Boye (raised lettering), ChiaoGoo (sizes laser-etched into all models), Boye (raised lettering on all models)

Have you broken your fair share of hooks? You’ll need one that’s super strong. There are a few varieties to try. Metal hooks are very difficult to break. Plastic hooks are flexible, so they bend easily and are slow to break.

Hooks to try: Any metal or acrylic hook. If you love bamboo, try ChiaoGoo, which is made from Chinese Moso bamboo, which is supposed to be the strongest bamboo around.

Do you find it hard to ‘catch’ your yarn while crocheting? A hook with a deep groove may be just the answer you’re looking for.

Hooks to try: Kollage Square hook, Susan Bates (all models).

Looking for something a little fancy? Do you make a statement with your hook? Then you’d probably love one with a decorative handle.

pictured: Furls handcarved hook

Hooks to try: Furls handcarved hook, Brittany.

Do your hands ache after too much crocheting? A handle with a comfort or ergonomic grip might help you out. A comfort grip is a handle that is bigger than a standard handle, and easier to hold. Ergonomic grips are curved to fit in the palm of your hand.

pictured: ChiaoGoo Comfort Grip

Hooks to try: Addi Swing, Addi Comfort Grip, Etimo Comfort Grip, ChiaoGoo Comfort Grip, Susan Bates Bamboo Handle, Kollage Square Hook.

Do you have arthritis? If you have arthritis, crocheting can be an achy task. You may find crocheting with an ergonomic or comfort grip (above) more comfortable. I’ve heard some folks with achy hands prefer plastic hooks (since they bend in your hand as you work) or wooden/bamboo hooks (because they’re warmer than metal) helpful.

Hooks to try: Susan Bates Crystalites, ChiaoGoo bamboo, Clover Takumi.

Do you have trouble seeing your stitches? If you need a lot of light to see well while crocheting, a light-up or glow-in-the-dark hook might come to your rescue!

Hooks to try: Susan Bates SmartGlo, Clover Crochet Lite.

How’d you do in the quiz? I’m a thumb-rest user who tends to split stitches and likes a deep groove… how about you?

Here are handy links to all the posts about crochet tools and supplies.

Return to the main table of contents for Let’s Learn to Crochet Amigurumi.

Move on to the posts about yarn.

Happy stitching!

Ultimate Crochet Hook Review: anatomy in action

So, yesterday you learned terminology associated with hook anatomy, and have a rough idea of ways in which hooks can differ… but what do all these differences look like in action? What’s the difference between a pointy and a rounded point? Let’s find out!

Finding out how to identify these differences in real-life hooks is crucial to helping you find your dream hook!

Points

The point of a hook makes a big difference to the way you crochet. A pointier point allows you to stick your hook into the next stitch much more easily than a rounded point, but comes at the risk of splitting your yarn. If you’re using a splitty yarn, then a rounder point is advisable.

Grooves

The groove is what catches your yarn as you pull it through the loop you’re working on. If the groove is too shallow, you’ll lose your yarn. If it’s too deep, it may get in the way of your crocheting rhythm. You may find that, as you become more experienced, your preference for groove depth changes.

Throats

An inline throat means that the width of the throat is the same all the way down the hook. This style helps some crocheters keep a more even gauge (especially for those who tend to crochet tightly). A tapered hook is much smaller at the top compared to where the throat meets the shaft.

Shafts

The shaft of the hook is what determines the size of your stitches. Since it’s job is to produce an even-sized stitch, most hooks have a straight shaft. However, occasionally, you’ll find a hook with a tapered shaft, and you’ll need to practice to make sure your gauge is spot on.

Thumb rests

A hook may or may not have a thumb rest. For some crocheters, a thumb rest is a convenient place to put your thumb and a way to maneuver the hook. For others, it just gets in the way. Whether or not you need one depends on your crocheting style.

Handles

The handle doesn’t need to be made from the same material as the hook. Many hooks have handles that are just an extension of the hook (or are ‘plain). Other hooks have comfort or ergonomic handles for your crocheting comfort. A ‘comfort handle’ is bigger than a plain one, and easier to grip. An ‘ergonomic handle’ is specifically shaped to rest in your hand for maximum comfort.

What’s the right one for you?

How do you know if you need a pointy point or a rounded one? That’s tomorrow’s topic!

Ultimate Crochet Hook Review: hook anatomy

Welcome to day one of my Ultimate Crochet Hook Review! I’m so excited to be running this series on my blog. Do you know why? Because there are so many crochet hooks out there, it often feels impossible to choose the right one for you! So, this week, I’m going to talk about the nitty-gritty details about hook shape and design, how to identify your crocheting style, and help you pick the hook that’s right for you!

So, let’s get started! How well do you know your crochet hook? Before you can figure out which hook will work best for you, you’ve got to get to know the basic anatomy of the hook.

Here’s a diagram:

Hook terminology

  • Point: this is the part of the crochet hook that pokes into the stitch you’re crocheting into. The point can range from very pointy to rather dull (rounded). Sometimes called the ‘tip’.
  • Groove: The groove is the indentation that catches the yarn as you pull it through a stitch. Grooves can be either deep or shallow, although there’s no standard way to ‘measure’ the ‘groove depth’.
  • Throat: the throat is the part of the hook where the loop transitions from being caught in the groove to its resting place on the shaft. Throats can be either ‘inline’ or ‘tapered’. This is perhaps one of the most salient features of a hook, and the throat style is often described on the package.
  • Shaft: the shaft is the part of the hook that the loop rests on while you are crocheting. It is the part of the hook that determines the size of your stitches.
  • Thumb rest: this part is pretty self-explanatory! It’s an optional indentation that allows you to rest your thumb on the hook.
  • Handle: another self-explanatory part! The handle is the part of the hook that you’ll hold while crocheting. Handles are usually made from the same material as the rest of the hook, but some styles of hook feature ergonomic or comfort handles.

More hook differences

In addition to the points raised above (inline vs. tapered throat, pointy vs. rounded point, etc.), hooks can differ in many other ways. Hooks can be made in many different materials (metal and bamboo are 2 of the most common), of course, come in different sizes and those sizes can be printed on the hook in different ways (ranging from ‘not at all’ to ‘laser inscribed’).

What the heck does all that mean? Want to know what all of these differences mean to you and your quest for the perfect hook? You’ll have to come back for the rest of the series! (it’s way too much for one blog post!)

How to embroider a smile on your amigurumi!

About a week ago, Tiffany wrote on the FreshStitches Facebook wall, and asked if I could post about how to embroider a smile on amigurumi. Sure thing!

If you’re shaky on doing embroidery, check out my video on embroidering amigurumi. That’ll help you with the basic technique. And now, I’ll show you how to get a nice, even smile!

Planning the smile

So, we begin with a blank canvas (in this case, an amigurumi head):

Now, here’s the real trick: I use locking stitch markers to plan out the shape of my smile! Here, I put one marker in each of the upper corners of the smile, and one at the bottom. You can use more if you feel like you need a bit more guidance while embroidering.

Embroidering
Now, with the smile all planned, you can begin embroidering! First, thread your tapestry needle with the yarn you want to embroider with:

… and get started! If you want to see how to embroider in more detail, check out my video on embroidering amigurumi.

And, you’re done!
Since you used the locking stitch markers as your guide, you have a nice, even smile!

Just remove the markers… isn’t it lovely?

Hope you enjoyed this Tip Tuesday… and that it’ll inspire you to dress up your amigurumi with pretty smiles!

Here are handy links to all the posts about faces and details. . .

Return to the main table of contents for Let’s Learn to Crochet Amigurumi.

Move on to the lessons about eyes.

Happy stitching!

Crocheting baby-safe eyes for amigurumi

Larger-sized amigurumi make lovely presents for babies… but you’ve got to make sure they’re safe for the little ones! Today, I’m going to give you the pattern for crocheting baby-safe eyes (to replace the plastic eyes often called for in patterns), and show you a technique for attaching the eyes so you’ll end up with an awesome plushie!

crochet owl

Pattern for Baby-safe Crocheted Eyes

Even though the plastic eyes used in amigurumi are often called ‘safety eyes’, they’re not approved for use by children under 3. So, whenever I’m making a toy for a baby, I crochet the eyes. Here’s the pattern:

With black yarn (in weight and hook called for in the remainder of the pattern), ch 2.
Round 1: sc 6 times into 2nd ch from hook. (6)
Round 2 (optional): Sc twice into each st. (12)
Fasten off with a long tail.

That’s it! Easy!

Attaching Crocheted Eyes

When you are attaching limbs, I recommend that you use a whipstitch to attach the piece to the loops on the fabric. However, because the eyes are so tiny, this technique makes the eyes stick out a bit:


This is the first baby-safe toy I crocheted… see how his eyes are a little buggy?


To get the eyes to lay flat, you’ll want to stitch all the way through the fabric that you are attaching to. Let’s look at an example of attaching baby-safe eyes to an owl.

To begin, I thread my tapestry needle with the tail of the yarn, as usual. Then, I stick my tapestry needle through the eye, then all the way through the head of the owl (going all the way to the wrong side of the owl head):

attaching a baby safe eye in amigurumi

Then, to complete a second stitch, I stick the needle back up through the next stitch- through the owl head and through the eye:

crocheting a baby safe eye on amigurumi

This is attaching the eye using a running stitch, and pulls the edges of the eye much closer to the head than with a whipstitch. Isn’t the final result pretty?

amigurumi crochet owl

Ideas for Variations

You don’t just have to crochet a black eye… you can be creative! Try:

  • Embroidering a french knot with a scrap of white in the center for a pupil
  • Crocheting a second round of white, so that the black is the pupil
  • Use a funky color!

Hope this tip helps you create a fabulous baby-safe toy! So, next time you have a baby shower to go to… think ‘stuffed animal’!

Tip for working long color changes in crochet

Happy Tip Tuesday! Last week, I talked about how to crochet with 2 colors of yarn, using a technique called stranding. This technique works wonderfully when there are only a few stitches between color changes.

crochet owl by freshstitches

I get a lot of questions about how to handle the color changes for the body of Nelson the Owl. To crochet Nelson’s body and head, you crochet 20 stitches in one color, then 40 stitches in another color, meaning stranding doesn’t work too well. Today, I’ll show you what I do!

One option is to cut the yarn every time you change colors, and tie a knot. However, this is time consuming, and makes the process of crocheting this cutie owl a drag… so I skip it!

What I do is strand the yarn across the back while crocheting! Crochet just like you would with a short color change, leaving the yarn stranded across the 20 stitch color change, as pictured:

Now, you can’t just leave them like this, because of two reasons. One, the stranding won’t allow you to stuff the owl well. Two, all of that extra yarn with no tension on it will make the edge stitches uneven. So, what you need to do is cut down the center of the strand:

It will look like this when you’re finished:

Now, you need to tie these ends into knots to secure them. I start at the bottom of each side, and tie a square knot (you know, that boring kind of knot) with one strand of white and one strand of brown. (If you’re wondering why there looks like there are too many strands here, it’s because I crocheted this particular owl using two strands of yarn at once… try to ignore that if you can!)

Here’s how it will look:

Yay! With this technique, the knot tying happens all at once, which means it takes less time overall. I’ve gotten pretty speedy with my owls!

Hope you enjoyed this crochet tip!

Here are handy links to all the posts about changing yarn color in crochet. . .

Return to the main table of contents for Let’s Learn to Crochet Amigurumi.

Move on to the lessons about crocheting stuffed animals in different sizes.

Happy stitching!

How to crochet with 2 colors, stranding

Hi everyone! On this Tip Tuesday, I’m going to talk about how to crochet with 2 (or more) colors by stranding the unused color along the back of the work. This is a great technique to use for crocheting vertical stripes, or other patterns where there aren’t many stitches between color changes. Since I know a lot of you are visual learners (and sometimes photos just aren’t enough!), I’ve filmed a video tutorial. Scroll down to see it!

Last week, I received a custom order in my Etsy shop to crochet a zebrafish, a fish with black and white stripes. I used the Wal the Tiny Fish pattern, and instead of crocheting in one color, crocheted black and white stripes.

Since these stripes are vertical (with respect to the direction of crocheting), I needed to change colors every couple of stitches. Now, you can imagine how annoying it would be to cut the yarn and tie a knot every couple of stitches to change yarn… which is why I didn’t do that! Instead, I did something called ‘stranding’, which is carrying the unused color along the back of the work. Stranding is a great technique to use anytime there aren’t more than 4 or so stitches between color changes.

Here’s how it’s done:

Above is what the first half of my little zebra fishie looked like! You can see that there are vertical stripes, with the white stripes 2 stitches wide and the black stripes 3 stitches wide.


Okay, now it’s time for me to change colors (I’m at the end of a black stripe). If you’re unfamiliar with how to change colors cleanly, check out my tutorial on clean color changes. Now that it’s time to use the white yarn, I pick it up (it’s dangling in the back from the last time I used it) and pull it across the back of the work.


Now, using the yarn I just picked up, I’ll begin crocheting with it!


As you can see, when you look at the back of the work, you’ll have lots of little horizontal lines between each color change. Beautiful!

If you’d like to see this in action, check out my video:

As I said, this technique is best for when there aren’t too many stitches between color changes. So, what do you do when there are lots of stitches between changes, like for Nelson the Owl? I show you that in this post about working long color changes in crochet.

Here are handy links to all the posts about changing yarn color in crochet. . .

Return to the main table of contents for Let’s Learn to Crochet Amigurumi.

Move on to the lessons about crocheting stuffed animals in different sizes.

Happy stitching!

New, Super-Easy Magic Ring!

NEW! Super Easy Magic Ring for Starting Amigurumi - a video tutorial from Shiny Happy World and FreshStitches

Update! If you want the easiest method for starting your amigurumi (easier than any version of the Magic Ring) try a sloppy slip knot. I started using it a few years ago and I’ll never go back to a Magic Ring.

Has the magic ring method for beginning to crochet in the round gotten you all tied up in knots? No worries! I’m going to show you a new and super-easy method for getting an adjustable (magic) ring to begin crocheting your amigurumi. First, I’ll show you in photos, but scroll down if you’d rather just watch the video!

In this technique, you begin by making a slip knot, then creating the adjustable loop. With this method, there are less loops flying around, so it’s more accessible to beginners. Who knows, it may become your favorite!

Step one: make a slip knot
Start off by getting the hook and yarn called for in your pattern.

Then, make a slip knot with about 6 inches remaining at the tail, and insert the hook into the slip knot.

Step two: make a loop
With that 6 inches you left in in the tail, make a loop, as pictured:

Step three: crochet into the loop
Pretend that GIANT loop is just one crochet stitch. Crochet into it six times (or do however many stitches called for in your pattern). To single crochet one stitch into the loop: insert your hook into the loop, wrap your yarn over the hook and pull through the loop, then wrap your yarn over your hook again and pull through the two loops on your hook! Repeat this until you’ve crocheted all of your stitches! Your piece will look like this:

Step four: pull, and you’re done!
To close up the hole, pull on the tail!

You’re done! Hooray!

If that went by too fast, have a look at the video I recorded of the technique:

I hope you found today’s post useful for demystifying the magic ring!

If not – seriously – just use the sloppy slip knot. 🙂

Here are handy links to all the posts about working the first round of your crochet pattern. . .

Return to the main table of contents for Let’s Learn to Crochet Amigurumi.

Move on to the lessons for round two and beyond of your pattern.

Happy stitching!