Guide to Crocheting Dog Toys

Tips for Crocheting Dog Toys - from Shiny Happy World

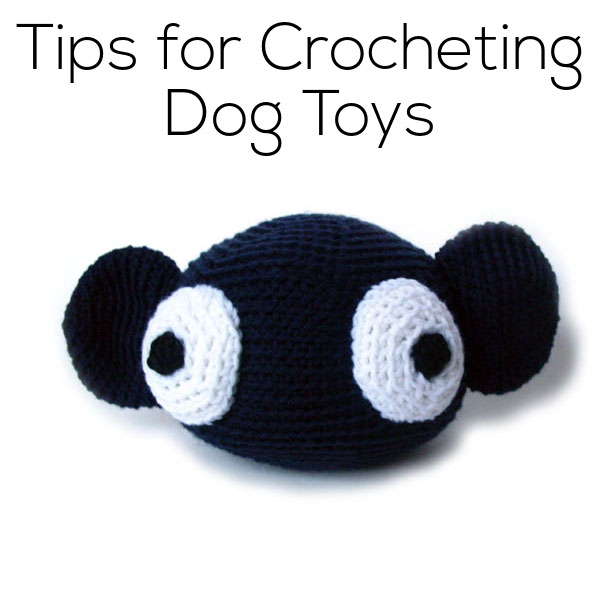
If you have a dog, you probably think of him as a member of the family… so wouldn’t you want to crochet him a sweet toy?

When crocheting for a dog, safety is the top priority! It’s a lot like crocheting for a baby, with a few extra considerations to keep in mind.

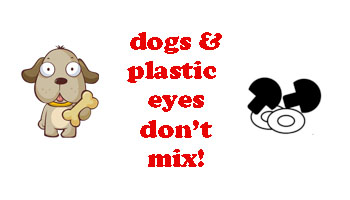
Don’t use buttons or plastic parts!

Some dogs are avid chewers, and even ‘safety eyes’ can come off when the fabric they’re attached to has been chewed through. I don’t need to give details about the digestion distress a swallowed eye can give your pup… so just avoid them!

dogs and plastic eyes

For any plush, you can easily add baby-safe crocheted eyes instead of plastic ones.

Select a Sturdy Yarn

Linen would totally rock, but so would wool or cotton. Nothing too soft (no merino!), because you want it to hold up. Even the gentle-est dog will have the toy in its mouth!

You can also look at thin rope in the hardware store. It’ll be sturdy and strong – you’ll just need to do some experimenting to find the right hook size.

Don’t forget to also select a machine washable yarn… because you’ll probably want to wash it!

Crochet a tighter gauge than usual

I used a size G hook on a worsted weight yarn- giving me a very stiff fabric. This will help almost any yarn last longer and stand up to more chewing.

Keep it Safe

Don’t make a super-tiny toy. I don’t know what the exact minimum size is, but make a toy that’s about the size of the toys you see sold in shops- that way you know you’ll be safe.

If you follow these tips, you can crochet an adorable toy that your pup will love… and will last through lots of playing!

Are crochet hooks allowed on planes?

This question came up recently, and I since I have a lot to say on the topic (because I travel oodles), I thought it’d make a good blog post!

The short answer- in US and Australia

The quick and easy answer is “Yes, crochet hooks are allowed as carry-on items in planes in the US, Australia and lots of other countries”.

In my personal experience, I’ve carried crochet hooks on board planes in the US, England, France, Switzerland and Australia without any problems. The photo below is of my ‘hippo’, the case I carry around with me at all times while traveling.

Yes, I travel with metal crochet hooks (as pictured), and I have even brought steel crochet hooks (the tiny, pointy ones) with me. (For the tiny crochet hooks, I was questioned in Paris about what they were, but they weren’t taken away). I often hear people say that ‘wood is allowed, but metal isn’t’, and as far as I know- at least in countries that permit crochet hooks- there’s no difference between the materials.

And (at least in the US), child-safe scissors (that is, blunt-tipped and with blades shorter than 4 inches) are allowed on board as well (and is stated so in the TSA Regulations).

The Caveat

Of course the disclaimer is this: any TSA agent (or their analog in another country) may confiscate something if they feel it is a threat. Ultimately, the agents are permitted to make judgement calls- and of course, you’ll hear stories about someone who had their hook taken away.

Also, there are countries where crochet hooks aren’t permitted on board (in fact, Australia was one of them until 2009). So, when you travel, always check the local regulations.

Tips for traveling with hooks

I’ve said that hooks are allowed… but that a guard could take them away from you if they are deemed dangerous. So, how can you feel confident bringing your hooks? Here are some tips:

  • Bring yarn along with your crochet hooks. Better yet, be in the middle of a project. It’s much easier to explain what you’re doing (and that it’s a handicraft and not harmful) if there’s evidence of what you’re working on.
  • Use a pencil case. If you’re not in the middle of a project, throw your hooks in with some pencils and pens in a pencil case. Especially if your hooks are wood, they’re unlikely to be noticed.
  • Don’t bring anything irreplaceable. Actually, this rule applies to more than just crochet hooks! There’s always a tiny chance your hook can be taken away, so don’t bring your grandmother’s ivory hook- it’s just a risk you don’t need to take!

I’m not trying to help you sneak on anything that’s not allowed… crochet hooks are permitted on planes. But the truth is that sometimes you’ll run across an agent who either doesn’t know what a crochet hook is or doesn’t know that they’re allowed. And, it really makes for a nicer plane ride if you can have your hooks with you!

A shortcut for crocheting stuffed animals more quickly!

crochet own stuffed animal

It’s Tip Tuesday! Today, I’m going to share my trick for cutting down on the crochet-time of an adorable stuffed animal!

We’ve all been there before: you have a baby shower/birthday party/event to go to this weekend, you want to crochet an adorable stuffed animal, but you don’t have a lot of time. What can you do?

You can slash your crocheting time with a combo approach: use a bulky yarn and downsize the pattern!

I do this all the time… and it cuts my crochet time by about 30%, and you still get a great result! Let me walk you through it.

The side-by-side comparison

Here is an owl that I crocheted following the pattern exactly (using a worsted weight yarn):

Now, here is an owl that I crocheted using a bulky yarn and a ‘downsized’ pattern:

Can you see a big difference? Probably not! They’re both 8″ tall… but the second one took me far less time to crochet! And you can do it, too!

The trick

The pattern I’m using is Nelson the Owl, but this trick will work on almost any amigurumi pattern.

My owl pattern calls for a worsted weight yarn, and tells me to do work 10 increase rounds for the head & body. So, here’s what I do to speed up the process: I use a bulky-weight (thicker) yarn and tweak the pattern to crochet a smaller amigurumi, basically working fewer increase rounds than the pattern says to.

You’ll want to read this blog post for details on how to crochet a smaller amigurumi… why smaller? Well, because you’re using a thicker yarn- you’ll end up with the same sized owl, but with less crochet time!

You ready to try it?

For my quicker owl, I worked 7 increase rounds on the head and body and crocheted the other features as written in the pattern. This means that the features (eyes, feet, ears) will be slightly proportionally bigger than on the original owl… but that doesn’t bother me! In fact, I think it’s a little extra-cute!

So, are you ready to give it a try? It takes a little bit of experimentation (to get the hang of making a smaller amigurumi pattern), but once you’ve got it… you can save oodles of time!

Here are handy links to all the posts about crocheting stuffed animals in different sizes. . .

Return to the main table of contents for Let’s Learn to Crochet Amigurumi.

Move on to the lessons for crocheting more advanced shapes.

Happy stitching!

Wrist Exercises for Knitters and Crocheters

If you knit/crochet a lot (or embroider!) . . . chances are you suffer from some achy wrists! I know that during last week, when I was crocheting up a storm, I certainly did!

Here are a few exercises that I do to relieve my sore wrists. Try to give these a whirl every hour or so while you’re working.

1. Swirl your wrist around! I don’t even know if this counts as an ‘exercise’… but moving your wrist in all sorts of directions (especially the directions it doesn’t move while you’re knitting/crocheting) really helps it out.

2. Prayer position. This is a little move I picked up from yoga class… it’s just like prayer position, but you’ll want to raise your elbows a little (while keeping your wrists still) to get a nice stretch in your wrist area.

3. Reverse wrist stretch. This one is the opposite of the stretch in point 2. Lay the back of your hand on a table, and press down lightly with your arm.

4. Rub those wrist bones! Use your thumb and massage all those little bones and tendons (and whatever else) that are in your wrist.

5. Squeeze. With your opposite hand, just squeeze your wrist. This gets all of your joint fluid flowing around.

Update! Stacey added a video showing some of these stretches here.

Happy wrists make a happy stitcher!

SHARE THIS

How to crochet a smaller amigurumi!

The easiest way to make a smaller amigurumi is to use thinner yarn and a smaller hook. You can even use embroidery thread!

But if you want to use regular yarn, there’s still a way to do it!

You’ll need to do some figuring on your own, but altering existing patterns is the first step to designing your own… so give it a try!

As an example, I’m going to talk about how to make any size Mike the Microbe, from my book Crocheted Softies. Feel free to try it out with any pattern!

Identify the parts of the Pattern

Have a good look at your pattern, and try to identify big chunks of the pattern.

When you have a look at the small microbe’s pattern, you’ll notice that rounds 1-9 are increase rounds (rounds where you add stitches), followed by 7 plain rounds (where no increasing or decreasing occurs) and 8 decrease rounds (rounds where you decrease stitches).

Start crocheting… with fewer rounds!

Mike the Microbe is adorable as is… but how do you make him smaller? Crochet fewer of all kinds of rounds!

I crocheted one baby microbe by crocheting 5 increase rounds, 3 plain rounds and then 5 decrease rounds to finish.

After the end of 5 increase rounds, I had 30 stitches… so when it was time to decrease, I started at round in the decrease instructions that had 30 stitches. Who knew so many instructions were built into the pattern?

Make features smaller, too!

Follow a similar logic for making smaller features… working fewer increase and plain rounds. Above, I decided to omit the buggy eyes- they were too hard to make smaller!

I also made a microbe adding the eyes that were in the pattern without modification- notice that they’re proportionally bigger on the body… but I think that’s cute, too!

So tiny and so cute!

Try it on everything!

Once you’ve tried ‘shrinking’ a simple pattern like a microbe, it’s time to this trick with other amigurumi! I crocheted a tiny version of Nelson the Owl by crocheting 5 increase rounds and 5 plain rounds instead of the 10 called for in the pattern.

I worked fewer increase rounds on the wings and eye circles… and it’s important to keep in mind that it’s okay if the smaller version doesn’t look exactly like the bigger version. As long as it’s cute, you’re doing great!

Hope you give ‘shrinking’ some amigurumi patterns a try!

Here are handy links to all the posts about crocheting stuffed animals in different sizes. . .

Return to the main table of contents for Let’s Learn to Crochet Amigurumi.

Move on to the lessons for crocheting more advanced shapes.

Happy stitching!

Is ‘worsted weight’ the same as 8 ply yarn?

Is worsted weight the same as 8-ply yarn?

I get asked this question via email quite often, so I figured it was time to answer it in a blog post!

The short answer is: no.

But leaving it there would make a very boring blog post, wouldn’t it? So, here’s a bit more info about how yarn weights are labeled!

What does ‘weight’ of a yarn mean?

‘Weight’ refers to the thickness of a yarn. Yarn can be very skinny or very bulky, and everywhere in between.

Knowing the thickness of your yarn is crucial when you’re trying to follow a pattern or figure out which hook/needle size to use, because the yarn’s thickness (largely) determines the gauge that you will get in your knitted/crocheted piece.

American and British Yarn weight terms

Worsted weight yarn is the American term for yarn that you might spy in Australia or the UK as ’10 ply’ yarn. It’s the most common yarn weight that you’ll find on American shelves… and if you shop in Big Box stores, you might see it labeled as a “medium weight yarn.”

8 ply is the yarn that you’ll find most easily in Australia (which I know from personal experience), and I’ve heard that it’s pretty standard in the UK as well. It corresponds to what is called ‘dk’ weight in the US.

Want a handy printable chart? This post has lots more info about yarn weight – including the different names and the recommended crochet hook size – for each weight

Help! How do I follow a US pattern with 8 ply yarn?

If you’re knitting/crocheting a garment, then there’s a slightly long and complicated answer about getting proper gauge and such when you substitute yarns.

However, the reason I get this question so often is because folks in the UK and Australia want to crochet an amigurumi pattern (which calls for worsted weight yarn), but they can only find 8 ply yarn. . . and then the solution is easy-peasy!

If you’re making amigurumi, what’s most important is that you use the right sized hook for your yarn. So, if you’re using an 8 ply yarn, select a hook size that gives you a nice-looking fabric that stuffing won’t show through.

Your finished piece will be an eensy bit smaller than one crocheted with thicker yarn… but it’s easier than ordering yarn from overseas!

So there you have it… worsted weight and 8 ply yarns aren’t the same… but you shouldn’t let that stop you from making an awesome amigurumi!

How to organize scraps of yarn

After you knit or crochet your first project, you’re immediately faced with an organizational problem: weird bits of leftover yarn. The more projects you do, the more these scraps build up.

And, if you don’t organize your scraps well, they have a habit of tangling themselves together into one giant knot. Not good.

So, even though it may seem a little obsessive… I wind each one of my leftover yarn bits into a nice little ball, and tuck them into my ‘scrap box’.

The Box

My box is just an ordinary copy-paper-turned-shipping box that I got in the mail one day. It’s sturdy, has a lid, and fits nicely on a shelf on my yarn bookshelf. Nothing fancy.

The big leftovers

My favorite kind of scrap yarn is the ‘big leftover’. You know what I mean… it’s a quarter to a half of a skein of some yummy yarn left over from a project. Since these guys are pretty substantial in size, I wind them with my ball winder. I make sure to tuck the end in the ball so that there’s no danger of them becoming unraveled.

Little Bits

Little leftover bits of yarn are trickier… I’m not even sure why I keep them. Maybe one day, I’ll just need 10 yards of bright orange for some project or another…

I just wind these guys around 2 fingers (it’s much too little amount for the winder), and then tie them around the center. Just like the big leftovers, you’ll want to make sure the ends are fastened so they don’t get the chance to become a giant knot in your scrap box.

What to do with the scraps…

Hmm… for now, mine live happily together (and neat) in their box. Sometimes I grab a ball if I need a little bit of a color… but no serious plans yet.

So, tell me… how do you organize your scraps? Any plans for them?

How to Clean Amigurumi

Happy Tip Tuesday! I get asked pretty often, ‘how do you wash your amigurumi, especially if you use non-machine washable yarn?’ Well, that’s today’s topic!

I crocheted two owls that I used as cake toppers. Even though the icing was pretty hardened, one owl inevitably ended up with icing on his owl-butt. Ooops.

Even though this owl is crocheted with a hand-wash-only yarn… there’s no problem! Almost all messes can be ‘spot cleaned’ using water and a cloth (that is, unless you drop an amigurumi in a mud puddle… then he may need an all-over wash). I just dip a washcloth in a little bit of water:

And dab at the spot:

… until it’s clean!

Hooray!

Now, what if your amigurumi is really dirty? Here are a couple of suggestions:

  • Try using a little bit of soap in your water for smaller (but hard to get out) spots
  • Soak your amigurumi in a sink of water and wool-wash (like Eucalan). Gently squeeze all of the water out, and let dry completely.
  • Animals made from non-machine-washable yarns can be machine washed without felting completely. The stuffing keeps the yarn from felting as much as loose fabric would. Of course, you may see some felting (due to agitation and hot water), but not as much as you may expect. Try machine washing on delicate with cold water… your amigurumi will come out clean as a whistle!

Here are handy links to all the crochet troubleshooting posts. . .

Return to the main table of contents for Let’s Learn to Crochet Amigurumi.

Happy stitching!

Homespun Boutique: Yarn store in Ithaca, NY


store: Homespun Boutique
address: 314 E. State Street, Ithaca, NY 14850
date of visit: October, 2011

I had no idea what to expect when I visited Homespun Boutique. it’s a store with no website or Ravelry listing… which often means it’s an outdated yarn store with not so lovely yarns. Fortunately, Homespun Boutique far exceeded my expectations!

The shop isn’t enormous, but it packs a whole lot of luxury yarn into a little space. You’ll find most of the brands you’re used to finding in a well-stocked LYS, plus some wools from farms local to Upstate NY.

Half of the store is filled with yarn, neatly stacked on shelves, and other half of the store is stocked with bolts of beautiful and modern fabrics.

There didn’t appear to be a table in the main store area for sitting & stitching, but the store advertised classes, so perhaps there’s a separate area, or a table gets moved in. The shop is located right in the heart of downtown Ithaca, so it’s a convenient walk if you’re visiting! I would recommend a stop in if you’re in town!

Tips for storing knitting & crochet projects

Most of us have a couple of knitting or crochet Works-in-Progress going on at one time. For today’s Tip Tuesday blog post, I’ve gathered ideas about different ways to store in-progress works. Store them neatly, and you’ll avoid the perils losing your hook or spare yarn associated with the project!

I gathered ideas by asking my twitter friends how they store WIPs. They all agreed… storing WIPs needn’t be expensive, but the storage has to keep the project together and tidy.

Questions to ask yourself before selecting a storage mechanism

  • Where do you crochet/knit? If you store and work on your WIPs in the living room, then portability might not be very important. If you tend to carry a few projects around in your purse, then you’ll need to make sure your method is travel-hardy!
  • What’s important for you to keep on hand? Some stitchers keep only the current work stored. Others like to gather up all of the yarn they’ll need for the project, plus that extra needle. Knowing how much you like to store will help you determine the kind of storage you’ll need.
  • What size are the projects you work on? If you love making afghans, you’ll need a larger tote or basket. If lacey shawls are your fave project, then a smaller bag will do. Most knitters/crocheters need a variety!
  • Do you need any extra accoutrements? In this post, I’m showing off different bag/holder ideas, but storage doesn’t end there! Think about if you need any extra tools for storing. For example, if you want to carry around a pair of socks on double points, you’ll probably also want to invest in some point protectors or a DP tube so that your socks don’t fall off of your needles while in your bag.

Storage Options

Ziplock bags
The most popular way of storing WIPs was hands-down the Ziplock bag. They come in various sizes (try the gallon size for projects like scarves, quart size for socks and mittens), are inexpensive and see-through. Since they’re transparent, you can instantly see what project is inside (a must when you start to gather WIPs). As an added bonus, you can either write on the bag itself, or stick a note inside that reminds you of crucial project info.

Cloth tote/ Reusable grocery bags
Many of us have reusable grocery bags in our home. These make great storage bags.

These bags often have handles, which makes them easy to carry around. They’re also suitable for larger projects because of their size. Lululemon bags (pictured above) come along with any purchase you make, and have a snap at the opening that’s great for keeping projects inside.

Plastic shoeboxes
If you aren’t interested in portability, then plastic shoeboxes are a great storage idea. They stack (meaning they’ll fit nicely in a corner of your room) and they’re often transparent.

For your larger projects, you can grab plastic boxes in larger sizes that are still stackable and tidy.

Your yarn store’s bag
You’re already buying the yarn… why not use the bag as a project bag?

Many yarn stores actually keep future-use in mind when ordering their bags… so make use of it!

Fancy project bags
I, of course, advocate re-using bags and making do with what you have. But, every once in a while, you need to get yourself something nice… so why not make it a lovely project bag?

You can purchase project bags in every shape, size and fabric! Check your LYS (they’re bound to carry a few styles) or have a look around Etsy (search for ‘project bag’). Erin Lane stocks a large selection of project bags- including the adorable drawstring bag pictured. I also love the square zippered bags from JessaLu. Have a look around… you’ll probably want to treat yourself to one!

How do you store your WIPs?

Please share! I’m always on the lookout for new ideas!