One of the many things I love about felt ornaments is that they’re impossible to break. That makes them perfect to give to even the youngest kids! And I love, love, LOVE the way little felt toys look hanging on a tree. 🙂
The second ornament in the 2014 Christmas Club is a cute little dinosaur – very easy to make. He was so easy and fun to make that I’m tempted to make a whole bunch in a rainbow of colors. Wouldn’t that be fun?
Here are the first two ornaments in the Christmas Club collection.
You can still join at any time!
The club is closed now, but you can still get the patterns!
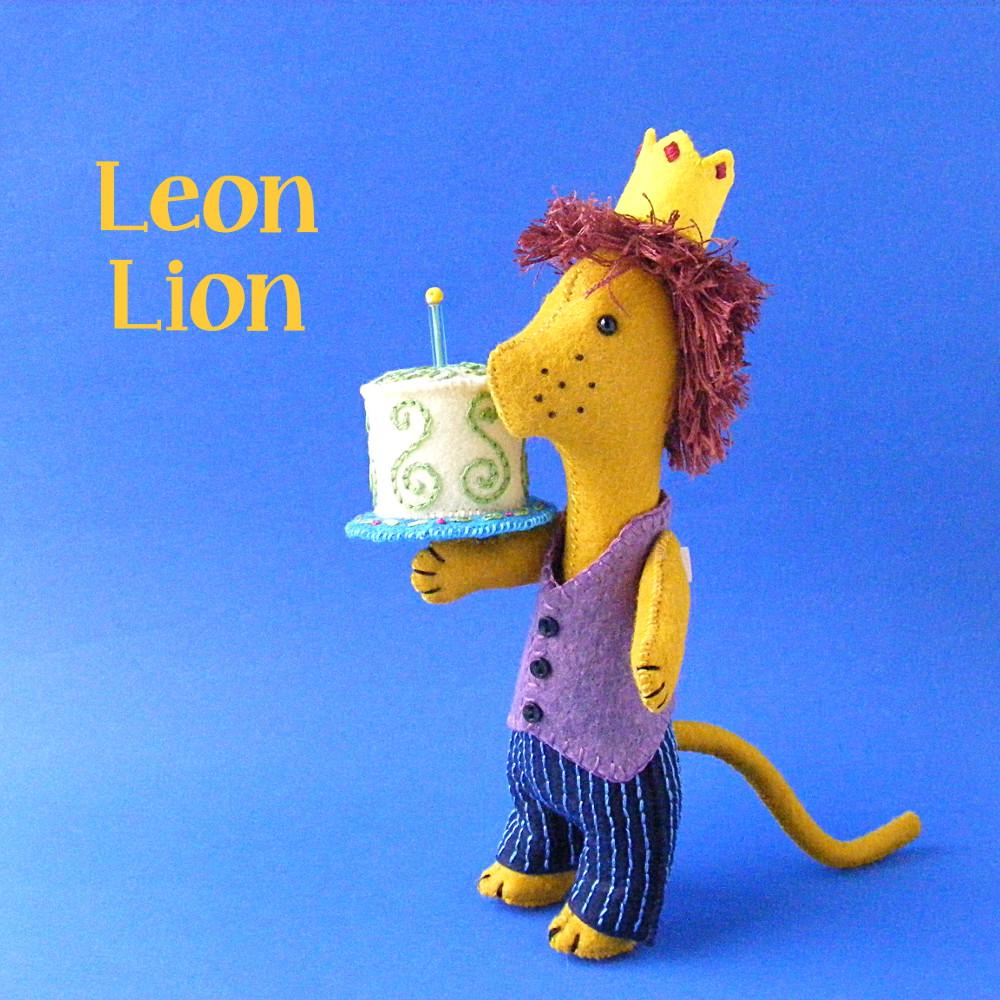
You may be feeling a little nervous about that mane. Don’t be nervous! It’s a relatively easy stitch called Turkey work and the pattern has a link to this video showing how to do it.
I had a question asking me to get more specific about the spacing of the stitches in the Turkey Work for his mane.
I didn’t get terribly specific because a little variation here won’t be a problem. It’s not like eyes which really need to be placed just so. If you start his hair a little farther back, he’ll just have a bit of a receding hairline. If you go lower on his forehead than I did, he’ll have a shorter forehead. It’s all good. 🙂
Here’s a bit more info. . .
I started stitching with a row of stitches right down the back of his head, starting a bit back from his forehead and stopping a bit short of the nape of his neck.
This shows an approximation of starting and stopping places. Again – you don’t need to stress too much about this.
Then you just basically circle around that first row of stitching, giving him a wider and wider Mohawk until it’s not a Mohawk at all anymore and starts to look more like a mane.
I stitched up one side, across the front, down the other side, across the bottom, etc. until I used almost the whole skein of thread. At some point I decided that it was far enough down the nape of his neck and I stopped adding loops when I went across the bottom and just skipped over to the other side by slipping my needle through his head. Every time you finish a circuit, take a look at him and decide if you like the way his hair is growing. You can add an extra row or two across his forehead if you want, or make it go lower on his neck the same way. It’s totally up to you!
I do recommend going around in circles. It’ll be the easiest way to keep your stitching even on both sides so his mane is balanced – which is more important than the particular placement on the head.
I also had a question about coverage.
You can see in the loopy photo that there are bits of head showing through the mane before cutting and fluffing.
That fluffing really fills things out! I took this photo after fluffing, but spreading apart the mane so you can see his scalp underneath.
You can see that there’s actually a LOT of scalp visible if you work your way down there – rather like a doll’s head. So don’t worry about getting perfect coverage there. The fluffing will really fill things out.
One other note. I made mine an adolescent lion with a shortish mane that doesn’t grow very far into his face. If you wanted to make a more mature lion you can buy an additional skein of the thread and keep making more circles until he looks the way you want. If you decide to do that, I’d make the loops a little longer too. My loops were about 3/4″ tall and not perfectly even. I left them a little shaggy after trimming – I just cut the loops in half and left them mostly untrimmed because I wanted a pretty shaggy look.
Did you notice how many times I said things like “a little variation is good” and “don’t worry too much about the placement here” and other things like that? That’s because it’s really not that fussy. I understand you being nervous – it’s a brand new stitch for most of you and it’s very different. But fluffing those loops out covers a lot of little “mistakes” – so relax and have fun! And imagine all the other things you can do with that new stitch! Fancy fringes, bushy eyebrows, dignified beards – the possibilities are endless!
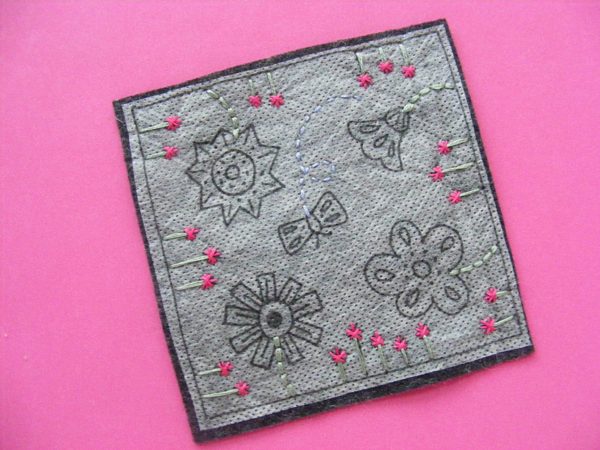
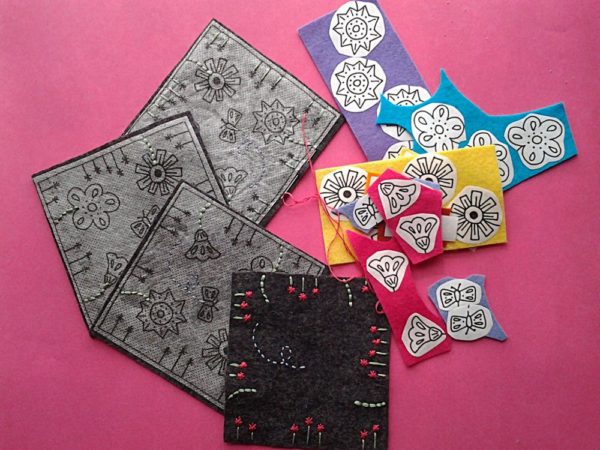
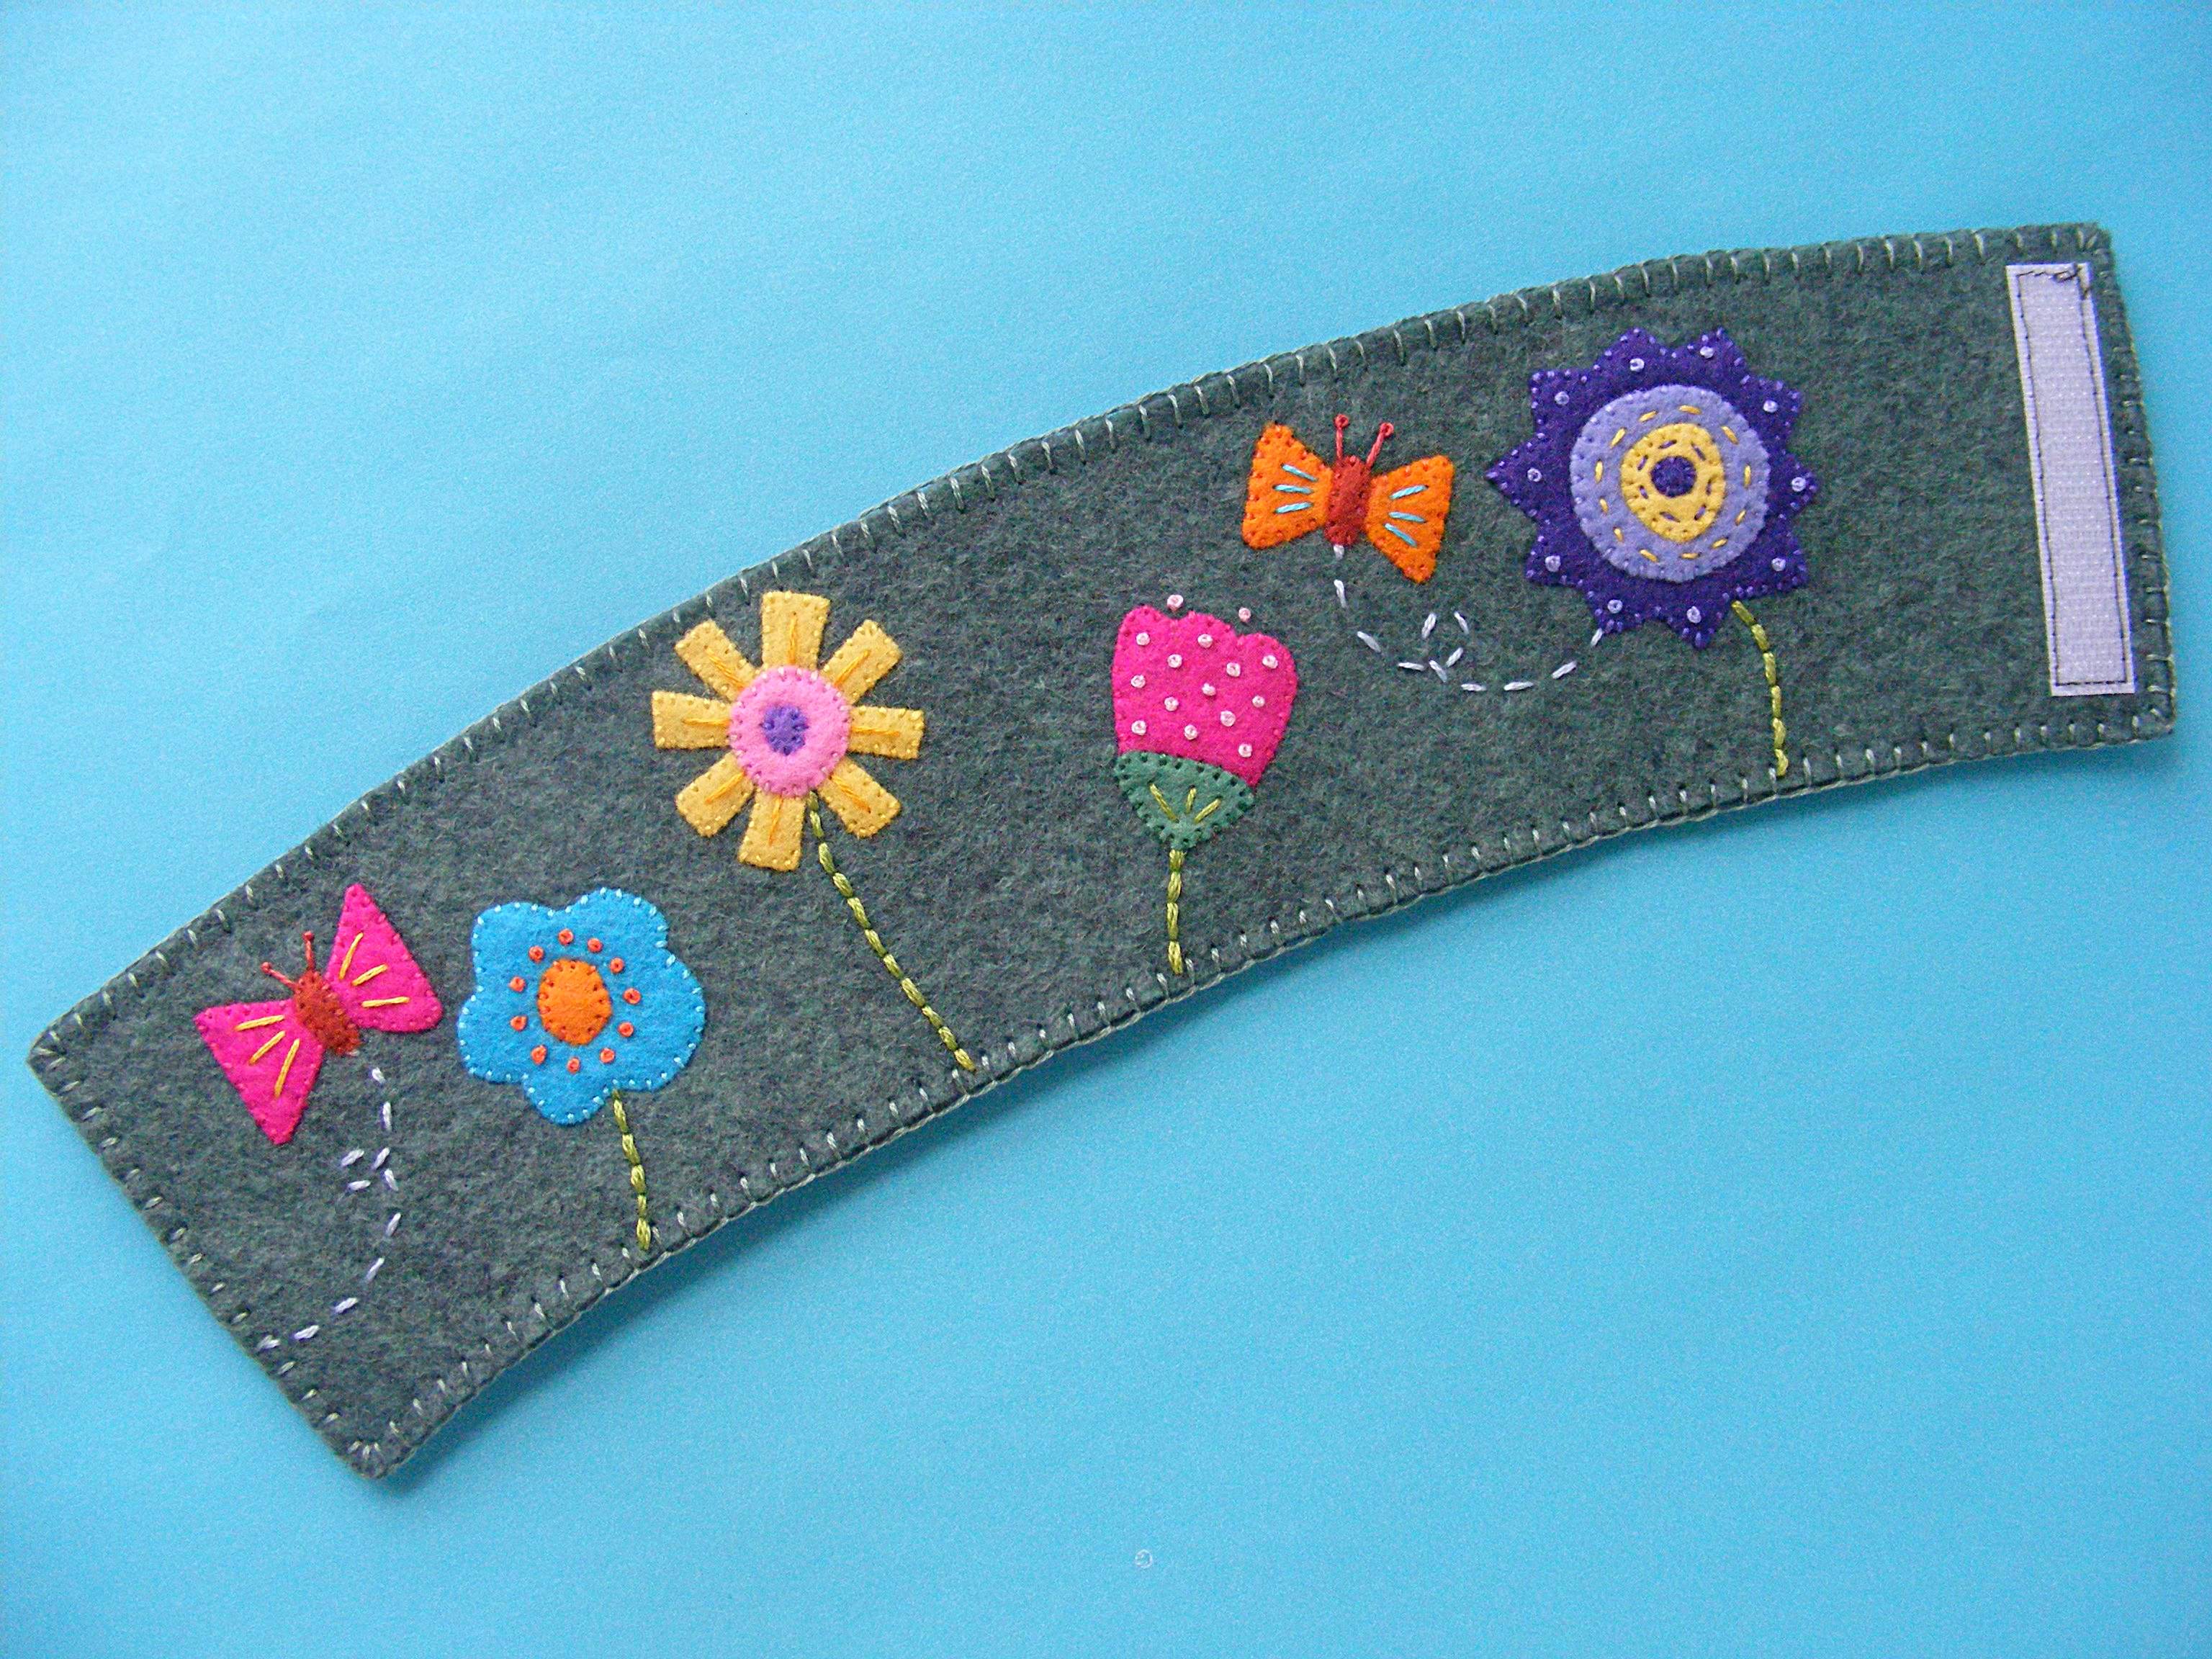
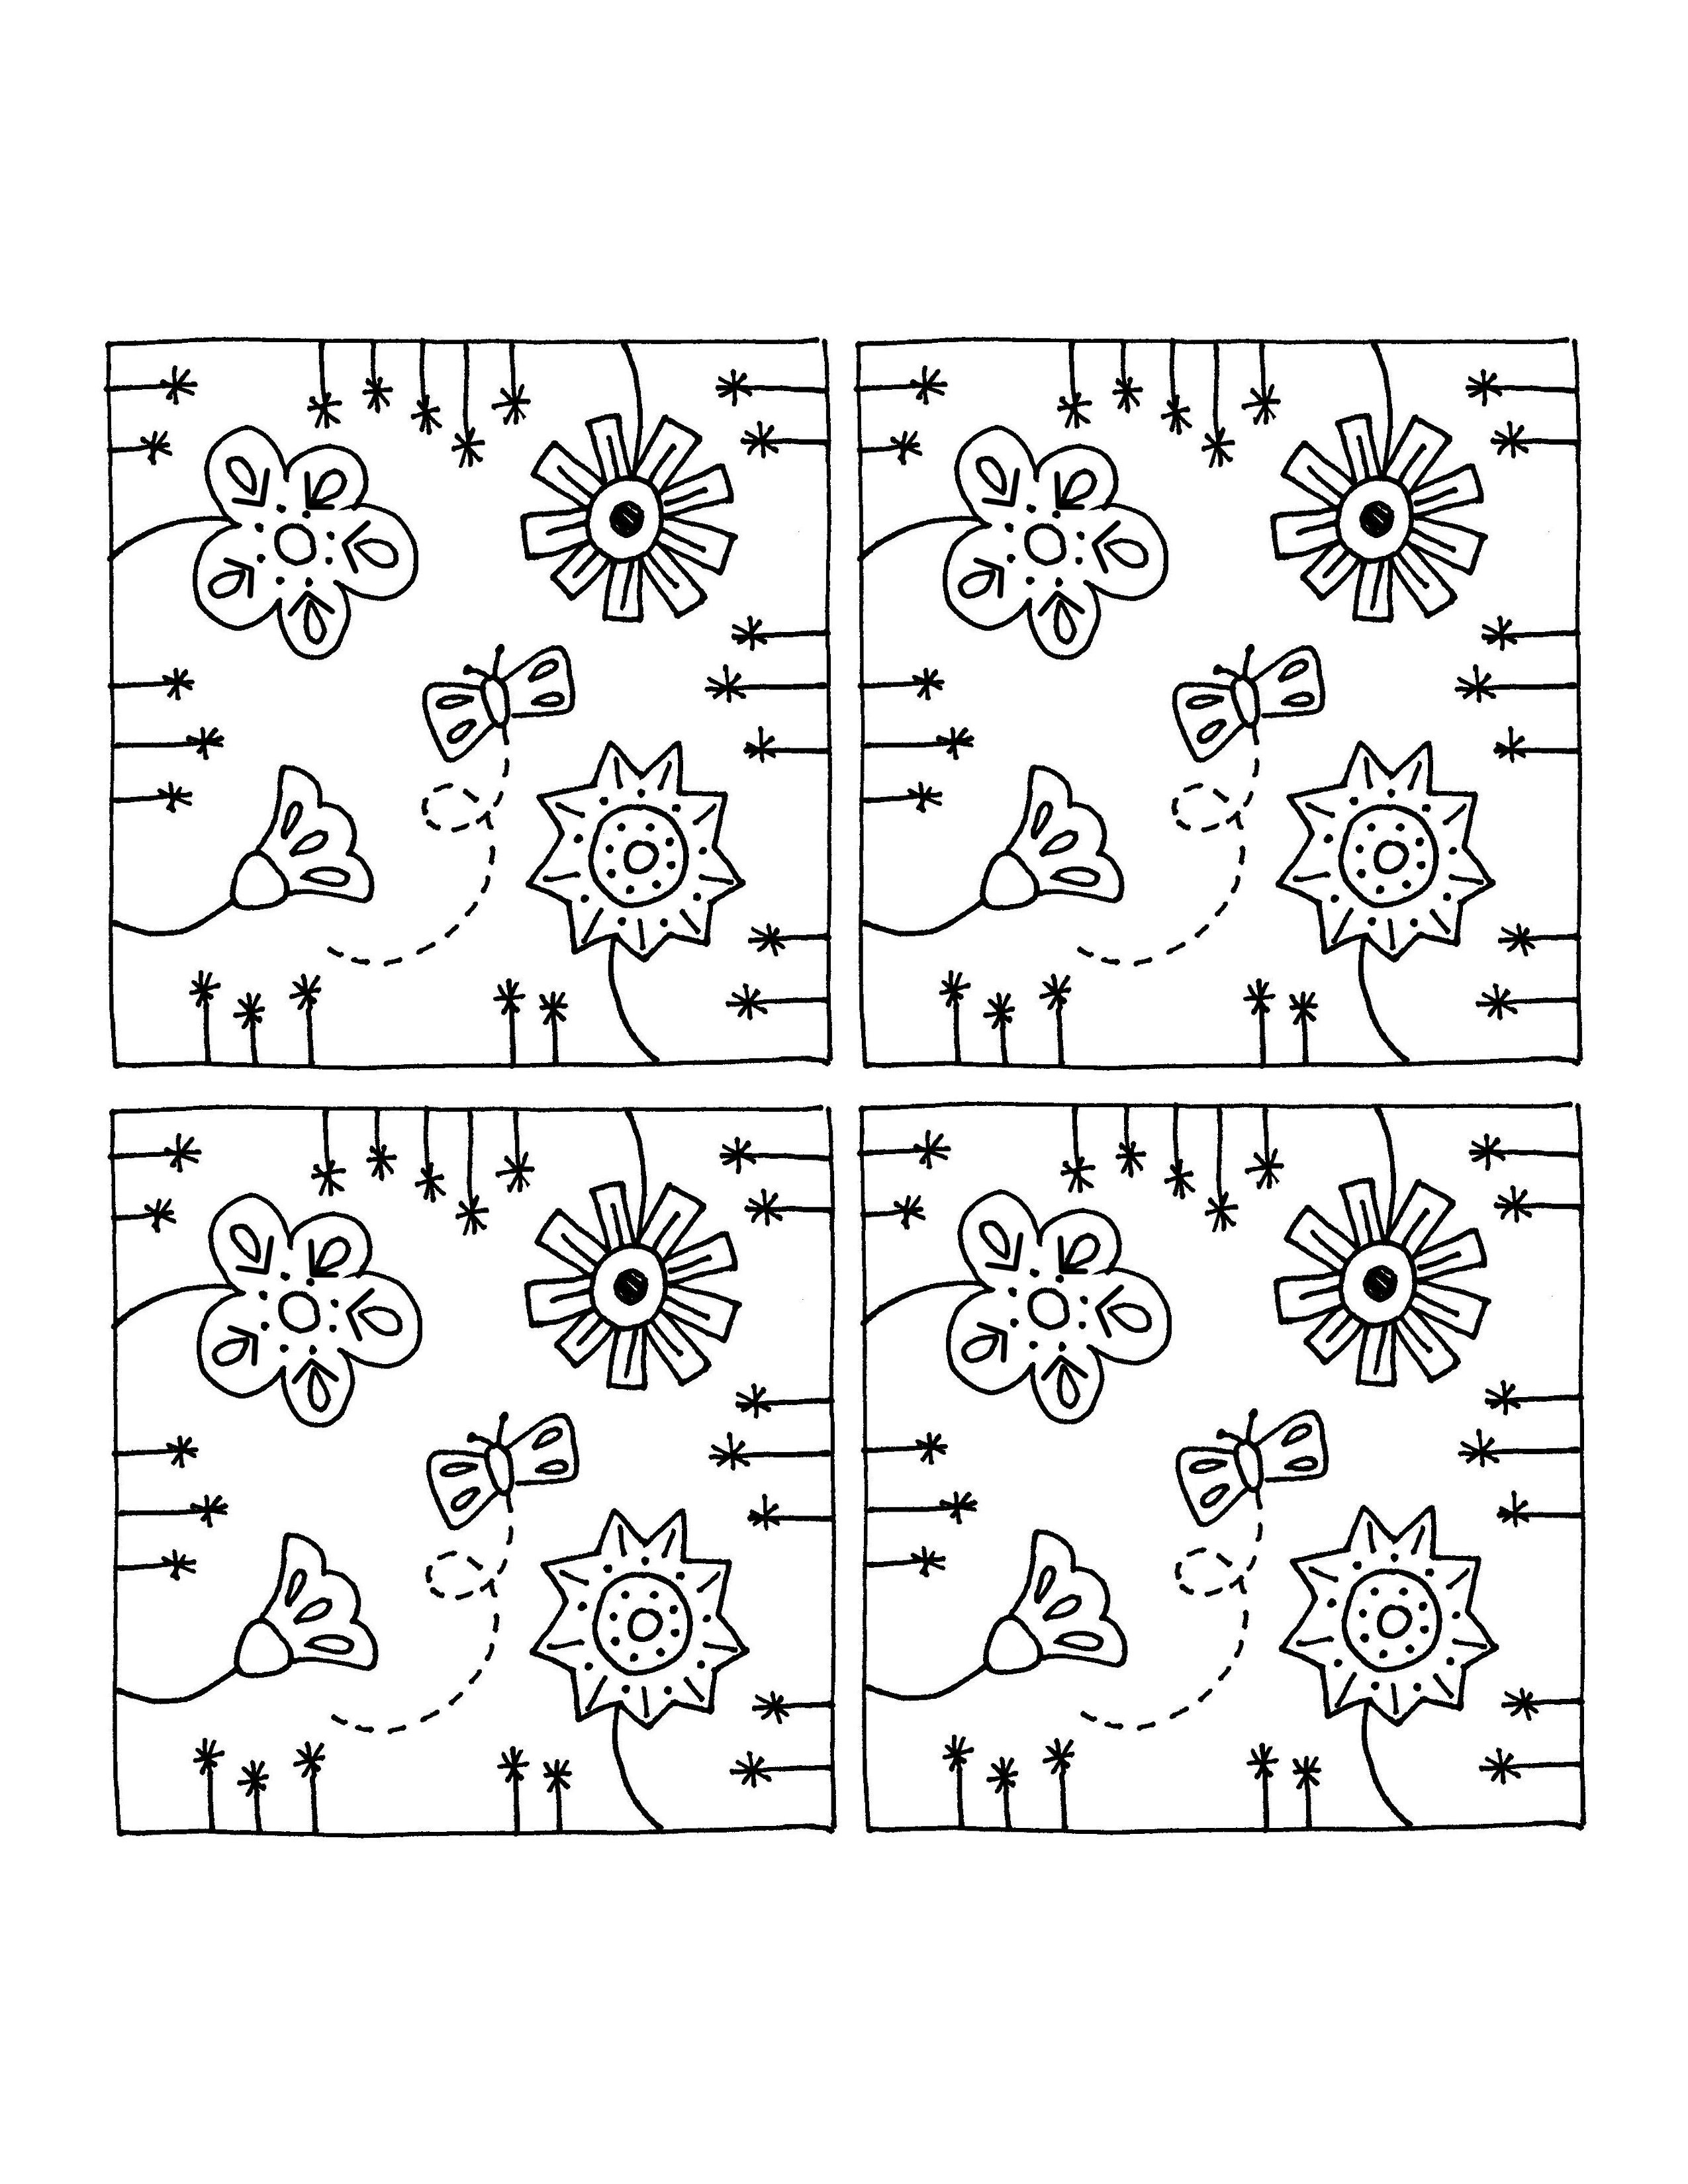
Here’s a free felt coaster pattern so you can stitch up some fancy floral finery.
Coasters are a bit of an issue for me.
I have a glass of ice water within reach all day long. I have a lot of potter friends – so most of my cups and glasses are lovely to look at and delightful to hold, but completely uninsulated so they sweat like crazy.
I’m always seeing pretty, pretty coaster tutorials online – and I’ve made a few. But the fabric ones (which are what I love to make) just catch the water and hold it in place. They usually soak completely through, so instead of getting a ring on my furniture – I get a big blobby smear.
Then I had a bit of an epiphany. Maybe everyone else has already thought of this – but none of the tutorials I’ve read mention it and it was a new idea for me, so. . . what if I put something waterproof inside a coaster – to block the moisture from soaking through to the bottom? Of course! *smacks forehead* I could make some very pretty – and also completely functional – felt coasters! Happy dance!
Fast forward to today. My felt coasters are finally finished – and I have a free pattern for you!
These are not hard to make – they only use very simple stitches – but they take a lot of time. Luckily, they’re small and easy to schlepp around for some portable handwork to pull out at the doctor’s office, the park, on long car trips, etc.
What You Need for This Felt Coaster Pattern
You can find links to sources for all my favorite tools and supplies here.
1 1/2 sheets wool-blend felt for the coasters (I used licorice)
4 squares of waterproof fabric for the inside of the coasters (I used scraps from some art aprons I used to make, but you could use anything waterproof like an old raincoat or shower curtain liner)
small scraps of wool-blend felt in assorted colors for the flowers and butterflies
embroidery thread in colors to match the felt
Sulky Sticky Fabri-solvy (optional)
freezer paper (optional)
size 8 embroidery needle (optional)
Thread Magic (optional)
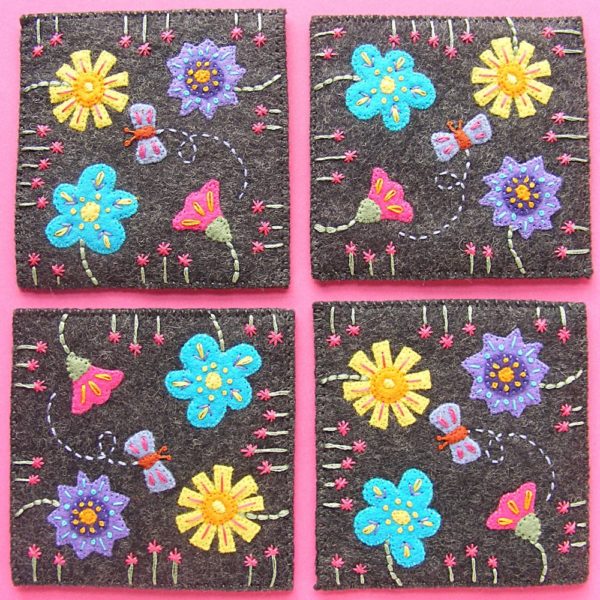
So there you are! Download your patterns and gather up some felt and thread in pretty colors and start stitching! It’s fun – and the finished coasters are so, so pretty. 🙂
How to Make Them
Step 1
Download the base coaster pattern here and trace or print it onto a rough side of a sheet of Sulky Sticky Fabri-solvy. I use Sulky Sticky FabriSolvy every time I work with felt. I love it!
Cut the four squares apart (leaving a little extra room around each square), peel off the paper back and stick the film to a square of felt.
Step 3
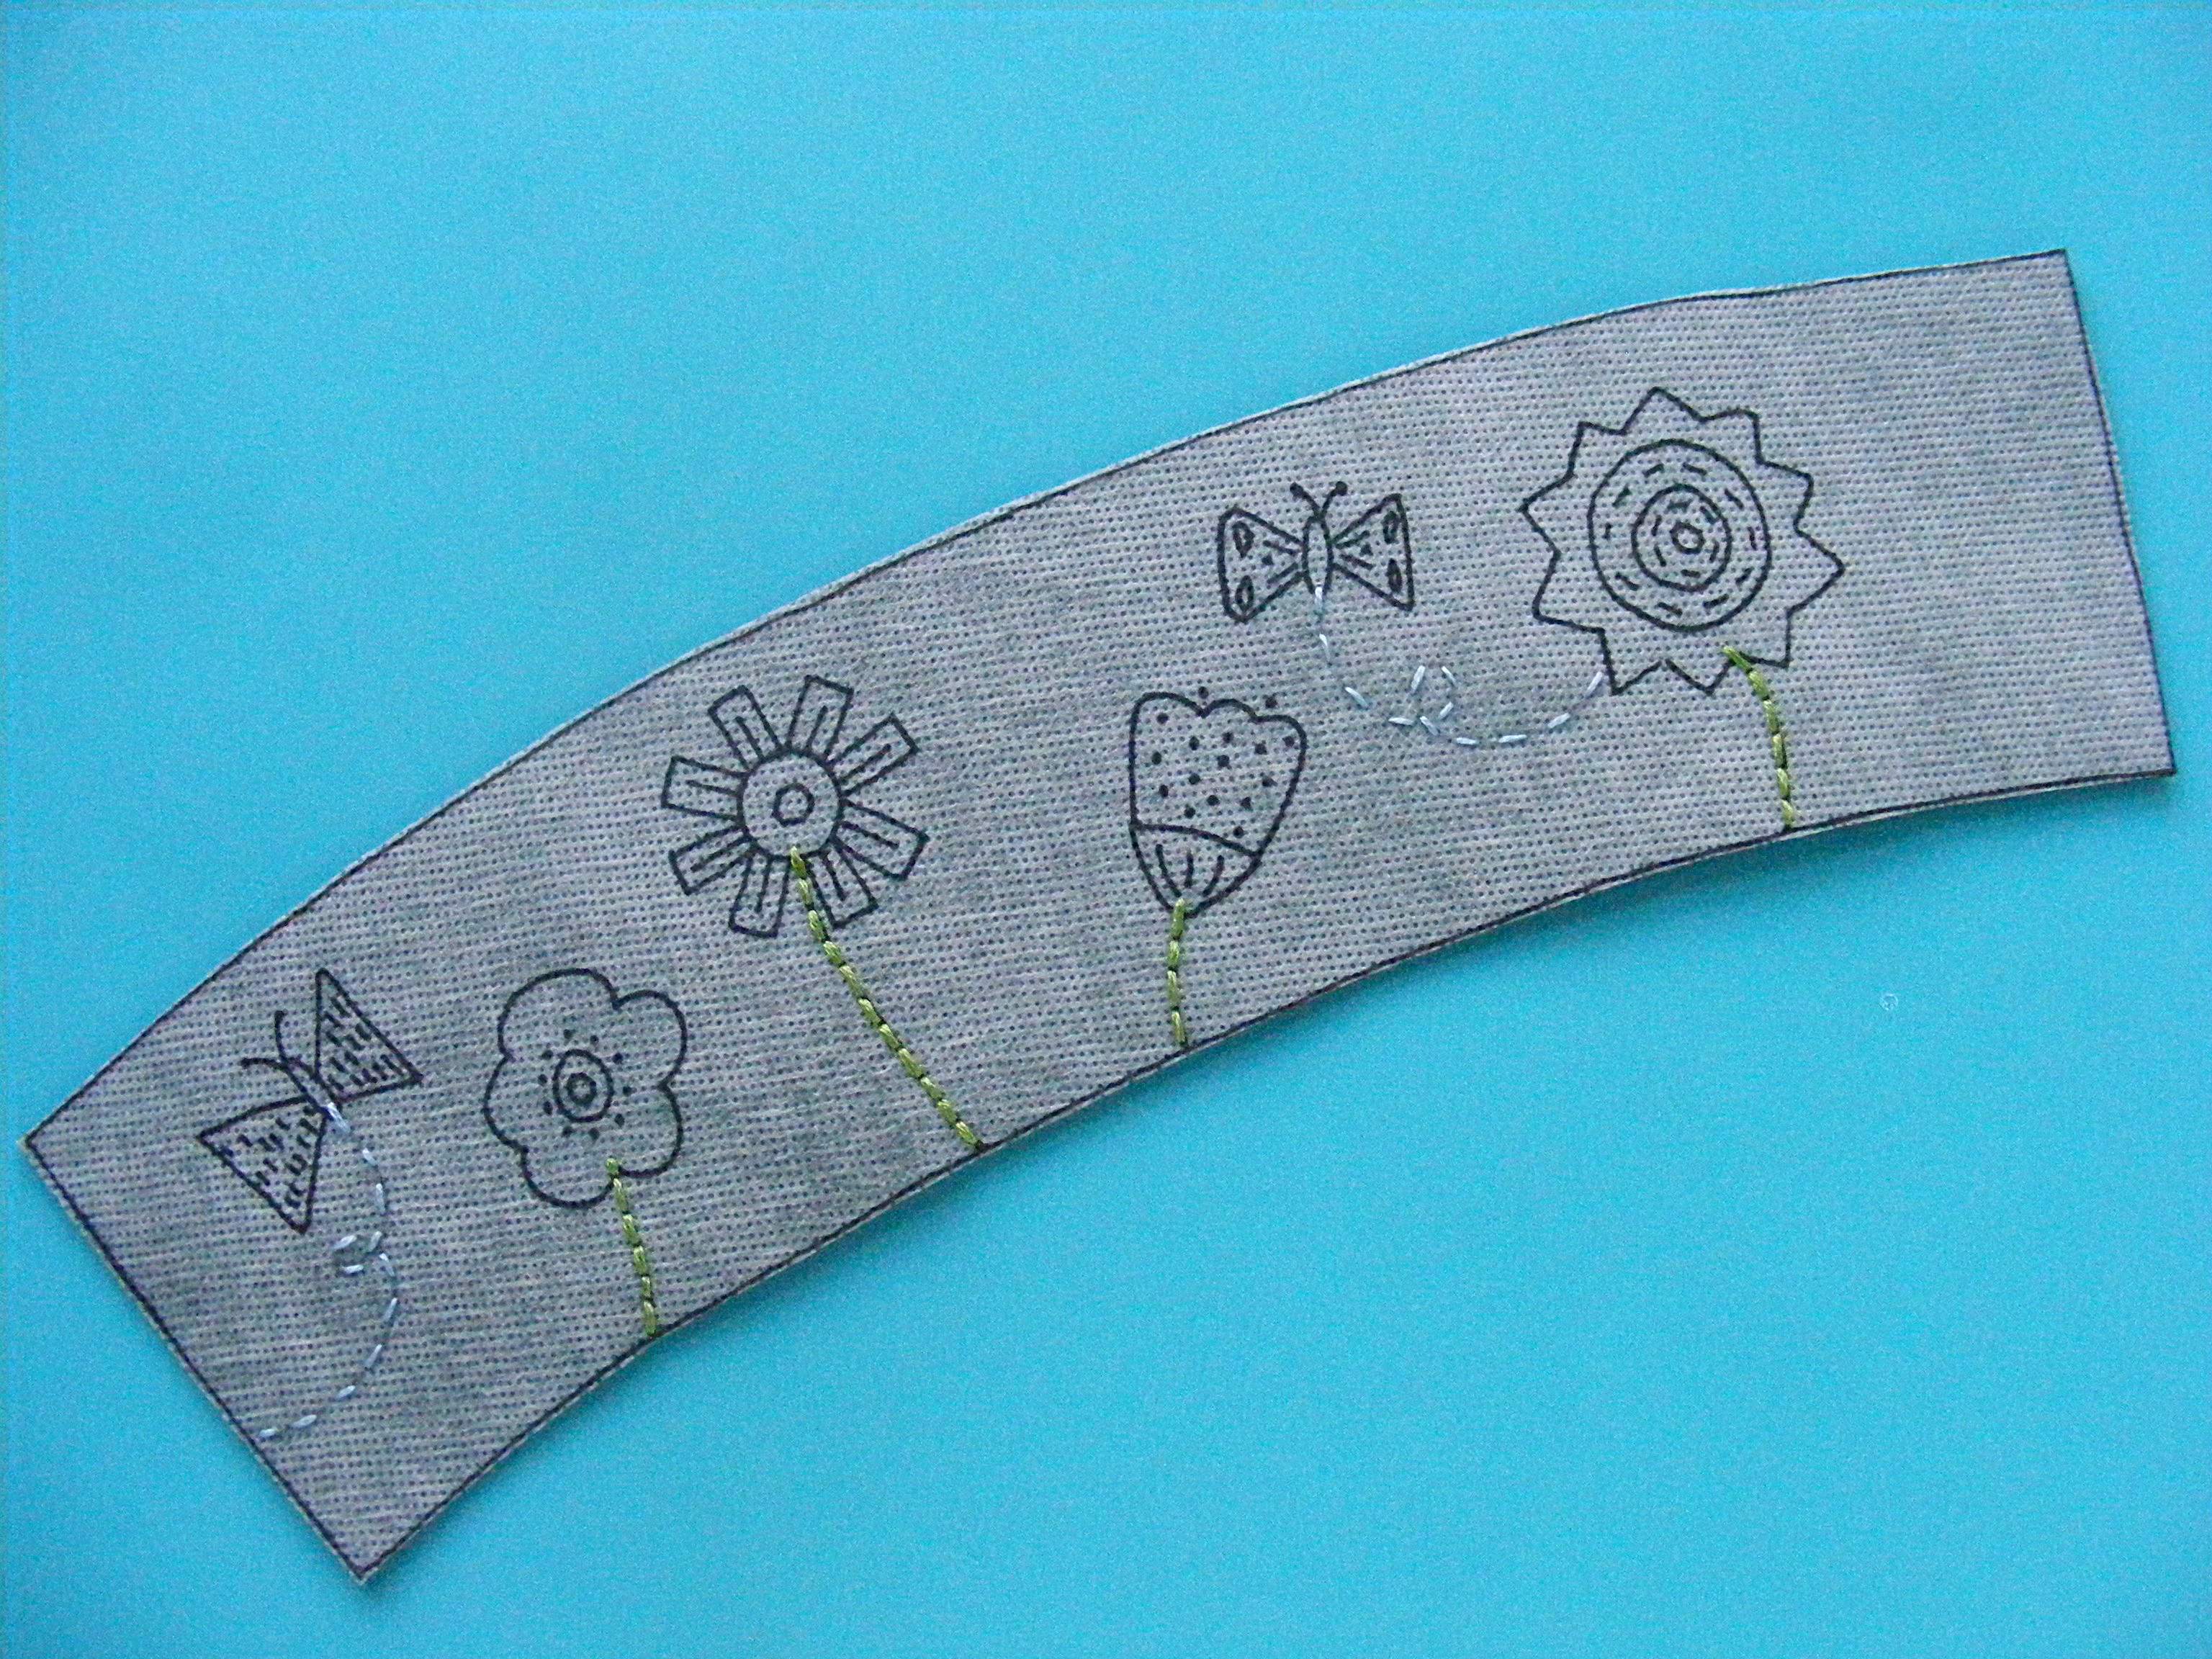
Embroider the design right through the stabilizer and the felt.
I’m going to applique most of the flowers and the butterfly, so all I stitched here are the stems, butterfly trail, and the small flowers all around the edges.
I used backstitch for the stems of the applique flowers with four strands of green thread (DMC #522). I used running stitch for the butterfly trail with three strands of periwinkle thread (DMC #156).
For the star flowers around the edges I used two strands of green (DMC #522) and a single stitch for each stem, and two strands of fuchsia (DMC #601) for the flowers.
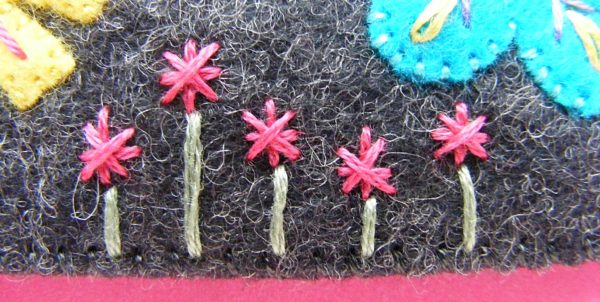
You have a couple of options when you stitch those star flowers.
In this first photo, I stitched the stem up to the base of the asterisk, then stitched the full asterisk for the flower.
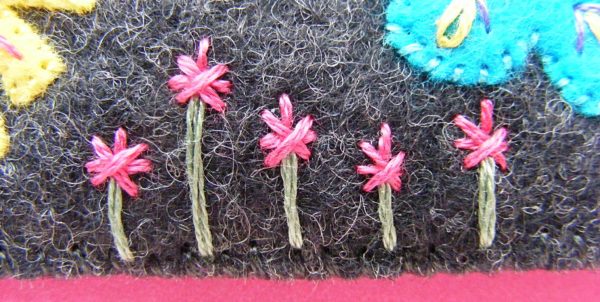
In this second photo, I stitched the stem up to the center of the asterisk, then stitched the rest of the asterisk around it, skipping the bottom stroke of the asterisk so it looks like the stem goes up into the flower.
Which do you like better? That’s what you do for yours. :-)
Step 4
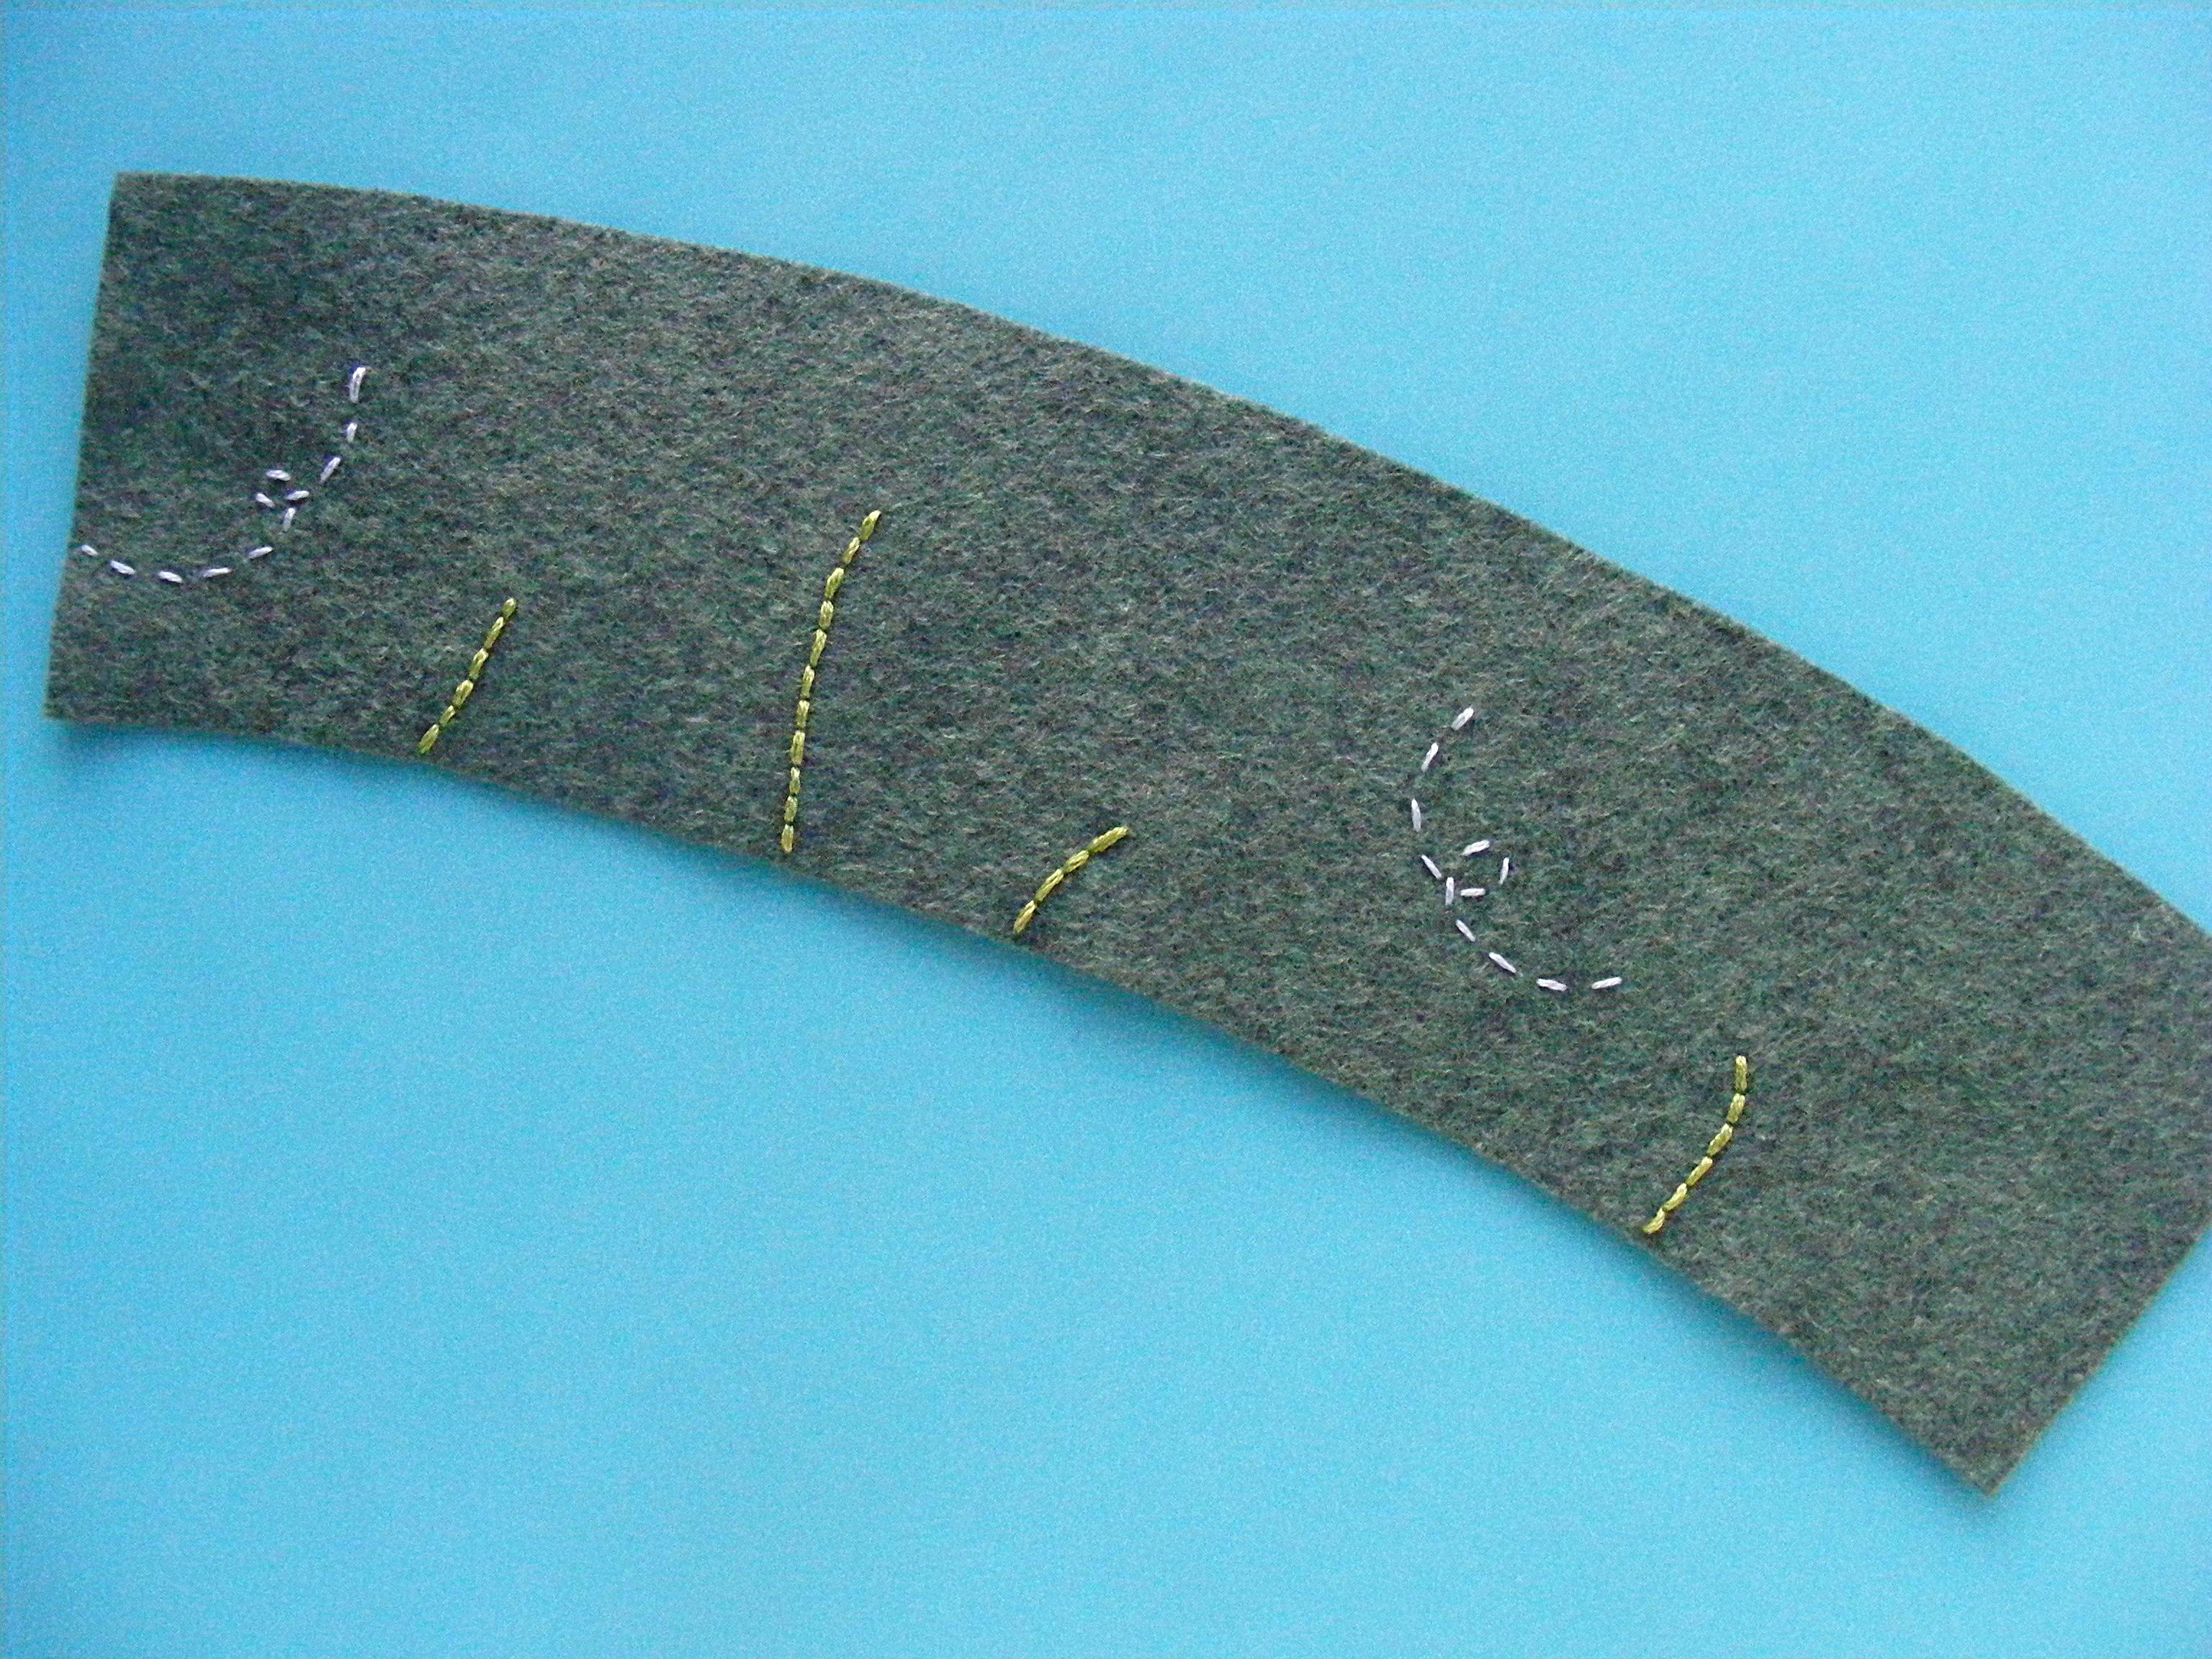
Trim around the edge of your stitched coaster, right on the line.
Soak out the Sulky Sticky FabriSolvy in cold water for at least an hour and rinse clean with more cold water. Hit any stubborn bits with a kitchen sprayer – don’t rub the surface of the felt.
Let the pieces dry flat. Don’t wring, twist or even smoosh them. Just set them on a towel and let them dry overnight.
You can see a coaster with the stabilizer removed at the bottom of the photo. Look! Now I know exactly where each applique piece goes. The stitched stems and flight paths are great guides!
Step 5
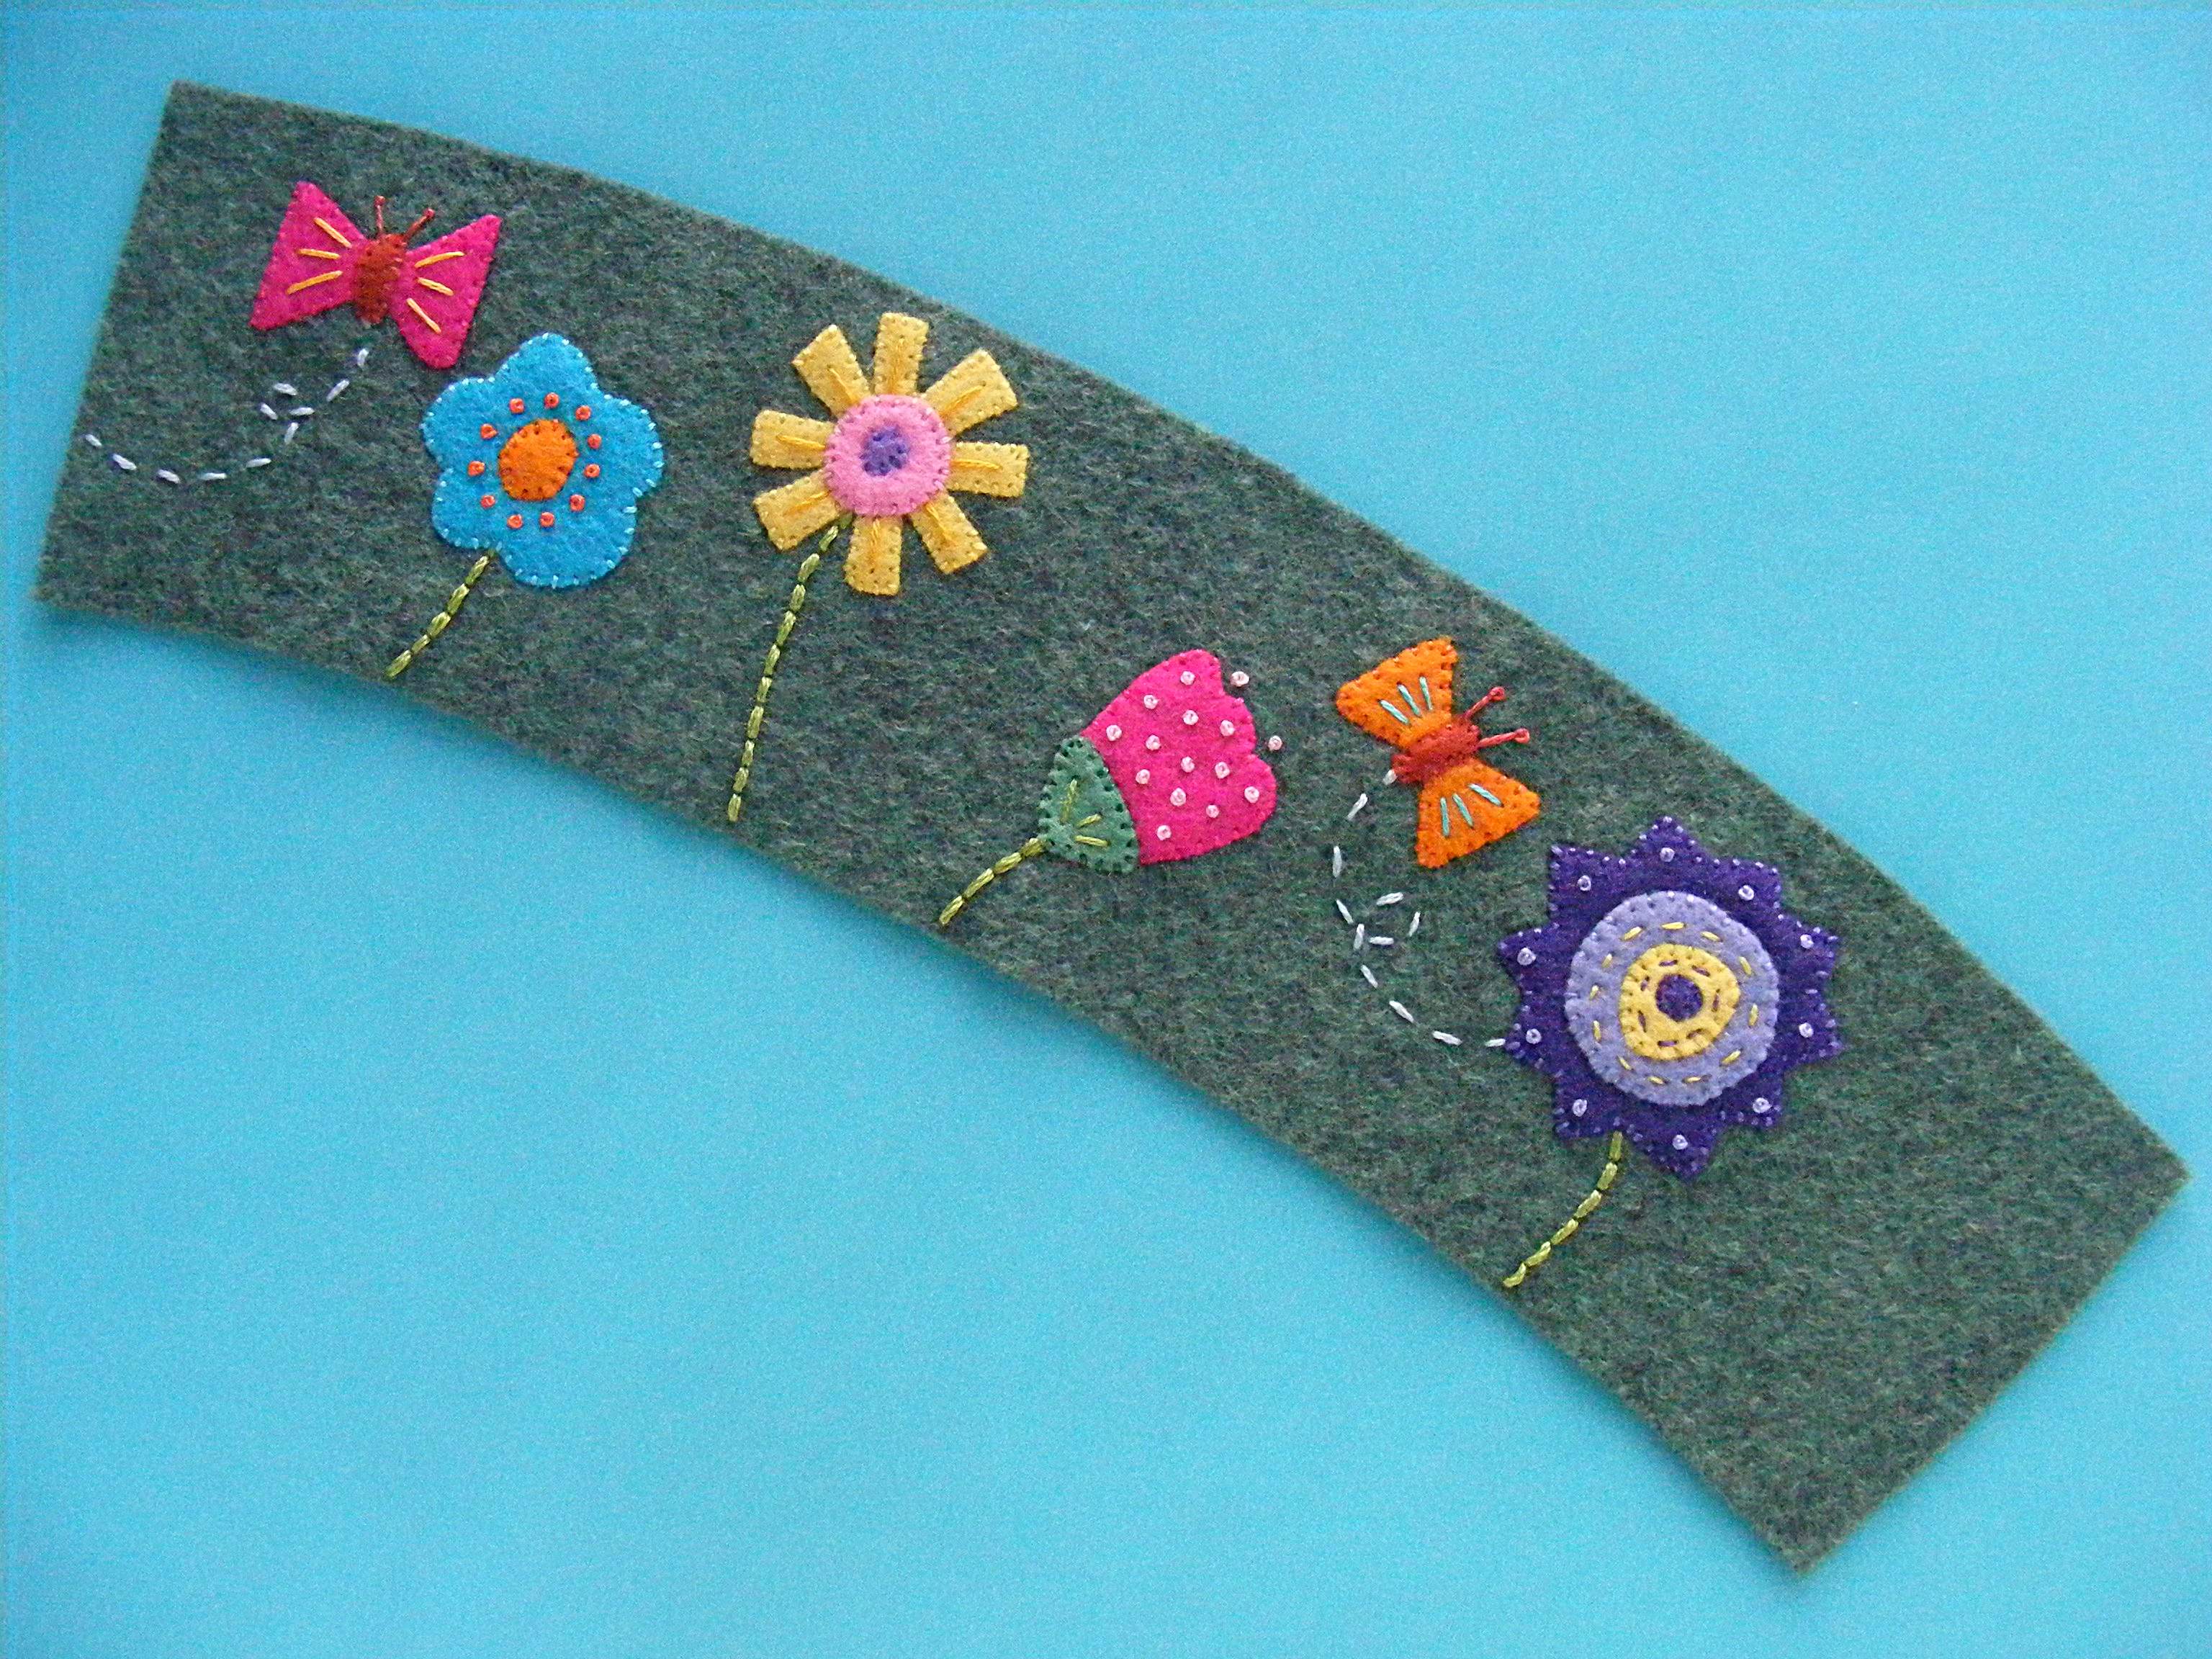
Applique and embroider the rest of your design.
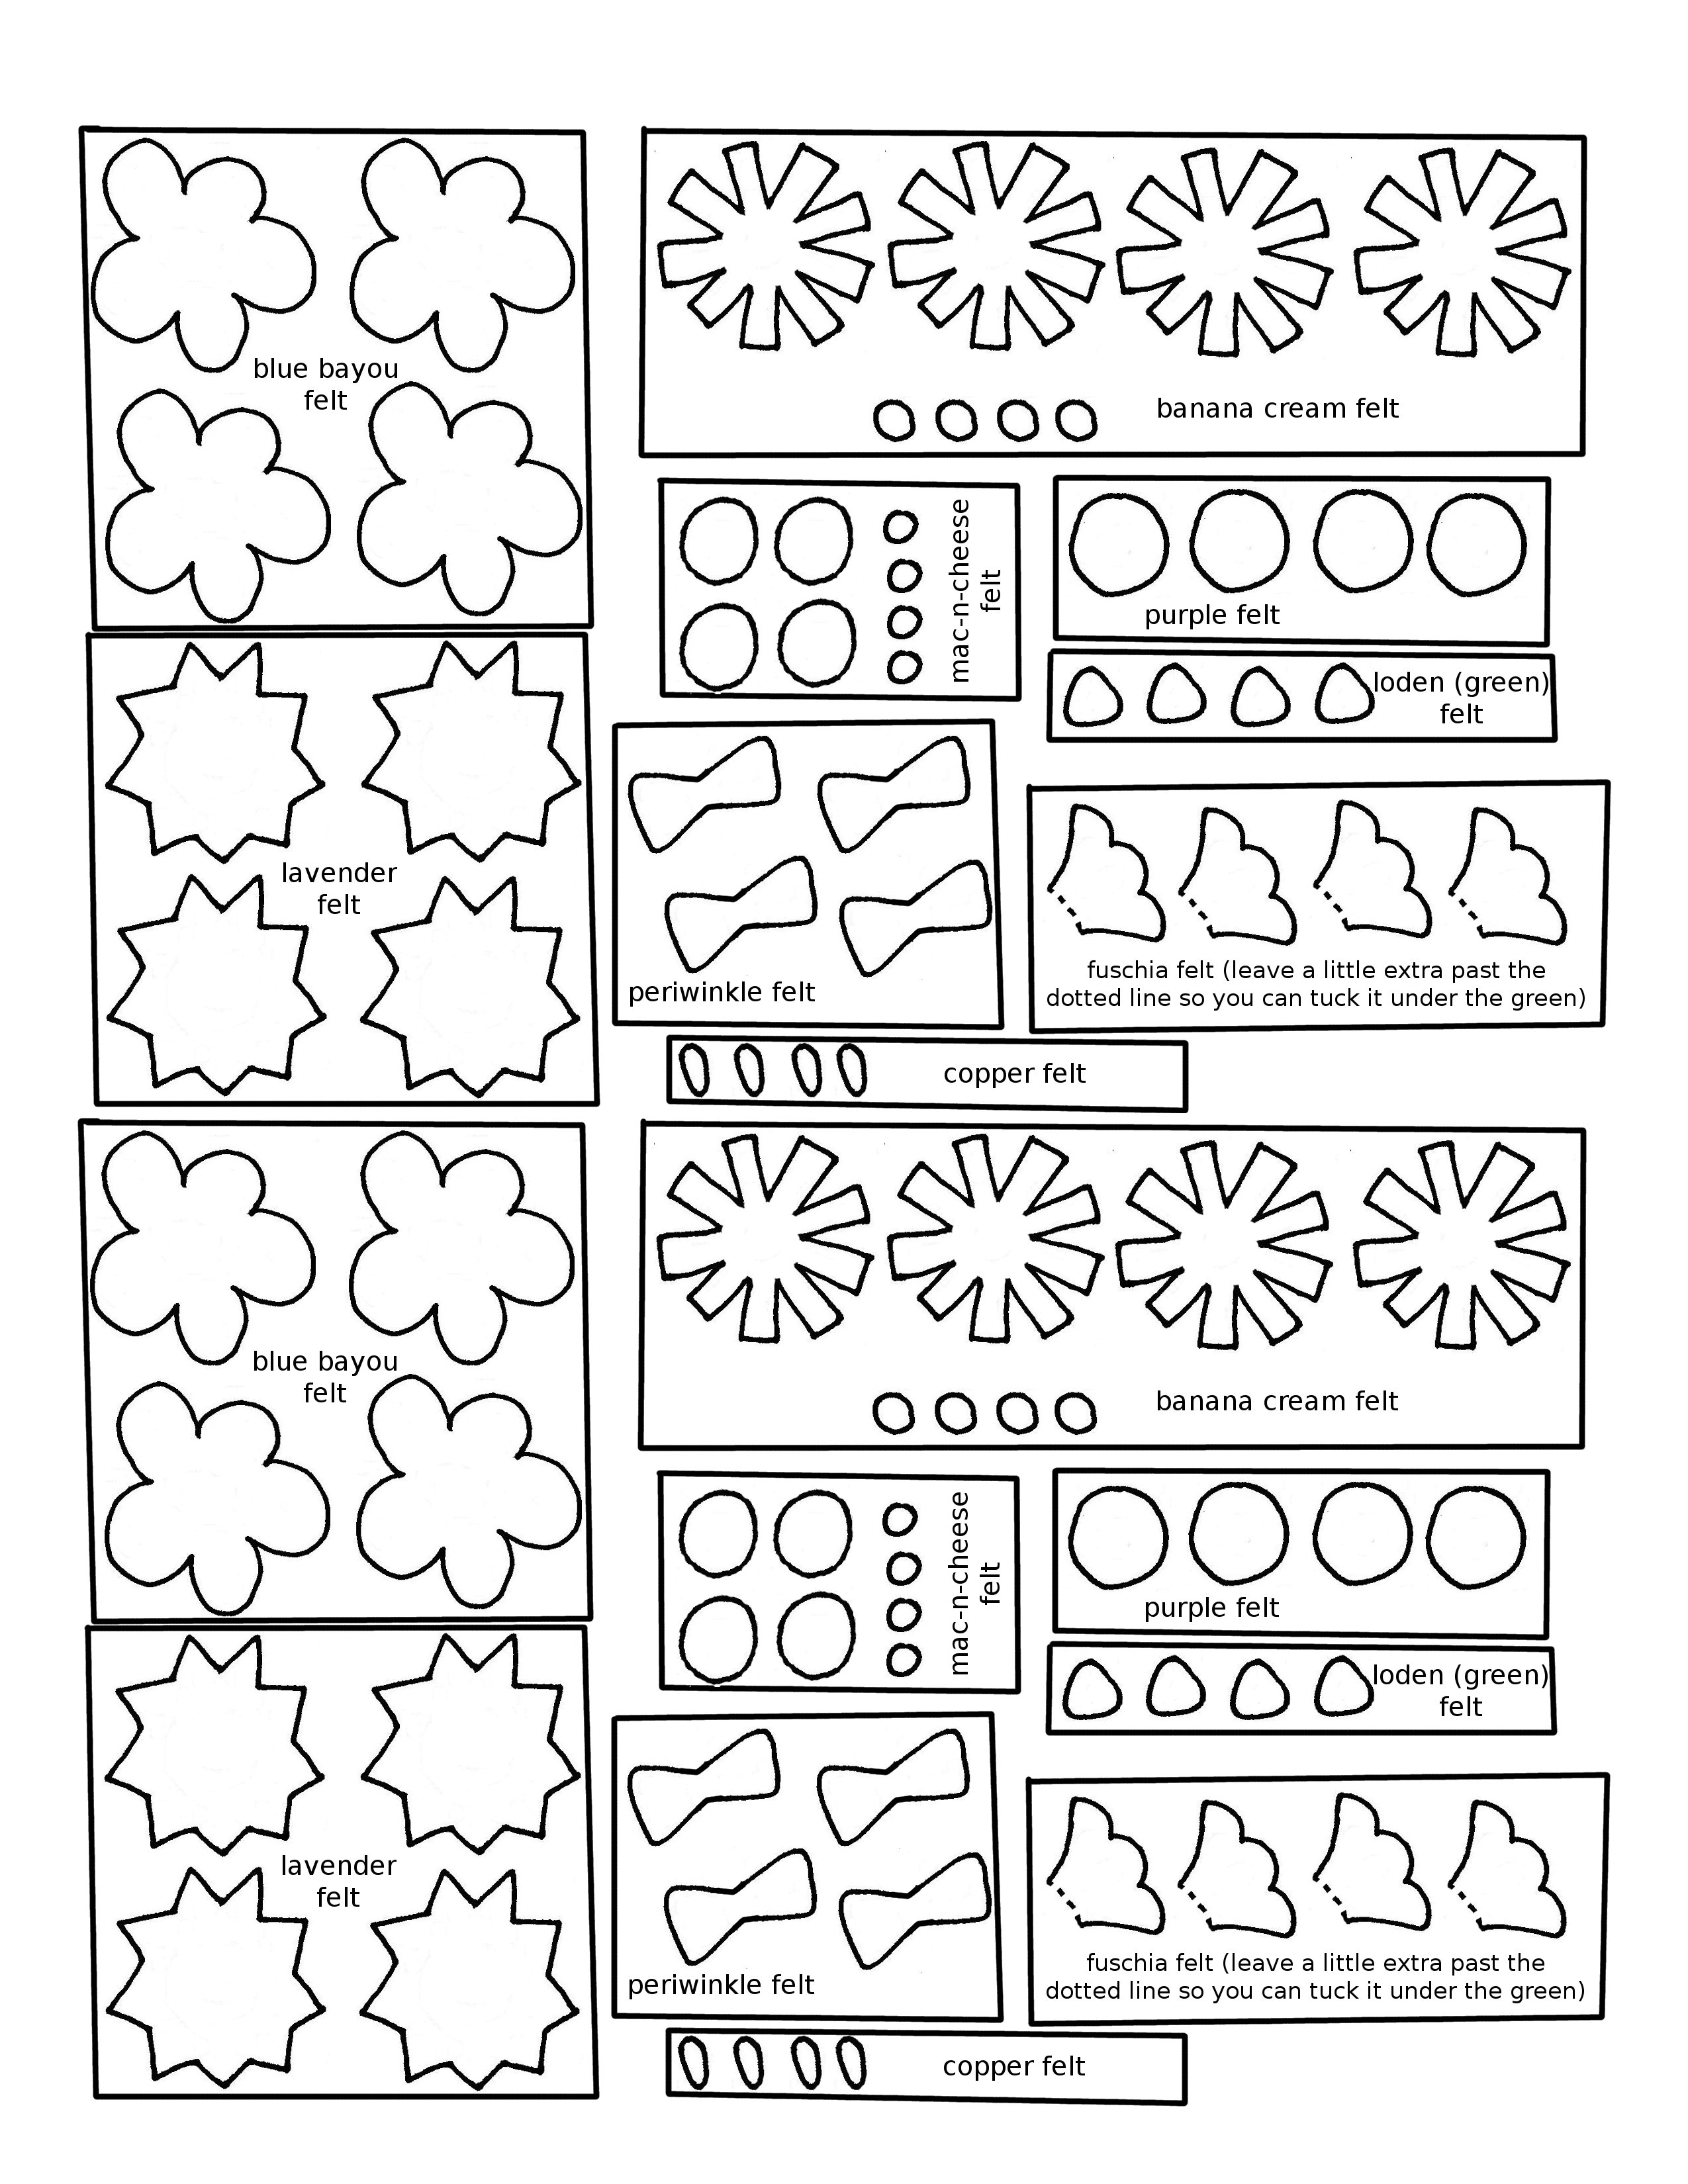
Download the applique patterns here and print or trace them onto the paper side of a sheet of freezer paper. One sheet has enough applique pieces for 8 coasters. Make a second set for a friend!
Iron the freezer paper to the felt and cut the small pieces out – cutting the freezer paper right along with the felt. That keeps your cutting accurate on such small pieces.
Peel off the freezer paper and use a swipe of glue stick to stick the flower where it goes on the coaster.
Use whipstitch and two strands of matching thread to applique each flower to the coaster, then add all the little detail stitches.
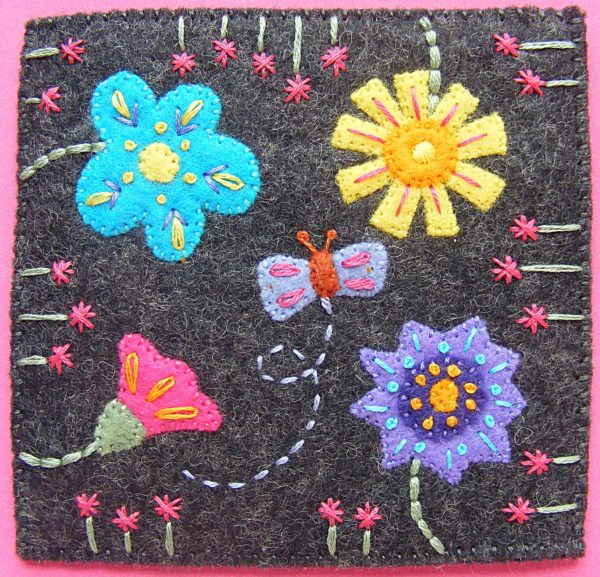
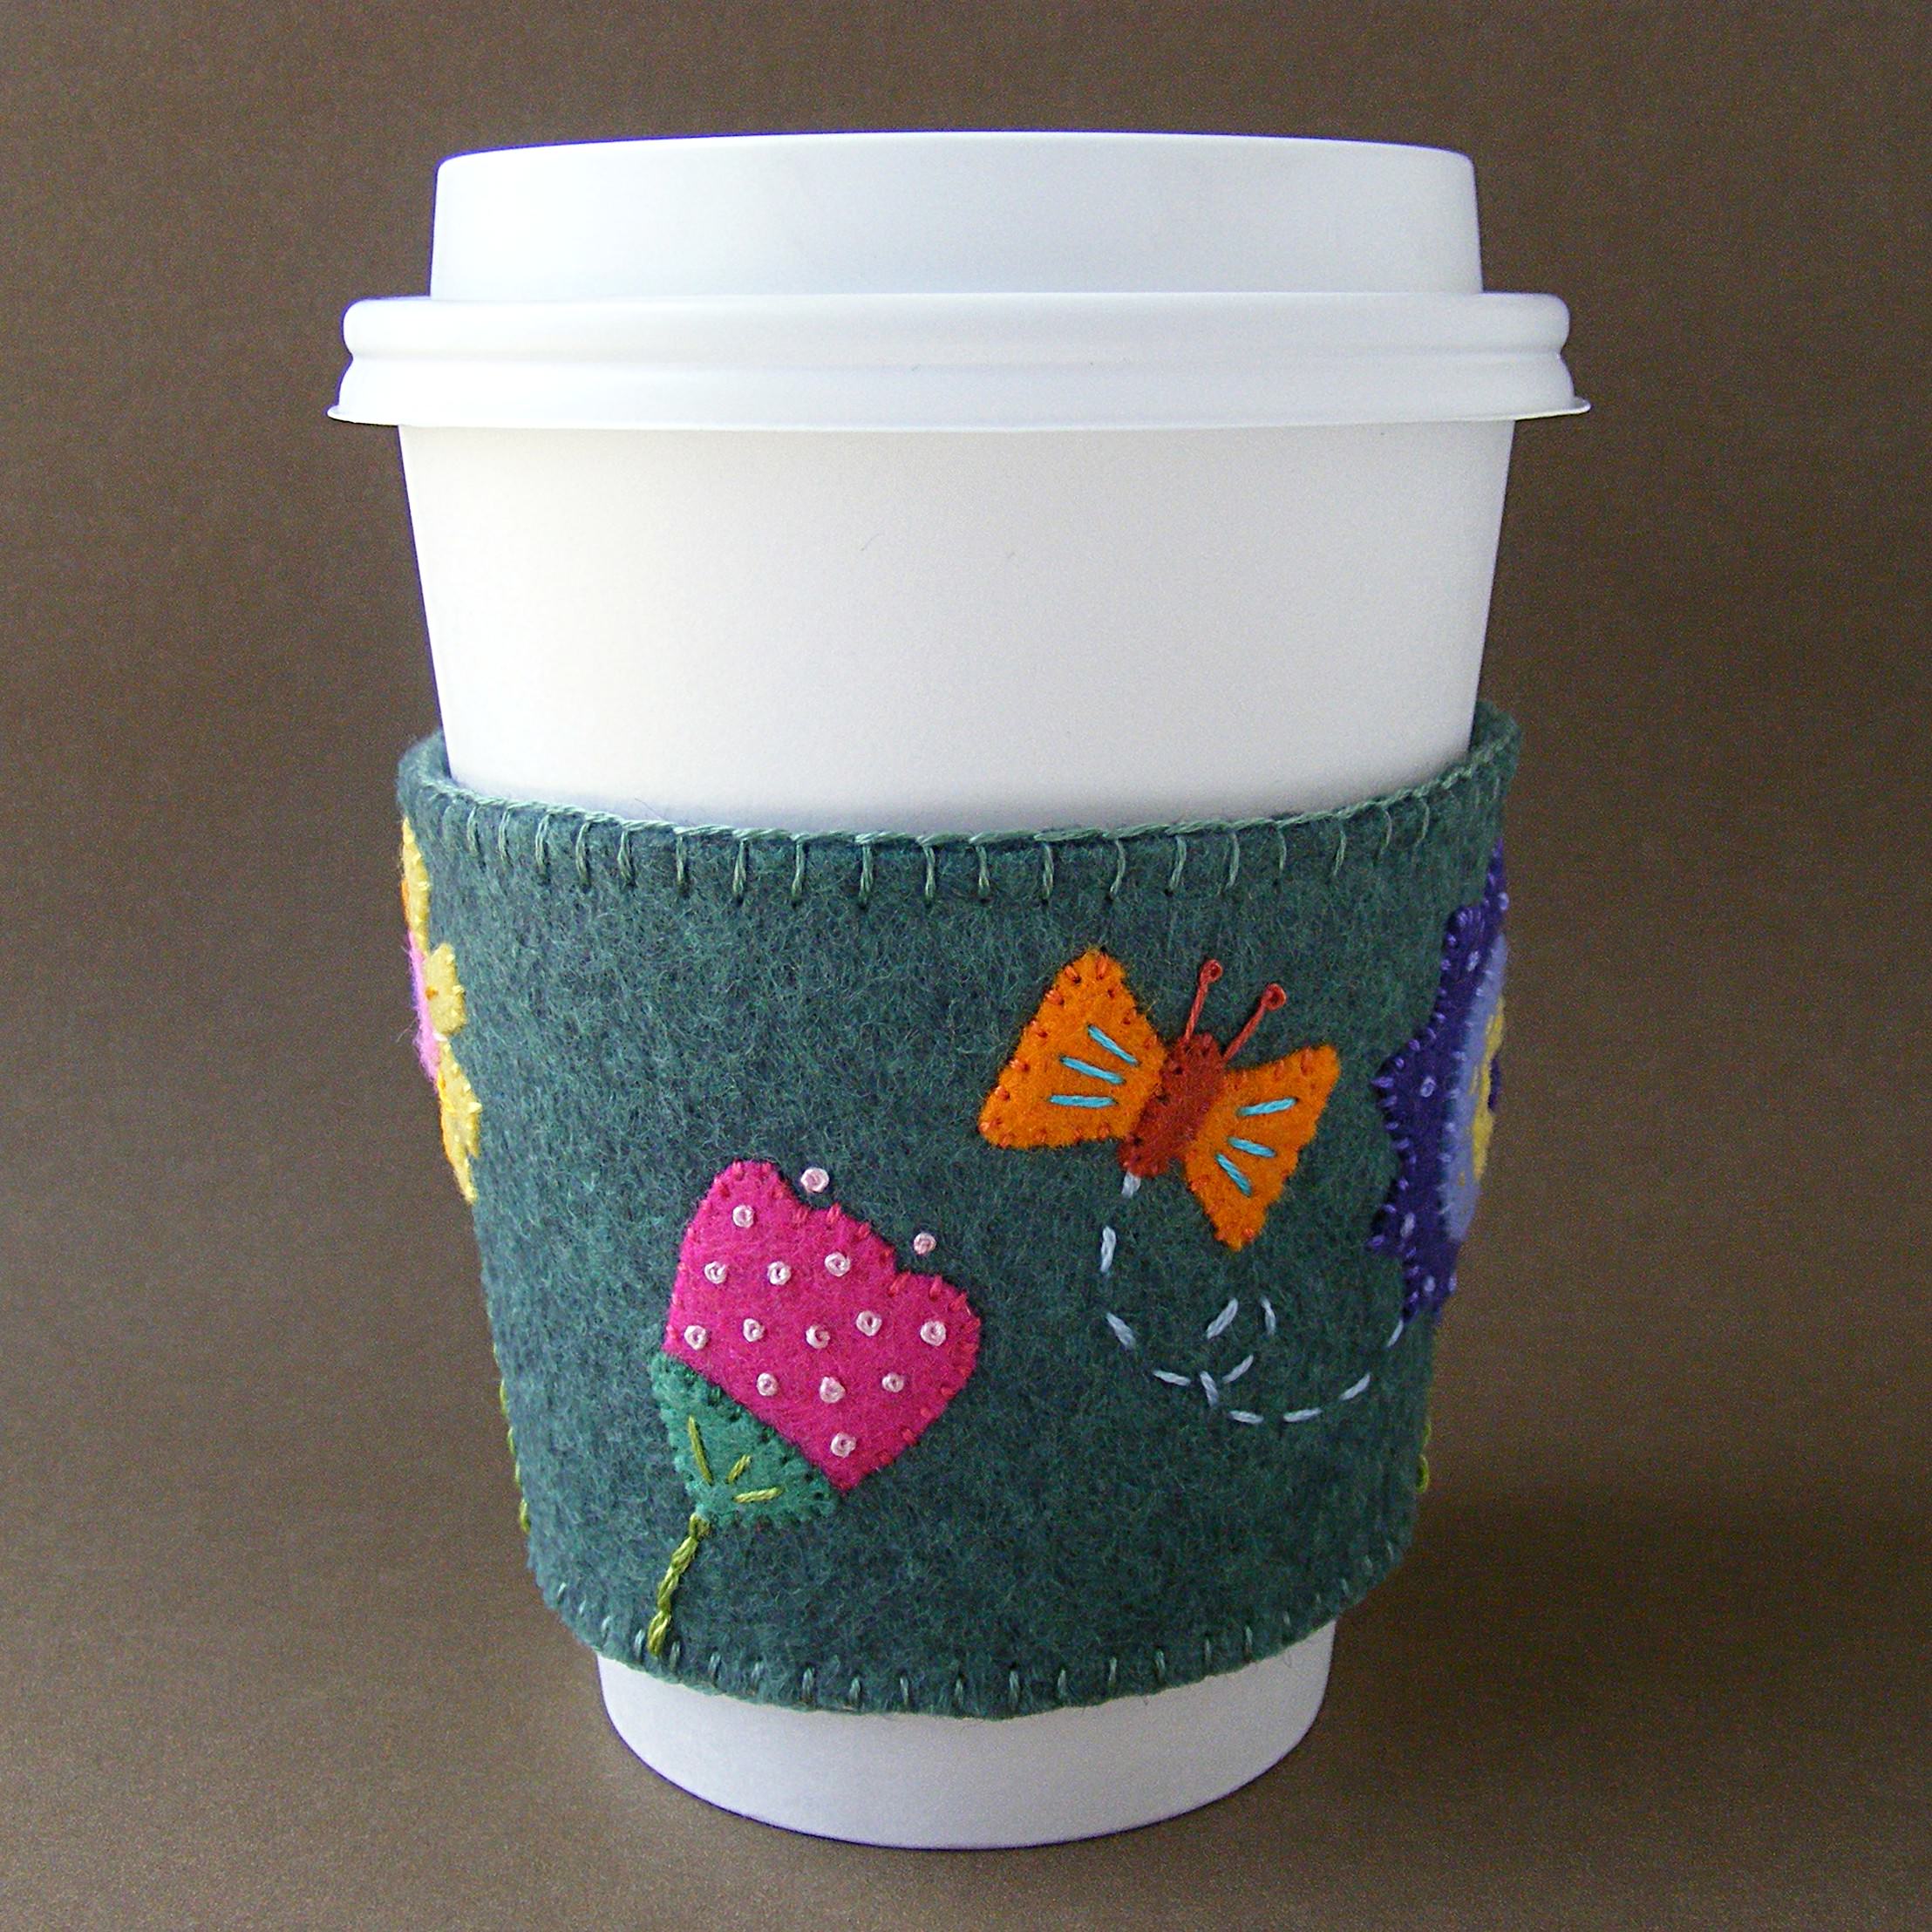
Here’s a detailed color and stitch guide and a super close-up photo of one finished coaster.
Oooh! Such a pretty felt coaster pattern!
Use two strands of thread for all stitching - the applique and the embroidered details.
Blue Flower
Whipstitch the flower with DMC #3846 and the center with DMC #726. French knots and lazy daisy stitches with DMC #726. Use straight stitches at the base of the lazy daisies with DMC #3746.
Yellow Flower
Whipstitch the flower with DMC #726 and the larger center with DMC #741. Satin stitch the small center with DMC #726. Straight stitch the pink lines on the petals with DMC #601.
Purple Flower
Whipstitch the flower with DMC #3746, large center with DMC #333 and tiny center with DMC #741. The orange French knots in the purple center are DMC #741. The blue French knots and straight stitches on the outer ring of the flower are DMC#3846.
Pink Flower
Whipstitch the pink flower with DMC #601. Lay the green bit so it overlaps the base of the pink petals and whipstitch with DMC #522. The orange highlights on the petals are lazy daisy stitches in DMC #741.
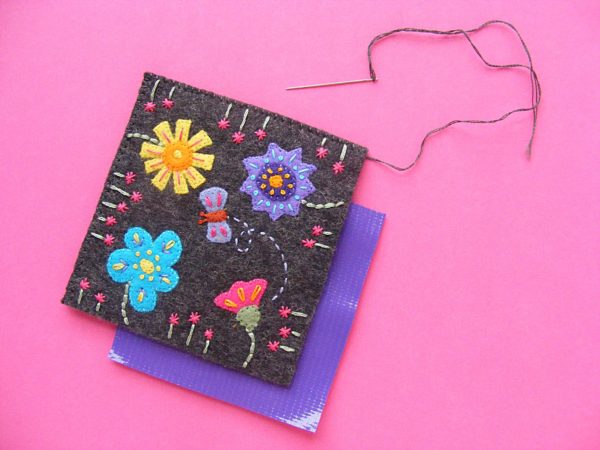
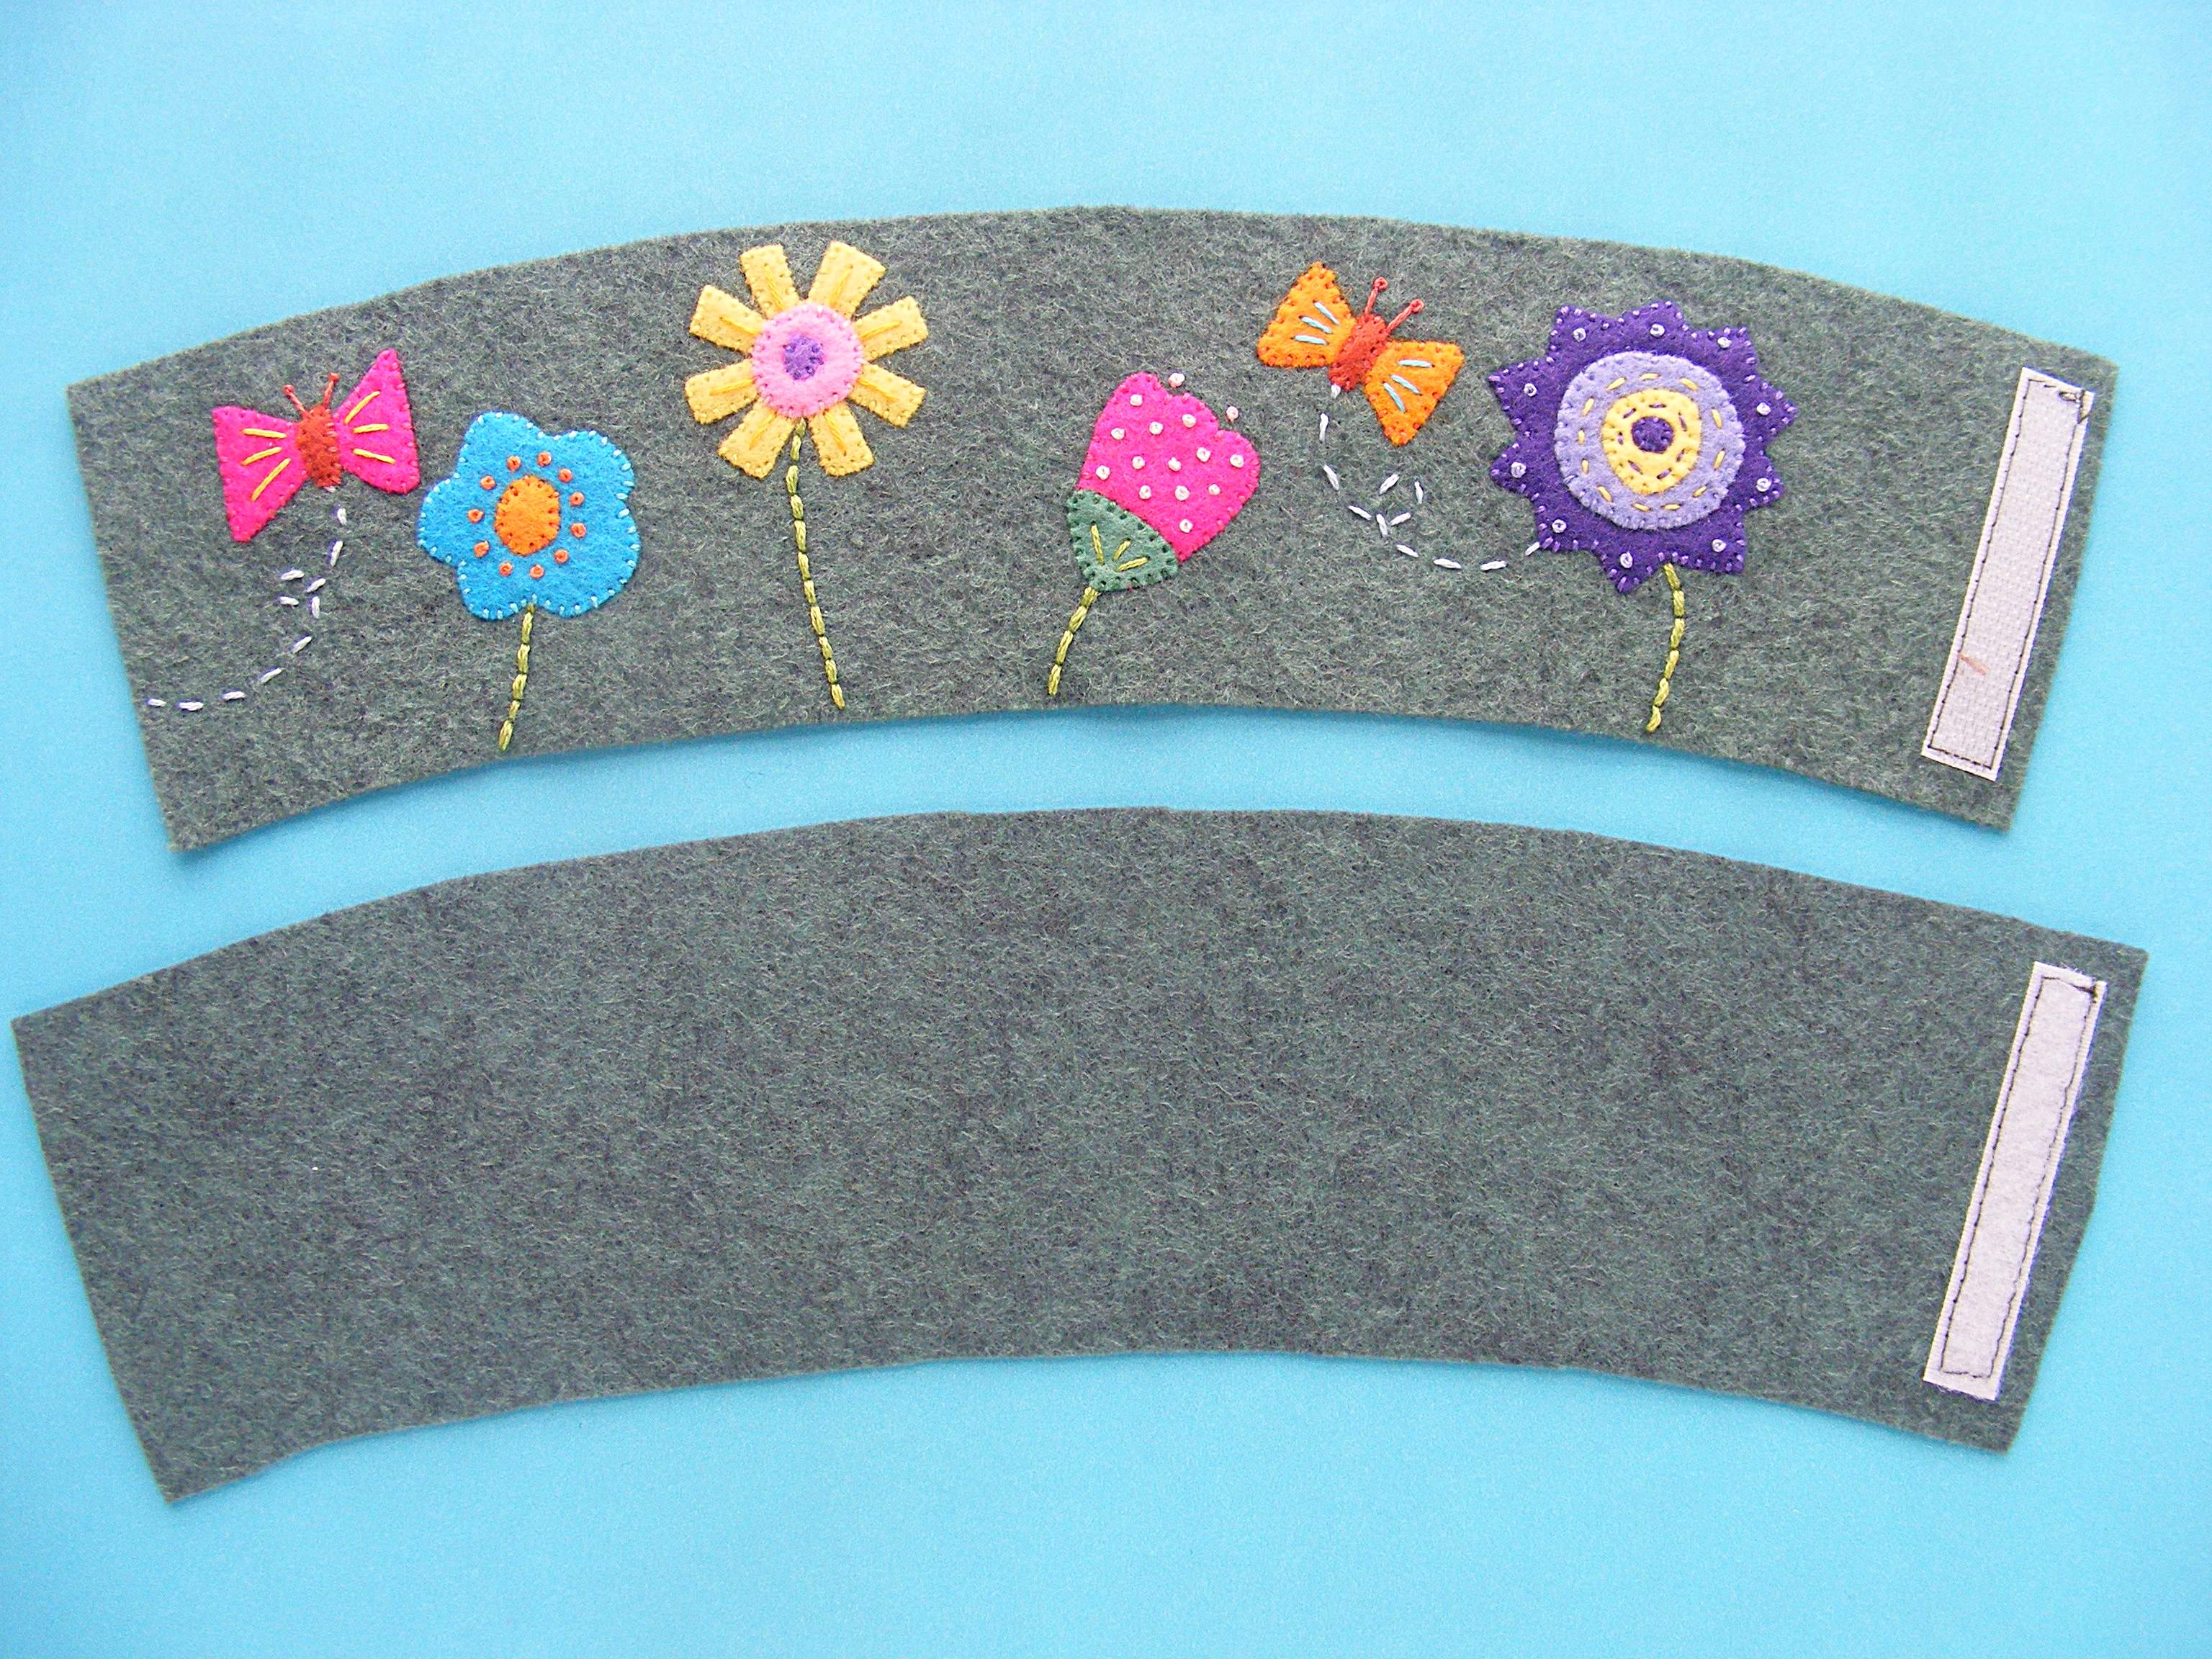
Sew the two layers together around two edges. I used whipstitch. Whipstitching felt edges is a tiny bit different from whipstitch applique. There’s a video here showing how.
You know I love working with felt and designing things for kids – so that was an easy yes! 🙂
I love Christmas tree ornaments that also hold gifts! This mini stocking is about 6 inches tall – perfect for holding a gift card, some candy, a small toy, some jewelry, or any other little gift. Fun! It’s easy to make too! It’s all hand-sewing, so it’s perfect for toting around with you to stitch a little bit at a time. And the whole thing uses just one easy stitch – whipstitch. Ready to make it?
What you’ll need. . .
1/2 sheet wool-blend felt for the stocking. I used Babbling Brook from my shop.
scraps of wool felt for the reindeer. I used Tahitian Sunset for the face and ears, Sandstone for the antlers, and Barnyard Red for the nose.
embroidery thread to match the felt (I used DMC thread in 502, 3858, 3032, 816, plus black #310 for the eyes and mouth – also available in my shop)
small bit of baker’s twine or other yarn for the hanging loop
Instructions
Download the pattern here. Print or trace the pieces onto freezer paper. Fuse them to your felt and cut out the pieces. Leave a little extra seam allowance wherever the line is dotted (the base of the ears and antlers). That extra bit will tuck under other pieces for a neat finish.
Arrange the reindeer pieces on one stocking piece. The antlers and the ears should tuck behind the head just a bit.
Whipstitch the antlers and ears in place with 2 strands of matching thread. (Here’s a video showing how.)
Whipstitch the face and nose in place with 2 strands of matching thread. Using 4 strands of black thread, embroider the eyes and backstitch the mouth.
Use the baker’s twine to make a hanging loop in one corner. Done!
Like all Shiny Happy World designs – you’re welcome to sell items you make with my patterns, but please don’t sell or distribute the patterns themselves.
If you like this free pattern, sign up for the Shiny Happy News! Subscribers get a weekly newsletter full of sewing tips and tricks, free patterns, special discounts, and other things to make you smile. 🙂
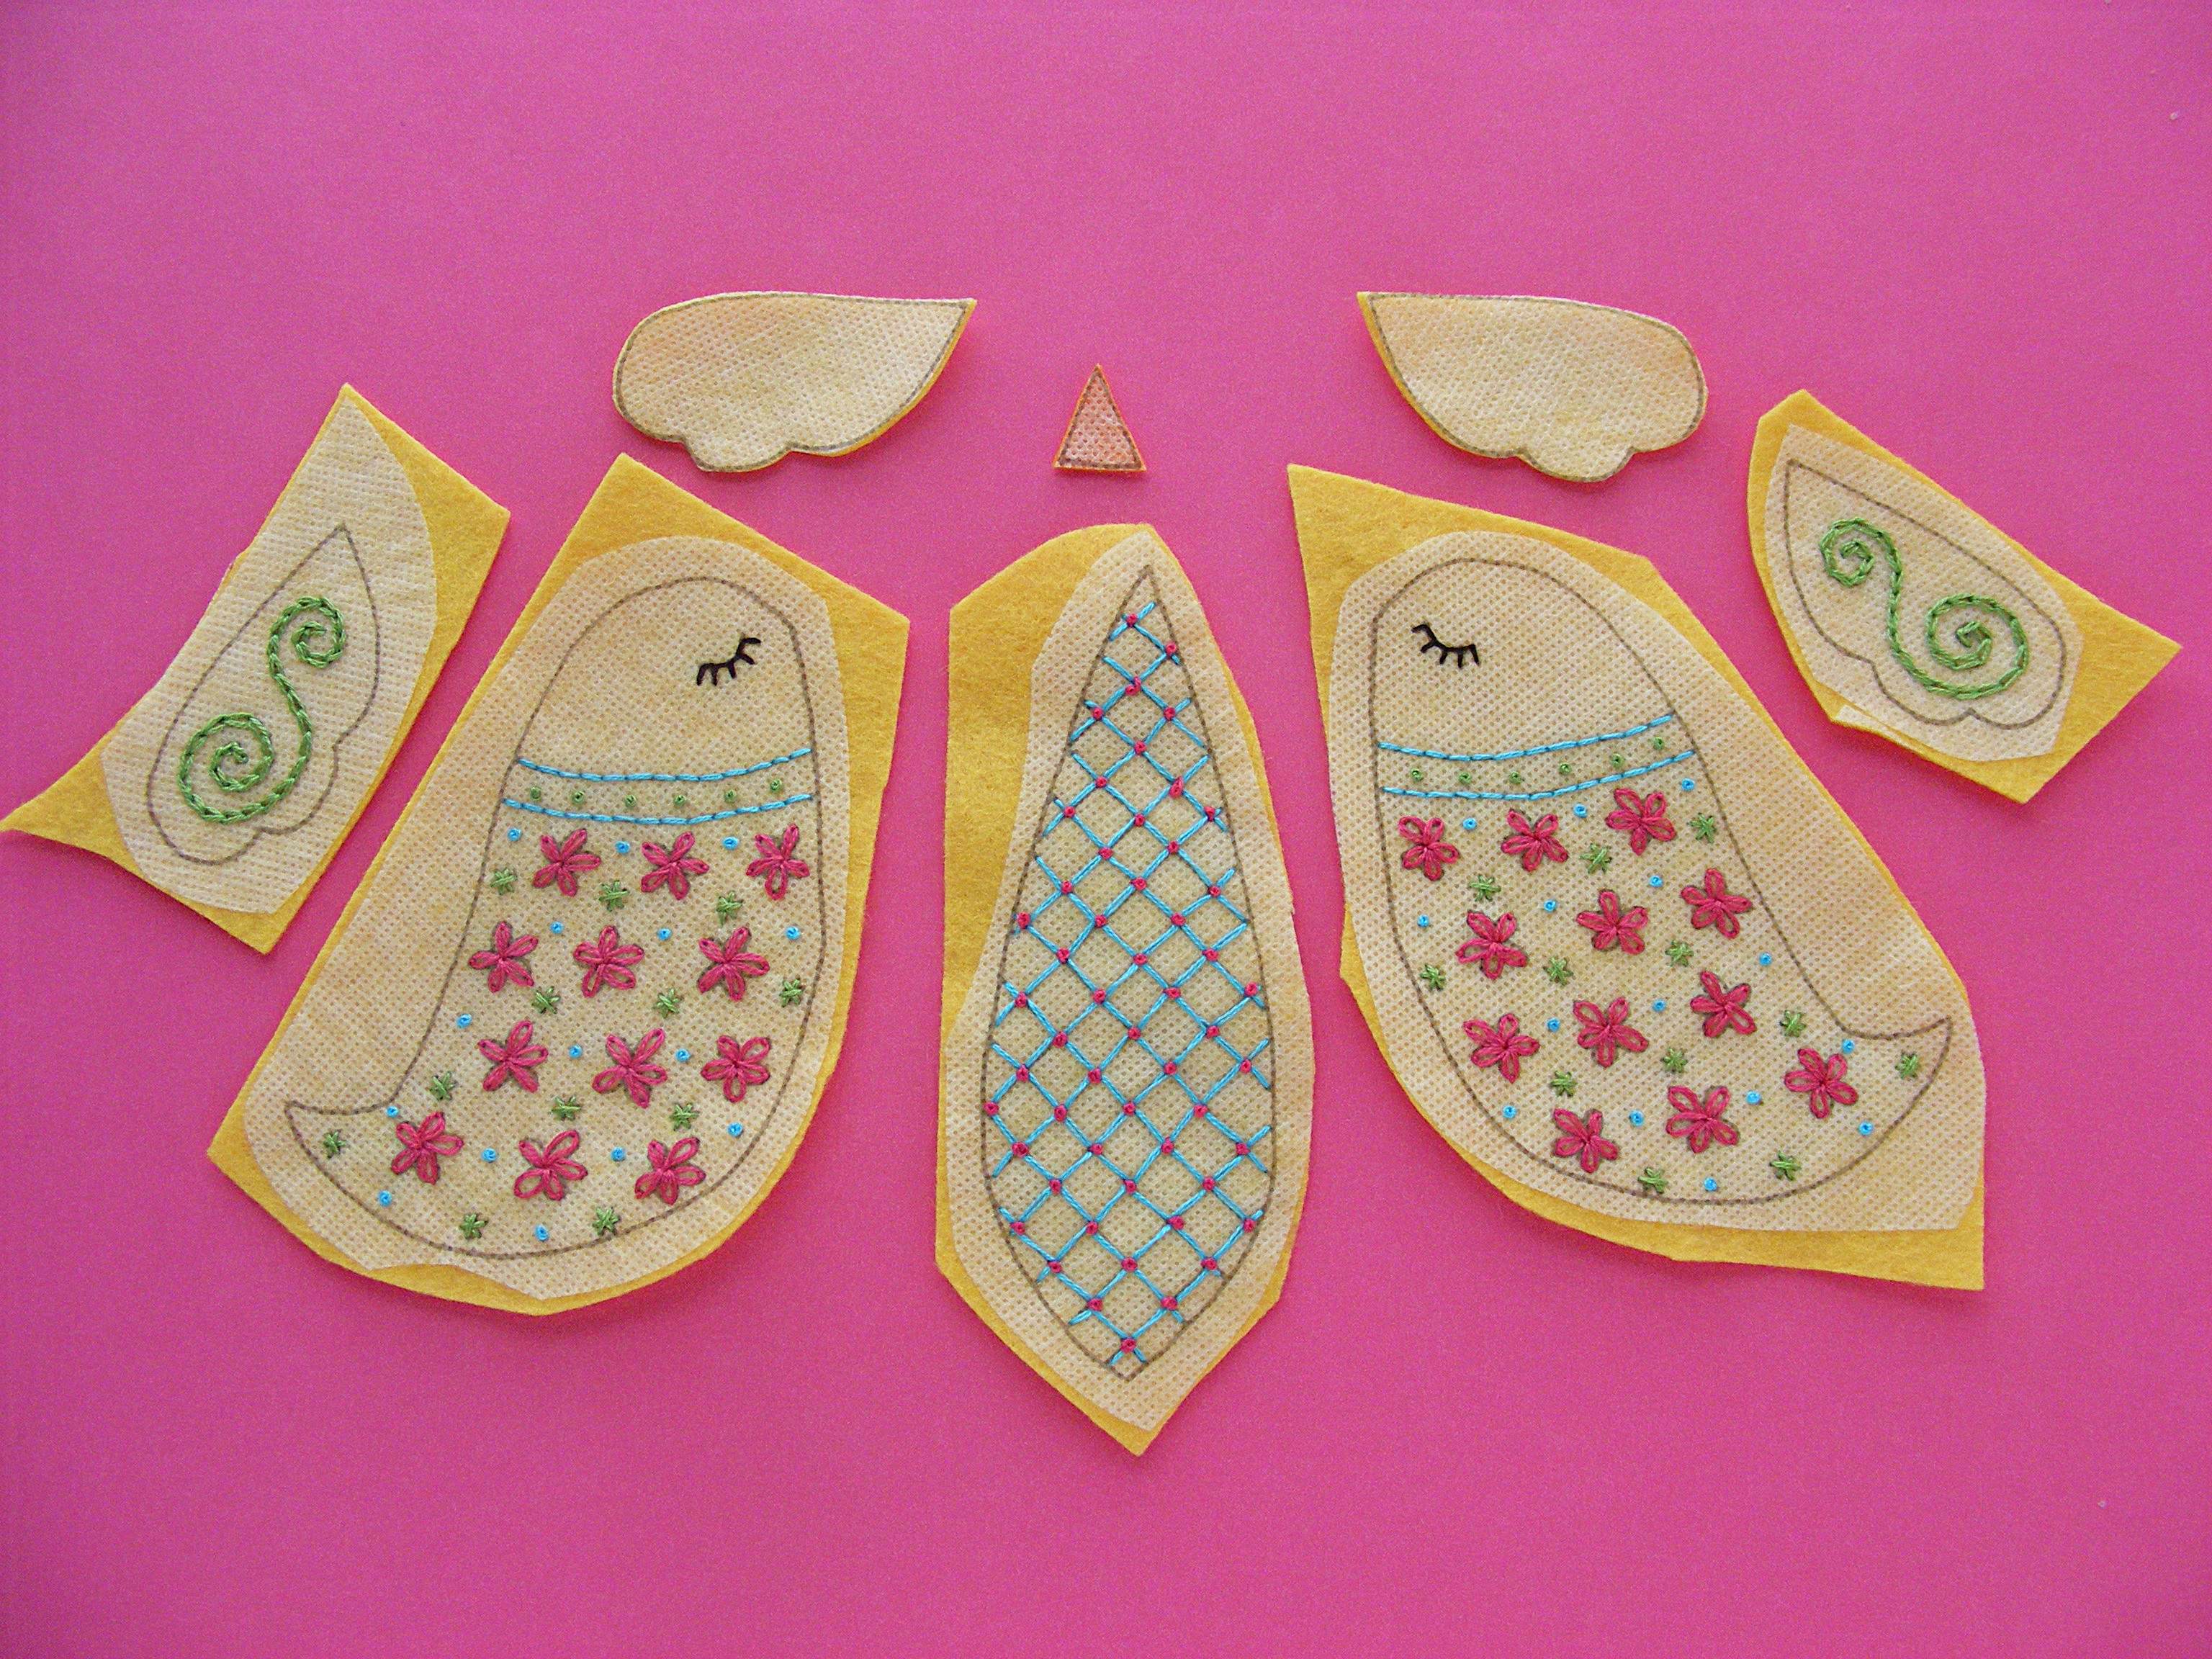
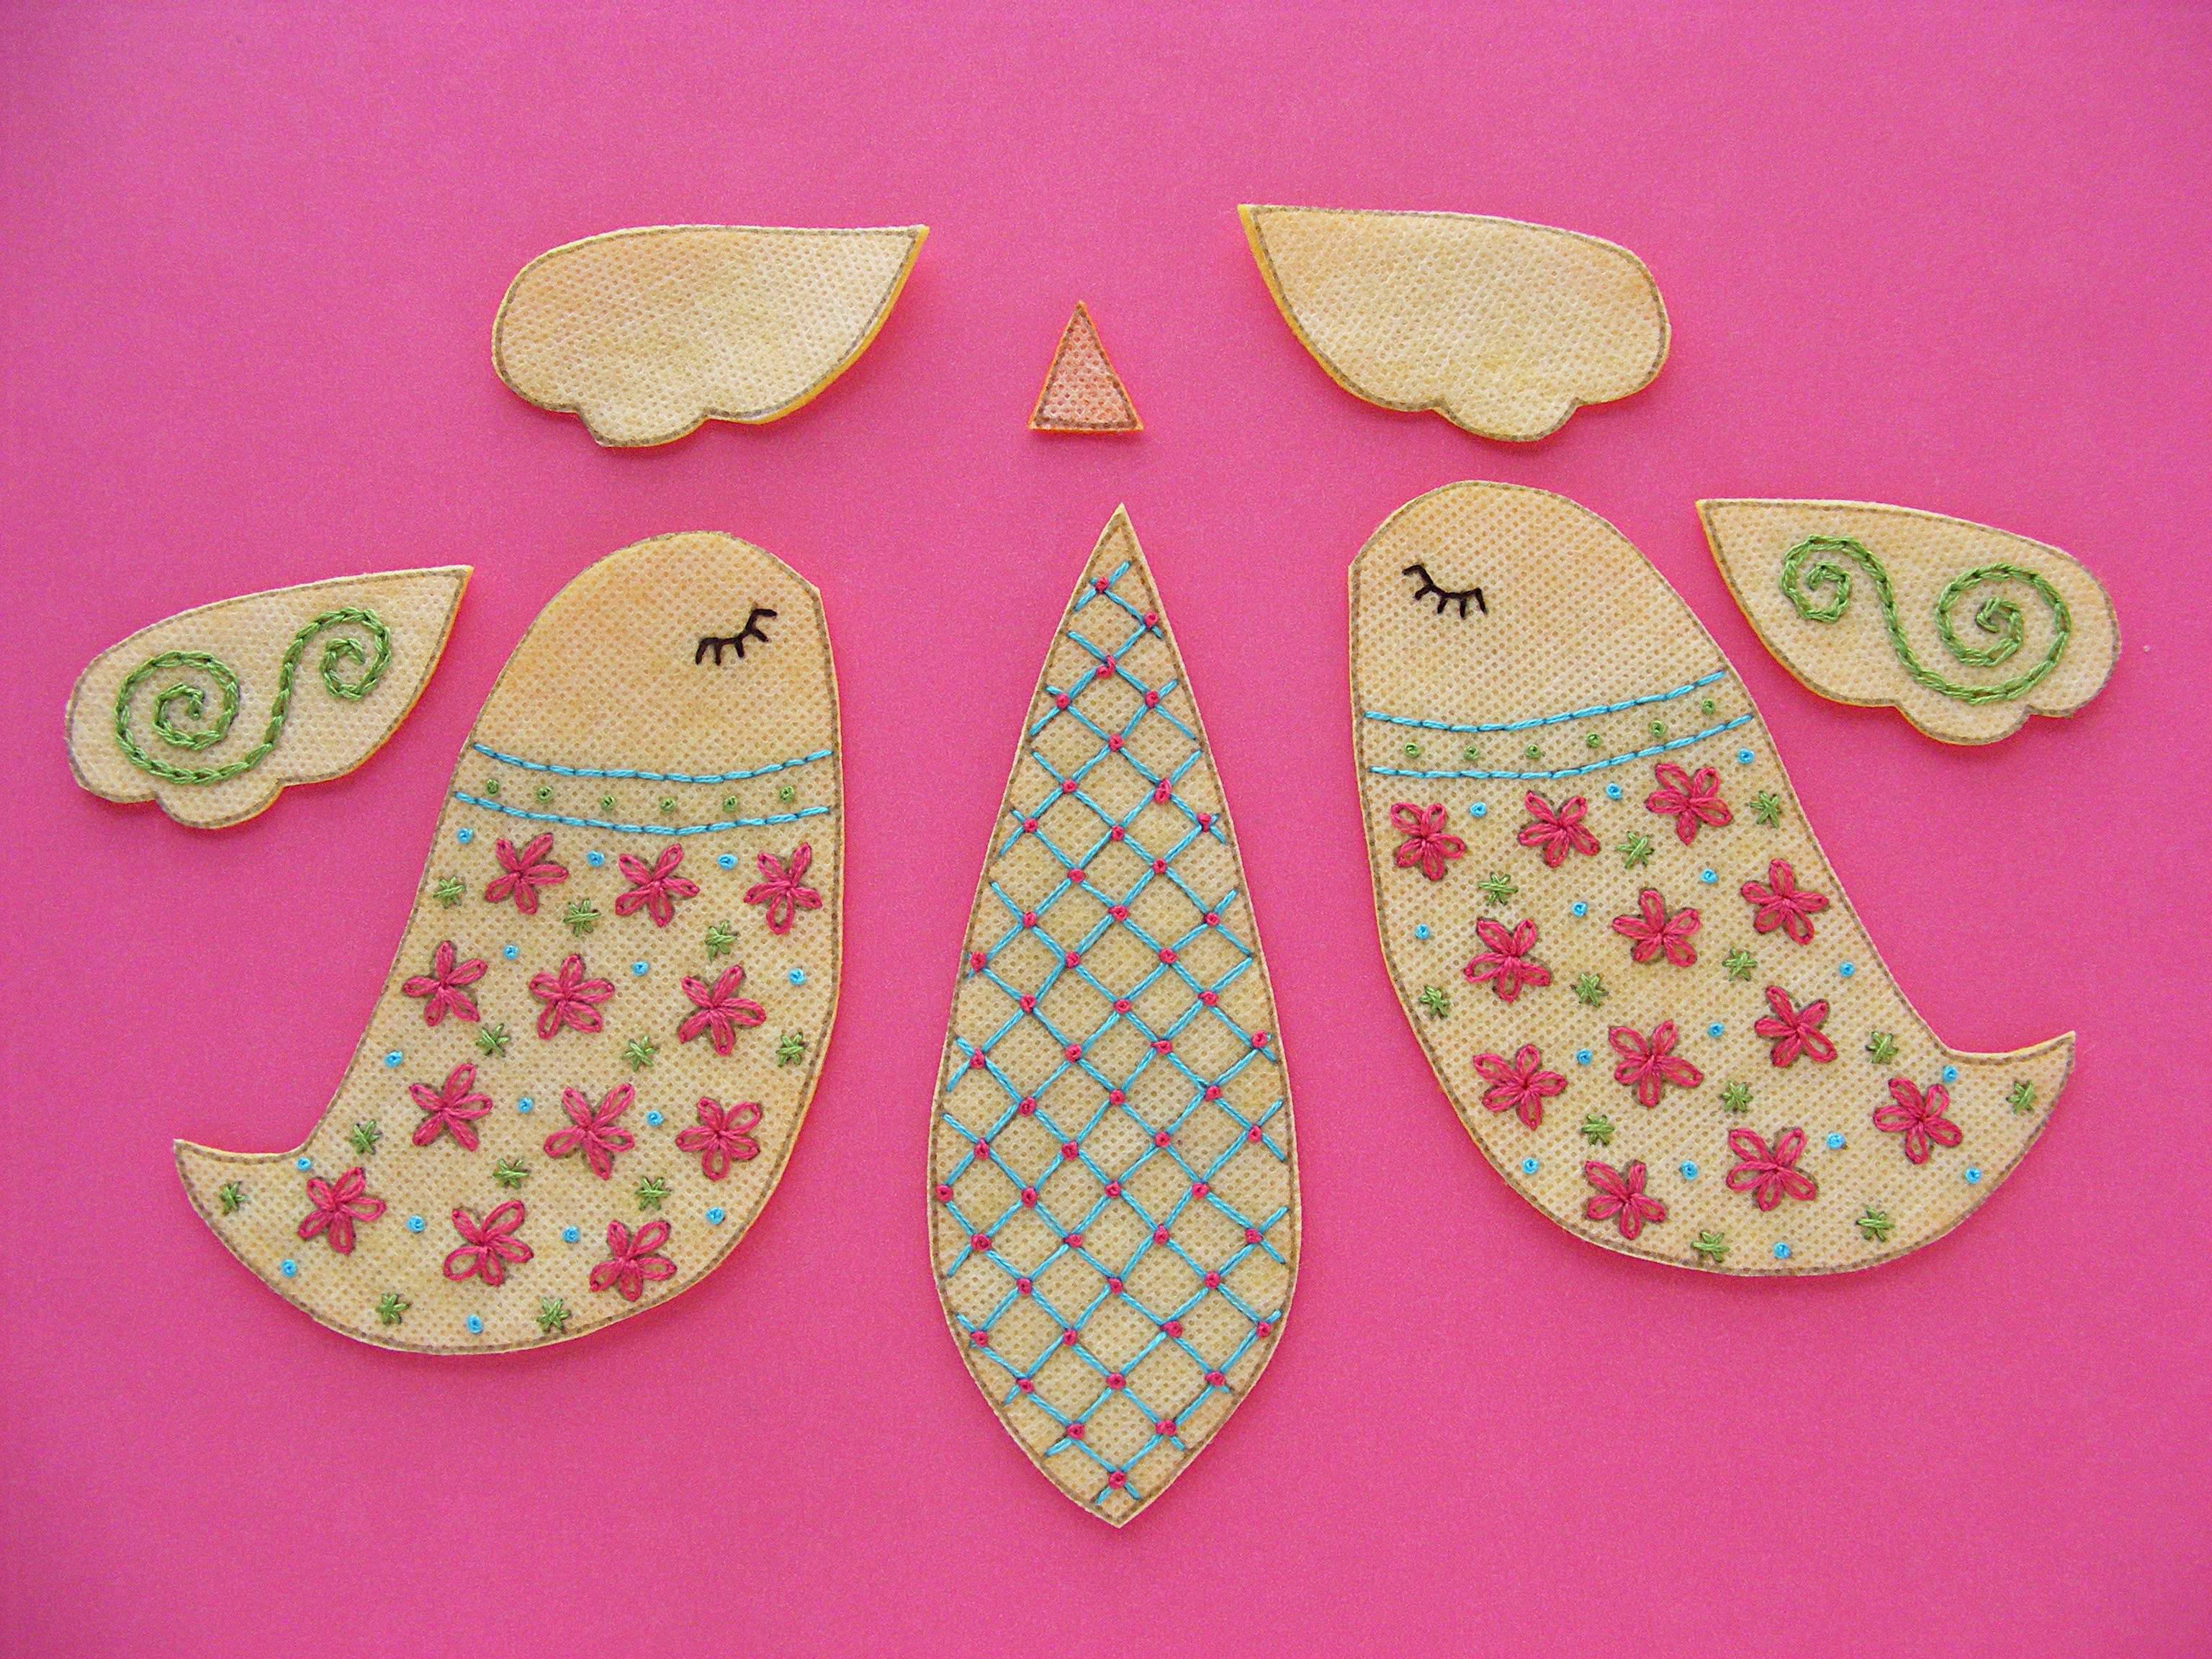
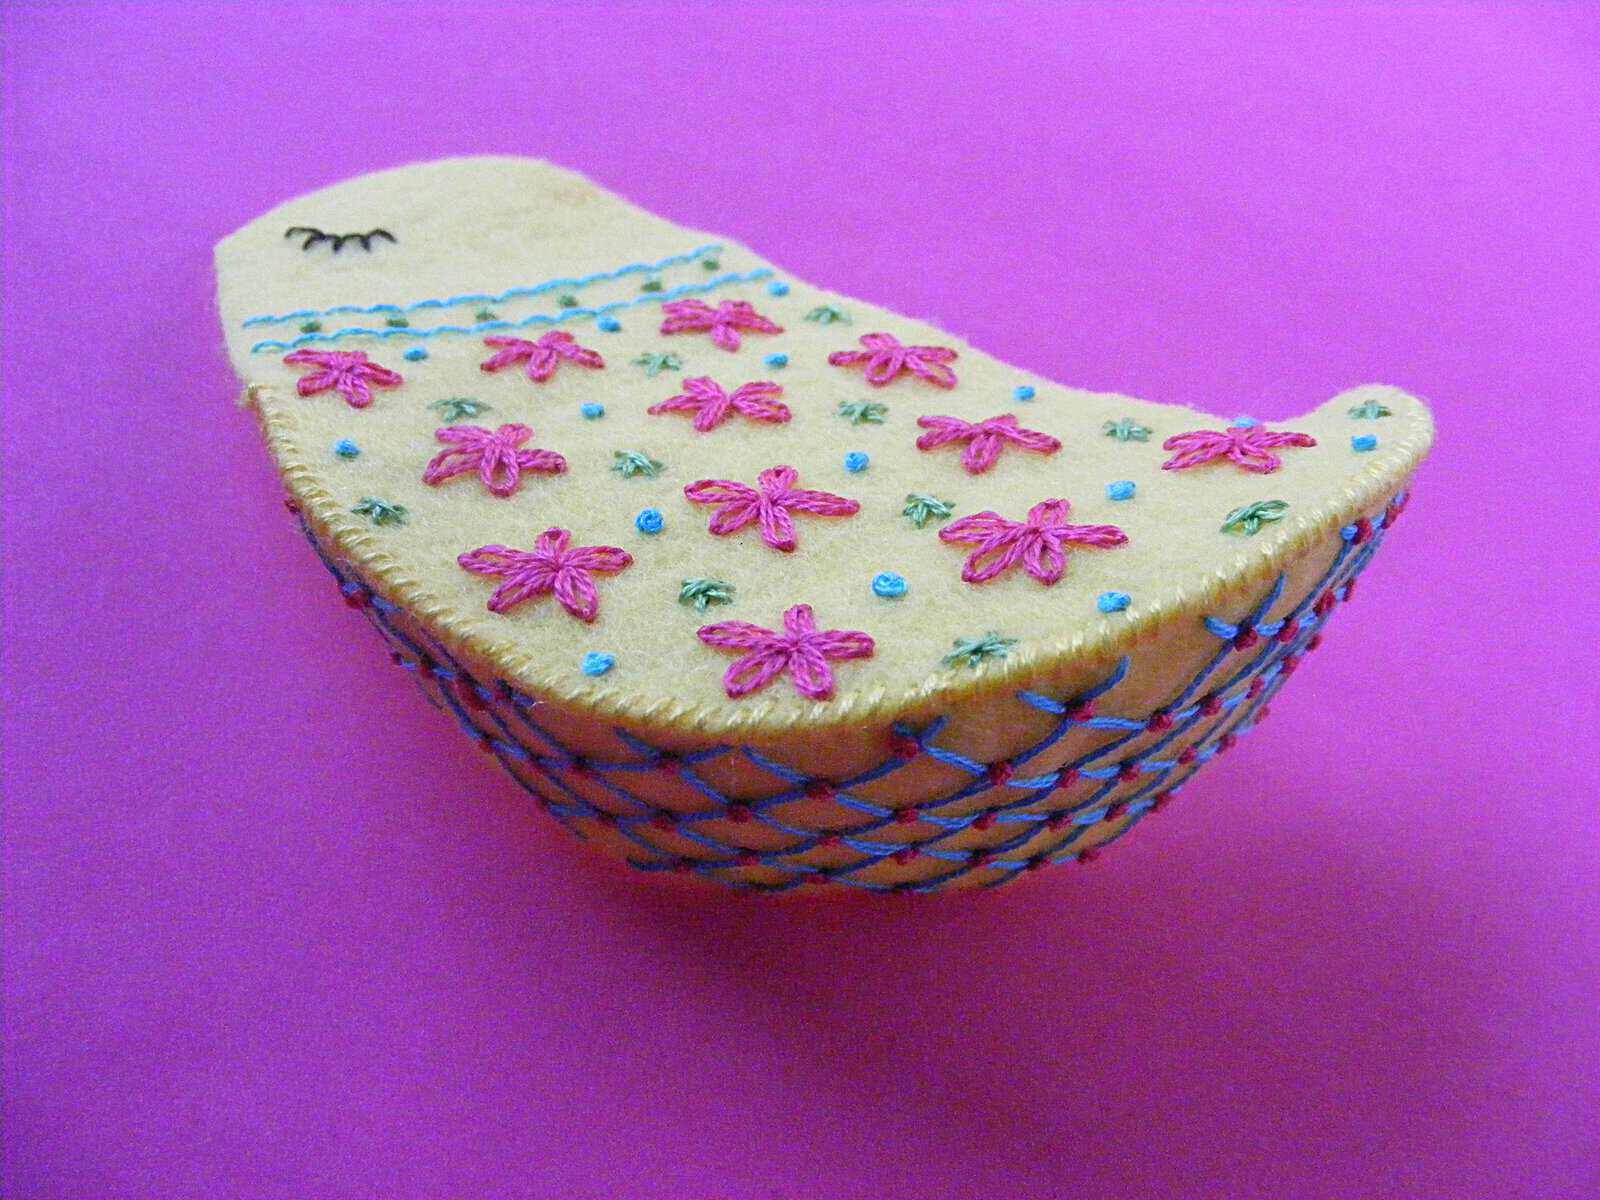
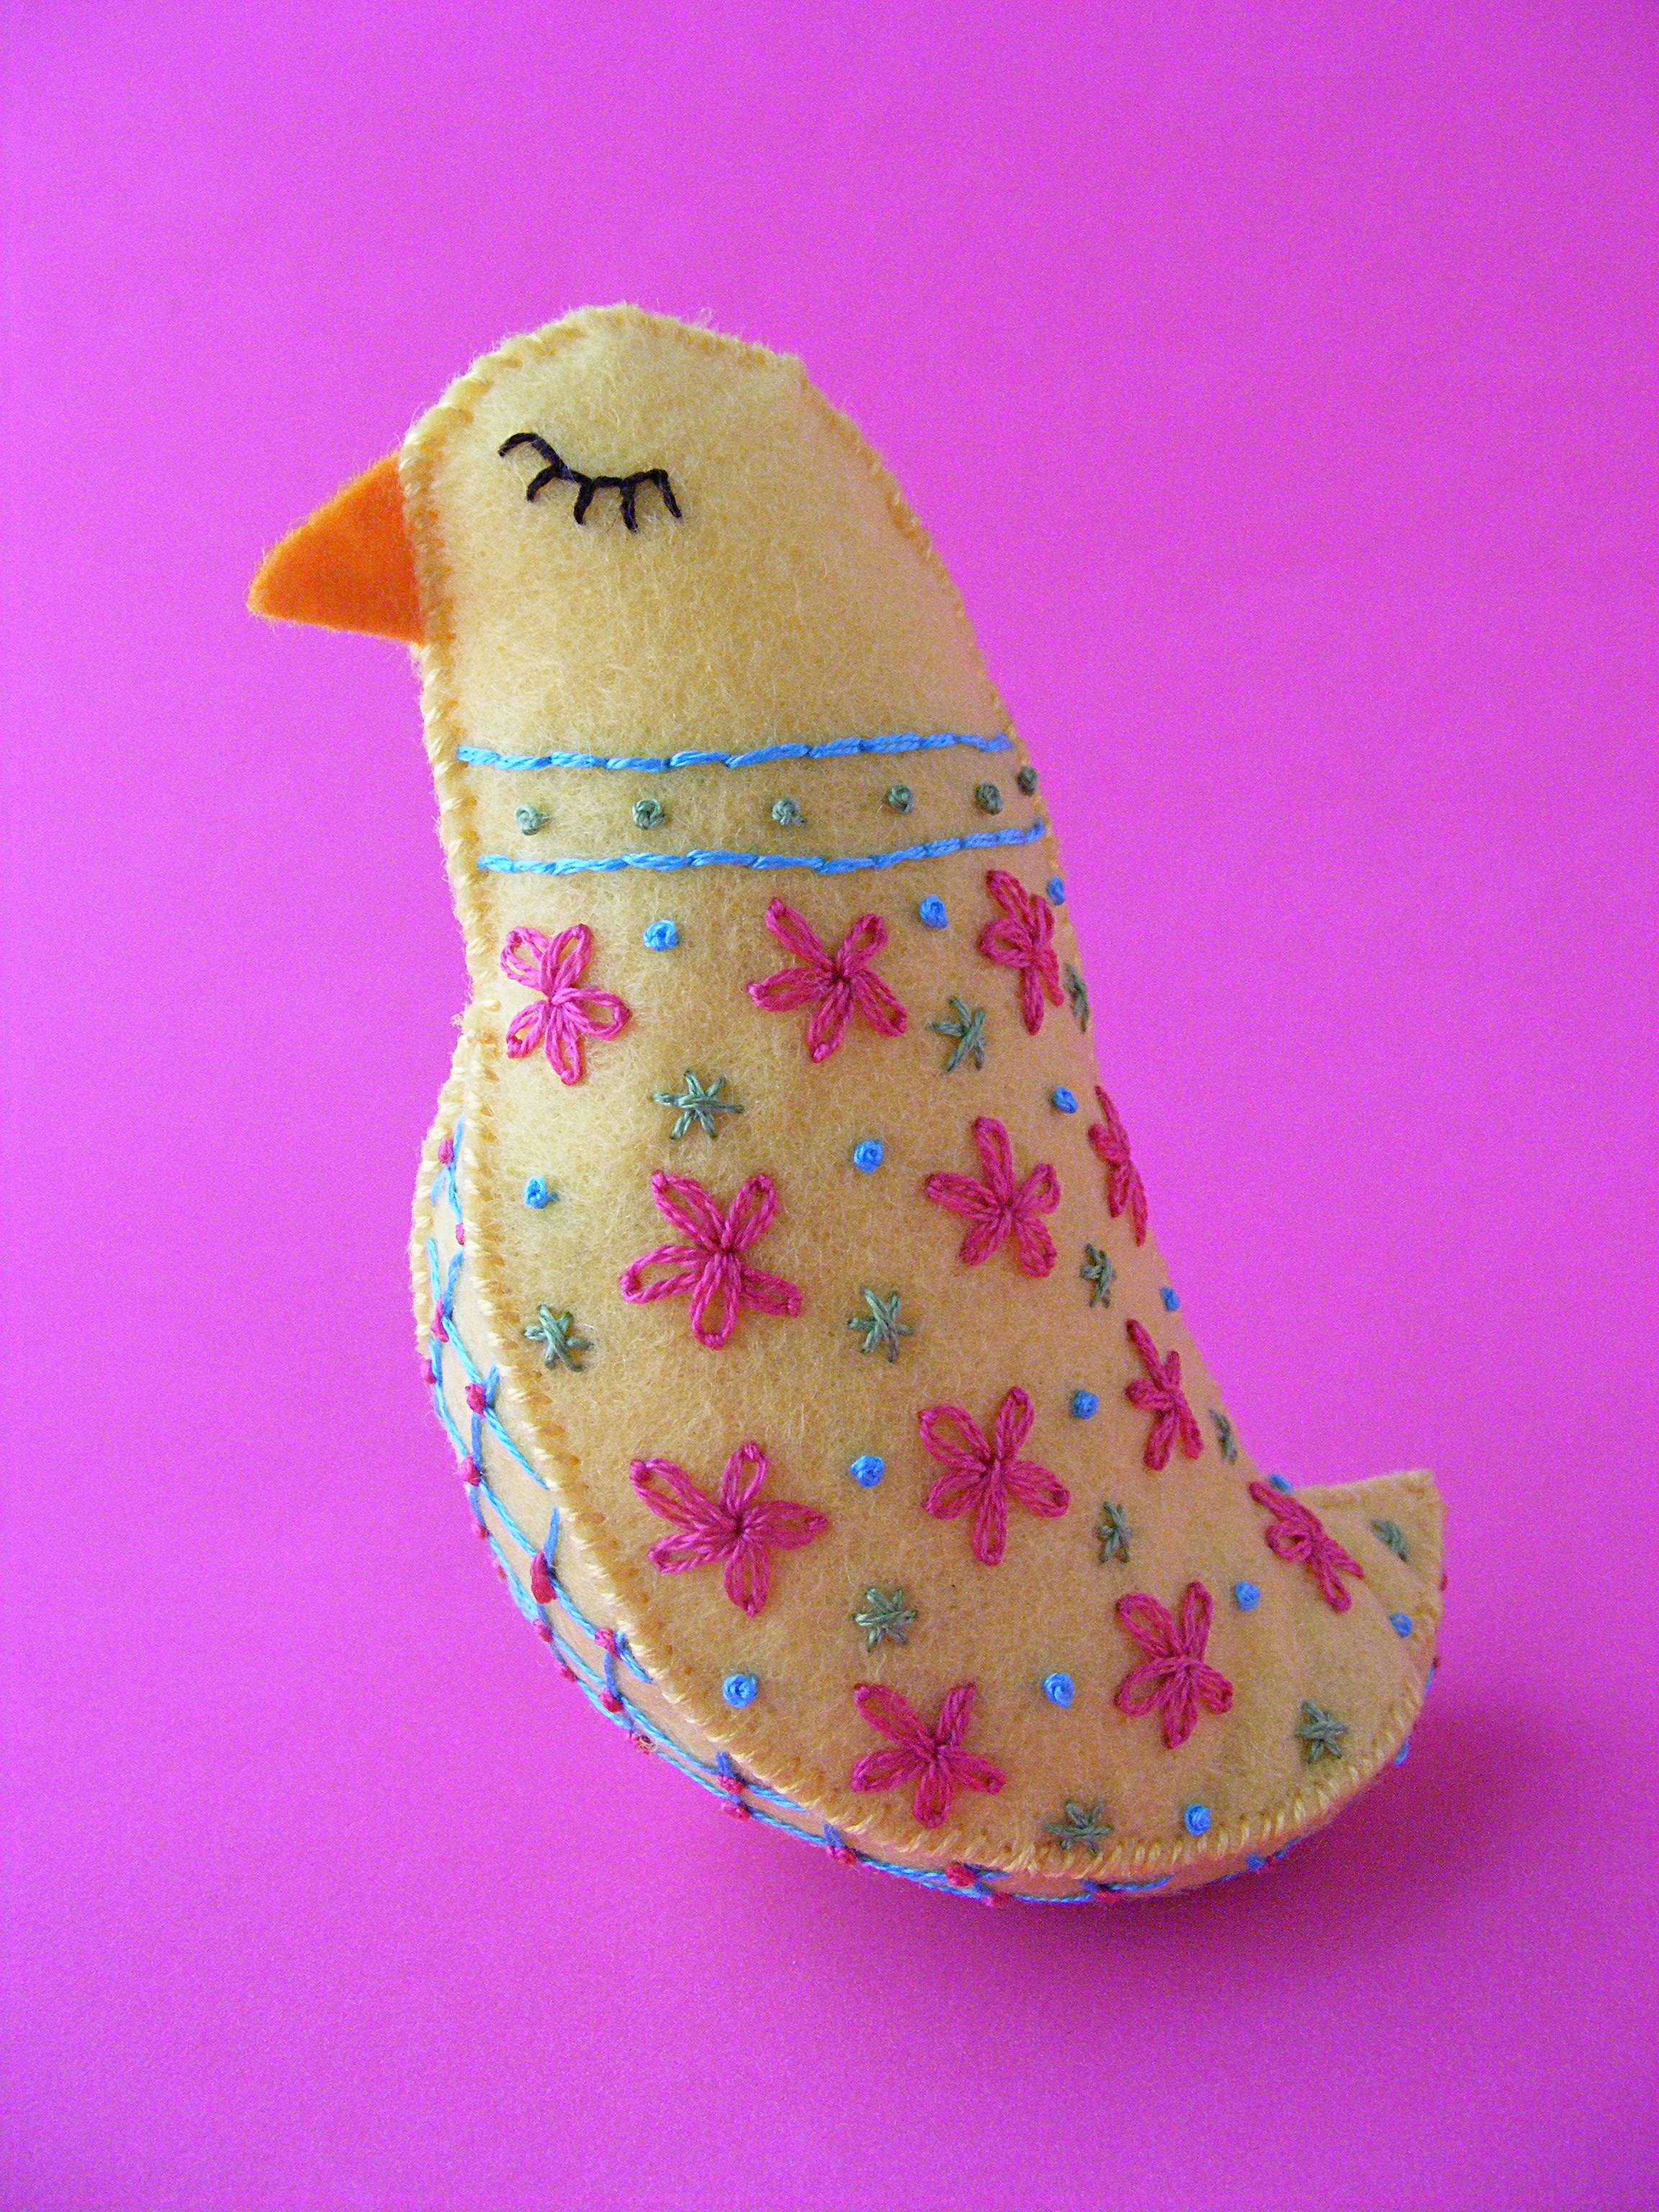
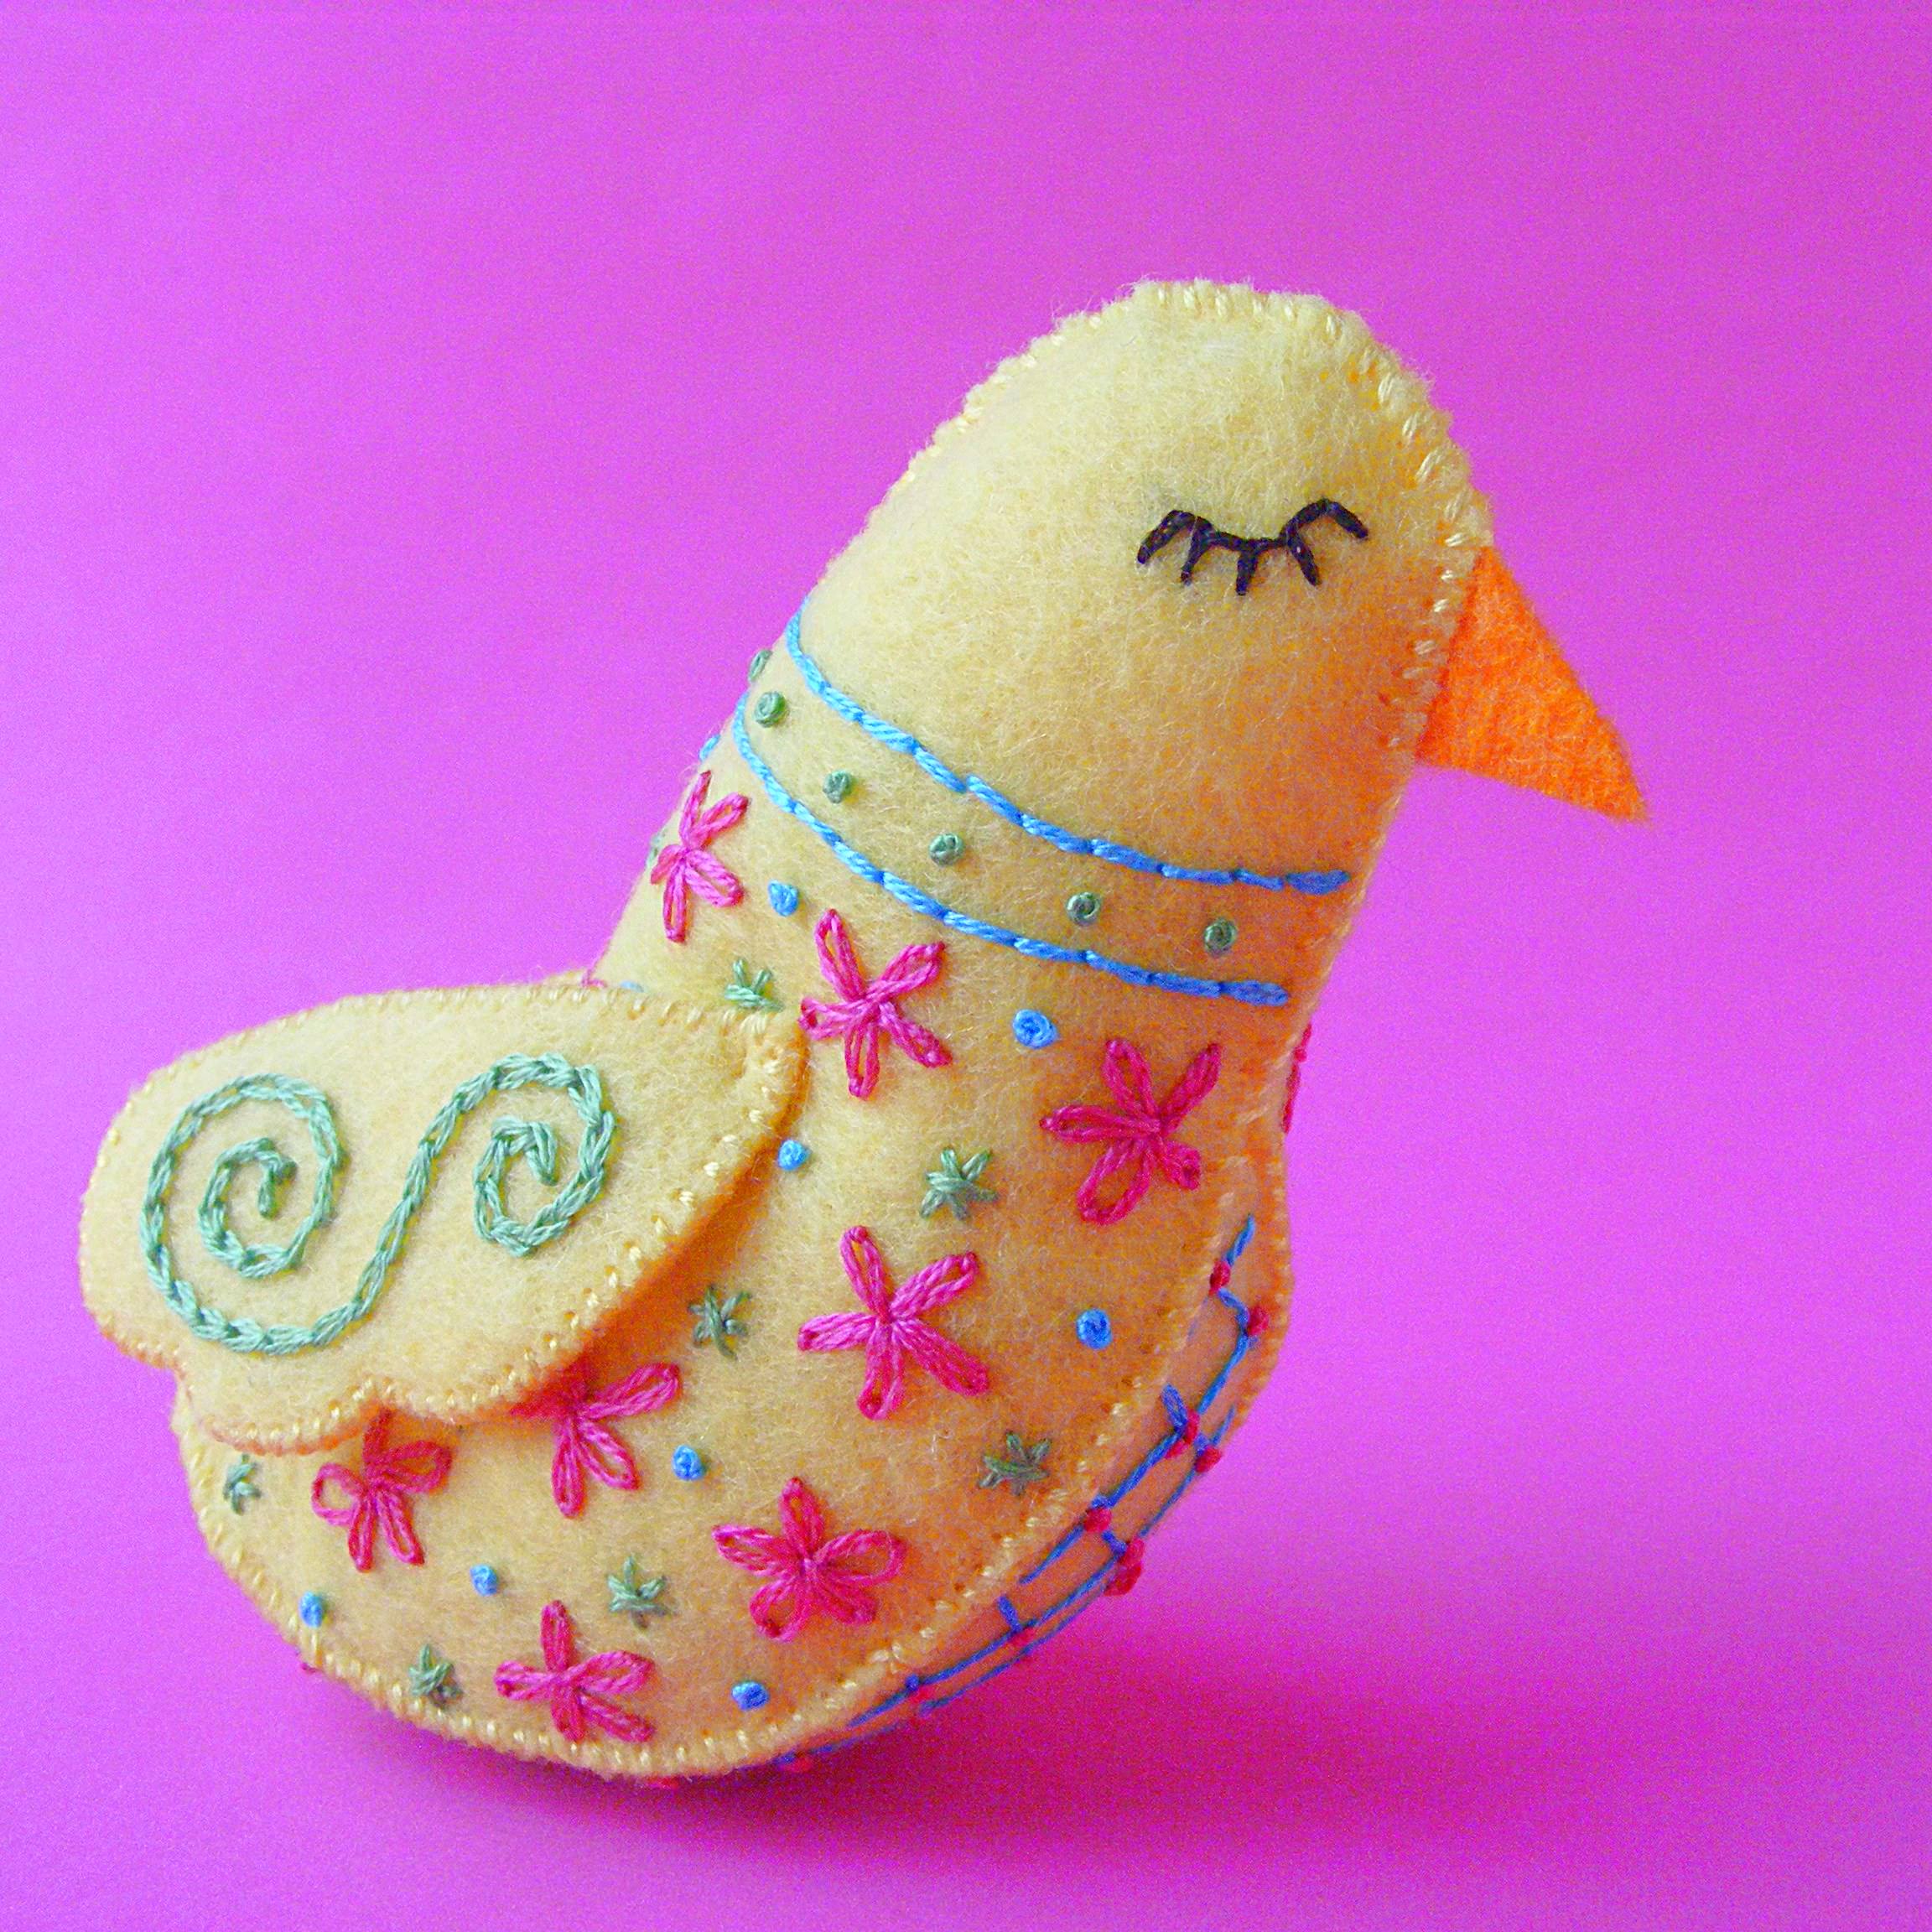
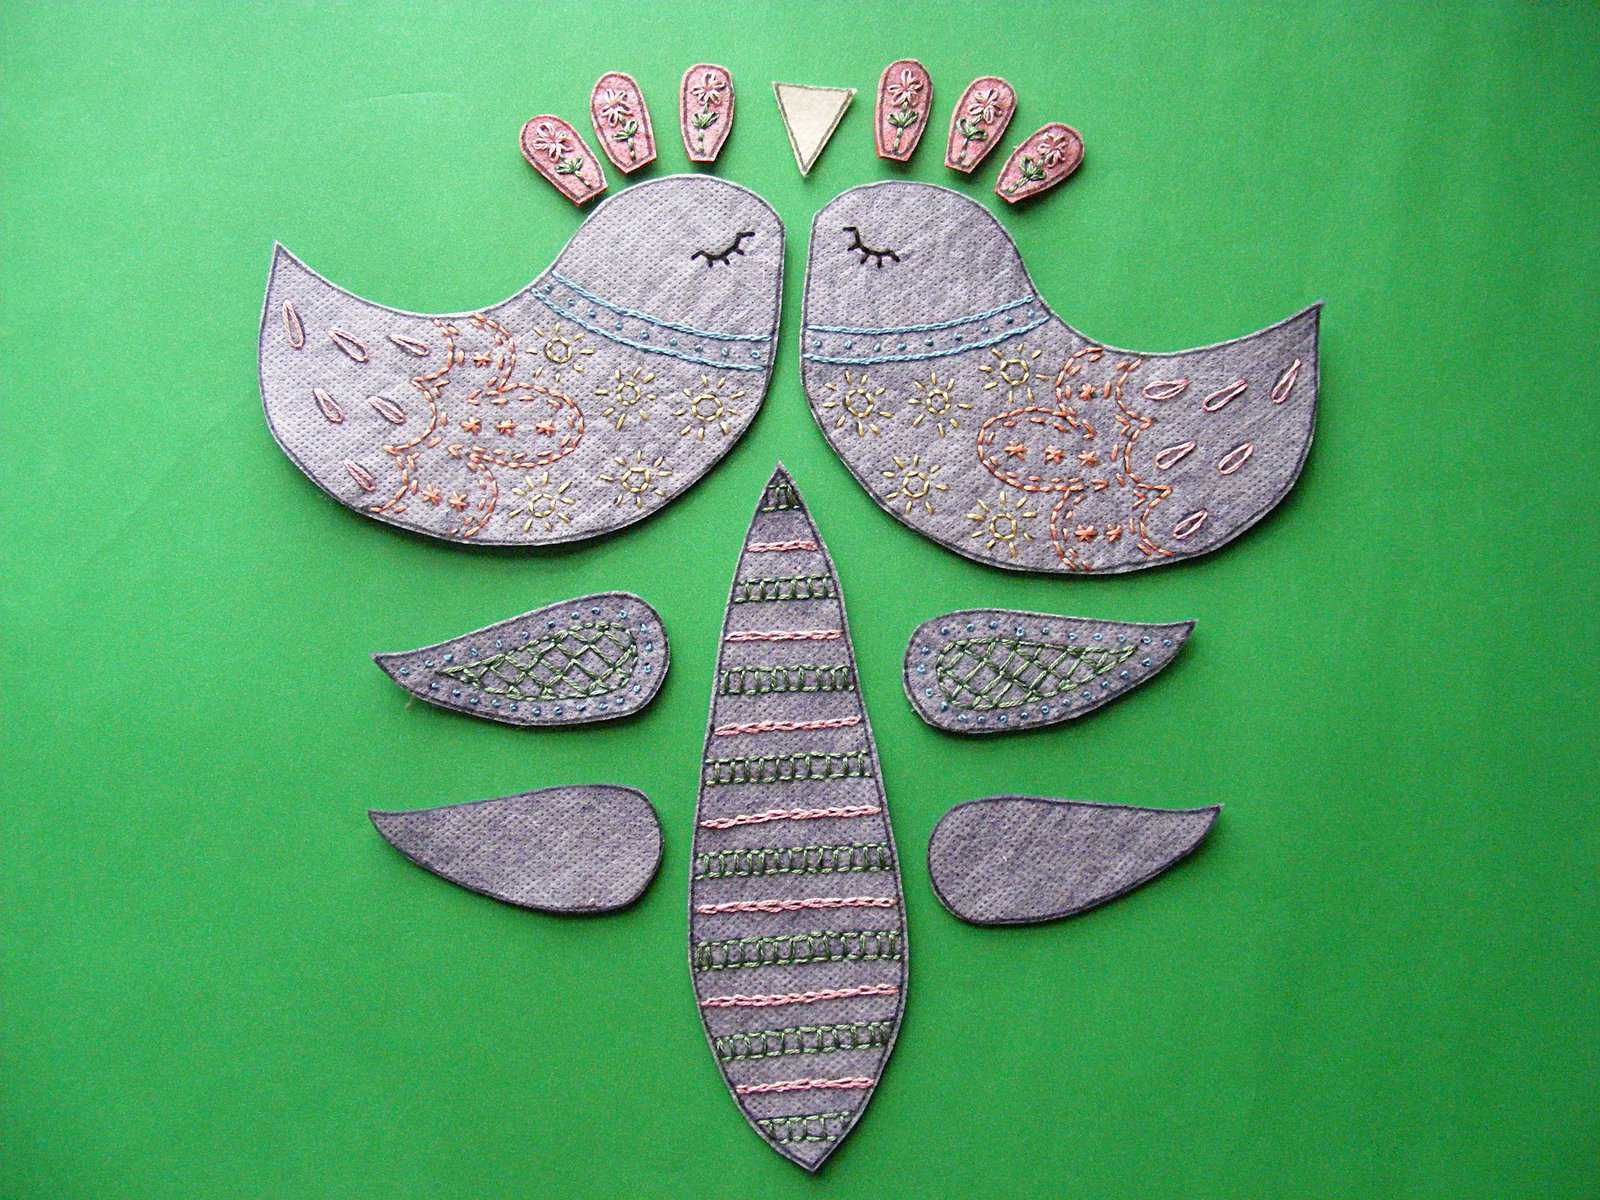
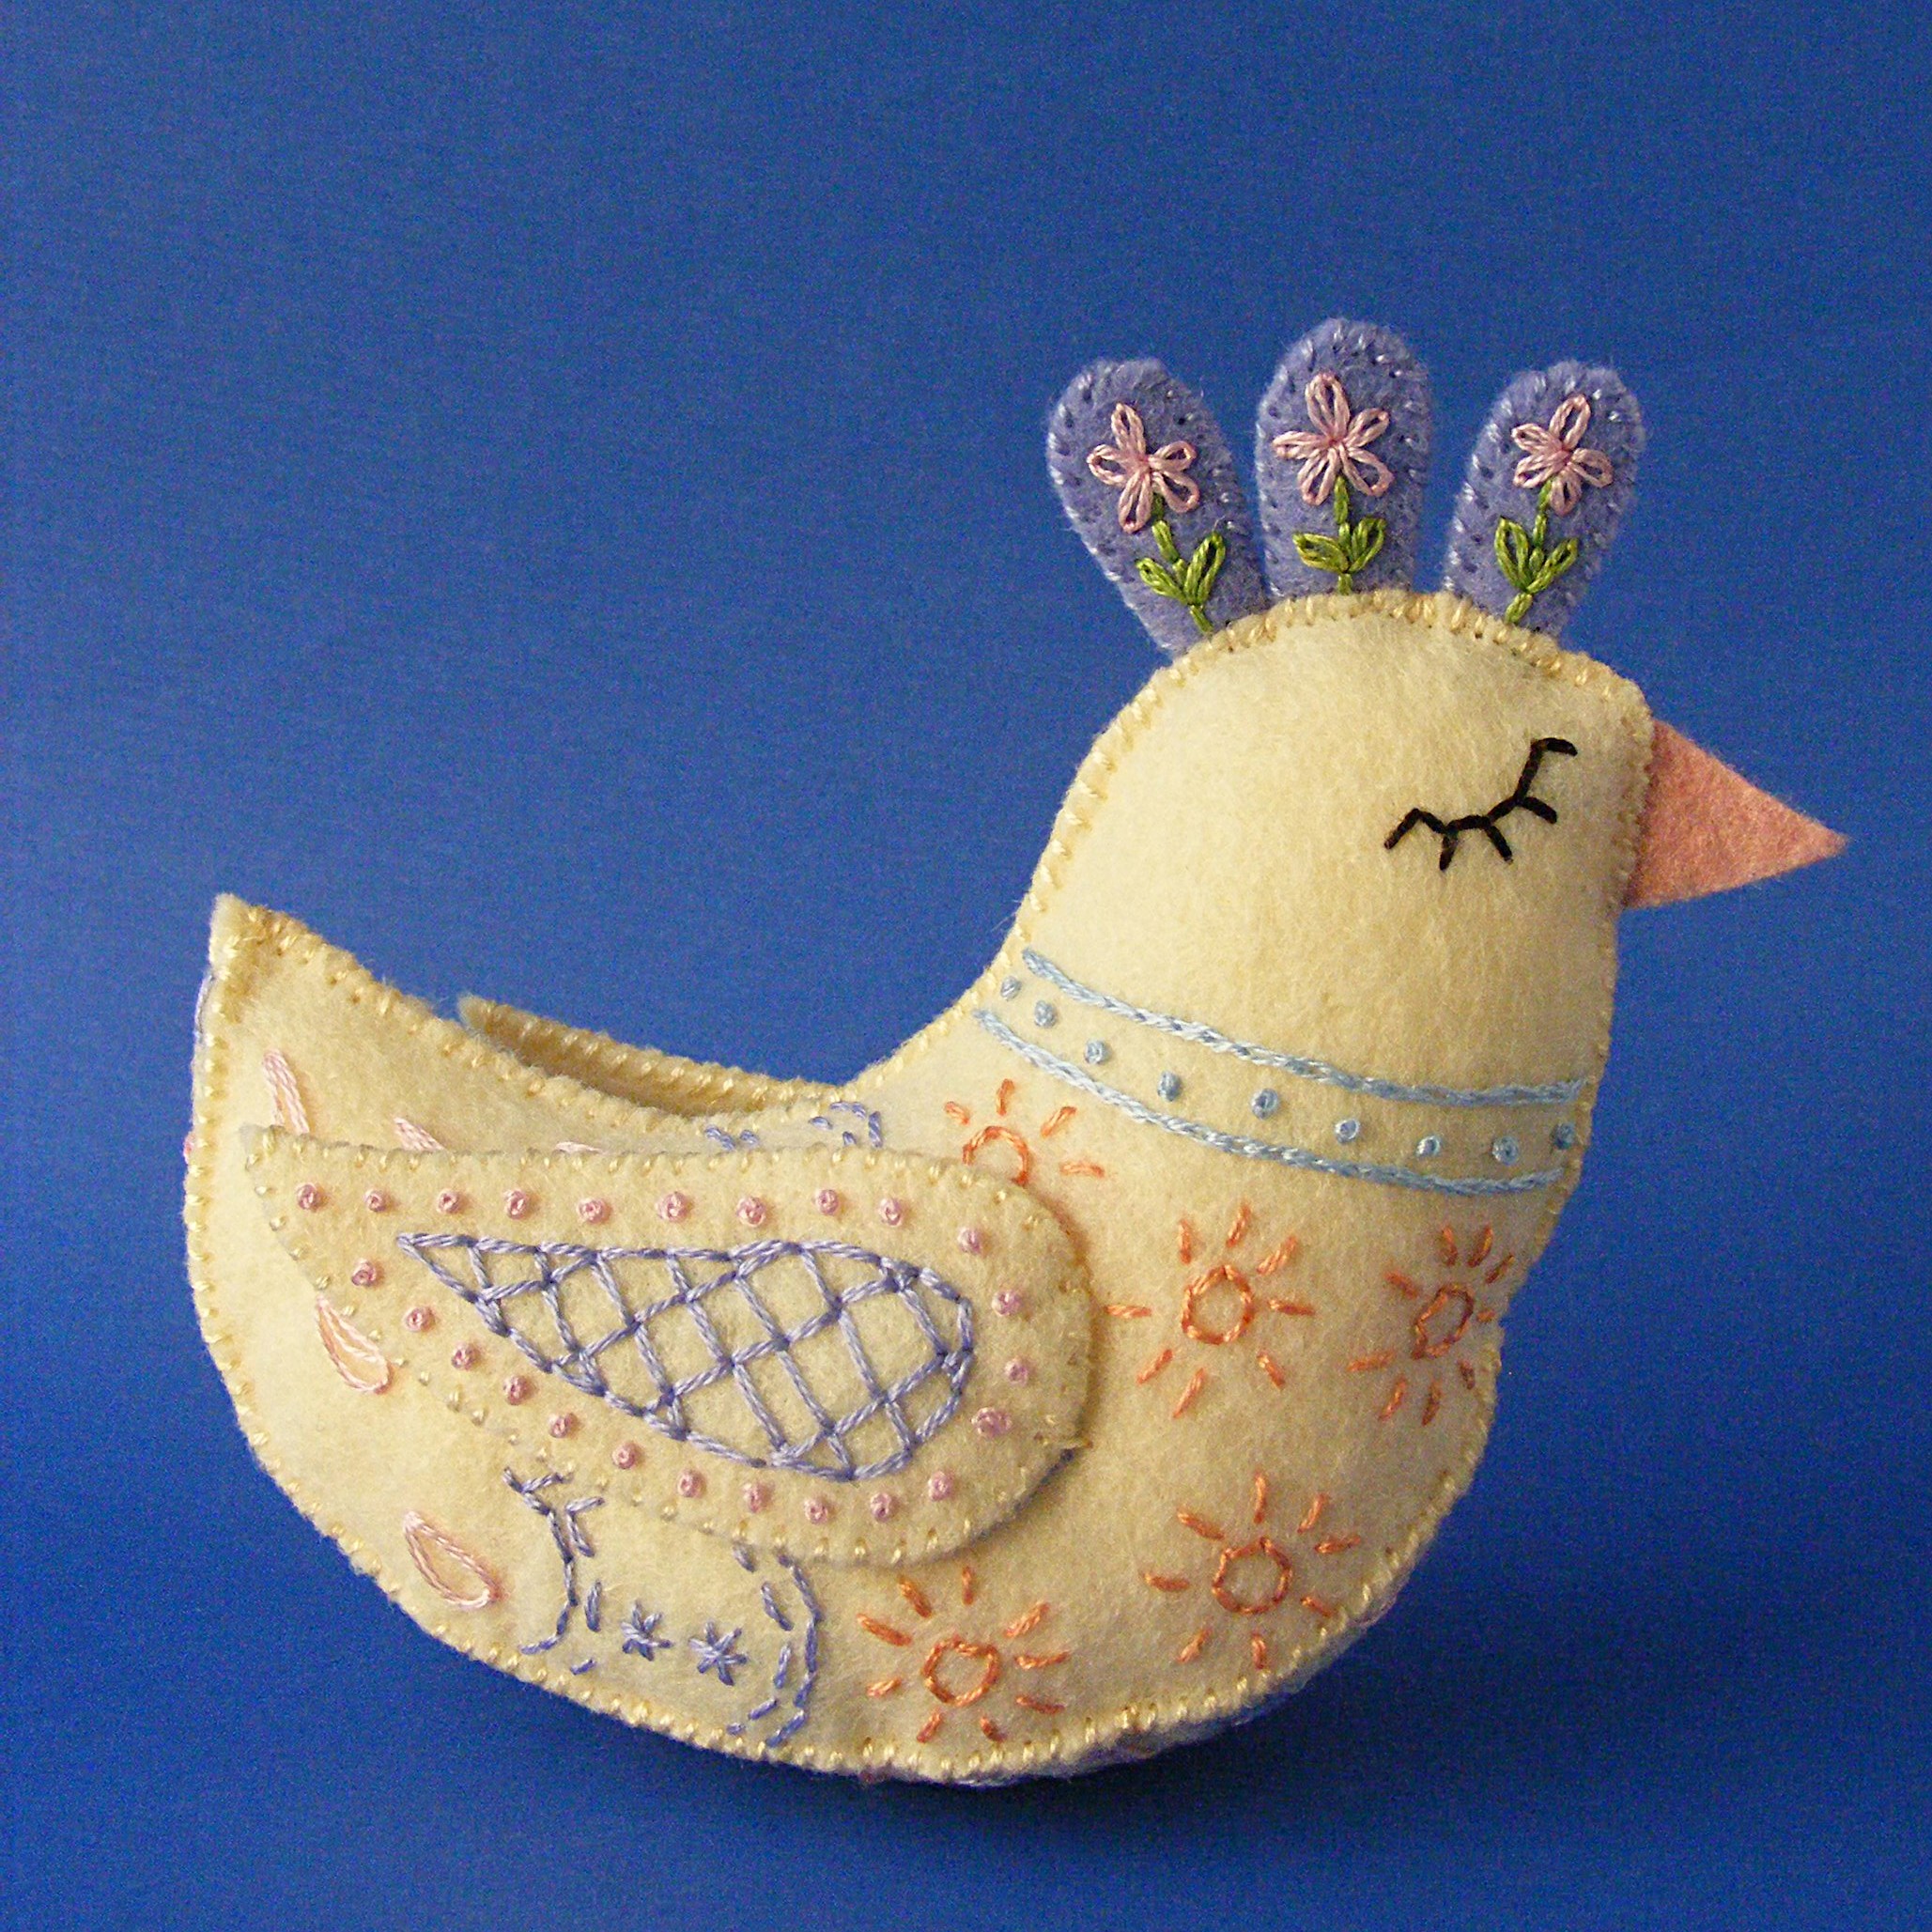
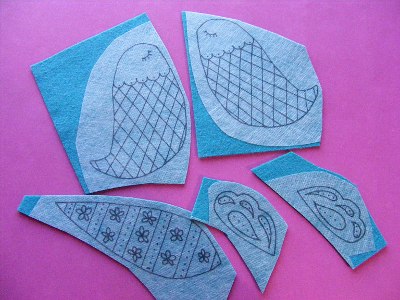
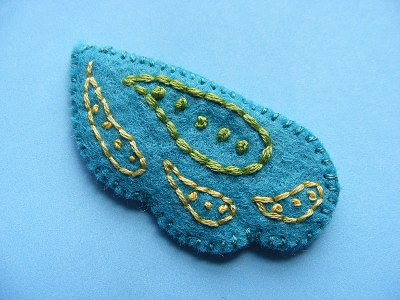
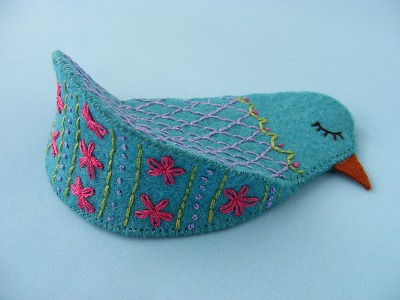
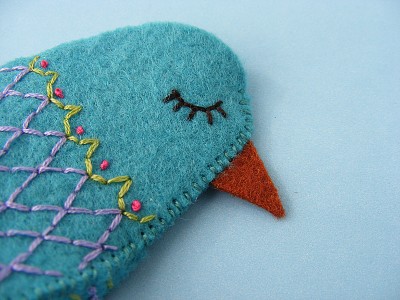
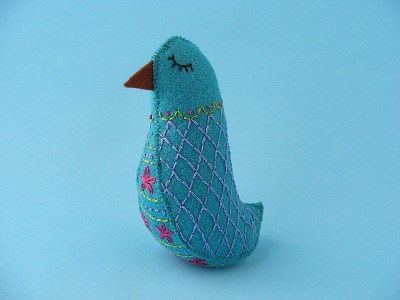
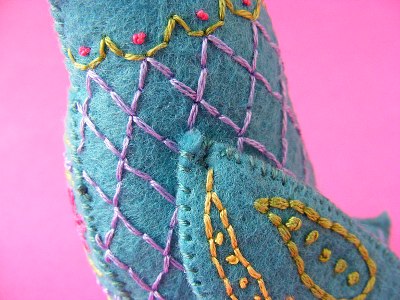
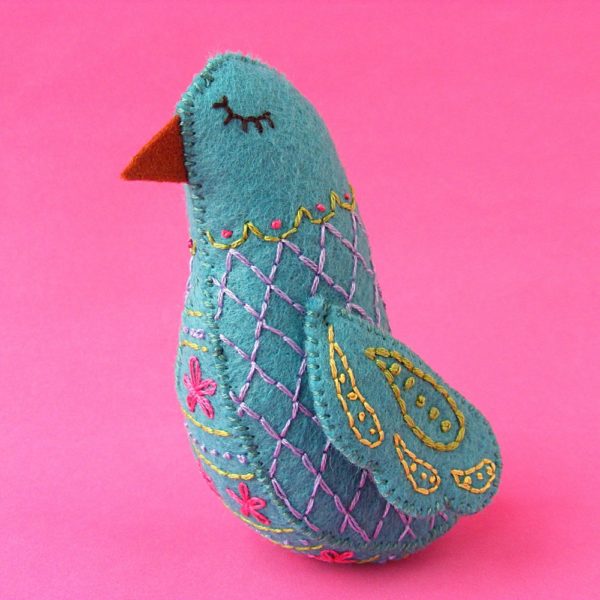
Brighten up your world a bit with Petal – a free felt bird pattern.
Isn’t she pretty?
She looks complicated – but she’s really not hard to make. It’s all hand embroidery and hand sewing, so it’s not fast. But this is a project that takes more patience than skill. Expect to spend a couple of evenings on her. Or him. I guess in real life it’s the boy birds who are all fancy – but I thought the finished one looked like a gentle girl named Petal. 🙂
It uses just a few of the most basic embroidery stitches and simple whipstitch to put all the pieces together.
This project uses one half sheet of lovely wool felt (I used banana cream) plus a tiny scrap of contrasting color for the beak (I used mac & cheese) and some colorful embroidery thread. I also use The Magical Embroidery Stuff to mark all that pretty embroidery. It makes things sooooooo easy!
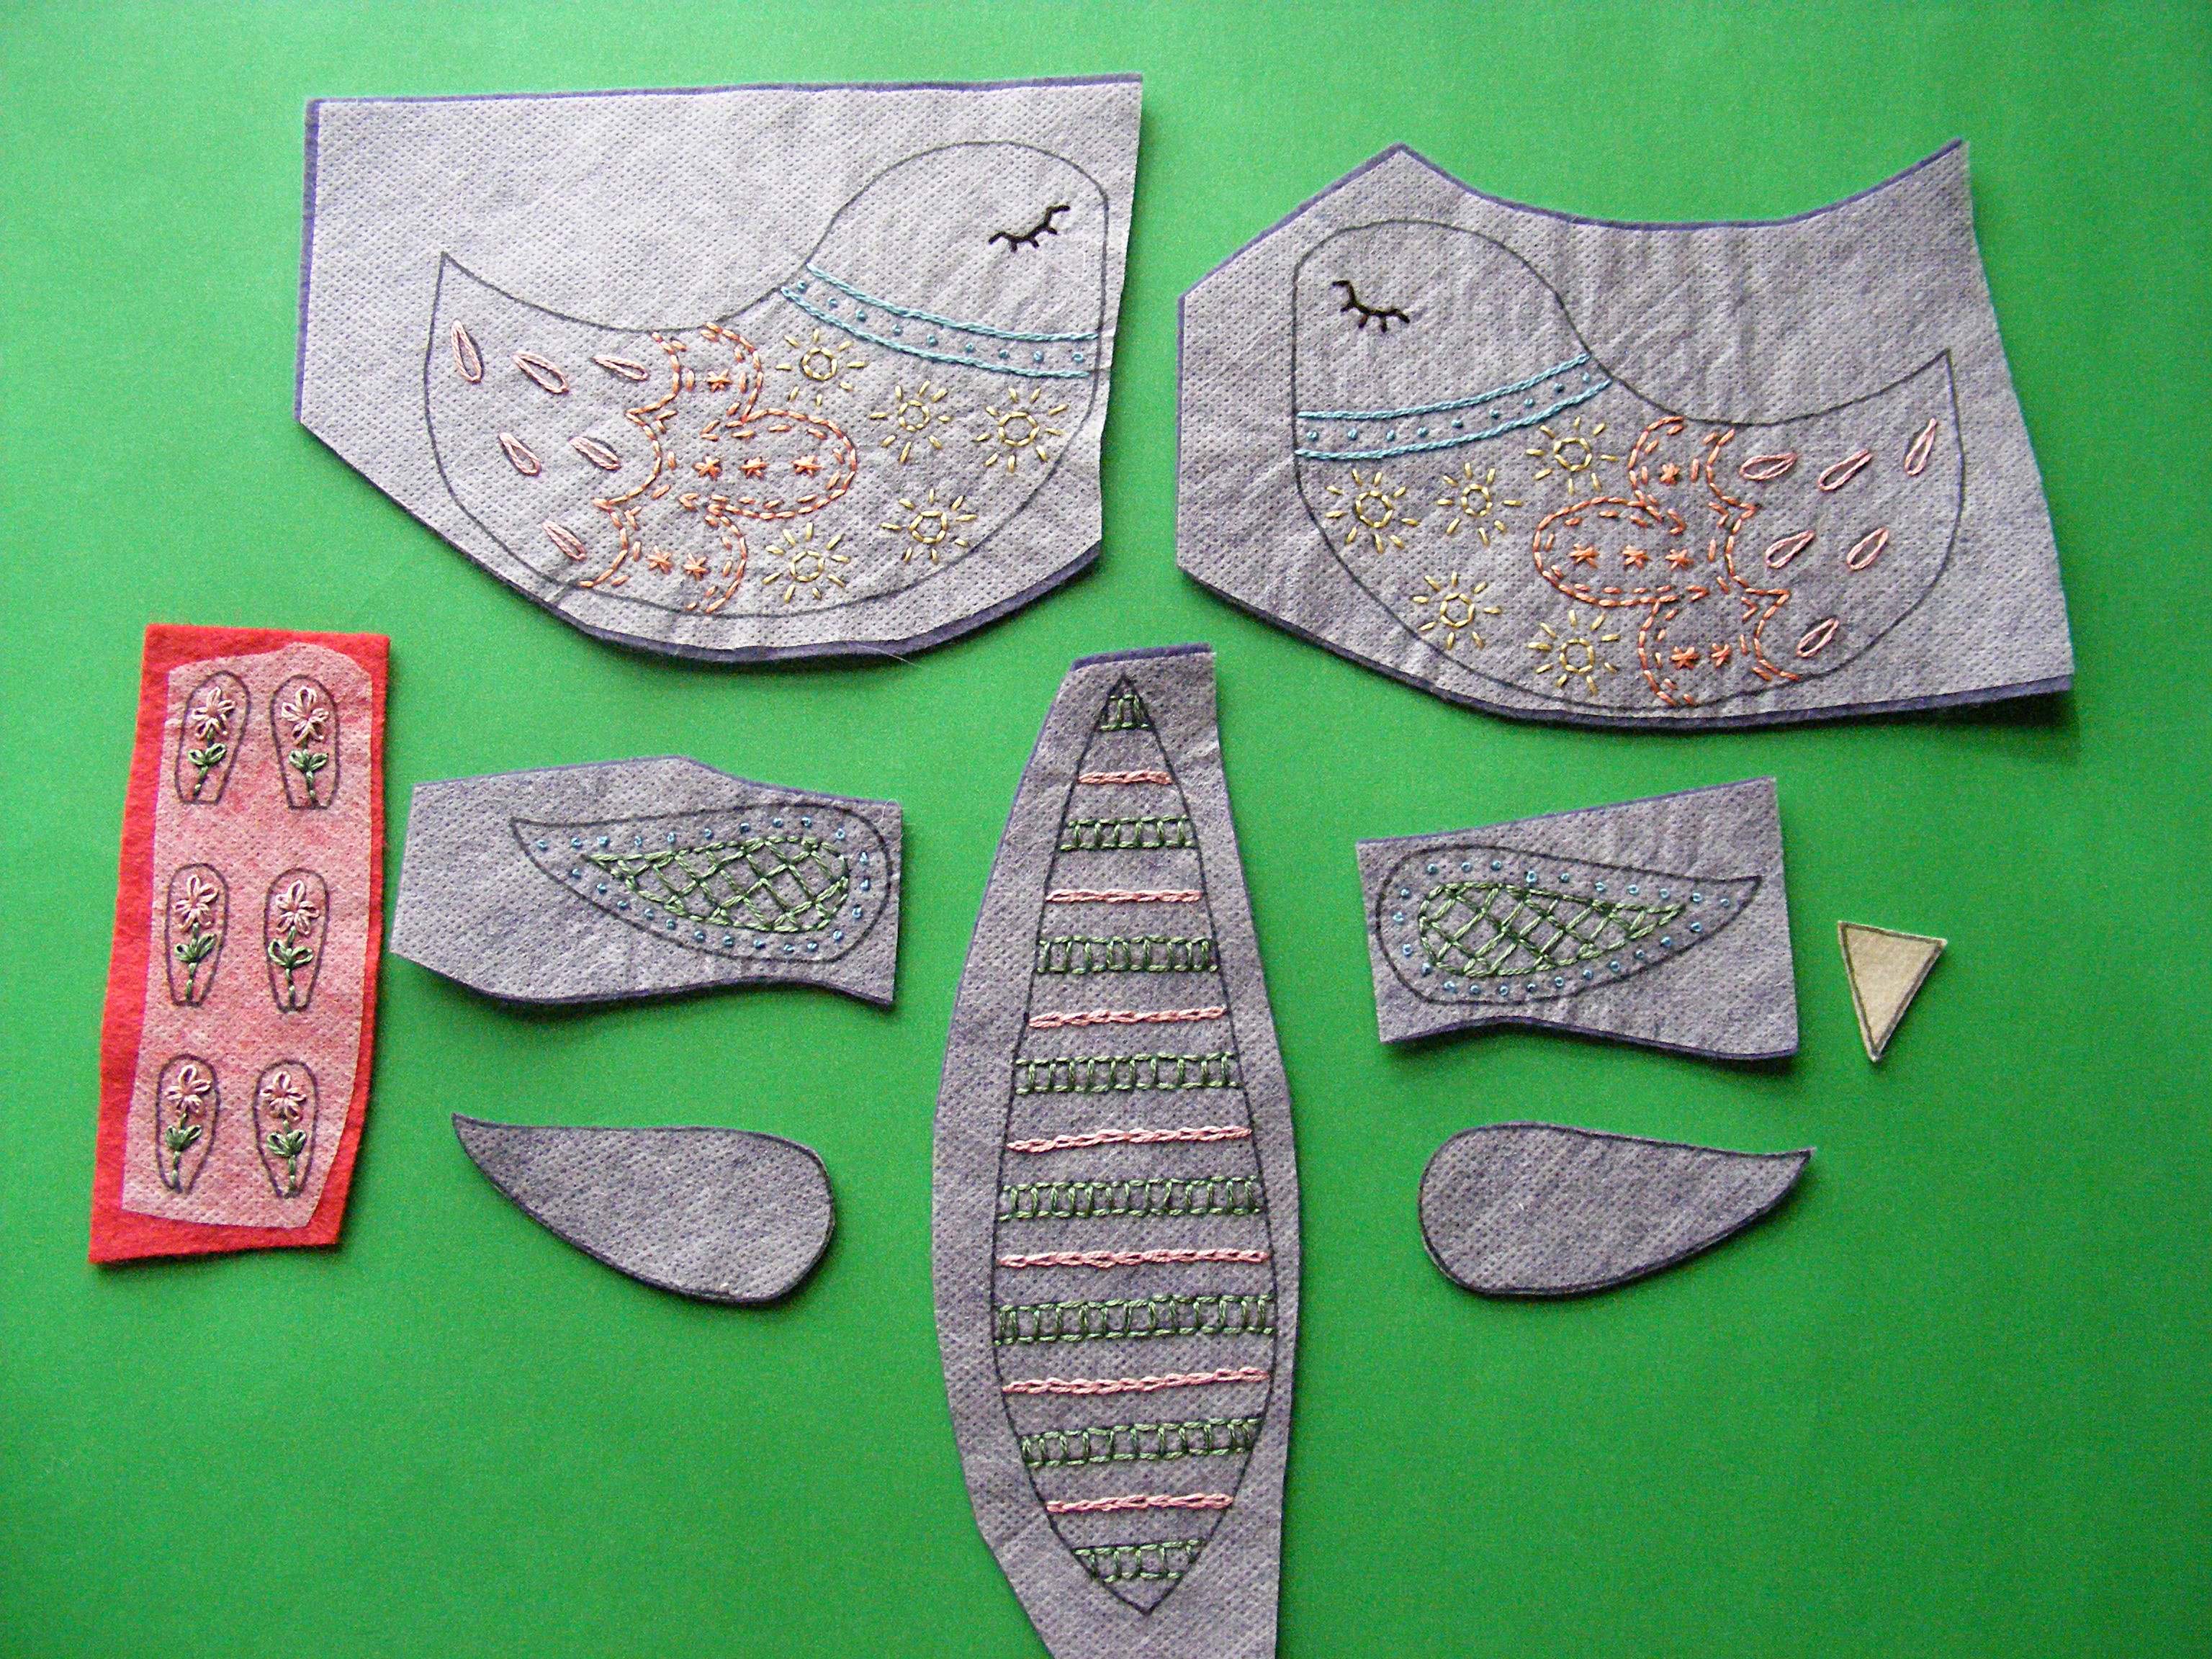
You can print all the pieces needed for two birds on a single page, so that’s how it’s laid out. Save the other pieces to make a matching bird for a lucky friend. 🙂
Step 2
Roughly cut out the pattern pieces and stick them to the felt.
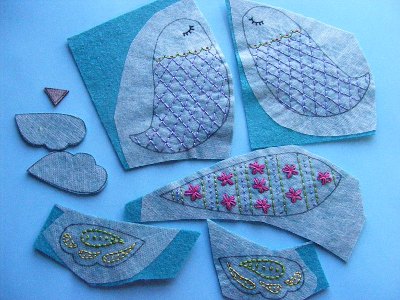
Embroider right through the stabilizer. I used 2 strands of embroidery thread for all stitching. These are the stitches and thread colors I used – but you can use any colors you like! (The links all go to video tutorials showing how to do the stitches.)
Cut them right on the solid lines – no need to add seam allowance.
Step 4
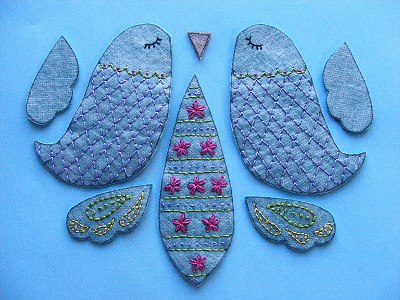
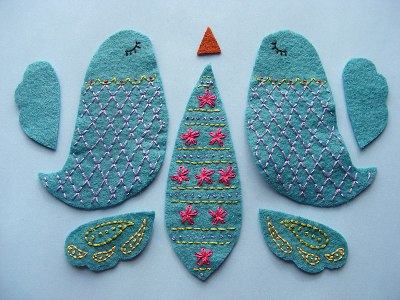
Soak off the stabilizer in cold water. Let it soak for at least 15 minutes (I often leave mine soaking for an hour or more) then rinse it off under cold running water. Use a sprayer to remove any stubborn bits, but do not rub the felt.
Lay the pieces flat on a towel to dry. Do not wring, twist or even smoosh them. Just let them dry flat.
Step 5
Time to start putting it all together! Use 2 strands of matching embroidery thread to whipstitch all the pieces together.
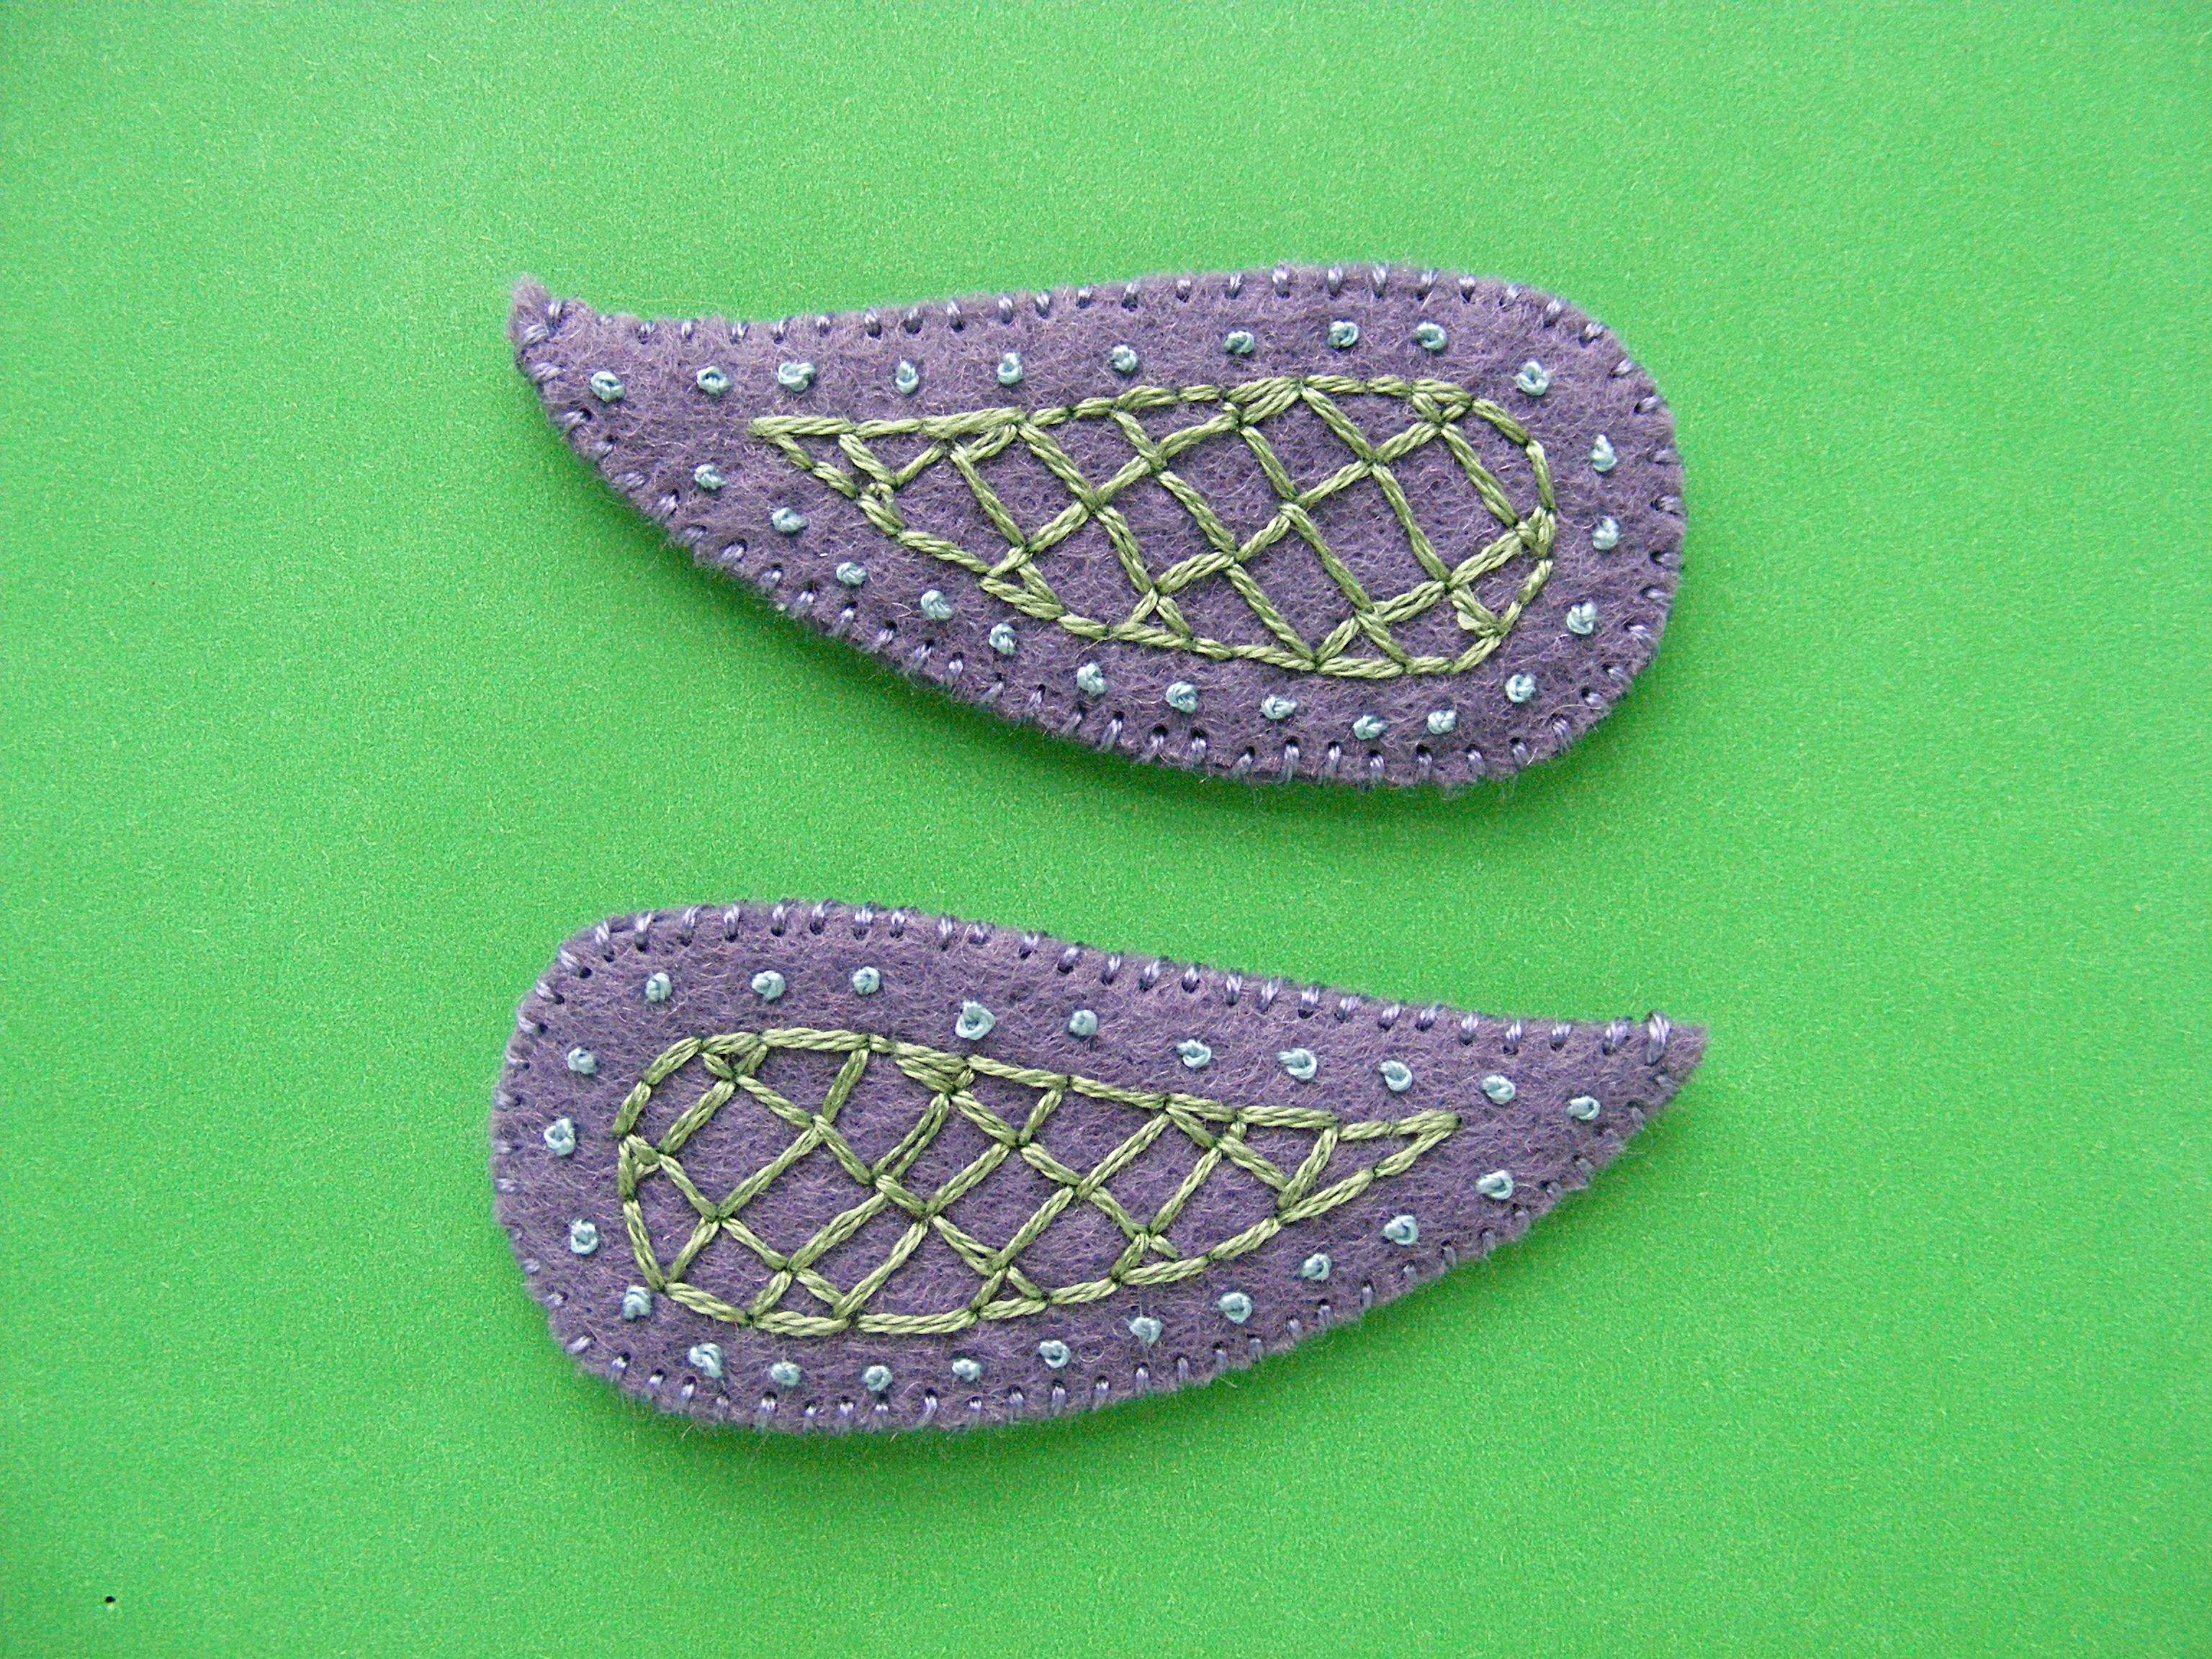
Sew one embroidered wing to one “naked” wing, all the way around the edge. Repeat for the second wing.
Step 6
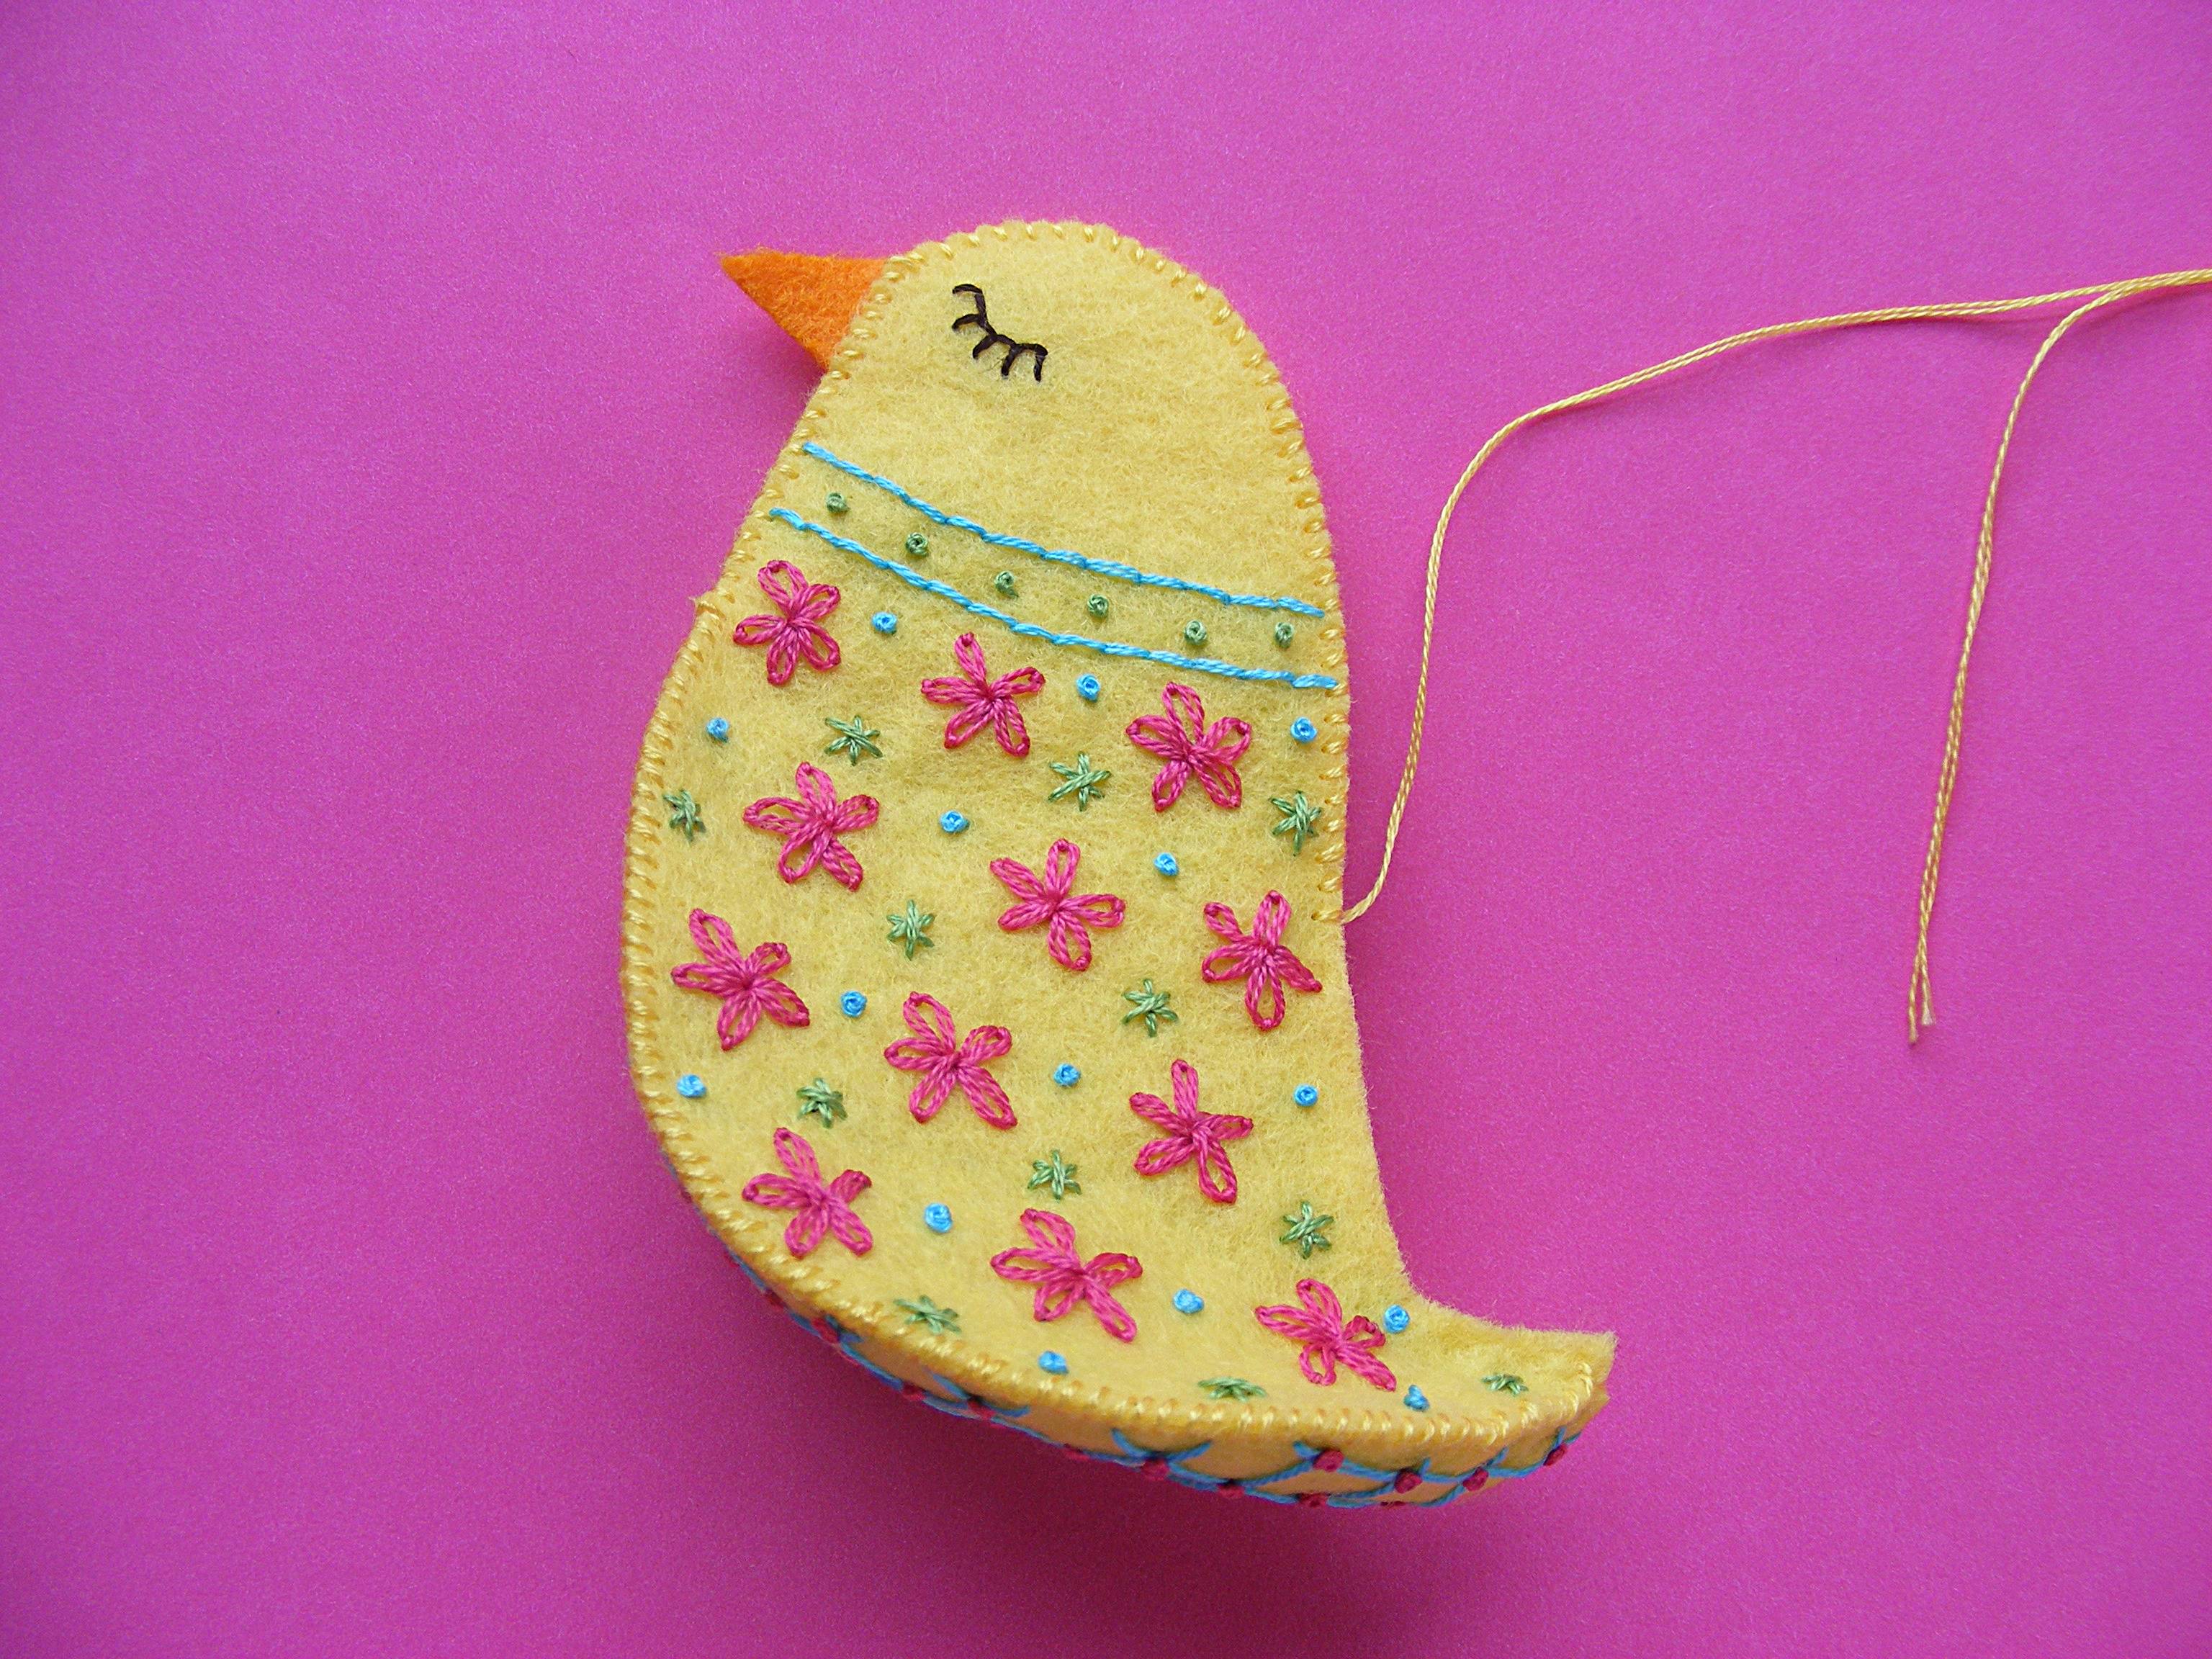
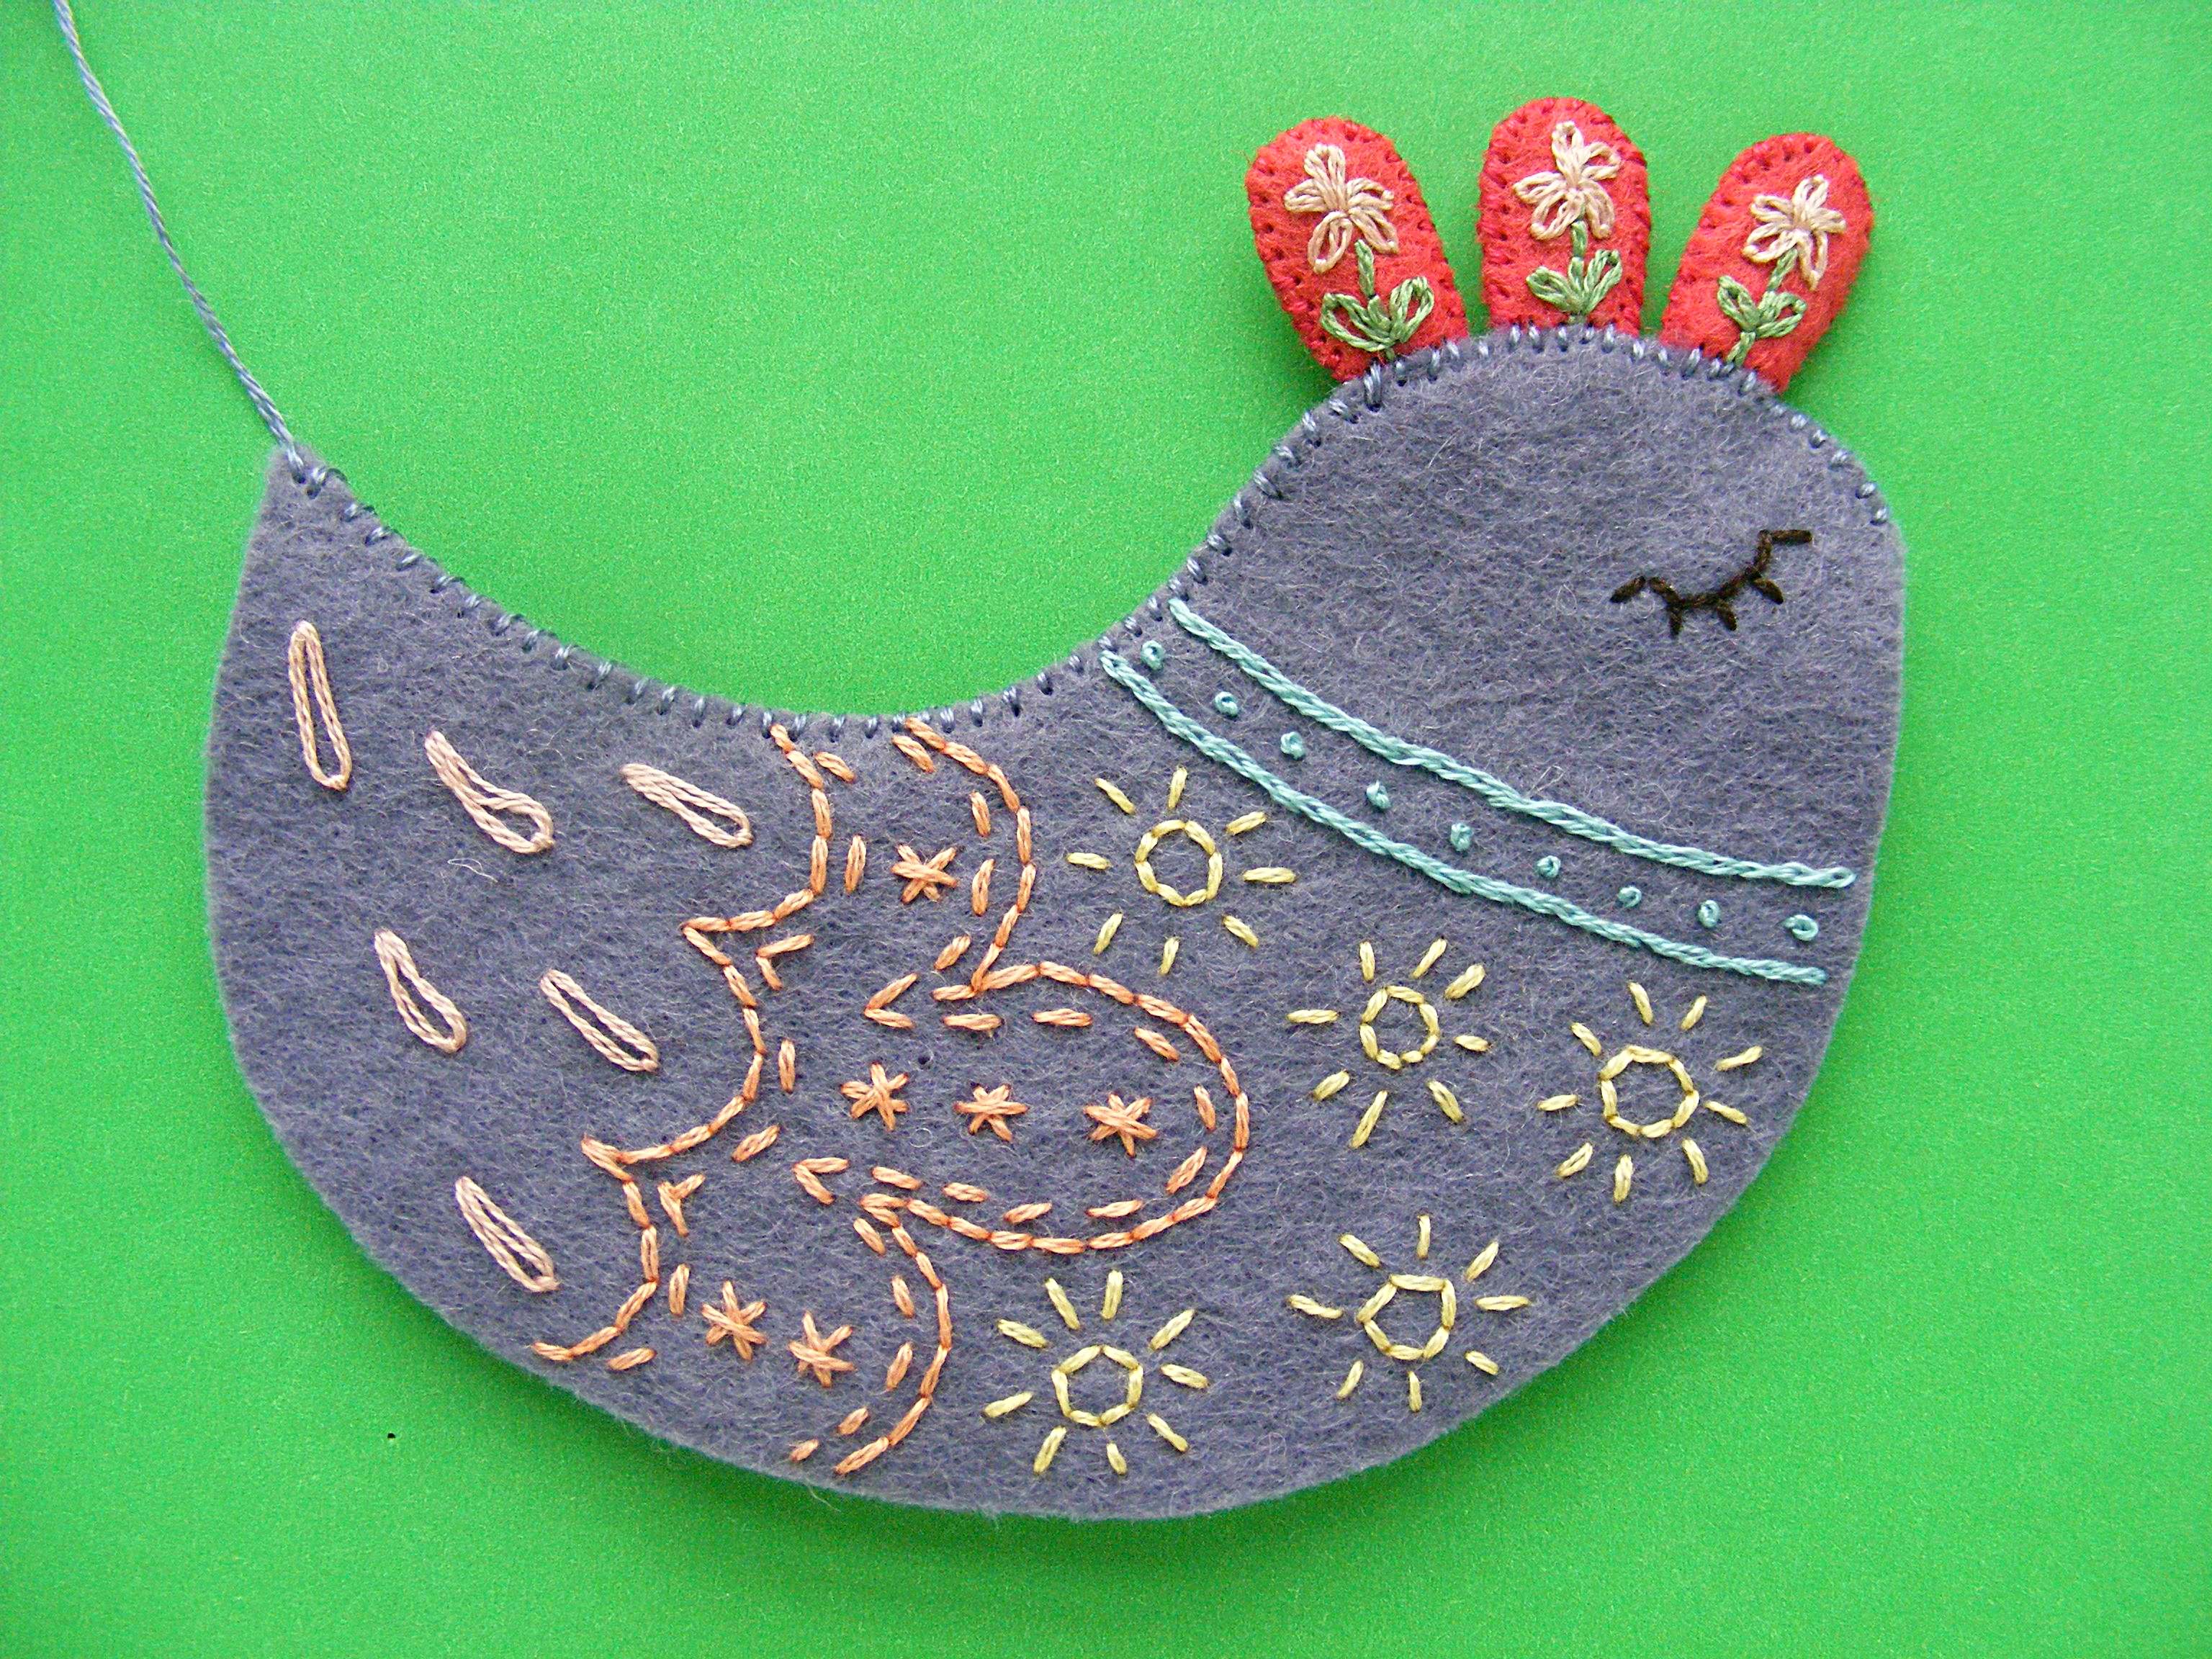
Sew the belly to one side of the bird.
Start sewing at the tail of the bird, matching it to the wider end of the belly piece, and sew all the way to the top of the belly piece.
Step 7
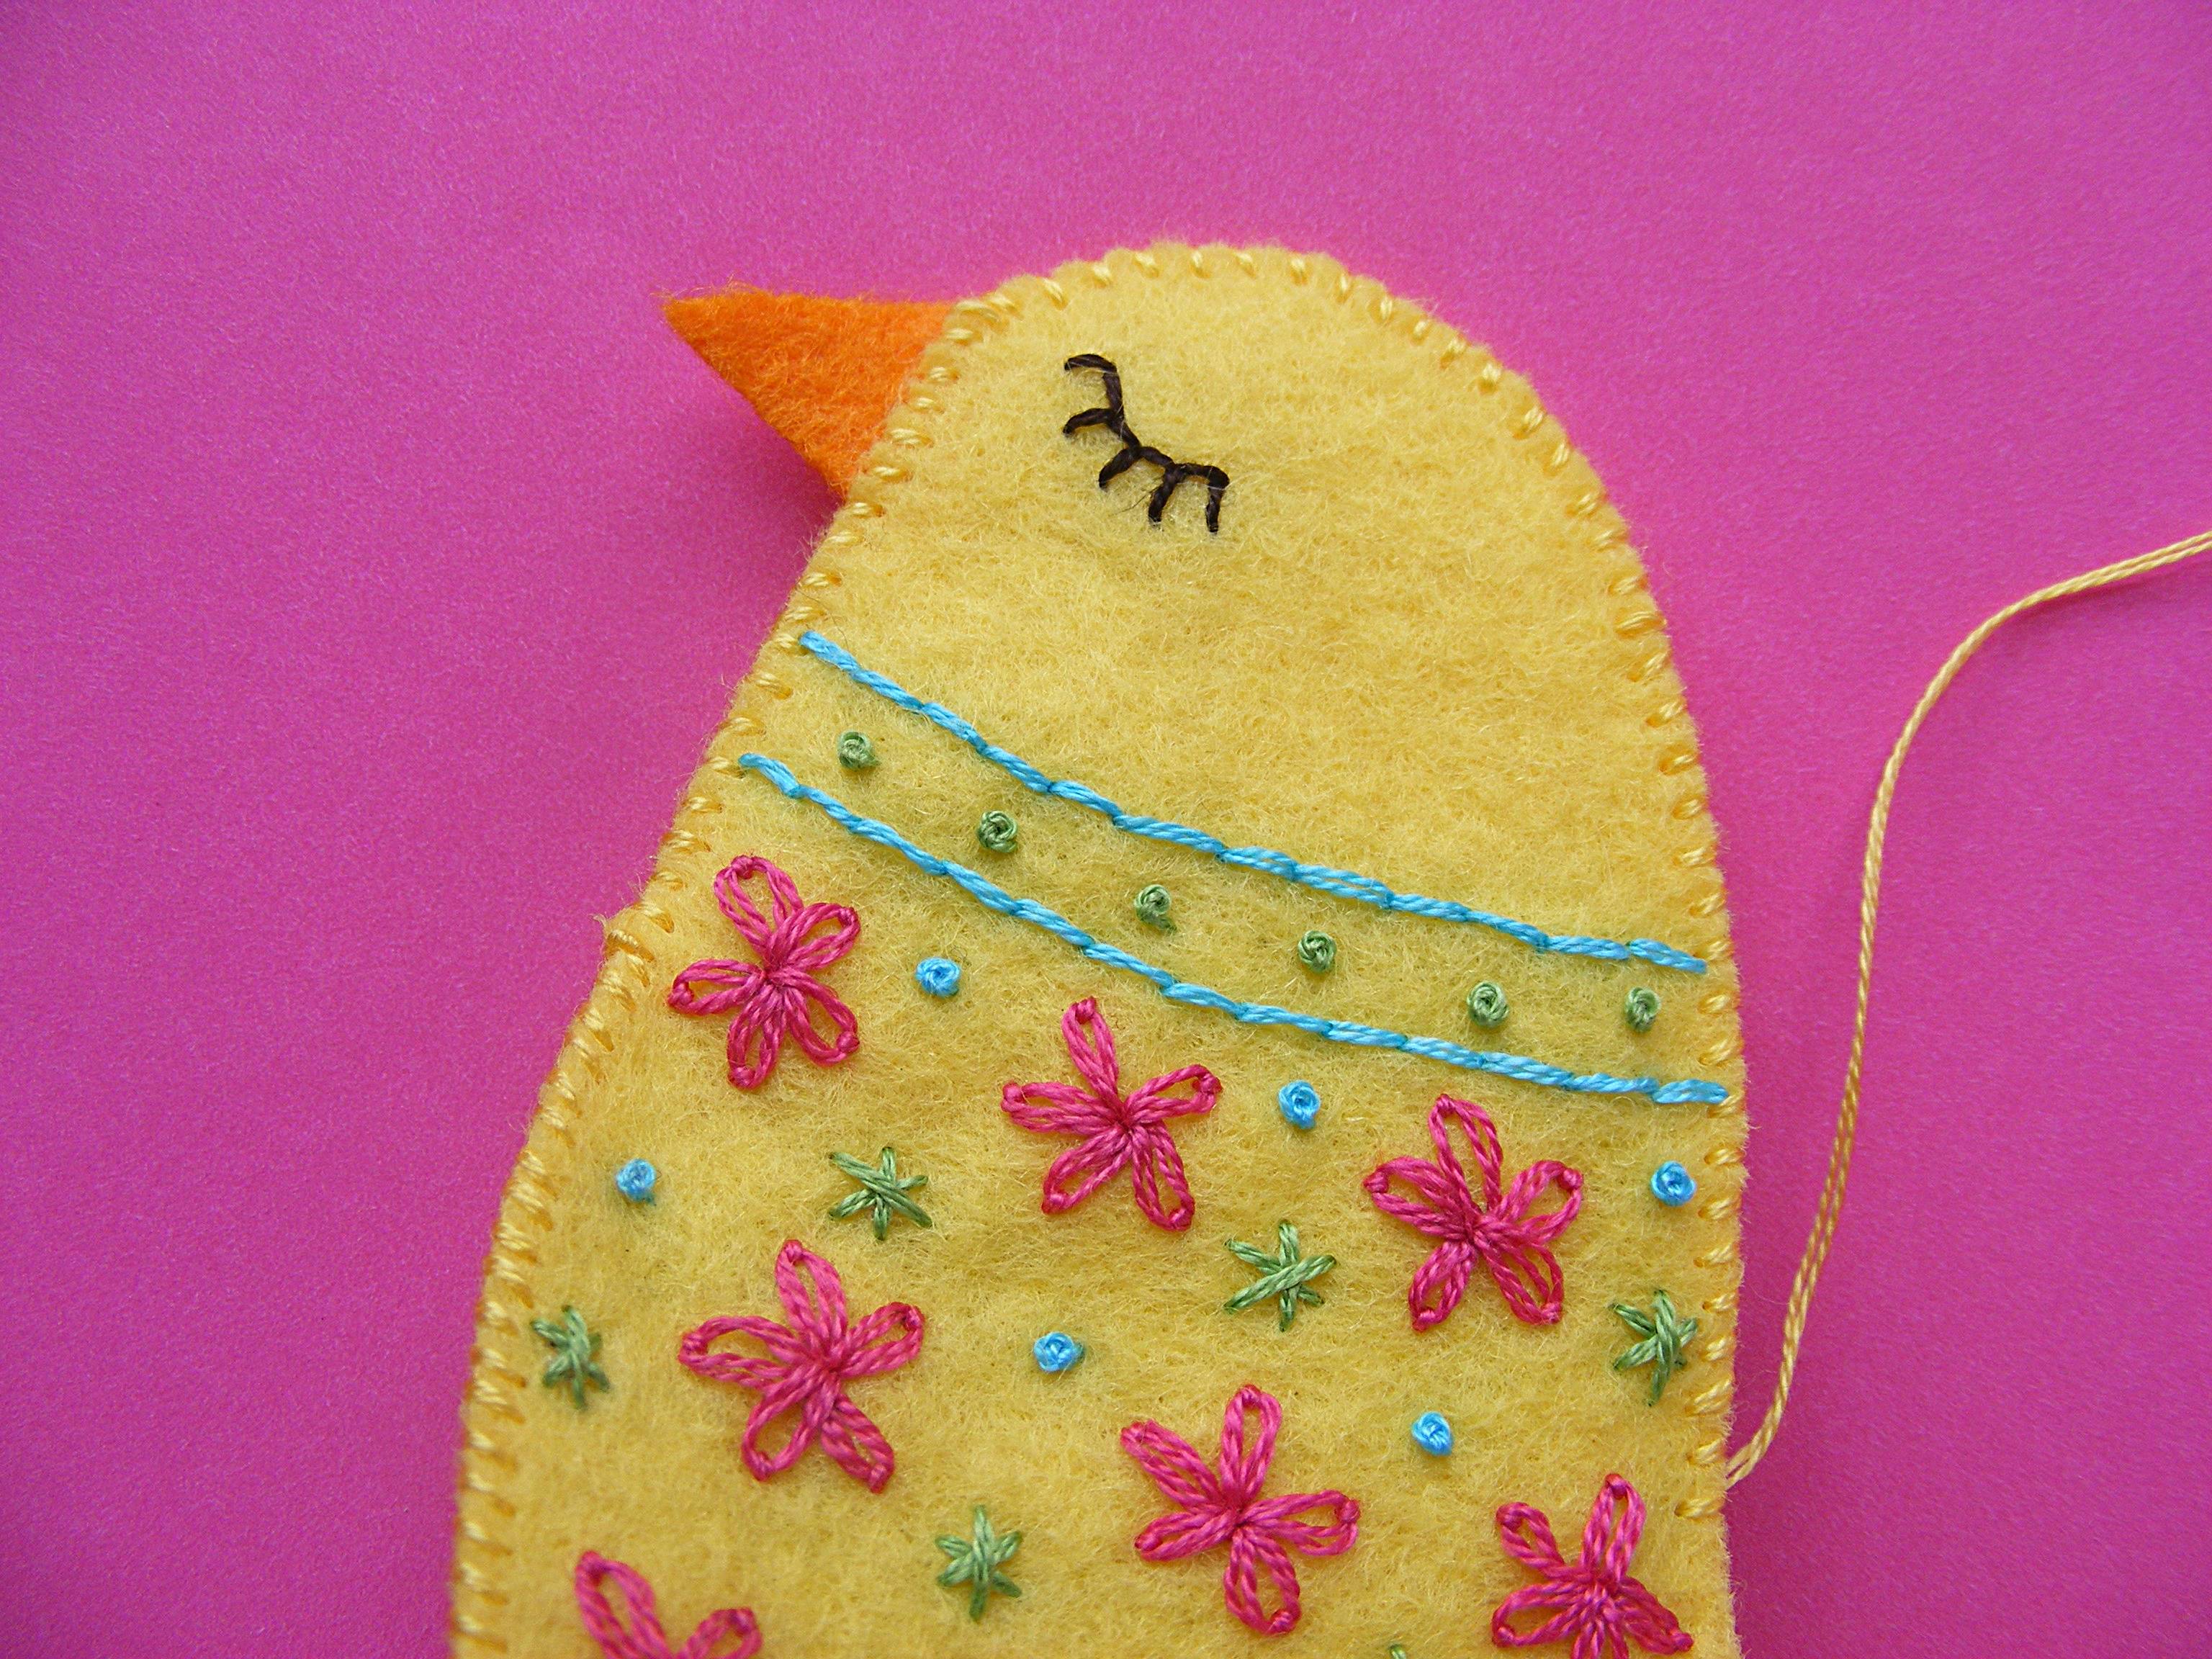
Sew the other side of the belly to the other body piece. Start again down at the tail and sew all the way up to the top, but this time keep going past the belly, sewing the two sides of the face together.
Continue sewing up over the top of the head and down the back.
Stop when there are a few inches left open, but leave your thread tail hanging.
Step 9
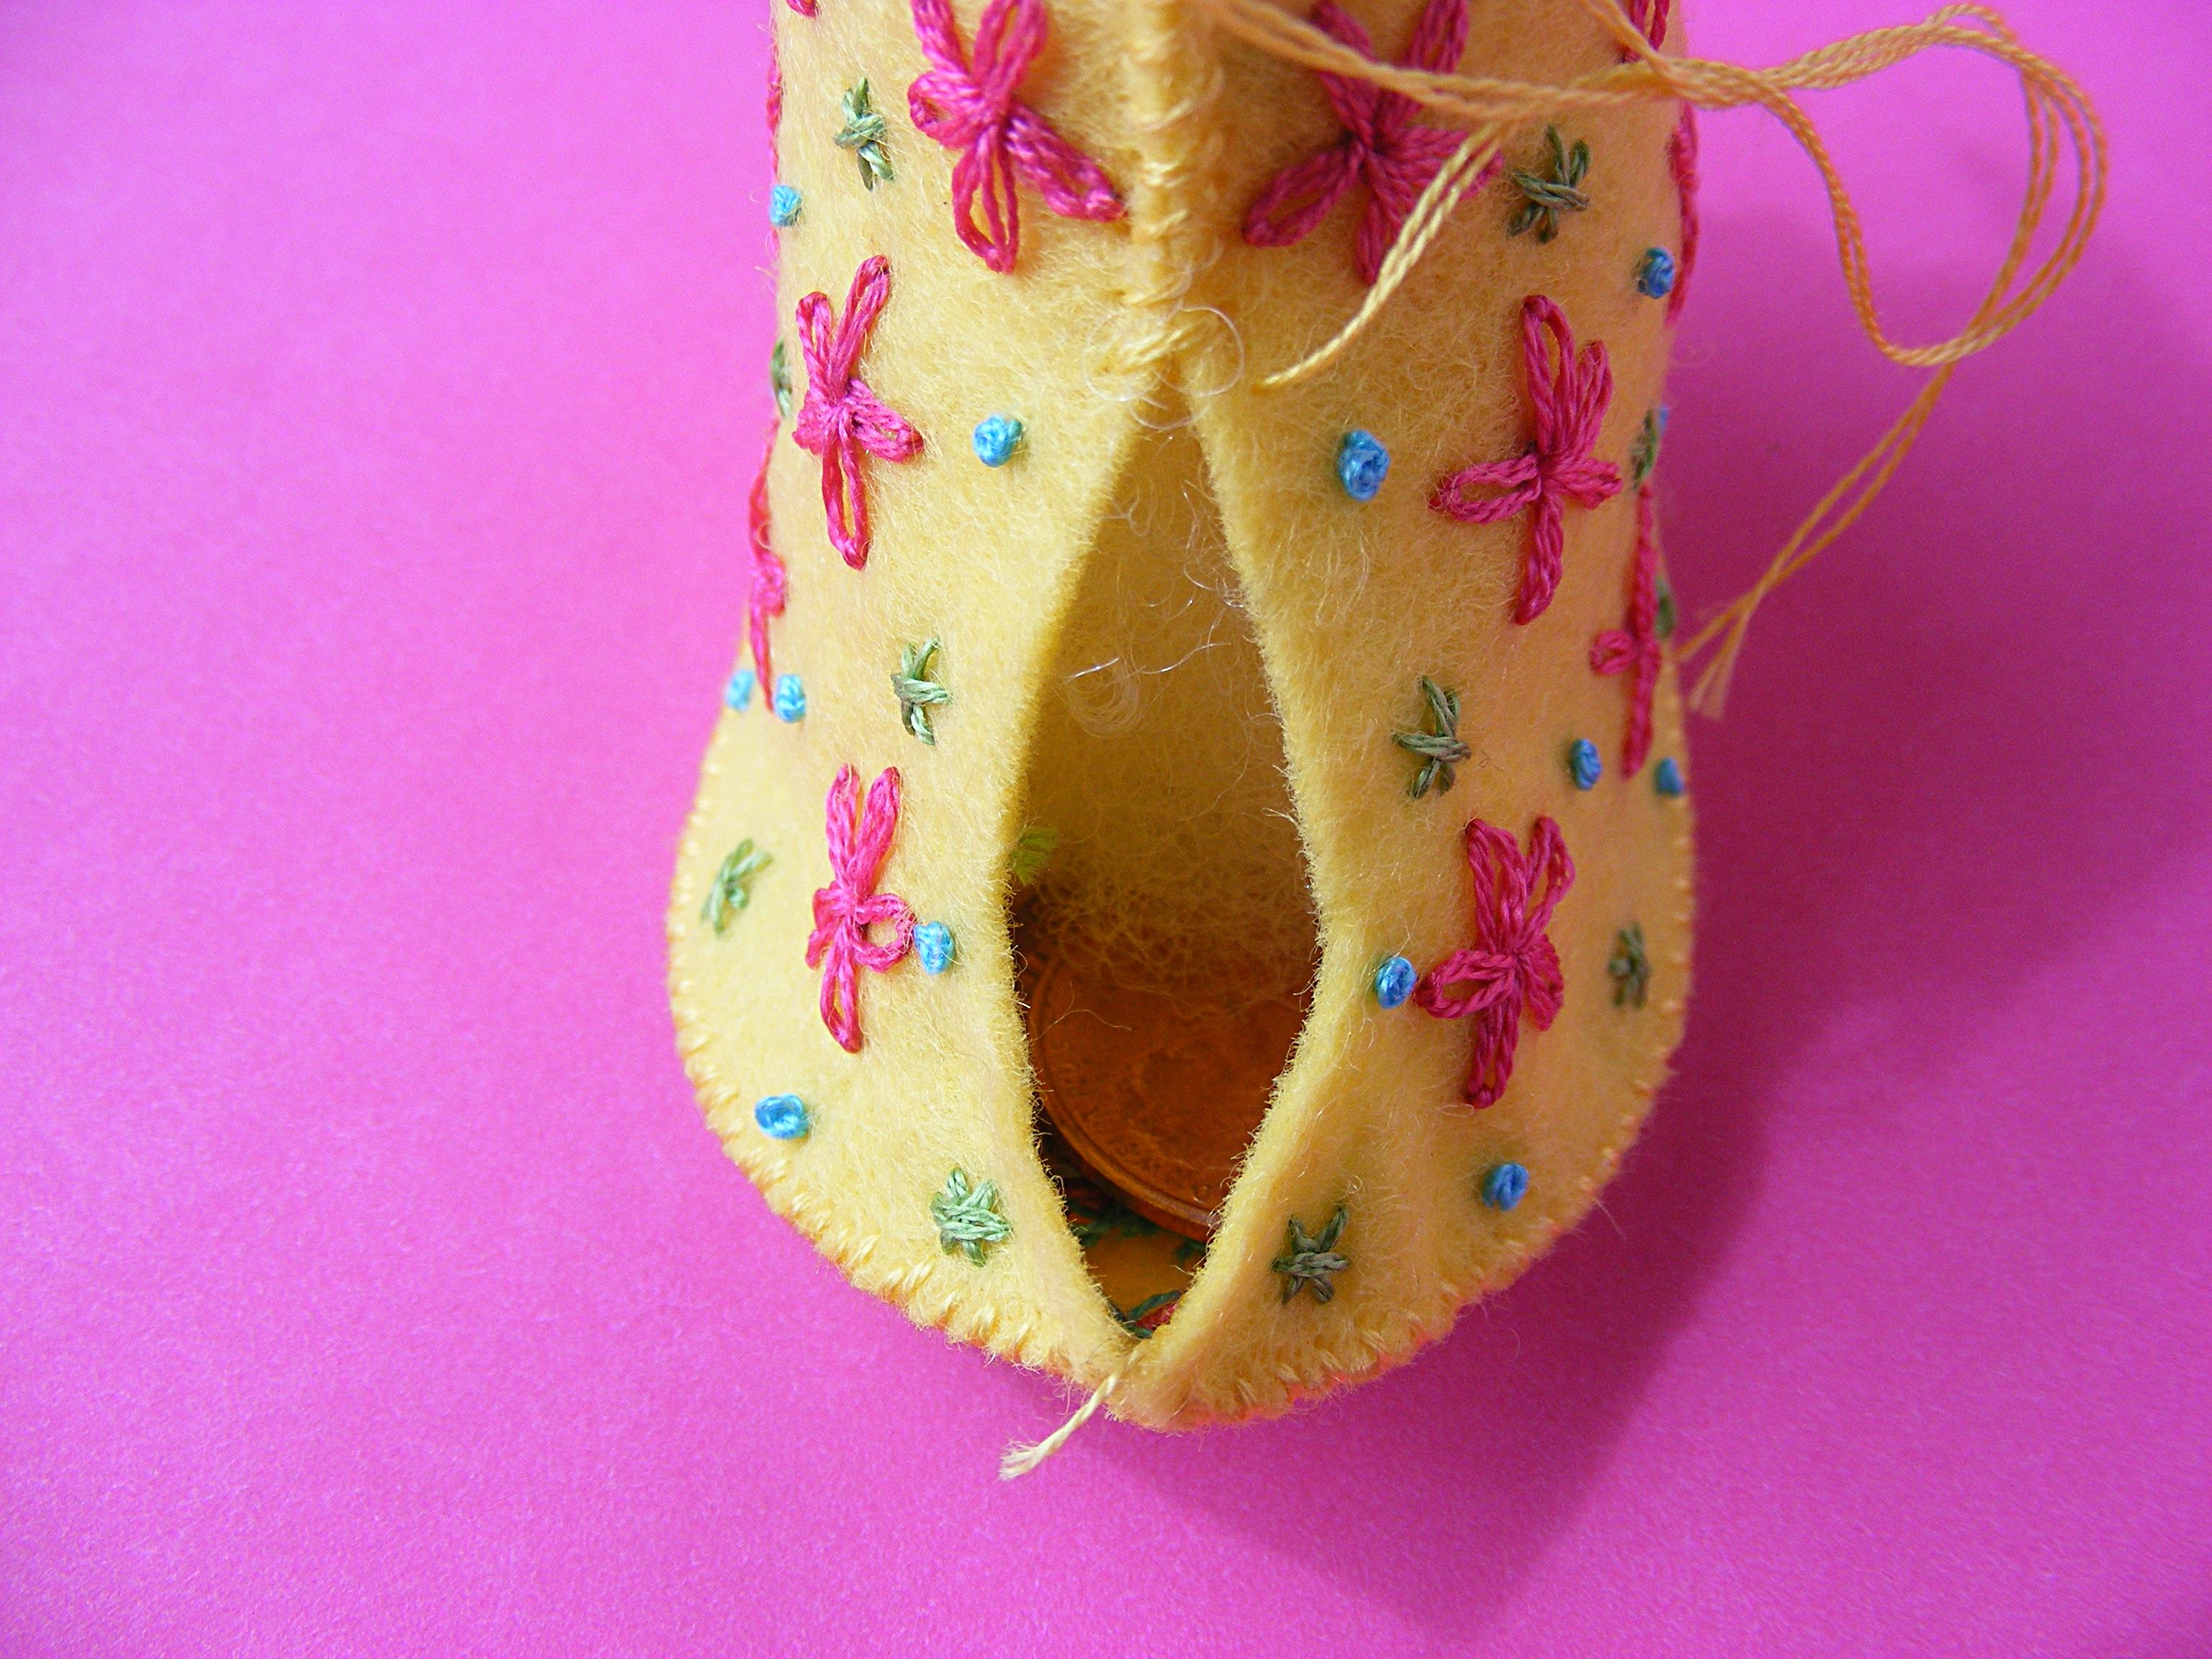
Start adding small bits of stuffing to the head and working your way down the body.
When you get to the tail, slip in a couple of pennies or other weights to keep her from tipping forward. I used two American pennies in mine. If you want her standing up even straighter (like Flora) use three pennies.
Step 10
Add a bit more stuffing to the tail and finish sewing her up.
Step 11
Pin the wings in place, one on each side of the body.
Use the flowers as a guide to line them up exactly. Thread a long needle with a long piece of thread. Start sewing underneath one wing, near the top, leaving about 6 inches of thread hanging. Sew through the body and out the other side, through the opposing wing. Take a small stitch back into the wing, through the body and out through the first wing. Stitch back and forth like this a few times to secure the wings. Don’t pull the thread too tight or you’ll distort the shape of her body. Knot your thread underneath one wing and bury the tails.
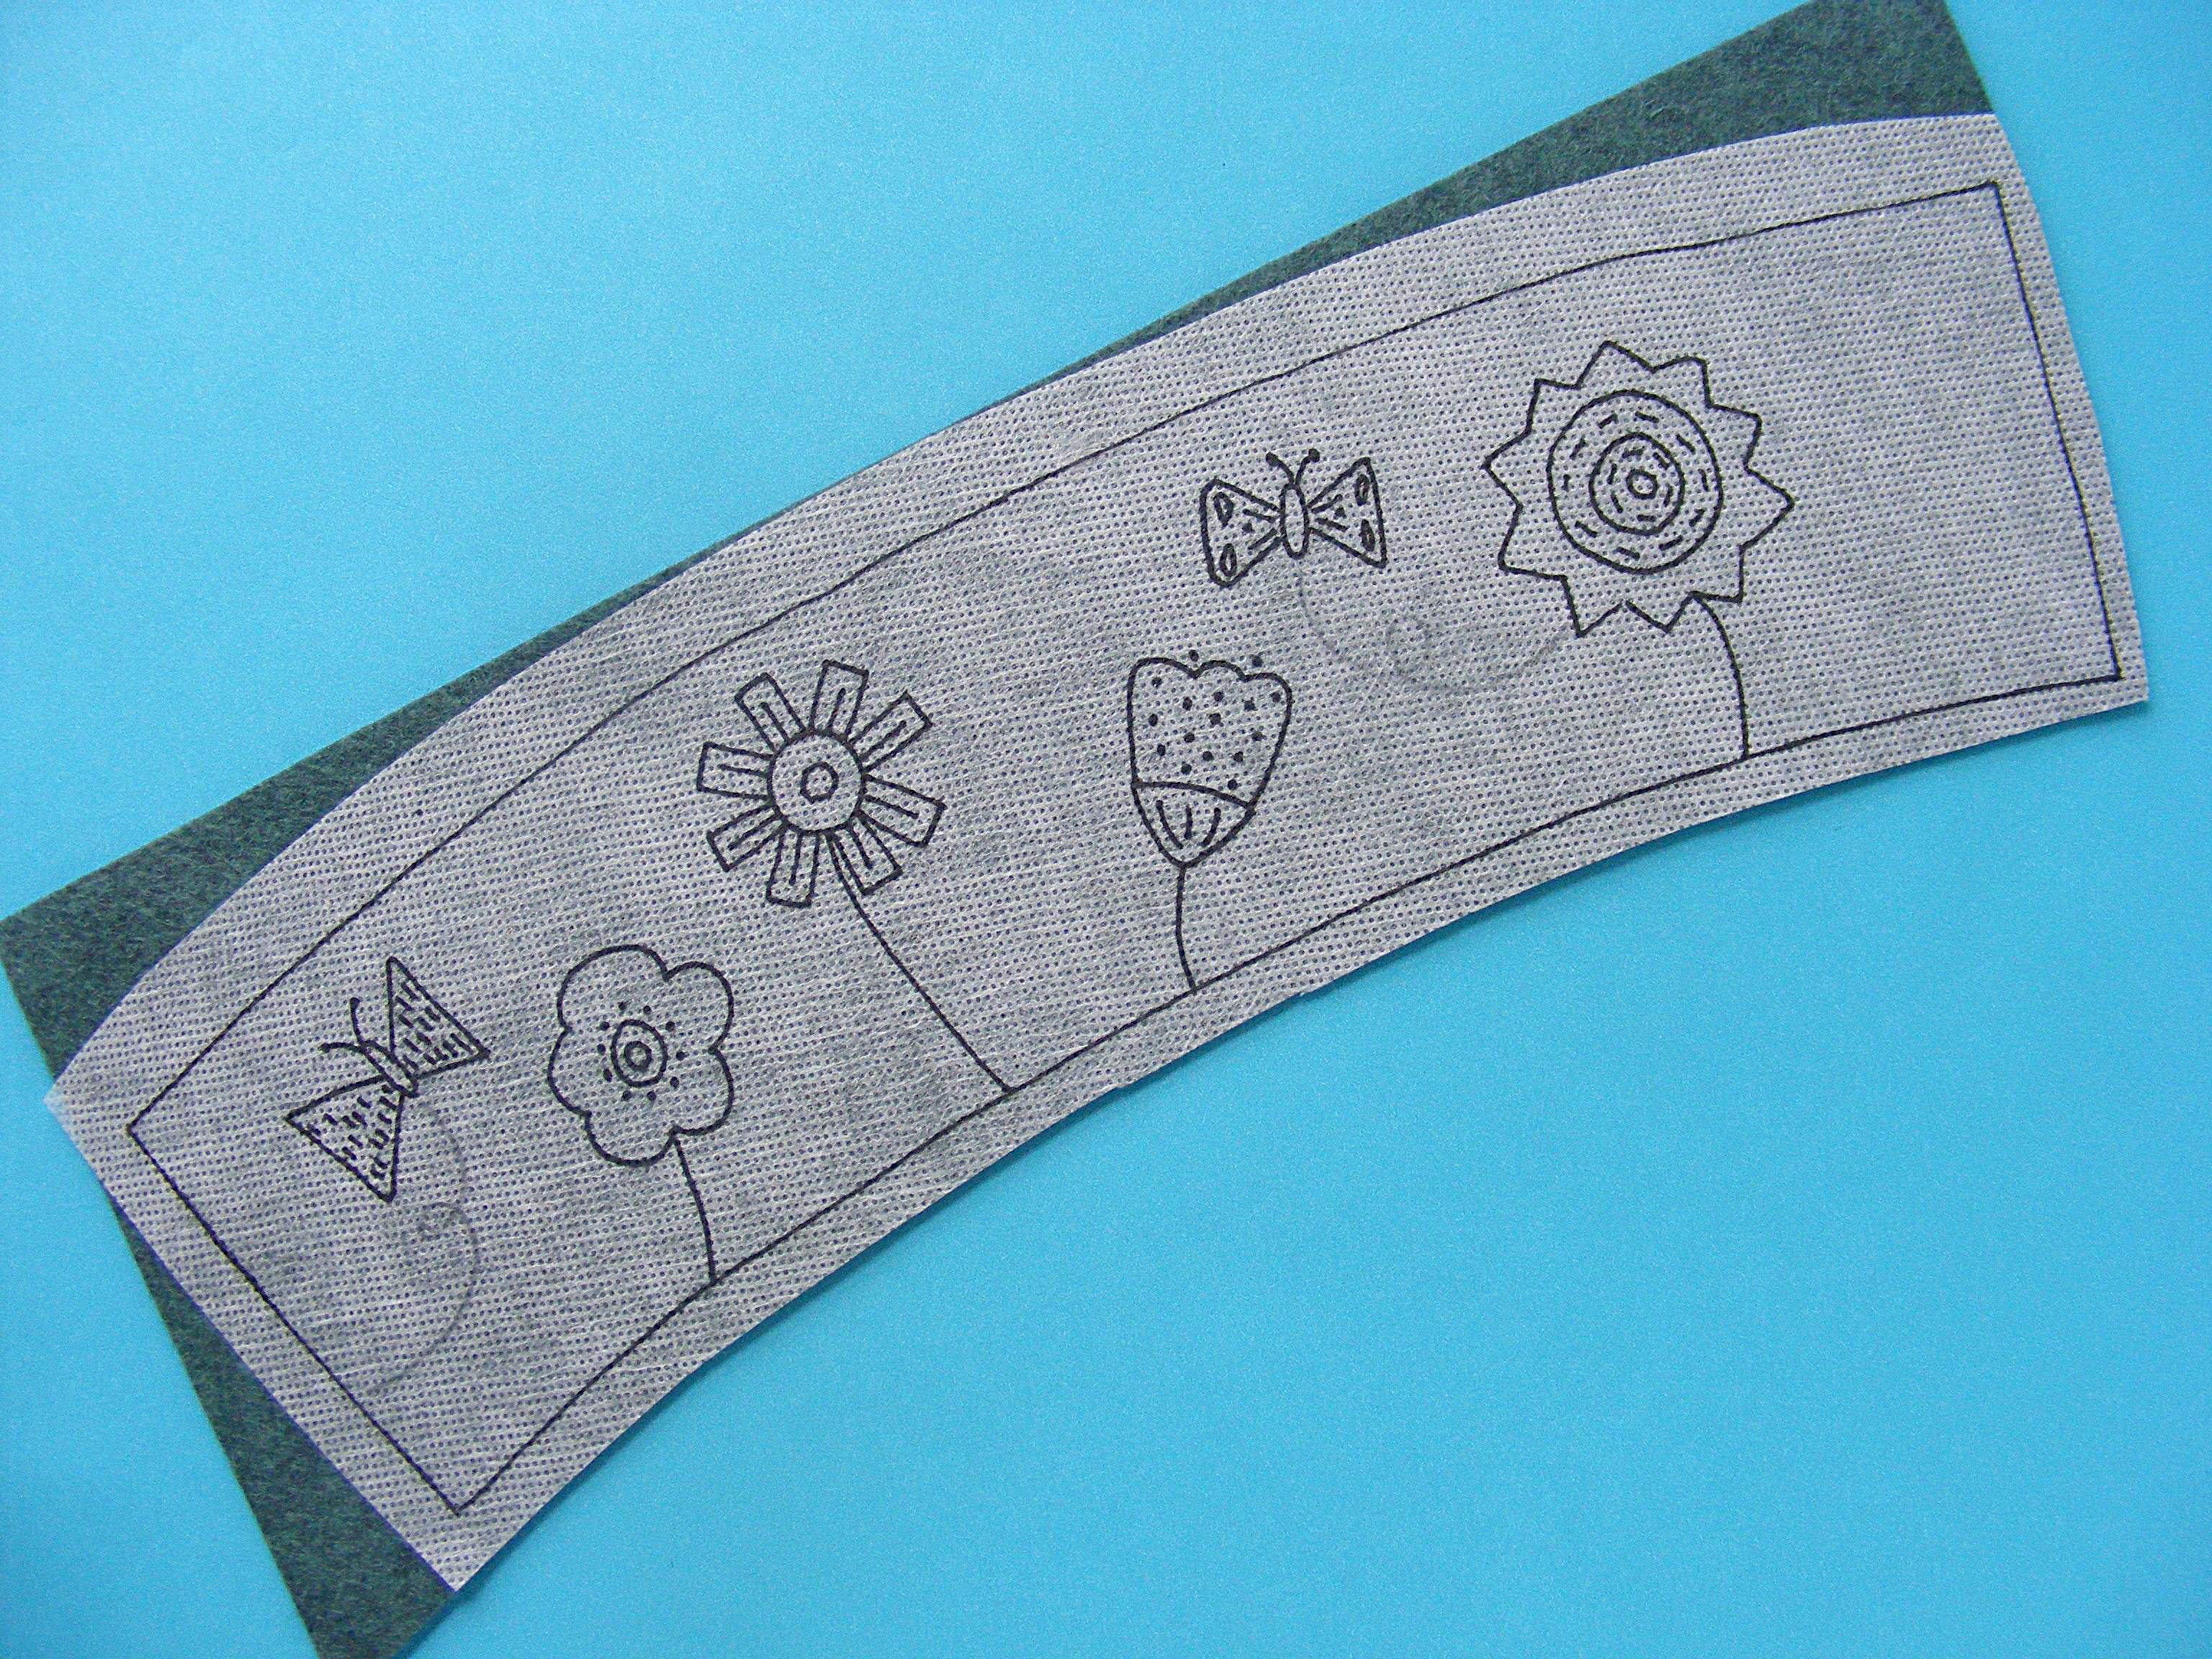
Transfer the pattern to the felt. I use Sulky Sticky FabriSolvy every time I work with felt. I love it!
If you’re wondering how it works with felt, read this post.
Step 2
Embroider the design and trim the edges of the felt to size.
I’m going to applique all the flowers and butterflies, so all I stitched here are the stems and butterfly trails.
I used backstitch for the stems with four strands of green thread, and running stitch for the butterfly trails with two strands of light blue thread.
Step 3
Soak out the Sulky Sticky FabriSolvy in cold water and let it dry flat. Don’t wring, twist or even smoosh it. Just set it on a towel and let it dry overnight.
Look! Now I know exactly where each applique piece goes!
Step 4
Applique and embroider the rest of your design.
Use freezer paper to cut out the tiny applique pieces. Trace the pieces onto the paper side of the freezer paper. Fuse the paper to felt, and then cut out the pieces, cutting through the paper and felt at the same time. It will help keep your cutting accurate.
You can find links to all my favorite tools and supplies here.
Step 1
Trace or print the ear and headband pieces onto some freezer paper. Fuse to the felt and cut out all the pieces. Cut right through the freezer paper and felt together, then peel the freezer paper away. It’s the easiest way to accurately cut small shapes like this.
Step 2
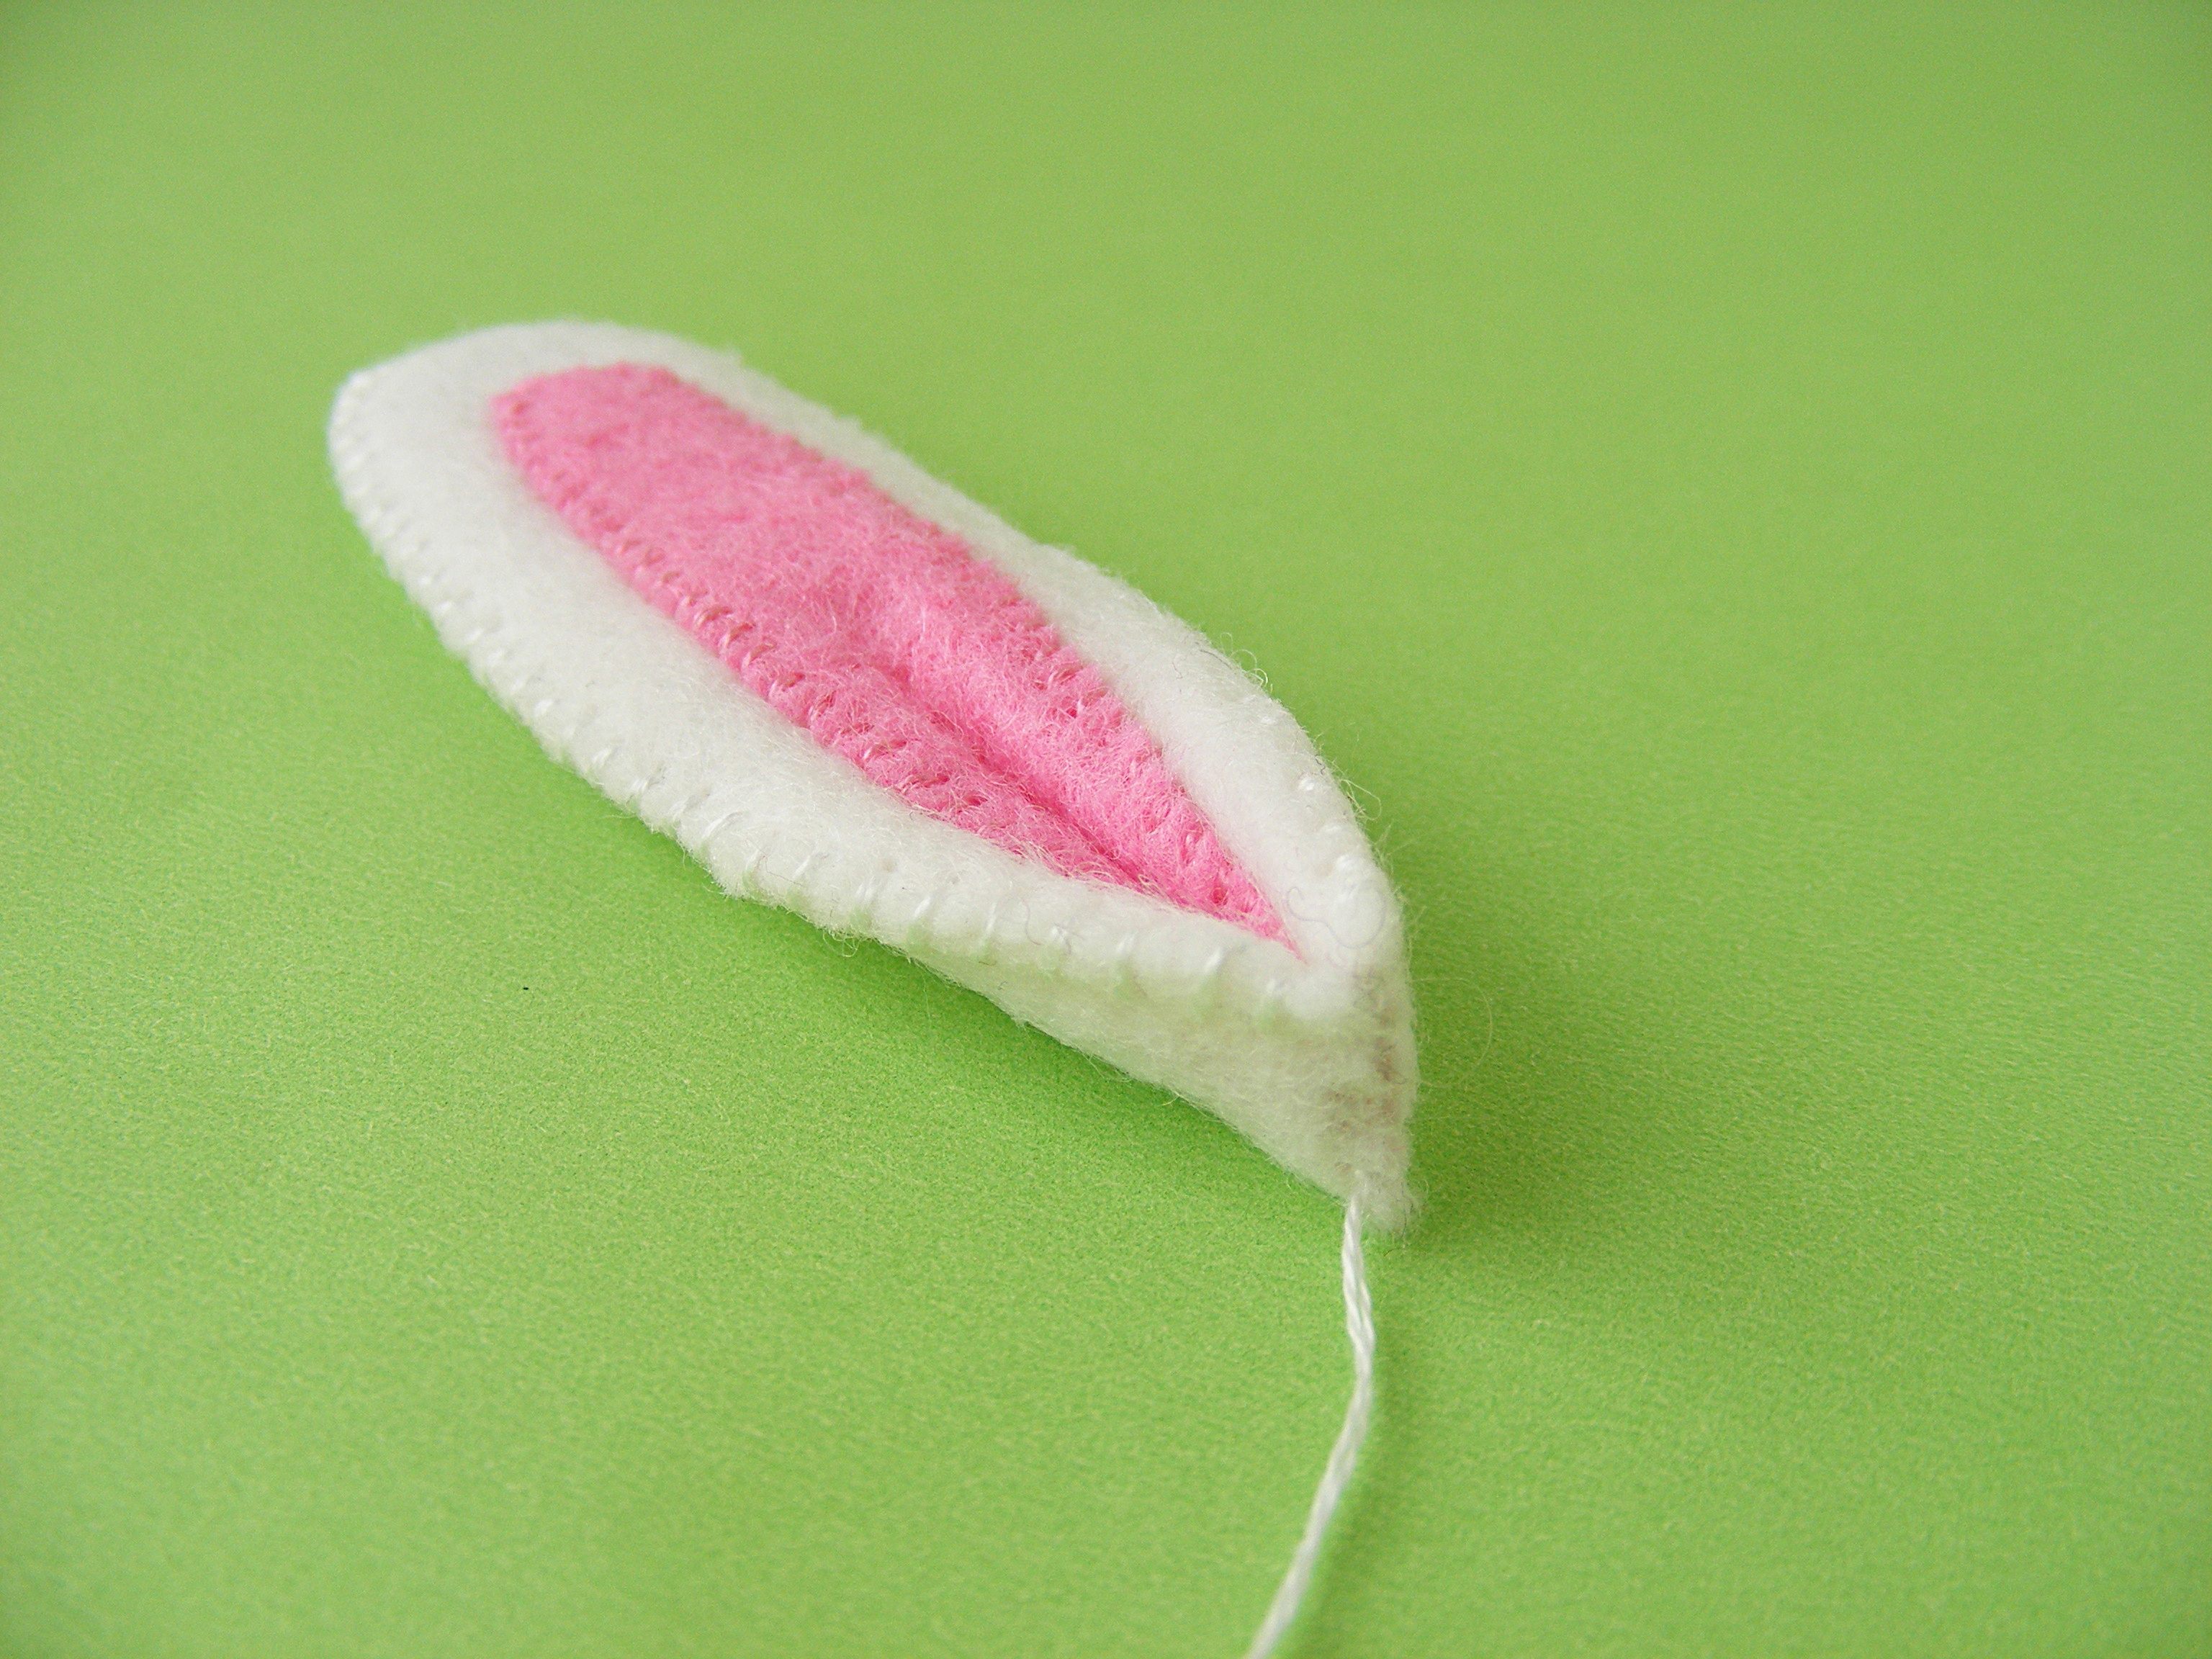
Whipstitch applique one inner ear to one larger ear piece using thread that matches the inner ear.
Whipstitch that piece to a second larger ear piece, leaving the bottom unstitched. Leave your thread tail attached.
(Whipstitch is slightly different from whipstitch applique – those links go to two different tutorials.)
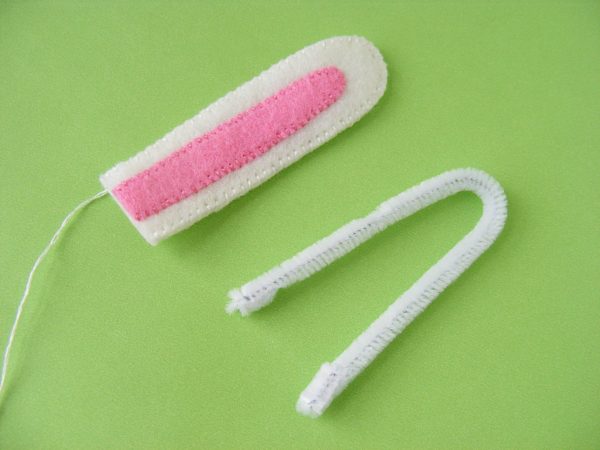
Cut a pipecleaner in half. Bend it into a gentle curve and fold both cut ends down about 1/2 inch - short enough to just fit inside the ear.
Step 3
Slide the bent pipecleaner up into the ear. Fold the bottom of the ear in half and whipstitch it closed. Don’t cut off your thread yet.
Repeat Steps 2 and 3 for the second ear.
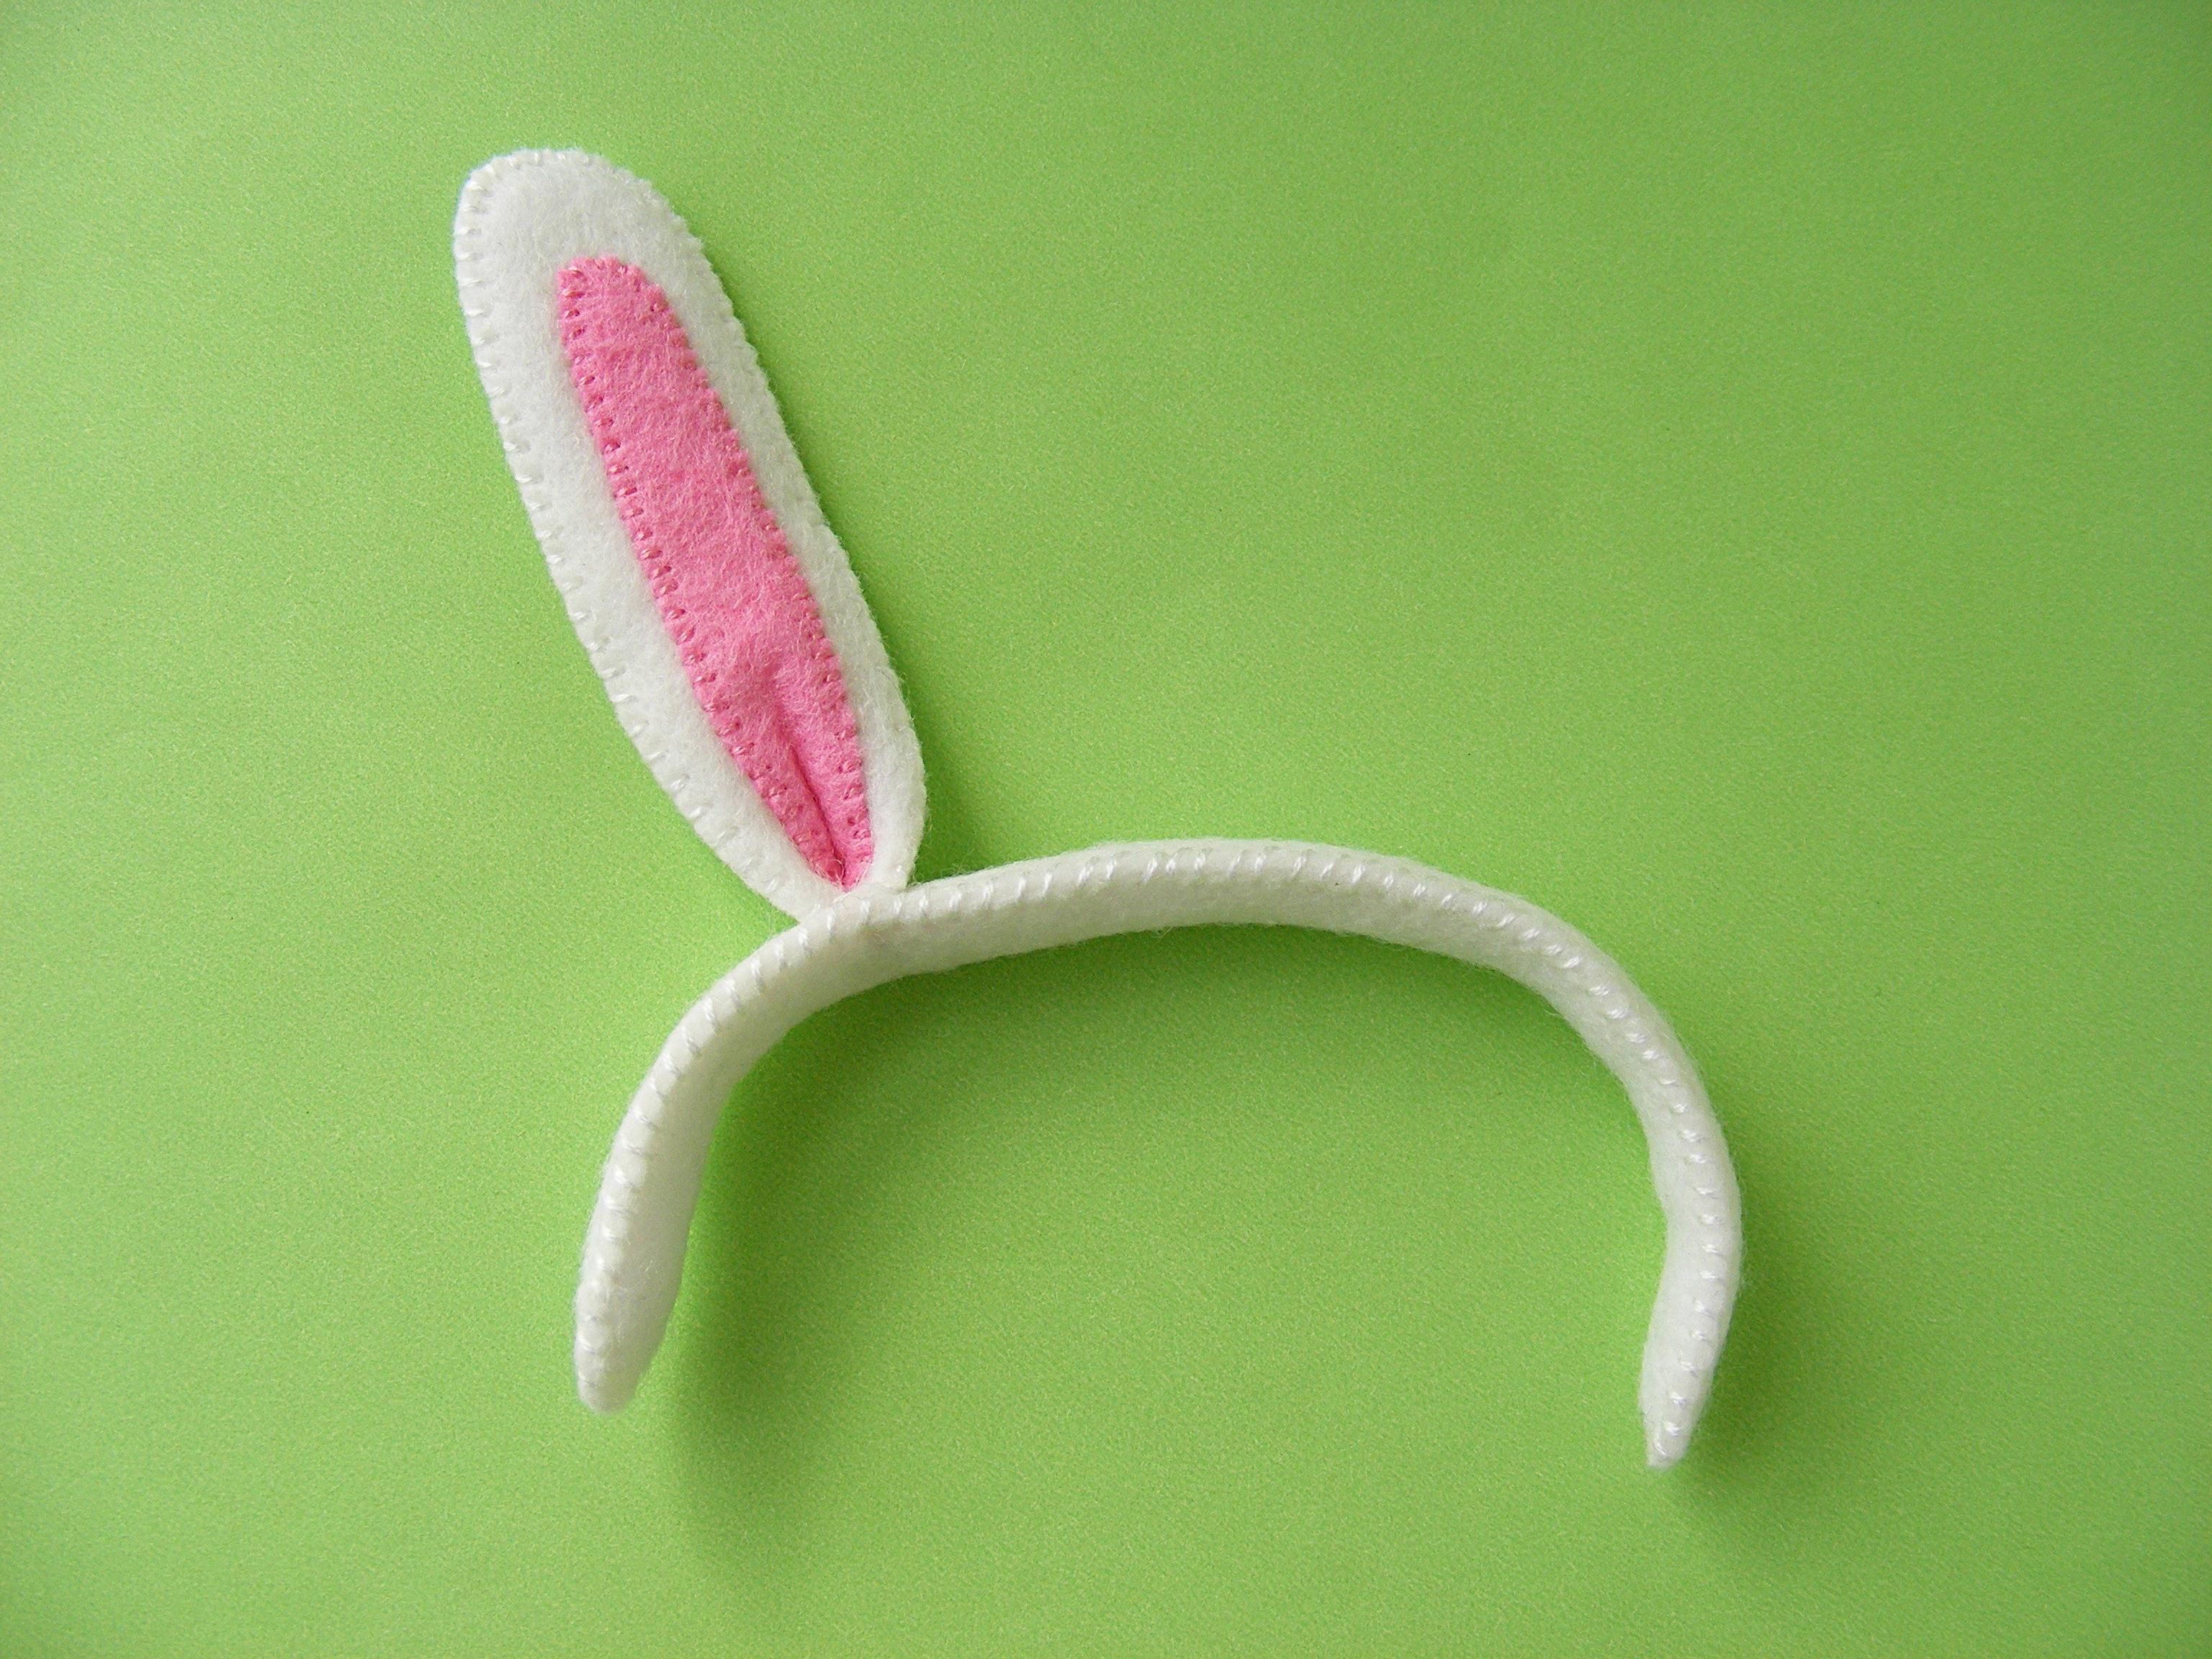
Step 3
Whipstitch the two headband pieces together, leaving the curve at one end unstitched.
Bend a pipecleaner in half. Measure it against the headband pieces and fold down the excess at the cut ends. Slide the pipecleaner into the headband and finish stitching the headband closed.
Fit the headband to whoever will be wearing it and mark where you want the ears to go.
I went around the base of the ear twice to make sure it was attached securely.
Attach the second ear.
Done!
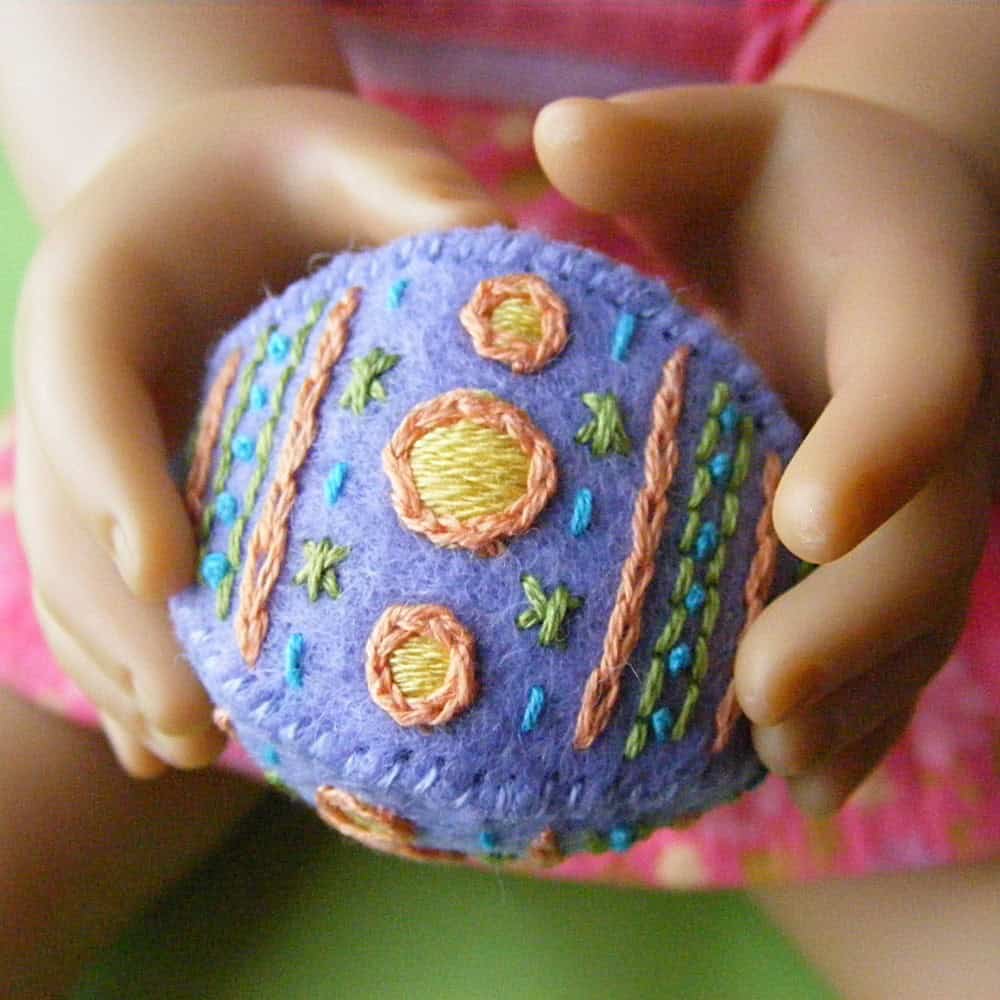
Now it’s time to make that fancy Easter egg.
You’ll need. . .
scraps of wool felt
matching embroidery thread
contrasting embroidery thread
small bit of fiberfill stuffing
Sulky Sticky Fabri-solvy
I used Periwinkle felt for the egg and matching thread DMC #156 to sew the pieces together.
Step 1
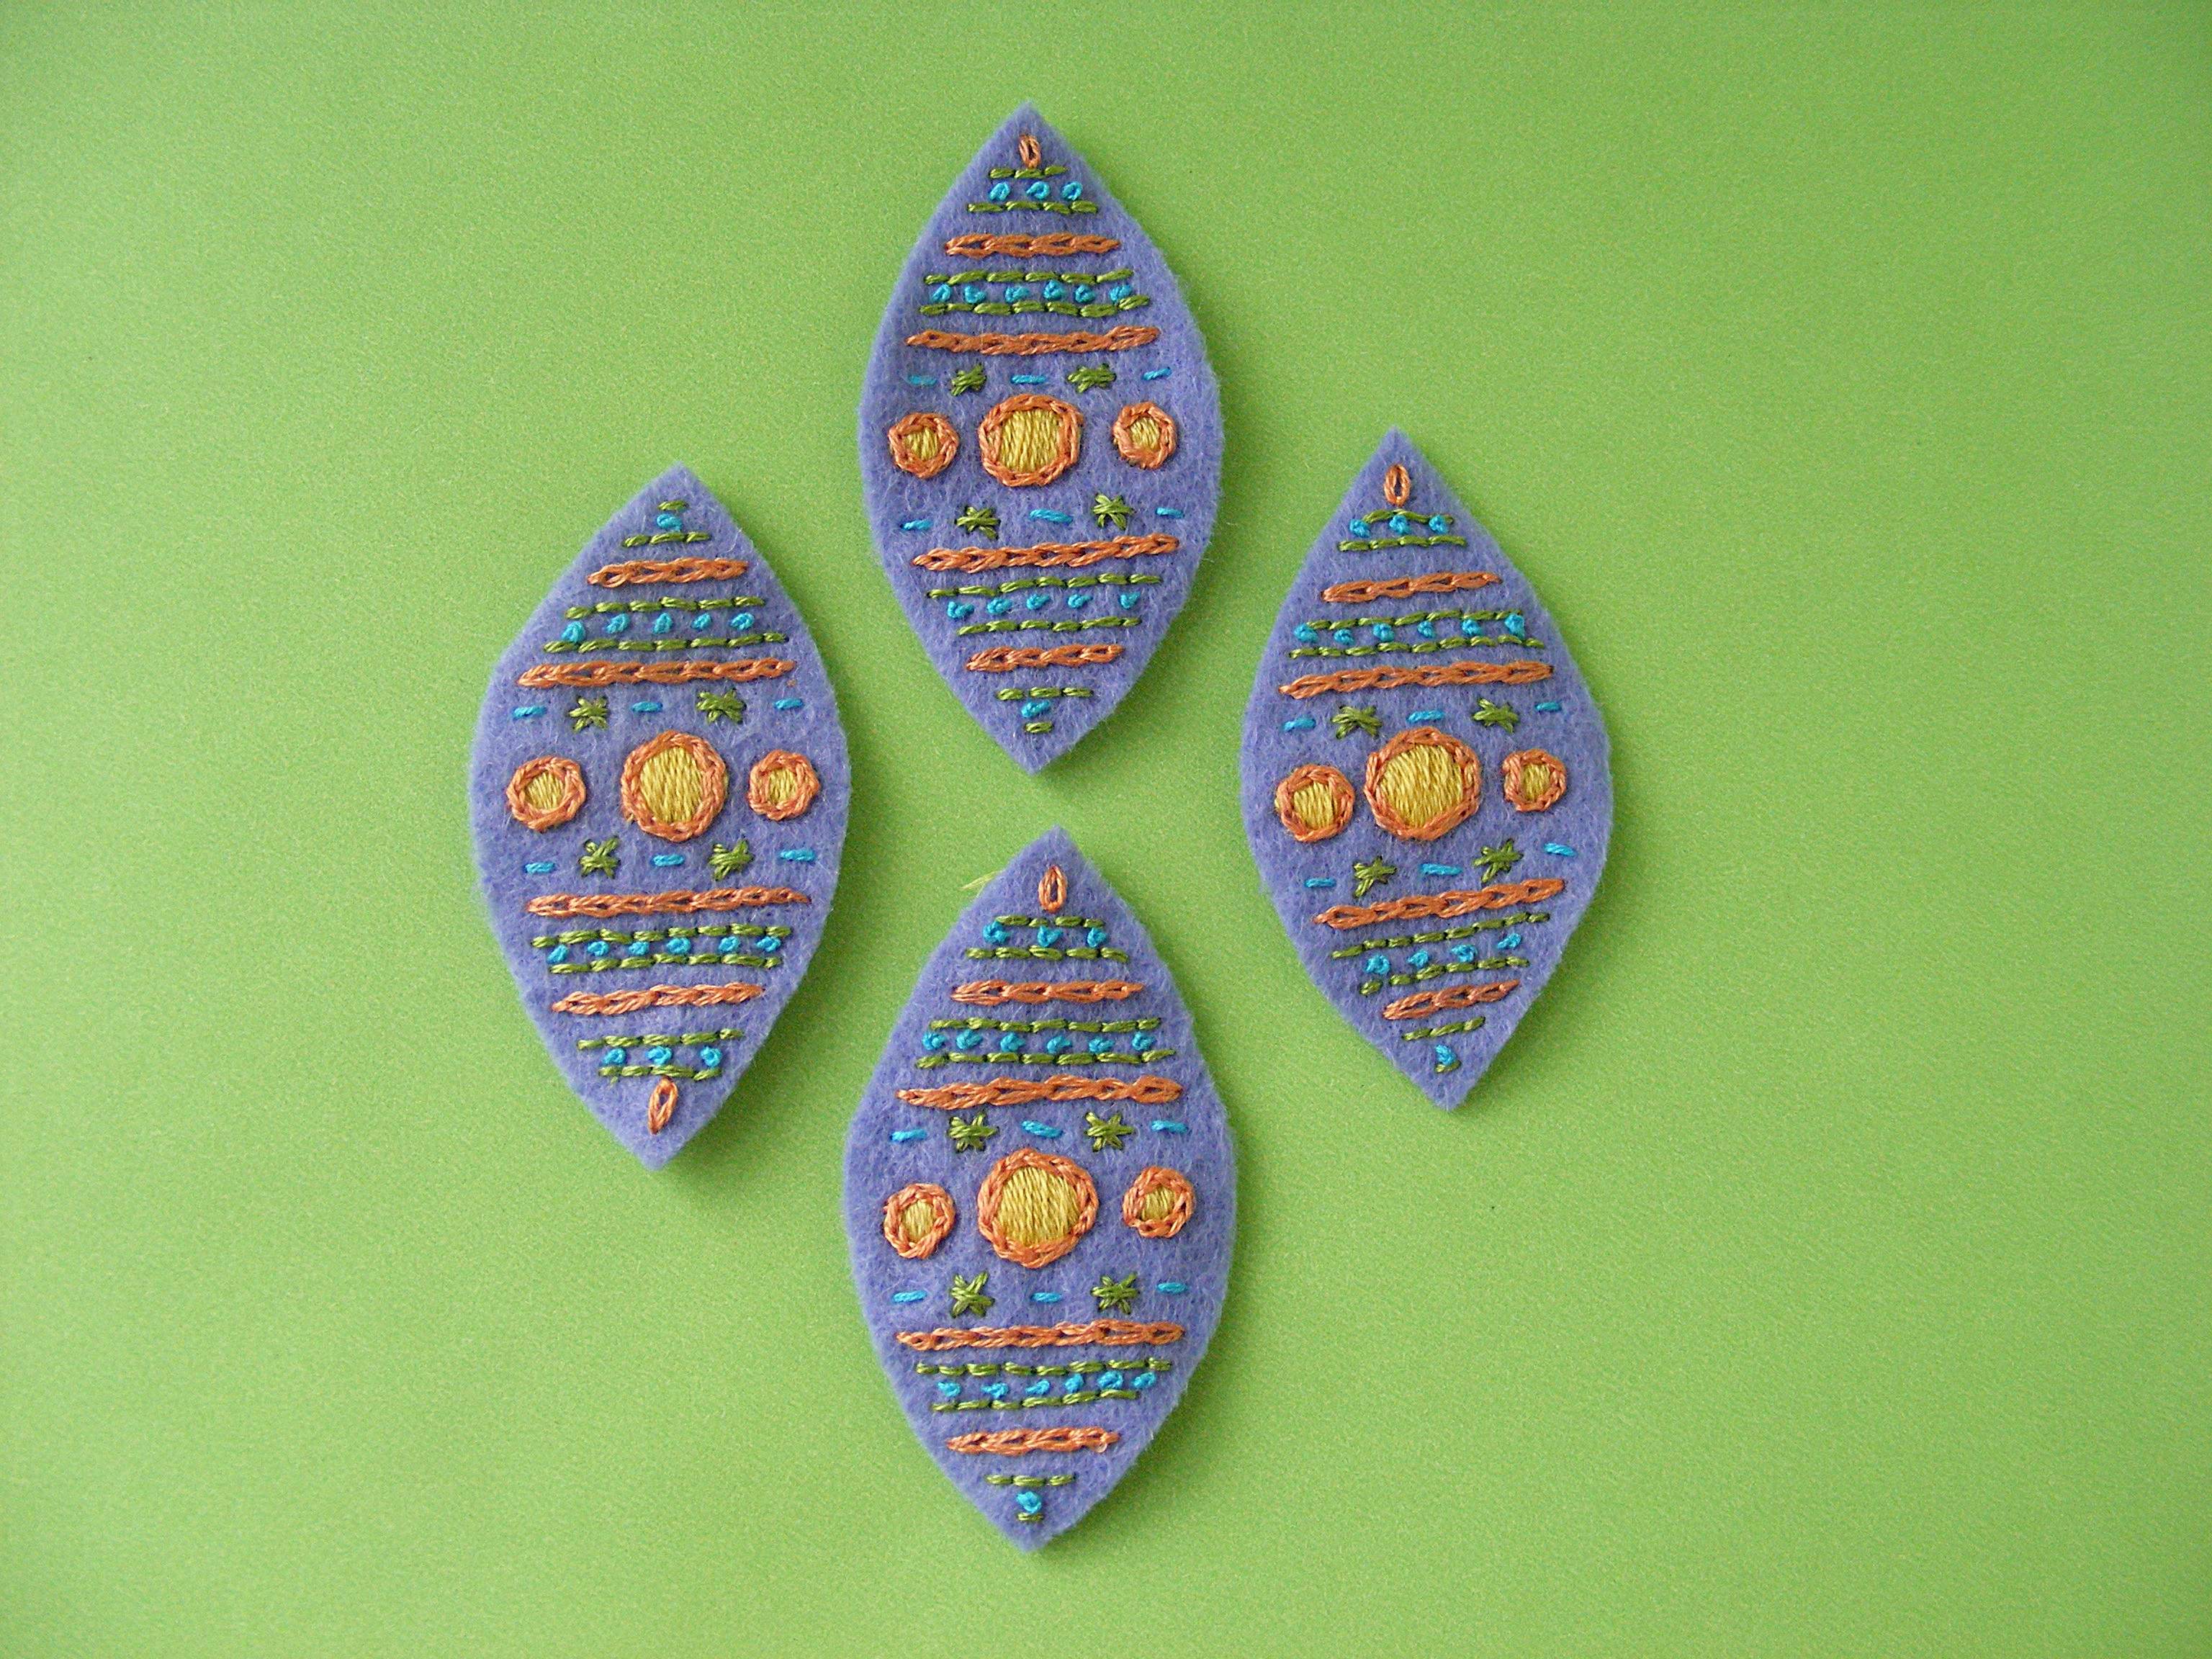
Trace or print the Easter egg pattern to some Sulky Sticky Fabri-solvy and stitch. You’ll be stitching right through the stabilizer AND the felt.
These are the thread colors (two strands throughout) and stitches I used - you should use whatever makes YOU happy. :-) All links go to video tutorials teaching the stitches.
Cut around the edges of the egg pieces, soak off the Sulky Sticky Fabri-solvy in cold water. I usually drop the pieces face down in a bowl of water, let them soak for 15 minutes or so (longer is just fine – I often forget about them and fish them out hours later) and then rinse off the soggy stabilizer under cold running water. If there are any stubborn bits, a quick hit with the kitchen sprayer usually does the trick.
Lay them out on a towel to dry. Don’t wring, twist, or even smoosh them. Just let them dry.
Step 3
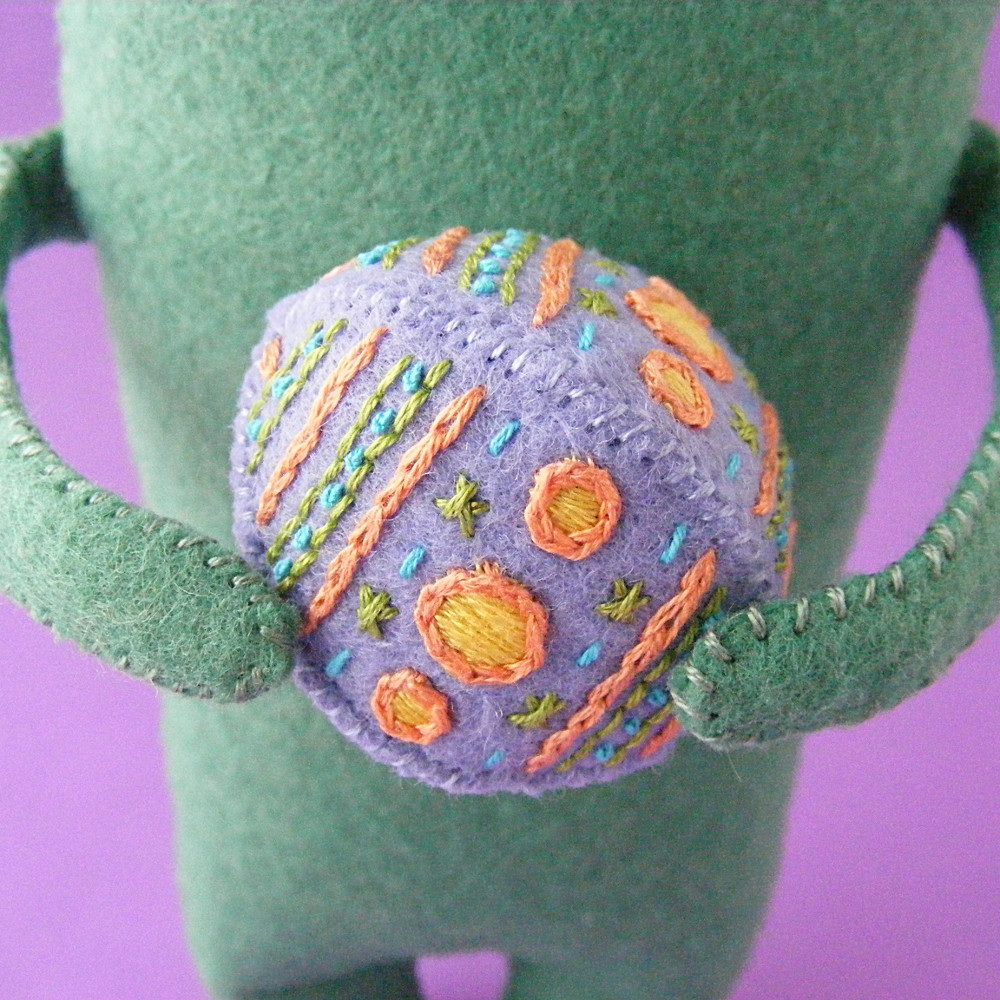
Whipstitch all the pieces together. I like to sew two pieces together, then sew two more pieces together, then join the pairs as the final step.
I made the design slightly different at the top and bottom so you could easily tell them apart. 🙂 Make sure all the single French knots are together at the bottom of the egg and the single lazy daisies are together at the top.
Done!
Even if you don’t play with dolls, it would be so pretty to make up a little basket and fill it with some of these tiny stitched eggs. 🙂
Happy stitching!
Play with some felt! Try the Oddballs – a fun pattern for silly monsters.
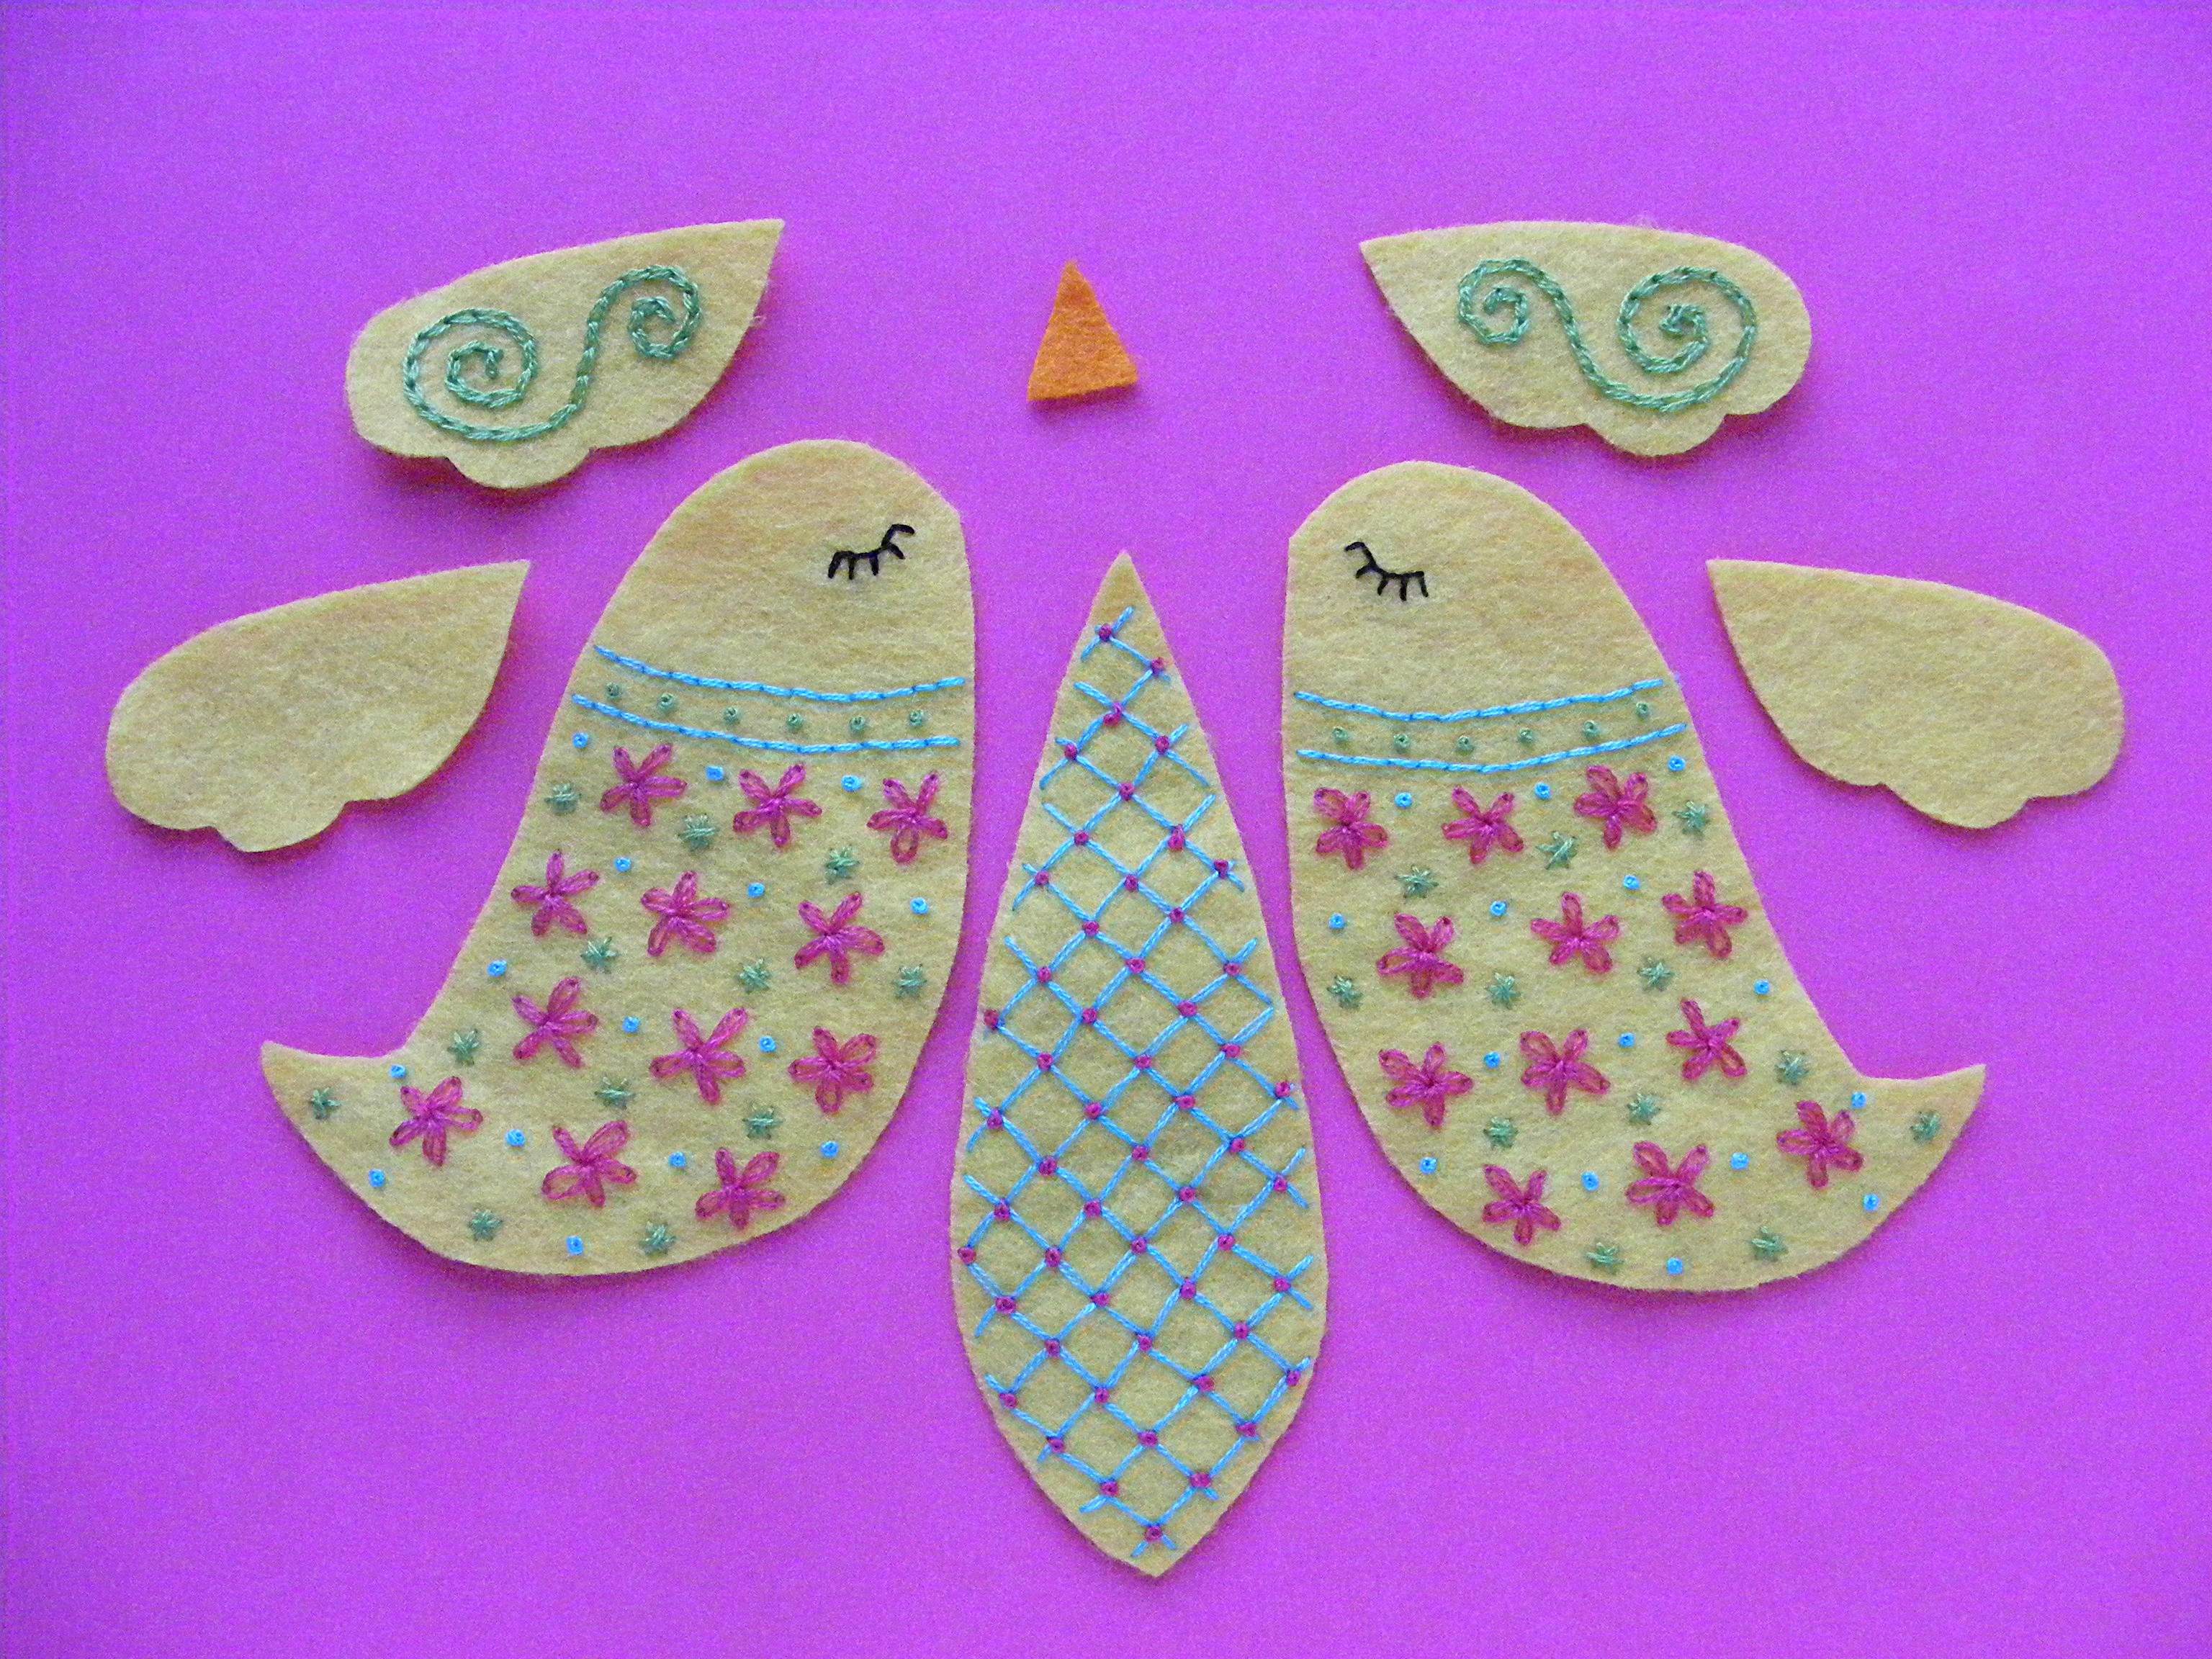
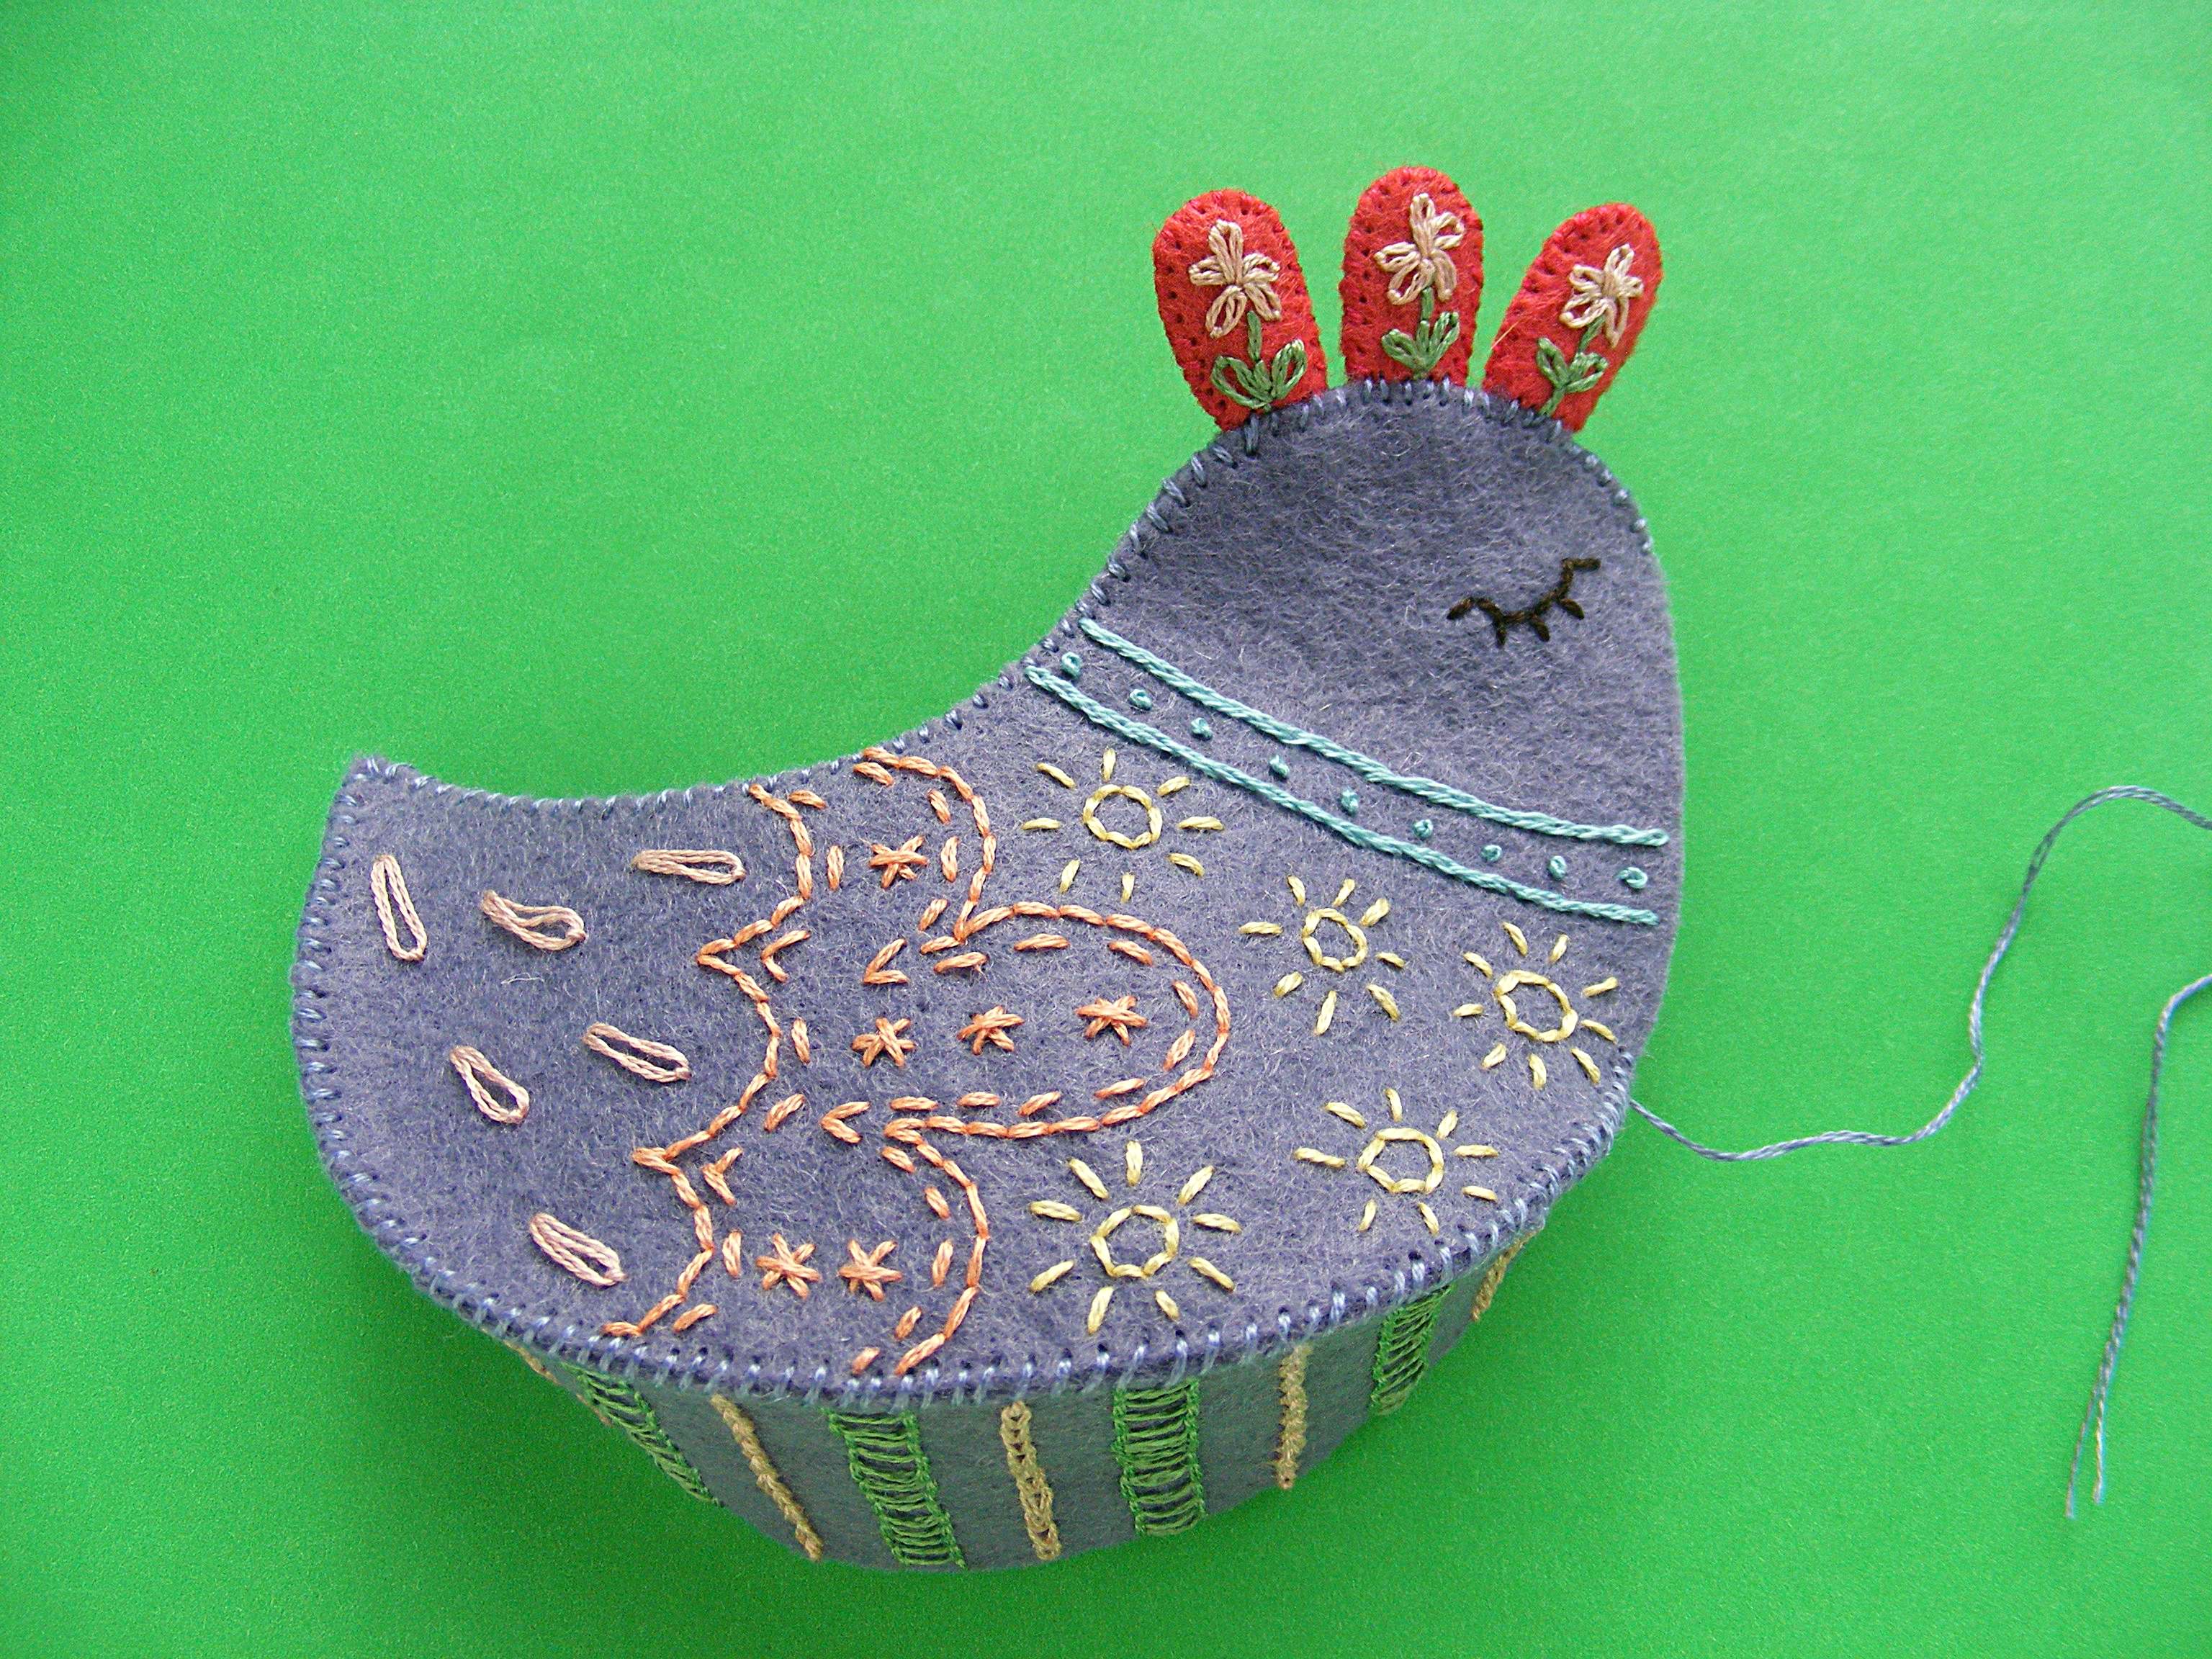
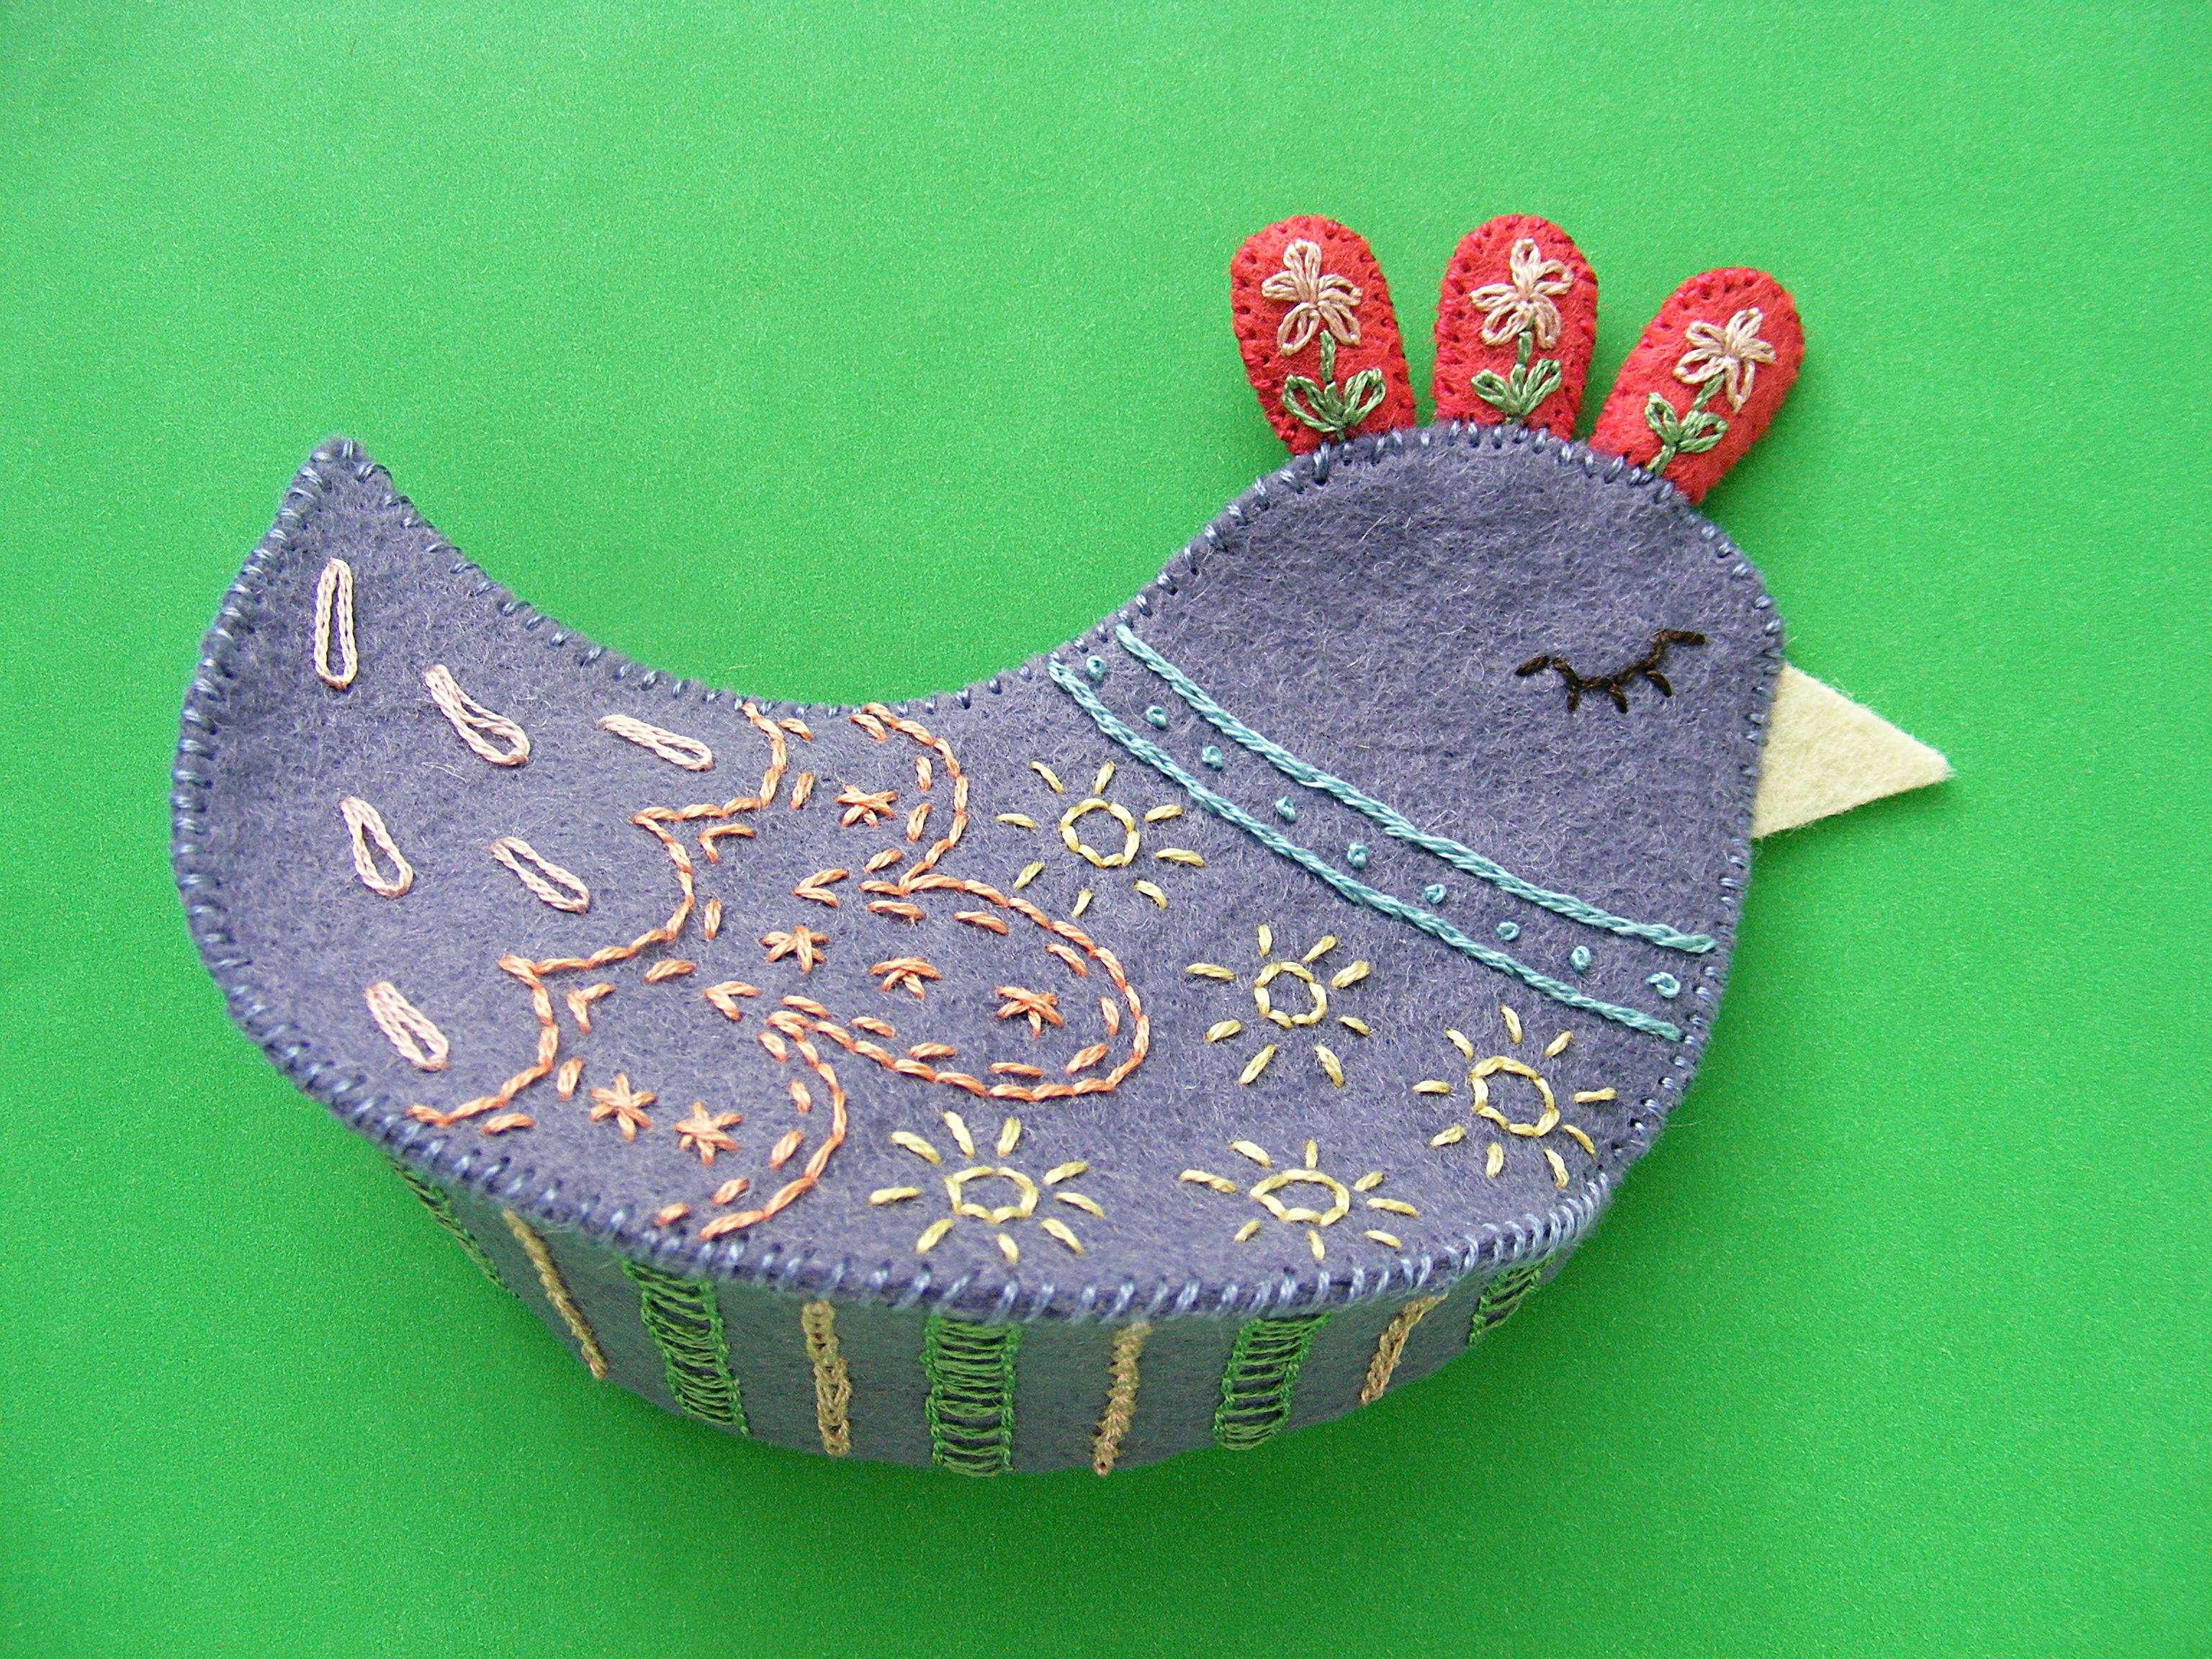
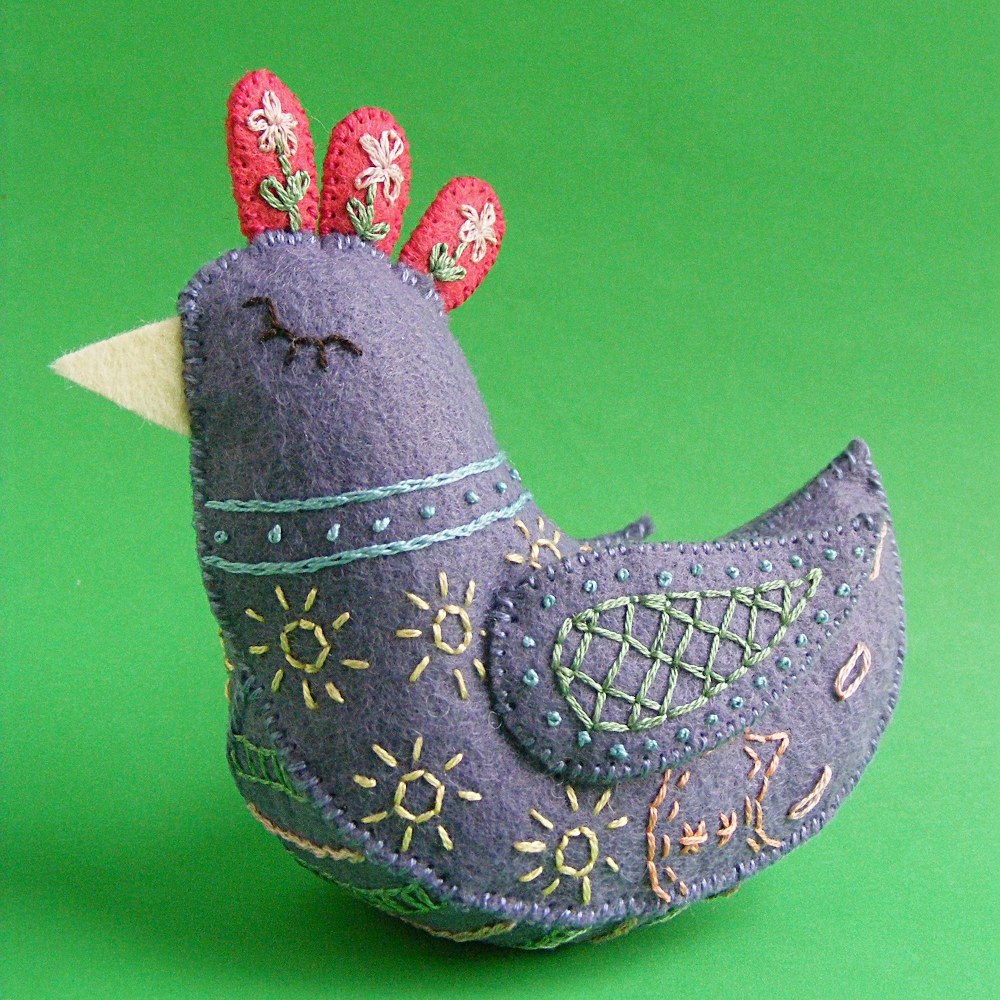
Here’s a free felt bird pattern for you to play with! Her name is Daisy. 🙂
Want to make her? All it takes is some felt, a bit of stuffing, and a few easy embroidery stitches. And a pattern, of course. 🙂
She uses just half a sheet of wool-blend felt for the body (I used purple sage, but it’s since been discontinued), a few small scraps for the beak and comb (I used strawberry dream and straw), and embroidery thread in your favorite colors.
You can find links to sources for all my favorite supplies here.
Comb - lazy daisy for the flower with DMC #152 and the leaves with DMC #320. Backstitch the stem with DMC #320.
Step 3
Cut out each piece carefully on the lines. Be sure not to cut into any of your stitching!
Soak the pieces in cool water to remove the stabilizer. I like to soak them for about an hour, then rinse off the mushy stabilizer under cool running water. Use a kitchen sprayer to get off any stubborn bits. Let them dry flat on a towel. Don’t wring them out - just lay them on a towel dripping wet. They’ll dry overnight.
From here on all the sewing is whipstitch around the edges of the felt. I used two strands of floss for all whipstitching. DMC #326 matches the strawberry dream felt I used for the comb, and DMC #161 matches the purple sage I used for the body.
Step 4
Put comb pieces together, right sides facing out, and stitch all the way around the edge. You’ll end up with three comb pieces.
Step 5
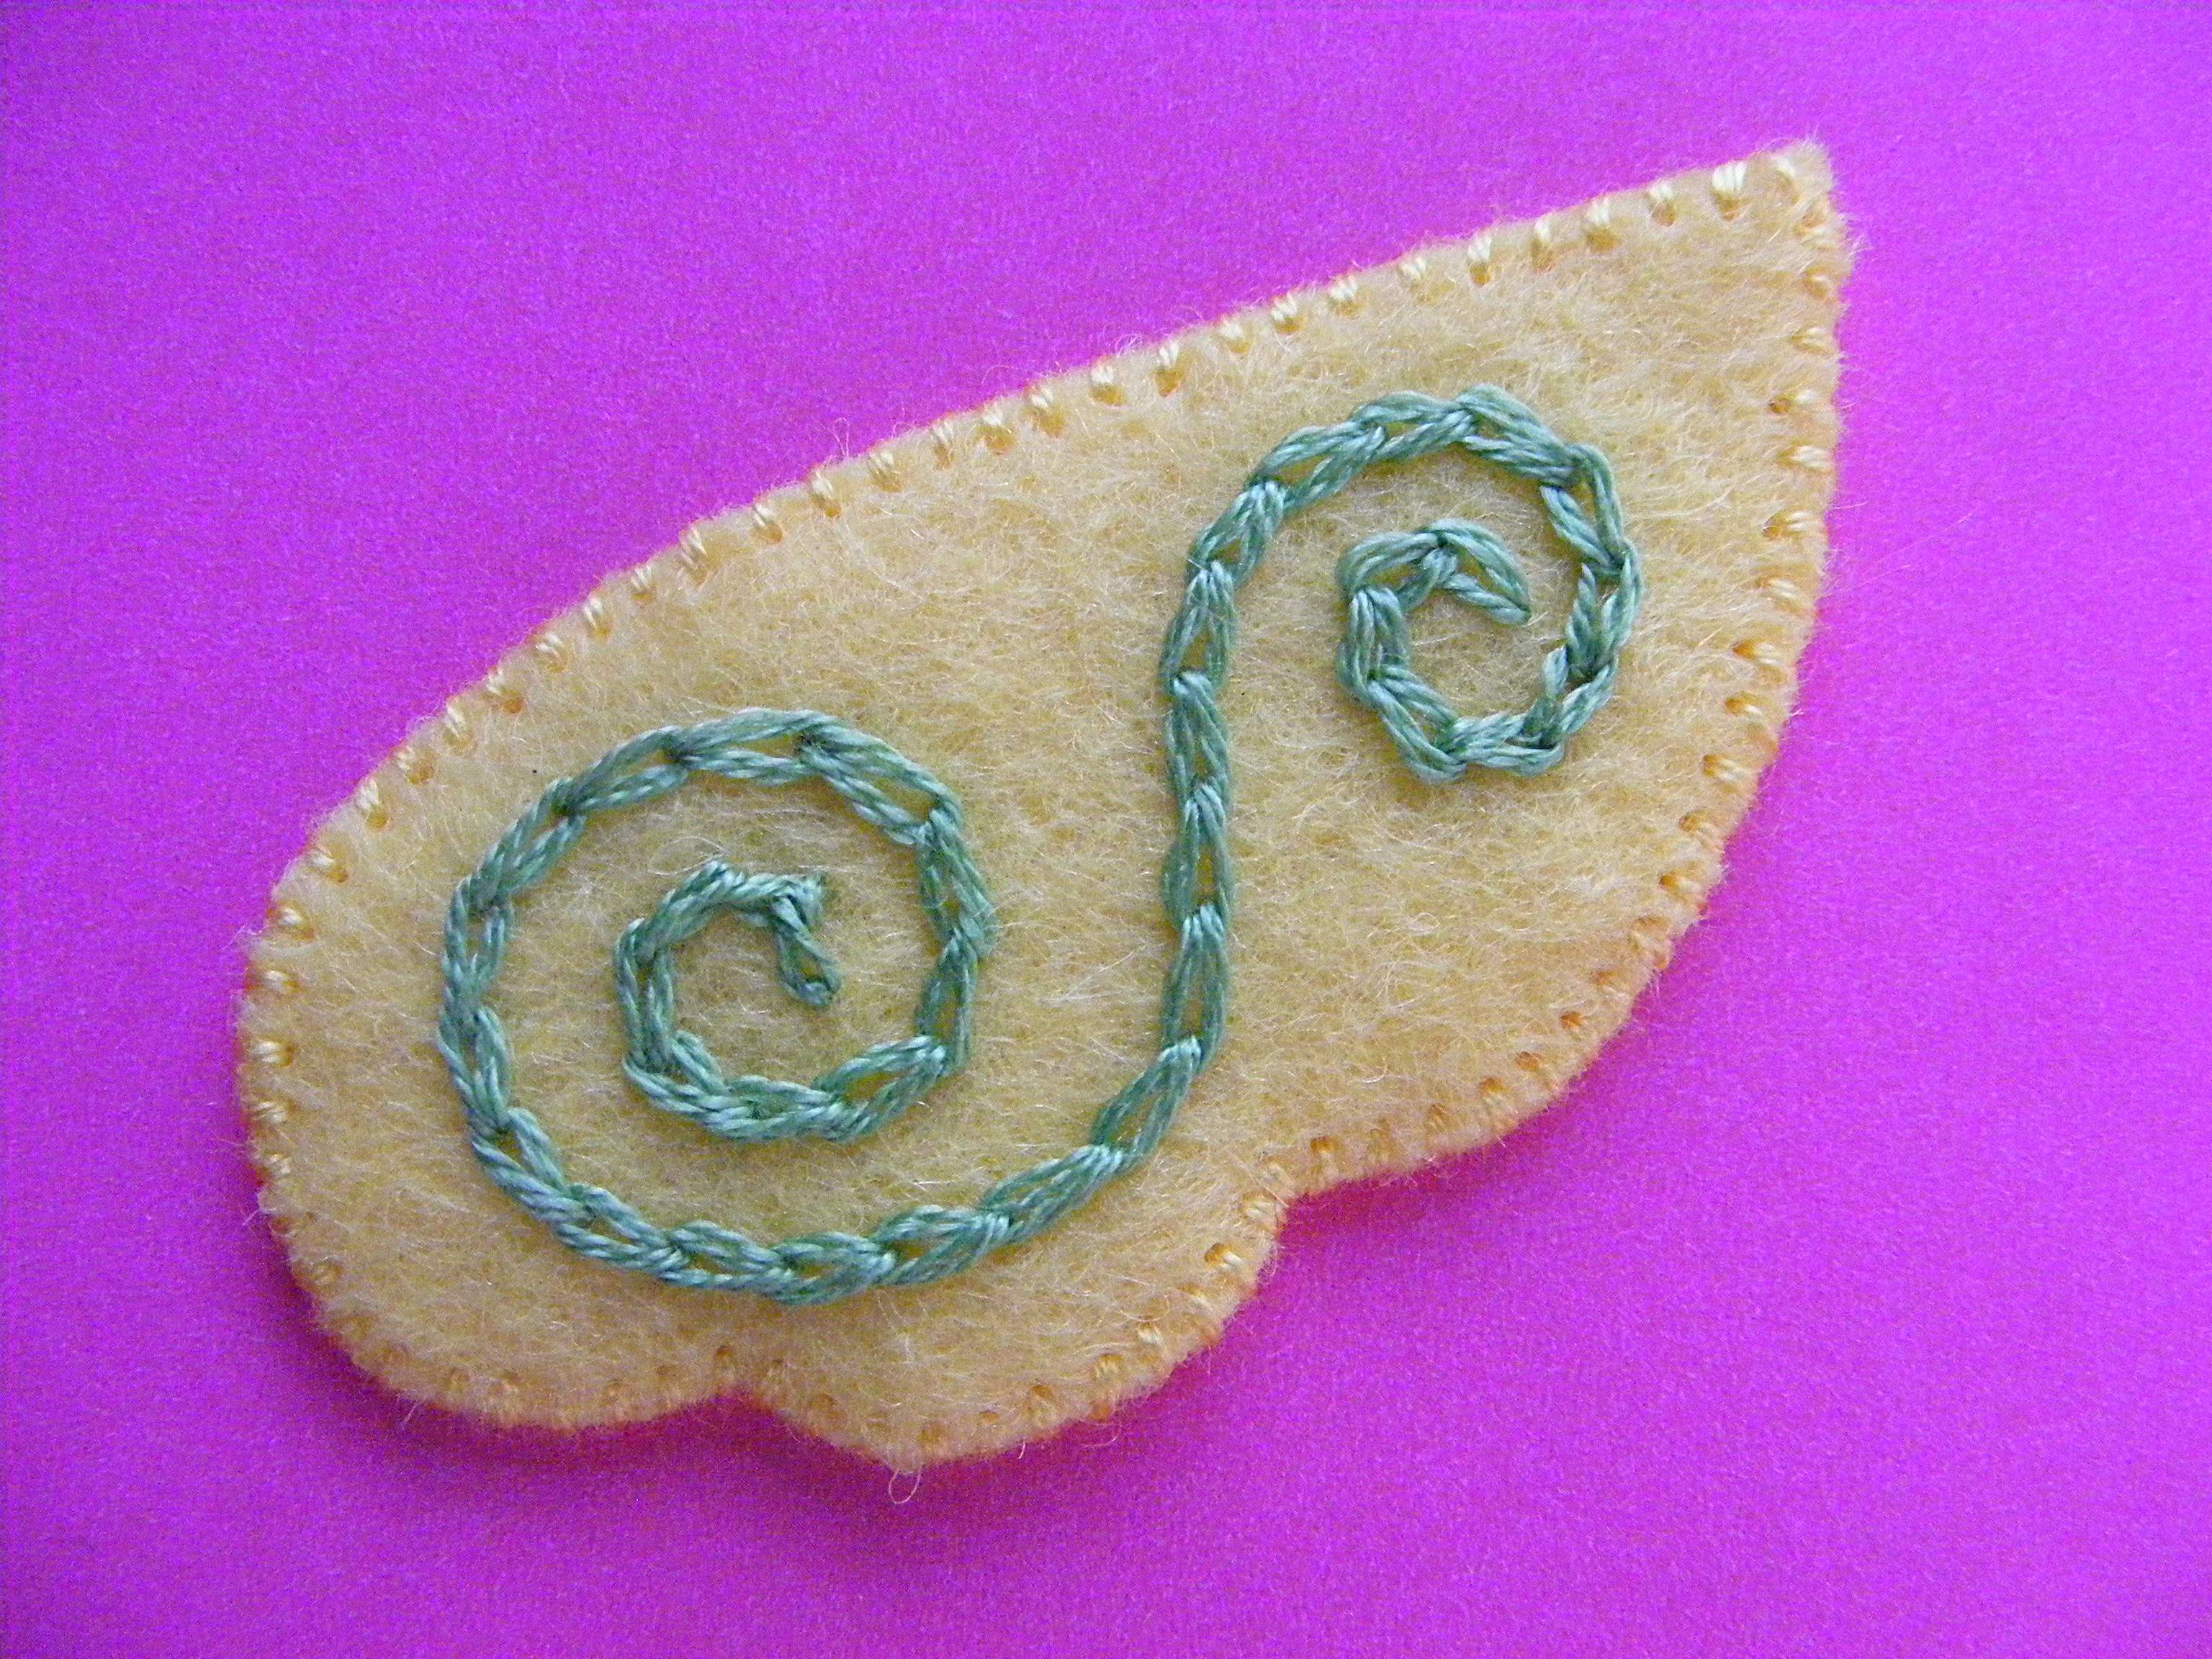
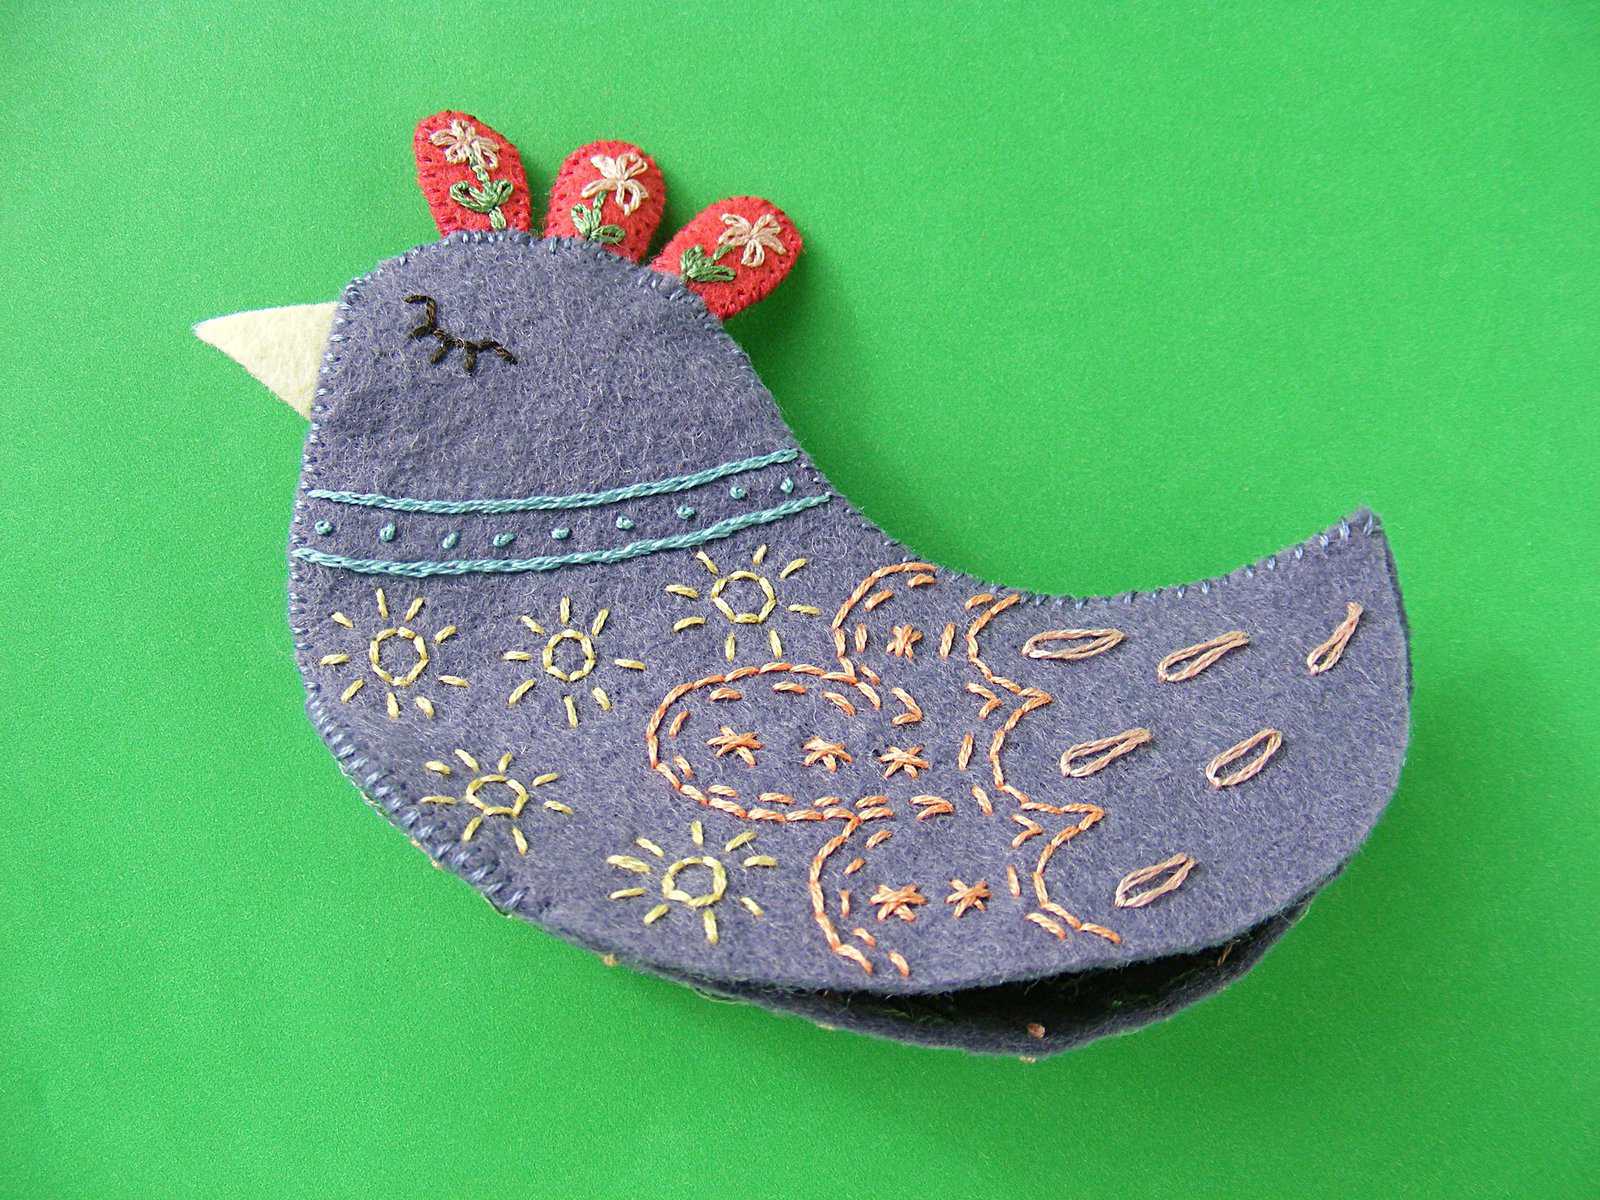
Repeat Step 3 for the wings, pairing one embroidered wing with one blank wing.
The blank sides of the wings will go up against the bird’s body where you can’t see them.
Step 6
Place the two body pieces right sides facing out, with the comb pieces sandwiched between the layers. Stitch the body pieces together along the top edge of the body. Stop when you get to the tip of the tail, but don’t tie off your thread.
When you get to the tip of the tail, slip the belly piece into place. The narrow end is the tail, and the wider end is the breast.
Stitch one body piece to one side of the belly piece. When you get to the front, stop stitching, but don’t tie off your thread.
Step 8
Go back to stitching the two body pieces together, this time stitching up the front of the face.
Slip the beak in between the two layers, right up at the top of the face, and stitch through it as you go.
Tie off your thread when you get to the top of the face.
Step 9
Flip the bird over.
Start a new piece of thread and stitch the free side of the body to the free side of the belly, starting at the front tip of the belly.
Stitch for a few inches, then tie off your thread.
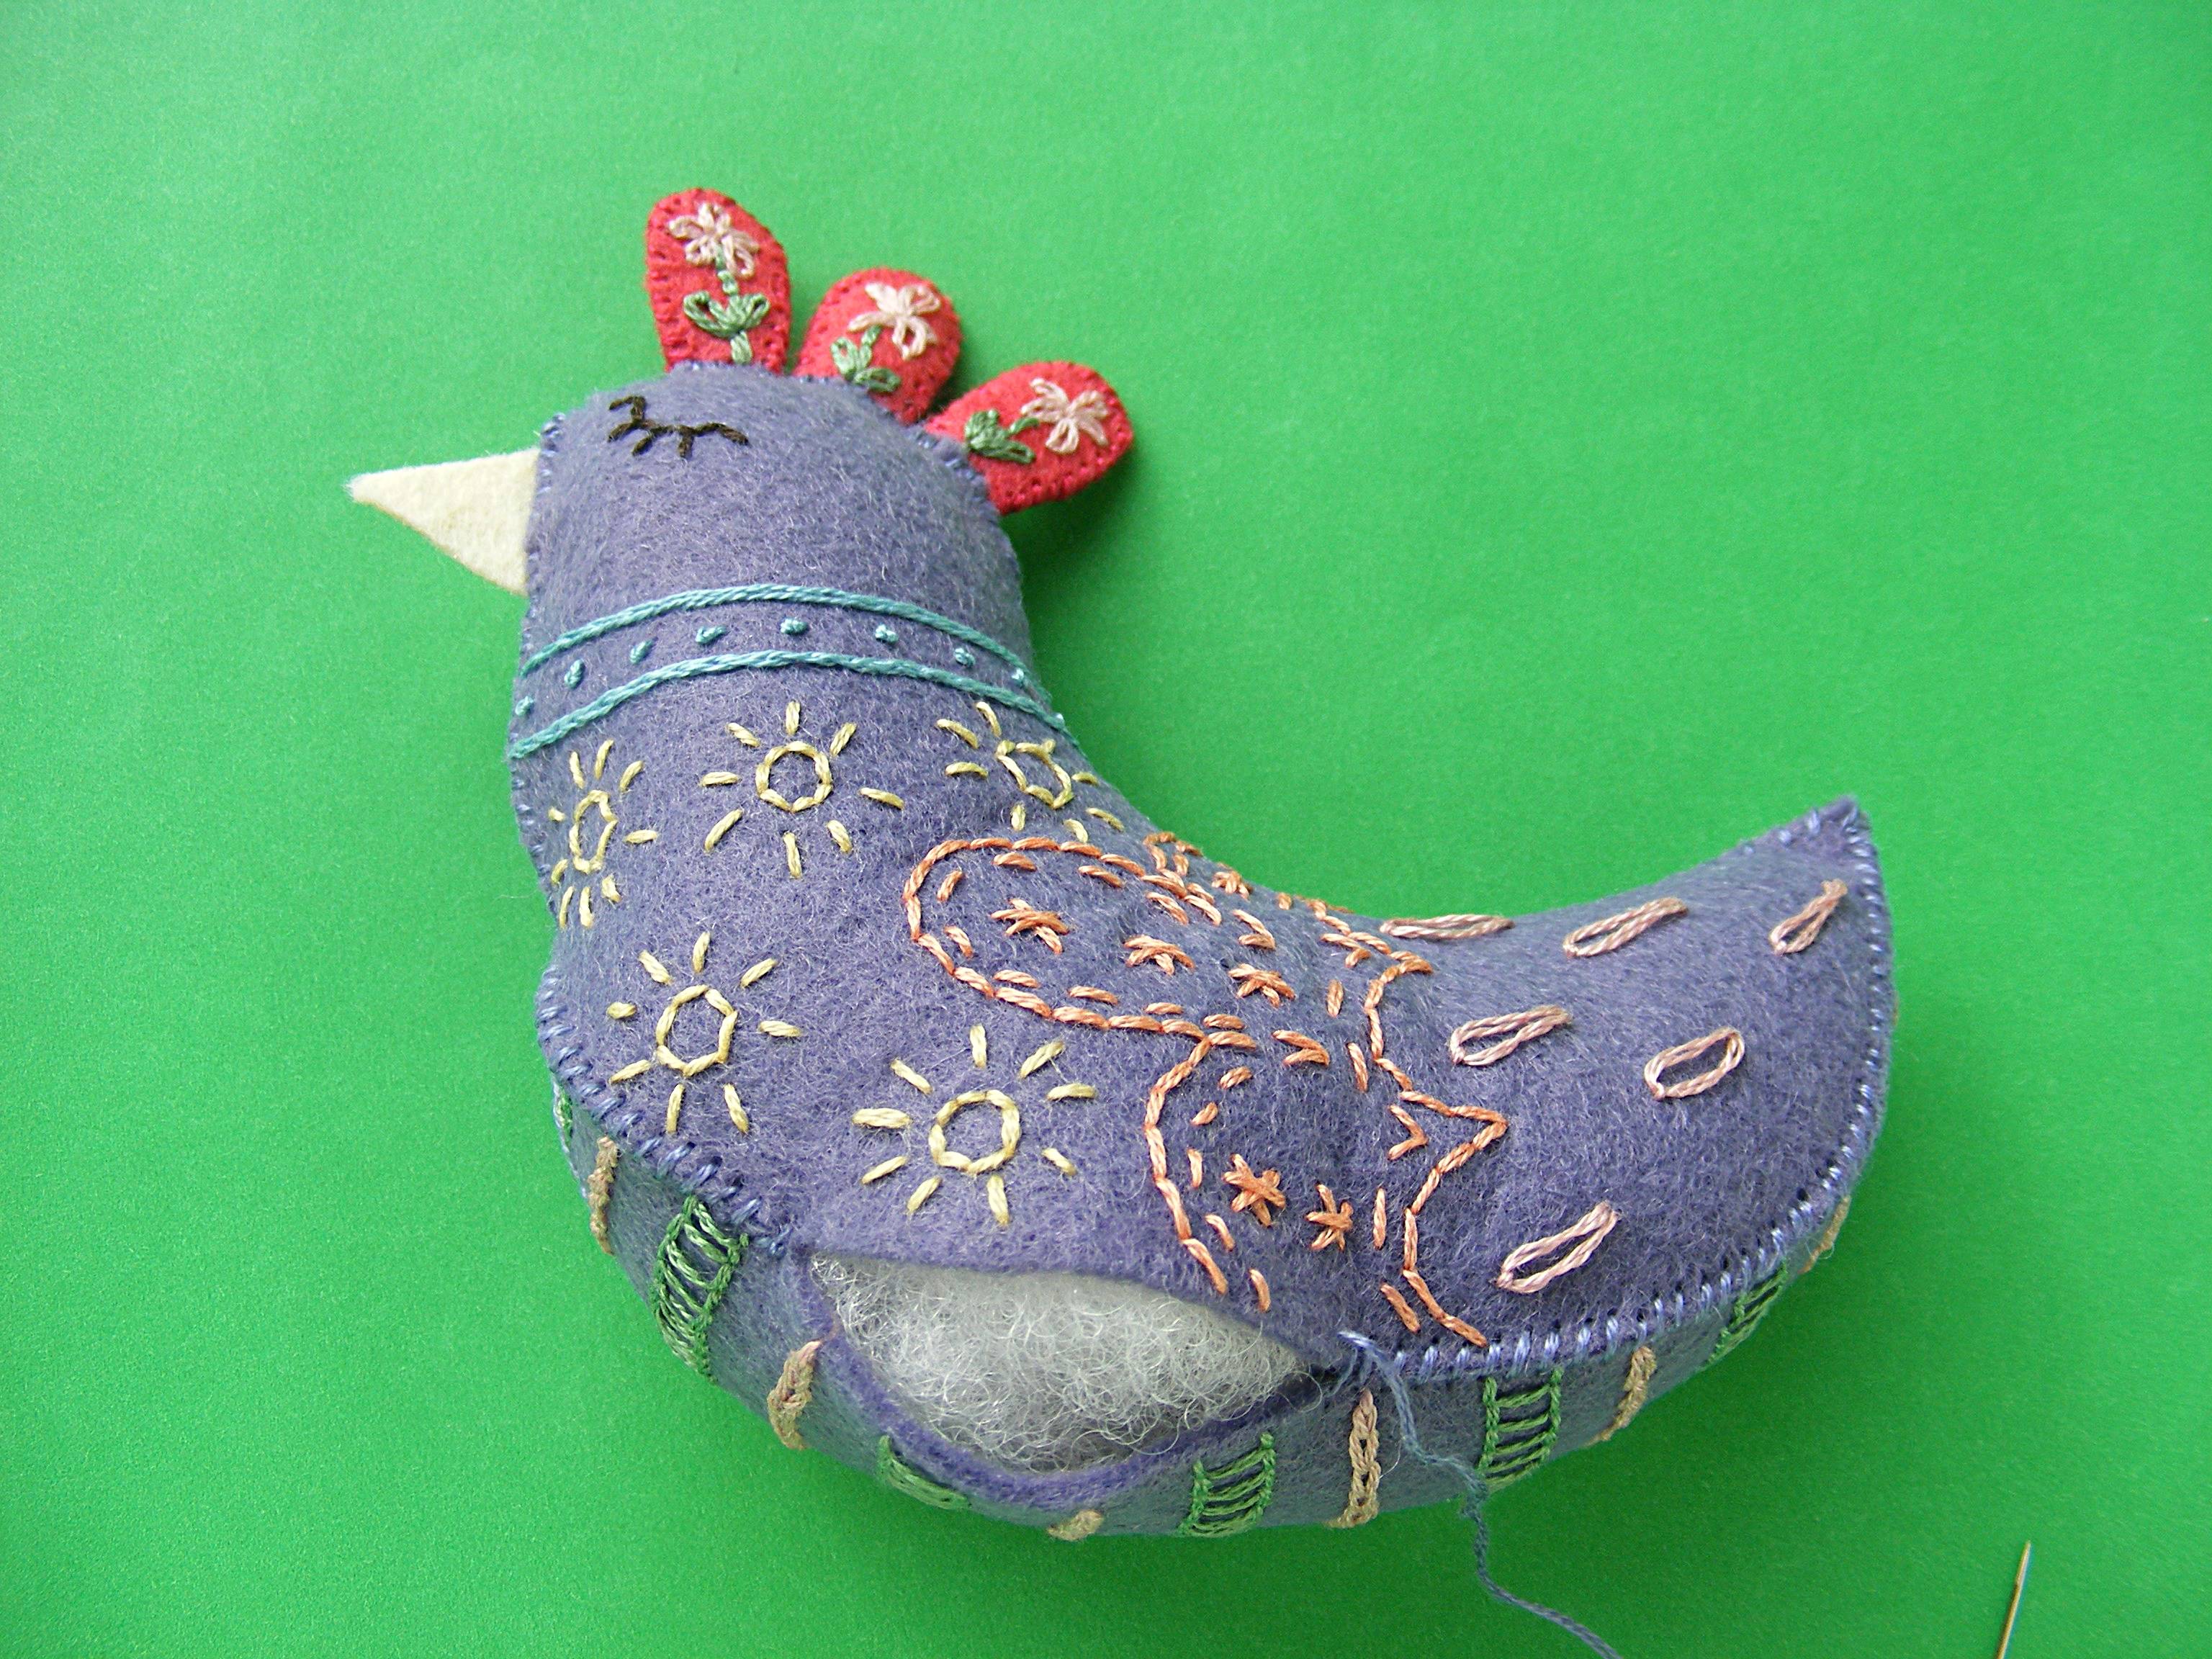
Step 10
With a new piece of thread, stitch the rest of the body closed from the tail to the other side of the stuffing opening you started in Step 9.
Stuff the body neatly. You can add plastic pellets if you like, for weight, but this shape doesn’t need it for balance.
Step 11
Sew up the rest of the stuffing opening.
Now she’s just waiting for wings!
Thread a long needle and knot the end. Start sewing underneath one wing, near the front. Sew through the body and out the other side, through the opposing wing. Take a small stitch back into the wing, through the body and out through the first wing. Stitch back and forth like this a few times to secure the wings. Don’t pull the thread too tight or you’ll distort the shape of her body. Knot your thread underneath one wing and bury the tail.
Done!
Isn’t she a beauty? I think this design would also be very pretty stitched up with a single color thread on a single color felt. White thread on this purple sage would be lovely! You’ll just have to make another. :)
Update – I decided to stitch up a new version of Daisy with different colors. Look how pretty she is in this cream felt! (It’s actually called straw.)
Since she’s all hand-sewn, this free felt bird pattern is a great portable summer project. Take Daisy to the beach, to the pool, camping, on long car trips – you get the idea. 🙂
Happy stitching!
Play with some felt! Try the Oddballs – a fun pattern for silly monsters.
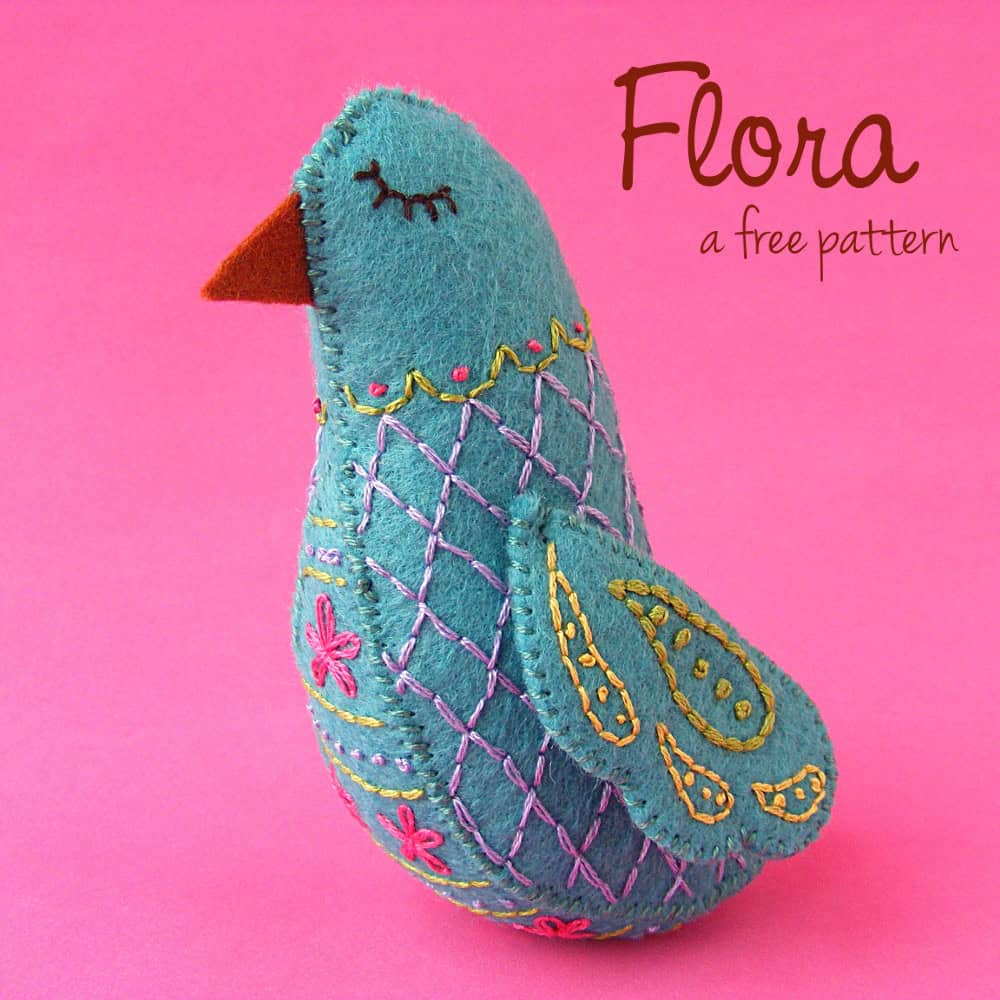
This little felt bird was such a delight to make! Seriously – I loved every minute of it. I want to make a whole flock of them in rainbow colors! And now you can make her too.
Flora is all hand sewn from wool blend felt and colorful embroidery thread, making her an easy, portable project, perfect for carrying around in your purse.
Transfer the pattern to the felt. When I discovered Sulky Sticky Fabri-solvy it changed my life. I made a video showing how awesome it is here. I call it The Magical Embroidery Stuff and I use it for everything. Here I’ve printed the pattern directly onto the Sulky Sticky Fabric-solvy, roughly cut around each piece, and stuck it to my felt.
Step 2 Stitch the design. I used two strands of embroidery thread and the following stitches: backstitch for all lines, French knots for all dots, lazy daisy stitch for the flowers. (Those links all go to video tutorials for each stitch.)
Stitch right through the stabilizer and the felt.
Step 3 Cut out the shapes.
Step 4 Soak off the stabilizer and let the pieces dry.
I lay the pieces face down in a bowl of cold water and just let them sit there for about an hour. Longer is fine – I’ve forgotten mine and let them soak overnight with no problem. The soaking will make the stabilizer all mushy and soft. Rinse it off under cold water. Use a kitchen sprayer if needed to get off any stubborn bits, but try not to rub the surface of the felt. Lay them out on a towel to dry. Don’t wring them, twist them or even smoosh them – just lay them dripping wet on the towel and leave them alone.
Step 8 Sew up the back, starting at the tip of the tail. Stop sewing about halfway up the back and stuff the tail. Mix a few large nuts (from the hardware store) into the stuffing to weight her bottom, otherwise she’ll tend to tip forward. Sew up a bit higher on her back and stuff in more stuffing. Finish sewing and stuffing until she’s nice and plump, and all sewn up.
Step 9 Pin the wings in place, one on each side of the body.
Use the grid pattern you embroidered to line them up exactly. Thread a long needle and knot the end. Starting sewing underneath one wing, near the top. Sew through the body and out the other side, through the opposing wing. Take a small stitch back into the wing, through the body and out through the first wing. Stitch back and forth like this a few times to secure the wings. Don’t pull the thread too tight or you’ll distort the shape of her body. Knot your thread underneath one wing and bury the tail.
She’s finished! don’t you want to sew a whole flock of these beauties?
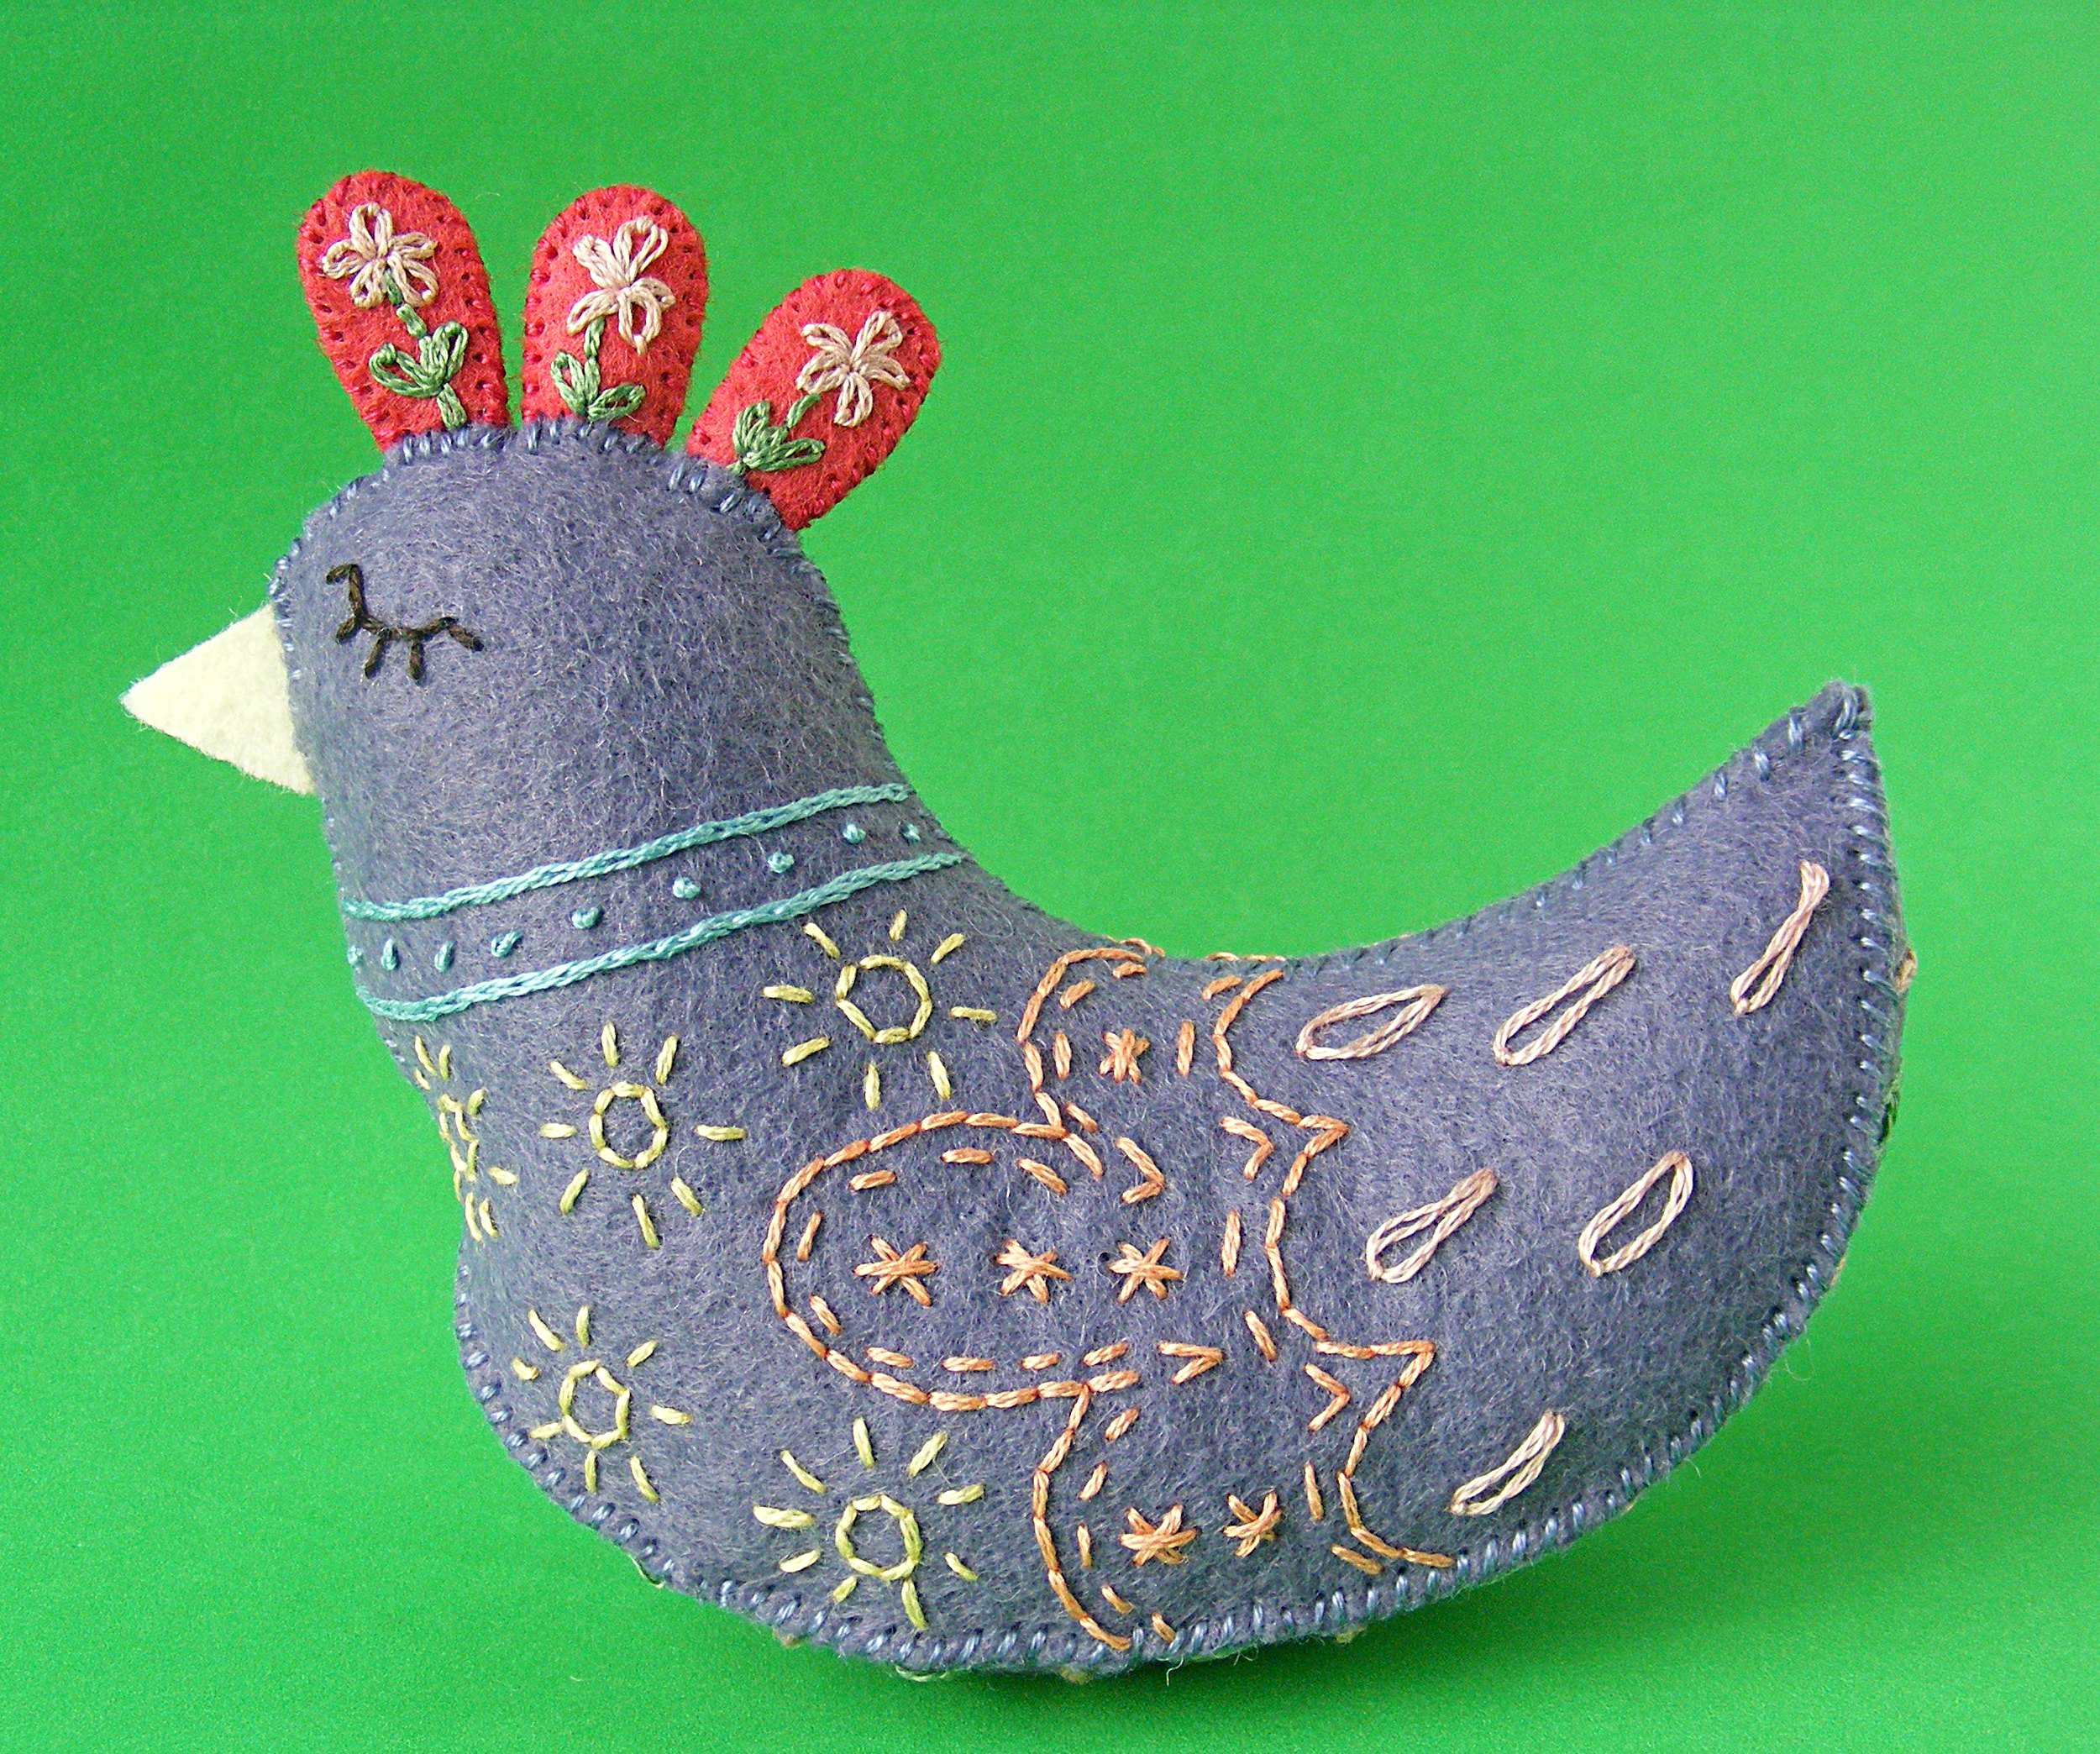
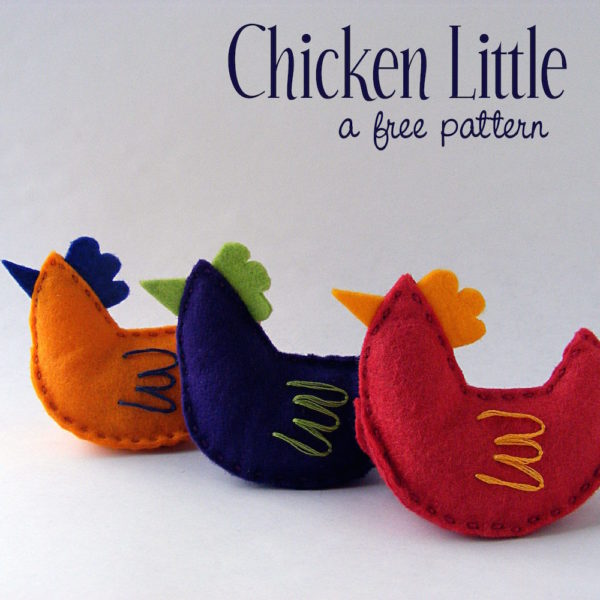
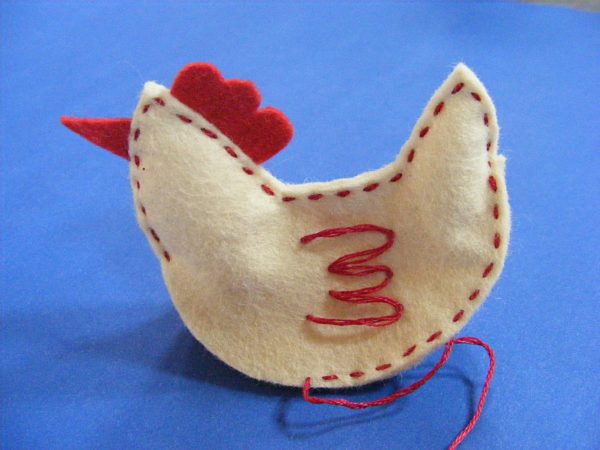
Make a sweet little softie with this free felt chicken pattern.
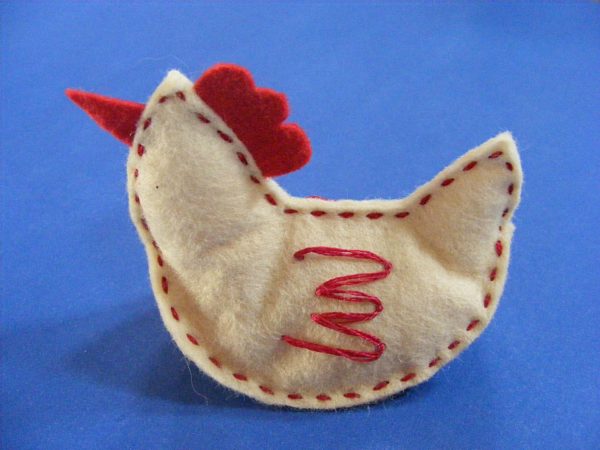
These simple little hens can be so many things!
Fill them with heavy aquarium gravel and you have some pretty dang fancy pattern weights.
Fill them with lightweight Poly-fil Stuffing and add a loop to the back and you have a pretty ornament for your tree.
Fill them with plastic pellets and you have a pocket-sized softie that sits in the palm of your hand.
These felt chickens are hand-sewn from scraps and a bit of embroidery thread and take about an hour to make. Want a little quiet handwork for couch-potato time? This is the perfect project. And it’s FREE!
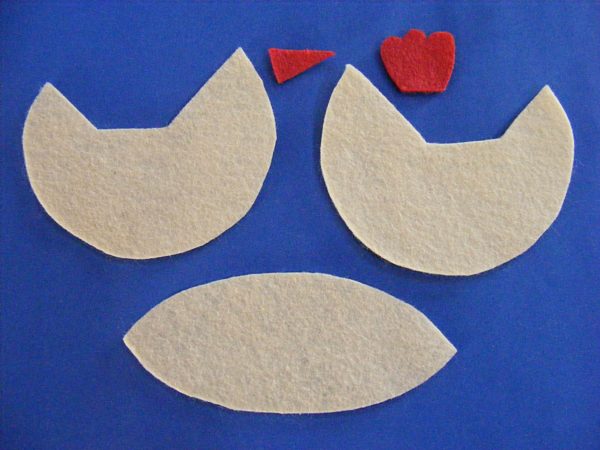
Cut out all the pieces. I don’t like to trace onto felt, because I don’t want even a tiny bit of that marking line to show on the finished piece. I trace or print my pattern pieces onto freezer paper, cut them out roughly, fuse them to the felt, and then cut around the edge.
It’s a nice way to cut clean, precise shapes.
Step 2
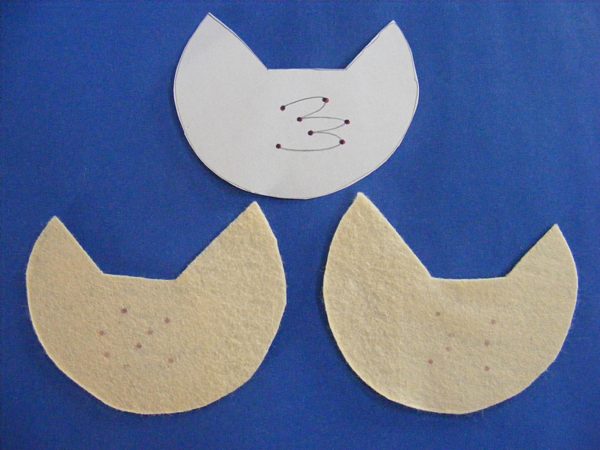
You’ll need two body pieces, one gusset, one beak, and one comb.
Step 3
Transfer the dots you’ll use as guidelines for stitching the wings.
I don’t like to draw the whole wing shape because the thread of my Ustitches might not sit right on that line, so I just mark the dots where each stitch will start, stop, and be tacked down.
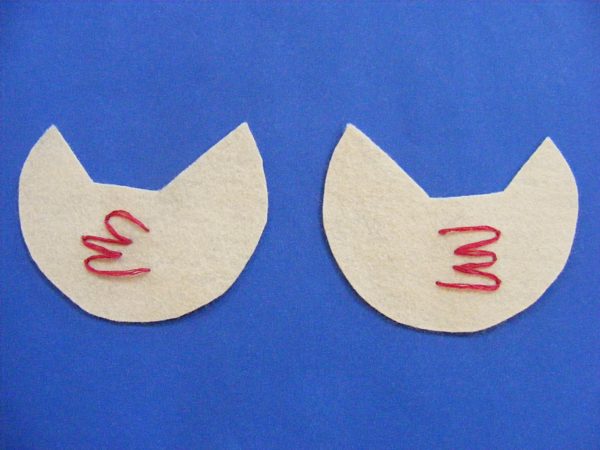
Step 4
Stitch the wings in a contrasting color (I like to match the beak and comb color) using the U-stitchand four strands of embroidery thread.
If you want really precise lines you can use backstitch, split stitch, or stem stitch, but the tight curves at the tips of the wings won’t be loads of fun in any of those stitches.
Step 5
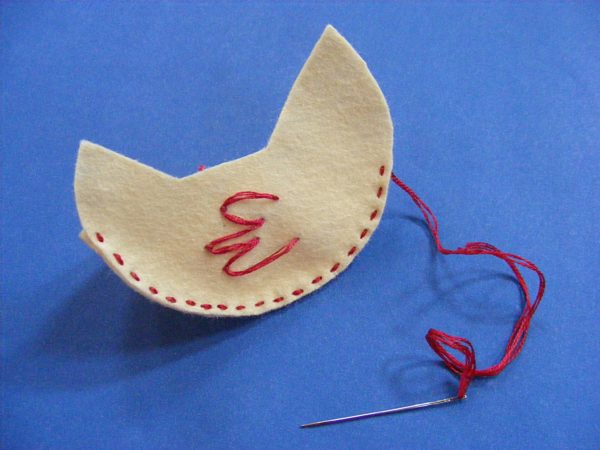
Lay the gusset along the bottom edge of one of the body pieces and stitch the two layers together using a running stitch and four strands of thread. If you use 36 inches of thread you’ll have enough to sew the whole hen without having to knot off and start a new thread. Sneaky. :)
I would normally use thread that matches
the chicken body. I used contrasting here
just so you could see it better.
You could use whipstitch instead of running stitch - choose the look you like.
Step 6
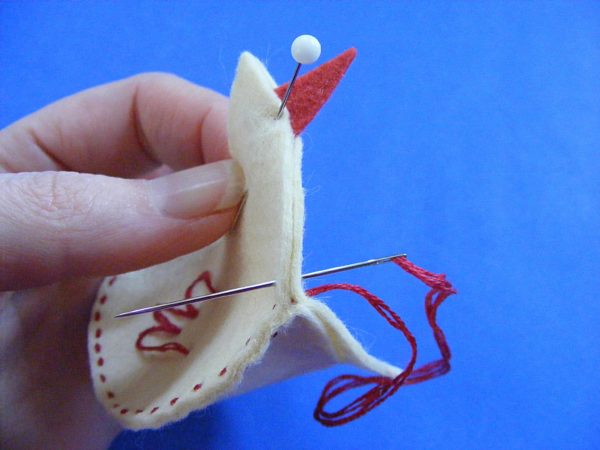
When you get to the end of the gusset piece, layer the second body piece with the first one.
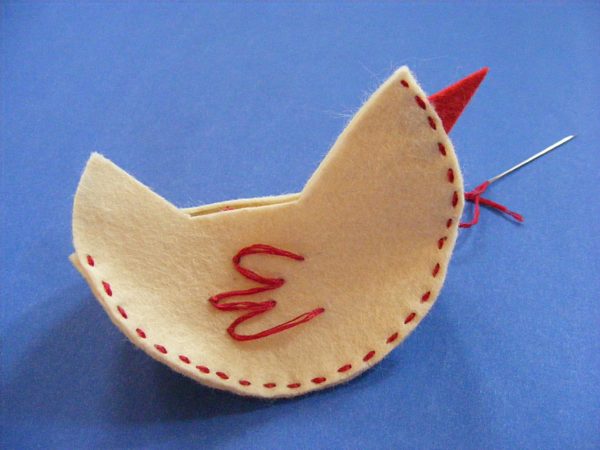
Pin the beak between the two layers and start stitching your way up the front of the hen’s face.
Step 7
Stitch up to the top of the hen’s head.
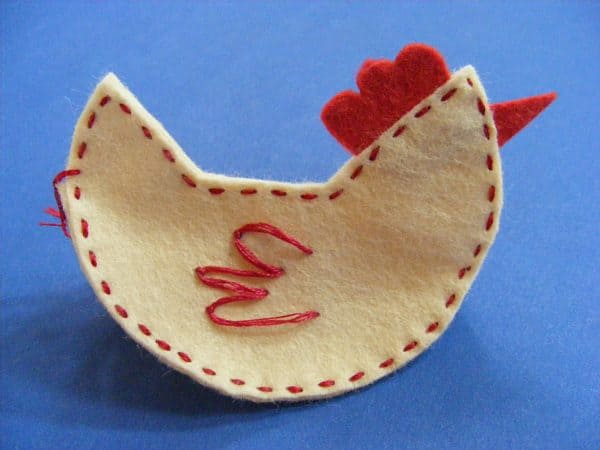
Step 8
Slip the comb in between the two layers at the back of the head and stitch the rest of the way across the top of the body.
A little felt chicken – all finished. Right? It looks like it’s done, doesn’t it?
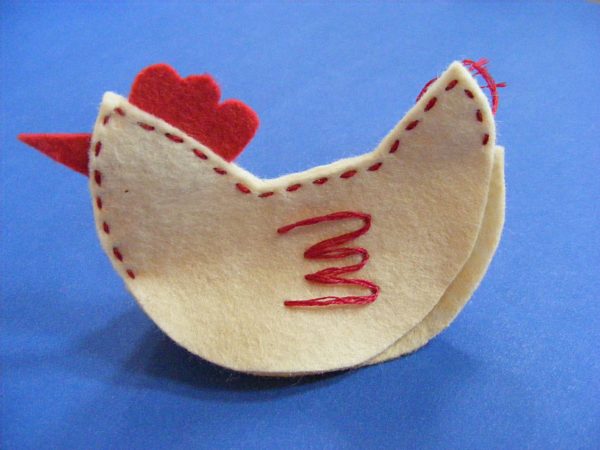
Step 9
Not quite. Turn it around and you can see that you still need to sew the bottom part of the other side of the body.
Line up the body edge with the gusset edge and keep stitching.
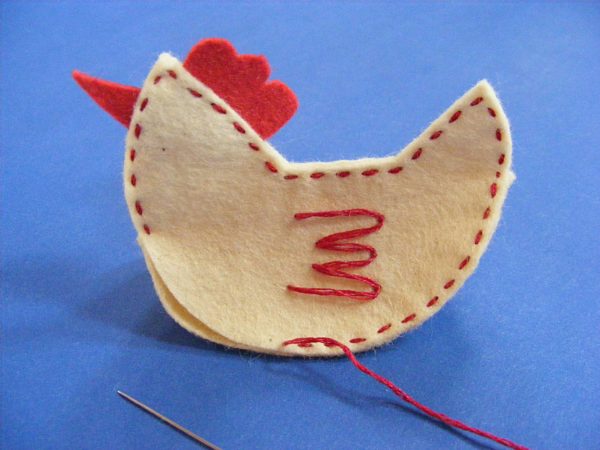
Step 10
Sew most of the way along the bottom edge.
When the opening is just big enough to slip your thumb inside, stop stitching but leave your thread tail there. I even leave it threaded on my needle.
Step 11
Tuck a tiny pinch of Polyfil stuffing in the head and another in the tail. Work it right up into the points.
If you’re making a tree ornament, fill the
whole body with Polyfil stuffing.
If you’re making a pattern weight, add two
tablespoons of aquarium gravel.
If you’re making a softie, add two
tablespoons of plastic pellets.
Step 12
Pick the needle and thread back up and finish stitching across the bottom of the chicken. Tie a knot and bury the tail inside the hen.
You’re done! Better make another - chickens don’t like to live alone. Now even felt chickens!
Happy stitching!
Play with some felt! Try the Oddballs – a fun pattern for silly monsters.


 wearing felt bunny ears made with a free pattern from Shiny Happy World")


 wearing bunny ears made with the free Easter Eggstras pattern from Shiny Happy World")


