Jo wanted to make a Totoro stuffed animal for a friend from school – and she had a pretty brilliant idea of how to do it without drafting a whole new pattern.
Start with Franklin the Fat Cat! It’s one of her favorites and she’s made it a few times, so she knew it was an easy pattern to work with.
She used Cuddle Fleece in charcoal and camel for the body, plus some felt scraps in black, white, and smoky marble.
She drafted new patterns for the ears, eyes, nose and those things on his chest. (There’s a link to download those pieces at the end of this post.)
She used the tail pattern from Eddie the Teddy Bear to give him a stubby little tail.
And she gave him no feet/legs.
Want to make your own? It’s pretty easy. The only part that’s really different from Franklin (as far as construction goes) is the ears.
Jo wanted them to stand up really well, so she used Soft & Stable foam inside.
Stack a piece of foam, then one ear piece right side up, followed by one ear piece facing down. Sew up and around the top of the ear, leaving the flat bottom open for turning.
Sewing through the foam is super easy. Here’s what that piece looks like from the bottom.
Reach in between the two fleece layers to turn it right side out – the foam will end up between the two layers. Neat!
Fold the sides of the bottom of the ear in to the center and stitch it across the bottom to secure the folds.
Now it has some shape.
Repeat for the second ear and then treat them just like the cat ears in the pattern instructions.
Applique the eyes, nose and chest thingies onto the body front. Jo stuck them down with a glue stick to hold them while she sewed. Clever!
After you stitch around the edges of all the pieces, insert 9 mm safety eyes into the middle of the whites. (If you do that sooner, the shanks of the safety eyes will make it impossible to sew around the whites.)
After that, the assembly is just like Franklin. Easy peasy!
One cute Totoro stuffed animal and his maker, ready for delivery to a friend. 🙂
If you want to make your own, here’s what you’ll need. . .
Add a name, a birth date, a gift date, animal sounds – even a poem or quote!
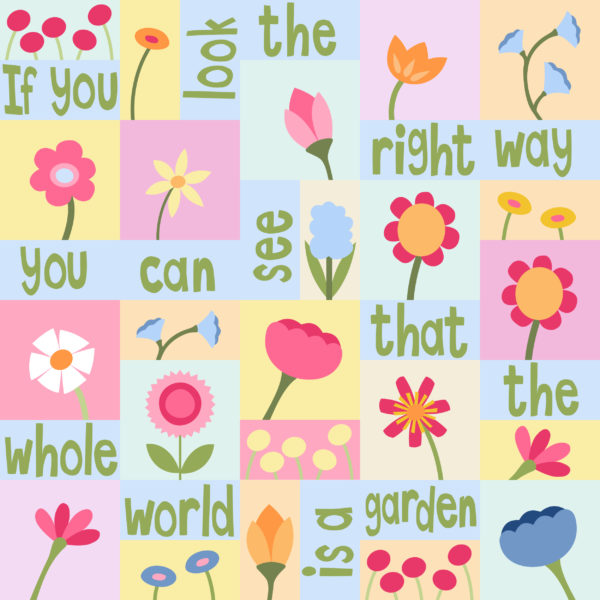
I especially love this version of the Wild Flowers pattern that adds a quote from The Secret Garden by Frances Hodgson Burnett.
Let your imagination run wild!
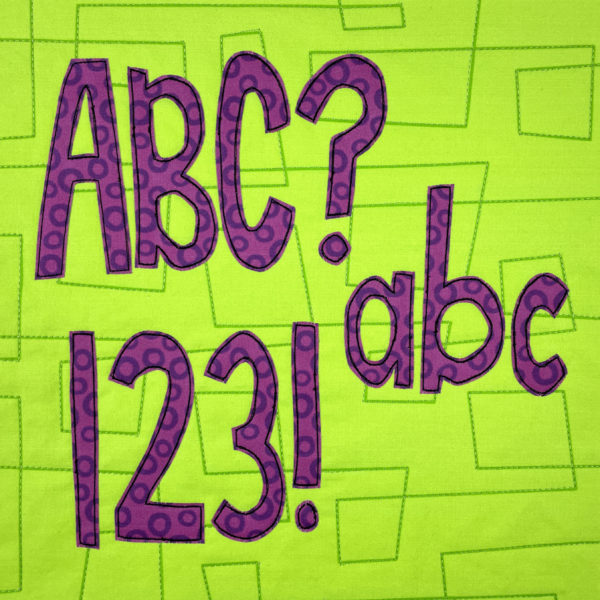
These letters are skinny-ish, allowing you to fit more letters in a standard block. They’re also very irregular so you can easily just shave a smidge off individual letters if you need to skinny them up just a touch to fit in a block and don’t want to go to the hassle of resizing them.
Also – after many requests – this alphabet includes capital letters, numbers, and some punctuation. Yay!
There’s a post here with more info about adding half-size blocks to your quilts – perfect for adding words. The nutshell version is to cut your blocks 6 x 11 inches, then trim them down to 5 1/2 x 10 1/2 inches so that when you sew them together with a quarter inch seam allowance they finish at 5 x 10 inches – exactly half the size of one of my square blocks.
If you need more than six letters, I recommend cutting a larger block. That’s what I did for cock-a-doodle-doo up in the corner of this quilt. (This sample uses an old, chunkier alphabet that I don’t use anymore – but you get the idea.)
Trace the reversed image of the letter onto the paper side of your fusible adhesive. Roughly cut around it.
Follow the manufacturer’s instructions and fuse it to the back of the fabric.
Cut it out as neatly as you can.
Peel off the paper and fuse the letter to your finished piece. Stitch around it if you like. Some adhesives require stitching – so read the label before you decide to skip it.
Use this free applique alphabet pattern to add words to your quilts, pillows, tote bags and more. Add your kids’ names to everything they own. Have fun with it!
If you like this pattern, sign up for the Shiny Happy News! Members get a weekly email with tutorials, patterns, sewing news, fun stuff and things to make you smile. 🙂
Press all the seams. I’m pressing mine open for this quilt. I think it will make things simpler in the end.
Arrange your squares according to the diagram below.
For this block I sewed things up in rows. The top and bottom rows are identical, as are rows 2 and 9, rows 3 and 7, etc. Knowing that can help you sew them up in batches.
Then sew those rows into one fabulous block. 🙂
That’s 15 blocks done – just 5 more to go!
I love how it’s coming together! And I feel like I’m so close to finishing!
Cut the pieces out right on the solid lines. Where there’s a dotted line, leave a little extra seam allowance. You can see that around the face, and at the top of the hair, apron and dress pieces in the photo.
Soak the stabilizer away in cold water. Let the pieces soak for a good long time, then rinse the softened stabilizer off under cold running water. Hit any stubborn bits with the kitchen sprayer, but don’t rub the surface of the felt.
Set them to dry on a towel. Don’t wring, twist or even smoosh them. Just let them dry.
Use two strands of thread for all stitching. You can, of course, use any colors and stitches you like, but here’s what I used on each piece. . .
For the dress, backstitch the vines and stripes with DMC #601 and #958. The leaves are lazy daisy stitches with DMC #958 and the dots are French knots with DMC #726.
Backstitch the mouth with DMC #3371. The eyes use this stitch.
For the apron, the French knots are DMC #601. The drops are lazy daisy stitches in DMC #726.
The dots on the scarf are French knots in DMC #958. The flowers are lazy daisy with DMC #601. The little stars and the centers of the flowers are DMC #726.
That’s all the pieces. Time to applique! I use this simple whipstitch and two strands of matching thread for all applique.
Applique the flower to the apron. Then applique the center of the flower and the yellow drop.
Lay the apron over the dress and applique the edges down.
Applique the hair to the top of the face.
Then applique the scarf over the face. Depending on how much extra seam allowance you cut around the face, it may hang out past the edges of the sides of the scarf. That’s ok.
Flip the piece over so you can see your stitching line – the circle of purple stitches here. Trim away the excess felt as close to the stitching as possible so that nothing sticks out past the edge of the scarf.
It should look like this when you’re done.
Finally, lay the back piece down on a flat surface and use that as a guide to line up the face and scarf over the bottom half of the doll. Applique the last layers together.
You can applique this finished front to anything else, or you can sew it to the matroyshka back piece using whipstitch all around. Leave a small opening and add a tiny bit of stuffing – just enough to puff it out a bit. Finish sewing it closed and attach a hanging loop to the top if you like.
Finished!
You could make a set of these in lots of different colors and string them together into a garland. That would be so pretty!
If you like this, sign up for the newsletter! You’ll get exclusive free patterns, special discounts, and notification of new patterns and tutorials.
I had to take a bit of a break from the Controlled Chaos quilt over the holidays and into this spring – but I’m ready to finish this baby!
Here’s block #14 in the Controlled Chaos Quilt!
What You’ll Need
48 two-inch squares in color A (shown in aqua)
52 two-inch squares in color B (shown in magenta)
Instructions
Use 1/4″ seam allowances for all sewing.
Press all the seams. I’m pressing mine open for this quilt. I think it will make things simpler in the end.
Arrange your squares according to the diagram below.
For this block I sewed things up in rows. The top and bottom rows are identical, as are rows 2 and 9, rows 3 and 7, etc. Knowing that can help you sew them up in batches.
Then sew those rows into one fabulous block. 🙂
That’s 14 blocks done – just 6 more to go!
I think I’m going to go with grey sashing between the blocks. I like the way it sets off each one as its own little composition. Plus – I’m heartily sick of matching up seams. 🙂
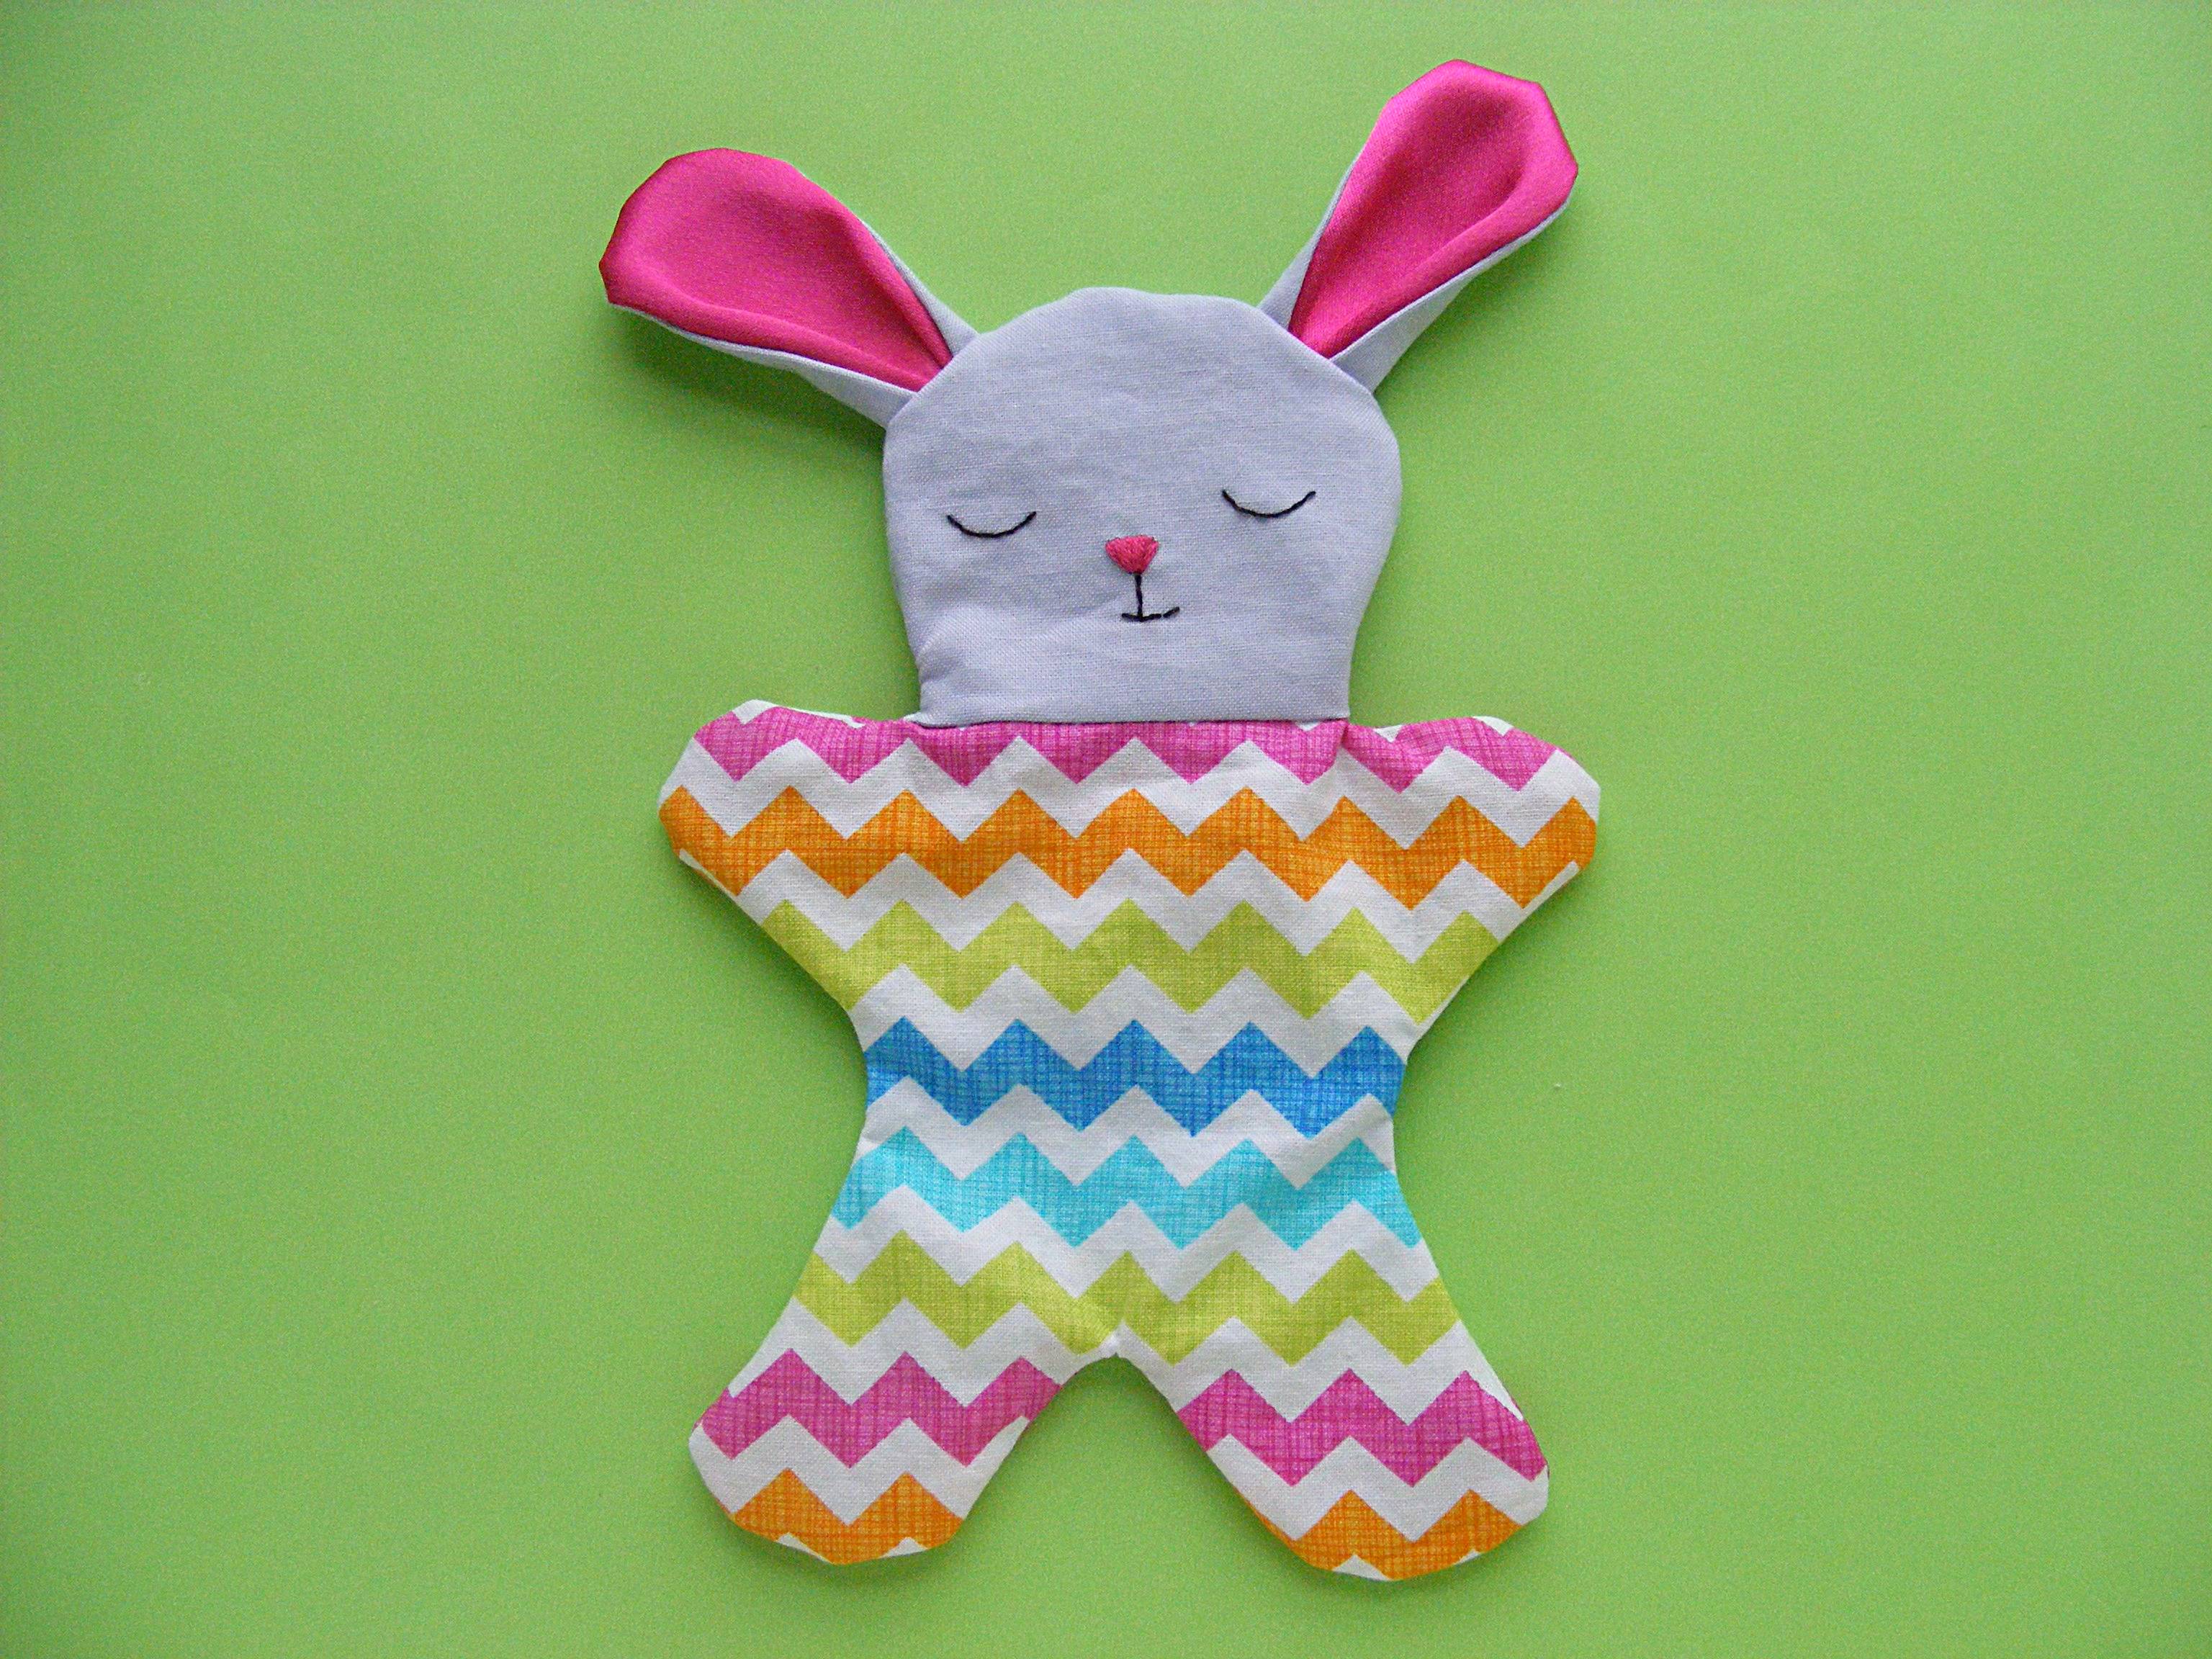
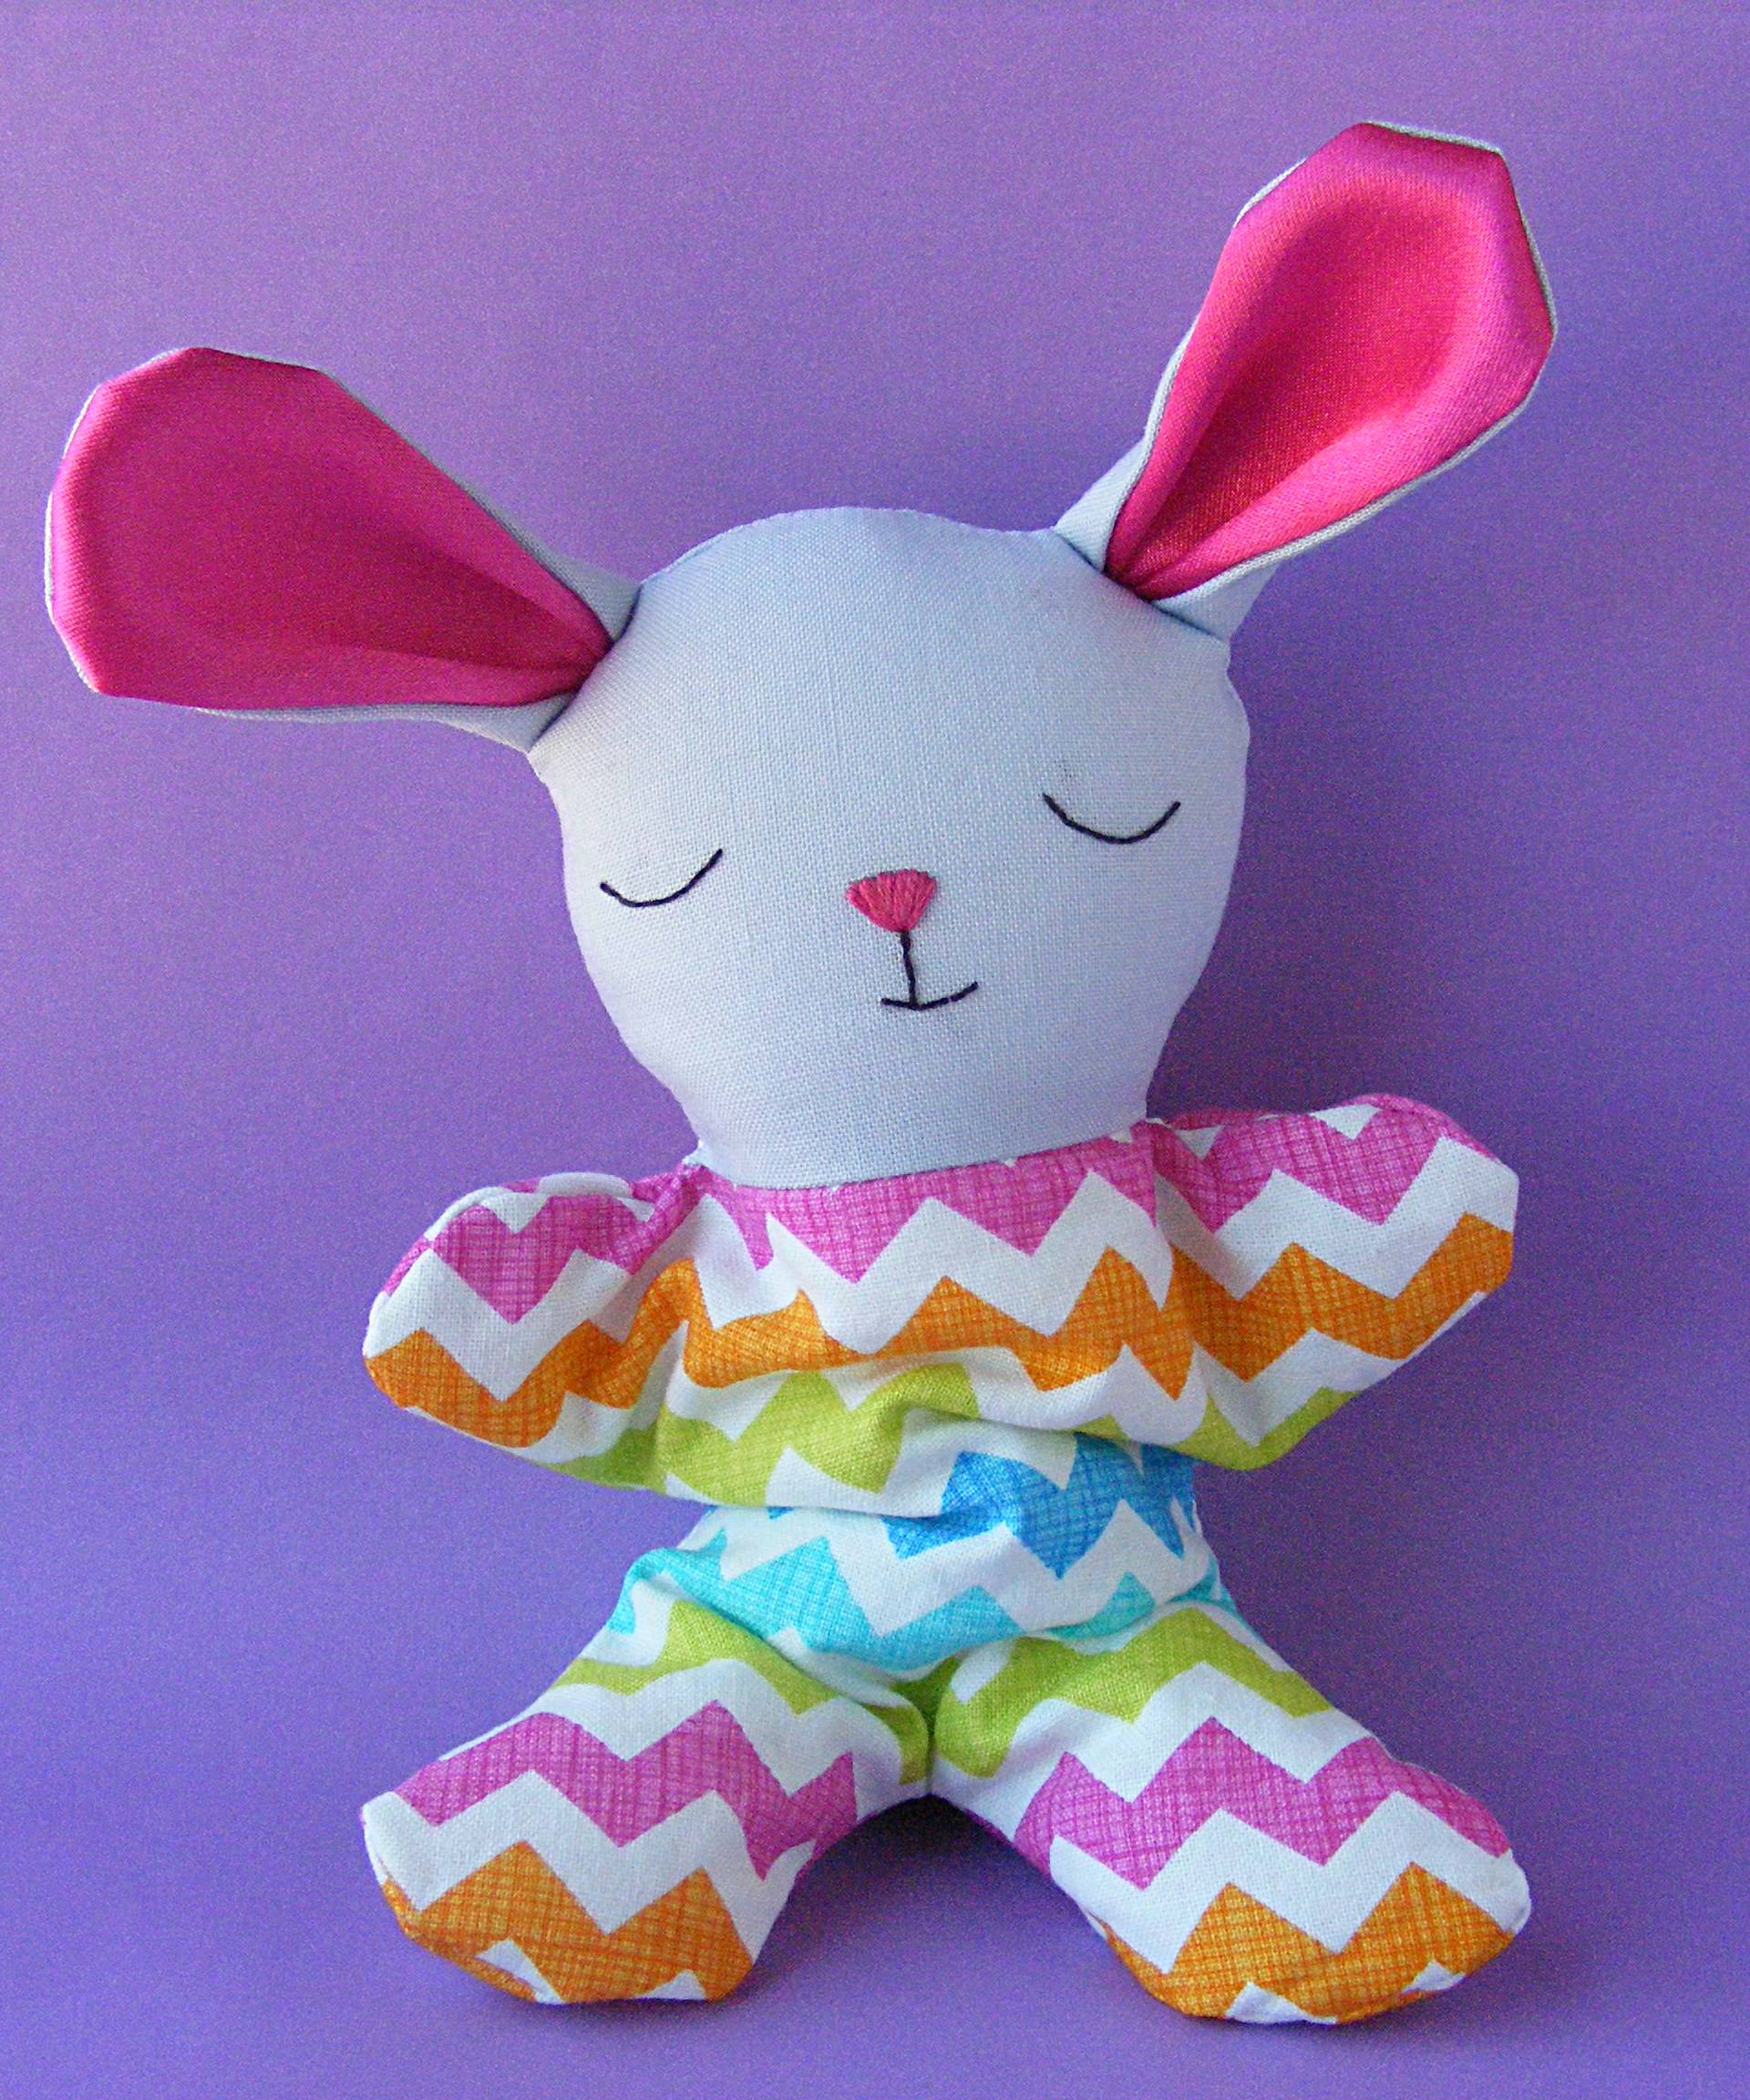
It’s a free bunny softie pattern! With a soft beanie body and small size, this Itty Bitty Bunny is just perfect for Easter baskets! And it’s super easy to make!
It can’t wait to hop into the pocket of someone special. 🙂
Here’s how to make it!
Materials
scrap bunny-colored fabric
scrap of pink satin for the bunny ears
less than a fat quarter of pajama fabric
embroidery thread for the face (I DMC #3371 and #601)
plastic pellets (I like PolyPellets Weighted Stuffing Beads)
polyfill stuffing (I like Soft Touch Polyfil Supreme Fiberfill)
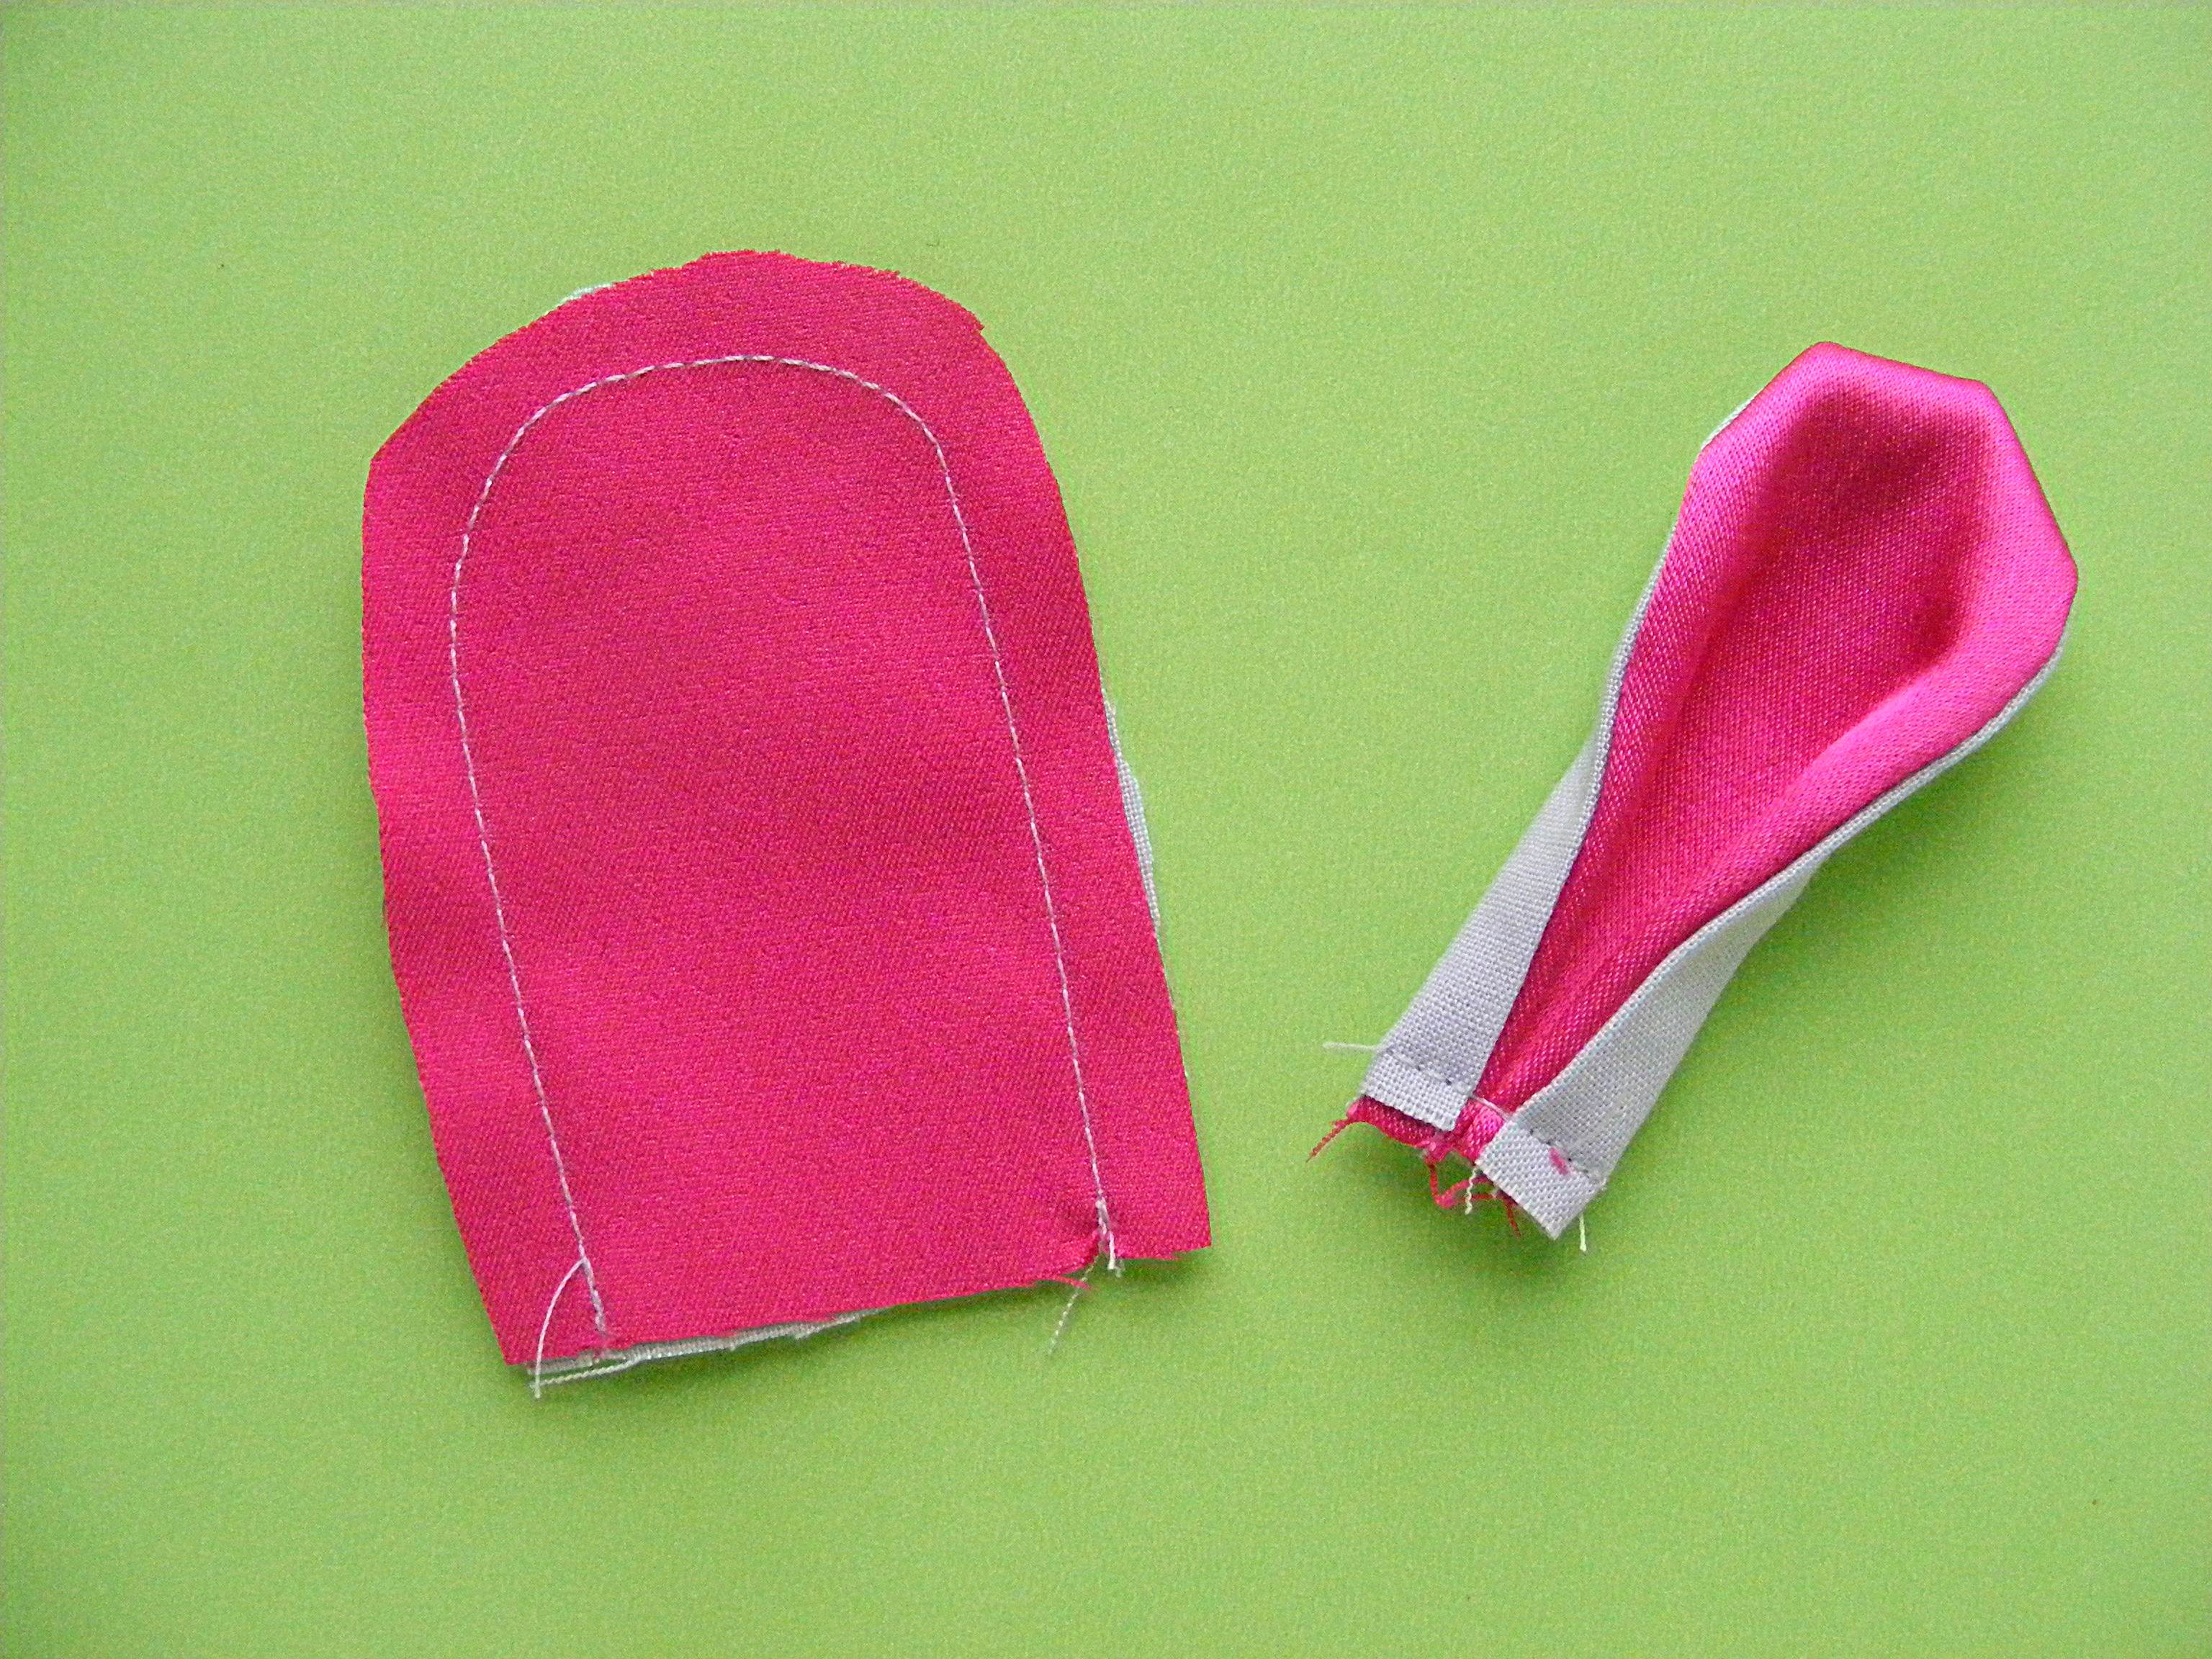
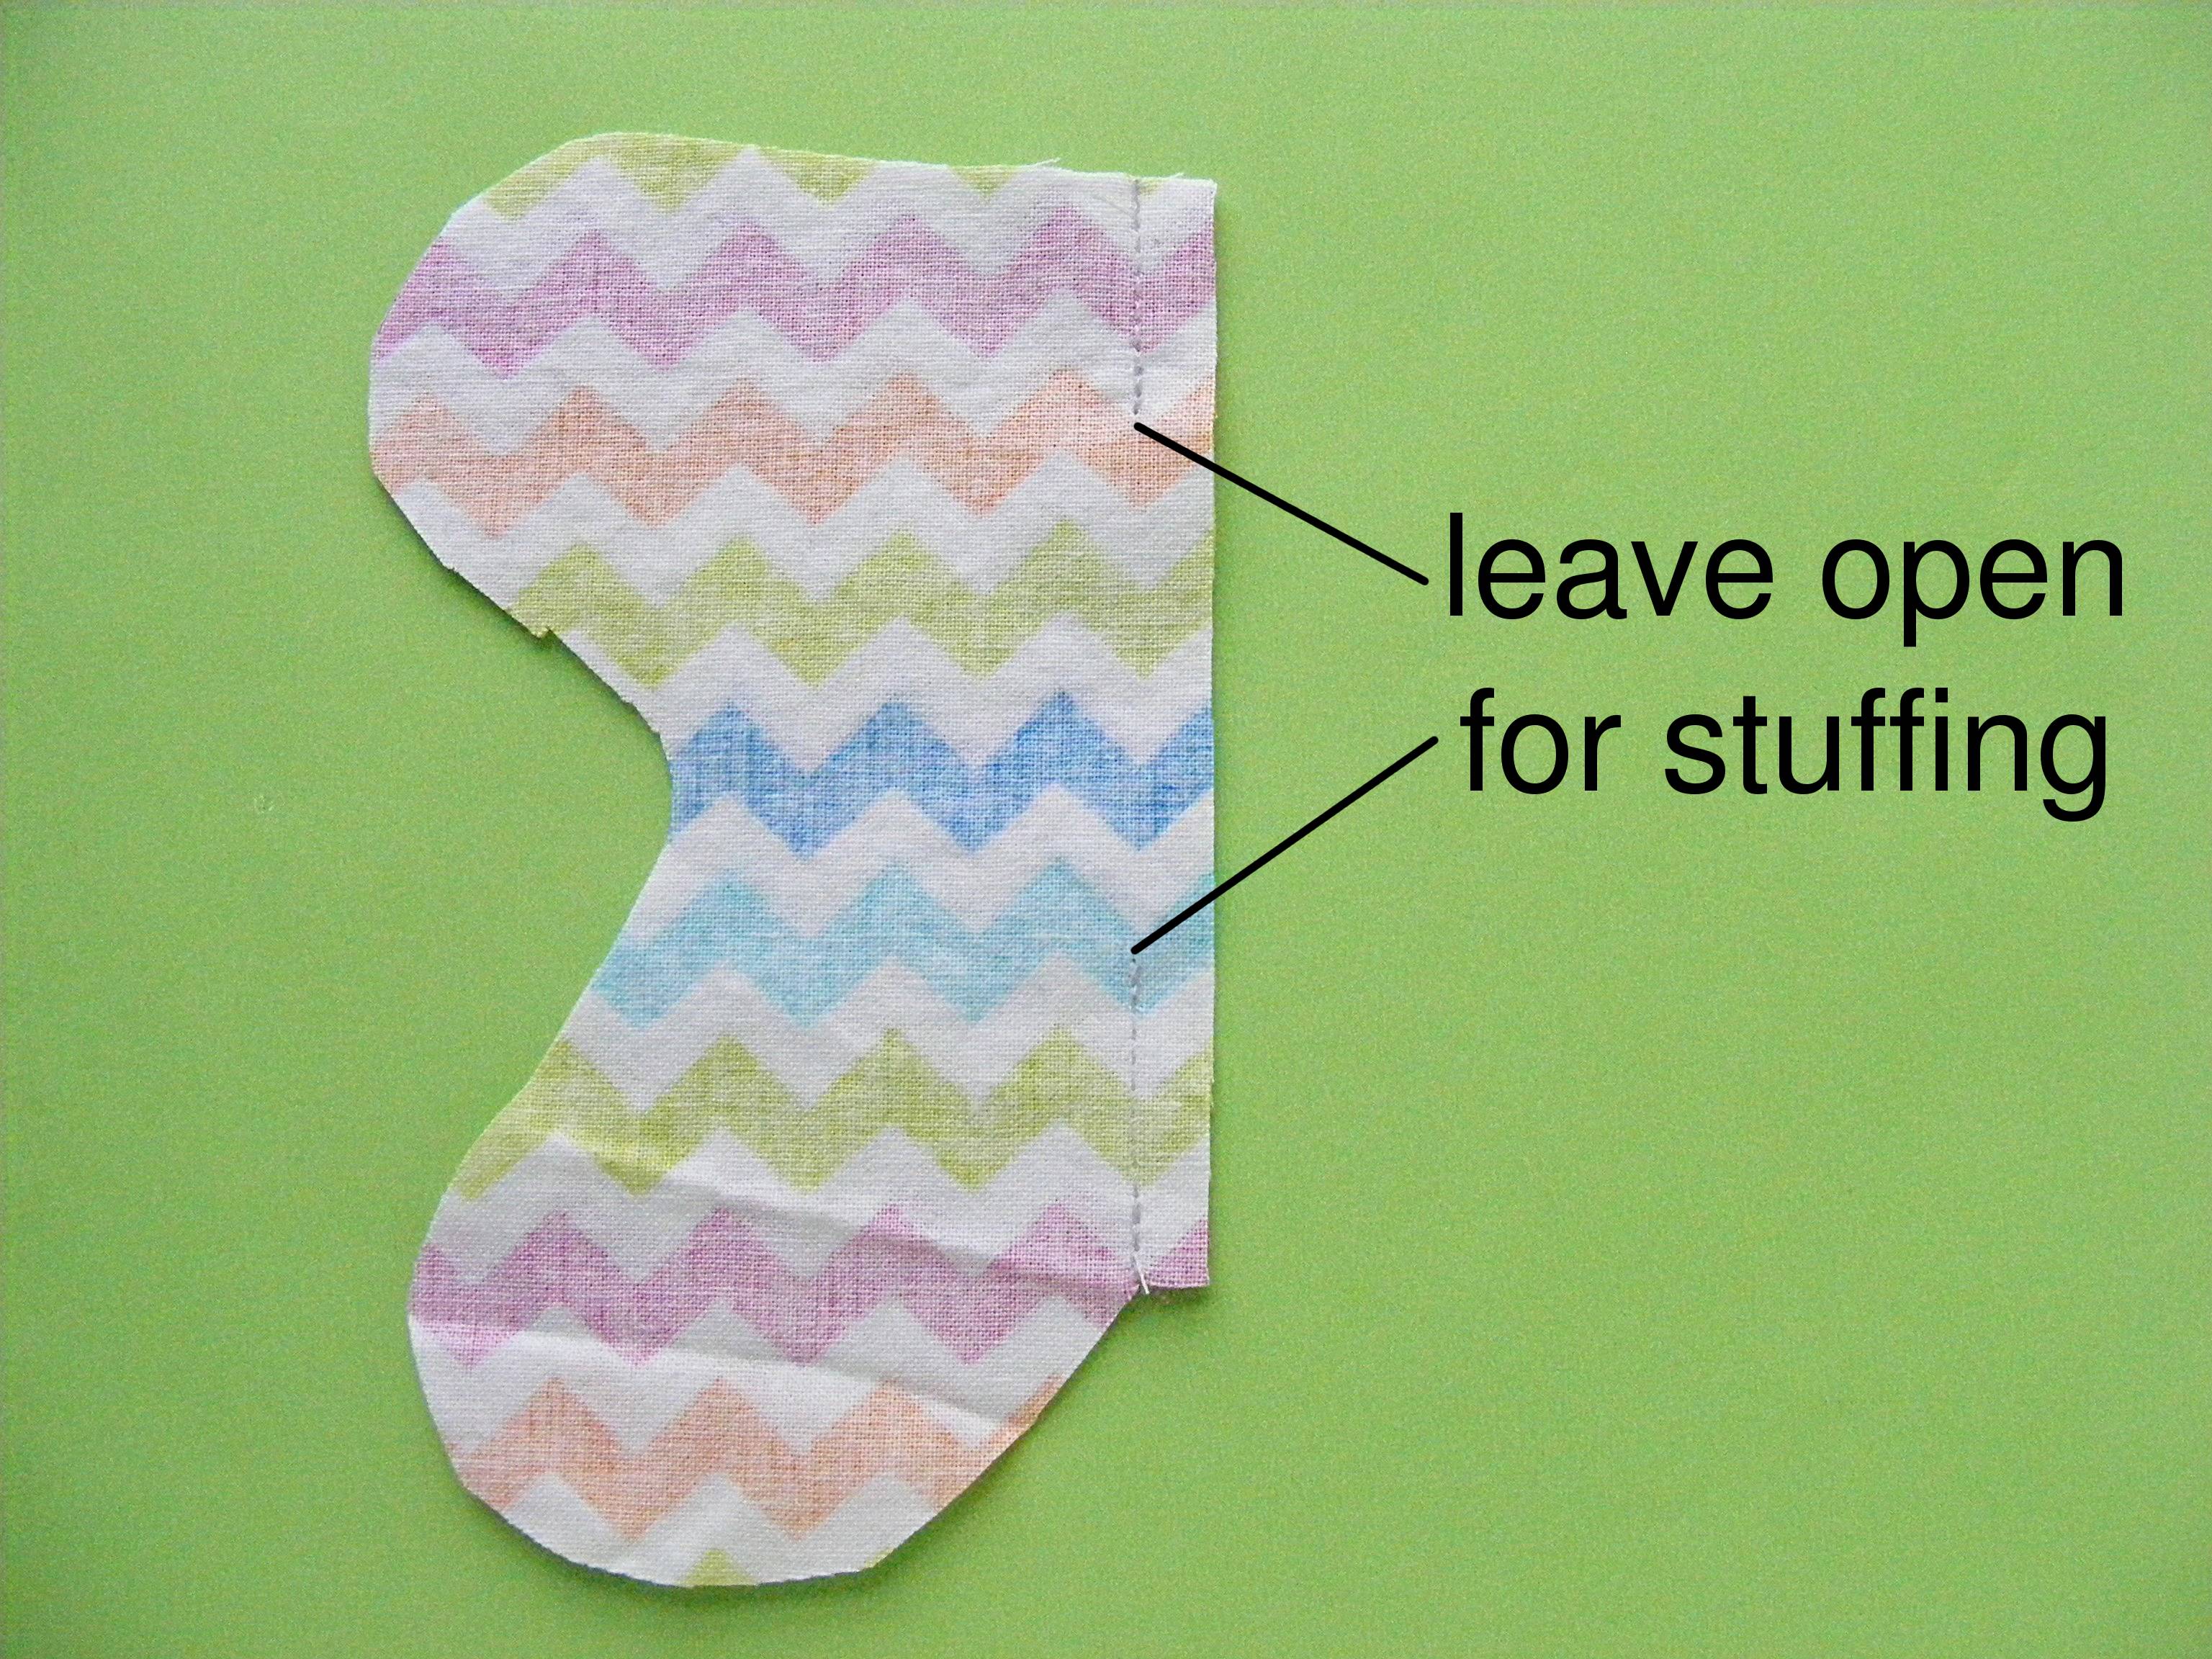
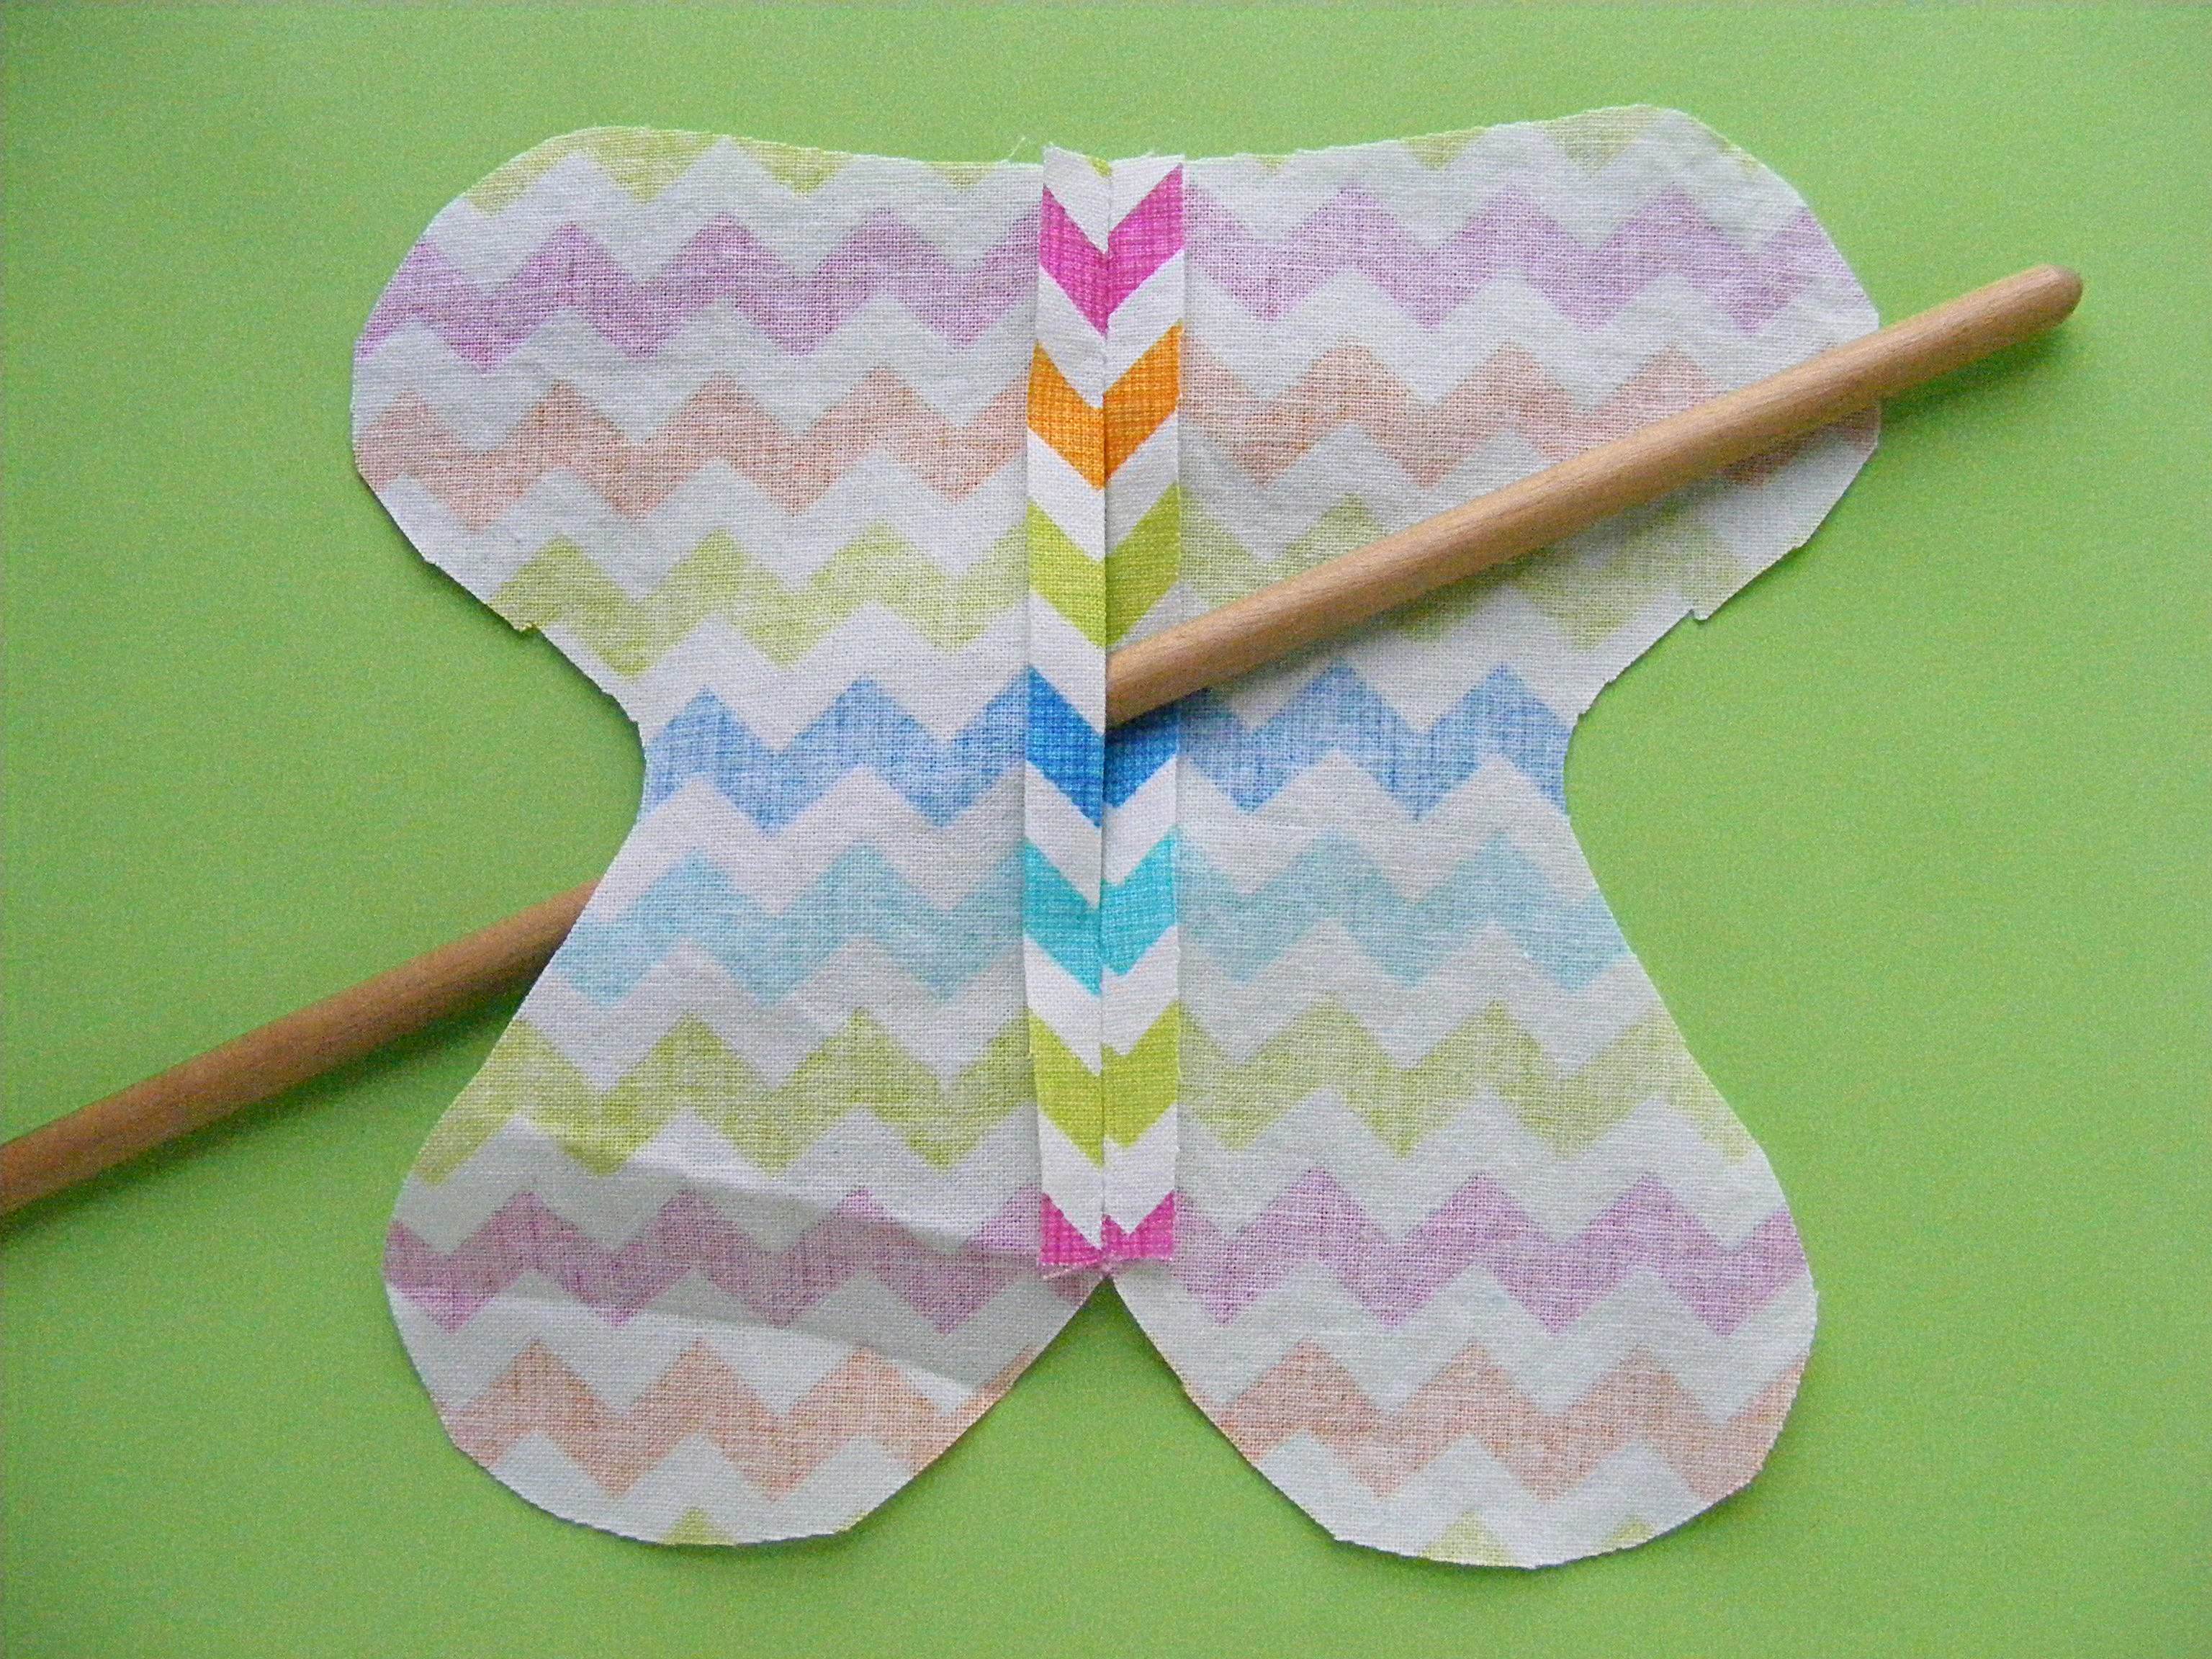
Sew the two body back pieces together along the center back line, making sure to leave a few inches open for stuffing.
Don’t forget to backstitch at the beginning and end of your stuffing opening.
Step 5
Open up the center back pieces and press the seam nice and flat, including the edges of the stuffing opening. That will give you a nice clean edge to sew when you’re closing up that opening by hand.
The stick shows where the stuffing opening is.
Step 6
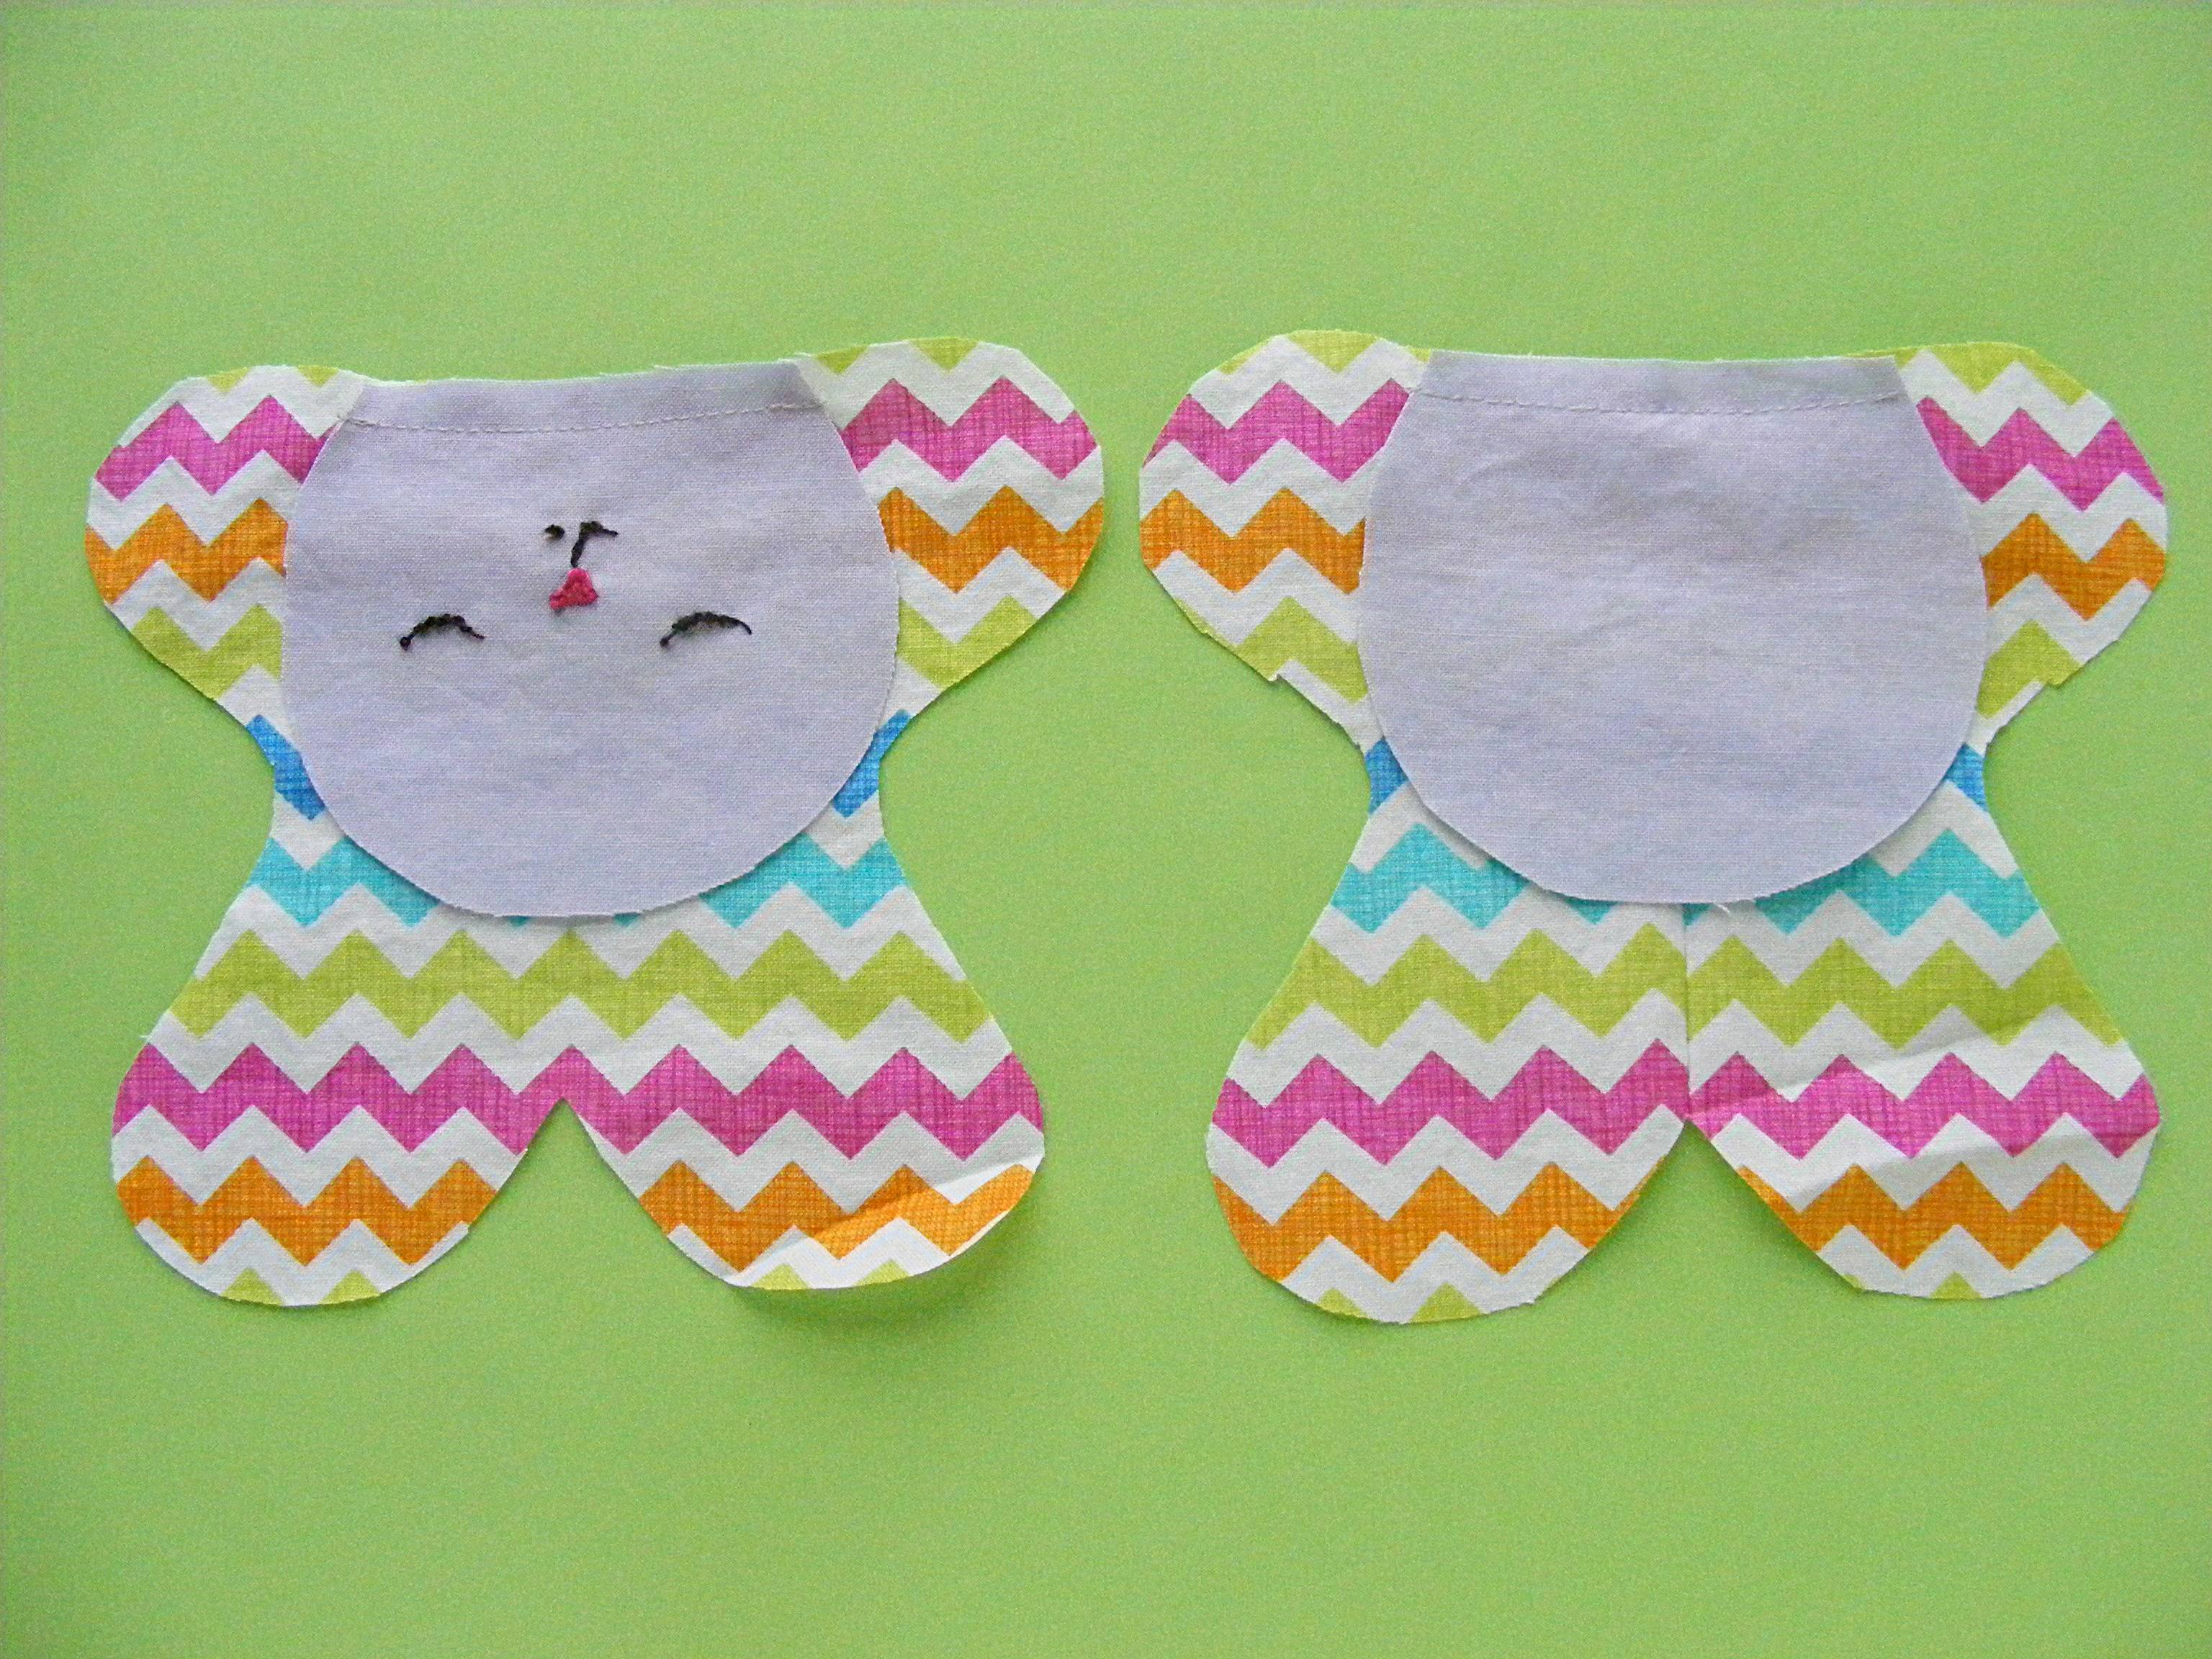
Fold the bottom of the head and the top of the body in half to find the centers. Line those centers up so the head is exactly centered on the body.
Sew the face to the body front and the other head piece to the body back.
Step 7
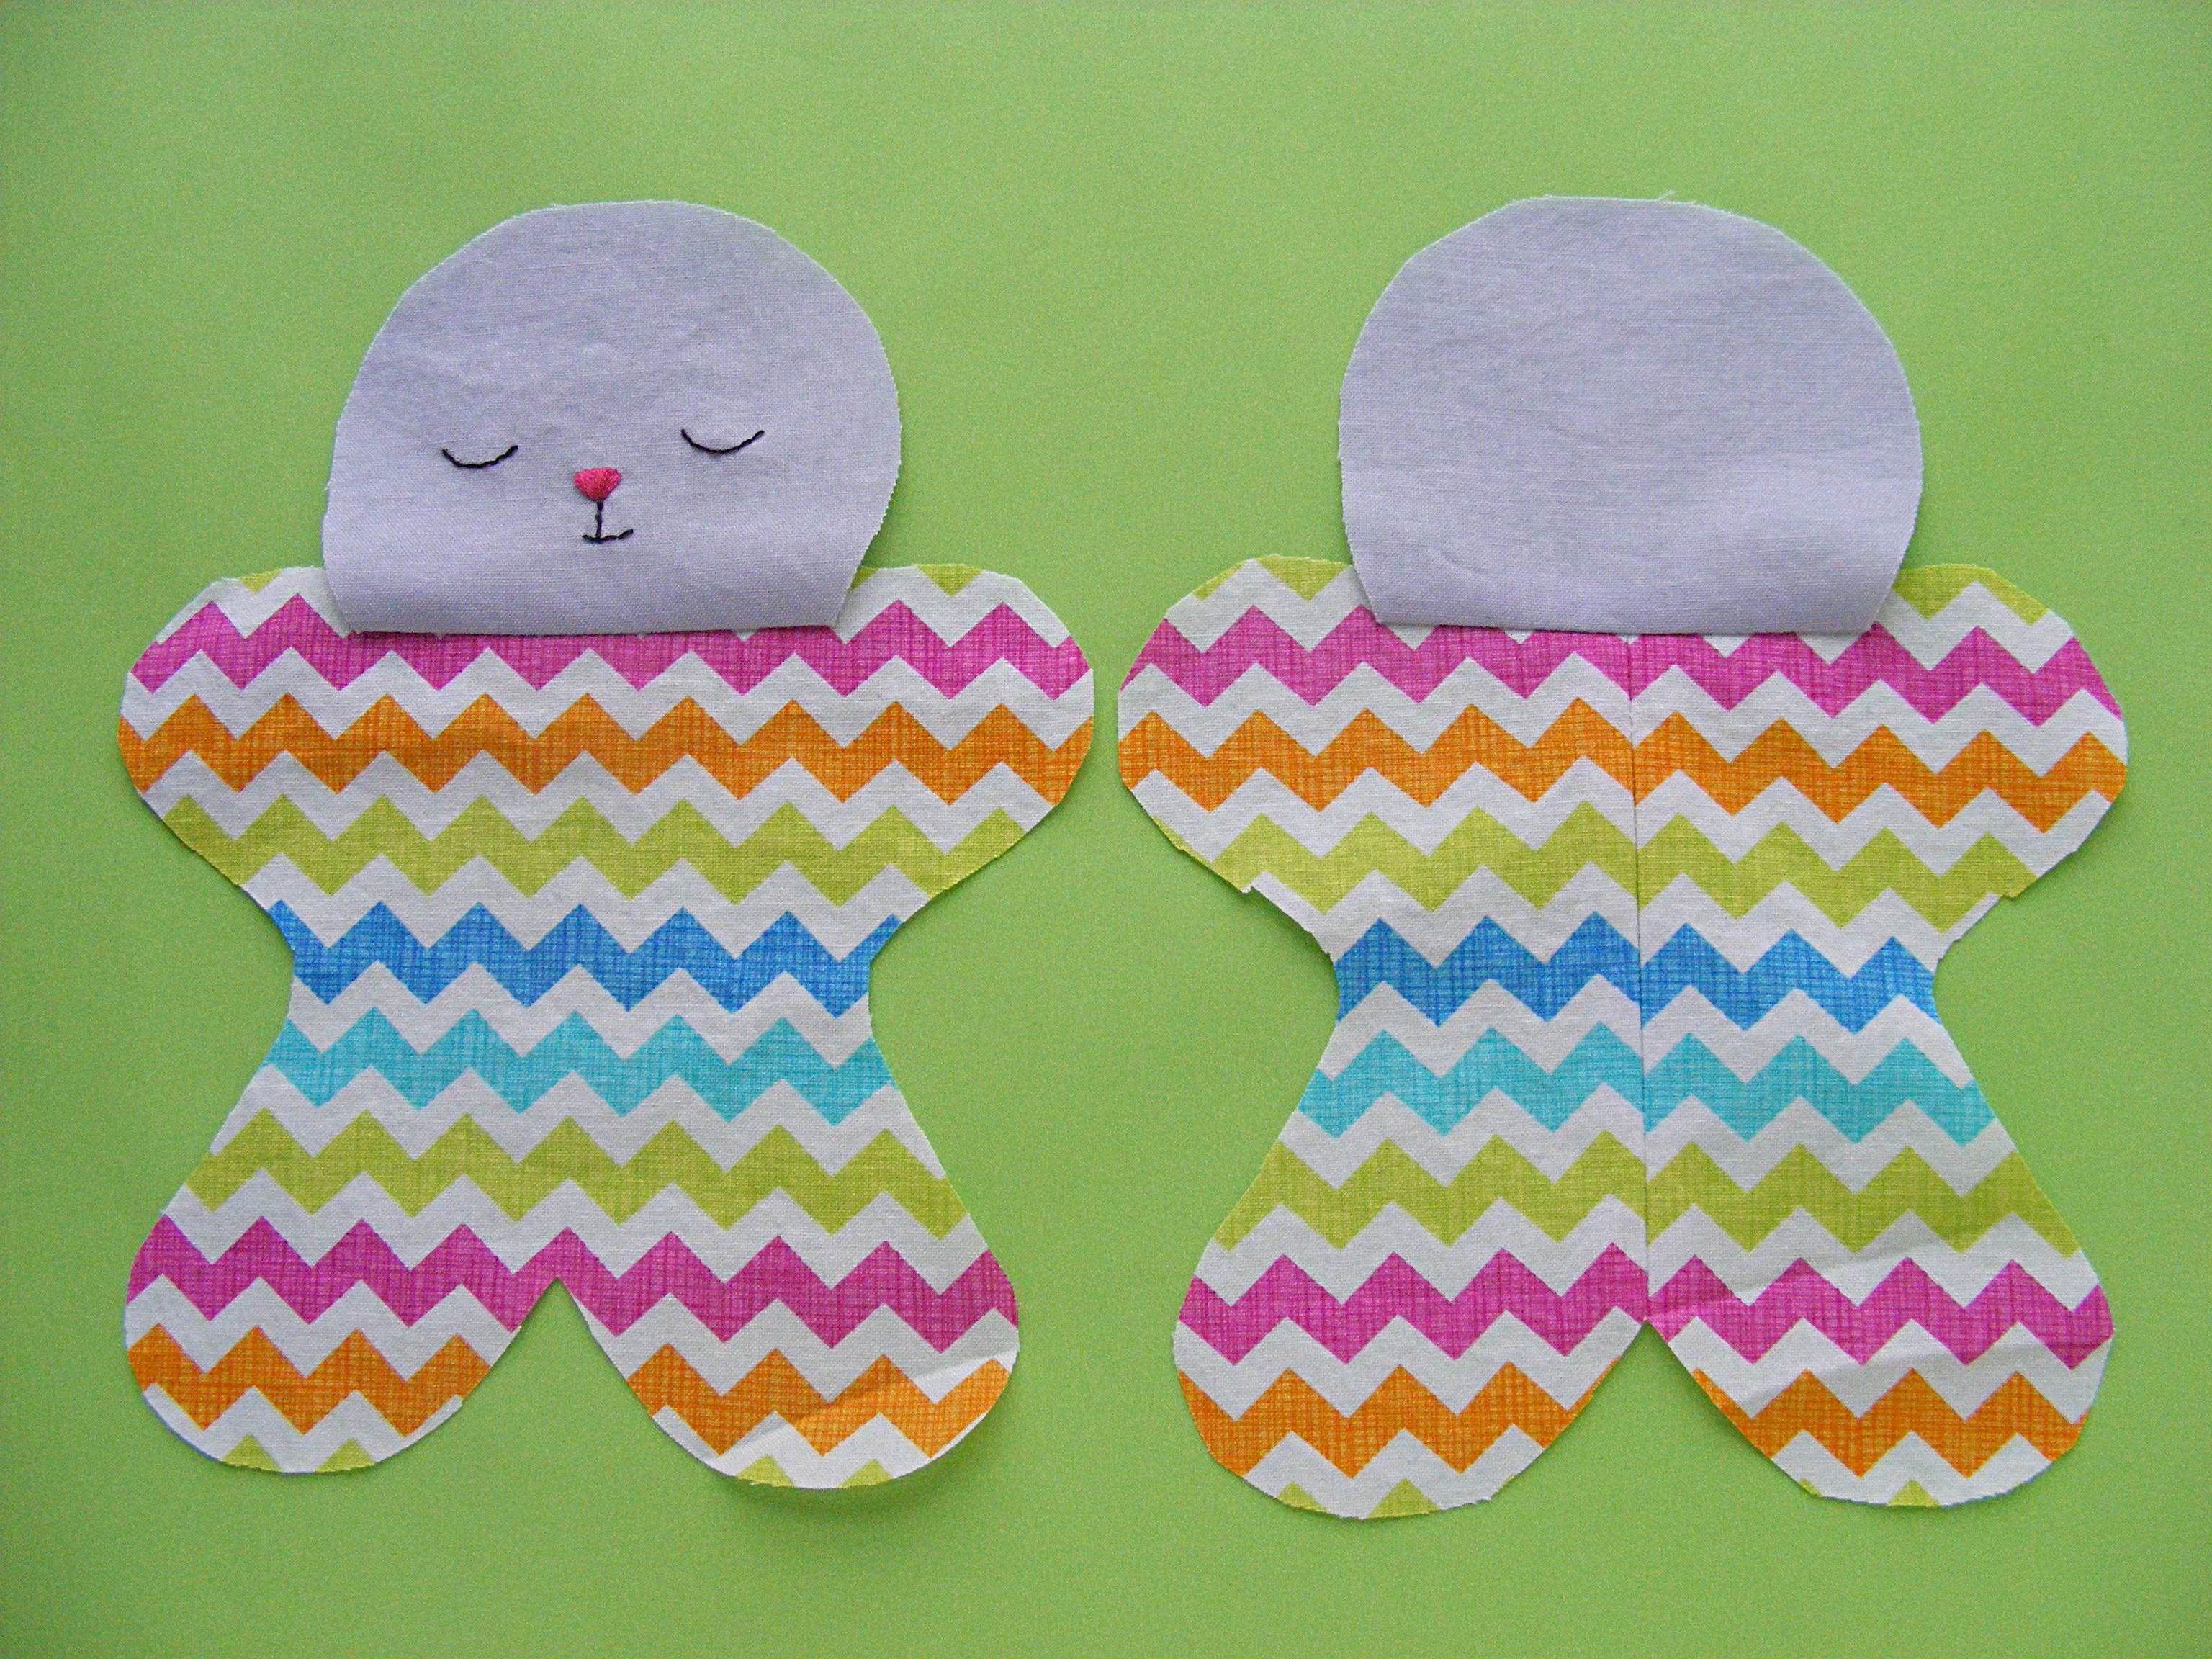
Fold the heads up and press.
The seam allowance should be pressed toward the head so the body remains flat.
Step 8
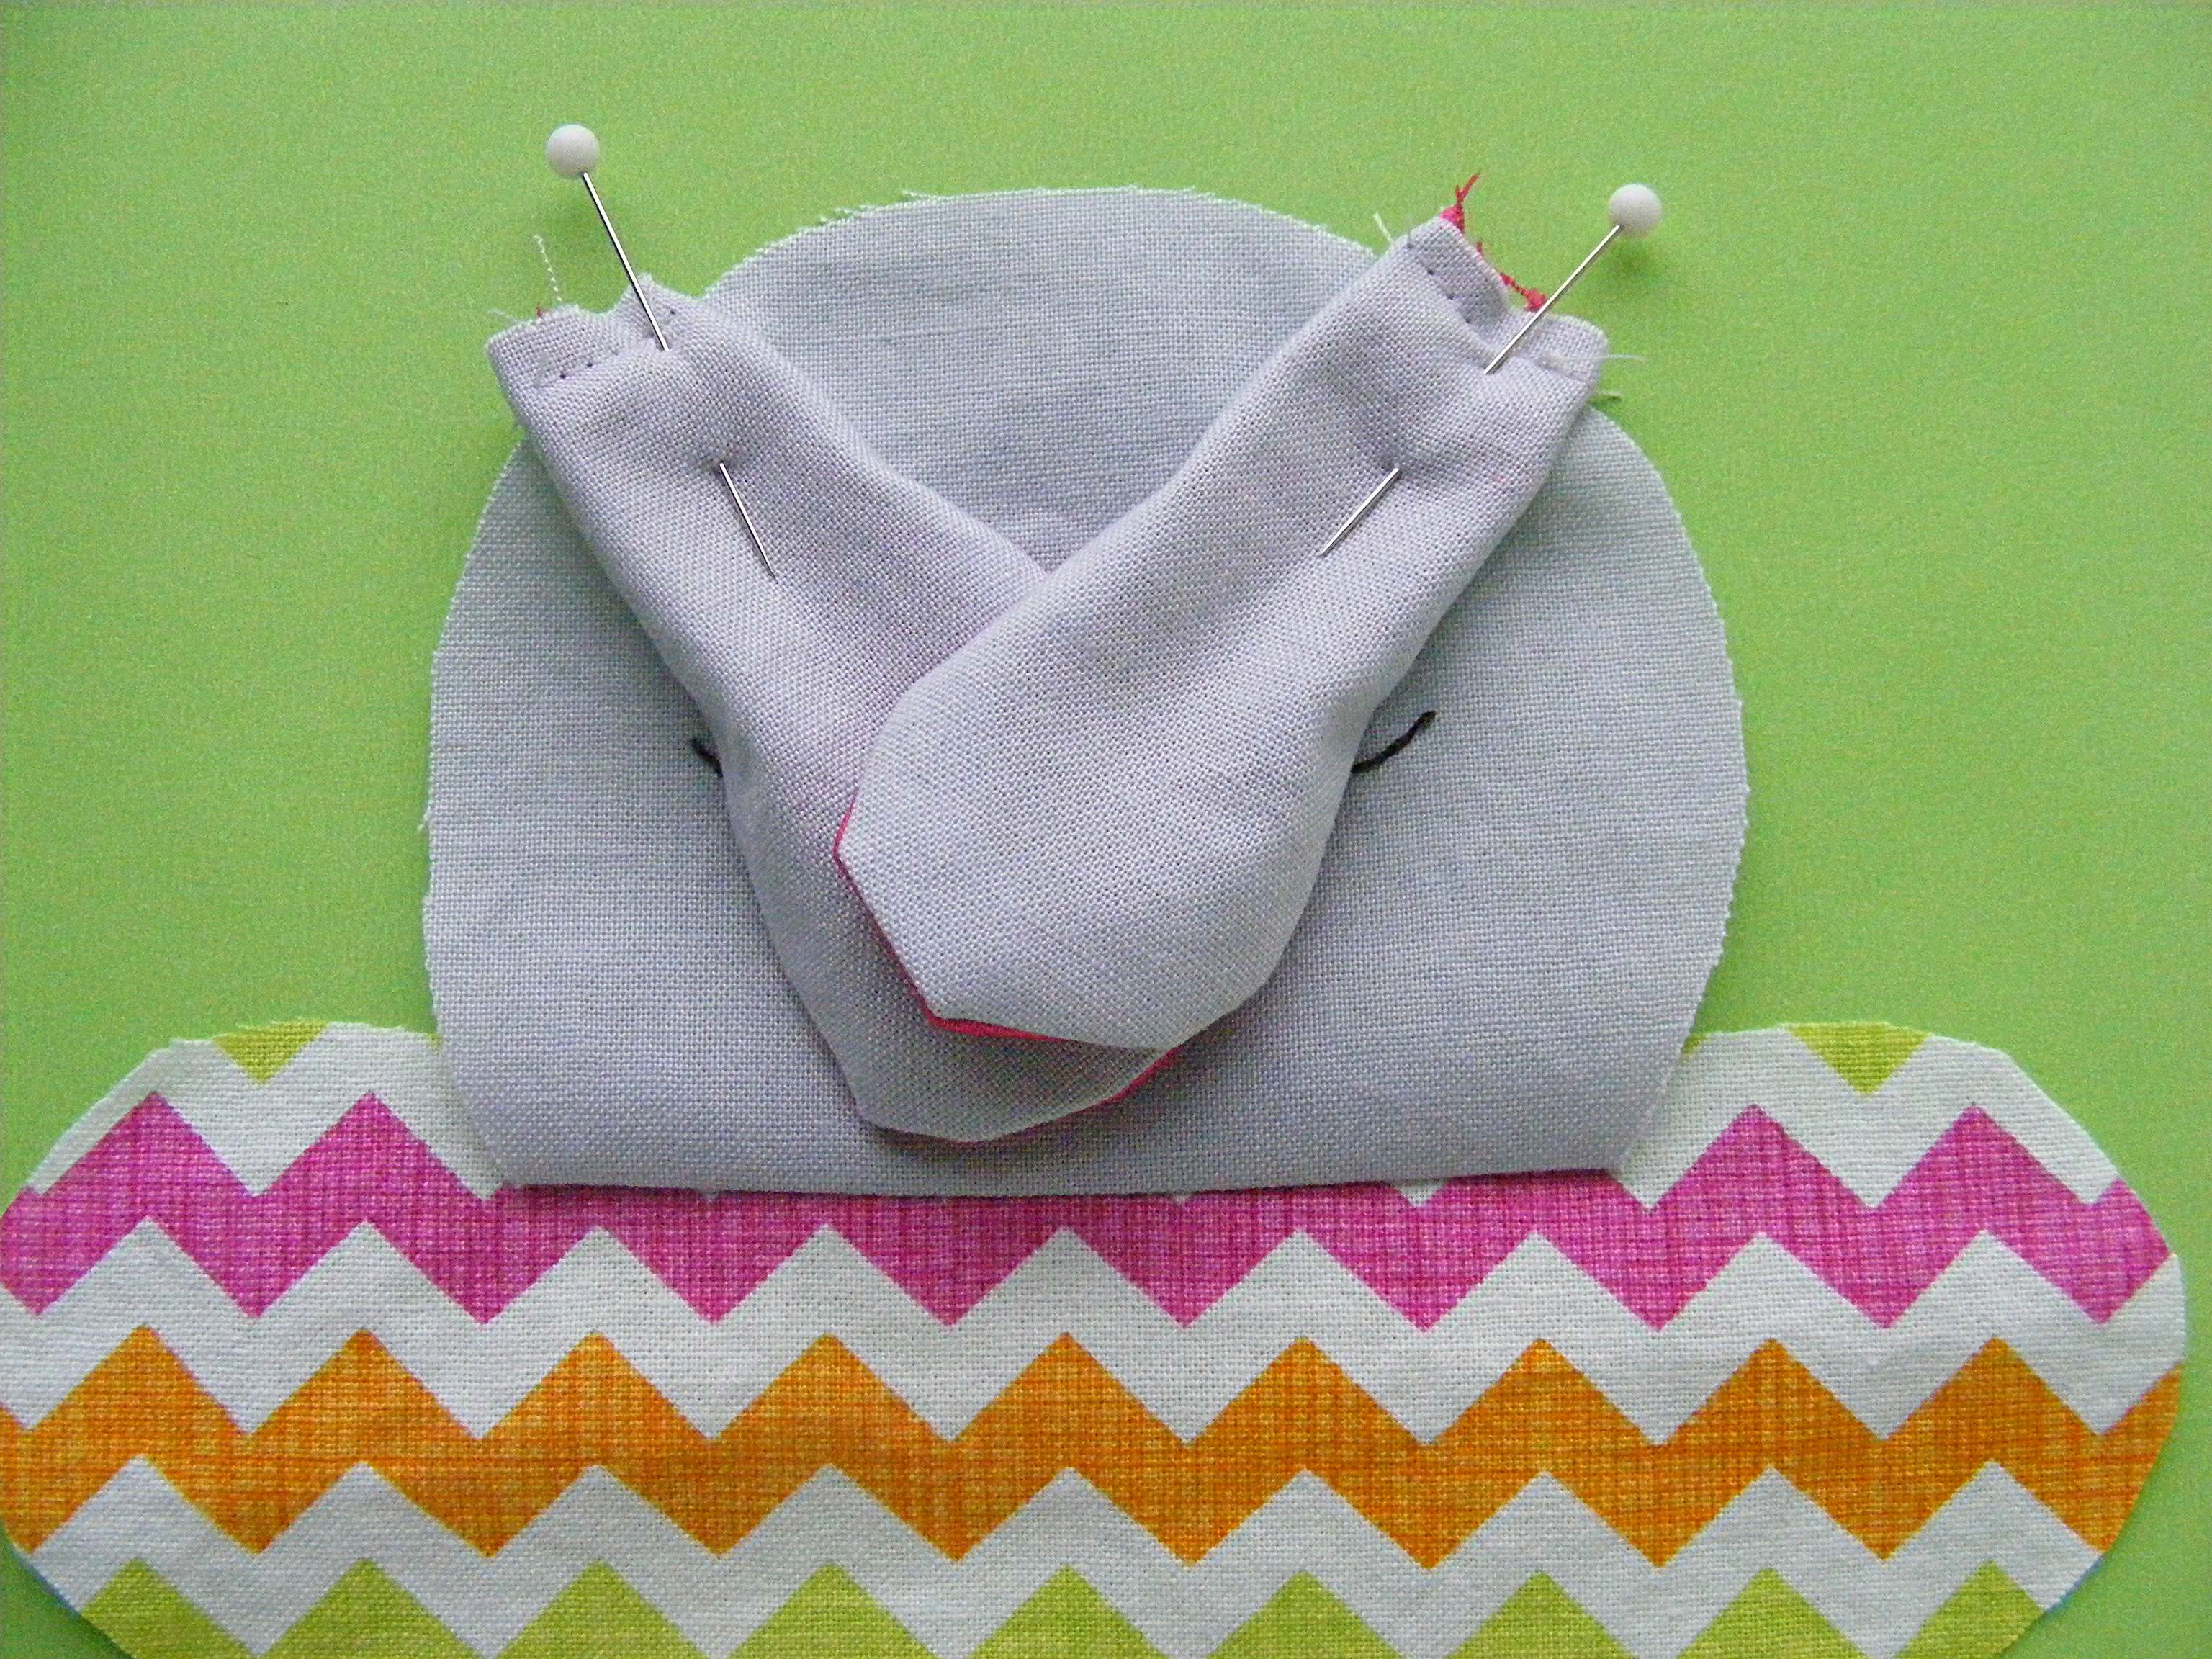
Lay the body front face up on a flat surface.
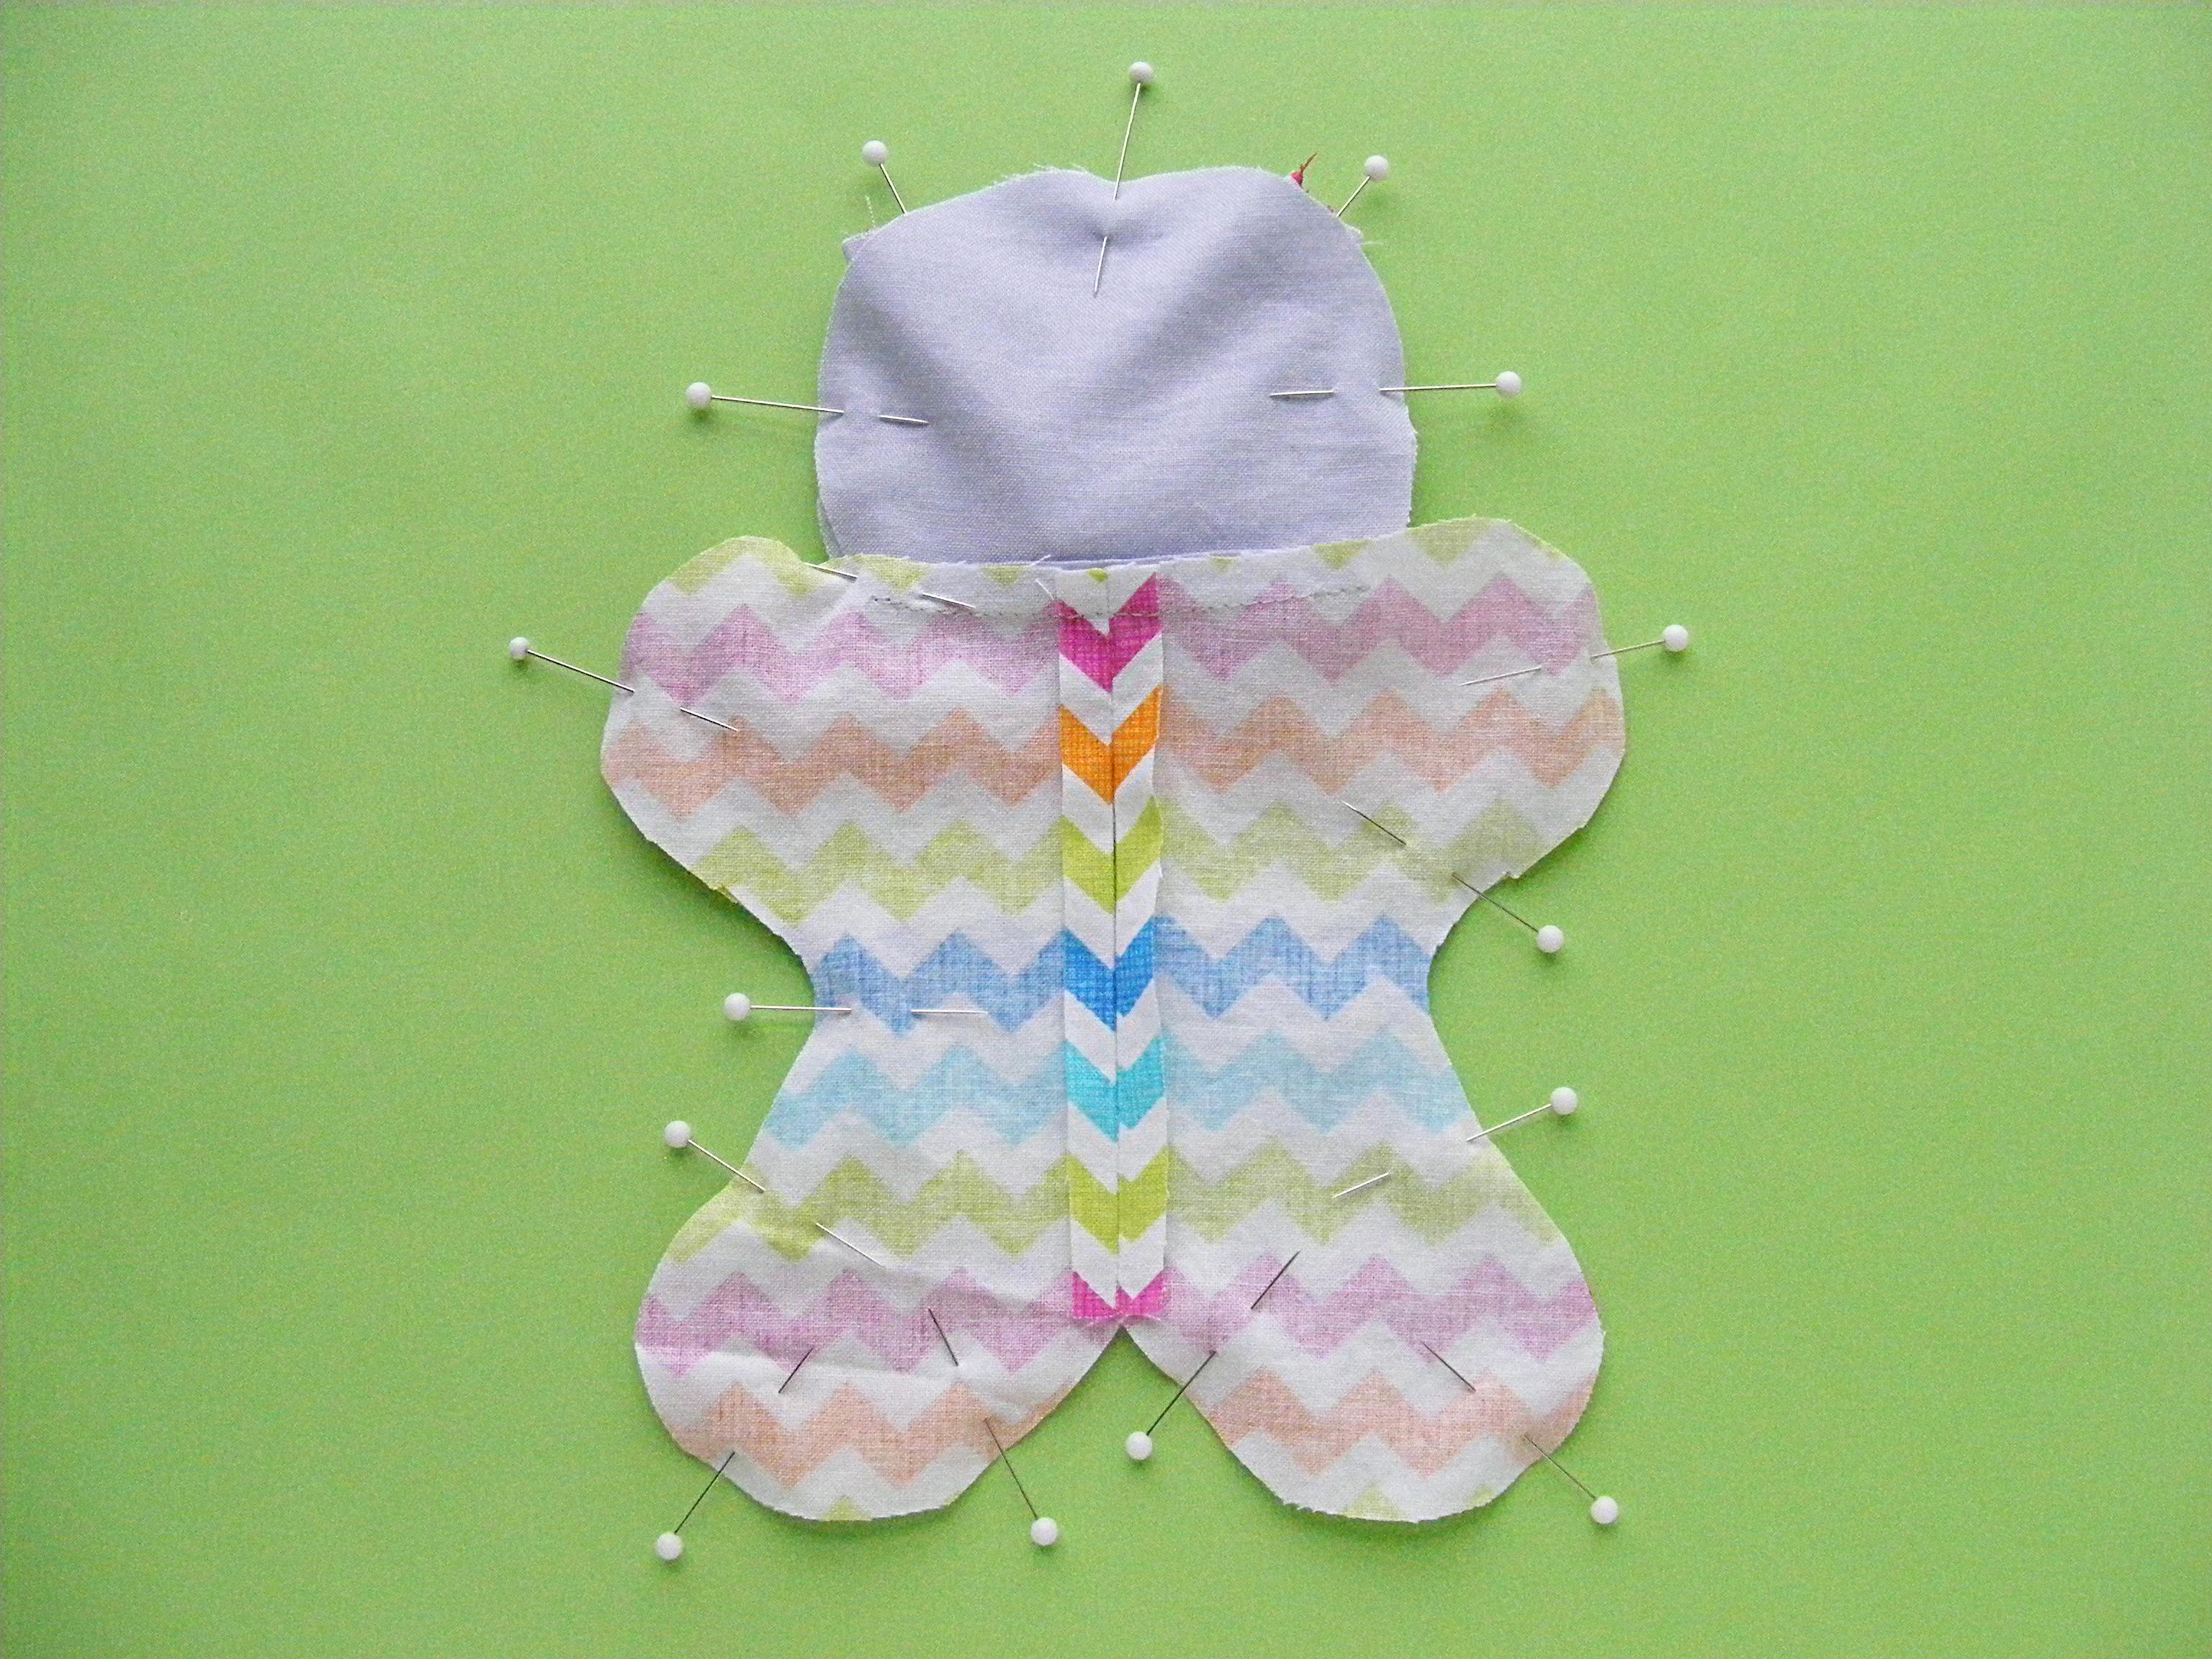
Lay the ears face down over the face as shown in the photo. Don’t worry about making them perfectly even crooked is cute. :-)
Pin in place.
Step 9
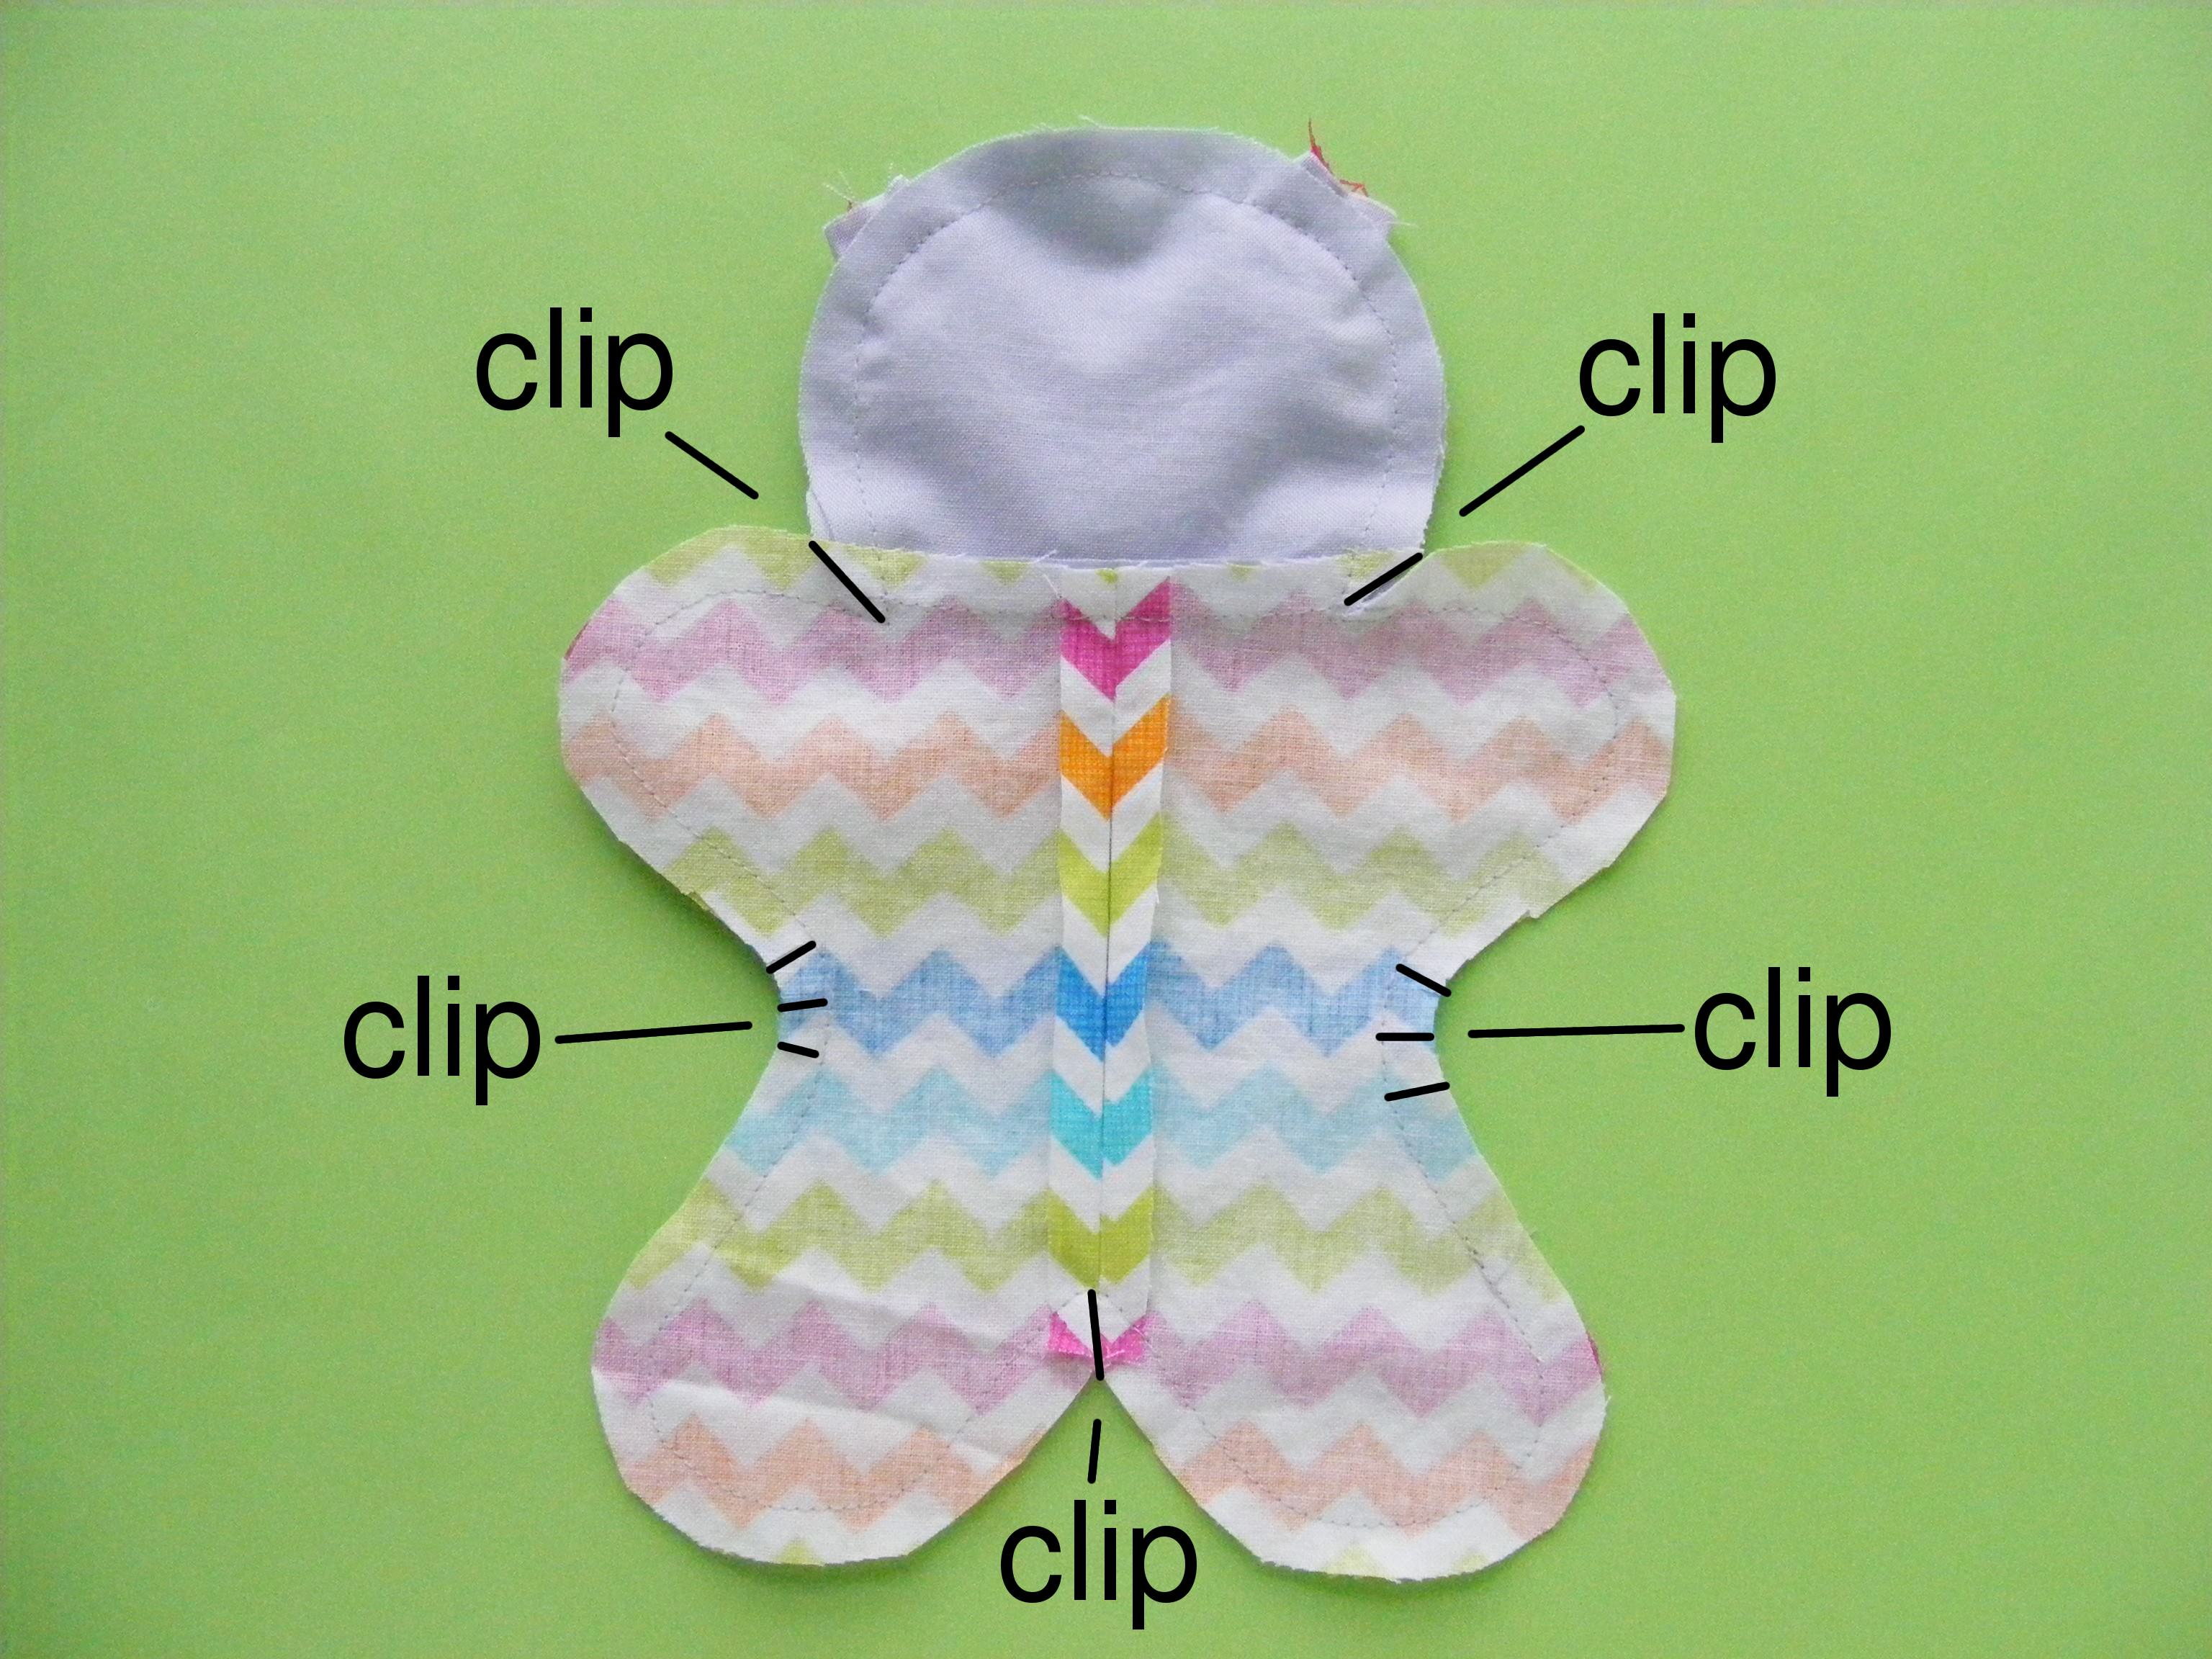
Place the body back face down over the front, sandwiching the ears between the layers. Pin or clip the layers together carefully.
I match the neck seams first, then the center bottoms, then the dips at the sides and then the tips of the arms and legs and the head.
Step 10
Sew all the way around the body using 1/4 inch seam allowance. Make sure you’re catching the ears.
Awwww! Isn’t that a cutie? Take a moment to admire your work so far. You’re almost done!
Step 12
Stuff the head pretty firmly with fiberfill but not past the neck.
Pour 1/2 cup of plastic pellets into the body and sew up the opening in the back using ladder stitch.
Finished!
All done! Give it an itty bitty hug and then slip it into a special someone’s pocket. :)
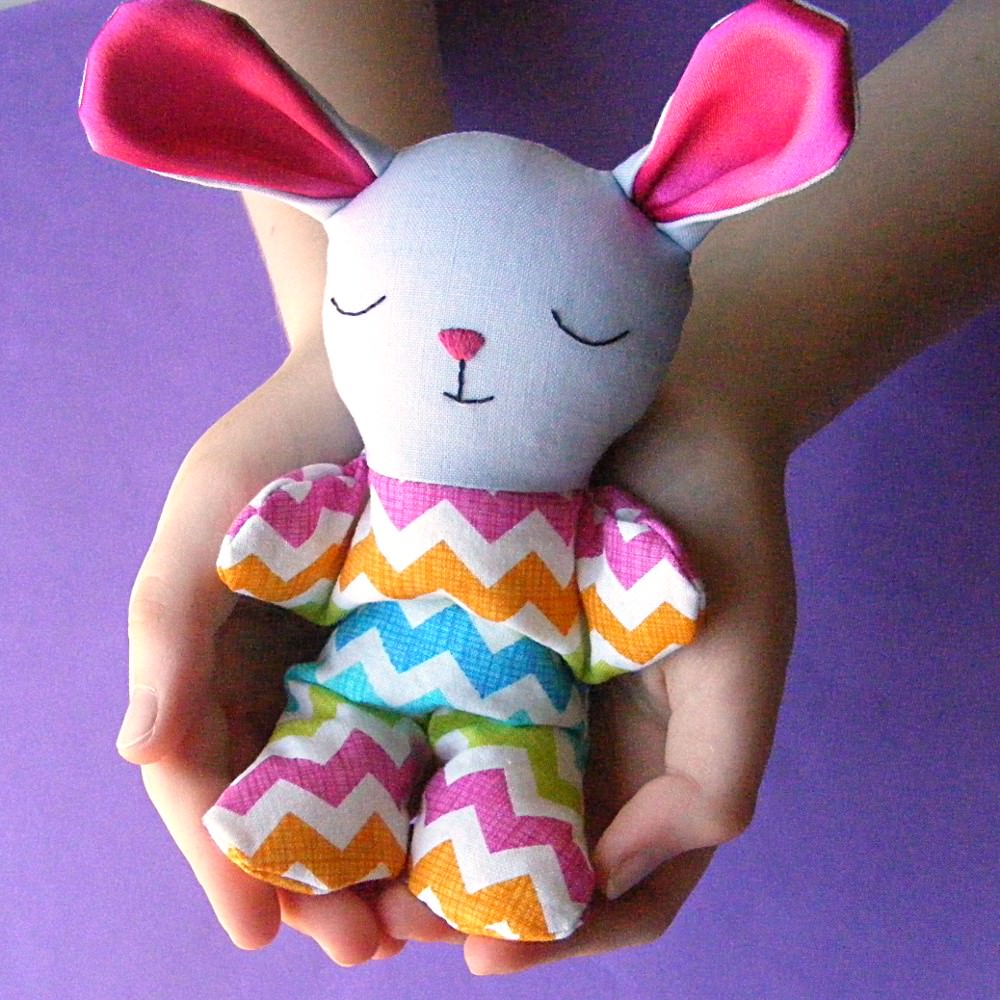
It’s a pocket-sized softie for your kids – and a snuggly bedtime softie for your kids’ dolls. Take a look at the Itty Bitty Bunny with one of the Dress Up Bunch dolls.
Because dolls need softies to play with, of course. :-)
Have a great weekend, everyone!
Best,
Wendi
The Dress Up Bunch is a collection of cute and cuddly rag dolls. Get patterns for the dolls, plus all their fun outfits and accessories!
I’ve been thinking about designing a bunny applique block for a couple of years now, but Easter always seems to come and go before I have a chance to do it.
But not this year!
And I didn’t just design a bunny block – I designed a free bunny applique pattern with mix & match parts so you can play with it to make lots and lots and lots of unique bunnies. 🙂
Playing is good!
The pattern has three bunny head shapes, three bunny ear shapes, and three bunny faces. You can mix and match those for (I think) 27 possible bunnies. Throw in different color possibilities and you could make a king-sized quilt with no repeated blocks!
If you’ve made any of my quilts, the construction will look familiar. The patterns have already been reversed and exploded so they can be printed right on my beloved printable fusible adhesive. No tracing! La la la la la.
I strongly recommend prewashing any fabric you use with fusible adhesive. The sizing on the unwashed fabric can resist the adhesive. And don’t use fabric softener in your wash – it can do the same thing. (Dryer sheets are fine.)
You can trace onto your favorite fusible if you want to, but I’m lazy and like to skip right to the fun part.
If you prefer the freezer paper applique technique you can print the pieces onto freezer paper, but the instructions I’m giving here are for applique with fusible adhesive. For a complete overview of that technique (my favorite) click here. Find general instructions for freezer paper applique here, and needle turn applique here.
I’m completely in love with the Quilt As You Go method, so I did all the outline stitching and quilting through the top fabric and the batting. I usually do the quilting before I do the applique so I don’t have to work around the pieces. Easy peasy.
Cut each background block 10 1/2″ square.
Step 1
Roughly cut out the pattern pieces and fuse them to the back of your fabric.
Step 2
Cut out the pieces neatly. Cut right on the solid lines. Leave a little extra seam allowance where there’s a dotted line – that bit of the piece will tuck behind another bit for a clean finish.
Step 3
Choose a face and trace it onto the face piece.
If you tape the face in a window and then hold the face fabric up against it, the image will shine right through for easy tracing.
I usually trace just inside the eyes and nose (so I don’t have to be perfect with how I position those applique pieces) and right on the mouth because I’m not using an erasable pen. Don’t use a Frixion pen to mark the face! It will disappear when you fuse the pieces together and you will be sad. 🙁
After I’m done tracing the face, I fuse the eyes and nose to black fabric for their applique pieces.
Step 4
Play around with the placement of the ears.
Do you want them standing straight up? Spread wide? Wonky and uneven? There is no right answer – they’re all cute. Do what you like!
Step 5
Layer all the pieces and fuse in place following the manufacturer’s instructions.
Don’t forget to tuck the base of the ears and inner ears behind the head before you fuse.
Step 6
Stitch around all your pieces.
I machine stitch with regular all-purpose black thread with basic straight stitching everywhere. I love the cartoony look it gives! I go over the mouth twice to give it extra weight.
Combine multiple blocks in any configuration to make a baby quilt, a wall hanging, or a bed quilt.
Like almost all of my applique quilt patterns this finishes to a 10″ block. That means you can easily pop a bunny into any of my other quilt designs. A cute bunny would be a great addition to the Wild Flowers quilt or the Noisy Farm quilt. 🙂
Sometimes it’s really good just to play around with a crazy idea or set of rules and see what I come up with. Several years ago I was playing with some basic geometric shapes and I tried to see how many animals I could come up with, and how much I could simplify its features before it stopped looking like the animal I was trying to convey.
The shape I had the most fun with was a triangle-based pyramid – so when Mollie at Wild Olive announced that she was playing with triangles all March long, I knew I had to share this idea with her.
Using the same pattern and much fancier/hard-to-work-with fabrics I also made a dragon.
That dragon even talks fancy. 🙂
In my book Creature Camp, kids made penguins and chicks using the same basic pattern.
Didn’t the kid sewists do a great job with these?
Today I’m going to show you how to make the mama and baby kangaroo like in the top photo.
First – hop over to Wild Olive to download and print the pattern and see the basic instructions.
Step 1
Modify the pattern.
Measure up 2 1/4″ from the base of the triangle. Draw a line parallel to the base.
Done!
Step 2
Cut out your pieces.
Cut out the triangle pattern piece. Use it to cut 3 triangles in the body fabric, and 1 triangle in the belly fabric.
Cut the pattern piece into two pieces on the line you drew in Step 1.
From the trapezoid bottom piece, cut 2 pouch pieces in the body fabric.
From the top triangle piece, cut 2 baby pieces in the baby fabric.
Step 3
Sew the pouch.
Put the two pouch pieces right sides together and sew along the top (shorter) edge using 1/4″ seam allowance.
Flip them right side out and press that finished top edge flat.
Step 4
Make the baby.
If you want your baby to stay attached the the mama (that keeps the baby from being a choking hazard) then sew a ribbon to keep them together. If not, you can skip the ribbon part.
Lay one baby piece face up on a flat surface. Pin one end of the ribbon to the center of one side of the triangle.
Lay the second baby piece face down of the first, with the ribbon sandwiched between the layers.
Sew all the way around the edge of the triangle, leaving a turning hole where the long end of the ribbon is coming out.
Clip the excess fabric off the corners.
Turn the baby right side out, stuff it, and sew up the opening.
Step 5
Put the kangaroo together.
For the most part the instructions will be just like what you see on Wild Olive. You just need to construct the belly piece.
Lay the belly piece right side up on a flat surface.
Lay the other end of the ribbon down the center of the belly. You can see where the edge is sticking out the bottom and pinned in place.
Layer the pouch piece over the belly with the ribbon sandwiched between them.
Lay one of the body pieces over the belly and pouch layers you just constructed and sew all the layers together along the bottom of the triangle.
Keep attaching triangles, just like in the Wild Olive instructions, until your four triangles look like this.
The stuffing hole is in the seam between the two left-most triangles.
Finish sewing up the kangaroo following the instructions at Wild Olive.
What other animals can you make from this same basic shape? My sketchbook has ideas for a horse, a mouse and a shark. 🙂
One – I wanted it to be easy and fun. Of course. That’s a main consideration in all my quilt designs. 🙂
Two – I wanted it to work especially well with those awesome fabric collections with great illustration that you just don’t want to cut up.
You know what I’m talking about.
How could I cut up this image?
Or this?
Use larger scale prints for the wide stripes, smaller scale on the narrow stripes. It’s a great way to use a whole fabulous fabric collection – which is especially nice for folks who stress out about choosing fabric.
I designed it especially for great prints like these – but you’re not limited to that! Try it in solids in a nice ombre layout. Or create a rainbow from your favorite tone on tone prints.
Stripes are always in season – always in style. And they’re oh so easy to sew. 🙂
Thick & Thin is a free quilt pattern.
That’s right – FREE! And that doesn’t mean it’s some skimpy abbreviated form of one of my regular patterns. You’ll get everything one of my regular quilt patterns normally includes.
Complete instructions – including yardage requirements, cutting instructions, and assembly diagrams – for six different sizes.
Baby (36″ x 48″)
Crib (50″ x 52″)
Nap (65″ x 76″)
Twin (65″ x 88″)
Queen (86″ x 92″)
King (104″ x 92″)
Detailed instructions – you’ll never feel lost or wonder if you’re doing things wrong.
Instructions (and diagrams) for pieced backs for all the quilt sizes.
Links to videos teaching you all the skills you’ll need to complete the project – including basting, quilting and binding.
Detailed quilting instructions – none of this “quilt as desired” single line of instruction at the end. 🙂
This is a very easy quilt – easy to cut, easy to sew, and easy to machine quilt.
Want the pattern? Here’s the link to download it – free!
If you like this pattern, sign up for the Shiny Happy News! Subscribers get a weekly newsletter with crafty tips and tricks, free patterns, special discounts and more.
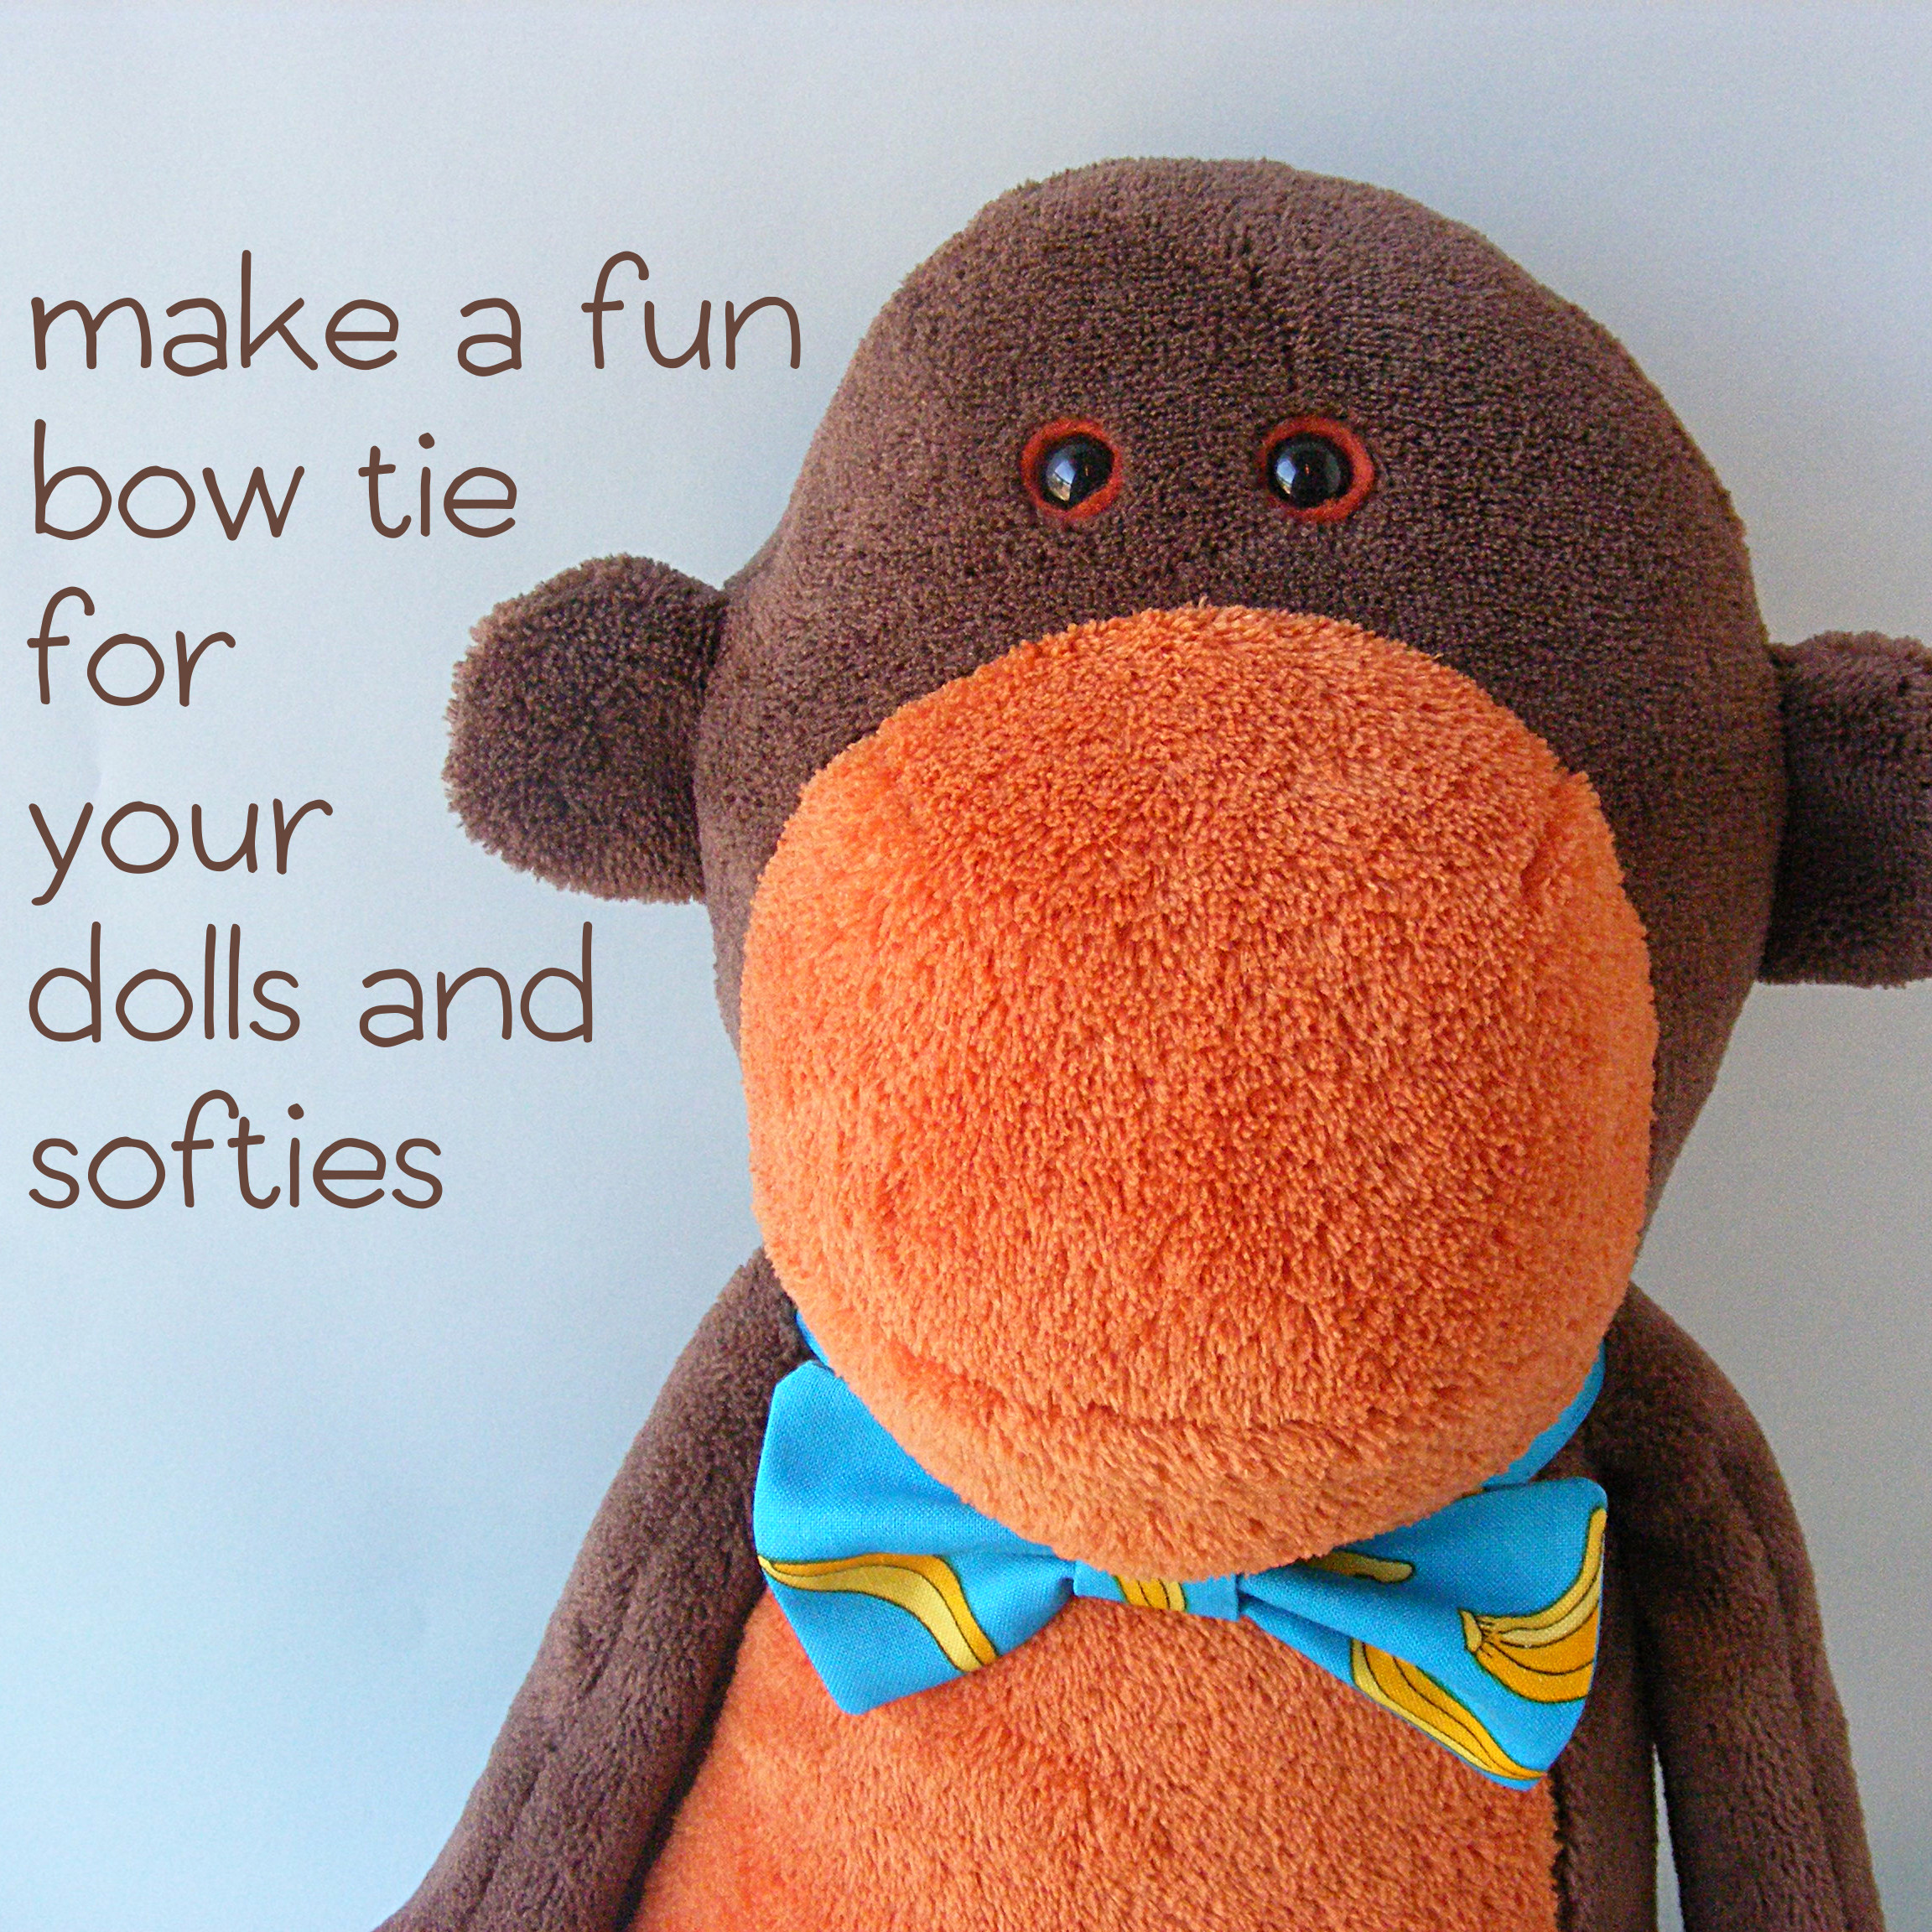
It’s an easy and fun accessory to add to any softie or doll!
This one fits most mid-sized softies – you can adjust the length of the strap pretty easily to fit whatever toy you’re trying to dress up a bit.
You can also leave the strap off and add a pin to the back to make a hair bow for a girl doll or softie.
Here’s the bow tie tutorial. . .
Cut out the pattern pieces as follows:
for the neck cut 1 piece 2″ x 14″
for the bow cut 2 pieces 4 1/2″ x 2 1/2″
for the knot cut 1 piece 2″ x 2 1/2″
Step 1
We’ll start with the bow part.
Place the two bow pieces right sides together and sew almost all the way around the edge using 1/4″ seam allowance. Leave 1-2 inches open in the center of one of the long sides so you can turn it right side out. Clip the corners.
Turn the bow right side out and press it flat.
You can hand sew the opening closed, but it will be hidden when you add the knot so you don’t need to. I didn’t.
Step 2
Now let’s prep the knot.
Fold the knot piece in half the long way and sew, using 1/4″ seam allowance.
Turn the piece right side out. Turn the tube so that the seam runs up the back and press it flat.
Step 3
Now for the neck band.
Fold the neck band in half the long way, pressing a seam down the middle.
Now fold the edges of the band in to that center fold and press. It should look like this.
Fold in the raw edges at the ends and press it flat, refolding and pressing that center seam.
Sew the folded edges together, as close as you can get to the edge. Sew a 1″ piece of hook and loop tape to each end of the band. Remember – one piece of the tape goes on the outside of the band and the other goes on the inside. I always try it out around a pretend neck to make sure I have it right before I sew the pieces in place.
Step 4
Let’s put it all together!
Pinch the center of the bow together. Wrap the knot around the pinched bow and the neck band. Fold the raw edge of the knot under and sew it in place.
This doesn’t have to be super neat – it will be on the back of the bow. While I’m at it (especially if this is for a child), I also tack a couple of stitches into the bow and the neck band to keep things from sliding.
Done!
You can easily make a whole bunch of bow ties in a range of colors and sizes to dress up all your toys and softies! Make some up in fun holiday prints to dress up for the different holidays!