Which way should my knitting go?

Tip Tuesday

You put down your knitting in the middle of a row, and then… how can you tell which way you were going? Has this ever happened to you?

No worries! I’m here to help. I’ll show you how to pick up your knitting and keep going without confusion!

For today’s blog post, I’m assuming you knit right-to-left (the way most right-handed and some left-handed knitters knit). If you knit the other way… then reverse the right/left instructions!

Check your yarn (left/right)

When you pick up your work, look at where the piece is attached to the yarn.

You want the yarn to be attached to the right needle:

knitting with yarn on right side

See how the yarn is coming out of the last stitch on the right needle? That’s what you want!

If the yarn coming out of a stitch on the left needle… just turn your work around!

Putting your yarn in its place (front/back)

You know that your yarn should be in the back for knitting and the front for purling… but what were you doing?

Have a look at the last stitch on the right needle. You want there to just be one piece of yarn in that stitch:

yarn in back for knitting

Here, I was knitting, and holding the yarn in the back is the right way to go.

Does it look like you have two yarns in your stitch? Check this out:

trouble with yarn

This means that you are holding the yarn on the wrong side of the needles. Just move it to the other side!

August Photo Contest Winner

The winner of August’s photo contest is Chloe, with her awesome back-to-school squid!

Squid with ink

Congrats, Chloe!

How to hand wash socks

Most of my winter socks are ones that I’ve knit myself. Many of them require hand-washing. It’s not hard… I’ll show you how. But first, let’s tackle some basic sock care questions and I’ll give you a little advice.

Sock Care FAQs

Do I really have to hand wash my socks? Check the label of the yarn you used. If the yarn says ‘hand wash only’, then… well, you need to wash your socks by hand. If your socks are made with machine washable yarn, then it’s up to you (read below for one reason you may opt to hand wash socks that are fit for the machine).

What happens if I put socks in the machine that should be washed by hand? They will felt, meaning that they will shrink and not be nice, lovely socks anymore.

tutorial on hand washing socks

How do you remember which socks need hand washing? The truth is, every once in a while, you won’t remember. Big oopsie. That’s why I recommend treating all of your socks as needing hand washing (see below).

Do I need a sock blocker? A sock blocker is a device that will shape your socks as they’re drying to look nice and pretty. I own one from Knit Picks, and use it for socks that I’m going to photograph for the blog. I don’t ever block socks just so they look nice in my sock drawer. I say skip it, unless you’re doing a photo shoot.

Separate your socks!

I’m going to give you my personal advice. Put all of your hand-knit socks in a separate basket from your clothes when dirty. And pretend that all of your socks need to be hand washed.

hand knitted socks

Why? If you don’t, one of two things is bound to happen:

  • Someone in your family will spontaneously do some laundry… and not know that they should pick out the socks for hand washing. This turns a wonderfully thoughtful gesture into ruined socks.
  • You will think that a particular pair of socks was knitted with hand washable yarn… and throw it in the machine. This will also result in ruined socks.

So don’t risk it. Make a habit of making a separate pile for hand-knit socks, and wash them by hand when you’re down to only one clean pair left.

How to hand wash socks

Hand washing gets such a bad rap… and I’m not sure why! It’s not that hard.

Gather your socks. Fill your sink with lukewarm water.

hand washing wool socks

Pour some Wool-wash (Eucalan is lovely and contains a natural moth-repellant) into the water as directed on the label.

Using Eucalan wool wash to wash socks

Be sure to look for a wash intended for hand washing, as these are intended to care for wool fibers and also do not need to be rinsed out. Contrary to its name, Woolite is a detergent and is terrible for wool. Spend the extra money for a real wool wash… you only use the tiniest bit for each wash and a bottle will last a long time.

Now, plop your socks into the sink, and press down so that they are fully submerged.

step by step tutorial on how to wash socks by hand

Leave for about 15 minutes.

That’s all! They’re clean! Squeeze each sock, getting out as much water as you can without wringing:

squeezing hand wash socks without wringing

Don’t get too disgusted by the icky-color of water that might come out… don’t forget, they’re socks!

Lay flat on a towel to dry.

When they’re dry, re-stock your sock drawer!

tutorial on how to hand wash socks

That’s not so hard, right?

If hand washing sounds like a nightmare to you, then I highly recommend that you knit all of your socks with machine washable yarn. Otherwise, your socks will wind up sitting in your drawer like an obscure antique, and who wants that?!?

But, if the siren song of the oh-so-delicious hand wash only indie dyed yarn sings to you… go for it! Hand washing isn’t so bad!

7 tips for planning travel knitting & crochet projects

The holidays are a typical time for traveling. And of course, you don’t want to set out without a project… but picking the right project for your travels can be tricky. In this blog post, I’ll give you some tips for picking the right project for you, and I’ll give you a peek at the travel knitting projects I’m planning!

airplane

Tips for picking the right project, and preparations

  • Think about your travel itinerary. Are you going to spend most of your time chatting with family or are you going to be alone on a plane? Thinking about your situation will help you decide whether you want a mindless project or one that can hold your interest.
  • Keep size in mind. Especially if you’re traveling by plane, luggage weight & space is important. Choose your travel knitting project accordingly. I tend to pack a shawl, since one skein of fingering weight yarn is fairly compact.
  • Keep notions to a minimum. If possible, you’d like a project that only requires one needle size, to keep your supplies to a minimum. If you require a large number of needles, consider a compact set, like an interchangeable set.
  • Do gauge swatches and investigate techniques in advance. This is an extension of the previous point: you want to keep your pack small. So, go ahead and do your gauge swatch so you know what needle you need. Also, look up any tricky stitches and print your pattern in advance, so you’re ready to roll!
  • Think about your seating situation. Have you ever lost a double point needle under an airplane seat? Or do you get carsick reading a pattern in the car? These things matter! Plan accordingly.
  • Investigate yarn shops in advance. Is there a yarn shop where you’re going? Jot down the address even if you’re not planning on a visit. You’ll never know when you’ll need more yarn!
  • Bring a back-up project. I can never decide on just one project. It’s easy to get bored or get stuck. Bring a backup just in case.

My travel projects

Tomorrow, I’m departing for Australia, which involves a 2 hour drive to the airport, a 6 hour domestic flight, a 5 hour layover and a 14 hour flight over the Pacific. Talk about needing a travel knitting project, huh?

My first project is Spectra by Stephen West. It’s been in my faves forever, and I’m really looking forward to it. I’ve selected my two skeins of yarn:

Blue Yarns

I’ve even done a swatch! The pattern calls for two fingering-weight yarns. The multi-color yarn I’ve chosen is listed as a worsted, but it looks quite thin to me. Fortunately, a swatch reveals that the two will play together nicely:

gauge

My second project is the There and Back Again Socks, a lovely pattern given to me by my friend Hollie. I’ve picked two close-in-color yarns:

purple yarn

Socks are a great portable project, and the color changes will keep the pattern exciting.

For these projects, I’ll bring along a size 6 24″ circular and a size 1 9″ circular. (I love 9″ circular needles so much that I wrote a whole post about them here.) Not too much needle baggage!

Plus, if I run low on projects, I can pick up a new skein of sock yarn and either knit another shawl or pair of socks!

What are your travel tips?

Do you have any tried-and-true travel planning tips to share? I’d love to hear them!

What does ‘amigurumi’ mean?

Today’s guest post is written by Alyssa, MonstersToyBox on Ravelry.

Alyssa is a student in Linguistics and Japanese, as well as a very talented knitter and crocheter. Who better to tell us what ‘amigurumi’ means?

What does the word ‘amigurumi’ mean?

You probably know that amigurumi are incredible cute toys made from yarn. And you probably know that amigurumi was originally Japanese.

A collection of amigurumi knit & crocheted by Alyssa
But what exactly is amigurumi? There are a couple different answers for that, and one of them is looking at what it originally meant in its native Japanese:

The first kanji (Japanese symbol of writing) is the character for “knit”; it can also mean several other things, but the knitting is what is important here.

And it is not just knitting; this character can apply to both knitting and crocheting. Japanese does not have two different words for knitting and crochet like English does. In fact, to crochet in Japanese is actually “to knit with a hook”.

So now we have the “knitted and crocheted” part of amigurumi. However, the second kanji is a bit trickier. One of its meanings is “wrapped”. At first, it doesn’t seem to have a lot to do with toys, however, “wrapped” implies that there is something being put inside. What is put inside amigurumi? Stuffing, of course! So perhaps a better meaning for this part, at least as it applies to amigurumi, is “stuffed”, although a native Japanese speaker told me that it is not limited to just stuffing. All sorts of things could be put inside amigurumi to give them shape, rubber balls, for example. The toy part here is assumed… what other knitting or crocheting is stuffed?

Does it have to be worked in the round?

Almost all translations will say that amigurumi means “knit or crocheted stuffed toy”, however, the majority of amigurumi (and especially Japanese amigurumi) is crocheted. That doesn’t exclude knitting as a valid form of amigurumi nor does amigurumi have to be worked in a particular style. I have found that many Japanese amigurumi are worked in joined rounds, but not all amigurumi has to be worked that way, and it certainly does not make it any less of an amigurumi!

Ready to start looking for Japanese amigurumi?

In Japanese, amigurumi is rarely written using the kanji anymore. Instead, it is written using the much simpler, syllabic hiragana (a phonetic alphabet):

If you are interested in looking for amigurumi in the original Japanese, this is what you are most likely to see.

Highlight this piece of text: あみぐるみ and pop it into Google… it’s your trick to finding oodles of images and even Japanese amigurumi books. Most Japanese books are charted, so they’re accessible to you even if you don’t speak Japanese!

Picking needles for knitting your sock…

A lot of folks get intimidated by sock knitting… and one of the things that’s so scary is picking what kind of needles to use! There are so many choices!

The truth is that the choice of which needles to use is completely personal preference, so you’ll probably have to try out a few. In this post, I’ll talk about the 4 main needle options for sock knitting, as well as the pros and cons of each one. Then, it’s up to you to pick your fave!

Double Point Needles

Options Available: material (metal, wood or plastic), length (ranging from 5-8″)

Double point needles (often abbreviated dpns) are a very common way to knit socks, and probably the most common way you’ll learn when you’re starting out. In fact, it’s the method I use in my Easy Peasy Sock pattern.

Pros:

  • Many sock patterns are written for dpns, so using them for these patterns is a lifesaver! (unless you’re already experienced with tweaking sock patterns)
  • They’re not very expensive.
  • Almost every needle company makes dpns (or a few!), so you have lots of options.

Cons:

  • There is a high probability of ‘laddering’, a funny gap that happens when moving from one dpn to another. You’ll have to knit carefully to avoid it.
  • The skinnier ones (which you use for socks) have a tendency to break. You might want to consider metal or needles with a replacement policy.
  • You’re using 4-5 needles to make once sock. Losing one (or dropping it under an airplane seat) is sad.

Are you going to be tossing your socks in a purse? Think carefully about how likely your stitches are to fall off, your needles are to break or get lost. If you love dpns, you might want to consider getting double pointed needle tubes so your in-progress socks don’t get into any mischief.

Two Circular Needles

Options Available: all of the options usually available for circular needles: material (metal, wood or plastic), length (ones ranging from 16″ to 32″ are usually used), pointiness of the tip

You can use two circular needles knit socks… they basically behave like 2 giant bendy double point needles. This is the way I knit my first pair of socks, and I love it! It’s a wise idea to use two circulars of different length (or different colored tips) so you can distinguish them while knitting. An added bonus is that this method makes available knitting 2 socks at one time (Knitting Circles around Socks, pictured).

Pros:

  • Because there are only 2 spots in between the needles (compared to 3 or 4 with dpns), laddering is less of a problem.
  • You may already have the circulars in your needle stash.
  • The ability to do two at a time? Rock on!
  • The project can easily be tossed in a bag without much risk of stitches falling off.

Cons:

  • If you don’t already have the needles, buying two circulars for one pair of socks can be costly.
  • Not many patterns are written for this technique, so you may have to do some adaptation.

It’s true, knitting on two circulars (especially two-at-a-time) has a little bit of a learning curve… but if you stick with it, you’re rewarded with less laddering and a more portable project. I also enjoy that you’re able to use your favorite circular needles (like my super-slick Addi Turbos), and don’t have to switch to another brand/style.

One circular needle (aka Magic Loop)

Options Available: material (metal, wood or plastic), pointiness of the tip

Magic Loop works very much like knitting with two circulars, except that you use one very long circular (usually a 40+ inch). The actual knitting technique is very similar, and has the same bonus is that this method makes available knitting 2 socks at one time (2-at-a-Time Socks uses one circular needle).

Pros:

  • Just like 2 circulars, less laddering (as compared to dpns) occurs.
  • The ability to do two at a time? Still rock on!
  • Also like 2 circulars, the project can easily be tossed in a bag without much risk of stitches falling off.

Cons:

  • Unless you knit shawls (or really like knitting your socks this way), you’re unlikely to use your 40″ needles on many projects.
  • Also like 2 circulars, not many patterns are written for this technique, so you may have to do some adaptation.

To me, knitting on 3 circulars and magic loop (1 long circular) have very similar pluses and minuses. More than anything, it’ll come down to your preference. For me personally, having extra cord drives me nuts. Therefore, magic loop drives me crazy! But for others, remembering which of the 2 circulars to use is endlessly confusing.

A 9″ circular

Options Available: material (metal or wood), pointiness of the tip

I’ll confess: this is my favorite way to knit socks. No laddering, no need to switch needles… just smooth knitting!

Pros:

  • No ladders!
  • Very easy to toss in a bag and travel with.

Cons:

  • You will need to switch to a different technique (either of the above 3 mentioned) to knit the toe, because there are too few stitches to fit around the circular.
  • Again, almost no patterns are written for this technique, so you’ll have to do some adaptation.
  • Many people say the smaller size gives them a hand cramp.
  • The needles aren’t yet widely available, and won’t be a part of any interchangeable kit.

I travel a lot, and I always bring a sock with me to work on. I absolutely adore the ease and portability (because I’ve had the traumatic experience of a dpn rolling under my airplane seat), and since my hands are small, I don’t mind the knitting. But, I also know a number of people who can’t stand them, so the only way to find out is to try them! The leading manufacturer in making 9″ needles is Hiya Hiya, who has 3 styles available: bamboo, metal and sharp.

Which are your faves?

What’s your preferred method of knitting socks?

If you’re a newbie… I hope I’ve given you a (not stressful) review of the options that are out there!

Insights on Expertise and Learning Knitting & Crochet

Right now, I’m reading Moonwalking with Einstein: The Art and Science of Remembering Everything. Want to know one thing I’ve learned? Experts can’t store more individual items in memory than beginners… but they can store more information overall because they divide content up into useful chunks.

What experts look like

Ever heard someone describe their project as, “Oh, I don’t need to look at the pattern. It’s just a basic top-down sweater with a raglan sleeve and waist decreases worked in stockinette with ribbing at the edges”? This causes most beginners to gasp… what? No pattern?!?

An expert is able to store the entire pattern for a sweater in memory because they’ve chunked big pieces of relevant information. Some examples of chunks:

  • Stockinette is knitting every row (when worked in the round) or knitting the RS row and purling the WS row (when worked in rows).
  • A Raglan sleeve is worked by increasing on each side of a stitch marker, every other row, until piece reaches desired size.
  • A top-down sweater is worked starting at the neck, down to the body.
  • Waist decreases are achieved by inserting a decrease on the sides of the sweater, and repeated every 4 rows.

And so on…

None of these items are secret knowledge. But they’re bits of information that has been acquired sweater after sweater, pattern after pattern.

What this means about beginners

If you’re a new knitter or crocheter, I don’t need to tell you how hard it can be to start! But, if you’ve been at it for a while, it’s easy to forget how tough it once was. But, when you’re teaching newbies, it’s incredibly important to remember how hard it is, in order to avoid a frustrating experience for everyone!

You have 7 (plus or minus 2) spots in your short term memory. That’s it. And that’s all people, even if you’re a genius. It’s how brains are built.

Now, let’s look at someone who’s beginning to crochet… starting with the basic stitch, the single crochet. The steps are:

  • Insert hook into the next stitch.
  • The next stitch is the one that hasn’t been used, and looks like a sideways V.
  • Wrap the yarn around the hook.
  • Pull the hook, catching the yarn, through the loop on the hook.
  • Don’t forget to rotate the hook down so you can catch the yarn!
  • Wrap the yarn around the hook again.
  • Pull the yarn through both loops on the hook.

That’s it! They’ve already used their 7 memory slots!

It’s pretty much useless to say to a (complete) newbie: “single crochet 3 stitches, then double crochet 3 stitches”… because there’s not enough spots in their memory to do it! They used all of their spots remembering the single crochet!

This sounds like a trivial point until you’ve run into a few less-than-gifted teachers. You know, the people who tell their (30-minute-old) knitters to ‘work a 2×2 rib’… when they don’t even have a grasp of the basics of successfully completing a knit stitch.

When teaching, channel the difficulty encountered by newbies, and keep their memory space in mind. Then, you can lead them to becoming experts!

Becoming an expert

All it takes to become an expert is one thing: practice.

Boring, right? No tricks, no secrets. Just doing the same thing over and over again until it becomes second nature.

After you’ve single crocheted for a while, you’ll no longer have to run through all 7 individual steps to complete the action. You’ll just ‘know’ the stitch, and it’ll only take up one slot in memory. Giving you space to start working on larger chunks!

For teachers, this means allowing students to work on a skill until they ‘get it’, and are ready to move on to the next concept. It may sound harsh, but I’ve been known to tell some students in my beginning knitting classes that they’re not ready to learn to purl. Their memories were still filled with the 7 steps of doing the knit stitch… and those were just going to be washed away by learning 7 new steps for purling. They thanked me, because it meant that, at the end of class, they had a skill they were solid on- instead of leaving confused.

What are you working on becoming expert at? Has it taken more or less practice than you expected?

Are you committing a gauge sin?

Ordinarily, I’m the sort of teacher who will say, ‘Do whatever you’d like, as long as it’s working’. I don’t care if you throw or knit continental, I don’t care if you crochet while holding your hook like a knife or a pencil. I even don’t really care if you pick up stitches with your fingers to manipulate them instead of using your hook/needle.

But, I’ve seen a couple gauge sins happen in my presence that need to be stopped! I’m going to tell you what the 3 biggest gauge sins are (regardless of whether you knit or crochet), explain why they’re hazardous to your fiber health, and tell you how to fix them.

Gauge Sin #1: changing how you knit/crochet

The other day, I met someone who was getting too many stitches per inch on her knitting project. Instead of switching to a larger needle, she said, ‘Oh, it’s no big deal, I’ll just knit looser.” Bad idea.

Why this is hazardous

The goal in knitting/crocheting is to first and foremost achieve an even gauge. That is, you want each stitch to be the same size as the next stitch, across your entire piece. This is what results in a professional-looking finished product.

The second goal is to get a gauge that matches the one specified in your pattern (if you’re following one). This is the only way to ensure that your finished item will fit you properly and as the designer intended.

If you rely on excess looseness in your stitching to get a certain gauge, you have almost no hope of achieving consistency… especially if it’s a project you work on for multiple days. You come home stressed one day, and you tighten up a bit… looser on days when you’re relaxed. This procedure = uneven gauge!

How to fix it

Different sized needles/hook were invented for a reason. They allow us to achieve different sized gauges effortlessly. You should work to create a consistent stitching style that allows the different sized hooks/needles to do their work!

I know… sometimes it hurts to buy a new needle. They can be pricey, and you already have so many! But think of it this way: you’re about to spend 40+ hours working on a sweater. Don’t you want it to turn out nicely?

If you have extreme buy-phobia that’s interfering with proper knitting, you may want to get it all over with at once and buy an interchageable knitting needle set. The set made by Addi gets very good reviews (lovely needles, smooth join). Too pricey? The Denise Interchangeable Set and the Knit Picks Set are more affordable options.

Gauge Sin #2: deviating wildly from the norm

Everyone knits/crochets slightly differently. Some folks are naturally tighter, others a little loose… and you’ll typically hear someone say, ‘I usually need to go down a needle size from what’s recommended in the pattern to get gauge’. That’s fine.

Saying, ‘I usually need to go down 4 sizes to get gauge’ means there’s a problem.

Why this is hazardous

There are two reasons why you don’t want to deviating in a significant way from normal stitching patterns. The first is that, if your knitting is so loose that you need to go down 4 needle sizes, then you’re probably not using the needle properly (as I mentioned above). The needle is there to lead you to the proper gauge. If you’re not following it’s lead, there’s a big chance that you’re going to get some unevenness.

The second reason is for practicality: what if you want to knit socks that call for size 0 needles… but you need something 4 sizes smaller? What are you going to do then? Manufacturers make supplies based on standard stitching practices. And the more you deviate from them, the more difficult you’re going to find getting supplies/following tutorials and patterns.

How to fix it

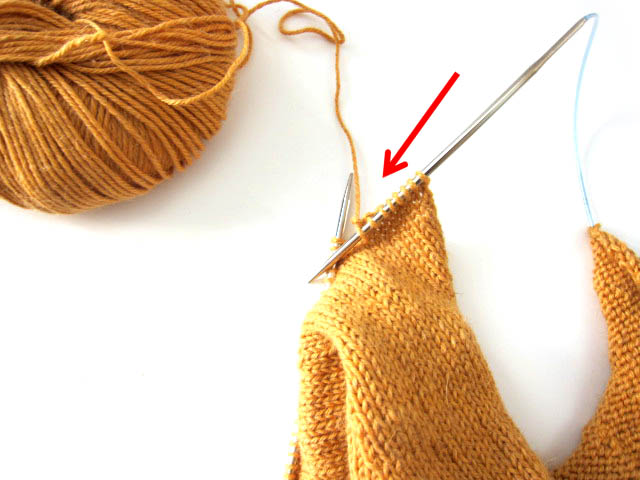
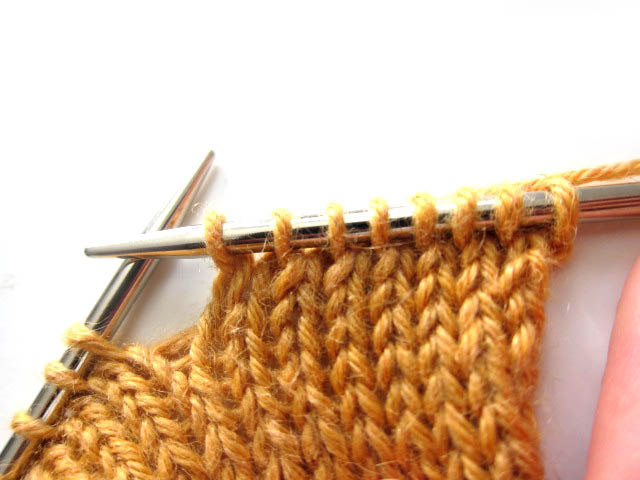
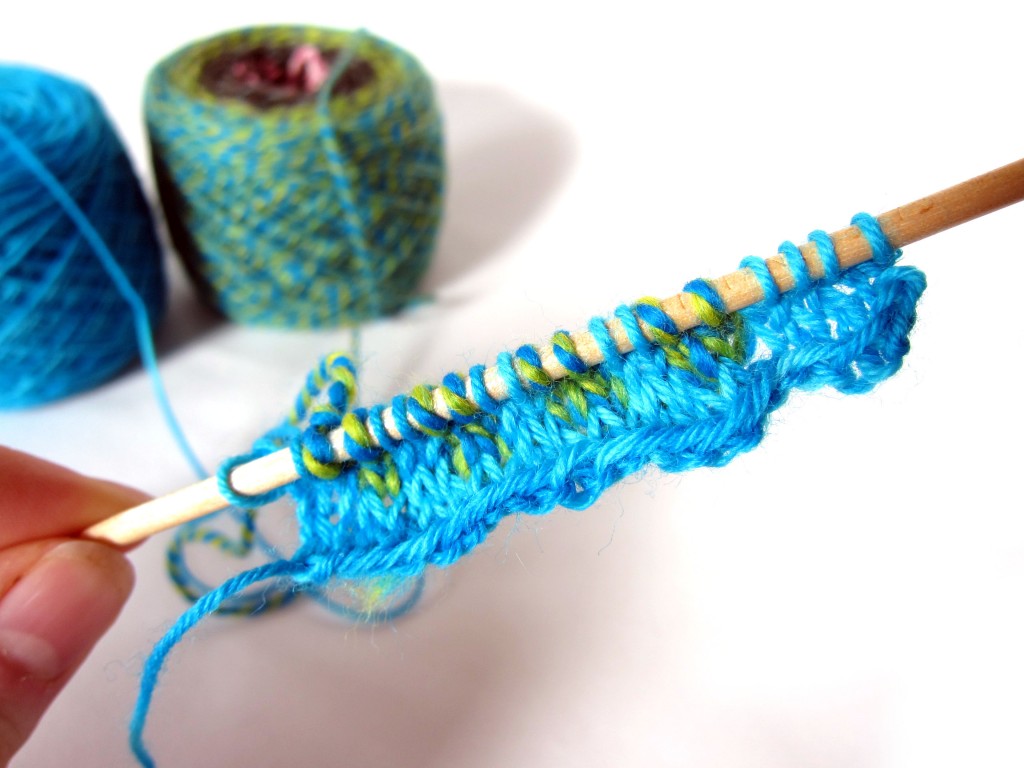
Your goal should be to knit/crochet so that the loop sits snugly on your needle/hook, but with a little wiggle room. I always say to look for a teardrop shape (shown here on my crochet hook):

The little teardrop is a way to check that your stitches are pretty snug, but not strangling your needle/hook.

If you can drive a VW beetle down your crochet hook and under the next stitch, that’s bad. You need to tighten up.

And it just takes a little practice. Read this blog post and spend some time making swatches with the goal of developing a snug and consistent stitch. Your future knitting/crocheting self will thank you.

Gauge Sin #3: assuming a yarn will always knit to a particular gauge

I can’t tell you how many times I’ve heard, “this yarn knits to 5 sts/inch… so I can’t use it for this pattern”. Hold your horses! The yarn label is a recommended gauge on a certain needle size, not word from the yarn gods about how it needs to be used.

Why this is hazardous

Let’s say that you you have a pattern for a loosely-knit sweater. The pattern may say they are using a worsted weight yarn, size 13 needles and getting 3.5 sts/inch.

If you look the label of a worsted weight yarn, it’s going to tell you that it knits to 5 sts/inch on size 8 needles… but this information is irrelevant to you! You want to knit it on size 13 needles!

How to fix it

Don’t obsess over the yarn label!

Check out this blog post on why yarn labels can be deceptive. A manufacturer puts a gauge that states how their yarn knits with a certain needle size.

When you’re following a pattern, it’s important to select the proper thickness of yarn, not match the gauge that’s indicated on the label.

If you’re comparing thicknesses of yarn, it’s okay to glance at the gauge info on the label… as long as you realize it’s for comparing weights, and not the gauge for your final product.

Confession time!

Have you fallen prey to any of these sins? I’ll have to admit, the third one had me mighty confused for a while. Have you been working on your gauge? Any tips to share?

Now that we’ve had this talk… you’re not going to do any of these, right? Good.

Want to make socks w/o knitting? A Review of the Sock Loom!

Almost every crafty person I know has, at some time or another, thought of making their own socks. I was intrigued when I saw the Authentic Sock Loom Knitting Board, which allows you to make socks without knitting! I had to give it a try!

About the Loom

The kit contains an adjustable knitting loom (the center bar on the board pictured slides so that you can get exactly the size sock that you want), a hook (that you use to make stitches on the loom) and an instructional DVD.

I was surprised by the high quality of each of the components. For less than $30, you could picture receiving a flimsy loom or a shoddily-produced DVD. However, the loom is quite hefty: constructed with solid wood and very secure and sturdy pegs. The DVD is neatly divided into sections (casting on, the knit stitch, turning the heel, etc.) and gives complete instructions for operating the loom.

How the loom works

A properly-fitting sock needs to be the appropriate size: so that it’s small enough to fit snugly, but not too small so that it doesn’t fit. The first step in using the loom is to set the knitting board so that it creates an appropriately sized sock for your foot. Fear not… this step is easy: you simply follow the calculations provided in the kit, and slide the center bar to the proper position.

The remaining steps mirror the steps involved in knitting a sock. You begin by ‘casting on’ the stitches:

Even though the actual motion for casting on stitches with the loom is different from knitting, the philosophy is the same, and the procedure is well-explained in the DVD.

After the initial cast-on, you begin ‘knitting’ your sock. Each stitch is created by pulling the working yarn through the stitch on the loom, using the hook:

Exactly how you manipulate the hook & yarn determines whether you produce a knit or a purl stitch.

You continue knitting and purling to create the cuff of the sock and then, just like knitting, you work a limited number of the stitches to form the heel. Then, you return to working all of the stitches for the foot of the sock.

The toe is constructed slightly differently on the loom than when knitting a sock: stitches for the top and bottom of the sock are decreased separately and then grafted across the entire toe. There is an option to remove the stitches from the loom and use double-point needles for a ‘traditional’ toe, but this seems to be an advanced option.

Benefits to the Sock Loom

The sock loom is an easy entry into making socks for those who don’t/can’t knit. Highlights include:

  • A well-constructed loom and instructional DVD (as well as further videos/support on their website: www.knittingboard.com).
  • Once you get a hang of the basic operation of the hook, you can create knit and purl stitches (and make an entire sock!) with ease.
  • Grooves in the pegs make it very easy to use the hook to manipulate the yarn.
  • Since the loom is adjustable, you can make socks of any size.
  • The design of the loom takes away many of the complicated calculations associated with knitting socks. Once you establish the number of pegs required, no further calculations are needed.

Disadvantages to the Loom

In my personal opinion, this loom is designed for people who do not currently knit. People who are already proficient knitters will find the experience of using the loom slightly tedious: it’s like using a crochet hook to create each new knit stitch.

Other downsides include:

  • The loom isn’t obviously portable. Although I suppose it may be, in principle… in practice, carrying a loom around is more awkward than carrying knitting needles.
  • Stitches can slide off of the pegs, particularly during the cast-on (see above photo, which happened as I was taking photos of my cast-on). In this case, the only option is to begin your cast-on, again.
  • The DVD doesn’t have many details on fixing mistakes. I assume this is because the loom is a new product, and I’d imagine that these will be videos added in the future.

Overview

The Sock Loom Knitting Board is an ingenious product that is well-crafted and allows you to create socks easily, without knitting.

This board isn’t a short-cut to making socks for people who already knit. I would advise knitters (who are afraid of socks) to find a helpful, beginner-sock pattern instead of turning to the loom. Some first-time sock knitting patterns are: Easy Peasy Socks and Basic Sock.

If you’ve been looking to make socks, and aren’t interested in knitting… this loom is your ticket!

Best,
Stacey

Flash your awesome Kool-Aid dyeing results!

I hope you’ve had an awesome time with Kool-Aid Dye Week… I know I’ve had a blast experimenting! Did you give any of the techniques a try? If so… show it off!

In case you missed it…

I’ve posted tutorials for quite a few ways of using Kool-Aid to dye your yarn! If you missed them, don’t worry… here’s a wrap-up:

Click on any of the following links to zip to the tutorial!

Check out what I made!

While I made a few knitted & crocheted swatches for Dye Week, I couldn’t wait to get started on a project! And since my favorite technique is dyeing the long colorways, I started with that skein, first!

Check out my socks!

EEE! Don’t you love it! In retrospect, I might have dyed smaller sections to get narrower stripes, but I’m not complaining… I think these are super-fun!

Show me what you’ve got!

I wanna see it!

Share your experiences with Kool-Aid dyeing in the comments section!

Better yet, write a blog post showing off your awesome yarn, and share the link in the comments! Then we can all see what awesome work you’ve done!

Tips for Knitting Wingspan

Have you heard about Wingspan by Tri’Coterie? It’s a trending knitting pattern on Ravelry recently… and I’m seeing it pop up everywhere!

I just finished knitting my first one and I’ve cast on for a second. It’s no wonder it’s a popular pattern… Wingspan is both fun and easy, and it’s a great yarn for showing off long color-repeats.

In this post, I’ll share a couple of tips I’ve learned… so you can get started on one for yourself. (trust me, you want to!)

Choosing a Yarn

This pattern is fabulous because it gives you the option of making a fingering, dk or worsted weight scarf… meaning you have lots of yarns available to choose from!

My personal favorite is to select a self-striping or gradient yarn. Yarns with long colorways will give you a shawl where each wedge is a different color (more or less), resulting in a gradient-effect across the entire piece.

Some yarns with long colorways are:

  • Almost any Noro yarn: try Taiyo or Silk Garden Sock for fingering weight or Taiyo, Kureyon or Silk Garden for a worsted weight.
  • Zauberball (Fingering)
  • Knit Picks Chroma (available in fingering or worsted weight)
  • Play at Life Maki Yarn (available in a wide range of fingering weight options)

I’ve also seen some lovely versions on Ravelry knitted up with yarns with shorter colorways, or even in a solid color. Doing this makes the ‘wedges’ in the shawl less defined, but still results in a beautiful shawl. Check out all of the projects and see what strikes you!

How to skip using a traveling marker

I like to knit on the go… and so adding and removing a traveling stitch marker every row was too much for me. Fortunately, you can easily go without using one.

To accomplish the patterning for Wingspan, you basically want to turn 3 stitches before the last time you turned on the previous row. Fortunately (since the pattern recommends not wrapping before turning), you’ll see a giant gap in your work where you previously turned (the red arrow).

So, all you need to do for your current row is turn 3 stitches before that gap (at the blue arrow), and bye-bye traveling stitch marker!

I recommend knitting one wedge by following the pattern before attempting working without the traveling stitch marker. Once you get the hang of it, you’ll only to add one marker every time you finish a wedge… much easier to manage!

The Cast-On

For this pattern, you’ll need to cast on stitches to the end of a piece you’re already working. Since there are already stitches in action (with yarn attached), your cast-on choices become more limited (for example, using the long-tail cast-on would require a second piece of yarn).

For this part, I use the Cable Cast on. It’s a simple way of adding stitches to a piece you already have. Check out KnittingHelp.com or consult a reference guide (like The Knitting Answer Book) to find out how to do it.

Have you started yours, yet?

It’s a fun, easy and portable pattern. I’ve just cast on for my second… a fingering weight version where I’m using up all of my leftover sock yarn pieces to create a rainbow effect. I’ll keep you posted on my progress!

Best,
Stacey