Free Tutorial – Easy Pattern Weights

Easy Pattern Weights - a free pattern from Shiny Happy World

These pattern weights are sooooooooo easy to make. Seriously. Each one takes less than five minutes. Dig into your fabric scraps and make a big batch of them for a sewing friend. This fabric (to match the rest of my sewing room) is designed by Ed Emberley for Cloud 9 Fabrics.

I’ve tried a lot of different styles of pattern weights and these are, hands-down, my favorite. The pyramid shape makes them really easy to grab, and they’re super heavy. My secret ingredient is aquarium gravel. I actually weighed all kinds of possible fillers to see which one weighed the most by volume. Gravel weighed more than twice as much as the next closest option!

Ready?

Cut a piece of fabric 6 1/2 inches wide x 3 1/2 inches tall.

Fold it so the right sides are together. Sew across the short ends using 1/4 inch seam allowance.

Turn the little tube right side out. Flatten it so the seam is running up one side. Sew across one end using 1/4 inch seam allowance.

Using contrasting thread is fun. 🙂

Fill it with 3 tablespoons of aquarium gravel. Flatten it this time so the seam is running up the center. Sew across the end using 1/4 inch seam allowance.

Careful not to spill the gravel while you’re getting it under the presser foot. 🙂

Trim up the edges using pinking shears. Not too close to the seam!

Done!

If you’re making these for a friend, 6-10 is a nice quantity. That’s enough to hold down just about any pattern.

These are really handy for more than just cutting patterns. I especially love using them for holding down the corners of freezer paper when I’m tracing applique designs.

Here are handy links to all the posts about quilting tools and supplies.

Sewing Machine

Iron

Rotary Cutting Tools

Scissors

Other General Sewing Room Supplies

One More Hugely Popular Post that Seems to Fit Here Better than Anywhere Else

Return to the Let’s Make a Quilt main Table of Contents.

Move on to the posts about choosing your quilt pattern.

Happy sewing!

The U Stitch – video

How to Embroider U-Stitch - a video tutorial from Shiny Happy World

Let’s call this one a U stitch.

I’ve searched through all of my embroidery encyclopedias and can’t find this stitch mentioned in any of them, so I have no idea what it’s called. I always think of it as a U stitch, so that’s what I’m calling it here. If any of you know the official name, please chime in in the comments!

The U stitch stitch is worked exactly the same way as a lazy daisy, but instead of a closed petal, it’s an open U. It’s almost a fly stitch, but the holding stitch at the bottom of the U is tinier than it is in fly stitch.

It’s really easy and makes great feathers, scales and petals. I used it for the wings on these hens.

See? Doesn’t the U stitch make perfect little wings?

Get the free pattern to make your own felt chicken here.

Here are all my lessons for other stitches.

Return to the Learn to Embroider main Table of Contents.

Move on to the lessons about finishing your work.

How to Use Poly Pellets in Amigurumi

Have you ever picked up a stuffed animal with a nice, weighty feel? Ever wondered how to achieve that feel in your handmade animals?

Use Poly Pellets!

Poly Pellets are small plastic-y beads that can be used to weight your stuffed animals. Today, I’ll tell you how to use them effectively.

How to use Poly Pellets

The trick to using Poly Pellets with a crocheted stuffed animal is to put the pellets inside a stocking or some other container. You see, the pellets are quite small:

If you simply pour the pellets into your amigurumi, then they will work their way through the stitches over time… not good! I’ve heard that there are larger pellets (that won’t come out) available in Europe, but I haven’t been able to find them on the American market.

Fortunately, it’s easy to put the pellets into a little stocking. I bought a pair of really cheap knee-high stockings (a light color is preferred if your animal is a light color), but you could also sew a little pouch if you desire. Once you have your vessel, poured the desired amount of pellets inside, and close up!

With the stocking, I tied a little knot… easy!

Now, place the bundle inside your amigurumi, and fill the remainder of your animal with stuffing, as usual!

Tips for using Poly Pellets

  • Use a stocking or some sort of fabric to keep the pellets contained.
  • Use the pellets sparingly. A fist-sized bundle is enough for an 8″ stuffed animal. Filling the entire animal with pellets will make it too heavy.
  • Try using pellets in the bottom of an animal, so that it will sit upright more easily. Use plain stuffing for the head.
  • Try using a small amount of pellets in dangling-style arms.
  • Remember that Poly Pellets are not recommended for use with small children.

Update – Wendi designed this free Squishy Monster pattern especially for the fun feel that poly pellets can give. Have fun with it!

Best,
Stacey

5 reasons to love your LYS

“I can order it online for cheaper”

Yup. It’s true.

In the internet age, where everything is available online for a discount, some people are wondering why it’s worth shopping at a local yarn store (LYS).

My suspicion is that many people feel this way because they haven’t yet discovered what an LYS truly offers. A good LYS is about way more than buying yarn: and once you know that, you’ll find it easy to support your favorite shop.

Why online shops can offer a discount

Don’t get me wrong: I shop online, too. Sometimes I’m looking for a yarn that my LYS doesn’t carry. Many online yarn retailers are also LYSs (like Jimmy Beans Wool and WEBS), so I’m in no way trying to convince you that online shopping is bad.

But there’s one unavoidable truth: you get what you pay for.

Why can online shops offer a discounted price on yarn? Because the costs of running an online shop are different than running a store front. An online shop has lower operating costs than a retail store, and they’re able to pass that savings onto the customer.

True, you may be able to buy that same yarn or book online for cheaper. But you’re missing out on all of the extra goodies that come with buying from an in-person shop.

What LYSs offer that online shops can’t

Besides the obvious plus of being able to see & touch a yarn in person (and who doesn’t want to do that?!?), there are some major benefits to shopping at a great LYS.

A good yarn store is the new town square. You know how in the old days, people used to gather in the town square to catch up on gossip and see their friends? That’s what a good yarn store is like. You can gather in a comfortable space, knit, chat with friends and get the newest yarn gossip from folks in the know.

A yarn-store owner is a curator. Have you heard of the paradox of choice? It’s the idea that selecting from 100 different yarns is daunting. A yarn store owner acts as a curator, stocking their shop with the loveliest in the land.

I can say this because I go to the annual trade show: there are a bewildering number of yarns out there! In a LYS, the owner has hand-picked a selection suited to the local market. Does the such-and-such brand have a bad rap for deteriorating in the wash? Your LYS owner knows about it and isn’t stocking that icky yarn… because they know that stocking a sub-par yarn would reflect poorly on their shop.

LYS employees are personal shoppers. How many stores can you go to where there is often an employee dedicated to helping you select the best fiber, thickness and color for the project you envision? That’s extraordinary service in most shops, but more or less standard at LYSs.

Samples. I don’t think I even need to say more! A typical LYS has samples of yarns worked up, so you can see an example of a finished product. No getting tricked by weird pooling. No getting fooled by how soft it’ll be.

Help when you need it. Don’t abuse this privilege (trust me, it just creates an awkward situation!), but most LYSs have the policy that if you bought the yarn/pattern in their shop, you can pop in for 5 minutes of free help. Most of the time, a touch of help from an expert looking at your work is enough to set you on the right path. Priceless.

What’s your stance?

Have you discovered an LYS that you love? What makes it great?

Do you have ‘a policy’ about when you shop online and when you visit a store?

I’d love to hear your thoughts!

All photos in this blog post were taken in Knit New Haven, one of the shining examples of what a great yarn store should be.

Looking for a great textured stitch? Bobble stitch tutorial!

crochet alligator as sample for how to crochet bobble stitch

I adore the bobble stitch: it’s such a great texture! I developed this stitch because I wanted a puff… but the traditional ‘popcorn stitch’ (used in a lot of sweaters, hats, and afghans) leaves a hole in your work that isn’t suited for amigurumi.

crochet alligator with bobble stitch bumps on his back

The bobble stitch (bbl st) creates a puff… but by using the front loop of the previous round, creates a hole-less fabric just as plain single crochet would!

The Bobble Stitch Video

Interested? Learn how to do it!

To view the video in a larger screen, press ‘play’, then click the square icon in the lower-right-hand corner of the dialog box!

You can use this stitch in some really unexpected ways!

Of course, you can use it to give an alligator a bumpy back like you saw above. (That pattern is in the book Crocheted Softies.)

But take a look at this guinea pig.

crocheted guinea pig with bobble stitch feet

See how the feet are just itty bitty bumps? Those are bobble stitches!

(You can get that guinea pig pattern here.)

If you want smaller bumps, you might want to try a picot stitch instead. That’s what Wendi used to give Merrick Monster his warts. 🙂

Merrick Monster crochet pattern

There’s a video here showing how to crochet picot bumps.

What do you think? Want to give it a try?

Here are handy links to all the posts teaching more fancy crochet stitches. . .

Return to the main table of contents for Let’s Learn to Crochet Amigurumi.

Move on to the posts about working with crochet patterns.

Happy stitching!

Adorn Anew Blog Tour: How to dye a gradient yarn with kool-aid!

Today I’m going to show you how to dye gradient yarn in two fabulous colors – with Kool-aid! But first, a little background. . .

I was excited when Laura Nelkin asked me to be on the blog tour for her serialized ebook, Adorn Anew. It’s a beautiful collection of knitted & beaded jewelry and accessories, with a new pattern released each month in 2012.

Adorn Anew by Laura Nelkin - book cover showing yarn and beads

Laura is well-known as the ‘knitting with beads’ goddess (okay, I made the title up, but that’s an accurate description!), and is the instructor of the crazy popular Knitting with Beads course on Craftsy.

I had never knitted with beads before, so the reason I was so stoked to be on the blog tour is that I knew it would give me a push to give knitting with beads a try. Beads add such a beautiful bling to your project without increasing the difficulty by too much. Besides, I know Laura’s work. The instructions in her patterns and accompanying videos on her site are fabulous. I wouldn’t run into any trouble.

Four hand-knitted Stellani shawls draped over a wall - all made with gradient yarn

So, anyway… (this is one of those stories where my husband would say, “where’s the point of this story?” And I would say, “I have to tell the story chronologically!”) I signed up to be on Laura’s blog tour back in early summer, when only half of the patterns had been revealed. I was anxiously awaiting November, so I’d discover which pattern I’d be knitting. I nearly fell off my chair when I found out that November’s pattern is Stellanti! It’s an amazingly beautiful shawl… and I spotted Laura wearing it at Rhinebeck, but I had no idea it would be part of Adorn Anew! I had been coveting it… and I am so excited to be knitting it!

What is a gradient yarn?

A gradient yarn is a yarn that slowly shifts from one color into another. Although Stellanti would be beautiful with any fingering weight yarn… the gradient yarn used for the sample gives it a little extra pizzazz.

The samples were knit in Nightfall by Fibro Fibers, which is absolutely stunning. But since each skein is hand-dyed (and there’s currently a huge demand for Stellanti!), this particular yarn can be hard to get your hands on.

And since this shawl requires 490 yards, purchasing a standard 440 yard skein (of Noro or another commercial gradient yarn) won’t work… since you’d run out of yarn and would need a 2nd ball… which would mess with the gradient.

Sound like a pickle! No worries! I’m going to show you how to dye gradient yarn, using Kool-Aid! It’s fun, cheap and easy!

How to dye a gradient yarn

Let’s do it! You’ll need:

  • 490 yards of undyed yarn (details below)
  • 2 colors of Kool-Aid, 5 packets each
  • 4 mason jars or containers

Prepare your yarn

To begin, you’ll need 490 yards of an undyed fingering weight yarn, mostly wool (a little bit of nylon is fine, but avoid plant fibers, since these won’t take dye the same way). I’m using LB 1878 from Lion Brand, but I’ve also had great success with the bare skeins from Knit Picks:

Roll your yarn into a cake… this step is important!

Select your Kool-Aid

I’ve blogged about dyeing with Kool-Aid before (read the different techniques here!), but today we want to dye gradient yarn, which means selecting only 2 colors. For the effect I want, I need to make sure one of my colors is noticeably darker than the other.

I chose Tropical Punch (red) and Grape (purple). I discovered that there’s a special Halloween color called ‘Ghoul-Aid’, which is closer to black and would work amazingly, but I didn’t know about it when I was dyeing!

Prepare your yarn and Kool-Aid

First, prepare your yarn by separating it into 4 approximately-similar-sized chunks. This is easy because you wound your ball… pull out one center chunk, then another…

Line your mason jars up in a row. Pour 2 packets of color 1 into the far left one, then 2 packets of color 2 in the far right one. For the center two jars, combine the colors to create your gradient. For example, my 2nd jar contains 1 packet of Tropical Punch and a teaspoon of grape:

Setting up the colors to dye gradient yarn

Next, pour very hot water into your jars:

Four mason jars, each holding a different blend of colors to dye gradient yarn - with a bundle of white yarn sitting in front of each jar

At this point, it would be wise to stick a little sample yarn into each jar… just to make sure you like the color. You can add more Kool-Aid to alter the color at this point.

Dye!

Stick the yarn in the jars! One yarn ball per jar. . .

Four mason jars holding a blend of dye shading from red to deep purple - each with a ball of yarn soaking up the dye

Use a utensil (remember, the water’s hot!) to poke at the yarn and make sure every bit of yarn is getting wet. If there’s a section that doesn’t absorb yarn, you’ll end up with a white blotch!

detail of yarn being dyed red

Do you notice a little section of white yarn between the jars? Be sure to dunk those sections into the dye as well!

Let dry

Remove the yarns and squeeze out the excess water:

How to dye gradient yarn - four balls of yarn each dyed a different color, shading from red to deep purple

Let these dry completely before you do anything else… you don’t want any tangles!

You have a gradient yarn!

Once dry, wind into a cake:

Finished cake of yarn dyed in a  gradient from red to purple

Ta da! Isn’t it beautiful!

Want to see my progress?

I think my Stellanti is knitting up beautifully!

And look at my beads! Aren’t they fabulous?

Knitting with beads isn’t too complicated… the most difficult part (in my opinion) is that once pre-strung, you have to keep scooting the beads down your yarn as you work. No biggie.

Want to get started?

Now you can dye gradient yarn yourself – no special tools or supplies needed, just two colors of Kool-aid! You can grab the Adorn Anew ebook (for the whole collection of fabulous patterns), or just the Stellanti pattern.

Happy stitching!

What is an ergonomic hook? Do you need one?

Although crocheting is far safer than other hobbies (take jousting, for example), it’s not without its dangers. Depending on your crochet style, genetic disposition and lifestyle, crocheting for long stretches of time can result in wrist/hand pain. Ouch.

What is an ergonomic hook?

An ‘ergonomic’ crochet hook is a hook that is designed to alleviate pain that occurs while crocheting. Most ergonomic hooks have an enlarged handle that can be more comfortable to hold.

Hook: Kollage Square Crochet Hook
I haven’t found much information on exactly why (medically speaking) a larger handle alleviates wrist pain while crocheting, but there is much anecdotal evidence that these types of hooks work.

There is a large variety of ergonomic hooks available on the market (check out my crochet hook review for some reviews). Some hooks simply have a thicker handle, while others have a shaped/contoured handle.

Hook: Addi Swing Crochet Hook

Is an ergonomic hook right for you?

If you’re experiencing tendonitis, arthritis or any other condition that makes crocheting painful… there’s a chance that using an ergonomic hook will provide relief.

The bad news is that there’s no sure-fire way to know which hook is right for you without just trying them out. For example, I find that the way I hold my crochet hook makes it difficult to hold the Addi Swing… but there are many other folks that swear by it.

Hook: Furls Crochet Hook
I personally adore my Furls crochet hook, which is handmade with the width of your palm taken as a measurement.

Another factor to consider is the shape of the actual hook. We all prefer different hook shapes, and no matter how comfortable the handle is, you’re probably not going to regularly use a hook that has a hook shape you’re not a fan of.

Hook: Chiao Goo Bamboo Crochet Hook
The only way you’ll know for sure if a hook works for you is to try it out. I know… that may not have been what you wanted to hear!

Try wrist exercises!

If you’re experiencing wrist pain, it may also be worth your time to try doing wrist exercises regularly. Let’s admit it: crocheting isn’t an action that our bodies evolved to do, and it’s bound to be a little tiring. So, if you’re crocheting for hours on end, be nice to your wrists and give them regular breaks and stretches.

Be nice to your wrists

Listen to what your body is telling you. Even if you find a lovely ergonomic hook that works for you, you may not be able to crochet for long periods of time. Respect that, and break your crocheting into chunks.

In my experience, many folks with wrist pain are able to find a solution that works for them. It just may take a little trial and error!

Looking back at one of my biggest FOs: Crocheted Softies!

It’s Finished Object Friday!

As you may have surmised from this week’s Work-in-Progress post, I don’t have anything finished that I can actually show you…

But, do you know what today is? It’s the 1 year anniversary of the release of Crocheted Softies! Talk about a big FO!

So today, I’m going to take a little look back and chat about my goals and how I chose the projects for the book!

My goals for Crocheted Softies

There are quite a few books of crocheted stuffed animal patterns out on the market. When designing my book, I wanted to make sure it was special and unique, so I set a few goals. I wanted to make sure that:

  • the book contained patterns for large, cuddly animals suitable for children to play with (many books available focus on teeny-tiny animals)
  • the book included Earth-friendly yarns, since one and two-skein projects are an excellent time to experiment with new fibers!
  • a newbie crocheter could pick up Crocheted Softies and make an animal
  • a crocheter of any level could find a project that is interesting and learn something new!

Selecting the projects

To meet these goals (the last two in particular), I had to put a lot of thought into selecting projects. I thought about what sorts of skills a crocheter might want to learn (from easiest to hardest) and then designed an animal that incorporated each one of these skills. Let’s take a peek!

The basics: single crocheting, increasing & decreasing

It can be daunting to start on a big project, so the simplest project in the book is also the smallest: Kai the Kiwi.

All photos courtesy of Martingale Publishing
This adorable little guy is a great project to start on (small, simple shaping, few pieces to attach) and also gave me the opportunity to use a yarn from New Zealand (that’s where Kiwis live!): Zealana Kia Ora Rimu DK. This yarn is made from New Zealand Merino and possum. The possums in New Zealand are an invasive species, and culling them for yarn saves the kiwi’s habitats! Isn’t that so poetic?

Practice attaching pieces, without complicated stitching

Many people tell me that attaching pieces is their least favorite part of making animals… so it’s helpful to get a little practice on a cutie that doesn’t require complicated stitching.

That’s why I designed this adorable owl: the stitches aren’t any harder than is required for the kiwi… but there are more pieces, so you’ll quickly gain confidence when putting him together.

And don’t you just hate buying three skeins of yarn for one project… and then having lots of leftovers? I designed this owl so that you could make all three of the owls with only 3 skeins of yarn! By using the main color of one owl as the contrast color of another… you use up the skeins perfectly!

(I thought it was very clever…)

Changing Colors

Changing colors is a skill that you’ll need for a variety of crochet projects! And, it’s a fun way to add character, so I put quite a few ‘color-changing’ projects in the book.

Maple the Moose is a great way to ease in to changing colors: each of his limbs just require one color change (going from the black of the ‘hoof’ to the brown of his ‘leg’):

The next level up in working color changes is to execute stripes… check out Fins!

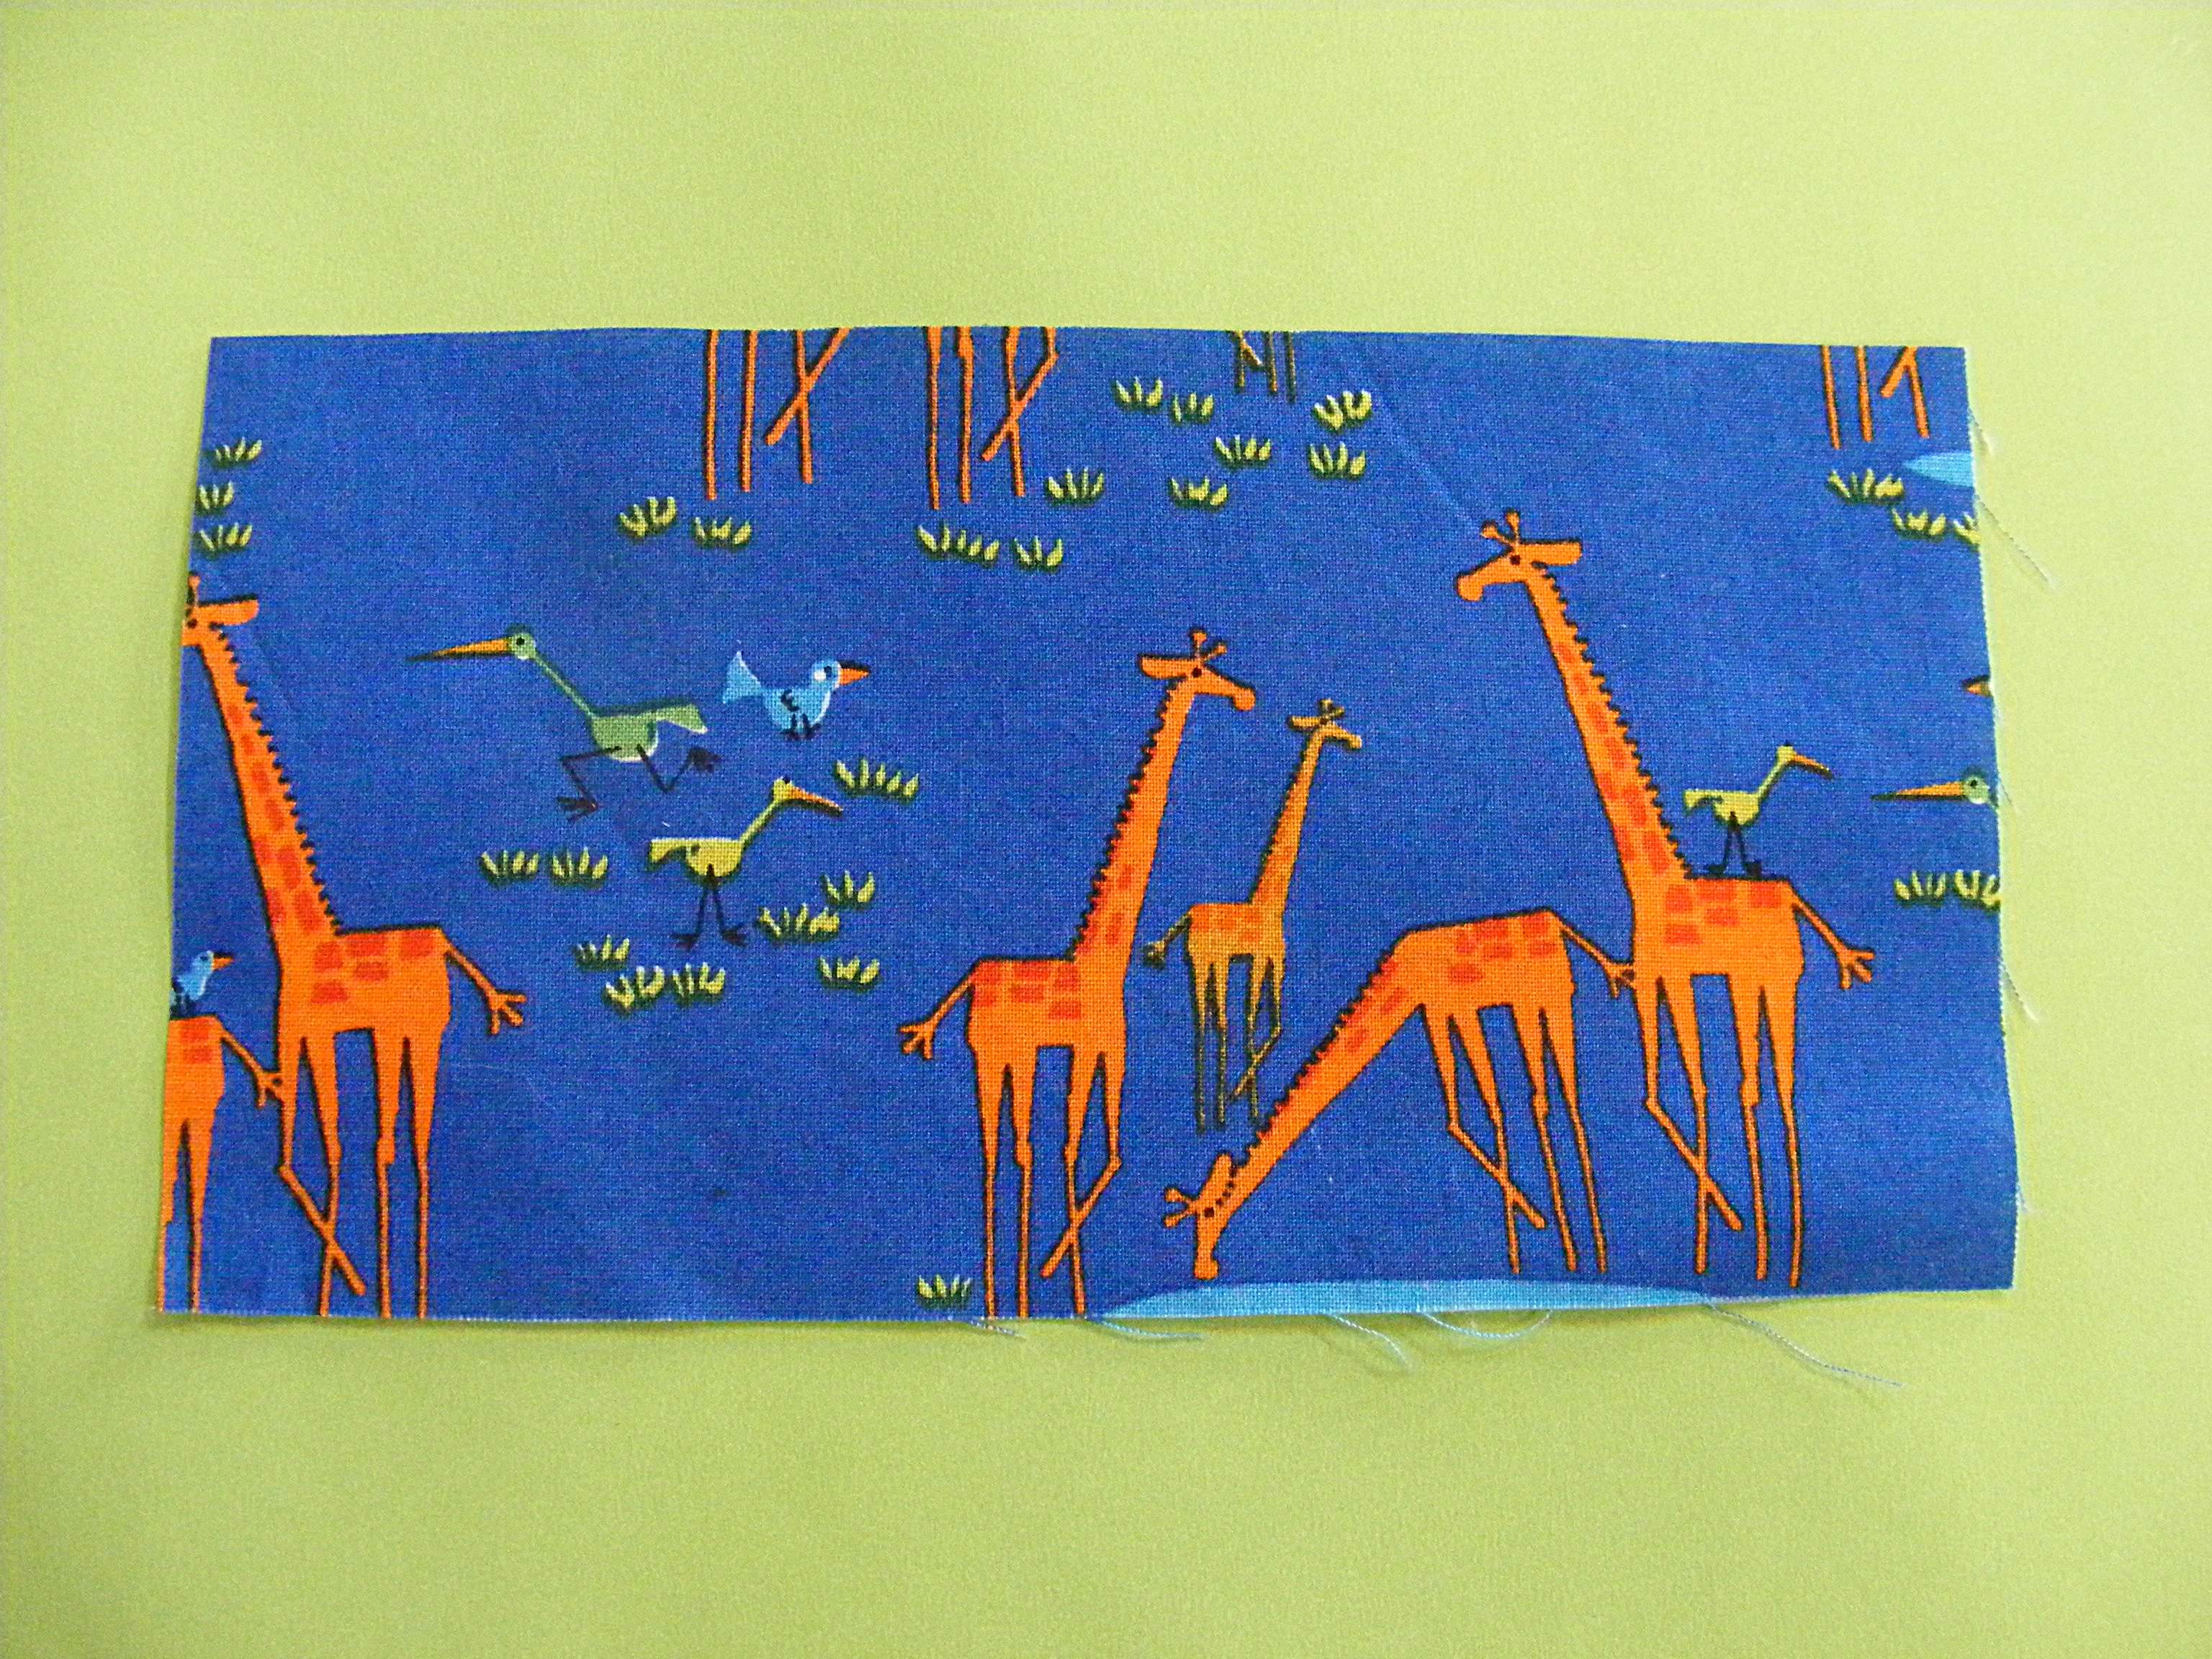
And once a crocheter has mastered those skills, they’re ready for working color changes multiple times over the entire piece, as you do for the patches of the giraffe:

By working through these patterns, a crocheter would end up with a bundle of awesome color-changing skills in their pocket! And what’s better than feeling fully confident with changing colors? It’s a boost that’ll let you tackle a whole variety of (non-stuffed animal) projects!

Shaping with slip stitches

Aside from shaping by using increases and decreases, I wanted to include a project that used slip stitches to accomplish the shaping. This technique creates the curvy body of Slithers the Snake:

Doesn’t he look fun?

Shaping with short rows

Another technique for shaping is using short rows. I designed Tuskegee the Walrus, which uses short rows to achieve the curve of his body:

Shaping with short rows allows you to create a sharper bend than is possible with slip stitch shaping. It’s also a technique that will pop up in garments such as socks and some sweaters. I thought, ‘what better way to practice than on a stuffed animal that doesn’t need to fit anyone?’!

The loop stitch

Who doesn’t want to add a little bit of texture to a crochet piece? The loop stitch is a super-fun stitch that creates a fabulous look. It can feel like a lot to learn, though, so I made sure to include a project with very little shaping, so crocheters could just practice the loop stitch:

And then, you could try your hand at the alpaca, which uses the loop stitch and shaping:

The alpacas are crocheted with 100% natural alpaca yarn… giggle!
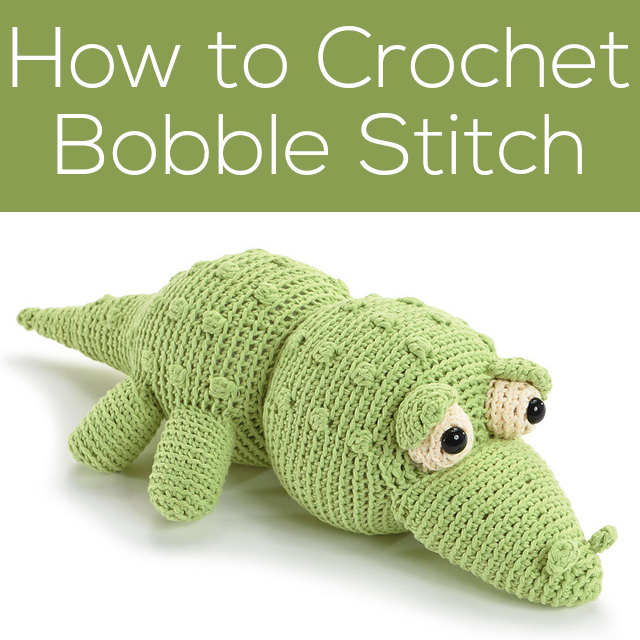
The bobble stitch

I created (at least, I haven’t seen it anywhere else!) a bobble stitch that can be used on stuffed animals, since it doesn’t leave a hole in the fabric like many other bobble/popcorn stitches. I wanted to use this stitch, so I had to come up with an animal that would have bumpy skin…

It’s a crocodile! The perfect excuse to use those bobbles!

Joining pieces by crocheting

Another technique I knew I wanted to include was joining separate pieces by crocheting them together. This is how I designed Zork the Alien’s eyes:

My hope is that this is a technique crocheters will fall in love with, and use on their own projects and designs!

Would you feel confident?

If you mastered all of these techniques, would you feel like a more confident crocheter? More willing to tackle patterns? My hope is that you’re saying, “Yes, I would!”!

There are more patterns!

Did you know that there were supposed to be 2 more patterns in the book? But that they got cut for space reasons?

And now… (this is exciting) those missing patterns are available for free!

One of these is M. Richard the Whale:

And he’s available as a free download from Martingale. (Do you like the name? Get it? M. Richard… think about that for a minute.)

The second is Hugo the hippo, available as part of Crochet Me’s free Amigurumi ebook!

Go ahead and grab those patterns!

Join in on the Crocheted Softies fun!

I’ve had a total blast in the year following the release of Crocheted Softies. It’s been wonderful getting emails from all over the world from people who have discovered/rekindled their love of crochet with my book! One of the highlights was when I found out that Adriana crocheted all 18 projects from the book! How awesome is that?

Crocheting doesn’t have to be hard or stressful… with the right tools (and I’m hoping the super-illustration-ful introduction of my book is one of them), you can develop the skills you need to make crocheting a fun part of your life!

So, thank you, everyone for loving Crocheted Softies and filling my year with fabulous projects and comments! If you don’t have it… maybe you should put it on this year’s Christmas list!

Thanks for stopping by and reading!

If you want to see more great finished items… make sure to visit Tami’s Amis blog, the organizer of this great FO Friday theme!

I hope you have an awesome and craft-filled weekend! I’m making it a goal to put some serious thought into my holiday crafting…

How to strand yarn in color changes: a video tutorial

Every Tuesday, I post a helpful tip… and this week, I’ve been getting a lot of questions about how to handle the unused yarn while crocheting with two colors. (It’s funny: you wouldn’t think there would be trends in customer questions, but there certainly are!)

For today’s post, I’ve made a video showing you how to strand your yarn while working color changes.

Which technique should you use?

When you’re working with two colors in crochet, there are a quite a few ways that you can handle the color changes. You can:

  • Cut and re-join the yarn at every color change
  • Use separate balls of yarn for each section of color (called ‘Intarsia’, this technique works best with large blocks of color and when working in rows)
  • Carry the unused yarn along the back of the work (called ‘Stranding’, and works best over short color-changes)
  • Strand, then cut and tie the yarns (a technique I developed for handling long color changes, worked in the round)
  • ‘Crochet over’ the unused yarn (this resolves some problems caused by stranding, but the unused yarn is often visible through your crochet)

That’s a lot of choices, right? Which technique you use will depend on how many stitches are between your color changes, and whether you’re working in the round or in rows.

How to use the stranding technique: the video

Stranding is best used for short color changes, and can be used in rounds or rows. Therefore, it’s a technique that comes in handy, often!

Here’s the video where I show you how it’s done!

Pattern: Nel, the Tiny Owl

Want to discover a whole new world of patterns? Try reading crochet charts!

I adore Japanese craft books. It doesn’t matter if the craft is sewing, crocheting, needle felting… you name it and I can guarantee that you’ll find a supply of irresistible Japanese books on the topic.

Just one example of the crochet fabulous-ness that comes out of Japan.
Of course there’s a little bit of bad news that accompanies this discovery: many of us (myself included) don’t read Japanese.

Meet your friend: the crochet chart

Want to know the good news? Japanese crochet patterns are written with charts: meaning that, if you can understand the international language of the charted symbol, you’ll gain access to all of those amazing patterns!

Page from Crochet with Color, book reviewed below.
(Actually, the illustration-heavy nature of Japanese instruction books applies to other crafts as well. You can read about my latest needle-felting book purchase in this blog post.)

I know… it can be daunting to pick up an entire book in another language. And, I’ll be honest with you: buying a Japanese book as a way of trying to learn the charts will be tricky. But fear not: I have an idea that will set you on your path to charted bliss.

Crochet with Color

What if there were a magical book: originally written in Japanese (so it contains all of the charts and illustrations, exactly as they would be written in a Japanese book), but with the text of the book translated into English? Wouldn’t that be the perfect way to get your feet wet with charts?

Crochet with Color is your book!

This book contains 25 beautiful & colorful crochet projects, all fabulously photographed and totally enticing. But really, if you’re just curious about the projects in the book, you can head on over to Amazon and use the ‘look inside’ feature. It’ll tell you everything you need to know about what the book contains.

Although the projects are adorable and lovely… if you’re buying a book for the projects, it’s a personal judgement about whether the particular projects in the book speak to you. And I can’t tell you that! But, I think there’s a real value to this book aside from the projects, and that’s the charts I’ve been talking about.

Don’t get me wrong, there are American books that contain charts (Robin Chahula‘s books are almost all charted, and are fantastic). However, let’s say your goal is to gain the skill set to read Japanese crochet books. Crochet with Color is, in my opinion, one of the best stepping stones you can get: since the charts and illustrations are exactly what you can expect to find!

And yes, I really do think that once you can read the charts and understand the illustrations, you can use Japanese crochet books… because I’ve done it!

Feed the addiction…

Once you feel comfortable with reading charts, you’re going to want to get your hands on more Japanese books!

If you live in a big city, you might have a Kinokuniya, an import book store with a huge crafting section! I definitely suggest a visit if you’re near one!

Aww! So cute!
If you’re shopping online, it definitely takes a little searching to find a source: since most of us don’t know the Japanese characters you would need to search a Japanese website. The Etsy store, Japan Lovely Crafts sells Japanese knitting, crochet and sewing books. Ebay is also a good source, search “Japanese Crochet Book”, and a good number come up.

Just be cautious, you want to make sure you’re buying the actual (legitimate) book and not an illegal pdf photocopy!

I hope you’re motivated to delve into a new world of crocheting!