Fancy Schmancy Felt Garland – free pattern

I’m going to be honest, you guys.

This project is insane!

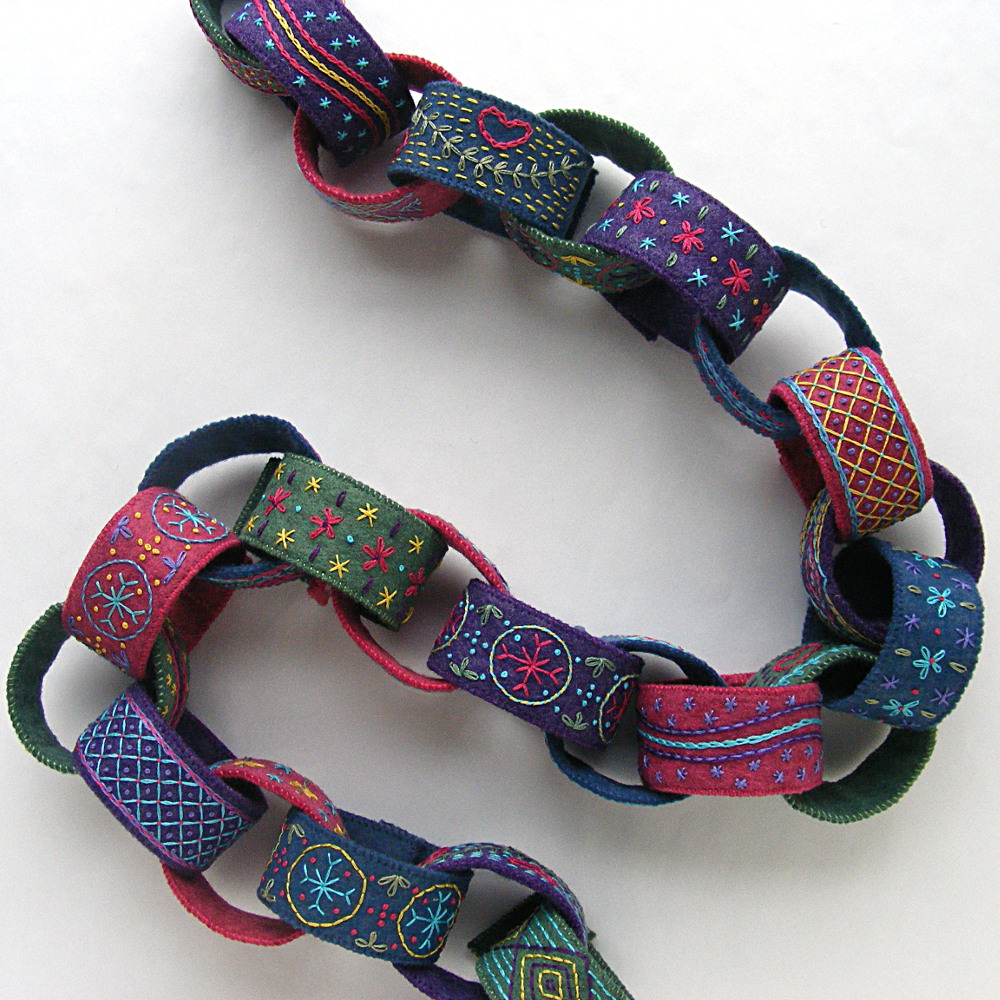
I mean – it’s lovely. A paper-chain inspired garland of hand-embroidered felt rings with hook & loop closures so you can store them easily. It’s sooooo beautiful and looks so warm and cozy and wintry. I’m absolutely enchanted with how it turned out!

But seriously. Hand-embroidered felt garland rings? Twenty-four of them? This is hours and hours and hours (and hours!) of hand embroidery. Of course, I enjoyed every minute of it. But I’d be the first to admit that I’m a little crazy about hand-embroidery on wool felt. This is a project that will keep your hands busy for a LOT of cozy evenings.

If I haven’t talked you out of it yet, here are the instructions. . .

The pattern includes six different band decorations and they all fit on one piece of Magical Embroidery Stuff (aka Sulky Sticky Fabri-solvy). So I did six bands each of four different felt colors for a total of 24 rings. That made a chain 42 inches long. For the materials below I’ll assume you’ll do the same crazy thing. 🙂

What you need

  • wool-blend felt – 2 sheets of each color you plan to use (I used grape jelly, babbling brook, denim, and ruby red slippers)
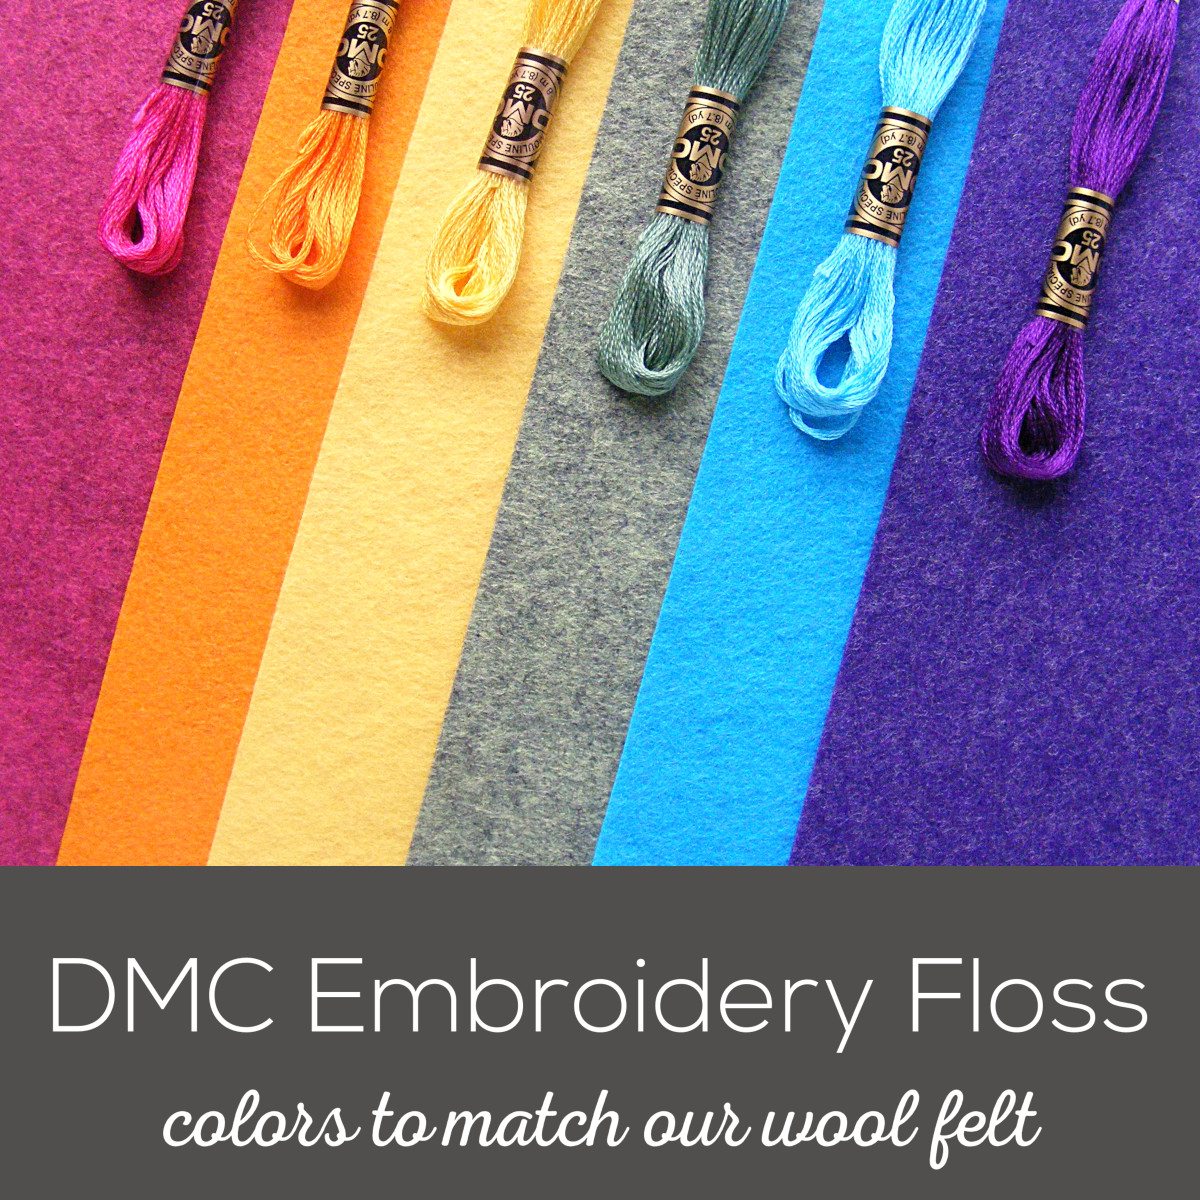
  • embroidery thread in matching and contrasting colors (I used DMC #550, 502, 336, 600, 3746, 522, 726 and 3846)
  • 2 feet of hook & loop tape
  • the pattern (download it here)
  • Sulky Sticky Fabri-solvy (optional, but very strongly recommended)

You can find a list of my favorite supplies (with links to where to buy them) here.

Throughout the pattern, the links go to video tutorials teaching that skill. If it’s a new stitch or technique for you, just click through to see how to do it!

Here’s how to make it. . .

1. Print the pattern. You can download it here. Print the pattern at 100% size onto four sheets of Sulky Sticky Fabri-solvy (aka The Magical Embroidery Stuff).

Fancy Schmancy Felt Garland - free pattern from Shiny Happy World

2. Peel the backing off and stick the stabilizer/pattern transfer onto the felt.

Cut the pieces out on the lines.

Embroider the designs right through the stabilizer.

I didn’t embroider the designs the same way every time – preferring instead to just play around. You should play too! You can find tutorials for plenty of stitches here. . .

For the lines I used. . .

For the dots and flowers and leaves I used. . .

By all means – don’t be limited to these stitches! They’re just what I used. You can find lots more stitch tutorials here.

http://wendigratz.wpengine.com/category/embroidery/embroidery-videos/fill-stitches

3. Soak off the Sulky Sticky Fabri-solvy. I soak mine in cold water for at least an hour, then rinse off the mushy stabilizer under cold running water. Don’t rub it to remove any stubborn bits – just hit them with a kitchen sprayer if needed.

Lay the pieces flat on a towel to dry. Do not wring, twist or even smoosh them. Just set them sopping wet on a towel and let them be. I promise they’ll dry. 🙂

(If you’ve never used Sulky Sticky Fabri-solvy before, I ramble on endlessly about how awesome it is and why I love it so much and how I use it here.)

http://wendigratz.wpengine.com/category/embroidery/embroidery-videos/fill-stitches

4. Finish the bands. Cut second piece of felt for the back of the band. I just laid the front band down and cut around it so the back would match the front exactly.

Sew a small piece of hook & loop tape to the blank end of the top of the band, and to one end of the back of the band.

I used a sewing machine, but you could do it by hand if you prefer. I left enough space on the embroidered side to use the narrowest big-box-store hook & loop tape (like you see on the top band) but if you order one of my kits you’ll get the special less-bulky skinny hook & loop tape I prefer (like you see on the bottom band).

Put the front and back together so that the hook & loop tape is on opposite ends of the band and sew the pieces together around the edge. I used whipstitch, but you could certainly use a sewing machine – especially if you want to finish before the end of the year. 🙂

Fancy Schmancy Felt Garland - free pattern from Shiny Happy World

5. Wrap them into rings and build your chain.

In the photo above you see the six designs in the pattern, stitched up on purple felt.

Finished!

*happy sigh*

I do so love handsewing felt. 🙂

Happy stitching!

If you like this free pattern, sign up for the Shiny Happy News! Every week I send out things to make you smile – free patterns, new tutorials, recommendations of patterns by other people, fun videos, yummy recipes and special discounts. 🙂

Best,
Wendi
That's me!

Free Thanksgiving Embroidery Pattern

Enough is as Good as a Feast - free embroidery pattern from Shiny Happy World

It’s beginning to look a lot like Thanksgiving!

Time to remind everyone about this free embroidery pattern. It’s one of my favorite reminders, and hangs on my studio wall all year. 🙂

It only uses basic embroidery stitches. So it looks complicated, but really it’s just slow.

As in, park yourself in a warm place for a few hours and savor every stitch. That kind of slow. 🙂

Download the free Thanksgiving embroidery pattern here.

Happy stitching!

Best,
Wendi
That's me!

Free Pirate Poster Embroidery Pattern

Pirate Wanted Poster - a free embroidery pattern from Shiny Happy WorldTalk Like a Pirate Day is coming up soon – September 19th!

To celebrate, I’m taking my favorite pirate embroidery pattern and giving it away for free. Free!

Stitch up a fun Wanted: Dead or Alive poster. I include a Peg Leg Pete pattern with an image of a boy pirate and also a Hurricane Hattie pattern with an image of a girl pirate. There were lots of female pirates out there – this is a great book about some of them.

You can even personalize the poster with your own pirate’s name!

What You Get

  • Full-sized patterns for small (6 x 7 1/2 inch) and large (8 x 10 inch) images and alphabets – no enlarging needed
  • Reversed patterns for use with iron-on transfer tools
  • Complete color and stitch guide
  • Instructions for personalizing with a custom pirate name
  • Links to videos teaching all the stitches used

What You’ll Need

  • Fabric to be embroidered (I used unbleached muslin, soaked in hot tea for about half an hour to stain it)
  • Your favorite tools for transferring the pattern (you all know I swear by Sulky Sticky Fabri-solvy)
  • Embroidery needle, thread, and hoop

Difficulty

Easy! The whole pattern uses just 3 simple embroidery stitches – and there are links to videos teaching all three.

It’s easy – but all that fill stitching does take a lot of time. Expect to spend several evenings on this one.

Download the pattern here.

Have fun with it!

If you like this free pattern, sign up for the Shiny Happy News! Members get a weekly newsletter full of sewing tips and tricks, free patterns, special discounts, and other things to make you smile. 🙂

Happy Friday!

Best,
Wendi
That's me!


Video – How to Do Turkey Work Embroidery

How to Do Turkey Work Embroidery - a video tutorial from Shiny Happy World

Turkey work is an unusual embroidery stitch that gives you a special effect. If you make long loops you can get a hairy or fringy look. Shorter loops can be trimmed to look like the pile of a rug or shorter hair.

Neat!

Turkey work stitching isn’t difficult, but it does require a bit of focus so you don’t lose track of what you’re doing. I tend to mumble to myself while I do it. . . flat stitch, loopy stitch, flat stitch, loopy stitch. . .

Here’s what I’m talking about.

See what I mean?

You can work this stitch on flat embroidery – you’ll often see it as the center of flowers, for example.

But I use Turkey work most often on little felt softies. It opens up a whole range of possibilities for hair, manes, tails, bushy eyebrows and more. 🙂

I used it here for the mane on Zoey Zebra.

Zoey playing Pin the Tail on the Zebra

In the video you saw me working on Leon Lion’s mane. Here he is all finished.

Leon Lion - felt lion softie holding a birthday cake. I used Turkey work embroidery for his shaggy mane.

You can get the Leon Lion pattern here.

Want to see another way to add longer hair to a softie? This tutorial shows how to add yarn hair to a crocheted amigurumi, but you could use the same method with embroidery thread on a smaller felt softie.

Here are all my lessons for fill stitches (besides satin stitch).

Return to the Learn to Embroider main Table of Contents.

Move on to the lessons for all the other stitches.

Play with some felt! Try the Oddballs – a fun pattern for silly monsters.

Everything You Ever Wanted to Know about Sulky Sticky Fabri-Solvy

Everything You Need to Know about Sulky Sticky Fabri-solvy - one of my very favorite supplies

I call this The Magical Embroidery Stuff.

Why?

Well, partly because Sulky Sticky Fabri-Solvy is quite a mouthful. 🙂 But mostly because I use it for absolutely everything I stitch and it’s absolutely magical. It really is one of my favorite products ever.

I’ve written a lot about it in a lot of different posts, so today I’m bringing all that info together in one handy-dandy place.

What is it?

It’s a printable wash-away embroidery pattern transfer and stabilizer. Yes – it does all of that in one easy product! In a nutshell. . .

  1. You print your pattern right on the sheets. You can print them with an inkjet or laser printer, or photocopy onto it. You can also trace onto it – but I hate tracing.
  2. Peel off the paper back and stick the stuff right to the surface of what you’re embroidering.
  3. Hoop it up and start stitching. You stitch right through the stuff.
  4. Soak it in water and the stuff dissolves away like magic.

Want to see all of that in action? Watch this video.

Problem fabrics

I use this on everything I embroider. EVERYTHING. But it’s especially useful on problem fabrics. You know what I’m talking about – the ones that are really hard to transfer an image to.

  • dark fabrics
  • napped fabrics like velvet, terry cloth and cuddle fleece
  • plasticy fuzzy fabrics like polar fleece
  • thick fabrics that you can’t see through to trace – like felt
  • stretchy fabrics like T-shirts

It’s awesome on everything!

Sulky Sticky Fabri-Solvy is great for transferring a face to cuddle fleece.

Look! You can stitch right through the stuff onto fluffy cuddle fleece.

Even felt?

YES! Felt gets its own category here because Sulky Sticky Fabri-Solvy is just so perfect for it. In fact – I wrote a whole post about using it with felt here.

I love it so much with felt that I include pattern pieces already printed on it in all my felt kits. It’s that awesome!

Using Sulky Sticky Fabri-Solvy - stitching and cutting

See? Beautiful stitching and nice, accurate cutting.

I’ve never run into shrinkage problems with it – but I know a couple of people have with projects that really needed to be very precisely cut. Larissa Holland came up with a great solution to that problem here.

What about stickiness?

I never ran into problems with stickiness until I left a project sitting in a hot car one summer afternoon. The next time I picked that project up (even though it wasn’t hot anymore) I found that I was getting a sticky residue on my needle. Not fun!

And then I discovered Thread Heaven. I was using it to solve another problem and discovered by accident that it totally eliminated any sticky needle problems. Fantastic! Especially since I love to carry my embroidery around with me and there was an excellent chance it would get left in a hot car again. Now I don’t need to worry about that!

Does the ink bleed?

It depends on the ink. I usually photocopy my projects or print them on my laser printer and those have never been an issue for me. But a couple of people reported the ink from their inkjet printers bleeding a bit when they rinsed off the stabilizer. Every brand is different so test the ink from your printer if you want to be sure! If you run into bleeding, try printing it out in draft mode – that uses a lot less ink.

The good people at Sulky let me know that one person had a issue with her laser printer. She said it didn’t actually bleed when she rinsed it, but it left little black specks all over her work. Yikes! The good news is that she sprayed it with Shout, washed it on the gentle cycle of her washing machine, and it came out as good as new. So if you run into laser printer problems, there’s an easy fix. 🙂

This isn’t a bleeding-ink issue – but it’s related. One customer reported that the ink wasn’t coming out of the centers of flowers where the stitching was the most dense. It wasn’t bleeding, but it’s like it was stuck there. She has very hard water and reported that a second long soak in distilled water took it out.

T-shirts

I want to add a special note here about T-shirts. I love embroidering on T-shirts, but it can be kind of fussy. You have to stabilize the fabric so it doesn’t stretch while you’re stitching. With traditional stabilizers you have to remove it after stitching. And stretch knits aren’t a treat to transfer the pattern to. All of these issues magically go away with Sulky Sticky Fabri-Solvy. Since it’s a pattern transfer and stabilizer all in one, you take care of both of those steps. And since it rinses out after stitching, there’s no fussy (and potentially destructive) removal of the stabilizer afterwards. It’s perfect!

embroidered dog T-shirt

That’s embroidered! 🙂

Now you know why I call Sulky Sticky Fabri-Solvy The Magical Embroidery Stuff. I love it!

Get it here!

I’ve heard that people use it for all kinds of other things too – like transferring complex patterns to a pumpkin for carving! If you’ve come up with an unusual use for it – let me know. I’d love to hear!

Happy stitching!

New Cross Stitch Embroidery Panels – Especially for Beginners

Cat and Dog Stamped Cross Stitch Panels

There’s a new kind of embroidery design here at Shiny Happy World.

Stamped Cross Stitch Panels for beginners – especially young beginners. 🙂

You can find both the cat and dog here.

I tell you all about what makes them special in the description, so here I’m going to show you some quick and easy instructions. There’s a video version of the instructions here.

If you’ve never done any kind of embroidery before, you might want to take a look at some of these videos before you get started.

Step 1

First you’ll need to hoop up your fabric. The fabric should be tight – like a drum – but not stretched out of shape.

Step 2

Choose the thread color that matches the background of the area you’re going to stitch. Thread your needle and knot the end of the thread. There’s a video here showing how to tie a knot in your thread.

Step 3

Start stitching. You work cross stitch one row at a time, filling in the bottom half of all the Xs first. Just stitch right over the Xs printed on the fabric. Make sure they’re all slanting in the same direction.

Cross stitch embroidery kits for beginners - a how to at Shiny Happy World
I always make my bottom stitches slant forward.

Step 4

Now work your way back across the same row, crossing all your Xs.

Cross stitch embroidery kits for beginners - a how to at Shiny Happy World
I always make my top stitches slant back.

Step 5

Work your way down until you fill in that whole section of color.

Step 6

Repeat until you’ve stitched up all the sections of the image.

Step 7

Finish as desired. You can make it into a tiny little pillow (maybe a scented pillow to keep in a drawer with your clothes?), use it as a square in a quilt, or frame it in its embroidery hoop.

Charlie - a dog embroidery kit from Shiny Happy World

Important Tip!

It’s very important to be consistent with the way your stitches slant. My bottom stitches always slant forward and my top stitches always slant back. It doesn’t matter which way you do it, as long as you do it the same way for the entire piece. Otherwise your stitches will look slightly off.

See how easy? This is a great, portable project for summer. It took me about 4 hours to stitch up the sample – with lots of interruptions. Most beginners will take longer than that. 🙂

Happy stitching!

The Perfect Match – just the right color thread for your felt embroidery

You all may have noticed that I love a little felt embroidery. 🙂

I love how portable it is. I love the way the thread looks on the wool felt. I love the way it feels in my hands. It’s all so yummy!

The only part of the whole process I don’t enjoy is choosing matching thread colors.

I’m not talking about choosing thread colors for the design. That part is fun!

I’m talking about choosing embroidery thread that perfectly matches the felt color for sewing around the edges. Like sewing up this bird. (It’s a free pattern here.)

Flora - a free felt bird pattern from Shiny Happy World

It’s important to get a good match – but the process is boooring. Try this thread. Nope – but close. How about this one? Ugh – definitely not. This one? Yes. It’s not a creative decision in any way. It’s just finding the best match. *yawn*

Every single time I do it I think to myself that I ought to write it down when I find the perfect match – so I don’t have to do it again for that color.

Then I started thinking I should have a master list of all the thread colors that match all my felt colors. That would be handy!

Update! Ask and you shall receive. A few people asked for a printable list of the matching colors – so I made one! You can download it here.

Then I started thinking I should make that master list and actually carry the thread in my shop, so you can buy the matching thread when you buy your felt. Now that would be super handy!

So I did it. I waited for one of those perfect-light days and pulled out all my felt and my DMC thread card and I found the perfect match for every color felt I carry. Then I ordered in all the thread and added it to the shop.

Get the felt here.

Get the matching thread here.

Enjoy! And have a fabulous weekend!

Best,
Wendi

Play with some felt! Try the Oddballs – a fun pattern for silly monsters.

Flutterby – a free butterfly embroidery pattern

free butterfly embroidery pattern from Shiny Happy World

Want to learn how to embroider with an easy online workshop – totally free?

Sign up for Embroidery 101 here. You’ll learn how to get started, the tools and supplies you’ll need, and all the stitches you’ll need to embroider just about any design.

It’s a fun, inexpensive, and totally portable craft. You can do it!

When my daughter Jo was little, I made her a yellow dress lined with pink satin, embroidered with a butterfly almost exactly like this one.

She loved it and wore it ALL THE TIME. When she outgrew it she passed it on to a smaller friend who also wore it ALL THE TIME. The last time I saw it around town, it was on a new little girl. Her Mom said she loved it and wore it ALL THE TIME.

I’m sure it was the satin lining getting all the love – but all three girls called it their “butterfly dress.”

Now you can make a butterfly dress – or t-shirt or pillow or tea towels or quilt or whatever needs a butterfly stitched on it.

This is a super easy embroidery pattern.

Download the pattern here.

My favorite way to transfer an embroidery pattern is to use Sulky Sticky Fabri-solvy. You can see it in action in this video. Just print the pattern right on the stabilizer, peel off the paper backing, and stick it down wherever you want to stitch your design. It works great for stabilizing stretchy fabrics like T-shirts too!

This cute little butterfly uses only backstitch â€“ with optional running stitches if you decide to include her swoopy flight path. Those are the two easiest stitches in the whole embroidery world! And if you’re brand spankin’ new to embroidery, just click on the links to watch videos to see how to do them.

I used 4 strands of thread for everything except the butterfly’s face and antennae. I used just 2 strands for them.

Here are the thread colors I used. . .

  • For the orange body I used DMC #721.
  • For the pink wings I used DMC #601.
  • For the yellow spots I used DMC #736.
  • For the face, antennae and flight path I used DMC #3371.

Have fun!

Happy stitching!

That's me!

Best,
Wendi

Sweet Sylvia Snail – a free embroidery pattern

Sweet Sylvia Snail - a free embroidery pattern from Shiny Happy World

Want to learn the basics of hand embroidery with an easy online workshop – totally free?

Sign up for Embroidery 101 here. You’ll learn how to get started, the tools and supplies you’ll need, the four most basic stitches, how to transfer your pattern and how to display your work.

If you already know the basics – sign up for Embroidery 201. It’s also free! You’ll learn how to stitch on specialty fabrics like felt and stretchy T-shirts. Plus you’ll learn lots and lots and LOTS more stitches – all my favorites!

Sweet Sylvia Snail loves to go for a sloooooow stroll around the garden, stopping at every pretty posy for a sweet sniff. 🙂

She’s small – the total image is under 4 1/2 inches wide and fits nicely in a 6 inch hoop.

As with any embroidery pattern, you can enlarge or reduce the pattern to make it any size you like, and use whatever colors and stitches you choose.

Here are the colors and stitches I used in my sample. . .

Body ­- backstitch the outline with DMC #703. Satin stitch the stripes. Add French knots to the tips of her antennae. All stitching is done with 4 strands of thread.

Shell -­ backstitch the outline and satin stitch the stripes with 4 strands of DMC #333

Flower -­ backstitch the stem with 2 strands of DMC #699. Use the same color for the leaves in lazy daisy stitch. Lazy daisy stitch the flower petals with 2 strands of DMC #601. The flower center is a French knot with 4 strands of DMC #151.

Face -­ backstitch the eye and the mouth with 2 strands of DMC #3371.

She’s sweet. Hang her on the wall. Stitch her on a gardening apron or tea towel. Stitch her down near the hem of a pair of jeans.

Want to frame your snail in a hoop? There’s a tutorial here showing how, and one here showing how to hide the messy back.

Want the pattern? It’s free!

Download the Sylvia Snail pattern here.

Sign up for the Shiny Happy News to get more free patterns like this one – plus new tutorials, sewing tips and tricks, yummy recipes, special discounts and more. 🙂

Best,
Wendi