How to Hide the Messy Back of Your Hooped Embroidery

How to Hide the Messy Back of a Hooped Embroidery Piece - a tutorial from Shiny Happy World

I’ve never worried too much about hiding the back of my embroidery when I frame it in a hoop. There’s a part of me that kind of likes leaving all the “ugly” visible to anyone who’s curious enough to flip it over and take a look. πŸ™‚

But I understand wanting to cover up the mess (especially if you’re making something like a little hooped Christmas tree ornament) and I get a LOT of questions about how to do it.

This technique is really just a simple adaptation of my How to Frame Embroidery in a Hoop (Without Glue!) video. You can watch that here.

And when I say simple adaptation – I mean simple. As in – simply add an extra piece of fabric to cover the back.

Here it is in just a few easy steps. . .

How to Hide the Messy Back of Your Hooped Embroidery - a tutorial from Shiny Happy World

That’s all one stacked image – feel free to pin it for handy-dandy reference. πŸ™‚

Want that sweet snail embroidery pattern? It’s free!

Here are all the posts about finishing embroidery projects.

Basic Finishing

Other Ways to Use Embroidery

Return to the Learn to Embroider main Table of Contents.

Happy stitching!

Children’s Day in Japan!

Koinobori crafts for Children's Day

Today is Children’s Day in Japan! That means families have been flying koinobori (carp flags) outside their homes and businesses for the last month. This is a beautiful tradition that greeted us when my family arrived in Japan for a month-long visit several years ago. What an amazing experience that was!

On Friday I released a pattern inspired by all those carp flags flying. (You can get the koinobori embroidery pattern here.)

Today I thought I’d share a bunch of other craft ideas inspired by the same carp. All those images up there (and more) are in this Pinterest board. Click over there to see all the images I pinned and to click through to more info and tutorials.

My favorite are those washi tape cupcake toppers right in the center of the collage. Aren’t they great? So simple and perfect! You can find the tutorialΒ here at Zakka Life.

Have fun!

Best,
Wendi
That's me!

Sylvester – a free embroidery pattern

Sylvester - a free embroidery pattern from Shiny Happy World

Meet Sylvester. (A free embroidery pattern for you to stitch up!)

He’s a groovy monster who drives a groovy car.

He’s so proud of his car that he drives it everywhere – even when he only has to go a block or two.

Jo informs me that this is a bird – not a monster. I told her that any bird big enough and smart enough to drive a car is totally a monster. Big birds (but not Big Bird, of course) scare me.

This is a very easy embroidery pattern – great for beginners because it only uses a few easy stitches. The pattern has links to videos teaching all of them. πŸ™‚

You can stitch him on anything you can get in a hoop – a T-shirt, a towel, a pillow. You can even frame your finished picture in its hoop! He’d look great hanging on the wall of a kid’s bedroom – and you can customize the colors to anything you like.

Sylvester - a free embroidery pattern from Shiny Happy World

You can do it!Β Download the free embroidery pattern here.

Happy stitching!

Best,
Wendi
That's me!

Zen Stitching – How to Embroider a Mandala with No Pattern

Zen Stitching - How to Embroider a Mandala with No Pattern (Shiny Happy World)

Want to learn the basics of hand embroidery with an easy online workshop – totally free?

Sign up for Embroidery 101 here. You’ll learn how to get started, the tools and supplies you’ll need, the four most basic stitches, how to transfer your pattern and how to display your work.

If you already know the basics – sign up for Embroidery 201. It’s also free! You’ll learn how to stitch on specialty fabrics like felt and stretchy T-shirts. Plus you’ll learn lots and lots and LOTS more stitches – all my favorites!

This is one of my favorite kinds of stitching.

Stitching with no pattern.

If regular embroidery is coloring in slow motion, this is doodling in slow motion.

Doodling with a needle and thread. I love it!

When you get into the right frame of mind, it’s the most wonderful, absorbing way to embroider.

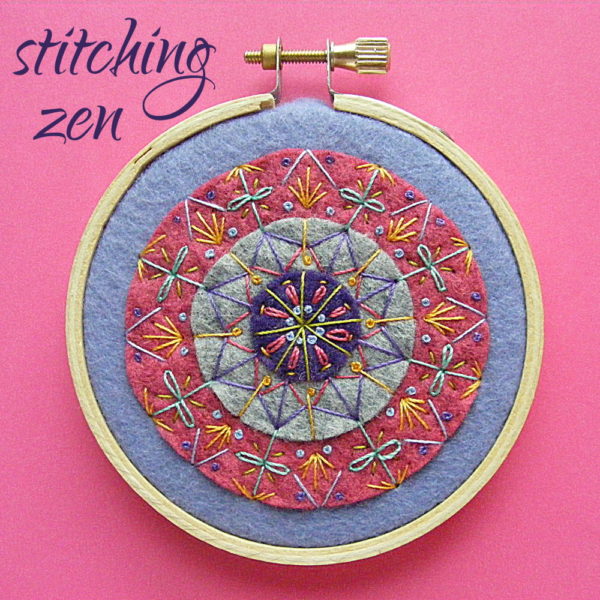
Do you think something like that mandala is way too complicated to stitch without a pattern? Or that you don’t have the skills?

Think again!

It’s almost all simple straight stitches, with just a few lazy daisies and French knots thrown in for fun. And I’m going to show you right now how to build the pattern. If you can connect dots you can do this.

One warning here – this isn’t speed stitching.

It’s sloooooow stitching.

It’s enjoy-the-process stitching.

It’s savor-the-moment stitching.

Have fun with it!

Step 1 Start with some circles of felt.

Zen Stitching - How to Embroider a Mandala with No Pattern (Shiny Happy World)These are small – they’re in a 3 inch hoop. I like to work small when I do this – large can be overwhelming.

I centered them by eye. This doesn’t have to be perfect, but I was pretty careful.

Time to start stitching. The key is to start in the center and work my way out.

Zen Stitching - How to Embroider a Mandala with No Pattern (Shiny Happy World)Step 2 I started with those green spokes. Come up in the center and stitch to the north, south, east and west points. These are going to be your guides for all the rest of your stitching, so take your time and get them nice and straight. You can stitch a plus sign, right?

Step 3 I stitched in between those spokes to add northeast, southeast, southwest and northwest spokes.

Woo hoo! I have guiding marks for the rest of my stitching!

Step 4 I filled in the wedges created by those spokes. Each wedge got a French knot, a lazy daisy, and a little straight stitch – all centered between the spokes on either side.

You don’t have to do these stitches. Do whatever strikes your fancy! Just try to keep whatever you do centered in the wedge.

Then I moved out to the next ring.

Zen Stitching - How to Embroider a Mandala with No Pattern (Shiny Happy World)Step 5 I started with the pink triangles. I stitched a straight stitch from the yellow stitch at the end of each lazy daisy (A) to a point in line with the green spokes, halfway across the grey felt ring (B). If you need to see the image bigger you can click on it.

See how I used the stitches that were already there (the green spokes and the yellow dashes) as guides? That keeps everything even and lined up and helps you build a complex-looking pattern very simply.

Step 6 After I worked the pink triangles all around, I added the purple spokes that go from the yellow dash (A) to the edge of the grey ring (C).

Step 7 I liked the look of the pink zigzags, so I worked purple zigzags all the way around, stitching from the ends of those long spokes I made in Step 6 (C) to the top of each pink triangle (B).

I just keep filling in the space, working from points already created. It’s just connecting the dots and filling in the spaces created when I connect the dots. I never plan the next step until I’m ready to stitch it.

Step 8 I created those yellow spokes, stitching from the center of each pink triangle (where the yellow French knots are) to the edge of the grey ring (D).

Step 9 Everything was looking a little stick-like at that point, so I added the French knots inside each pink triangle to change up the texture a bit.

Time to move out to the last ring.

Zen Stitching - How to Embroider a Mandala with No Pattern (Shiny Happy World)This time points C and D were my main markers, because they’re the ones that go all the way to the edge of the grey ring.

Step 10 I started with the point at the tip of the purple zigzag (C) and stitched a spoke to the edge of the pink ring. I did it in two stitches because it was a wider ring – which gave me the idea to stitch a lazy daisy coming leaf coming out of each side of that spoke/stem.

Step 11 I stitched a couple more straight stitches from just past the end of each lazy daisy to a point straight out from the yellow spokes in the grey ring (E).

Step 12 I stitched the little yellow bursts from the end of each yellow spoke (D), kind of filling in the space in those green points I created in Step 11.

Step 13 I liked those yellow bursts, so I added some little yellow rays coming out of where the lazy daisy stitches joined the spoke/stems from Step 10.

Step 14 I was still liking the pop of the yellow bursts, so I added smaller bursts at the top of each green stem/spoke.

I was almost done – I just wanted to add a bit more color and more French knots to change the texture again.

Step 15 I added blue French knots at the base of the yellow bursts created in Step 12.

Step 16 I had purple felt in the center and purple stitching in the middle ring. I felt like it needed more dark purple in the last ring, so I added French knots all around the edge, one on each side of the green points.

Done! Just take it one step at a time, work your way all the way around each ring, then build up the next level. As long as you stay lined up with your original points – those green spokes in the center – everything will line up and you’ll end up with a very complex-looking pattern.

Zen Stitching - How to Embroider a Mandala with No Pattern (Shiny Happy World)

What do you think? Anyone else want to try this kind of stitching? Do you want more info or to see more sample ideas? I’d love to share!

I hope you liked this tutorial. Want more? Sign up for the Shiny Happy News! I’ll keep you up to date about all the new tutorials here and also give you early access to any sales!

Happy stitching!

Best,
Wendi
Wendi_Gratz_Shiny_Happy_World

Enough Is as Good as a Feast – a free Thanksgiving embroidery pattern

Enough is as Good as a Feast - free embroidery pattern from Shiny Happy WorldHappy Thanksgiving!

Whether you celebrate the American holiday or not, I want to take today to tell everyone how very grateful I am for you – who allow me to do this job I love so much.

Feast is one of my favorite embroidery patterns, and I’ve decided to make it free. You can download it here.

It’s a good message for Thanksgiving, but mine hangs on my studio wall all year long.

The stitching on this is easy – no tricky or advanced stitches – but it will take some time. It’s the sort of thing that’s a delight to pull out every night and stitch a little bit at a time in front of the fire.

Enjoy! And thank you!

Best,
Wendi
That's me!

SHARE THIS

How to Embroider a Mouth on an Already-Stuffed Softie – video

How to Stitch a Smile on a Finished Softie - video

Want to learn the basics of hand embroidery with an easy online workshop – totally free?

Sign up for Embroidery 101 here. You’ll learn how to get started, the tools and supplies you’ll need, the four most basic stitches, how to transfer your pattern and how to display your work.

If you already know the basics – sign up for Embroidery 201. It’s also free! You’ll learn how to stitch on specialty fabrics like felt and stretchy T-shirts. Plus you’ll learn lots and lots and LOTS more stitches – all my favorites!

Usually my patterns include instructions for embroidering the face before you sew your softie together. That makes it easy to transfer the pattern and position it correctly, and easy to hoop it for stitching.

But sometimes it just works better to stitch some features on after it’s all sewn up. This mouse doll is one of those times. And it’s really not hard at all! But you do need a couple of special tools. Nothing expensive or hard to find – just a doll needle and a water-erasable marker.

I show you the tools – and how to use them – in this video. Watch Miss Squeak get her smile!

See? That wasn’t hard at all!

Want a refresher on the stitch I’m using? Watch the backstitch video here.

You can find the Squeak the Mouse pattern here!

Happy stitching!

Best,
Wendi
Wendi_Gratz_Shiny_Happy_World


New DMC Thread Colors – a Finished Stitches Prize!

DMC_Embroidery_ThreadJust in time to be one of the prizes in the Finished Stitches Challenge – DMC has released sixteen luscious new thread colors!

Want a quick recap of the prizes?

Gift certificates to TWO awesome embroidery pattern shops – Polka & Bloom and Wild Olive.

Beautiful embroidery books – the brand new Stitched Blooms and all three of Aimee Ray’s Doodle Stitching books.

And now – a pack of all the new thread colors from DMC. They’re so pretty!

new_DMC_thread_colorsHalf of them are brights. You all know I like the bright, clear colors. πŸ™‚ I’m especially excited to see some turquoise in there! I love turquoise and I’ve always felt like they didn’t have just the right shade. Now they do! And there’s a dark and light that will work really well together. Nice!

DMC_new_embroidery_thread_colorsThe other half are these lovely rich natural shades. So beautiful! Especially the blue and the berry color. Wouldn’t they be pretty for some fall stitching on tea towels or napkins?

The whole thread bundle is one of the prizes. Woo hoo!

So get your photos in pronto! Email them to me at blockhead[at]wendigratz[dot]com and I’ll get them posted to the projects page. Or you can post them to the Shiny Happy World Facebook page and I can grab the images from there. Just do whatever’s easiest for you. πŸ™‚ Edited to add: This contest is now closed. But you can still look here to see all the final entries, and get inspiration for how to finish your next embroidery project! Go take a look at all the entries!

Happy stitching!

Best,
Wendi
Wendi_Gratz_Shiny_Happy_World

How to Embroider with Yarn

How to Embroider with Yarn - tips for stitching amigurumi faces from FreshStitches and Shiny Happy World

Today, I’m going to show you how I embroider features on my stuffed animals. It’s a little different than regular embroidery… because you stuff the inside of an animal, there’s no need to worry about tying knots!

There’s a video at the end of this post too – for those who want to see every step in action. πŸ™‚

My technique makes a slip-proof knot and creates a double-thickness of yarn, so your embroidery will stand out!

Step 1: thread the tapestry needle with a length of yarn (about a foot or two). Tie the two ends of the yarn together with a knot, as pictured in (a).

how to embroider with yarn

Step 2: pull the needle through to the the front of the work, leaving about an inch between the knot and the back of the work, and then poke the needle from front to back, and through the loop created (between the knot and back of work) by the two pieces of yarn, as shown in (b). Tug, and this anchors your work!

Step 3: to do a stitch, put the needle (from back to front) where you’d like the stitch to go (c), about 1/4 inch (5mm) from where your previous stitch (or knot) is anchored.

Step 4: to finish the stitch, push the needle from front to back, connecting the stitch to your previous work (d). Continue stitching (following steps 3 and 4) according to the desired pattern.

Step 5: to finish, cut your yarn-loop in half, and use the two ends of yarn to tie a knot!

Easy, huh?

Sloth

See the embroidery that makes this sloth’s mouth? Cute!

Now here’s the video.

Give it a try!

Here are handy links to all the posts about faces and details. . .

Return to the main table of contents for Let’s Learn to Crochet Amigurumi.

Move on to the lessons about eyes.

Happy stitching!

Embroidery Thread Review – 12 wt. Sulky Cotton Petites

A review of Sulky Petites 12-weight thread

Remember when I said I found lots of great things at Quilt Market?

This is one of them.

You know I love Sulky products! I use Sulky Sticky Fabri-Solvy on almost every single embroidery project.

So, of course, I had to pop by the Sulky booth to see what was new. πŸ™‚

These were new.

Sulky makes thread for hand embroidery!

Now – in spite of my love for Sulky stabilizers and pattern transfer tools, I’ve never tried their thread. I thought it was for just machine embroidery and I don’t do that.

But these are for hand embroidery!

It doesn’t snag!

Tweet - a free bird embroidery pattern

I took away a little sample and tried it. I tried it in the early summer when my hands were all gnarly from putting in my garden – a time when I rarely embroider because I hate snagging individual strands of thread on my gnarly hands.

I did not snag any threads!

A single strand of the Sulky 12 wt. is the same thickness as two strands of regular 6-stranded floss. I think that gave it just enough extra weight not to snag and pull individual strands loose. Plus it’s very smooth, which helped a lot.

Nice!

It’s very round and has a nice sheen

Blossom free embroidery pattern

I told the folks at Sulky that I liked my sample. They offered to send me more so I could put it to a real test – a whole embroidery project.

Here’s why it took so long to get this review to you. After all – Quilt Market was back in May!

I figured as long as I was going to do some test stitching, I might as well design some new patterns. Small patterns that would let me test out a few different things – bigger stitching, tiny stitching, fill stitching, etc. Ooh – and I could make them free patterns!

So I stitched up some samples. And I loved it even more! It has a beautiful sheen to it. Not shiny – but sheeny (if that makes any sense).

And it’s rounder than regular 6-stranded floss. That makes it sit up nicely on the surface of the fabric, which I really like. It’s subtle, but I definitely noticed the difference in the finished work.

No more tangled mass of embroidery thread!

Jackie cover 1000 px

Ok – I know this may sound dorky – but love the little spools! It keeps everything so neat and tidy! And since there are no strands to separate I don’t have itty bitty bits of leftover floss that I need to store. And the color numbers are right on the spool so they don’t get separated from the floss (unlike the little bands that slide so easily off an almost-done skein of thread). And there are no kinks like you get from winding on bobbins or cards. It’s pure awesome.

Excellent price

The price for each spool is $1.69. That seems expensive at first – but each spool has 50 yards on it – as opposed to 8.7 yards in a skein. Even when you account for the fact that the thread skeins are thicker you’re still getting about twice as much thread on the spool as you get in a skein. And I found that I have much less waste working with the spools.

Lovely colors!

Right now they have 66 solids and 14 Blendables or variegated threads. Plenty to choose from – and they have plans to add more!

So I give the Sulky 12 wt. Cotton Petites Thread a big thumbs up! You can find it here.

All the embroidery patterns you see in this post are FREE! Click here to get the patterns for them – plus one more.

Update – a couple of years after writing this review I found another great use for this thread. It’s absolutely perfect for Big Stitch quilting! That link goes to a video showing how.

Here are links to all my posts about embroidery tools and supplies.

For Beginners

Specialty Fabrics

Threads

Stabilizers and Pattern Transfer Tools

Return to the Learn to Embroider main Table of Contents.

Move on to the posts about working with patterns.

Four Free Embroidery Patterns

Free Embroidery PatternsIt’s been a little while since I released an embroidery pattern – and now you know why! I’ve been working on this set of four free patterns – commissioned by Sulky, the maker of the thread I used. I posted a review of the Sulky thread here.

Now they’re ready to see the world – and you can make them!

All the samples are framed in 5-inch hoops but you can easily enlarge or reduce the patterns to be any size you like.

Tweet - a free bird embroidery pattern

Tweet

Tweet is a very pretty bird whose stitching looks more complicated than it actually is.

It uses just five very basic embroidery stitches!

If you’re just learning how to embroider, this is a terrific pattern to start with.

Download the free Tweet pattern here.

Blossom free embroidery patternBlossom

This single flower is a great way to practice your French knots. I love using them all clustered together as a fill stitch, like in the center of this flower.

I used variegated thread for a nice mottled effect without needing to change thread.

You’re not scared of French knots, are you? I used to be – but then I figured out The Trick and now I get a perfect knot every time. Watch this video and learn how.

Download the free Blossom pattern here.

Full Heart cover 1000 pxMy Heart Is Full. . .

This is a great pattern to practice tiny stitching.

I made it sampler-like, with each row of pattern in the heart showcasing different stitches.

None of them are very complicated stitches – but they’re small. πŸ™‚

Download the free My Heart Is Full. . . pattern here.

Jackie cover 1000 pxJackie

Jackie is another great pattern for beginners.

She uses just five embroidery stitches – all of them very basic.

My favorite part is the polkadots outlined in a contrasting color. That seems like a tricky extra step – but it actually helps cover up any raggedy edges on your satin stitches. ***shhh. . . don’t tell***

Download the free Jackie embroidery pattern here.

Like all patterns from Shiny Happy World, the pattern has links to videos teaching you all the stitches and techniques used. And you can sell anything you make using the pattern – as long as you make it yourself. πŸ™‚

Happy stitching!

Best,
Wendi
Applique Wendi (with fabulous hat)