Mrs. Claus – free applique pattern

Mrs. Claus - free applique pattern from Shiny Happy World


There’s a new free applique pattern for you! Merry Christmas! 🙂

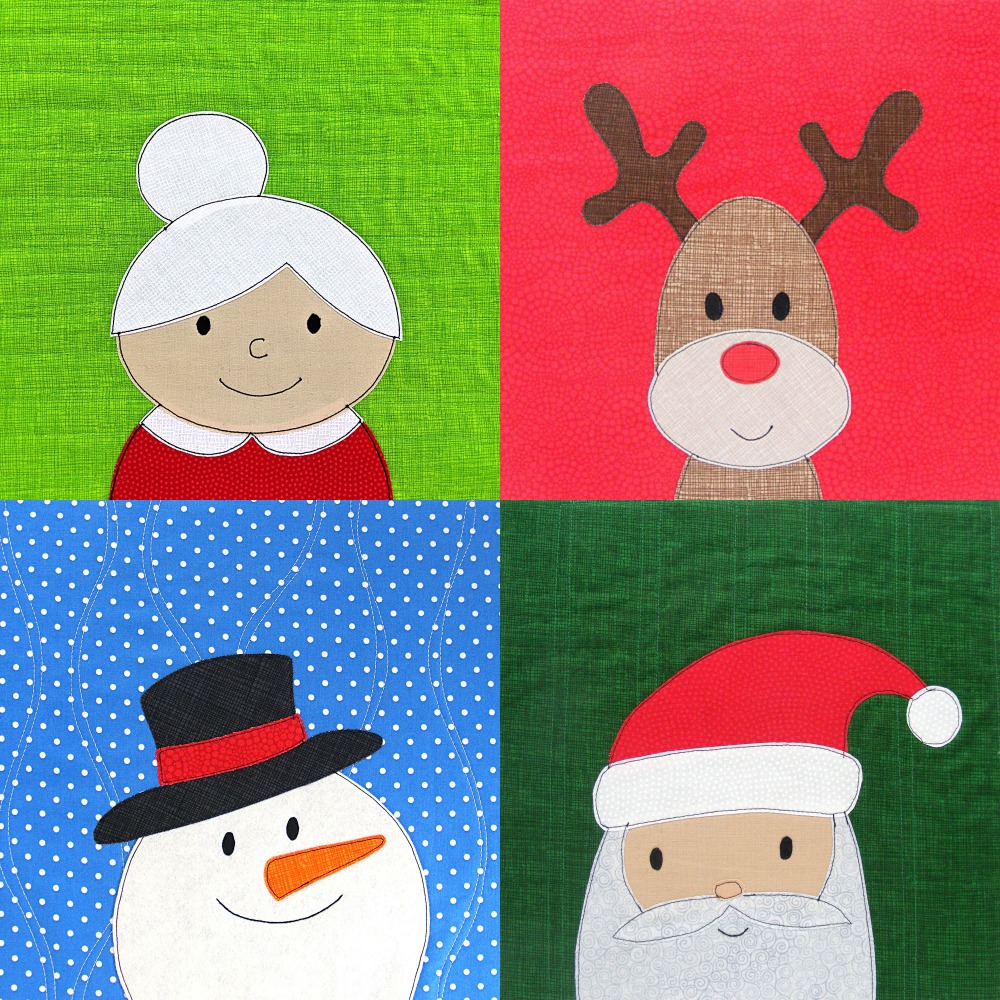
This Mrs. Claus pattern is the same size and style as the other free Christmas applique patterns (10 inch finished blocks). There are four now so you can make a square wallhanging!

Free Christmas applique patterns from Shiny Happy World

Here are links to the other three. . .

Download the Mrs. Claus pattern pieces here.

Here’s how to make her!

Step 1

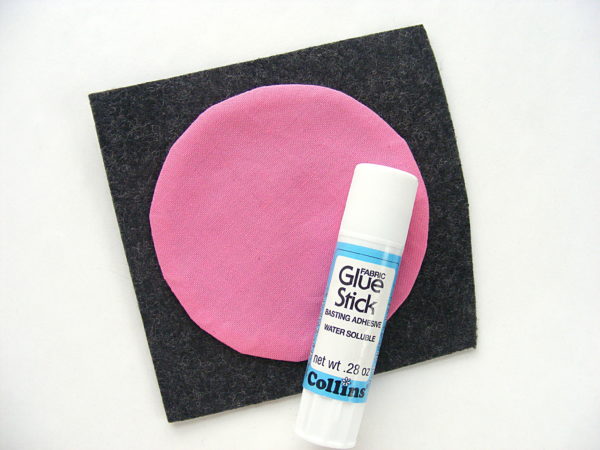
If you’re using Quilt As You Go, quilt the background to the batting. I’m showing mine from the back so you can see the stitching more clearly.

Mrs. Claus free applique pattern from Shiny Happy World - step by step photos

Step 2

Print or trace the pattern pieces onto the paper side of fusible adhesive.

Mrs. Claus free applique pattern from Shiny Happy World - step by step photos

I love these printable sheets of Heat & Bond Lite because I’m lazypants and don’t like to trace.

The pieces have already been reversed, so no need to flip anything.

Step 3

Roughly cut out the pieces, leaving a little extra all the way around each piece. Leave a little extra extra wherever there’s a dotted line. That edge will tuck under other pieces for a clean finish.

Mrs. Claus free applique pattern from Shiny Happy World - step by step photos

Fuse the pieces to the back of your fabric, following the instructions on your fusible.

Step 4

Trace the features onto the front of the face fabric.

Mrs. Claus free applique pattern from Shiny Happy World - step by step photos

If you hold it up to a window, you’ll be able to see the lines very clearly through the fabric.

I trace just inside the lines marking the position of any applique pieces – like the eyes.

I trace directly on any lines to be stitched – the nose and mouth.

I just use a fine tip black Sharpie.

Here’s what it looks like without the light shining through.

Mrs. Claus free applique pattern from Shiny Happy World - step by step photos

Step 5

Cut out all the pieces neatly.

Mrs. Claus free applique pattern from Shiny Happy World - step by step photos

Cut directly on the solid lines. Leave a little extra seam allowance past the dotted lines.

Step 6

Peel off the paper backing and layer up all the pieces.

Mrs. Claus free applique pattern from Shiny Happy World - step by step photosRemember – those dotted line edges will tuck behind other pieces. For example – the bottom of the bun has a dotted line, showing it tucks behind the top of the head.

Line up the lower edge of her shoulders with the bottom edge of the block. You’ll trim away the excess when you trim your block down to size so you don’t see that cut edge.

Fuse the design in place, again following the instructions on your fusible package.

Step 7

Stitch around all the pieces to secure the edges. Stitch right over your traced lines for the nose and mouth. (This video has tips for stitching those tight curves.)

Mrs. Claus free applique pattern from Shiny Happy World - step by step photosI like to use a simple straight stitch in thick black thread. I think the cartoony outline suits my simple designs, but you can use matching thread and any stitches you like.

This post has more info if you’re trying to figure out in what order you should stitch the pieces.

Step 8

Trim it down to size and you’re finished! I recommend starting with an 11 inch square and trimming it down to 10 1/2 inches if you’re making a quilt or a wall hanging – but you can also use this design to make some placemats (free placemat pattern here) and that will need a different starting block size.

Mrs. Claus free applique pattern from Shiny Happy World - step by step photos

Happy quilting!

Best,
Wendi
Wendi Gratz from Shiny Happy World

Mrs. Claus - free applique pattern from Shiny Happy WorldFree Christmas applique patterns from Shiny Happy World

Free Trick or Treat Bag Tutorial

Trick or Treat Bag - a free pattern from Shiny Happy World

Need to whip up a super easy trick or treat bag for Halloween this year?

Then I have the pattern for you!

It’s fully lined (which actually makes construction easier), requires no hand sewing, can be made with any of my square quilt block patterns with no resizing – and you can make it in an hour or less. 🙂

This project will work with any of my square applique patterns. If you’re using someone else’s pattern, you may need to resize it to fit a 10 inch square.

I’m using two monsters from the Scary Squares monster quilt pattern.

If you have a witch who needs a black cat, you could use the free Spooky Cat applique pattern.

If you have a farmer who needs a few farm animals, you could use any of the blocks in the Noisy Farm pattern.

If you just want to customize it with a name or Halloween greeting, use a fun Halloween print fabric and this free alphabet applique pattern.

The sky is the limit!

What You’ll Need

  • 1/2 yard medium weight fabric for the main bag (I used black cotton twill)
  • 1/2 yard light weight fabric for the lining (I used a Halloween novelty print)
  • fusible adhesive (I recommend Heat & Bond Lite)
  • fabric for your applique
  • black thread
  • applique pattern of your choice

Cutting Instructions

  • Cut two 11″ x 11″ squares from the main fabric.
  • Cut two 11″ x 11″ squares from the lining fabric.
  • Cut two 14″ x 4″ rectangle from the main fabric for the handles.

Put It All Together

Step 1

Applique the main fabric squares with the design of your choice. If it’s one of my portrait designs, make sure the cut edge of the body is lined up with the bottom edge of the square.

Trick or Treat Bag - a free pattern from Shiny Happy World

If you’ve never done applique with fusible adhesive, it’s super easy! You’ll find instructions with video links in any of my patterns, and there’s a general video tutorial here.

Step 2

Fold the rectangles for the handles into double-fold strips and press.

There’s a video here showing how to do that if it’s new for you.

Stitch through all the layers down each long edge.

Trick or Treat Bag - a free pattern from Shiny Happy World

Set the handles aside.

Step 3

Layer the two lining pieces right sides together. Sew down one side, across the bottom, and up the other side using 1/4″ seam allowance.

Trick or Treat Bag - a free pattern from Shiny Happy World

I clipped the corners here out of habit, but you don’t need to do that. They’re about to get chopped off in the next step.

Repeat for the two main trick or treat bag pieces.

Step 4

Box the corners  of the lining so the bag is 1 inch deep

Trick or Treat Bag - a free pattern from Shiny Happy World

If you’ve never sewn boxed corners before, this video will show you how.

Repeat for the main bag.

Step 5

Fold the bag in half to find the center of the top edge.

Pin the handles to the bag so that the inside edge of the handle is 2 inches from the center pin, and the raw edge of the handle is lined up with the raw edge of the bag.

https://wendigratz.wpengine.com/2014/07/video-sew-boxed-corners.html

Pin the handles in place on both sides of the main bag. You can baste them in place if you like, but I usually just hold them with pins for the next step.

Step 6

Leave the main bag right side out, and the lining inside out.

Slide the lining over the main bag, so that the right side of the lining is facing the right side of the applique, and the handles are sandwiched between the two layers. Match the side seams and centers and pin the two bags together around the top edge.

Sew around the top edge of the bag using 1/4″ seam allowance and leaving an opening on one side between the inside edges of one of the handles.

Trick or Treat Bag - a free pattern from Shiny Happy World

This is easiest if you start sewing right at the inside edge of one handle. Sew through that handle, around the side seam, through both handles on the other side, around the second side seam, and through the last handle. Stop as soon as you sew over the last handle (remember to backstitch!) and you’ll have an opening about 4 inches wide.

Step 7

Turn the bag right side out. This step is a little mind-bendy if you’ve never done it before, but it’s actually really simple.

First pull the main bag out of the lining so that both parts are inside out.

Trick or Treat Bag - a free pattern from Shiny Happy World

Now reach into the opening, grab the main bag and pull it through the opening so that it’s right side out. Keep pulling and the lining will follow – also right side out.

Trick or Treat Bag - a free pattern from Shiny Happy World

Now just tuck the lining down inside the bag. 🙂

Step 8

Smooth and press the top edge of the bag.

Fold under the seam allowance from the turning opening and press that as well.

Edgestitch all the way around that top edge. This will finish your bag, sew up the turning opening, and reinforce the handles – all in one step. 🙂

Trick or Treat Bag - a free pattern from Shiny Happy World

Finished!

Trick or Treat Bag - a free pattern from Shiny Happy World

Now go out and fill your trick or treat bag with lots of yummy candy. 🙂

For a slightly smaller tote bag, made with the same method, head over here.

Here are several free patterns that work with my basic 10-inch applique squares – no resizing needed!

Here are several free patterns that work with just some simple resizing. This post about making coasters has info about resizing an applique pattern that can be applied to any of these projects.

Return to the main Let’s Make a Quilt Table of Contents.

Happy Halloween!

Tutorial – Make a Tablet Cover

blue quilted tablet cover with circles

This post is originally from November 2013. I updated it in July 2017 to add the quilted batik tablet cover I made for my iPad Pro.

The day before I left for Quilt Market I decided that a really efficient use of my time would be to make myself a tablet cover using some of my new patterns. 😛

Here’s the result.

pink tablet cover with green applique dog

I posted it on Facebook and I got a bunch of requests for a pattern.

How about a free tutorial instead?

First you’ll need to measure your tablet. Of course, they’re all just a little bit different.

Add one inch to each dimension – length and width. This is your cutting size. If your tablet is 8″ x 11″ your cutting size is 9″ x 12″.

Cut four pieces of fabric to your cutting size. Two are for the outside and two are for the lining.

Oh yes – it’s lined.

Applique whatever you like to the two outside pieces, using whatever applique method you prefer. Click here for a free workshop teaching Quilt As You Go and applique with fusible adhesive – my favorite method.

The puppy is Harold – one block in the Lovable Mutts quilt pattern.

Of course, you can use any applique pattern you like! You can find tons of individual block patterns here.

For those who don’t like applique – how about embellishing it with some stitching? I’ve got a bunch of easy embroidery patterns here.

Or just make it out of the most fabulous fabric you can find!

For the new iPad cover, I used a fabulous hand-dyed batik fabric from Malka Dubrawsky of Stitch in Dye and added Big Stitch quilting around all the circles.

quilted circles on blue fabric

These are the tablet cover front and back, all quilted, trimmed to size, and ready to assemble.

Shop for Malka’s fabulous fabric here.

Learn how to do Big Stitch quilting here.

Back the outside layers with some thin cotton batting and hold the layers together with some machine quilting (if you didn’t already quilt it as part of your embellishment). For the cat/dog cover, I just followed the line of the zigzags in the fabric. Easy peasy! Since the tablet is lined you don’t even need to back the batting.

So. You’ve cut your pieces, added any fanciness you like, and quilted in some padding. Time to start sewing it all together. This is super easy.

Sew your front to your back, right sides together, using 1/4″ seam allowance. Sew down one side, across the bottom, and up the other side. Don’t forget to backstitch at the beginning and end of your stitching.

Do the same thing with your two lining pieces except leave a 3-4 inch opening in the bottom for turning the whole thing right side out later.

Turn both the outside and the lining right side out and press.

pink fabric with a pocket

I’ve got my turning stick poked through the opening I left in the lining. See how I pressed that too? That’ll make it a cinch to sew up when you’re done.

Now turn the outside inside out again. Leave the lining right side out.

Measure a strip of elastic 3 inches long. I used soft fold-over elastic in a pretty color but you can really use any elastic in any size or color.

Fold the elastic in half and pin it to the center of the front of your cover. (Fold the cover in half to quickly find the center.)

loop of pink elastic pinned to a work in progress

I like to leave a little extra hanging over the raw edge.

Slip the lining (right side out) inside the cover (inside out). Line up the side seams and pin or clip the layers together around the top. The elastic loop should be sandwiched between the two layers.

layers of batting and fabric clipped together

You can really see my quilting lines here on the batting.

Sew the outside to the lining all the way around the top using 1/4″ seam allowance.

stitching detail in white batting

I go back and forth over the elastic a couple of extra times. It’s a stress spot and I like to reinforce it.

Now comes the fun part.

Pull the lining out of the bag. Then pull the whole thing through the opening in the bottom of the lining. Sew up the opening in the lining using either whipstitch or ladder stitch and tuck the lining down into the bag.

Flip down the elastic loop to see where you need to position your button and sew the button in place.

Done!

pink quilted tablet cover with a blue applique cat

Here’s the back of my cover. Of course I had to decorate the back too!

And here’s a full view of the batik cover.

blue quilted tablet cover with batik and quilted circles

It’s the same font and back. 🙂

Here are several free patterns that work with my basic 10-inch applique squares – no resizing needed!

Here are several free patterns that work with just some simple resizing. This post about making coasters has info about resizing an applique pattern that can be applied to any of these projects.

Return to the main Let’s Make a Quilt Table of Contents.

Happy sewing!

Free Pattern! Big Stitch Felt Coasters

Big Stitch Polkadot Coasters - a free pattern from Shiny Happy World

Practice your running stitch with these big stitch felt coasters.

This project is all about those big stitches!

It’s simple, fun and easy.

It’s all hand-sewn – perfect for stitching while you binge-watch your favorite show. 🙂

My friends at Sulky were watching my progress on this big-stitched lap-sized quilt. . .

Quilt-in-progress from Shiny Happy World's Big Stitches and Patchy Patchwork class

(It’s a WIP from my Big Stitches and Patchy Patchwork class.)

They knew I was using Sulky Petites 12 wt. thread for all the big stitch quilting, and they knew this was a BIG project. They asked me if I’d consider designing a smaller project for people who just wanted to give big stitch quilting a try.

Of course I would!

I loooooove stitching in spirals and I had been kicking around the idea of making some round coasters. This is what came out of it!

Materials

Other Tools and Supplies

Step 1

Trace a circle onto the Sulky Soft & Sheer. You can trace a jar lid or a roll of tape – anything coaster-sized.

circle traced on Sulky Soft & Sheer stabilizer

I forgot to measure my circle before I shipped the finished coasters. I think it was about 3 ¼ inches?

Step 2

Roughly cut around the circle, leaving at least ¼ inch of stabilizer all around the circle. Layer with a scrap of fabric, right sides together, and sew directly on the traced line.

making coasters - circle sewn on stabilizer with pink fabric

Sew all the way around the circle.

Step 3

Trim around the edge, leaving a narrow seam allowance.

making coasters - sewn circle, cut out with pinking shears

I like to use pinking shears so I don’t have to trim notches to remove bulk.

Step 4

Pull the layers apart and cut a small slit in the center of the Sulky Soft & Sheer.

turning a circle of pink fabric right side out

Step 5

Turn the dot right side out through the slit.

Circle of fabric turned right side out with stabilizer backing

Smooth the curved edge and press it flat.

finished circle with neatly turned edges

See? A nice, neat circle with perfectly turned edges.

Step 6

Glue the circle to a scrap of felt using fabric glue stick.

Making Felt Coasters - pink fabric circle glued to a square of grey felt.

Step 7

Using running stitch and a single strand of Sulky Petites 12 wt. Thread, sew the circle to the felt all the way around the edge.

Making Polkadot Felt Coasters - sewing a pink circle of fabric to grey felt using a running stitch and matching thread.

There’s a video here showing how to embroider running stitch.

Step 8

Once you get all the way around the outside edge, start spiraling in to the center of the circle.

Making Polkadot Felt Coasters - stitching a pink circle down to grey felt using running stitch

Step 9

Using a glue stick, glue a second layer of felt to the back of the first.

Making polkadot felt coasters - almost finished.

Step 10

Cut out the final coaster circle through both layers of felt at the same time for a perfectly even edge.

making polkadot felt coasters - almost finished

Cut just a little bit beyond the edge of the fabric dot so that you can see the felt color around the edge.

Step 11

Using running stitch and a single strand of Sulky Petites 12 wt. Thread to match the felt, sew the felt edges together.

close up image of Big Stitch Felt Coasters, showing the detail of the stitching

Finished! Now make more in every color of the rainbow.

Felt polkadot coaters made with big stitch quilting

Pretty, pretty big stitch felt coasters!

Happy stitching!

Free Embroidery Files for Machine Stitched Eyes

Free Embroidery Files for Machine-Stitched Eyes - from Shiny Happy World

I know the eyes are the trickiest part of my applique patterns.

I’ve got a video here showing some tips for outlining them, and I have a tutorial here showing a cheater-pants way to stitch the very small Paper Doll quilt eyes on many regular sewing machines.

But I’ve heard from several of you who have embroidery machines and want embroidery files to satin stitch those eyes – including the larger ones.

That would be awesome! But I don’t have an embroidery machine and I have no idea how their files work. 🙁

We were chatting about this in one of the video Q&A sessions, and Ceil followed up after the session by putting me in touch with Titania Creations – someone who specializes in designing patterns for embroidery machines.

Thanks Ceil!

Titania Creations created a set of files for oval eyes that I’m giving away for free here.

Yep – free!

The eyes are all ovals in various sizes – from 1/8″ tall (great for the Paper Dolls quilt pattern) up to 1 1/4″ tall (great for the Silly Sloths quilt pattern).

You can find all the files here.

Here are the details. . .

Sizes

  • 01 = 1/8 inch tall
  • 02 = 1⁄4 inch tall
  • 03 = 1⁄2 inch tall
  • 04 = 3⁄4 inch tall
  • 05 = 1 inch tall
  • 06 = 1 1⁄4 inch tall

Machine Formats

  • PES – Brother / Babylock
  • XXX – Singer
  • JEF – Janome
  • VIP / VP3 – Pfaff / Husqvarna
  • HUS – Husqvarna
  • EXP – Melco / Bernina (Bernina also uses .ART but this is not available commercially)
  • DST – Tajima / Industrial machines. Any machine can use DST format but most home embroiderers don’t like to use it because it does not retain any colors.

So if you need a 1/2″ tall eye and you have a Janome embroidery machine. . .

  1. Go to this link.
  2. Double click on folder 03 for the half-inch eyes.
  3. Download the file ending in JEF.
  4. Wave a magic wand to get that file onto your embroidery machine.
  5. Stitch your eyes.

You can see that my knowledge of this process breaks down at Step #4. 🙂

I’m hoping that if anyone has a question they can ask it in the Shiny Happy People group and someone who actually HAS an embroidery machine will be able to help. 🙂

Oh! And these files can also be used to machine-embroider eyes on softies, for those of you making them for kids too young for the safety eyes. Hooray!

Here are links to all the posts showing how to applique with fusible adhesive – my favorite method. It’s fast and easy and (with the right materials) it holds up beautifully to rough use and repeated washing.

Here are links to special posts about eyes.

Here are links to some extra fun things you can do with your applique.

Other Applique Methods

Finished with this topic?

Return to the Let’s Make a Quilt main Table of Contents.

Move on to the lessons about outline stitching.

Happy stitching!

Weekly Planner: free printable! (+ suggestions!)

Free Printable Planner from FreshStitches and Shiny Happy World

Planners are a big deal. They can get really fancy. And there are planner people to follow on instagram. Whoa.

It’s a little overwhelming!

I’ve always struggled with finding the right planner for me. I love having a paper planner, but I always found it hard to find the right one. Some have a page for each day (I don’t have nearly enough going on!) and some are monthlies (I need more than an inch to write all my appointments for a day!). I just want a lovely, weekly planner. With room for a to-do list. And a way to separate those things I have to do on Tuesday from the things I have to do sometime this week.

So, I designed my own

I know! It’s such a Stacey-thing to do!

FreshStitches Planner page

FreshStitches Planner page

I posted a photo to instagram, and you guys LOVE it! And want to do it yourself! Sure, why not?

Download the Printable!

Now, I know this planner won’t be perfect for everyone. After all, I made it just for me!

Let me tell you a bit about the features. One page is the ‘weeklies’, an overview of the week. I have a box for the weekly to-do list (things that I can do anytime, but need to get done that week), a checkbox task (things that need to be done every day, but it doesn’t matter when… like posting to facebook or checking email) and a meal planning area.

Freshstitches planner weekly todo list 8.5 x 5.5

You can download the Weeklies page in pdf format, here.

Then I have another page called the ‘Dailies’… things I schedule in for every day. You can see there is a blank space for the date, and a space to write a major task to work on each day. Below the date, I include appointments or items that have to be done that day (like 10am dentist appointment). I left a little space in the corner of the page for goals or mantras to keep in mind for the week. And I shaded out Friday and the weekends… a reminder not to schedule too many things for then!

You can download the ‘Dailies’ page in pdf format, here.

Make the Planner + Suggestions!

To make your planner, simply print both of these pages on 8.5″ x 5.5″ paper and have it wire bound! It’s a convenient size! I used 20lb paper (which is quite thin), so the resulting book isn’t too thick even though I printed out through the rest of 2017.

The wire binding means it lays open nicely on the table and you can see both pages at a glance. If you want to get creative, you can throw in extra pages (like a monthly calendar) on your own! Google ‘calendar printables’ for oodles!

You can write in the numbers and dates, but I splurged and bought these adorable number stickers. They fit perfectly. I also love these fun travel stickers. And of course I have my knitting stickers by Symposi Press.

It’s so much fun!

I hope you enjoy! And tell me about your planner!


Save

Fast & Easy Free Placemat Pattern

Free Fast & Easy Placemat Pattern - perfect to use with any quilt or applique pattern


Use this free placemat pattern and get a little bonus use out of your favorite blocks from your quilt patterns!

I love seeing people make things besides quilts with their Shiny Happy World quilt patterns.

Don’t get me wrong. I love seeing your finished quilts!

But if you make quilts – it’s a great way to get extra use out of your patterns.

And if you’re new and a little nervous about making a whole quilt, it’s a nice small, single-block project to dip your toes in. 🙂

Today let’s talk placemats.

They’re so easy to make!

Placemat Pattern Instructions

A typical placemat – one that easily fits a standard place setting – is anywhere from 12″ to 14″ tall and 18″ to 20″ wide.

(A fat quarter is typically 18″ x 20″ so any placemat in this size range will take two fat quarters and some batting.)

I cut my rectangles (a front, a back, and a batting) 13″ x 19″ – right smack in the middle of the normal range.

If you’re going to use Quilt As You Go and you like to quilt before you applique (that’s what I do) layer your placemat top with the batting (no backing yet!) and quilt however you like. Press it flat.

Next – add your applique character.

Positioning the Applique

Almost all the characters in my quilts are designed to fit in a 10″ square, and I find they work really well with this placemat pattern without any resizing. If you’re using another designer’s pattern, just enlarge or reduce the image to be 8-9 inches tall.

I like to position my image to one side or the other. If it’s centered it gets completely hidden by the plate, plus I like things to be asymmetrical. 🙂

Look at the way the image is framed/cropped. Maurice (my favorite cat from this Cats quilt pattern) is chopped off straight at the shoulders. I designed him to look like he was in a portrait. You’ll want to be sure to position that straight cut edge flush with the bottom edge of the placemat – like he’s popping into the frame and we just snapped a photo.

gold applique cat on a blue placemat - made with the free placemat pattern from Shiny Happy World

This bird from the Chirp pattern, on the other hand, isn’t cropped anywhere. Position complete images like this fairly close to the bottom edge of the placemat (that will anchor the image and keep her from looking like she’s floating in space) – but not so close that any part of her gets cut off when you sew up the edges.

chubby pink applique bird on a light green placemat - made with the free placemat pattern from Shiny Happy World

See the difference?

Applique your image in place using your favorite technique.

You can find all my applique tutorials here. I used applique with fusible adhesive and outlined with simple straight stitching in black thread.

Now comes the extra fast and easy part of this placemat pattern.

Finishing Your Placemat

You can, of course, layer on the backing and bind the edges just like a quilt. I love binding and would choose this technique unless I was in a hurry.

But not everyone shares my love of hand-sewn binding. 🙂

For all of you – here’s a fast and easy finish.

Layer the placemat front and back right sides together. Pin or clip all the way around the edges.

partially-sewn placemat marked to show leaving an opening for turning when you sew up the edges

Sew it up around the edges (I used a 1/4″ seam allowance, but you can fudge that a little) leaving a few inches open on one side for turning.

Don’t forget to backstitch at the beginning and end of your stitching!

sewn corner of fabric shown with attention drawn to how you need to clip the corners

Clip the excess seam allowance off the corners – very close to your stitching. That will allow you to get nice crisp points.

Turn it right side out, smooth and straighten all the edges, gently poke out the corners, and press. Turn the seam allowance of the opening inside (so that folded edge lines up with the sewn edges) and press that too.

No need to sew up that opening by hand! Topstitch all the way around the edge of the placemat and that will close up the opening.

zoomed in detail showing edgestitching

I like the topstitching around the edge of the placemat to be about the same distance from the edge as my topstitching on the applique pieces. That keeps everything looking neat and unified.

pink applique pig on a brown placemat made with the free placemat pattern from Shiny Happy World

Finished!

There are so many possibilities for this! You can use any applique pattern. (I used blocks from Cats, Chirp, and Noisy Farm.)

Add some lettering from this free alphabet applique pattern to personalize each placemat with someone’s name!

Oooh! Instead of a name, use the Paper Dolls quilt pattern to create images that look like the person the placemat is for. That would be so much fun!

Use some of my free applique patterns to make a set of holiday placemats. I have free Halloween, Easter and Christmas patterns. 🙂

Instead of applique, do some embroidery. The placemat size and construction method is exactly the same.

You can make traditionally pieced placemats too! Just start with your favorite pieced block, and add enough fabric around it to get it up to the standard placemat size. The method is just like this one for turning any quilt block into a pillow.

Have fun with it!

Here are several free patterns that work with my basic 10-inch applique squares – no resizing needed!

Here are several free patterns that work with just some simple resizing. This post about making coasters has info about resizing an applique pattern that can be applied to any of these projects.

Return to the main Let’s Make a Quilt Table of Contents.

Happy quilting!

Rudolph the Red-Nosed Reindeer – a free applique pattern

Rudolph the Red-Nosed Reindeer - a free applique pattern from Shiny Happy WorldI know it’s not even Thanksgiving yet, but I wanted to share this free reindeer applique pattern early enough that you would have plenty of time to make it before Christmas. 🙂

It’s designed as a 10″ finished block, just like this free Santa applique patternthis free Snowman applique pattern, and this free Mrs. Claus pattern. Use them all together to make a fun quilt or wall hanging!

Free Christmas applique patterns from Shiny Happy World


Or you can use Rudolph combined with one of these free patterns. . .

You can find all the free Shiny Happy World patterns here.

Ready to make him? Here’s how. . .

You won’t need much fabric – less than a fat quarter of everything, so you can probably find what you need in your scraps. Here’s what I used – all from Timeless Treasures. . .

  • Pop in Poppy for the background block
  • Sketch in Latte for the head and shoulders
  • Sketch in Coffee for the antlers
  • Sketch in Linen for the face
  • Sketch in Ruby for his shiny nose 🙂

Want to give him a truly shiny nose? Use this tutorial to make the nose out of satin, or this one to make it out of shiny tissue lamé.

The instructions that follow are for Quilt As You Go and applique with fusible adhesive. You can, of course, use other applique methods. Find videos teaching other methods here.

Rudolph the Red-Nosed Reindeer - a free applique pattern from Shiny Happy World

Step 1

Cut a piece of background fabric and a piece of batting each 11″ square. You’ll trim it down to 10 1/2” square later, so it doesn’t have to be exact. If you’re using Quilt As You Go, quilt your block now. The quilting wouldn’t really show up on the busy fabric I chose, so I just quilted a simple grid and show it here from the back (batting) side.

Rudolph the Red-Nosed Reindeer - a free applique pattern from Shiny Happy World

Step 2

Download the templates here.

Trace or print the pattern onto the paper side of the fusible adhesive. I use printable Heat & Bond Lite fusible adhesive so I just print out the page. No tracing! The image has already been reversed, so just trace or print.

Rudolph the Red-Nosed Reindeer - a free applique pattern from Shiny Happy World

Step 3

Rough cut around each shape. Leave a little bit extra all the way around – a little extra extra (at least 1/4 inch) where there’s a dotted line. That’s the allowance that will tuck under other bits or into the seam allowance for a nice clean finish. Follow the package instructions and fuse each piece to the wrong side of the fabric.

Rudolph the Red-Nosed Reindeer - a free applique pattern from Shiny Happy World

Step 4

Cut out each piece neatly. Cut directly on the solid lines. Leave a little seam allowance past the dotted lines (like at the base of the antlers and the top and bottom of the shoulders). Cutting after you fuse ensures that the adhesive goes right up to the very edge.

Rudolph the Red-Nosed Reindeer - a free applique pattern from Shiny Happy World

Step 5

Trace any features onto the face. If you hold the piece up to a window, the light will make the lines very visible – even on dark fabric. I mark directly on any lines to be sewn (like the mouth) and inside the bits marking the appliqué position (like the eyes and nose).

Rudolph the Red-Nosed Reindeer - a free applique pattern from Shiny Happy World

Here it is after tracing so you can see the eyes, nose and mouth marked. I just use a fine Sharpie, but you can use something erasable if you’re worried about being able to stitch right over that line for the mouth.

Rudolph the Red-Nosed Reindeer - a free applique pattern from Shiny Happy World

Step 6

Peel off the paper backing, arrange the pieces, and fuse in place according to the adhesive product instructions. Remember – dotted line edges tuck behind other bits. The bottom edge of the shoulders should be lined up with the bottom edge of the block.

If you’re using Quilt As You Go, press your already-quilted block before adding the appliqué.

Rudolph the Red-Nosed Reindeer - a free applique pattern from Shiny Happy World

Step 7

Stitch all the edges down. You can use any stitch you like, in matching or contrasting thread. I really love the cartoony look of a simple straight stitch with black thread.

I demonstrate sewing with different thread weights here.

This post will help you with the order in which to stitch.

Rudolph the Red-Nosed Reindeer - a free applique pattern from Shiny Happy World

Step 8

Trim your block down to 10 1/2″ square.

Finished!

I hope you have fun with this guy – and I can’t wait to see what you make! Share your photos in the Shiny Happy People group so we can all see. 🙂

Rudolph the Red-Nosed Reindeer - a free applique pattern from Shiny Happy World

Happy quilting!

Best,
Wendi
Wendi Gratz from Shiny Happy World

Add a Name and Date to Your Felt Ornaments

Free alphabet embroidery pattern and instructions to personalize the back of a felt ornament

All my ornament patterns have solid felt backs – no applique or embroidery. That makes it the perfect spot to add a name or date using this free alphabet embroidery pattern!

In my family and in my husband’s family, it was a tradition to give handmade ornaments to the kids every year. Having our names on them somewhere was absolutely necessary since we both have siblings. 🙂

Now that I’m a grown-up with my own daughter it’s fantastic to have those dates too. She loves knowing how old we were when we got each ornament and who made them for us. 🙂

It’s easy to add a bit of embroidery to the back of your felt ornaments. Here’s how.

Download the free alphabet embroidery pattern I used here. You can also choose to type up your name and date and adjust the size and choose the font – but be sure to choose a font that’s mostly straight lines with minimal tight curves so it’s easy to embroider.

Now grab a piece of Sulky Sticky Fabri-solvy.

This is a great use for any small scraps you’ve saved. 🙂

Draw a straight line to use as a guide to line the letters or numbers up, then trace them onto the stabilizer.

Use Sulky Sticky Fabri-solvy to transfer the date, ready for stitching

Peel off the backing, stick the stabilizer to the felt, and stitch right through it.

partially embroidered date on the back of a felt ornament using the free alphabet embroidery pattern from Shiny Happy World

I used backstitch with three strands of white thread.

I traced the date in pencil. It can be a bit hard to see, but there’s NO chance of it bleeding on the white thread. Most pens bleed a lot – test yours or use a pencil.

After you’re done stitching, soak off the stabilizer in cold water and lay the piece flat to dry.

Finish making your ornament according to the pattern instructions. (You can find all the Shiny Happy World ornament patterns here.)

Free alphabet embroidery pattern and instructions to personalize the back of a felt ornament

Now you’ll always remember when you made it!

Happy stitching!