Here it is! The very last block in the Controlled Chaos scrap quilt!
What You’ll Need
52 two-inch squares in color A (shown in purple)
48 two-inch squares in color B (shown in green)
Instructions
Use 1/4″ seam allowances for all sewing.
Press all the seams as you go. I’m pressing mine open for this quilt. I think it will make things simpler in the end.
Arrange your squares according to the diagram below.
For this block I worked in big chunks. I sewed things up in the following order. . .
Sew all your individual squares into pairs of matching colors. You should have 26 purple pairs and 24 green pairs.
Sew the purple pairs into 2 x 2 squares.
Pull out four of those purple squares. Sew two green pairs to opposite sides of each purple square. Sew the remaining green pairs into eight 1 x 4 rectangles.
Sew these rectangles to the top and bottom of your purple squares, so that there’s a green ring around each of the four purple squares.
Sew the rest of your purple squares into one 2×10 rectangle and two 2 x 4 rectangles.
Sew a 2 x 4 purple rectangle between two purple/green squares. Repeat with the last 2 x 4 purple rectangle and the last two purple/green squares
Assemble your chunks in rows and sew the long 2 x 10 purple rectangle between your other two rows.
Finished!
Well – finished with the blocks. 🙂 I still need to join them all together with sashing strips between them and then quilt the whole thing. Here’s what it’s going to look like. . .
I’ll have a tutorial showing how to do the sashing strips (there’s a little trick to that!) and then tutorials showing basic hand quilting, quilting without marking, and big stitch hand quilting. Yes – I’m going to spend the winter hand-quilting this beauty!
But all of that is going to have to wait just a little bit. I have a new and improved website that I’m really close to launching, so that’s taking a lot of my attention behind the scenes these days. It’ll be worth it! While you wait – finish all your blocks!
Remember – you don’t have to make your quilt the same size or number of blocks as my quilt. You can make fewer quilts for a crib size, or repeat some of the designs in different colors (or make up your own additions!) for a larger quilt. Mine is going to be just the right size for curling up on the couch. 🙂
But first – let’s move my big head out of the way so you can see the whole quilt. 🙂
You guys saw bits and pieces in the sneak peeks last week, but here’s the entire thing – my Woodland Critters Quilt.
There are 9 different animals, 6 mushrooms, and 4 trees. You also get an alphabet so you can add animal sounds like this. . .
These examples are crib size, but I also include layouts for napping and twin size quilts. That’s the napping size hanging on the wall behind me in the top photo – my favorite size for couch use.
What’s that in front of me? It’s an owl quilt!
I took just one block from the Woodland Critters Quilt and went crazy with all my favorite colors and fun decorative stitches and made this beauty. I love how some of the owls are sleepy and some of them are grumpy. It’s super easy to make the change and I show you how in the class.
The class! Let me tell you what’s in the class!
(I can’t believe how much we packed into seven video lessons!)
I get a lot of emails from people saying they wish I could just come to their house and show them how to make a quilt from start to finish.
This is the next best thing. I show EVERYTHING!
How I choose fabric
How I true up my fabric and cut background blocks
How I quilt my blocks before adding applique
Fusible applique basics – my favorite products and how to use them
My tricks for marking faces and how to handle overlapping bits
Lots and lots of options for doing the eyes (the hardest bit)
How I outline stitch all the pieces
Fancy stitching options
How to appliqué on knits (you’ll see me appliqué a fox on an adorable baby onesie)
How to join those already-quilted blocks
How to back the quilt and finish quilting it
How to bind the quilt
See what I mean? It’s not just an appliqué class – it’s also a beginning quilting class and a QAYG class. You get to keep the class forever and watch it as many times as you like. You can pause it at any time. There’s a handy “go back 30 seconds” button. And you can ask me questions at any time. It’s fantastic!
Update – Please be aware that Craftsy (now Bluprint) has added a subscription plan to their offerings, which changes the way instructor support happens. If you buy the class for your Forever Library, you get instructor support – which means your questions are posted to a special instructor dashboard where I can see them and answer them. If you watch the class as part of the streaming subscription, any questions you post go to the larger class community – not to me. I never even see them, so I can’t answer them.
It’s normally $34.99 (which I think is a terrific price for an exclusive pattern plus all that video content) but for the first week of the release I have a special discount for you. $20 off!
Use this link to get the discounted price.
And use it now – because that is a crazy price and it’s only available until midnight EST on Monday 8/10.
Here’s block #18 in the Controlled Chaos Quilt! There are only two left after this!
What You’ll Need
64 two-inch squares in color A (shown in aqua)
36 two-inch squares in color B (shown in red)
Instructions
Use 1/4″ seam allowances for all sewing.
Press all the seams as you go. I’m pressing mine open for this quilt. I think it will make things simpler in the end.
Arrange your squares according to the diagram below.
For this block I worked in big chunks. I sewed things up in the following order. . .
Sew all your individual squares into pairs of matching colors. You should have 32 aqua pairs and 18 red pairs.
Sew the aqua pairs into large 4 x 4 squares. You’ll need four of them.
Sew the red pairs into 2 4×2 rectangles and 2 rows each 10 squares long.
Sew the long red rows together into one long rectangle 2 x 10 squares.
Sew one aqua block to one short red 2 x 4 rectangle and then to another aqua block. Repeat with the remaining aqua blocks and 2 x 4 red rectangles.
Assemble the final block by sewing an aqua/red row to the long red 2 x 10 rectangle and then to the last aqua/red row.
That’s 18 blocks done. I can’t believe we’re down to the last two!
Here’s what I calculated I’ll need to finish the quilt. I’m going to use a grey solid – I’m looking for a nice slate color. I’ll need. . .
1 1/4 yards for the sashing
5 yards for the backing
3/4 yard for the binding
I usually use Cuddle Fleece to back my quilts, but I want to hand quilt this one and I think the Cuddle Fleece will be too thick for that, so I’m going to use the same grey fabric. I’m going to big stitch quilt in a lot of different colors – it should make pretty speckling on the back and they’ll show up nicely on the solid.
I’ll be back next week with the penultimate block!
Press all the seams as you go. I’m pressing mine open for this quilt. I think it will make things simpler in the end.
Arrange your squares according to the diagram below.
For this block I worked in columns. I sewed things up in the following order. . .
Sew all your individual squares into pairs of matching colors. You should have 24 orange pairs and 26 green pairs.
Sew the orange squares into columns – each 2 blocks x 8 blocks.
Add a green pair to the top and bottom of each orange column.
Sew the remaining green pairs into 4 strips, each 10 blocks long.
Assemble the final block by alternating green columns with the columns that have the orange in them.
That’s 17 blocks done – just 3 more to go. THREE!
Did I mention just three blocks left? I’d better do the math and figure out how much fabric to order for the sashing and the back. I’ll include that info with next week’s block. 🙂
I love, love LOVE my new project bag! It makes me smile every time I use it – and I’ve been using it steadily for about two months now.
It’s made with the Stitch & Stash Project Bag pattern from Betz White – reversible, with no zippers or velcro to snag on my work, and with a handy pocket inside to hold my tools. Such a well-designed bag for crafters!
Of course, I had to add some appliqué to the front. Give me a flat surface in a pattern and I will add some appliqué. Guaranteed. 🙂
I only made a couple of simple changes to the project.
The original pattern has snaps on the sides, but I decided not to add them because I know I will never actually snap them and I like the shape without tucking in the sides.
I quilted the outer bag fabric instead of just staystitching the batting around the edges. I love the little bit of extra texture the swoopy quilted waves add to the front. I just quilted the batting to the main fabric – no need to add a backing fabric since the bag is lined. This is how I quilt all my quilts, too.
You might worry that that will make the seams too bulky, but if you use 100% cotton batting (I love Warm & Natural) and press the seams open, it’ll squish nice and flat.
When I work with batting like this I also use sewing clips instead of pins. They’re great for holding bulky fabrics in place with no distortion!
Of course, the main change I made was adding the cute kitty. 🙂
After I did the quilting, I appliquéd the cat in place with fusible adhesive and stitched around all the pieces with black thread. I love the cartoony pop that gives.
The cat is one of the blocks in my Cuddly Cats quilt pattern, shrunk down a bit. I made the small bag and resized the cat image to be 5 inches tall and 4 inches wide. That left plenty of breathing room between the top of the cat and that awesome big grommet, and fit from side to side nicely. I wouldn’t go any bigger than that in either direction for whatever image you’re adding.
I love it! Mine is holding my current EPP project (to be shared soon – it’s almost finished!) and Jo has already requested a larger one with a monster on it, and a tall, skinny pocket inside especially for holding a few crochet hooks. My plan is to make a few more in different sizes (the pattern includes three sizes) to hold various works in progress and hang them on some hooks on my studio walls. Cute AND functional. I see a lot more of these in my future. 🙂
Really enjoying working on these blocks and this quilt. Kind of glad now that I’m so far behind in the blocks, I don’t know if I could wait for the next block to come out. Thanks so much for the tutorials they are very helpful. I love sewing and feel so happy I can finally use the fabric pieces I have saved for something other than taking up space.
I made a small pillow for a friend who’d just lost her orange tabby. I added two mice to balance the design. I used wool felt because I liked the colors I had in my sewing room.
I’m so touched by the people using the dog and cat patterns to memorialize their beloved pets.
Deborah writes. . .
I never thought about sending a picture of my quilt until I read your newsletter. I did a blue backing to finish it. It was dedicated to our Lab, Jake, who passed away in November.
Thanks for your Charity Quilt pattern–I tried it and it was so fun and easy and a terrific way to use up all those scraps I can’t seem to throw out… Also, thanks sooo much for your Quilt As You Go tutorial…now I finally get it and what a difference!
I’m sure it’s not perfect by any means but it’s not too bad for my first attempt at a quilt!
Thanks so much for the beautiful pattern, I loved using it and have had loads of friends ask me where I got it! I’ll have to find something else to do with my time now…..maybe some matching cushions??!!!
Thanks to your lovely pattern, clear instructions and hints about the sticky stuff (whatever it is called) we finished our quilt for baby Lucia Rosalie Sharpe. We embroidered the dog’s names and some contributors made up their own dogs names, hence the inclusion of “Lulu” and “Karl.”
I love it! And for those wondering – the “sticky stuff” is Sulky Sticky Fabri-solvy and it’s terrific for adding embroidered details like these sweet puppy names. 🙂
I really enjoyed this method of quilting. But I had to play around with the pattern just a little. I always do. I made all the ears floppy. And rather than make a one dog more than once I took pits from one dog and matched it with another to make a true mutt. And of course I added borders. Thanks so much for the pattern and tutorials. All very helpful.
Here is the dog/cat quilt I made to donate to a local animal shelter as part of their fundraiser. It was raffled off and made some nice $$$ for our furry friends.
Two of my favorite things – people mixing and matching blocks from different quilts, and quilts made for animal shelter fundraisers!
Add a name, a birth date, a gift date, animal sounds – even a poem or quote!
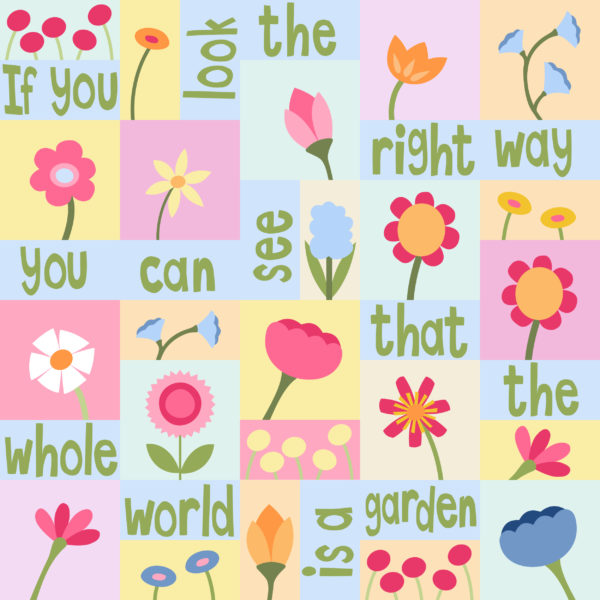
I especially love this version of the Wild Flowers pattern that adds a quote from The Secret Garden by Frances Hodgson Burnett.
Let your imagination run wild!
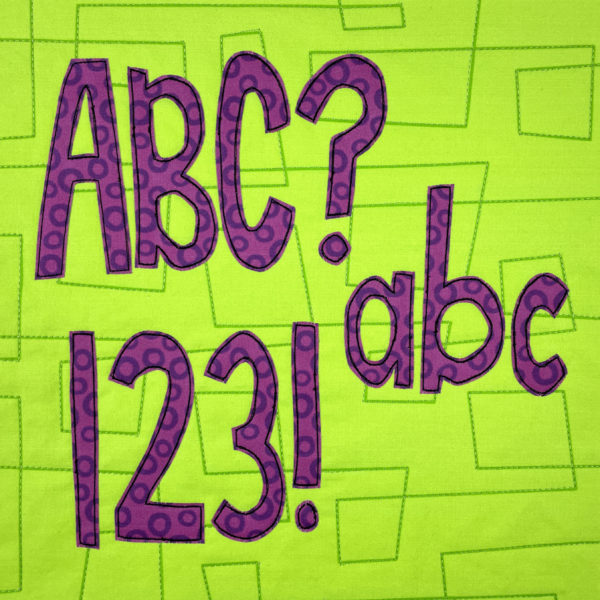
These letters are skinny-ish, allowing you to fit more letters in a standard block. They’re also very irregular so you can easily just shave a smidge off individual letters if you need to skinny them up just a touch to fit in a block and don’t want to go to the hassle of resizing them.
Also – after many requests – this alphabet includes capital letters, numbers, and some punctuation. Yay!
There’s a post here with more info about adding half-size blocks to your quilts – perfect for adding words. The nutshell version is to cut your blocks 6 x 11 inches, then trim them down to 5 1/2 x 10 1/2 inches so that when you sew them together with a quarter inch seam allowance they finish at 5 x 10 inches – exactly half the size of one of my square blocks.
If you need more than six letters, I recommend cutting a larger block. That’s what I did for cock-a-doodle-doo up in the corner of this quilt. (This sample uses an old, chunkier alphabet that I don’t use anymore – but you get the idea.)
Trace the reversed image of the letter onto the paper side of your fusible adhesive. Roughly cut around it.
Follow the manufacturer’s instructions and fuse it to the back of the fabric.
Cut it out as neatly as you can.
Peel off the paper and fuse the letter to your finished piece. Stitch around it if you like. Some adhesives require stitching – so read the label before you decide to skip it.
Use this free applique alphabet pattern to add words to your quilts, pillows, tote bags and more. Add your kids’ names to everything they own. Have fun with it!
If you like this pattern, sign up for the Shiny Happy News! Members get a weekly email with tutorials, patterns, sewing news, fun stuff and things to make you smile. 🙂
Press all the seams. I’m pressing mine open for this quilt. I think it will make things simpler in the end.
Arrange your squares according to the diagram below.
For this block I sewed things up in rows. The top and bottom rows are identical, as are rows 2 and 9, rows 3 and 7, etc. Knowing that can help you sew them up in batches.
Then sew those rows into one fabulous block. 🙂
That’s 15 blocks done – just 5 more to go!
I love how it’s coming together! And I feel like I’m so close to finishing!