And now – a pack of all the new thread colors from DMC. They’re so pretty!
Half of them are brights. You all know I like the bright, clear colors. 🙂 I’m especially excited to see some turquoise in there! I love turquoise and I’ve always felt like they didn’t have just the right shade. Now they do! And there’s a dark and light that will work really well together. Nice!
The other half are these lovely rich natural shades. So beautiful! Especially the blue and the berry color. Wouldn’t they be pretty for some fall stitching on tea towels or napkins?
The whole thread bundle is one of the prizes. Woo hoo!
So get your photos in pronto! Email them to me at blockhead[at]wendigratz[dot]com and I’ll get them posted to the projects page. Or you can post them to the Shiny Happy World Facebook page and I can grab the images from there. Just do whatever’s easiest for you. 🙂Edited to add: This contest is now closed. But you can still look here to see all the final entries, and get inspiration for how to finish your next embroidery project! Go take a look at all the entries!
It’s one of my favorite posts every month – sharing what people are making with Shiny Happy World patterns! I love getting your photos!First up are these cute elephant friends from Kris. Look how she made them hold hands for the photo! Awww! But wait – it gets better!
Linda made a very cute Spot the dog in some awesome jammies. Look how perfect that fabric is! And look at that cute tail sticking out! You can find the Spot pattern here, and the pajamas pattern here.
Rachel made these terrific pencil cases for her nieces. Didn’t she pick the best colors for them? So cute! The Gobbler pattern is a freebie for newsletter subscribers. You can get more info here.
Vivienne made these snakes (and other creepy crawlies). She says. . .
I made some of your snakes. We like them so much I expanded to other bugs. They appeared in a play my girls did last week (from a book called “Wombat Stew”, with other home educating families). Thanks so much for your inspiration. I also used your tutorial on working with fun fur to make a costume (for my daughter to be a “platypus”) for the same play.
Fun! The snake pattern is free – and a real favorite. Get it here.
Annette made this fabulous Franklin the Fat Cat. I think this is the first one I’ve seen in green and I love him! She writes. . .
I just finished making Franklin the Fat Cat. He is just the cutest ever! I plan to make many more for Christmas presents for my many grandkids. Thought you might like to see him.
So fantastic! He’s such an easy pattern – perfect for making in bunches for bunches of grandkids. 🙂 Get the pattern here.
Want to be part of next month’s Show & Tell? Send me a photo of something you’ve made with a Shiny Happy World pattern! My email is blockhead[at]wendigratz[dot]com. I can’t wait to see what you’ve made!
When I read a book to review it, I read it with a notepad next to me so I can capture my thoughts as I go along. My notes for Quilting Happiness – a terrific new book by Diane Gilleland and Christina Lane ended up being a long list of things I loved.
So let me tell you what I love about Quilting Happiness. . .
I love the title. My business is called Shiny Happy World. How can I not immediately pick up a book called Quilting Happiness?
I love the quote mentioned in the dedication. “You’ll never notice it on a galloping horse.” That – in a nutshell – sums up my quilting spirit. It’s something I often tell my students when they fixate on a tiny “mistake” in a big, beautiful quilt.
I love the list 5 Things About Quilting That Makes Us Happy.
I really connected immediately with both authors of the book – but especially with Diane’s last point. “Give me some hand quilting to do, a cup of coffee, and a Doctor Who marathon, and I’m one happy woman.” That’s exactly how I feel about all hand work – quilting, embroidery, finish work, etc. Although I’d also add in Sherlock, Downton Abbey, the Phryne Fisher Mysteries and lots of other favorite TV shows. 🙂
I love the many quizzes sprinkled throughout the book. They can help you articulate what kind of quilter you are – something I sometimes find difficult to do. And I love how the results of the quizzes point you to specific quilts in the book. It’s a fun “Choose Your Own Adventure” way to work your way through the projects.
I love that every single project has very specific suggestions for quilting each quilt.
So many books just say “quilt as desired.” That’s not helpful at all! And not only does the book have specific suggestions – it has multiple suggestions for every project! And they range from simple line stitching to more complicated free motion stitching and even some hand quilting and tying suggestions. That is fantastic – and very unusual!
I love that the instructions for each quilt are super clear – with excellent diagrams.
I love that there are detailed instructions for cutting the fabric. A lot of books will tell how many of each shape and size to cut, but leave it up to you to figure out the most efficient way to do that. This book breaks it down step by step. It tells you how many strips to cut of each size, then exactly what pieces to cut from those strips. Very nice!
I love this Crazy Strips quilt. I think it’s my favorite in the whole book. It’s pieced improvisationally, but within a structure. That helps keep things balanced and can be less overwhelming to someone just getting started with that kind of loose approach.
I love the range and variety of projects. There are bold, dramatic, modern quilts. There are traditional quilts made with vintage-style fabrics. There are quilts for beginners and quilts for more advanced stitchers. There are small projects like pillows and tote bags, and there are large bed quilts. This is an especially great book for beginners who know they want to try quilting, but maybe aren’t sure what kind of quilts they want to make. They can take some of the quizzes to get pointed in one direction, then stretch their skills as they learn.
I love the “Happiness Practice” exercise about Finding Inspiration Guides. It’s a great guide to studying a quilter you admire – breaking down just what it is about their quilts that really works for you so you can apply that to your own work without copying them directly. What a terrific exercise!
I love the general instructions at the end of the book. They’re very clear and cover all the basics – how (and why) to square up your fabric, piecing curves, basting and binding your quilt and more. It’s a great reference.
I love this Haphazard Chevron Pillow. It’s similar in many ways to the Crazy Strips quilt I mentioned above – in that it’s irregular piecing within a structure. But it’s a smaller project and one I could realistically tackle right now. So I decided to make one for myself!
I strayed a bit from the instructions (of course) – not because they were unclear – they’re terrific! But I have overflowing scrap bins, I knew my daughter would really like a rainbow pillow, and I wanted to try a quilt-as-you-go technique I’ve been toying with. So here’s my Scrappy Rainbow Chevron Pillow. 🙂
My pillow form was a bit larger than the one in the book, but I used the same suggested range of widths for the strips I cut so it would have a similar effect.
I love it! Thanks so much for the inspiration!
Are you ready for some Quilting Happiness of your own? Get the book here.
There are a lot of different kinds of stuffing you can use in your softies – wool, bamboo, corn, polyester, excelsior, sawdust – and probably lots of others I can’t come up with at the moment. I always use polyester fiberfill (often in combination with weighted pellets). It’s inexpensive, readily available, has a nice springy feel, and is washable.
I’ll be honest. Once I decided what material I would use for stuffing, I never gave much thought to the quality. I figured that threads of spun polyester are threads of spun polyester and I always just bought whatever was cheapest.
I was wrong.
When I started writing Creature Camp I contacted a few manufacturers to ask if they would provide some materials for use in the samples in the book. Fairfield sent me a few bags of their plastic Poly Pellets (I love that weighted feel and flop) and an ENORMOUS box of stuffing.
Twenty-five pounds of stuffing.
That is a LOT of stuffing! That’s enough stuffing – packed as tight as I can get it – to fill two trash cans to overflowing, requiring a bungee cord to keep the lids on.
As soon as I opened the package I noticed that it was very different from my usual stuffing. It was very smooth and the fibers had a kind of a silky glide to them. The spun threads felt finer and it didn’t clump up at all.
With my old stuffing I had to spend a good bit of time pulling the stuffing apart into tiny bits before stuffing in order to keep the finished softie smooth and lump-free. No need to do this with the new stuffing. I can just pull out big handfuls and stuff them in. Nice!
Jo’s response was absolutely priceless.
She raved about the new stuffing. “It’s sooooooo soft!” “It’s sooooooo silky!” “My softies are sooooooooo smooth!”
But the best was the moment I came into my sewing room and found her, head down, buried up to her chest in my trash can full of stuffing, bouncing up on her tiptoes trying to “swim” even deeper into it.
I wish I had a photo. 🙂
When I asked her what the heck she was doing she said, “It’s just so soft and fluffy. I couldn’t resist!”
After we had used the new stuffing on a few projects she asked me if I would please give away what we had left of the old stuffing because she just didn’t want to use it anymore.
I did. My Dad always said to use the right tool for the job and I had found the right tool.
So. You’re probably wondering what this magical stuffing is. It’s Fairfield brand Poly-fil Supreme Fiberfill. I recommend it by name in almost all of my softie patterns. You can find it in Walmart under a different name and with different packaging. There it’s call Poly-fil Supreme Ultra Plush. I’m including a photo of both kinds of packaging so you know what you’re looking for.
I really, really love this stuff and feel like it has made my softies noticeably better. Not only is it really pleasant to touch and work with, the finished softies are smoother with a lot less effort on my part. Also, it allows me to get a nice smooth fill without packing the stuffing in as tightly and I really like the squishier softie that results.
Squishy = Huggable = Good.
I wanted to share it with some of you and asked Fairfield to send some samples I could give away. They said yes! So this will be one of the giveaways for folks who pre-order Creature Camp from my shop. In addition to getting a free pattern, a few randomly selected people will also get a bag of this stuffing – enough to make several softies! Thanks, Fairfield!
Edit – Sorry – the giveaway is over now.
And I’ll leave you with one more photo from the making of the book. Jo says the stuffing is her favorite part of making softies. “It’s like feeding them.” Here are Jo and her friend, Hana, feeding their new softies some silky smooth fluffy stuffing. 🙂
To me, glue is something that holds two things in place while you attach them more securely with something else – like screws or stitches.
I’ve just had too many glue fails in my lifetime. I have a big crate of all different kinds of glues and I really try to make sure I’m using the right glue for the right situation. But still – glue fails.
That’s one reason I’ve always been pretty hesitant about using fusible adhesive. Sure – it’s fast and easy and I’m happy to use it on something that doesn’t need to be held together forever. It’s great for Halloween costumes. It’s fabulous for banners and wall hangings. But I’ve never used it on a clothing or a bed quilt.
Besides the fail factor – there’s the stiffness. I don’t like it.
And the stitching that you usually add around the edge to secure it can look awfully clunky.
Plus – I hate tracing. (I know. I know. I’m a broken record on this. But I really hate tracing.)
When I went to Spring Quilt Market one of the things I was looking for was a fusible adhesive I could fall in love with.
I would love to be able to share a product with you that would allow you to make quilts like this. . .
. . . super fast and with no burned fingers.
I tested two weights of Heat & Bond fusible adhesive.
Heat & Bond Featherlite is very, very soft. It doesn’t have any of that fusible adhesive stiffness.
Heat & Bond Lite is a little bit heavier – but still very soft.
I set up two identical applique blocks, following the instructions on the packaging exactly. I never use fabric softener or dryer sheets on fabric I’m going to sew with because it can interfere with any adhesives I might use. I used exactly the same fabric in the two blocks.
This is before any washing (except for pre-washing the fabrics).
I sewed around the head with a basic straight stitch. I sewed both sides of the neck with a fairly open zigzag stitch. I didn’t do any extra stitching on the ears, the eye spot, the eyes, or the nose.
Then I threw them in the wash with a load of laundry, and ran them through the dryer too.
After one trip through the washer and dryer.
Featherlite is the one on the left. Everything not sewn on fell off – but that was to be expected. The instructions DID say to sew it after fusing so it was kind of an unfair test. I just wanted to see what would happen. 🙂
So you do have to sew this stuff in addition to fusing. On the plus side – it was so soft that you could easily hand stitch through it – and there was no gumming of the hand or machine needle. And after one washing the applique was crazy soft. So soft that I never would have guessed there was adhesive in there.
The Heat & Bond Lite is the one on the right. It’s also supposed to be sewn on, but it didn’t lose as many unsewn pieces. One eyeball came off, the eye spot came loose, and the top ear came loose. (Again – not a fair test because the package DOES say to sew it.) With this product too, there was no gumming of the needle when I did sew it. You can feel a little stiffness from the adhesive, but it’s not bad at all.
So I found out that both products needed stitching on top of the glue (as I suspected all along and as the package said). Now I wanted to find out how things held up after repeated washing and drying. This time we’ll look closer at the edges of the sewn applique pieces.
After two trips through the washer and dryer.
The Featherlite (on the left) is showing a little fraying on the edges – but I kind of like that so I don’t consider it a problem – just something worth noting because I know some people don’t like it. There’s more fraying on the head piece with the straight stitching than on the neck with the zigzag – even though it’s a pretty open zigzag.
The Heat & Bond Lite had no fraying at all.
I had more laundry, so. . .
After 3 trips through the washer and dryer.
No noticeable change. Looking good!
I had one more load of laundry. Towels. Towels are rough so this would really put those edges to the test.
After four trips through the washer and dryer – including in a big load of towels.
Hmmmm. . . maybe a tiny bit more fraying on the Featherlite? Maybe? All in all I was really impressed with how they held up.
Update – I’ve used the Featherlite on some other projects since then and it DOES continue to fray over time. The Heat & Bond Lite really doesn’t. What you see after a few washes is pretty much what you’re going to get.
The final verdict. . .
They both win!
No. It’s not a cop out. I’d just use them for different purposes!
If I were adding applique to clothing that would only be worn a few times I would use the Featherlite.
It’s super soft, making it especially awesome forthings like baby onesies where it will only fit for a short period of time and so the number of trips through the wash is limited.
For toddler T-shirts I’d use the Lite weight for better durability – and it’s still awfully soft after that first washing.
For just about anything else I use the Heat & Bond Lite.
It held up really well in the wash – far better than I anticipated. I cannot believe that tiny eyeball hung on through that final load of towels – with no stitching! And there was almost NO fraying on the sewn pieces – even when sewn with a straight stitch (which I prefer over the zigzag).
It’s also pretty dang soft. Not as soft as the Featherlite, but not bad at all. In fact – I don’t think it’s really even noticeable in a finished quilt. When layered and quilted it’s really hard to tell that there’s any extra stiffness under the applique.
So there you have it! I can recommend both of these fusible adhesives, but the Lite weight is the one I use in all my quilts. I LOVE the printable sheets so I don’t have to trace my pattern pieces. Shop for Heat & Bond Lite printable sheets here.
One more thing – a lot of people ask how this holds up over a long period of time with just the straight stitching. I’ve got a post here that shows one of my daughter’s quilts after almost two years. You can see the results in this post.
What about Ultrahold?
Yes – there’s another fusible adhesive weight available. It’s called Ultrahold and it’s the strongest adhesive that heat & Bond makes.
You’re not supposed to stitch through it. I tried it and it gummed up my needle like crazy. I do not recommend trying it yourself. 🙁
It’s very stiff, so I only recommend it for small pieces like eyes and noses – pieces that are annoying to stitch around and small enough where you’ll never notice that extra stiffness.
This weight does hold very well – BUT ONLY IF YOU DRY IT AT LOW TEMPERATURES. The adhesive melts at high temperatures, right? That’s what gets it to stick. That’s also what gets it to unstick. If your dryer gets as hot as an iron on medium heat, no steam (mine does) that is hot enough to loosen the adhesive. So wash and dry on cold or cool!
All of my patterns are optimized for use with printable products. What does that mean? Each applique block in the pattern is formatted “reversed and exploded” with extra space between the pieces for use with printable fusible adhesive or this freezer paper method.
Yes! I found a fusible adhesive that I’m excited to use! Not just excited – giddy! I was awake most of the night thinking about my next project. 🙂
These links go to all my posts about quilt supplies.
This is one of my favorite photos of Jo. I think she was seven or eight and I have no idea why she was wearing that mask while she sewed – but it’s totally her. 🙂
Creature Camp (Bookshop link, Amazon link) is coming out soon and Jo helped me so much with it that she became a co-author!
I hadn’t planned it that way.
I’ve taught so many kids how to sew (including Jo). I put together a proposal for a book written for kids, teaching them to sew (and even design) their own softies. That meant working up a detailed outline of the book, sketching all the softies that would be included, and selling the proposal. Stash bought it and I went to work prototyping and making. When it came time to photograph the first finished softie I was. . . disappointed. It looked like a grown-up had made it and I know that can be intimidating for kids. I realized I wanted all the softies in the book to be sewn by actual kids. Luckily, I have an actual kid who likes to sew and loves softies. Jo said she was willing to sew up every project in the book. Woo hoo! Stash was immediately on board and Jo and I went to work.
Not only did she sew all the samples – she also did all the sewing for the step by step photos. Those are her hands you see in the how to photos. Every single stitch you see in the book was sewn by a real kid – mostly Jo.
She also gave me great feedback along the way. “This step is hard. Can we make it easier?” “I think we should fold these ears here.” “I like these long, skinny legs. Can we make them even longer? That would be fun!”
She was a huge part of the book!
So I wanted to introduce you to Jo, tell you a little bit about her sewing history, and along the way answer some questions you probably have about sewing with kids.
What’s a good age to start using a sewing machine?
It depends on the kid.
Jo was four when she got her first machine.
(It was a toy. Don’t do that. After a couple of months it died in a large cloud of smoke and she moved on to a real machine.)
My classes usually start at age 6, but Jo was asking to use the machine, I knew she could focus, and she had pretty good motor skills. Let them start on the machine just as soon as you think they’re able. Sewing on the machine is lots of fun and I’ve never yet met a kid who didn’t want to do it. I’ve got a post here with some tips to help you get started.
Right away she said she wanted to make a quilt big enough to fit her bed (a twin). These are the first blocks. Look how proud she is!
What Kinds of Projects Should Kids Work On?
Six-year-old Jo makes a tutu for Wedge the Uglydoll.
Whatever they are most interested in! I usually steer kids towards small projects – some beanbags, a skirt for a favorite doll, a simple softie – something they can finish in a day or two and get that quick satisfaction.
But Jo really REALLY wanted to make a quilt. A big quilt for her bed.
That’s okay too.
Just don’t expect them to finish it soon. 🙂
It took Jo four years to finish her quilt. It would get put away for months at a time while she worked on other things (or didn’t sew at all) and then she’d pull it back out again and add a few rows.
Jo’s quilt after about 1 1/2 years.
If your child chooses a big project, try to find a way to let it grow as you go – not just be pieces in a pile. If I were making this myself I’d have sewn all the rows together, then joined the finished rows into a big quilt. Jo sewed two blocks together, then two pairs into a four-square block, then sewed four-square blocks into a row two blocks tall, then attached that row to the growing quilt. She loved seeing those units get bigger and bigger and it really helped that every time Jo pulled the quilt out and worked on it, it GREW.
Don’t Expect Them to Follow an Imaginary Line
Jo sewing at age six.
The number one thing you can do to help kids sew successfully right out of the gate – especially if they’re starting really young – is to draw a sewing line on the fabric for them.
I was still drawing lines on Jo’s quilt blocks at age six – if you click on the photo above you’ll be able to see it bigger.
Creature Camp is recommended for ages 8 and up if they’re sewing solo. But if you’re willing to lend a hand, a younger stitcher can handle any of the projects in the book. After Jo sewed all the main samples we recruited some of her friends to sew variations on the projects in the book. It was such fun watching them play with the patterns!
One of those stitchers was just seven years old and I knew she’d want to make the reversible butterfly/caterpillar – one of the more advanced projects near the end of the book. I drew on the stitching lines for her and helped her with some of the trickier pinning and she did just fine.
And now here’s Jo! She was nine when she made all the projects in the book, ten when we got this sample back and I recorded the video – and eleven now. That’s how long it takes to write a book! Here’s Jo talking about her favorite project in the book. . .
The physical book is out of print now, but you can still find used copies or get the eBook. (Bookshop link, Amazon link)
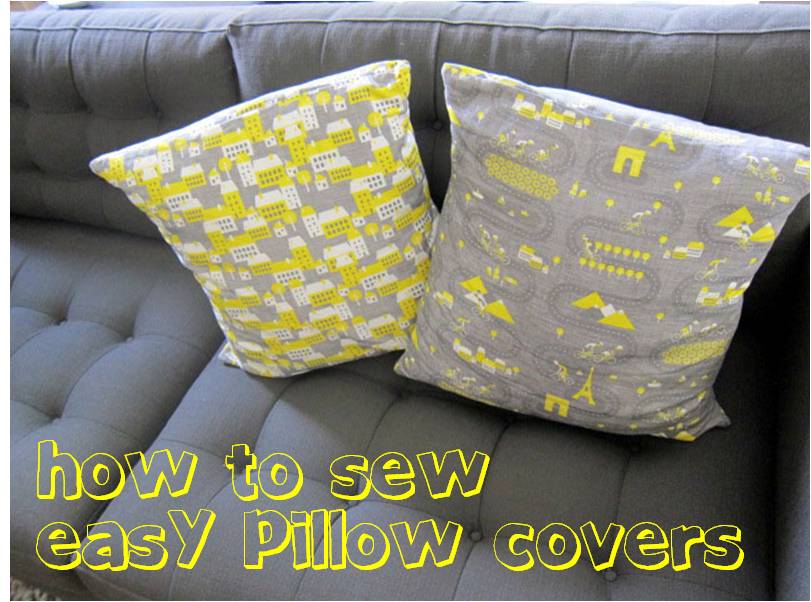
Today, I’ll show you the super-easy pillow covers I made!
This isn’t a full step-by-step tutorial, but if you’re familiar with the basics of sewing, I think you’ll get the idea!
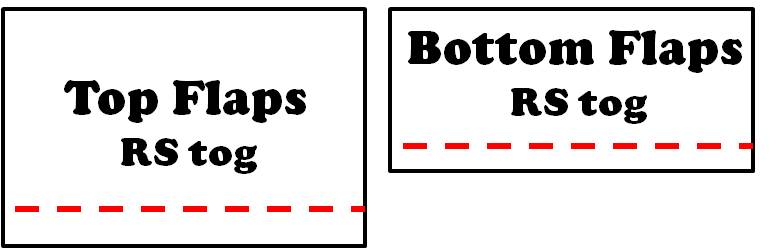
I wanted pillow covers that were removable, but I didn’t want to put in a zipper or do buttonholes. So, I went for a super-easy ‘flap’ technique. The back is composed of overlapping flaps that allow you to take the pillow in and out, but still cover the pillow:
The Basic Steps
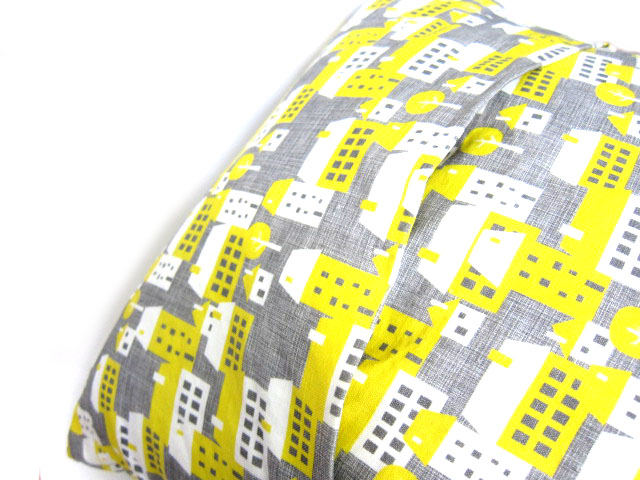
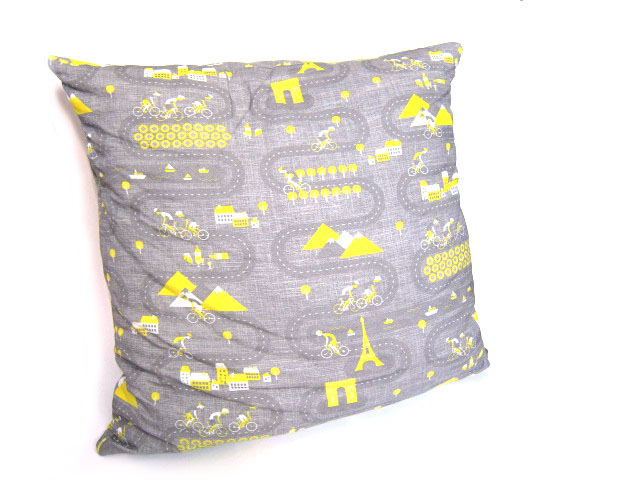
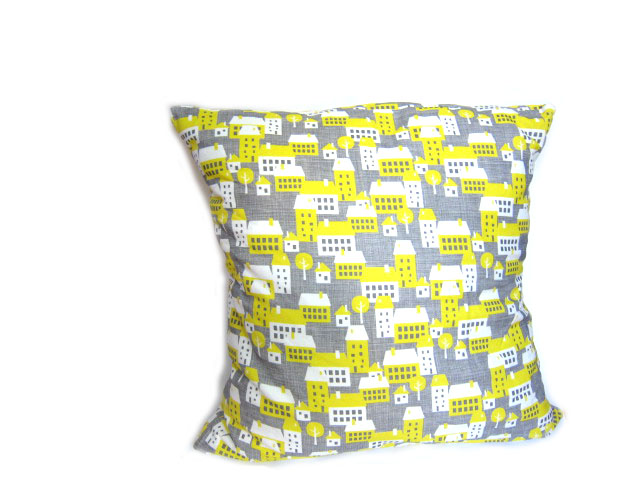
I ordered my fabric from Spoonflower, a great place to get fabric from indie designers. I went with a Tour de France fabric in yellow & grey (a sport I love and colors that match our sofa!) and a coordinating ‘houses’ fabric from the same designer.
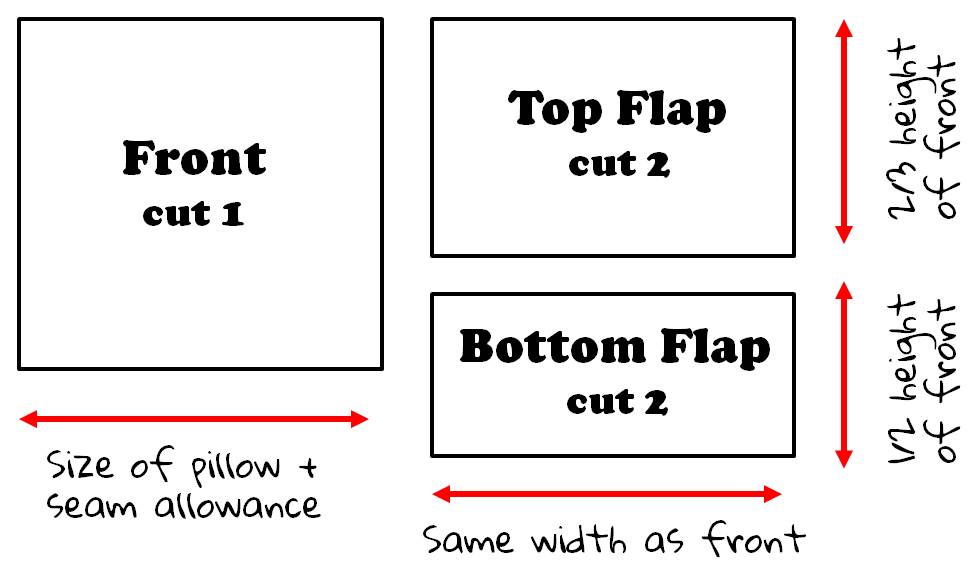
Next, I cut out the fabric.
The important thing is that you want to cut the back pieces to be bigger than just 1/2 of the height of your pillow… or else you won’t get any overlap.
Then, I sewed the pairs of flaps together:
Turning these inside out (to the right sides) gives you the nice, sewn edge at the opening of the flap.
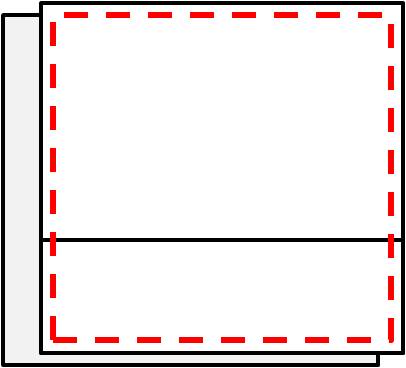
Finally, I sew the front onto the (overlapping) flaps, lining up all of the raw edges:
Presto! Pillows!
As you can tell, they’ve already been well-loved (that is, squished) by me and hubby!
Being a knitting/crochet designer is kind of a weird job. Being successful means being part designer, part webmaster, part marketer and part photographer. And you can’t go to school for it. (okay, you can go to school to learn to design, but not do all the other stuff!)
I learned it through the grapevine…
Most of what I know about ‘the biz’, I learned from other designers. Chatting on online forums. Talking in person at trades shows. It took me years to feel like I really got what was going on.
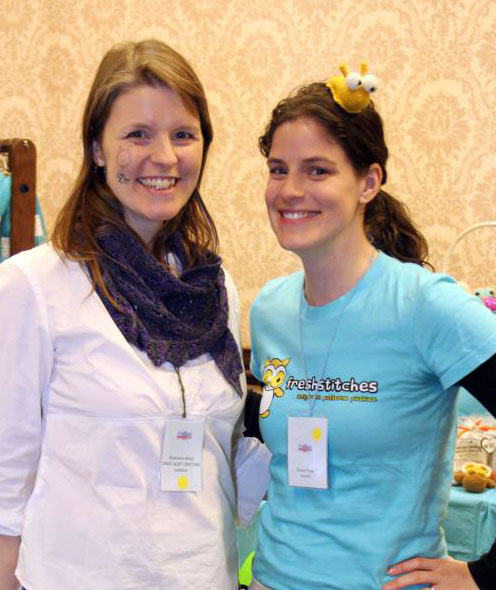
That’s me and Space Cadet pausing for a photo during a chat-session!
I can’t tell you how much I learned about marketing and my brand by chatting late into the night with other designers at conferences!
But now… the Reference Guide!
If you’re a newbie designer, you’re coming in at a great time! You don’t have to spend big bucks traveling to conferences to find out about the ins and outs of the industry… there’s a book about it!
Alex Tinsley (designer behind Dull Roar and also Designer Liason with Malabrigo) has just written an ebook that tells you (basically) everything you need to know to be a knitting or crochet designer.
I just read it. It’s awesome.
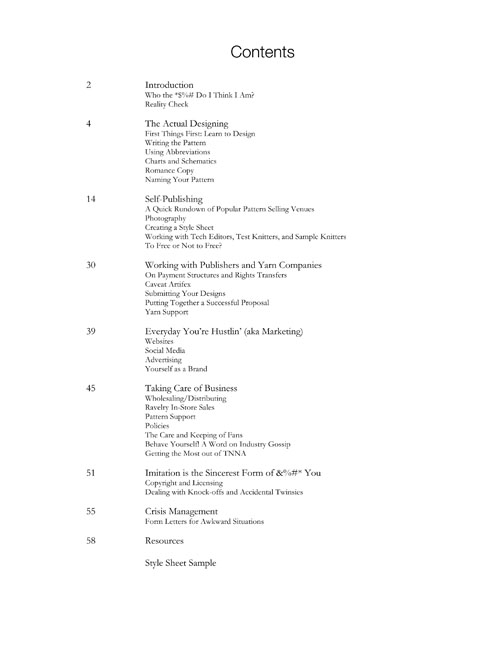
Not only is Alex hilarious, but the information in the book is dead-on. She gave me permission to post a looky-loo at the table of contents:
So You Want to Be A Knitting Designer covers how to write patterns, hiring a tech editor, photography, self-publishing, how to work with magazines, marketing, what to do if your idea is stolen, how to wholesale to yarn stores… you name it!
Is this book for you?
Alright, so let’s talk about what this book does and doesn’t do.
This book:
gives you real, authentic help for becoming a designer: including a pattern template, sample emails for sticky situations and advice about submitting proposals that you really need for real design life.
gives you a comprehensive list of resources for finding tech editors, hiring photographers and chatting with other designers.
walks you through the basics of the industry (including the dos and don’ts of asking for yarn support!) in a friendly and honest manner… from someone who’s worked in lots of different parts of the industry.
leaves you feeling confident about doing knitting design as a career (it’s hard, but not mysterious!)
Although the book has ‘knitting’ in the title, it’s equally applicable to crochet designers, too!
This book is intended to helping someone who’s seriously thinking of designing navigate the industry, and already has some knitting experience. It doesn’t contain lessons on how to design, detailed help with taking photographs or address the financial/tax/contract aspects of beginning a business.
Get it!
I would really recommend this book to anyone interested in becoming a designer (whether it’s part or full-time).
Not only does it distill lots of information that’s available in thousands of posts online into one fun & readable document, but it also contains a little bit of extra information that many designers aren’t always willing to post in a public forum (such as how much tech editors are usually paid and examples of email templates in sticky situations).
I’m so happy Alex wrote a book like this… the industry really needed one!
Most of the time, I’ll say: you should crochet however you feel like it. Don’t worry about how I crochet. However, there are a few signs that you should change your crochet technique. If you:
experience pain after only a short period of crocheting
have difficulty getting even stitches
struggle to tension your yarn properly
find crocheting difficult or annoying
… then the problem might be your technique! Go ahead and watch how I crochet (and watch some other folks, too!) and see if there are some changes that you can make to your style.
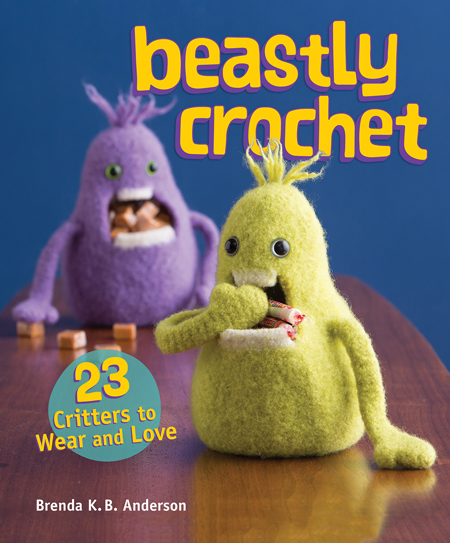
As soon as I saw the cover of Brenda Anderson’s new book, Beastly Crochet, I knew there would be some cuties inside:
But… I had no idea there would be so much other awesome stuff! Let’s peek inside, shall we?
The Beasties
You know me, I can’t resist a cute stuffed animal. (Are monsters really animals?!? Hmm… I digress.)
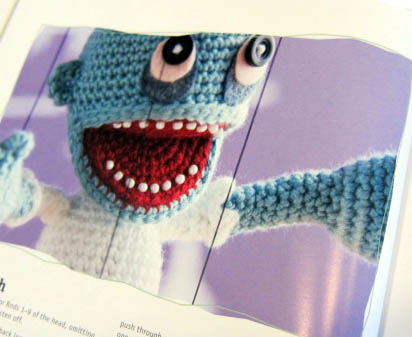
The thing I really love about the creatures in this book is that they feature a variety of crochet techniques. Check out ‘A Zombie named Skip’, a marionette who sports an open mouth with beads as teeth!
The other critters (including a Frankenstein & his bride and an adorable yeti-type monster among others) feature colorwork, textured stitches, appliques and even felting (the cuties on the cover!). While there are a few patterns suitable for beginners, this book is targeted at crocheters who are looking for innovative patterns and want to add a new skill or technique to their repertoire.
The Wearables
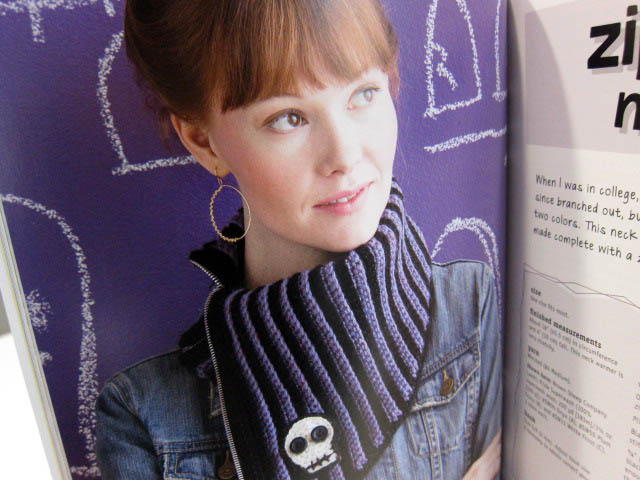
The ‘Beastly’ part of the book is broadly construed to include: zombies, monsters, skulls, robots and myths. I was really surprised by some of the fabulous wearables in the book:
This fun skull cowl is just one of many clothing patterns in the book. There are Sasquatch slippers, a couple great sweaters for kids as well as bibs and bags.
Seriously, how did Brenda fit all of this stuff in one book?
And more!
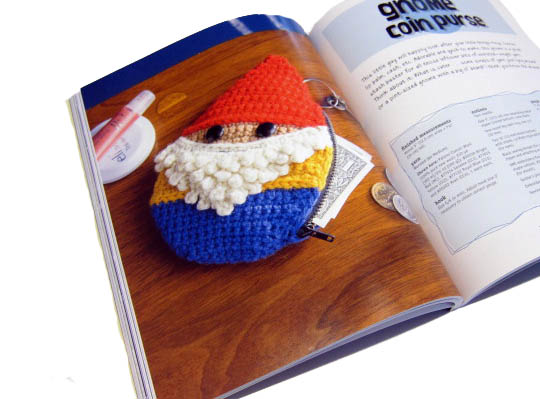
Look at that coin purse! Isn’t it ridiculously cute?
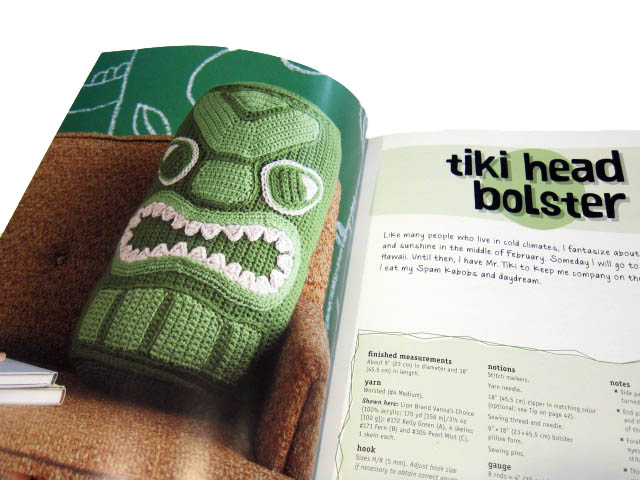
And this Tiki pillow:
So clever and fun!
I particularly love the book’s section on ‘Principles of Cuteness’, where Brenda talks about eye shapes and spacing, so you’ll get the maximally cute monster!
The Verdict
With Halloween coming up, the timing of this book couldn’t be better! It contains 23 fabulous projects for anyone who loves monsters/robots/fantasy.
This book is aimed at the advanced beginner/intermediate crocheter. It doesn’t contain a lot of introductory material (so, expect to learn how to single crochet elsewhere!), but it’s packed with patterns that have great assembly/finishing information. A crocheter with a standard cache of skills won’t get lost, and will learn a bundle of new techniques and methods.


 Just in time to be one of the prizes in the Finished Stitches Challenge – DMC has released sixteen luscious new thread colors!
 Half of them are brights. You all know I like the bright, clear colors. 🙂 I’m especially excited to see some turquoise in there! I love turquoise and I’ve always felt like they didn’t have just the right shade. Now they do! And there’s a dark and light that will work really well together. Nice!
 The other half are these lovely rich natural shades. So beautiful! Especially the blue and the berry color. Wouldn’t they be pretty for some fall stitching on tea towels or napkins?
 It’s one of my favorite posts every month – sharing what people are making with Shiny Happy World patterns! I love getting your photos!