An honest talk about charity, donating and the Philippines

I was going to show you how I made my monster skirt today… but I’ve postponed it a little because there’s a topic weighing heavily on me that I want to talk about.

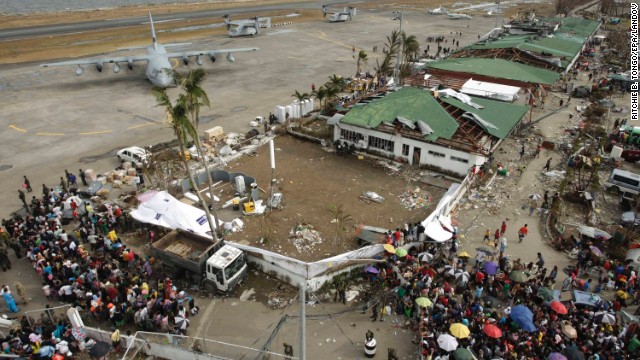
By most reports, the typhoon that struck the Philippines is the worst tropical storm to make landfall. The death toll is over 3,000 and some estimates predict it will reach 10,000.

What I’m about to say may be controversial, but please hear me out.

Donating toys to the Philippines

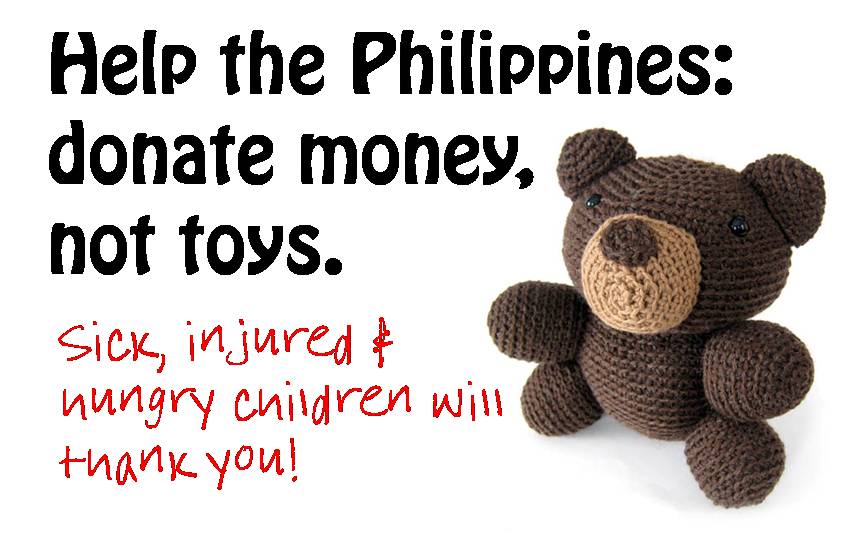
Please do not send stuffed animals to the Philippines

The victims of the Philippines typhoon do not have food, drinking water or medicine. They don’t have enough personnel to move debris to search for survivors, or enough well-bodied people to bury their dead. It is a catastrophic situation that most of us find hard to imagine.

As crafters, we want to help. Our first instinct is to make/sew something to send to people in need.

This is a great instinct, but we need to use our judgement. We need devote our crafting energy towards causes where we can make the greatest impact.

And right now isn’t the time. Let me tell you a little about what we learned from Newtown…

Lessons from Newtown

Do you remember when we collected stuffed animals to send to the children of the Newtown tragedy? Crafters banded together and sent an astonishing number of stuffed animals. I was so proud!

I was devastated to find out that what we thought was a great idea turned into a burden. The town was overwhelmed with stuffed animals, requiring countless volunteers and warehouses.

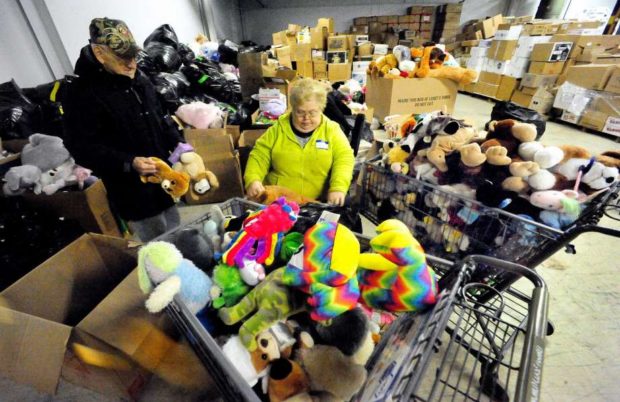
It breaks my heart to say that many of those animals never made it to children. There were just too many.

Do what is most needed

I love stuffed animals (trust me!), but we need to make sure we are doing what is best for the disaster area. The people in the Philippines need water and relief workers, and right now, the best way to get that help to them is to donate money to a relief organization.

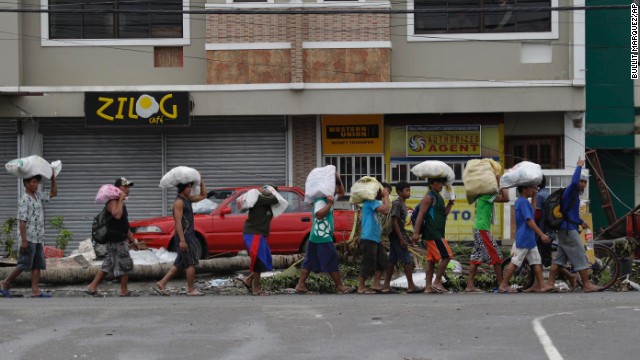
Sending a stuffed animal to the Philippines won’t calm the grumble of a child’s hungry tummy and it takes up valuable shipping and distribution resources that are needed for essentials. The shipping cost, alone, would provide food for a family for days.

Use the tragedy to inspire your charity crafting

I know that in horrible times such as this, your fingers get itching to make something… that’s wonderful! You can still help! Maybe you make animals and sell them, donating the profits to the relief effort.

Or maybe you feel inspired to make animals… but save them and donate them to your local fire department, to calm a local child after a scary incident.

amigurumi crochet bear

Crafters are an amazingly caring group of people. Please continue the tradition of caring by doing what’s best for the disaster-struck region. Send money. Save your stuffed animals for where they’re needed.

Playing with Thread Weight

I’ve been working on some cat applique blocks for a kitty quilt that matches these puppies. I’ve been posting some of the blocks as I finish them – and I’ve been getting some questions about them.

All of the blocks so far use fusible adhesive. It’s so quick and easy and I LOVE using the printable sheets. They’re worth every penny (in my tracing-hating opinion). I use Heat & Bond Lite weight for all my quilts.

All of the stitching is done by machine. Every bit of it. The eyes and nose are appliqued on and stitched in black thread – just a simple straight stitch. I stitched around the edges in a simple straight stitch too – in black thread for a loose, cartoony effect. I love it!

(For those who wonder if outlining your applique with simple straight stitching is durable enough – here’s a post showing one of my daughter’s quilts after over a year of use and many trips through the washer and dryer.)

And then there’s the big question from the folks who are clearly zooming in on the image for a closer look.

How are you getting a thicker line on the face and whiskers?

Very observant, my friends!

I’ve been doing some experimenting and I’m getting the thicker line in two ways. Sometimes I stitch over the same line three times. And sometimes I use thicker thread. I’m demonstrating both with these Oscar blocks.

Oscar - kitty applique pattern from Shiny Happy World

In the brown cat I used thicker black 12 weight thread for all the stitching. In the orange cat I used regular all-purpose thread once around the body, then three times for the whiskers and mouth.

You can’t just change the thread weight all willy-nilly. In my very first sewing project I used some really thick stuff called buttonhole twist and had all kinds of problems with it. I had just grabbed it because it was a small spool and I liked the color. I didn’t know there were different kinds of threads!

Now I know – and I did some deliberate experimentation with some spools in different thread weights I brought back from Quilt Market. Here are the results. . .

This is a really big photo I loaded up, so you can click on it to zoom in super close.

Just like needles, thread sizes get smaller as the numbers get bigger.

50 wt

This is crazy fine thread – noticeably thinner than the basic all-purpose stuff you can get at any of the big box stores. Use a thinner needle with it (I used a Microtex/Sharp size 80/12). You’ll get a nice, subtle thin line of stitching. This would be great with thinner fabrics or subtle quilting – like stitch in the ditch where the thread won’t be so much in the spotlight.

40 wt

A little bit heavier than the 50 wt, this feels like the most “normal” thread in the bunch. I used the same needle as the 50 wt.

28 wt

This one was noticeably thicker than the others – and is where I started having trouble with a couple of skipped stitches. It turns out I just needed to sew a little slower which, frankly, I’d be doing anyway if I was stitching around an applique shape instead of just zipping down a quick row of straight stitches to see what it looked like. I did an extra couple of rows of stitching here to get the hang of it and you can see the results – no more skipping.

For the 28 wt I used 50 wt in the bobbin and a new needle – a topstitch size 90/14. I like it. But I love the next one.

12 wt

This is the equivalent in thickness of two strands of embroidery floss. If I were hand-embroidering these faces it’s what I’d use – but I didn’t know you could use such thick thread in the machine. What a revelation!

Just like the 28 wt – use lighter weight thread in the bobbin and a topstitch needle size 90/14. You’ll probably need to play with the tension just a tiny bit since the top and bobbin threads are so different. Stitch up a quick sample using the same weight batting you’ll be using and different color threads in the top and the bobbin. Adjust the tension as needed until the bobbin thread doesn’t show on the top and the top thread doesn’t show on the bottom. In this sample you can see the tiny green specks of bobbin thread showing on the top. It’s easy to fix. Make a note of the new tension and use that every time you’re topstitching with your heavy threads and you won’t need to test it again.

So which one is better – thicker thread or more passes?

I think this is totally  a matter of preference. Scroll back up to the two cats side by side. Click on the image to see it bigger and zoom in. Which do you like better?

For me it will probably vary from project to project. The heavier thread weight is certainly faster – you’re only sewing everything once. But I also really like the slightly sketchy look of sewing the same lines more than once. It’s impossible to get them perfectly lined up all the time, so the final result really looks a lot like my sketchbook. There’s a post here with more information about how to deliberately get that sketchy line.

I think they’re both going to have a place in my bag of tools. And now they’re in yours, too!

Vibrant handmade crochet toys and patterns from Shiny Happy World.

Here are links to all my posts about outline stitching.

Finished with this topic?

Return to the Let’s Make a Quilt main Table of Contents.

Move on to the lessons about how to trim and assemble your blocks.

Happy sewing!

Vibrant handmade crochet toys and patterns from Shiny Happy World.

How to Embroider a Mouth on an Already-Stuffed Softie – video

Soft plush stuffed animal with a cute, stitched smile and black button eye, perfect for kids.

Usually my patterns include instructions for embroidering the face before you sew your softie together. That makes it easy to transfer the pattern and position it correctly, and easy to hoop it for stitching.

But sometimes it just works better to stitch some features on after it’s all sewn up. This mouse doll is one of those times. And it’s really not hard at all! But you do need a couple of special tools. Nothing expensive or hard to find – just a doll needle and a water-erasable marker.

I show you the tools – and how to use them – in this video. Watch Miss Squeak get her smile!

See? That wasn’t hard at all!

Want a refresher on the stitch I’m using? Watch the backstitch video here.

You can find the Squeak the Mouse pattern here!

Happy stitching!

Best,
Wendi
Wendi_Gratz_Shiny_Happy_World


Do you knit two at a time?

Have you ever knit two at a time?

I originally learned to knit two socks at a time using Antje Gillingham’s book Knitting Circles around Socks: Knit Two at a Time on Circular Needles… but now I use the technique for all kinds of things!

gillingham two at a time socks

What does it mean to knit two at a time?

It’s just what it sounds like! Using two separate balls of yarn, you’ll knit round one of the first sock, then round one of the second sock. Then, you’ll move onto round two of the second sock…

It’s a great technique for ensuring that two pieces are exactly the same!

Once I got the hang of socks, I moved onto knitting other pieces this way, like these monster arms:

knitting monster arms two at a time

And now…

Do you remember when I told you I’d started knitting a Charleston Tee?

When it came time to knit the sleeves, I thought, ‘hey! I should do them both at once!’

knitting sleeves two at a time

(I apologize for the late-at-night photo… I’m busy knitting!)

This way, the sleeves would be exactly identical, and I’d only have to read through the directions once! Hooray!

Because the sleeves are knitted flat (instead of in the round), I only need one needle instead of two.

It’s almost finished… fingers crossed it’s ready for me to wear at Stitches East!

That’s what I’ve been up to this week… how about you? I hope you have an awesome Wednesday, and get some great knitting/crocheting done this week!

If you want to check out more Work-In-Progress posts, please check out Tami’s Ami’s Blog, who’s been organizing a great WIP Wednesday blog theme! And, don’t forget to come back for FO (Finished Object) Friday!

Free Hot Stuff Apron Pattern

Flower patchwork apron with vibrant orange, pink, and yellow patterns, handmade and stylish. Here’s a little gift from me.

A free pattern for an apron you can make entirely from scraps!

That’s right – a stash-busting project that comes together really easily and makes a great hostess or holiday gift. If you can sew a straight line, you can make this apron. The pattern has links to videos teaching all the skills you’ll need – including how to sew a straight line. 🙂

The pattern includes sizes for kids and grown-ups – so it’s totally versatile. Make a mother-daughter set! Package it up with some gardening tools and seeds, or some cooking utensils and a couple of your favorite recipes for a nice, personal gift. Have fun with it!

Materials

  • scraps of fabric for apron and tie
  • rectangle of fabric for the lining ­- amount depends on measurements
  • sewing machine
  • thread
  • basic sewing tools

Step 1

Calculate the dimensions of your apron.

Measure all the way around the waist, and measure from the waist down to the desired length (usually anywhere from mid-­thigh to the knee, depending on the look you prefer).

Length ____________ Waist _____________

You’re going to piece your apron front from 3 inch strips of fabric, so divide the total width of your apron (the waist measurement) by 2 1/2. That will tell you how many strips wide your apron top will be. If you don’t get an even number (and you probably won’t) round up.

Number of strips____________

From your scrap fabric, start cutting 3 inch wide strips. They can be any length you like ­ I usually just go with the length of my scraps. Try to have a variety of long and short strips. Rotary cutting tools are ideal for this ­- learn how to use them here.

Start joining the strips together into longer strips. I usually join a few together until I have a strip longer than the length of my apron. Then I trim it to the desired length and start attaching more strips to what I cut off. Keep joining strips and cutting to the desired length until you have the desired number of strips. For my 8 year old daughter that was 8 strips, each 15 inches long.

Step 2

Now play with the layout of your strips. For this one I made sure to spread out the larger solid bits so they’re not touching each other. You may have a greater range of lights and darks that you’re trying to keep balanced -­ it will depend on your fabric selection. Just keep rearranging the strips until it feels balanced and happy.

Colorful patchwork quilt featuring vibrant pink, orange, and yellow fabric patterns.

This is the fun part ­ so take your time and play a while. When you’re satisfied, sew the strips together using 1/4 inch seam allowance. Press everything nice and flat.

Step 3

You’ll want to cover up all those seam allowances. Basically, we’re going to make a quilt without the batting. Lay the backing fabric face down. Lay the patchwork rectangle face up over the backing fabric. Smooth it all out.

Colorful fabric quilt block with vibrant orange, pink, and patterned textiles.

Trim the backing fabric to size -­ making sure it’s slightly bigger than the patchwork fabric all the way around.

Pin the two layers together.

Step 4

Stitch the two layers together by stitching as exactly as possible over your seam lines. This is called “stitching in the ditch.”

Colorful quilt fabric with small embroidered flowers on a pastel yellow background.

Also stitch the layers together 1/4 inch from the edge along both sides and the bottom. This will help you with a cheater­ pants hemming technique. No measuring!

Step 5

Now trim the backing so it’s even with the patchwork top all the way around.

Colorful quilt fabric with pink floral and geometric patterns on a blue background, handmade sewing detail.

Step 6

Hem each side of the main apron piece. Turn the edge under 1/4 inch. Press.

Bright pink fabric with orange and yellow floral pattern, close-up detail.

These hemming photos show the apron with the back side facing up.

See how I folded it right on the stitching line? That makes it soooooo easy to hem without measuring!

Step 7

Turn under another quarter inch. Press.

Stitch down very close to the folded edge of the fabric.

Bright orange and yellow quilted fabric with moon and star design on a blue background.

Repeat with the second side.

If you need a refresher on how to hem, watch this video.

Step 8

Now repeat with the bottom hem. Turn the bottom edge up 1/4 inch. Press.

Brightly colored fabric edge detail from Shiny Happy World, featuring vibrant quilting and sewing techniques.

The corners can get a little bulky here -­ so trim away an itty bit off the corner, from stitching line to stitching line.

Step 9

Turn the bottom edge under a second 1/4 inch. Press.

Stitch it down very close to the folded edge of the fabric.

Bright red fabric with a yellow flame and moon pattern, colorful quilted textile.

The hems will give the back of your apron a nice frame around the bottom and sides.

Step 10

Time to make your apron tie. On a scrappy apron like this I especially like to make my tie out of scraps of fabric too. Cut enough 3 inch strips so that when joined together they are the desired length.

For a girl’s apron that ties in the back, you’ll need a total length of 58 inches. To double­-wrap and tie in the front you’ll need 84 inches.

For a woman’s apron that ties in the back you’ll need 72 inches. To tie it in the front you’ll need 96 inches.

Join your strips together on the diagonal so you don’t get thick, bumpy bits in your tie. You can see how in this video.

Step 11

That video also shows how to fold the strip into double-fold tape. In a nutshell. . .

  • Fold it in half the long way.
  • Press.
  • Fold each long edge into the center.
  • Press.
  • Refold the center.
  • Press.
  • Open up the center fold and turn the short end under 1/4 inch.
  • Refold and press. Now you’ll have a neat end to your tie.

Colorful fabric hair clip with floral pattern.

Yes – the fabric in the photos is changing here. 🙂 These instructions are exactly the same as for finishing the Easy Apron pattern. There’s a free tutorial for that here.

Step 12

Gather up the top edge of the apron until it’s the desired width, usually a little more than half of the total waist measurement.

Vivid floral fabric with blue and red pattern, perfect for sewing projects and crafts.

This isn’t rocket science, so don’t tear out your hair (or your stitches) if you end up a little longer or shorter than you wanted. A little bit of variation won’t look bad. 🙂

There’s a video here showing two methods for gathering fabric.

Step 13

Fold your double-­fold tape over the raw, gathered edge of the top of your apron. If you pin the center of your tie to the center of your apron piece and work your way out from that center point, it’s very easy to get everything even with no measuring.

Colorful floral fabric sewing project on yellow background.

Pin the double-­fold tape in place.

Step 14

Stitch the folded edges together, the whole length of the waistband/tie.

Bright blue floral fabric with pink and yellow flower pattern, tied in a bow.

Start at one end. Stitch the short end together. Turn the corner and stitch all the way down the length of the tie, enclosing the gathered edge of the apron top in the fold. Sew slowly, making sure that you are catching the back fold of the tape in your stitching. Turn the corner and stitch the other short edge.

Finished!

Bright colorful patchwork quilt skirt with abstract floral and geometric patterns.


You’re done! Step back and admire your awesome thriftiness. I bet you have more scraps hidden away somewhere. You should make aprons for everyone you know!

Happy sewing!

Best,
Wendi
Wendi_Gratz_Shiny_Happy_World

Where do you insert your hook for ‘2nd ch from hook’?

How to Find the Second Chain from the Hook - crochet help from Shiny Happy World and FreshStitches

When you crochet amigurumi, most instructions begin, “Ch 2. Sc 6 in 2nd ch from hook”.

Where is the 2nd chain?

2nd chain from hook crochet

Getting this instruction right is particularly important if you’re using the sloppy slip knot technique for starting, since crocheting your 6 stitches in the wrong chain will prevent your hole from closing.

I like to picture stitches as little Vs, laying on their side:

2nd chain from hook crochet

Do you see the 2nd chain now?

Now, stick your hook in that one!

second ch from hook

Ta da!

Vibrant handmade crochet toys and patterns from Shiny Happy World.

Here are handy links to all the posts about working the first round of your crochet pattern. . .

Return to the main table of contents for Let’s Learn to Crochet Amigurumi.

Move on to the lessons for round two and beyond of your pattern.

Happy stitching!

Vibrant handmade crochet toys and patterns from Shiny Happy World.
Handmade crochet Pippi & Pippa amigurumi toys for beginners.

Getting My Quilting Mojo Back

Colorful quilt display behind smiling woman with red quilt wrap.

I used to be a quilter – with a capital Q. I entered my quilts into shows and sold them in galleries. I liked making the quilts, but I hated everything else about the process. I hated writing Very Serious Artist Statements. I hated entering quilt shows. I hated worrying about how much time I was spending on a quilt, knowing that that was pushing up the price. I didn’t like thinking about my designs in that way.

So I stopped. And I started Shiny Happy World and I didn’t make a single quilt for a few years.

Colorful patchwork quilt featuring alphabet letters on a rural fence outdoor background. I started making cute toys instead of expensive quilts. And then I started designing patterns for those cute toys so other people could make them too. And that was awesome!

But then I made a quilt. I made the Buttonholes quilt and it was really fun to design a quilt pattern especially for beginners – with no places where the seams needed to match up and no stress whatsoever.

And then I made the Scary Squares quilt and had the Most Fun Ever. And then there were a few more quilts – including the Puppies quilt which I love, love love. Colorful monster quilt with playful cartoon creatures for kids' stuffed animals and bedroom decor.

And all of a sudden I realize I have my quilting mojo back. And you know why? Because I’m making quilts that I LOVE. These quilts will never appear in any gallery. They’ll never win a prize in a show. But they make people smile and they keep people warm and they’re really fun to make. I’m not stressing about points or matching seams – I’m playing with color and shape and cuddly monsters and cute puppies. And I love it!

Why did this come as a revelation?

12_puppy_applique_patternsI reviewed Quilting Happiness here, and in responding to some people’s comments about the book and the review, it really made me think about my own quilting journey. I feel like I fell into this trap of always pushing my skills – always making more and more complicated quilts – until I didn’t enjoy what I was doing. I was designing for the galleries and the judges and my own weird internal measuring stick.

It’s like I had to give myself permission to make quilts that were “below” my skill level. Where does that come from? I have the technical skills to make a mariner’s compass quilt. Or a Baltimore Album quilt. That doesn’t mean I HAVE to make one! Making one (for me) will be stressful and sweaty and I’ll probably say a lot of bad words. I can do it – but it won’t be fun. And I want my quilting to be fun, dang it!

I’m writing this because I know a lot of you have struggled with the same thing. I read it in a lot of private emails after I posted my Quilting Happiness review. You don’t need my permission – but I’m giving it here just in case hearing it from another source helps.

You do not need to challenge yourself with every project you make. If you want to learn a new skill – awesome! But don’t feel like you have to. It’s ok to just make things for the joy of it. You can make beautiful, stunning, gorgeous quilts for the rest of your life without ever worrying about chopping off points or matching seams.

There. I’m off my soapbox now. 🙂

Colorful quilt blocks featuring star designs and vibrant patterns for quilting projects. And now that I have my mojo back, I’m planning a LOT of new quilt patterns for next year. Most of them will be of the easy peasy Buttonholes variety – with no fussy points and no seams to match. A few of them will be skill stretchers, like the Starry Night quilt. (Update – I’ve pulled the Starry Night pattern temporarily while I reformat it to be released as a regular pattern. Sign up for the newsletter to make sure you know when it’s in the shop.) I hope all of them will be fun – and that all of you will make things you love, whether those things are simple rag dolls or complicated quilts. Think about what makes you happy when you sew and follow that path!

Have a wonderful day!

Happy sewing! Or quilting! or stitching! Or whatever you love to do!

Best,
Wendi
Wendi_Gratz_Shiny_Happy_World

Crochet Mike the Monster from Monsters University!


I love monsters. And I love crocheting monsters. So, when I found out that Disney was looking for bloggers to write tutorials for crafts based on Monsters University, I nearly fell out of my chair.

Monsters-University banner

My love for monsters must have poured through the computer screen… because here I am, sharing my super-awesome crochet tutorial with you!

This tutorial is celebrating the release of Monsters University (in a Blu-ray combo pack) tomorrow! Hooray!

How do you pick just one monster?

I’ll confess. It was really hard to pick a monster from Monsters University to turn into crochet-form. The movie is just so darn chock-full of adorable and creative monsters!

Characters from Monsters University

I was tempted by Squishy (the multi-eyed cutie with a knit sweater!) and Terry & Terry (the double-headed duo)… what great shapes!

But in the end… I had to go with familiar and loveable Mike.

movies-monsters-university-character-art-4

You can crochet your own Mike!


To crochet Mike, you’ll need:

  • 2 colors of worsted weight yarn: green (250 yards) and white (15 yards)
  • Size H (5.0mm) crochet hook
  • Tapestry Needle
  • Polyester stuffing
  • Small amounts of felt: black, white, grey and blue
  • Craft glue (one that works for fabrics)

Once you have your supplies gathered, download now.

The pattern download will take you step-by-step through the stitches you’ll need to bring Mike to life… too many for just one blog post!

Crocheted fingers

One of the things I love about Monsters University is how lifelike the animation is… and I didn’t want to lose any of that detail in the crochet version. That’s why I made sure to give Mike separate fingers and toes!

It’s a little extra crocheting… but I hope you love the results!

Add the details…

Once you’ve finished crocheting the pieces, you’ll need to decide which expression you’re going to give to Mike… during the course of the movie, you’ll notice that he sports quite a few!

mike-and-sulley-monster-university-wallpaper-wide

I decided to give Mike the wide grin (with retainer!) that’s featured on the cover of the DVD:

felt mouth

To make Mike’s mouth, use your pieces of felt and cut out the shapes you’ll need. First, cut a smile (or frown) from the black felt. Next, cut bumps (for teeth) from the white.

Here’s a trick: you don’t need to cut the teeth to fit the mouth perfectly. Just cut the top ridges for the teeth, then glue in place on the black mouth. Notice how, in my photo below, the white is hanging off the side of the black:

shaping a felt mouth

Once the glue dries, trim the excess white, and you’ll have a perfect mouth! A simple line of grey makes the retainer.

Since you’ve used yarn to make Mike, a craft glue will hold the smile in place:

mike1

Isn’t he so cute?

More accessory ideas

I’m a real sucker for the University-wear sported in the movie!

mike-wazowski-monsters-university-18119-1920x1080

How cute would your crocheted Mike look with a knitted blue and white scarf? Or an MU pennant made from felt? Use your imagination!

You can also get super-creative and make multiple expressions… and attach them to Mike with use hook and loop tape! He’ll be a toy with many emotions!

Are you going to get crocheting?

I had so much fun watching Monsters University and crocheting a Mike… I see more monsters in my future.

I hope you absolutely love this free pattern download as much as I do!

Helpful Links

Be sure to share the cutie monster you crochet!

Disclosure: This is a compensated post from Disney and Blueprint Social. I received a copy of Monsters University. All opinions are my own. I received permission to create a pattern using the likeness of Mike.

Happy stitching!

Best,
Stacey

How to Make Quarter Square Triangles – video and cheat sheet

How to Make Quarter Square Triangles - video tutorial

The first triangle blocks I taught you were half square triangles. Those are my favorites and you can make quilts for the rest of your life and never move beyond that. Seriously. They’re that versatile.

But quarter square triangles are also a great skill to have. They’re not much harder, and they allow you to make a whole bunch of additional star blocks.

If you don’t already know half square triangles, go get that lesson here. Quarter square triangles start with half square triangles so you need to know them first.

Then watch the quarter square triangle video.

See how easy they are?

Download the handy dandy cheat sheet here so you can keep it by your side while you work – all the key info in one neat and tidy page. 🙂

Bright blue and orange patchwork quilt with star and geometric patterns, perfect for fall.

Colorful quilt blocks featuring star designs and vibrant patterns for quilting projects. Happy quilting!

Best,
Wendi
Wendi_Gratz_Shiny_Happy_World


Is My Child Ready to Sew on a Machine?

sewing machine skill drills for kids from Shiny Happy WorldHead on over to Sew, Mama, Sew because I’ve got a guest post over there that I’m really proud of – and I think you all are going to love it! It’s got. . .

1. A fun way for your kids to practice some basic sewing machine skills.

2. A sneaky way for you to asses whether they’re ready for the projects in Creature Camp and whether they’ll be able to sew alone or need some help from you.

3. A video with my awesome daughter (Jo!) teaching other kids how to use a sewing machine. I’ll admit – I cried a little while I edited that video. She’s just so. . . competent! And I’m so proud of her!

So head on over and see the post at Sew, Mama, Sew!

Happy sewing!

Best,
Wendi
Wendi_Gratz_Shiny_Happy_World