Which loop to use when attaching…

Which Loop Do You Use When Attaching Amigurumi Pieces? - tips from FreshStitches and Shiny Happy World

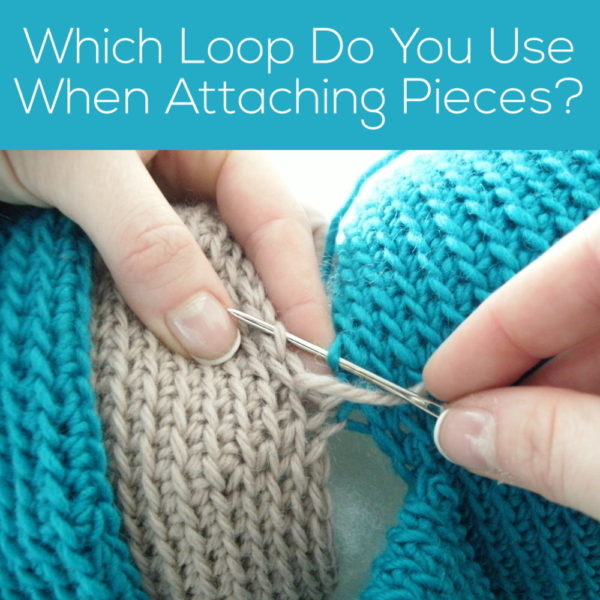
Yay, it’s Tuesday… which means it’s time to share another amigurumi-making tip! This week, I’m answering a question sent in to me by Mary:

When attaching parts do you sew into both loops on the piece to be added? Which do you recommend?

Excellent question! And I have two answers.

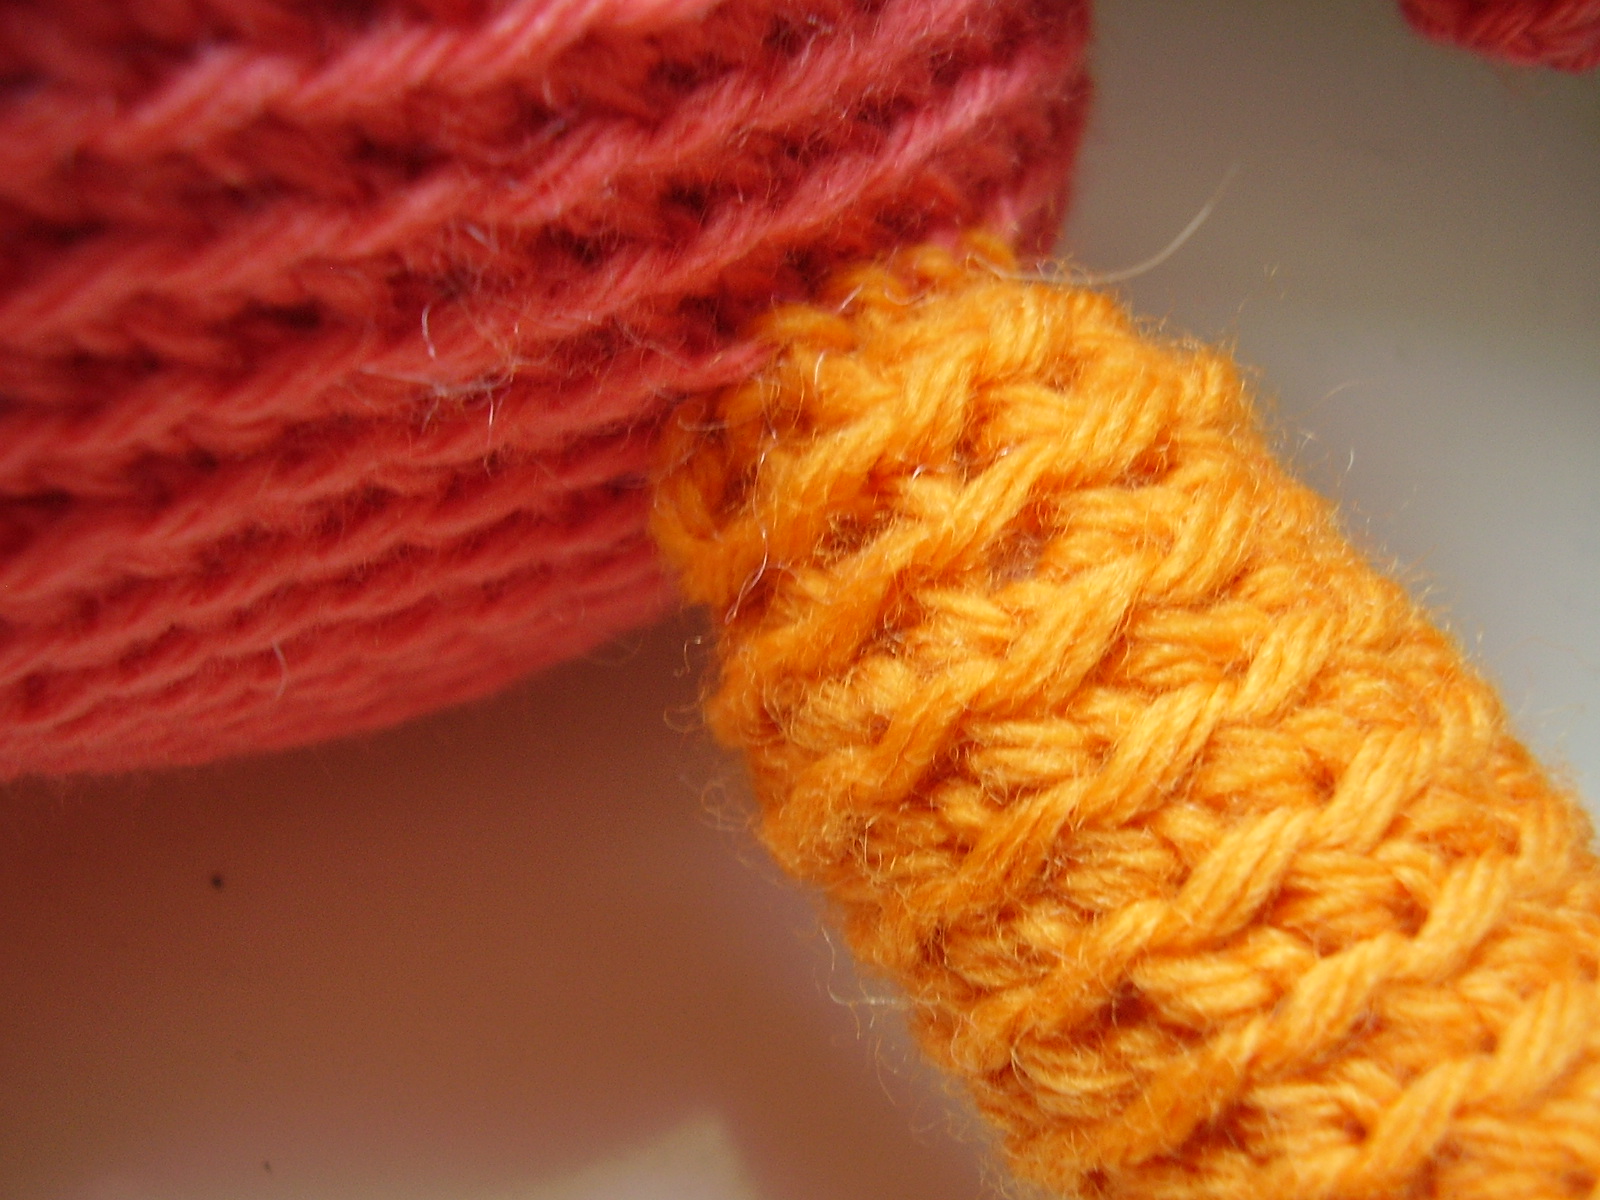
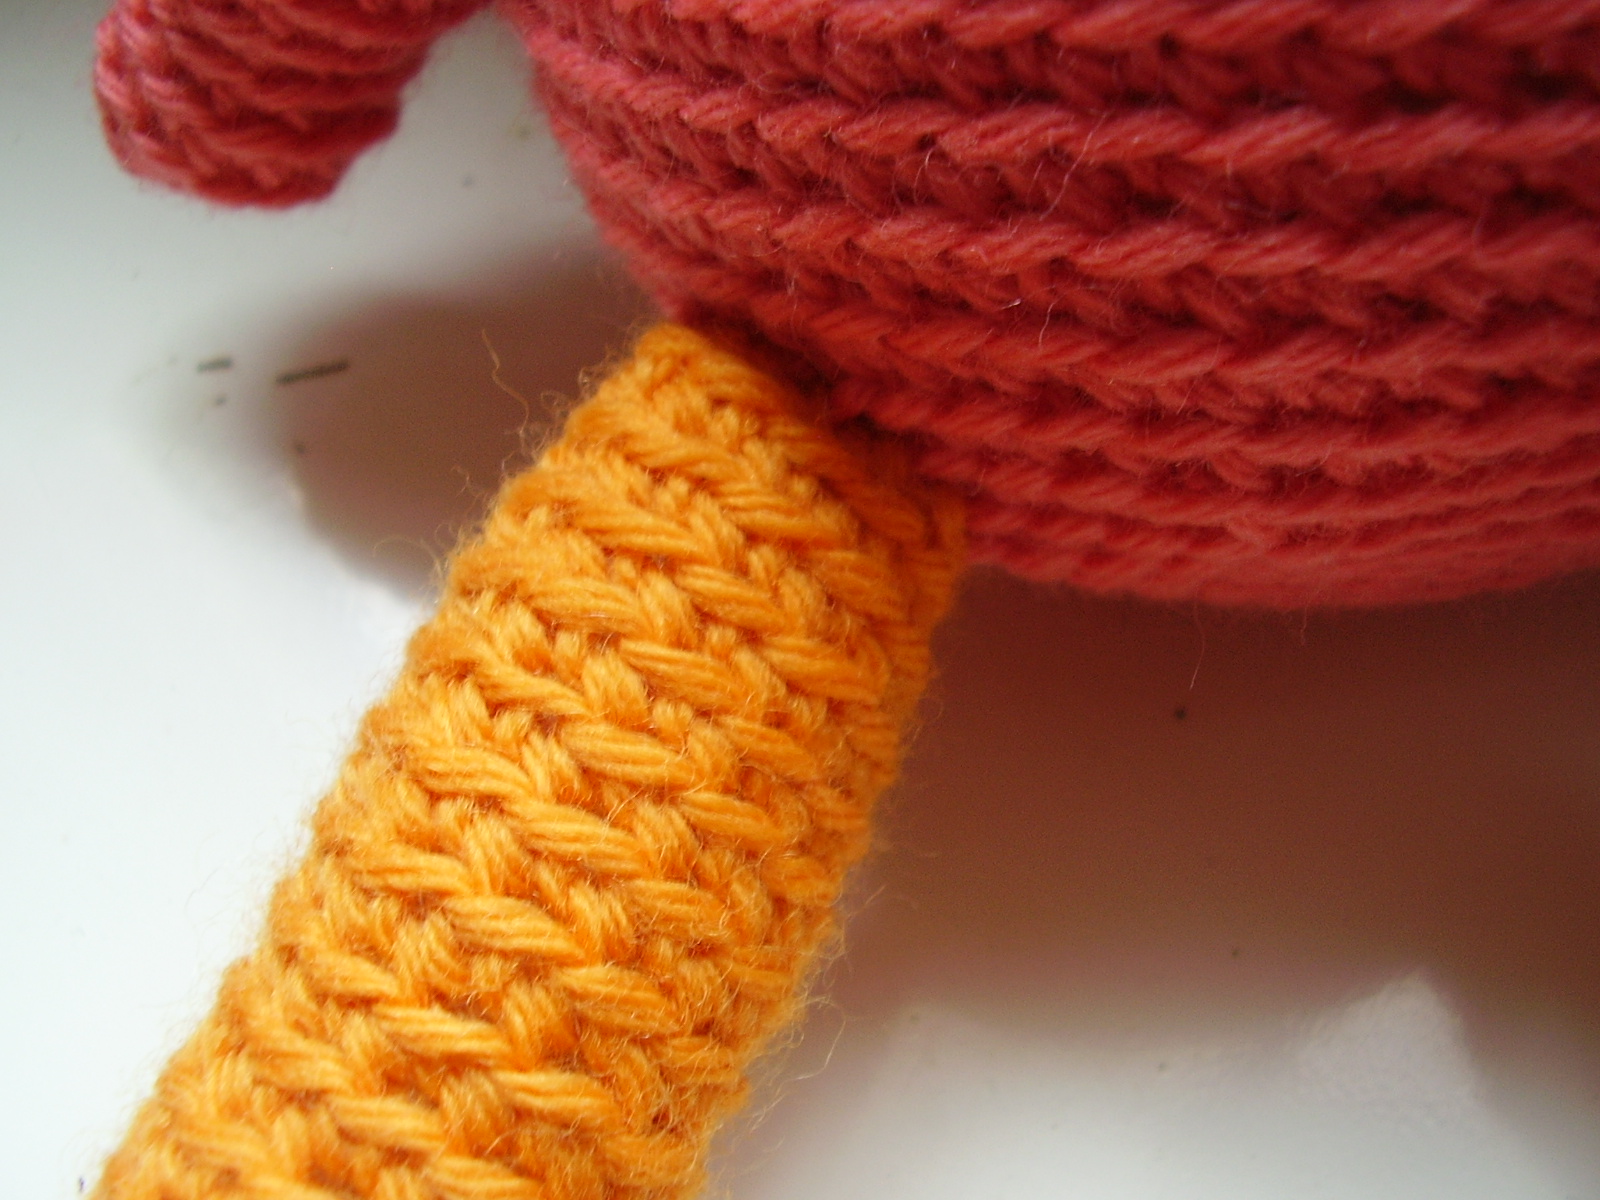
The first answer is that it really doesn’t matter whether you attach your animal’s pieces using both loops or just one. Neither way results in a significantly different look. For the best results, you should be consistent throughout the piece about which one you use.

Okay, now the second answer is about what I do. I actually only use the back loops when attaching pieces.

There’s no real method to my madness- I think that, since I crochet through the back loop, it’s easier for me to attach through the back loop!

So, there you go… either way you want to do it will result in a happy amigurumi! Hope you have a great Tuesday!

Here are handy links to all the posts about attaching parts. . .

Return to the main table of contents for Let’s Learn to Crochet Amigurumi.

Move on to the lessons about faces and details.

Happy stitching!

A little help assembling amigurumi

Today is another ‘Tip Tuesday’! Today, I’m going to share a little tip that helps me when I’m assembling tricky amigurumi pieces (although, you could use this when you’re seaming anything small)!

I use locking stitch markers to hold my pieces in place!

locking st marker

I’ve already talked about using locking stitch markers to help you keep track of your rounds while crocheting, but they’re great for holding two pieces of fabric together, as well!

Just place a couple around the piece that you’re attaching, and it’ll be held in place- making your sewing even easier. Yay!

How to get great-looking stripes!

How to get Great-Looking Stripe Patterns - tips from Shiny Happy World and FreshStitches

Welcome to ‘Technique Tuesday’! Every Tuesday, my blog post will feature a new tip/technique that will help you with your crocheting! Be sure to join me ever week!

I’ve been on a stripe-kick recently… I just can’t get enough of them! Stripes are a great way to use up leftover yarn: you can mix together half-used skeins into a beautiful finished project- if you pick a good color combination and pick a pleasant striping pattern! In this post, I’m going to share a few tips I’ve learned for making beautiful-looking stripes. I’m going to share tips for striping with 2 colors, striping with 3 colors, and striping with a whole bunch of colors.

The key to a good stripe is a little bit of randomness. We want to develop patterns that are a bit beyond “2 rows green and 2 rows of yellow, repeat”.

An easy way to insert a little bit of randomness into your stripe pattern is to make one band of color thicker than the second band. This is a simple, 2-color stripe that still has a bit of pizazz! Check out monster’s stripe pattern, below:

This monster is crocheted with a 5 round-thick stripe of pink, and a 2 round-thick stripe of yellow. This is a very simple pattern to follow, but is still a little unexpected!

Okay, now let’s move to using stripes with 3 colors effectively. As before, we want to keep a little bit of randomness going… so let’s look at an example where 3 colors were used really well:

This striping pattern uses brown, light pink, and dark pink. There are two things to note: one, all three colors go together well. Even though the brown is a contrasting color, it matches well with the pink. Two, the stripes are not of even thickness. Thick stripes occur with thinner stripes. Try writing out a pattern that uses these principles. For example: 4 rounds brown (medium stripe), 2 rounds light pink (thin stripe), 2 rounds dark pink, 6 rounds light pink (thick stripe), and repeat. It’s not a very long pattern, but will give a look of variety.

Now, what if you have a lot of yarns in your stash, and want to use up a whole bunch of colors in a striping pattern? The key to doing this effectively is to select three color families. Put each color family in a pile, and stripe according to the 3 color scheme- treating each family as a color. This is the technique I used with my striped pup:

I gathered all of my spare yarn that fit into one of the following color families: cream/white, light-medium green and light to medium pink. Then, I striped: 6 rounds of family one, 4 rounds of family 2, 1 round of family 1, and 3 rounds of family 3. This resulted in the pattern that looks so great on the pup!

I’ve loved this technique so much, that I’m doing a second pup, with three different color families: pinks, burgundy and orange-y/pink. The result (I’ve only finished the pup’s head, so far) is below:

Because all of the colors complement each other, it’s going to turn out fine!

So, next time you’re feeling adventurous, try some stripes… see what great combinations you can come up with!

Creating cone shapes in amigurumi

Want to learn how to make adorable crocheted stuffed animals with an easy online workshop – totally free?

Sign up for Let’s Make Amigurumi here. You’ll learn how to get started, the tools and supplies you’ll need, and how to make an easy amigurumi from start to finish using simple crochet stitches.

It’s a fun, inexpensive, and totally portable craft. You can do it!

A basic amigurumi circle is made by working an increase round (usually 6 evenly-distributed increases) every round. This standard pattern of increasing is how you get nice round shapes, such as the baby penguin’s head and body.

crocheted baby penguin

In this blog post, we’re going to show how changing the number of increase rounds can provide you with different cone shapes. Once you’ve learned how to make them, you won’t want to stop!


In sample #1, we’ve increased every other round (working the remainder of the rounds without increasing). This creates a cone with about 45 degree-angle sides. If you increase every third round (as we’ve done in sample #2), you the head of my squid and I’ve used this shape in making the hat for my gnome. Can you think of other animals that might have a cone shape in them?

There are already oodles of possibilities for what you can do with cones… but you can do even more! All of these shapes can be flattened, and used for other amigurumi parts. For example, I used a flattened elongated cone as the hat in our holiday penguin. Flattened cones can also be used as dinosaur spikes, pointy ears… and so much more!

I hope that you have fun experimenting with some fun cone shapes!

American/British Conversion chart: cut out & save!

American British crochet terms conversion - printable chart

Do you need a handy dandy refernce for converting between American and British crochet terms and hook sizes?

I’ve got you covered.

As I am about to enter my 3rd year of spending 1/15th of my year in the Land Down Under, I am becoming increasingly aware of the differences between the US and Australia. Forget about vegemite vs. peanut butter… the real issue is sorting out your crochet patterns!

The worst part about it is that the two countries use the exact same terms – but for different stitches! Talk about confusing!

I made a handy-dandy guide that you can print out and carry along with you. You don’t even need to travel much to use it: chances are, you’ve run across a great pattern from another country, and you have to translate the terms. No longer a problem! You can even hide this chart in your pocket and impress your friends!

Right-click the image to save it to your computer for easy printing and handy reference.

Want more conversion charts? This post has an even more detailed printable chart. It doesn’t include American and British crochet terms, but it lists all the different yarn sizes, the various names they have in lots of different countries, and the recommended crochet hook size for each yarn weight.

Happy stitching!

Here are handy links to all the posts about working with crochet patterns. . .

Return to the main table of contents for Let’s Learn to Crochet Amigurumi.

Move on to the lessons for working the first round of your crochet pattern.

Happy stitching!

Selecting a scale for yarn use

Last week, I purchased a new postage scale, because my last one went kaput… and I’m very pleased with my new one! So, I thought I would share some features that I considered when purchasing a new scale.

You may be asking, why do you need a postage scale for knitting & crocheting? I find that it comes in handy fairly often:

  • If you are planning on knitting two socks at a time (or some other project that requires you to divide a skein of yarn), you can use the scale to wind the ball into two even halves.
  • When designing, I often need to give the exact yardage required for a pattern. The easiest way to do this is to weigh how much yarn you have left over from a skein, and calculate how much yardage you used. (or, you can weigh your finished piece and calculate yardage… either way, a scale really helps!)
  • Anytime you have a partial skein laying around in your stash, it can be helpful to weigh it and calculate how many yards are left- that way, you can find a pattern that you have enough yarn for.

So, now that I’ve (maybe) convinced you that a postage scale is a must-have, I’ll suggest a couple of scale features that I find very useful:

  • A digital scale It’s very useful to have accuracy to the tenth of an ounce, and digital scales provide this accuracy in a small package.
  • AA Batteries This is a personal preference of mine, but I like to be sure that all of my electronics (camera, scale, clocks, remotes, etc) use AA or AAA batteries. I use rechargeable batteries, and this way, I can always be sure I have a charged pair of the right size battery on hand. Some scales use an adapter, but I’m not a huge fan. First, you need to keep track of the adapter. Second, I’ve had adapters die on me (while the item still functions fine), and it can be a pain (and really expensive) to purchase the correct adapter for a specific item. Third, if you take an item that uses an adapter overseas, you’ll need to use a converter- a problem that you don’t really run into with batteries.
  • Grams and Ounces I prefer having the ability to view the weight in either grams or ounces. This is becoming quite a common feature, so chances are, you’ll end up with this capability.
  • On/Off switch Some scales have an ‘automatic off’, which is handy if you’re the type of person who accidentally leaves things on a lot. However, I’m not one of those people, and I prefer turning the scale off manually- which saves batteries over the automatic off.
  • An adequate tray If you buy a postage scale, this is probably a non-issue, but you want to make sure that the scale has a tray (the thing you put stuff on) large enough to hold a skein of yarn. Depending on the type of yarn you tend to use (are you a chunky-weight knitter?), you may want an even larger tray.

In the end, I purchased the Escali Primo Digital Scale from Amazon. It had all of the features I wanted, and the price was reasonable. There are lots of choices out there, so you’re sure to find one that suits you!

Knit & Needlepoint: Boston, MA

  • store: Knit & Needlepoint
  • address: 11 Newbury Street, Boston, MA 02116 now moved, see update at bottom
  • website: http://www.needlepoint-boston.com
  • date of visit: August, 2010

Knit & Needlepoint is located on Newbury street- the ‘high fashion’ street of Boston- less than a block away from the Boston Common. It’s a long street, so don’t despair… as long as the street numbers are decreasing, you’re going to find it!

Although the store isn’t your typical American yarn shop (as it is also a Needlework shop, like many of they yarn stores in Australia), that doesn’t mean it skimps on the yarn! Knit & Needlepoint has a fun & unique selection of yarn… including their own line of yarn! Their line of yarn contains yarns that are hand-dyed and custom made from a number of indie yarnies across New England. That means you’re guaranteed to find yarns you won’t find anywhere else (and isn’t that always what you’re looking for when you’re yarn shopping on vacation?)

A large proportion of the yarns in stock are ‘fancy fibers’: wonderful for making a creative scarf or artistic project. In addition to yarns, they also provide free knitting instruction (with purchase)… so even if you’re rusty, you can grab some fantasy yarn and get started.

Next time you’re in Boston, add this shop to your list of stops! And, keep an eye on our store spotlight, we’re going to be visiting two more yarn shops in Boston!

As of 2012, the store has moved locations. It’s new address is: 244 Newbury Street, Boston.

Help for sore wrists

As knitters and crocheters, we use our hands (and wrists) a lot… and it’s not uncommon to read about developing painful wrists as a result of doing needlework. In this post, I want to share a couple of simple moves that I just learned- designed to get the fluid in your wrist joints moving, and alleviate some pain.

I, personally, have had a fair amount of wrist trouble for about 10 years. I get Ganglion Cysts, which are a buildup of joint fluid that has crept out of the joint (ick!). They’re quite painful, and I get them most often after I’ve been crocheting or knitting with bulky yarn for long periods of time… bigger yarn means bigger needles and more moving! And, since I crochet as a living… I’m very concerned about keeping my wrists healthy!

Last week, I was in yoga, working on crow pose, which (at least to those of us not super-experienced) feels very intense on the wrists. Afterward, my yoga teacher (Margot, at Breathing Room, if you’re local!) showed us some wrist maneuvers – and my wrists felt so much better!

And, they’re really simple! First, squeeze your wrist, applying pressure on the top and bottom. Second, rub the top of your wrist with the thumb of your opposite hand. Then, rub the bottom of your wrist with the thumb of your opposite hand (click on the photos above to enlarge them). Easy! I did each of these for about 30 seconds, and noticed a difference.

Be nice to your wrists… they’re important for your knitting and crocheting! And if they’re sore, give these simple moves a try.

SHARE THIS

Making yarn from fabric strips

I recently knitted a bath mat using yarn that I had made from fabric strips. Unfortunately, I didn’t photograph the entire process (because I didn’t know I’d like the end product so much!), so this post is more of a guideline than an actual tutorial… but I hope you’ll get the idea about how to make your own.

Making yarn from fabric is a lot of fun, because you have complete control over the process! You can select the colors of fabric that you’d like, and pick the order that you’re going to put them in. Here are the basic steps:

  1. Pick your fabric I would recommend 100% cotton fabric, like the type used for quilting. Not only is cotton fabric machine washable and durable, you’re sure to find it in lots of colors because of the quilting market. You’re going to be using a fair amount of fabric, so take amount into consideration when purchasing… you might not want to select the priciest cottons on the market.
  2. Turn your fabric into 1″ strips One benefit of cotton is that you can tear (yes, literally rip) the fabric into perfect strips along the grain of the fabric. Tearing your fabric is MUCH quicker than using a ruler and scissors to cut it, and it also results in fewer ‘loose threads’ as the fabric wears. See this video to see how to tear your fabric.
  3. Put your strips together Some sites recommend sewing the strips together… but, if I had to do that, I wouldn’t have gotten enough strips together to make anything! This video (the same one I linked to above) is where I learned to join the strips of fabric together. Just ignore the bits about locker hooking… this is the best way (in my opinion) to join fabric strips together.

That’s it! Join as many strips as you need… and you have fabric yarn!

Here are handy links to all the posts about yarn. . .

Return to the main table of contents for Let’s Learn to Crochet Amigurumi.

Move on to the lessons for the basic crochet stitches.

Happy stitching!

Too tight foundation row?

For some amigurumi pieces, you’ll need to crochet a foundation row, instead of working straight out from a circle. An example is when I was crocheting the leg of Gordon the Flamingo.

Sometimes, when you begin with a foundation chain, the stitches in the chain can be too small, making the top of the leg look a little anemic.

foundation chains are too tight

But don’t worry… there’s an easy solution!

If your foundation rows tend to be a little tight, all you need to do is go up a hook size when you crochet the first chains! For example, my pattern called for a size H hook, so I would use a size I to crochet the foundation chain. Then, continue as usual (with your normal sized hook). And, as you can see below, the top of the leg flows nicely into the rest of the animal… no chain-induced restriction!

This tip will also work wonderfully on blankets, or any other piece where the chain row tends to get tight.

Here are handy links to all the crochet troubleshooting posts. . .

Return to the main table of contents for Let’s Learn to Crochet Amigurumi.

Happy stitching!