My Favorite Tip for Machine Quilting without Swearing

My Favorite Tip for Machine Quilting without Swearing

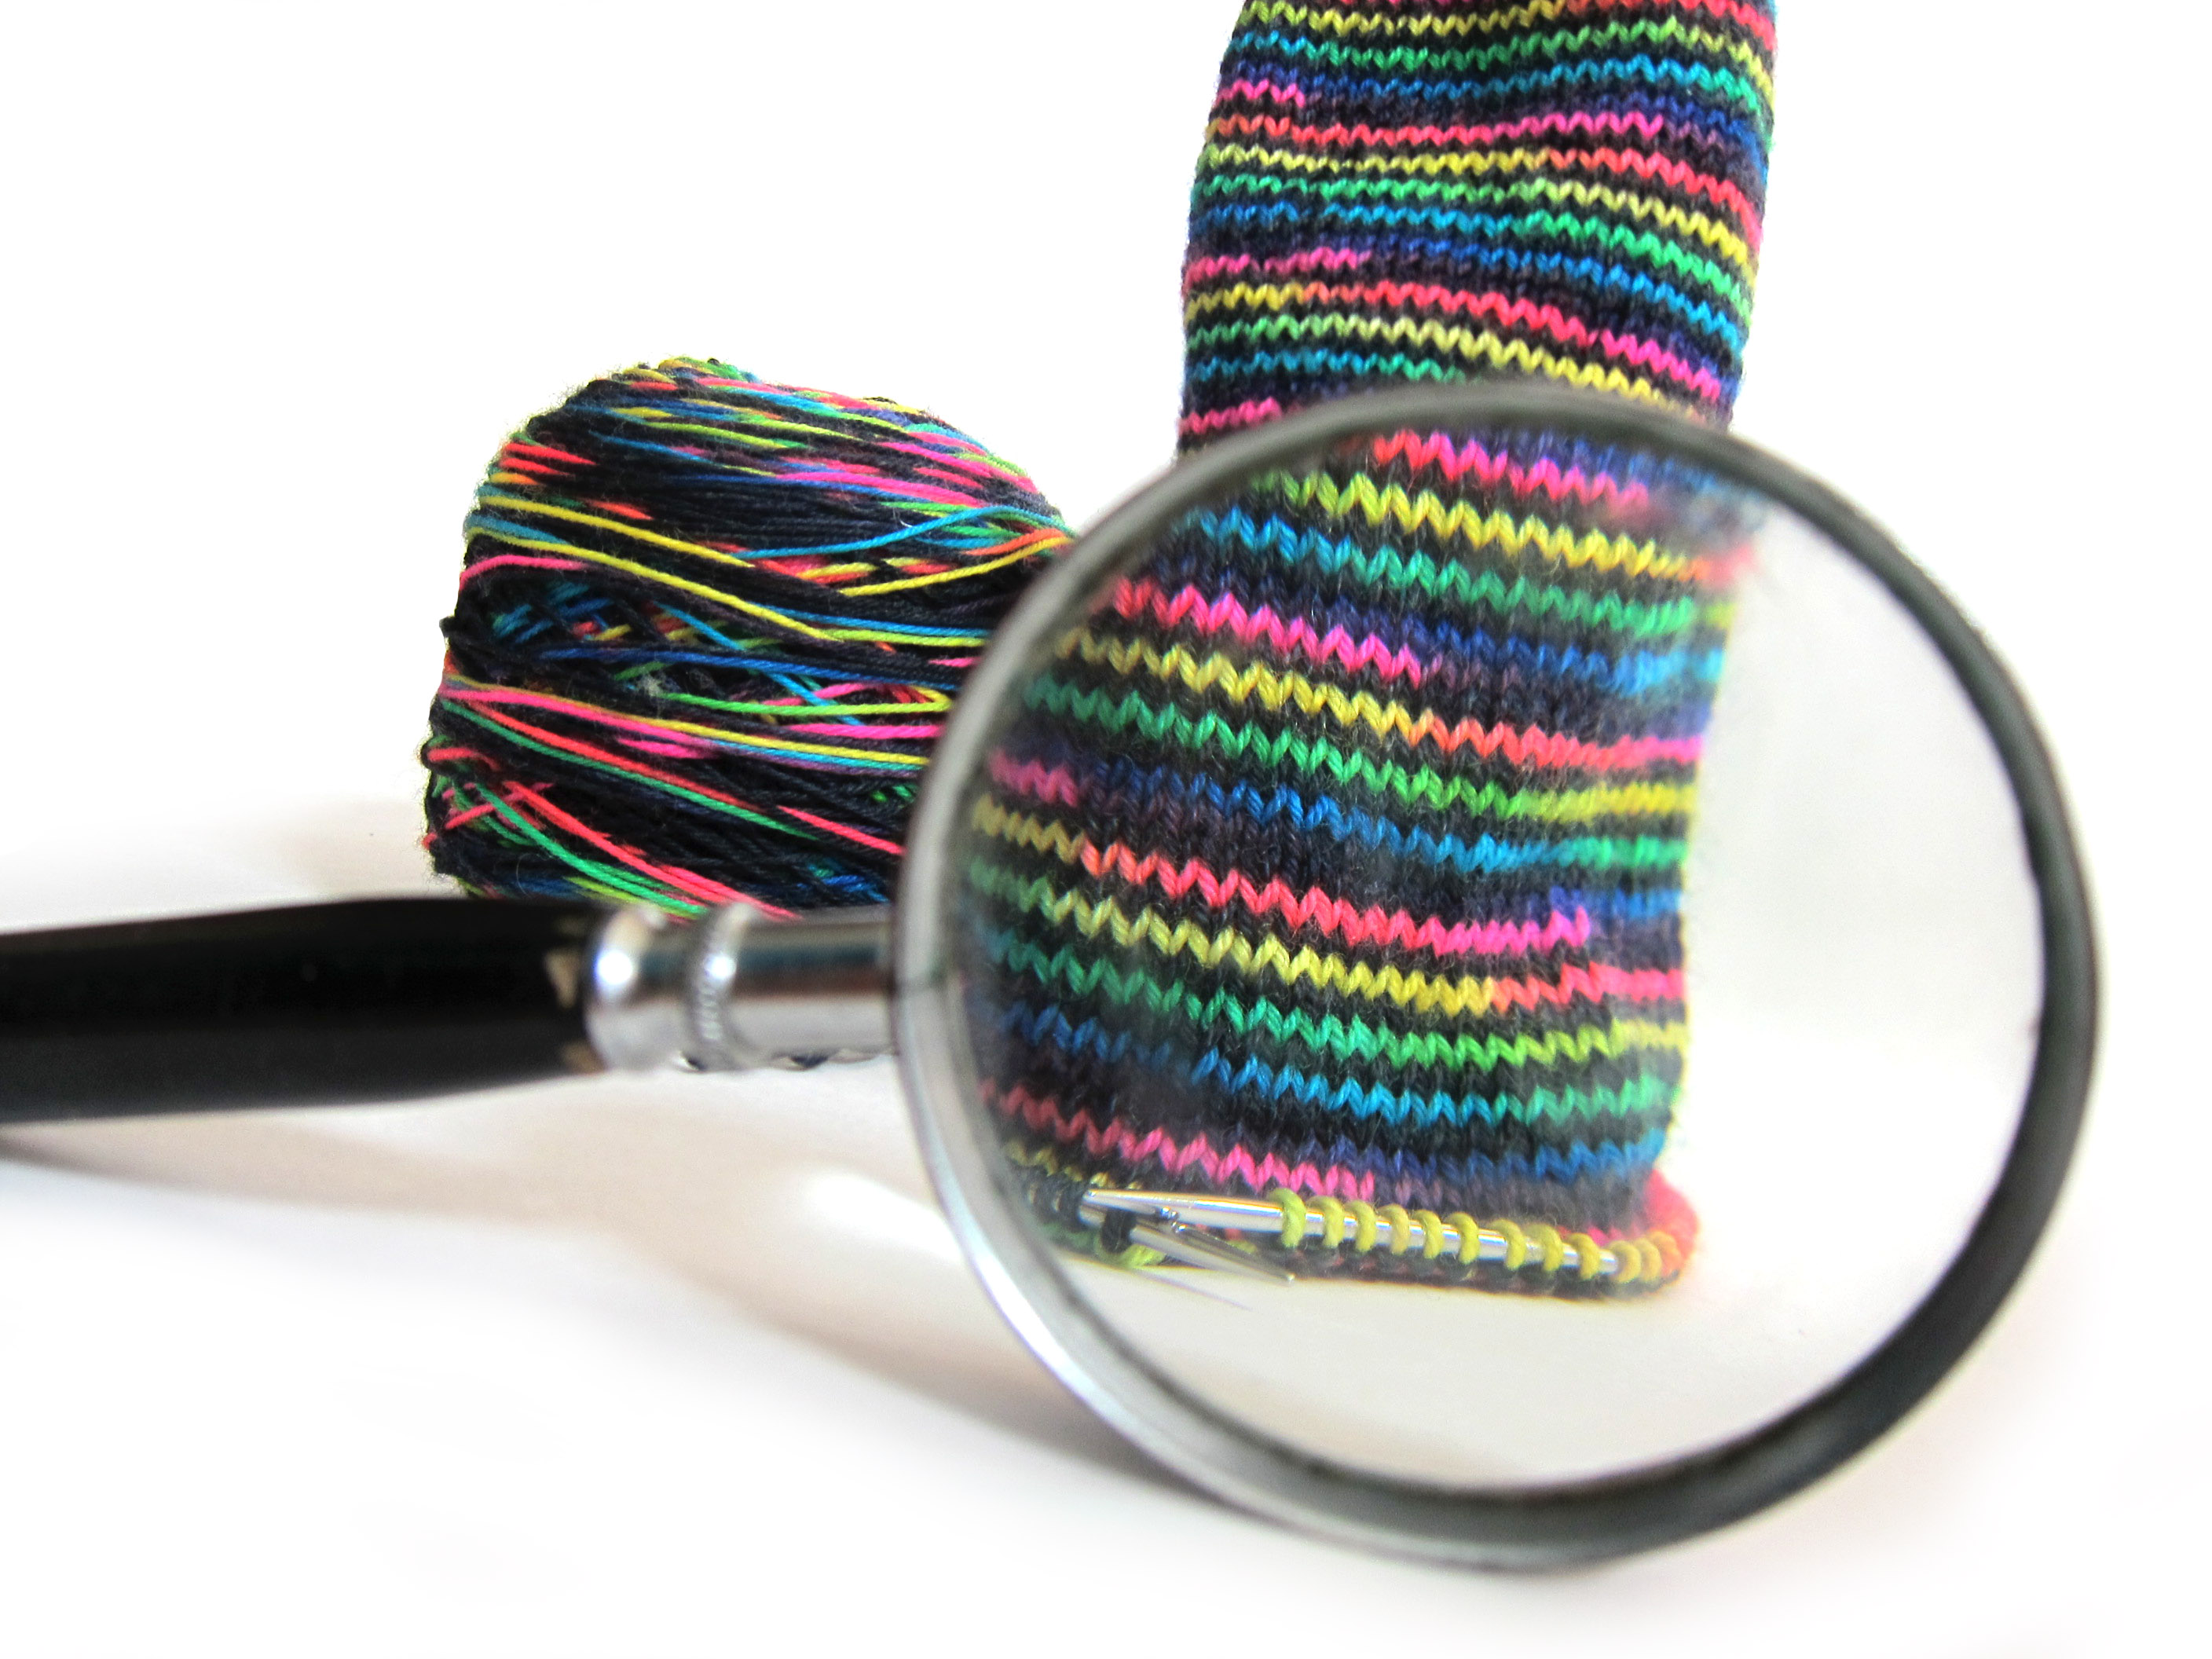
Nothing – and I mean nothing – is more likely to make me curse like a sailor than when my bobbin runs out of thread in the middle of a long row of stitching while machine quilting. You sew and sew and sew, shifting the heavy weight of the quilt over and over again – and then get to the end and realize you just stitched a whole row with no bobbin – so there’s no stitching. Grrrrrrr. . . just thinking about it is making my blood pressure go up.

*breathe*

I had this happen one too many times on my last project – and then I had a little epiphany.

Actually – a big epiphany. πŸ™‚

Wind a bunch of bobbins before you get started. Like – at least ten for a twin size quilt. Pop matching full bobbins into the top (where you’d normally use a spool) and in the bobbin case. The top and bottom stitching should use the same amount of thread, so you can look at the top bobbin at any time to see how much thread you have left in the bottom (secret hidden) bobbin.

Check before you start every row. If it’s close to empty – go ahead and replace both bobbins. You may waste a little thread – but you’ll be saving your sanity. I say choose sanity.

And even if you miscalculate and run out in the middle of a row – you’ll know right away instead of continuing to stitch on in painful, oblivious ignorance.

Here are all my posts about layering and basting your quilt, and the final round of quilting.

Here are all my posts about hand quilting and Big Stitch quilting. I don’t use these techniques with fusible applique or Quilt As You Go, but I LOVE using Big Stitch Quilting with my cheater fabric.

Finished with this topic?

Return to the Let’s Make a Quilt main Table of Contents.

Move on to the lessons about binding and finishing your quilt.

Happy quilting!

Video – How to Sew or Quilt Perfectly Parallel Lines

How to Sew or Quilt Perfectly Parallel Lines - video

In this video I show you how to install and use the quilt guide – a mysterious-looking tool that comes with most sewing machines. It’s really easy to use and lets you sew or quilt perfectly parallel lines.

You can do quilting that looks like this. . .

Buttonholes Quilt with parallel line quilting
Buttonholes Quilt with simple parallel lines quilted

Or you can topstitch on plain fabric to give it pinstripes. I did that on this Mighty Casey baseball jersey I made for my husband.

Mighty Casey baseball jersey

You can click on it to get a closer look.

Here are all my posts about layering and basting your quilt, and the final round of quilting.

Here are all my posts about hand quilting and Big Stitch quilting. I don’t use these techniques with fusible applique or Quilt As You Go, but I LOVE using Big Stitch Quilting with my cheater fabric.

Finished with this topic?

Return to the Let’s Make a Quilt main Table of Contents.

Move on to the lessons about binding and finishing your quilt.

Happy stitching!

New to crocheting? Try an animal!

New to Crochet? Try a Stuffed Animal! It's a surprisingly easy way to start. Tips from FreshStitches and Shiny Happy World

Want to learn how to make adorable crocheted stuffed animals with an easy online workshop – totally free?

Sign up for Let’s Make AmigurumiΒ here. You’ll learn how to get started, the tools and supplies you’ll need, and how to make an easy amigurumi from start to finish using simple crochet stitches.

It’s a fun, inexpensive, and totally portable craft. You can do it!

I honest-to-goodness think the easiest way to learn to crochet is to make an animal. But of course, I design crochet animal patterns, so maybe you don’t want to take my word for it!

I reached out to my readers and asked for folks whose first crochet project was a stuffed animal! Responses came pouring in!

Why are animals easy?

There are a few reasons:

  • They’re small (compared to an afghan), so changes in tension as you learn to crochet aren’t a big deal
  • They’re mostly single crochet… easy!
  • They’re crocheted in the round, so they avoid those oh-so-tricky turning stitches

How to get started

If you’re interested in crocheting an animal, I recommend beginners take my Let’s Make Amigurumi free video class or Stacey’s Amigurumi Woodland Animals class on Craftsy. They’re both geared to complete newbies.

But, not everyone takes my advice! Melanie L. dove straight into Nelson the owl!

She says: “I had no idea how to crochet and just grabbed a hook from my mum – I didn’t even know there were different sized hooks! So, using your pattern, the kit materials, and your videos, I got started on Nelson (of course I chose a more difficult one – with a colour change!). I watched some of the videos about 10 times each, I swear! But eventually I got through it, and Nelson the First was born. He’s affectionately known as a ‘special needs’ Owl due to the resulting product, but he has pride of place on my shelf. “

When there’s a will, there’s a way!

caterpillar2

Chloe confirms that the first project isn’t always the cutest: “In just a few words, last April, I wanted to do something crafty and I came across the Crocheted Softies on the Book Depository. It was love at first sight with those cuties on the front page! I knew I wanted to make them myself, it just happened to be crochet! My very very first project was the owl from that book. It was really chaotic at first. I didn’t know how to begin, I had to look up every stitch (and more than once), I wasn’t sure which were the back loops, I didn’t use stitch markers and kept losing count, I did a very clumsy work in attaching parts etc. It took me several days, but after that I was really hooked! I haven’t stopped crocheting since then!

So, don’t get discouraged if your first one seems a bit crooked… it’s your first one! We’ve all been there, and your skills will improve as you practice. Both Melanie and Chloe started crocheting about a year ago, and they’re putting out fabulous pieces, now!

Don’t give up!

It’s unanimous. The first project is the hardest!

And not only that – the first two rounds are the hardest. Once you finish round two you’re cruising. So don’t give up!

What’s important is to not be too hard on yourself, and find what works for you.

Melanie M. says that “By far the most difficult part for me was learning how to hold the yarn in order to achieve the right tension. I watched a lot of videos of people crocheting and tried out each of their methods for wrapping the yarn around their fingers until I found one that was comfortable for me.”

crocheting holding hook like a pencil

Nikki agrees, Don’t give up! Like any craft, learning something knew takes time. You’re not going to pick up the hook and yarn and know exactly what to do… start small and work your way up. I highly recommend Howie. (Click here for the free Howie the Penguin pattern.) It gives you all the necessary tools to begin crocheting. The best part about crocheting is there is always room to learn more; you will never be done learning.”

Are you ready to start?

Okay, I’ll warn you… it might be addicting!

crocheting

Melanie L. says, “I am definitely a convert! Crocheting plays a few roles in my life now – it’s a form of relaxation, enjoyment, and productivity. I love being able to hand-make a unique gift for my nieces or my friends’ kids, or even my adult friends and family! I can’t pass a yarn store now without buying a few balls of wool and I’m always trawling the internet for pattern ideas. I’ve even started to design a few things of my own. It’s a great hobby!”

Are you going to join us in loving crochet? If you do, be sure to stop by the Shiny Happy People group and say ‘hi’! We love newbies!

Best,
Stacey

Try our newest crochet pattern! Get the Merrick Monster pattern here.

Video – How to Machine Quilt a Big Quilt on a Standard Sewing Machine

How to Quilt a Big Quilt on a Standard Sewing Machine - video

I know. You look at that mass of quilt and you look at the space under the arm of your sewing machine and you think, “No way!”

You’d be wrong.

You can totally quilt a big quilt on a regular sewing machine.

I’ve actually quilted king size quilts on my machine – though in this video I’m demonstrating on a twin size.

First, watch this video showing the basics of machine quilting. That video uses a little doll quilt as a sample – easy to see and get a feel for the process – but it doesn’t answer the question you really have about doing the same thing with a bed quilt. That’s what I tackle in this video. So watch it now.

Important! See that little black bit behind the presser foot on my machine? That’s my walking foot. I forgot to mention it in the video – but it’s pretty critical. You really can’t machine quilt without one – it’ll end up all puckery and you’ll be sad. πŸ™

And what if you want to quilt lines that don’t follow the seams of the quilt?

Tape – my friends. Painters tape.

Using Tape as a Quilting Guide

On the Flower Beds Quilt I wanted to quilt a diagonal grid over the whole surface. I laid down a strip of masking tape to guide my first line. See how the edge of the tape intersects the corners of the blocks? (That’s what those red circles are showing.) That helps me get a perfectly straight line. Quilt right along the edge of the tape.

Using Masking Tape as a Quilting Guide - detail

Then remove the tape.

You only need to do this for the first row of stitching. After that each row serves as the guide for the next.

I usually just eyeball the distance between rows, but in case you want a little more precision – check out this videoΒ showing you a nifty little gizmo to help you stitch perfectly parallel lines.

Here are all my posts about layering and basting your quilt, and the final round of quilting.

Here are all my posts about hand quilting and Big Stitch quilting. I don’t use these techniques with fusible applique or Quilt As You Go, but I LOVE using Big Stitch Quilting with my cheater fabric.

Finished with this topic?

Return to the Let’s Make a Quilt main Table of Contents.

Move on to the lessons about binding and finishing your quilt.

Happy quilting!

How to overdye yarn!

tiptues

Admit it. You have a skein of yarn in your stash that isn’t your favorite color. You might not even be sure how it got there…

What’s a girl to do? Overdye it!

How to Overdye

I’m a huge fan of Kool-Aid Dyeing yarn, but when you’re trying to cover up an existing color… Kool-Aid just isn’t strong enough.

Dyeing yarn with Rit Dye

To overdye yarn (which basically just means dyeing over a color), you’ll need a fabric dye like Rit. You can see my not-favorite-color skein above as well as a package of black dye.

The dye needs heat to set and can be abrasive, so you don’t want to use your normal cooking pots. I used the saucepan that I use for making soap (which I don’t use for food!).

To dye your yarn, follow the instructions on the packet (which are basically: add yarn, water and dye to a pot and heat):

dyeing with Rit

If you’ve dyed with Kool-Aid before, you’ll notice that the Rit dye takes a little longer. The package says up to a half hour… but I got the results I was looking for in about 10 minutes.

And it’s that easy! Take out your yarn, rinse, and hang to dry! And you’ll have a newly-colored skein of yarn!

Best,
Stacey

My favorite tool: a 9" circular knitting needle

Hi there folks! Welcome to day 6 of Knitting and Crochet Blogging Week!

4th Annual knitting and crochet blog week

Today’s topic is ‘a tool to covet’… so I’m going to talk about my favorite tool: my 9″ circular knitting needle!

Why a 9″?

Most people think I’m crazy when I say that my favorite knitting needle is a 9″ circular. But I can’t help it. I’m in love.

Toe-up socks knitting

I’ve already chatted about how I like knitting socks… and 9″ circular needles are a fabulous way to knit them! When you knit with other techniques (double point needles, two circulars or magic loop), there’s always a join that creates the potential for laddering (those icky loose stitches) as well as costs you some time maneuvering them around.

With the 9″ circular, there’s none of that! You just knit around and around!

My favorite one is the *Hiya Hiya 9″, because the tips of the needles aren’t too pointy. Clover makes a 9″ needle that’s made from bamboo with pointier tips. It’s just a matter of personal preference which one you choose.

What are the downsides?

I can’t report many… I love not losing a double point needle under an airline seat (oy, what a mess!) and not having to worry about finding multiple needles to get a sock done.

However… the 9″ is small… and too small for a number of people.

knitted socks

The only way to know if a 9″ will work for you is to give one a try.

Another downside is that they haven’t really ‘taken off’ yet, and they can be a bit difficult to find in stores. For example, even though big box stores carry the line of Clover needles, I’ve yet to see the 9″ available with his needle-buddies. Some LYSs carry them, so it’s worth giving your local shop a call to see if they have them!

Give ’em a try!

bright socks 9" circular

I’ll be honest, if you have big hands or like a lot of ‘space’ when you knit… the 9″ probably isn’t for you.

But if you like to knit socks, and are tired of losing a double point, getting ladders in your work or having trouble tossing your knitting into your bag and going… then you might love these guys! Try them!

Best,
Stacey

This post contains affiliate links. That means I make a little commission if you buy something after clicking through. All affiliate links are marked with an *.


Free Pretty Posy Applique Pattern

cover image of a large pink flower for the free Pretty Posy applique pattern from Shiny Happy World

This flower is super simple to make – just three easy pieces. And it mixes in perfectly with the other flowers in the Wild Flowers pattern.

Download the pattern here.

Cut your background fabric 11 inches square. Cut your batting 11 inches square. Layer the background fabric and the batting and quilt them together. You can find my favorite straight line quilting designs here. You can find my favorite wavy line quilting designs here.

Print or trace the pattern onto the paper side of paper-backed fusible adhesive. I like to use Heat & Bond Lite.

printed pattern page for the free Pretty Posy applique pattern

Roughly cut out all the pieces and fuse them to the wrong side of the fabric.

Pretty Posy applique pattern pieces cut out and fused to fabric

Cut out all the pieces neatly. Cut directly on all the solid lines. Leave a little extra seam allowance wherever there’s a dotted line.

Flower pieces cut out, for the Pretty Posy free applique pattern

Peel off the paper backing and fuse the pieces onto your block. Tuck the seam allowance at all the dotted lines behind the adjoining pieces.

Pretty Posy applique pattern instructions - flower pieces fused in place

Outline all the pieces. I like to use black thread and a simple straight stitch for a fun cartoony look.

finished flower applique using the Pretty Posy free applique pattern from Shiny Happy World

Finished!

A lot of the fun of this pattern is in the fabrics you choose. You can also play around with the angle of the stem, and the flower at the top of the stem.

nine flowers made with the Pretty Posy free applique pattern - each using different fabrics

Want more flowers? You need the Wild Flowers applique quilt pattern. πŸ™‚

Have fun with it!

Does The Magical Embroidery Stuff work on wool felt?

Does Sulky Sticky Fabri-solvy work on wool felt? YES! It's fabulous!

So – just how magical is The Magical Embroidery Stuff (aka Sulky Sticky Fabri-Solvy)? Does it work on wool felt?

I’ve gotten this question a lot lately and the answer is. . .

OHMYGOSHYESITWORKSBEAUTIFULLYANDILOVEITSOSOSOMUCH!!!

Seriously – every time I try this stuff on something new I’m even more impressed with it.

Here’s the scoop on using it with wool felt. . .

Print your pattern onto the stabilizer. Stick it to the felt. Rough cut around each piece.

Using Sulky Sticky Fabri-Solvy - pattern transfer
See? It’s easy to transfer your pattern. And it sticks very well to the felt.

Stitch right through the felt and stabilizer. (Don’t zone out and stitch the outside lines – those are your cutting lines. Not that I’ve ever done that. ahem.) You don’t need a hoop for this – the felt is sturdy enough to stitch through without it. After you’re done stitching, cut the pieces out on the cutting lines.

Using Sulky Sticky Fabri-Solvy - stitching and cutting
See? Beautiful stitching and nice, accurate cutting.

Soak off the stabilizer.

Using Sulky Sticky Fabri-Solvy - after soaking
See? Not a trace of stabilizer and no ugly marks. All ready to sew!

The soaking. I know this is the part that you’re worried about. Normally I soak it off in a bowl of warm water, then rinse it under running water. I do the same thing for felt, only the water is cold. I don’t want to pebble the surface of the felt by getting too warm with it. I fill a bowl with cold water, then drop the embroidered felt in face down and let it sit for a long time – sometimes as much an an hour or more, depending on what else I get busy with. When I come back the stabilizer is all swollen and mushy and, depending on how much stitching there is, kind of clinging to the felt. Time to rinse.

I rinse it under running water – again cold. The stuff does cling a bit more to fuzzy felt than it does to smooth cotton, but the running water takes it off pretty well. It comes off really fast if I switch my kitchen faucet to the sprayer, but just regular running water will work in time.

After all the gunk comes off, just lay it on a dry towel. For the best results I don’t wring it, twist it, or even press it. Just set it sopping wet on the towel and leave it alone. It will dry – I promise. And look how pretty the results are!

Flora the felt bird - free pattern

I left the picture nice and big – click on it to really zoom in and look at the texture of the felt. No pebbling! No stray marks!

So – no more frustration transferring your pattern to lovely-to-stitch-on but impossible-to-trace-through and difficult-to-write-on fuzzy felt. Use Sulky Sticky Fabri-solvy and feel only peace, joy and felty happiness. πŸ™‚

Want to stitch your own Flora the felt bird? Find the free pattern here.

Happy stitching!

Play with some felt! Try the Oddballs – a fun pattern for silly monsters.

My favorite relaxing knitting projects…

It’s day two of Knitting and Crochet Blogging week!

4th Annual knitting and crochet blog week

Today’s topic is to write about a project inspired by your mascot. If you read yesterday’s post, you’ll remember that I’m a Manatee, because I love to knit projects that are fairly simple and relaxing.

So today, I’m going to share with you some of my favorite patterns for relaxing knitting!

What is relaxing knitting?

Relaxing (or mindless) knitting usually means that you’re knitting slightly below your skill level. For example, if you just learned to do cables, then a cabled sweater isn’t going to be relaxing. However, if you’ve been knitting cables for 20 years, then a lovely cabled sweater might be very relaxing for you!

I’m accomplished at knitting cables and lace and sweaters… but with these skills, I still find myself checking the pattern often, so they aren’t relaxing to me, yet. Projects that are relaxing to me are typically ones with an easy-to-memorize pattern or repeat, simple colorwork or short rows are allowed.

For me, relaxing knitting doesn’t mean boring knitting. Sure, I could do a blanket in garter stitch… but what’s the fun in that? To be fun, a project needs a little bit of interest!

I’m going to show you some of my faves… feel free to check them out for yourself! Who knows… you might find these patterns either too complicated or boring… but I highly recommend that you find your own collection of relaxing patterns for yourself!

Wingspan

Wingspan by Maylin is a simple-to-memorize and beautiful shawl pattern. I’ve knit two!

Wingspan knitting

Although the pattern is easy once you get it, you have to do a repeat or two to internalize it. I’ve written some tips for knitting Wingspan to help!

Stripe Study

I’ve knit three shawls from Stripe Study by Veera Valimaki… because it’s such a pleasure to knit!

Stripe Study Shawl by Vera Valimaki

The pattern uses simple colorwork (changing colors every couple of rows, with the yarn carried up the side), an easy-to-remember short row pattern and increasing (placed at stitch markers) to create this delightful shawl!

The main downside is that it’s asymmetrical, and so is tricky to wear. It’s the only thing that’s stopped me from knitting a fourth!

Pogona

Pogona by Stephen West is another fabulous shawl. I’ve knit two!

Pogona by Stephen West

It’s a little bit of effort to start up (you’re placing quite a few stitch markers!), but once you get going, it’s just stockinette and reverse-stockinette with regular increases at the stitch markers. Love it!

Basic Sock

The Basic Sock by Churchmouse Yarns is my default knitting project. Take any sock yarn, and you’re guaranteed to get a great pair of socks!

Basic sock pattern knitting

A sock isn’t relaxing the first (or second time), but once you’ve knit a few pairs, you get the ‘formula’ of the sock. I cast on, knit the cuff for a while, check the pattern for the heel-turn instructions, knit the foot and then decrease for the toe. That’s a lot of relaxing knitting in there!

I’ve knit 6 pairs from this pattern!

$5 in Paris

$5 in Paris is a fabulous top-down sweater pattern… I’ve done two with plans for more!

$5 in Paris by Anna Peck

A sweater isn’t usually very relaxing, because there’s lots of shaping and seaming, but this one is different! Starting at the neck, you increase regularly until it’s time to separate the sleeves, then the body is plain and simple knitting! The color changes of the stripes keep it from being mundane.

Because they’re 1/2-length sleeves, there isn’t even any shaping, there! Easy!

Citron

Citron by Hilary Smith Callis is another fabulous, but simple shawl. I’ve made two!

Citron Shawl Knitty

The cute little ruffles are made by increasing and decreasing quickly… and the remainder of the shawl is made by regularly-spaced increases. Cute and easy!

And you?

What are your faves? What’s your ‘go-to’ relaxing knitting project?

Any of my faves that you’re looking to try?

SHARE THIS

Simple wrist exercises for knitters and crocheters (video)

Simple Wrist Exercises for Knitters and Crocheters - a video from FreshStitches and Shiny Happy World

My wrist exercises for knitters and crocheters blog post has been super-popular… and some folks have asked me, “Can we see the exercises in action?”

Well, sure!

So, here’s a video of some little stretches and exercises you can do to keep your wrists happy!

Click ‘play’, then the rectangle in the lower right corner to see it big!

Here are handy links to all the crochet troubleshooting posts. . .

Return to the main table of contents for Let’s Learn to Crochet Amigurumi.

Happy stitching!

SHARE THIS