Mini Stockings Advent Calendar Pattern – all your questions answered

Colorful mini Christmas stocking advent calendar pattern for holiday decor and crafting.

I’ve been stitching away at the Mini Stockings Advent Calendar and I’ve been getting a lot of questions about it. I thought I’d pull together all of my answers in one handy place. 🙂

How big are the stockings?

They’re definitely mini stockings. Each stocking is about 4 inches wide and 5 inches tall – at the widest and tallest points. The “leg” of the stocking is 3 inches wide. I made sure it was big enough to slip in a gift card. Maybe one of the goodies is a gift card for a movie night?

How long do they take to stitch?

It depends on the design. Some take me only an hour. Some take more like three hours. And I’m a fairly slow and careful stitcher.

How hard is the stitching?

Really easy. Even if the pattern looks complex, it’s actually made of very simple stitches. And the fact that they’re stitched on a grid makes it soooo easy to get perfectly spaced stitches – even if you’ve never embroidered before.

What’s that filmy stuff on the felt?

That is Sulky Sticky Fabri-solvy – my very favorite embroidery supply. You print the pattern onto it, peel off the paper back, and stick it to the felt. Then you stitch right through the felt and the stabilizer. When you’re done stitching you soak it in cold water and it dissolves away. It’s pure magic. I have a post here that shows in more detail how awesome it is for working with felt.

Is every stocking a different pattern?

Yes – you’re getting a total of 25 different geometric patterns.

Why is there a sheet of plain grid paper in the pattern?

That’s so you can use the same geometric patterns in other designs. Like maybe stitch a monogram letter filled in with your favorite pattern? Or the silhouette of a favorite animal? Or trace a cookie cutter, use brown felt, and stitch the design in white thread like icing?

Do I have to stitch the numbers? I’d rather use the little stockings as gift tags/tree ornaments.

Of course not! The pattern also includes a page of three stocking with just the grid – no numbers.

Can I machine sew the stocking front to the back?

Yes! Just use a simple straight stitch and matching thread, and stitch really close to the edge.

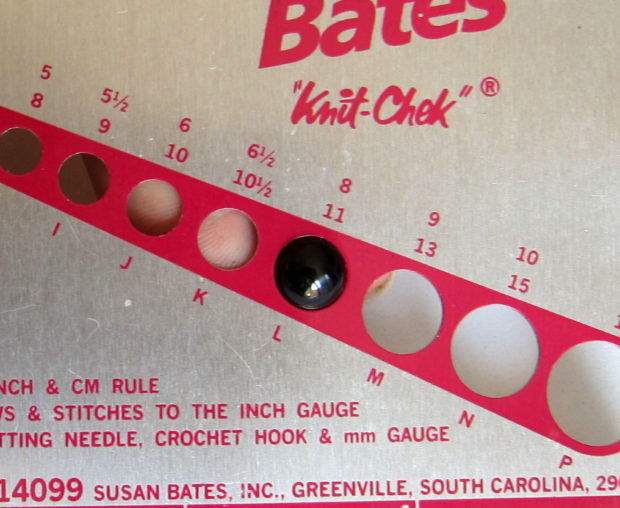
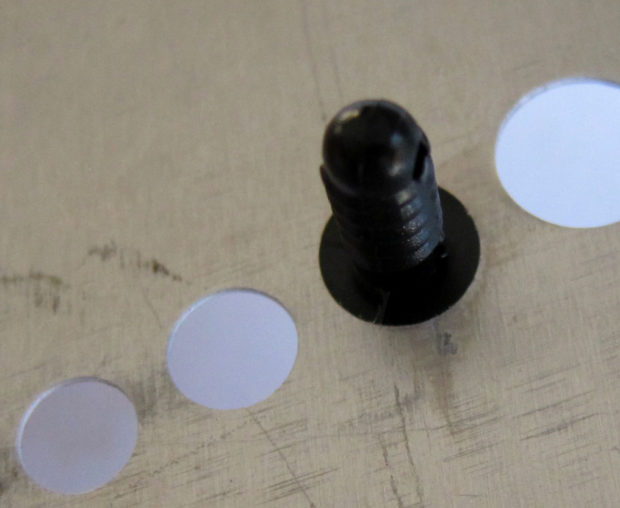
Can I get those tiny clothespins?

Yes! You can get them here.

Where did you get that red and white twisted cord?

I got it at Joann’s a few years ago and I use it for all my ornament hanging loops. It was in the section of cotton yarn – the stuff people use to knit or crochet dish cloths.

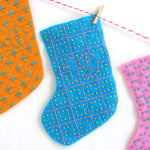
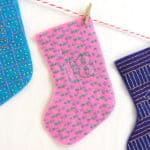
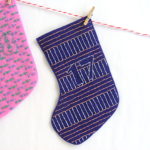
Can you show some examples of the designs in different colors?

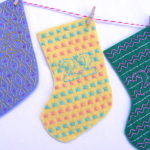
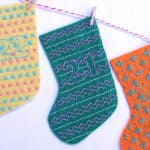
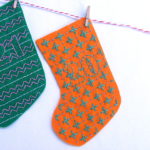
Sure. I’m using the Tutti Frutti felt and thread bundles for my samples, but I stitched up a couple of individual stockings in other colors for you to see.

Festive Christmas stocking ornaments with embroidery and felt decorations.

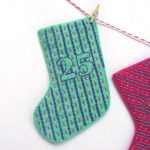
These two use felt from the Enchanted Forest felt bundle with white thread. I thought that would be a really nice “snowy woods” kind of collection. 🙂 And the first stocking (the white thread on Tahitian sunset felt) looks just like gingerbread to me. A whole set done as gingerbread stockings would be terrific!

Festive handmade Christmas stocking advent calendar, holiday sewing craft, fun embroidery project, Christmas countdown decor.

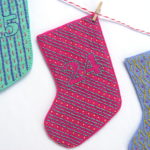
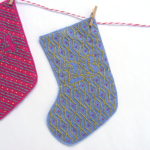
I also love these classic red and white stockings. Easy peasy! Red thread on white felt. 🙂

I haven’t had a chance to stitch up samples yet, but I also think these would look great in this Frosty Pastels palette.

Colorful embroidery thread and felt fabric samples for creative craft projects.

What are some ideas to fill the stockings?

The sky (and three inches!) is the limit. 🙂 Candy or small toys would be great. A little note in each stocking with a favorite family activity would be fun. Maybe a little pack of cocoa and the name of a favorite Christmas book to read aloud. I’ll post this to the Shiny Happy People group and see if other have fun family traditions they can share.

I hope that answers all your questions! If you have any others, just ask and I’ll add the answers to this post. 🙂

Get your Mini Stockings Advent Calendar pattern here and stitch along with us!

Happy stitching!

Best,
Wendi
Bright, cheerful woman smiling at a colorful fabric craft display at Shiny Happy World.

Giveaway: "Mini Knitted" Book Series + Interview with Sahiyo Ishii

Mini Knitted Books

I have an amazing opportunity for you today! Search Press (the publisher of the adorable Mini Knitted series) is giving one reader 5 books, including:

Keep reading for details on how to enter! Sachiyo Ishii is the author of 4 of these books, and she’s joined us to tell us a bit about herself and her process!

Each book is packed with projects (more than 25 patterns per book), using a variety of techniques with simple knitting stitches.

Interview with Sachiyo Ishii


Sachiyo is the prolific author of 4 of the Mini Knitted books, and I was delighted that she took the time to come talk to us! Welcome, Sachiyo!

How did you begin knitting? And when did it take a professional turn?
I took up knitting in my 30’s after my second son was born. I could not knit a stitch until then. I thought dressing my boys in my handmade clothes was trendy and very Yummy Mummy, but soon discovered that knitting requires skill and patience. With my friend’s help, I did achieve my very first piece, but the stitches were messy and uneven, and the sleeves came out in different lengths.

It seemed to me that I had a very long way to go until I would be able to knit a decent garment. I almost gave up knitting altogether, however, I discovered that you can make small toys with basic skills. I practiced published patterns for some time and then, I started creating my own to add personality. I knitted many animals and proposed my current publisher, Search Press the idea of the knitted animal park. It is great to find a channel that I can put my effort into.

You’ve written so many books! Where do you find your inspiration?
I get inspiration from everywhere. When I walk in town, looking through books and magazines, shop windows, everywhere! I am constantly thinking of new designs no matter where I go or what I do. Illustrations and cartoons, felted work and sugar craft are a good source, too. They are already in simplified forms and it is easy to make them into my craft projects.


What do you like to do in your free time?

I enjoy attending fitness classes and swimming. When I get stuck with a project, swimming can be the best solution to get a fresh idea. I don’t do enough but I like visiting craft shops and fairs. I guess I cannot completely be free from crafting.

What is your favourite yarn/knitting needle/craft supply?
For many years, my favourite yarns are Rowan. I love felted tweed especially. It is such a delight to knit with quality yarn.
I have been using bamboo needles since I took up knitting. They are less slippery and keep stitches well and the best of all, they feel great in hands. If you are still new to the skill, bamboo needles are must. I have been using Clover Takumi needles.
My favourite is Clover products. My mother loved them for many years and recently I inherited them all. Some are bought over 30 years ago but still in very good condition.

Is there a favourite piece you’ve made? Perhaps for yourself?
It is hard to say since I have many favourites, but I love the knitted carousel. I have a whole set of amusement park in knitting and would love to do a book someday. Most of my creations are for myself except occasional gifts to my friends. It is great to be an author. You get to keep all samples!
knitted carousel Sachiyo Ishii

Thank you, Sachiyo!

Find Sachiyo!

Website: www.Knitsbysachi.com
Instagram: knitsbysachi
Facebook: www.facebook.com/KnitsBySachi/
Ravelry: sachiyo-ishii
Pinterest: knitsbysachi
Twitter: Knitsbysachi

The Crochet Wildlife Guide Review + FREE Penguin Pattern + Giveaway!

I am so excited! I love showing off a great book to you… and there are so many goodies! Keep reading to grab a FREE download of the Chinstrap Penguin by Philip Ha (aka Sir Purl Grey) AND enter to win a digital copy of the book, The Crochet Wildlife Guide.

The Crochet Wildlife Guide

You may have heard me say this before on the blog, but I get a lot of amigurumi books across my desk and for many of them, I say, ‘oh, ok. This has some cute patterns.’ And it ends there.

And I’ll admit it, my books are among them.

Much of the bare-bones nature of many books you see is completely driven by the publisher’s desire to save money. Cute illustrations? You have to pay an illustrator for those. Step-by-step detailed instructions? Nope. That takes too many pages. Fancy shaping techniques? Oh, no. That doesn’t appeal to a wide-enough audience.

For a crocheter who wants extra information either because they’re a beginner (and need the help and explanations) or are adventurous and want to try something new (hence, needing explanations of new and complicated stitches), this formula can be very frustrating.

Needless to say, when a book comes to me that breaks the mold, I jump out of my chair with glee!

The Crochet Wildlife Guide

The Crochet Wildlife Guide is a self-published book by Philip Ha and Jeff Wiehler, and the book is filled with creative crochet ideas and an artist’s touch. I was impressed by the coverage of basic crochet techniques as well as detailed instructions and illustrations for each animal.

The Crochet Wildlife Guide bird

Each project contains a diagram (as shown above) that allows you to see each piece and how they are put together. These photos are often what takes a good pattern and makes it amazing and easy-to-follow. (It’s why I include step-by-step photos in all of my individual patterns… no matter how many words you have, sometimes, you just need a photo!)

I was also enchanted by the darling illustrations in the book (including this table of contents).

The Crochet Wildlife Guide table of Contents

The patterns included in the book walk the line perfectly between wildlife-realism and kawaii cuteness. Amigurumi like the red panda on the cover, have little details so the animal is instantly identifiable and unique, but not fussy and still cute with wide appeal.

The book also includes a table of the skills required for each pattern. This is such a great idea… you can identify the project that’s just right for you!

The Crochet Wildlife Guide difficulty levels

Throughout the book, the authors emphasize places where you can become your own designer, by highlighting small changes you can make or pointing out the design techniques used to create a particular shape.

The Crochet Wildlife Guide Bat

The photography, with animals photographed in nature, is lovely as well.

The book is available for purchase in digital or print form, from The Crochet Wildlife Guide website or from Amazon.

FREE Chinstrap Penguin Pattern

Free penguin crochet pattern

Phillip and Jeffrey have given us a pattern that didn’t make the book for FREE so that you can get started on some crochet cuteness right away!

Click here to download the pattern:  Penguin pattern by SirPurlGrey

Happy stitching!

How to Crochet Standing Legs with No Hole

green crochet project in prgress. Text reads: How to Crochet Standing Legs with No Hole

Today we’re lucky enough to have a guest post written by Mirena of Mirena Made! Mirena has been a FreshStitches customer for years, and she creates hand-crocheted creations that she sells in her shop. (Yes, you too can sell anything you make with Shiny Happy World or FreshStitches patterns!)

Thank you so much, Mirena, for coming by and sharing this new technique with us! It’s a nifty trick that lets you crochet standing legs with no hole. Nice!

New Technique to Crochet Standing Legs in Amigurumi

I am a huge fan of FreshStitches designs and of Stacey and I also prefer patterns where the sewing and attaching is kept to a minimum (I suspect there are other amigurumi crocheters like me!)

adorable bear from FreshStitches Ami Club

One of my favorite FreshStitches patterns is Bentley the Bear, which is crocheted using standing legs.  In the standard technique, you get little hole that remains between the legs and you have to sew it afterwards… ah, sewing!

So, here is a technique that eliminates the hole and lets you continue your crocheting without worrying about it!

Step 1: You crochet the first leg exactly as stated in the pattern BUT at the end you cut the yarn, leaving a long tail and you DO NOT fasten off.

Step 2: You crochet the second leg as stated in the pattern (leaving the yarn attached, as instructed).

how to crochet standing legs without leaving a hole

Step 3: You take both legs and you place the first one behind the second one, matching their stitches.

how to crochet standing legs without leaving a hole


Step 4: You place the loop of the first leg on your hook and using its tail you single crochet in the next stitches through both thicknesses. You do 4 sc in total and you fasten off.

how to crochet standing legs without leaving a hole


Step 5: You place the loop of the second leg on your hook and you are ready to continue crocheting!

how to crochet standing legs without leaving a hole

The disadvantage to this technique is the stitch count. Normally, you would have 36 stitches after joining the legs but because we crocheted some of them them to attach the 2 legs together, we lost a few stitches. I solve this problem by increasing in the next round.

This technique will work with any pattern with standing legs, you just have to pay attention to the stitch count and adjust accordingly!

What a fabulous technique! Thanks so much for sharing, Mirena! You can use this trick to crochet standing legs with no hole in ANY of the standing-leg patterns in the shop. It’s my favorite body shape – so there are lots to choose from – but here are a few of my favorites.

Vibrant handmade crochet toys and patterns from Shiny Happy World.

Here are all the handy links to posts about crocheting standing legs. . .

Return to the main table of contents for Let’s Learn to Crochet Amigurumi.

Move on to the lessons showing how to change colors.

Happy stitching!

Vibrant handmade crochet toys and patterns from Shiny Happy World.

How to Clean a Cutting Mat

blue rotary cutting mat with fuzz embedded in it

I love Quilt As You Go and use it for almost all of my quilts – but cutting the batting squares and then trimming the finished blocks to size makes a real mess of your cutting mat. All those cotton fibers get embedded in the mat and no amount of rubbing with a rag will get them out.

But there’s a really easy solution – easy, fast, and cheap.

Yep. One of those inexpensive white artist erasers.

Just rub it on the mat wherever it’s fuzzy, like you’re erasing the fuzz.

It pulls all the fuzz right out of the cuts and balls it up so you can just brush it into the trash.

Easy peasy.

In five minutes your cutting mat will look almost like new, all ready for your next quilt. 🙂

Here are some related posts about rotary cutting tools and how to use them. . .

Vibrant handmade crochet toys and patterns from Shiny Happy World.

Here are handy links to all the posts about quilting tools and supplies.

Sewing Machine

Iron

Rotary Cutting Tools

Scissors

Other General Sewing Room Supplies

One More Hugely Popular Post that Seems to Fit Here Better than Anywhere Else

Return to the Let’s Make a Quilt main Table of Contents.

Move on to the posts about choosing your quilt pattern.

Happy quilting!

Vibrant handmade crochet toys and patterns from Shiny Happy World.

Quilting with Decorative Stitches

close up of quilting with decorative stitches - a series of circles

The Fish Quilt pattern is finished! I did the final quilting with decorative stitches that come standard on my sewing machine. More on that in a minute.

All week I’ve been sharing peeks behind the scenes at some of the design decisions I made for my sample quilt.

In this post I showed how I quilted my background blocks in a fun wavy pattern.

In this post I talked about choosing fabric – especially the color.

In this post I talked about how to work with the print/pattern of your fabric – using the example of the striped fabric I used for some of my fish.

Today I’m talking about the final quilting.

This is different from the waves I quilted into the background blocks. This is the final round of quilting – just over the seams joining the blocks – that holds the backing to the quilt.

Usually I do either straight line quilting 1/4″ on each side of all the seams, or a fairly open and narrow zigzag over the seams.

But sometimes I find a decorative stitch on my machine that will be perfect for a quilt – and that’s what I did for this one.

Doesn’t this look like bubbles?

I used it for all the vertical seams, because streams of bubbles like this travel straight up. 🙂

For the horizontal seams I used a small wavy stitch to echo the wavy quilting within each block.

I used a variegated blue thread for both of them.

(For the Beep Beep quilt I did the final round of quilting with a decorative stitch that looked just like tire tracks. Perfect!)

Decorative stitches like the bubbly one CAN BE TRICKY – so I recommend doing some test stitching on a swatch to make sure it’s going to work for you.

The biggest problem is with stitches where the feed dogs move the quilt back and forth to achieve the stitch, instead of always steadily forward. It can be very hard to manage that back and forth motion with a large, heavy quilt in there!

Here’s where I went wrong on my quilt.

I didn’t have the quilt “fluffed” loose enough and it was hooked on the corner of my working surface. That was keeping it from feeding through properly, and you can see in the top of the photo where the stitches are all scrunched together and those bubbly circles are distorted and almost overlapping each other.

Instead of properly fixing the problem, I gave the quilt a tug – and ended up feeding the next section through too quickly, so that I made distorted wavy spirals instead of circles. 🙁

Sigh. I really know better. I slowed down and “stuffed and fluffed” properly for the rest of the quilt and everything else looks great. 🙂

(If you don’t know what I mean by “stuff and fluff” this post about quilting a full-sized quilt in a standard machine will explain.)

So – the moral of the story is. . .

It’s a lot of fun to use decorative stitching for the quilting, but only do it if you have the patience for it. If not (or if this is your first time machine quilting) use either a straight stitch, or a wide stitch that moves steadily forward, like a zigzag.

I hope some of you will share close-ups of your quilting in the Shiny Happy People Facebook group! It’s always so much fun to see what design decisions everyone else is making!

You can order the Fish Quilt pattern here.

You can order the Sea Creatures quilt pattern (designed to combine with the Fish pattern) here.

Vibrant handmade crochet toys and patterns from Shiny Happy World.

Here are all my posts about layering and basting your quilt, and the final round of quilting.

Here are all my posts about hand quilting and Big Stitch quilting. I don’t use these techniques with fusible applique or Quilt As You Go, but I LOVE using Big Stitch Quilting with my cheater fabric.

Finished with this topic?

Return to the Let’s Make a Quilt main Table of Contents.

Move on to the lessons about binding and finishing your quilt.

Happy quilting!

Vibrant handmade crochet toys and patterns from Shiny Happy World.

Make Your Fabric Print Work FOR You in Applique

Pink and red fish quilt block with striped fins on blue fabric background, demonstrating fabric print techniques.

Some of the most common questions I get are about choosing fabric for a quilt. People often want to know how to choose colors that go together, but I also get questions about how to choose the right print.

Usually I make things really easy on myself by choosing a tone-on-tone print or blender. These work GREAT for applique, because the fabrics read as a solid (making it easy to “see” each shape distinctly), but they have texture from the print (making your finished block more interesting).

A lot of times a high-contrast print fights against your applique, because you tend to see all the shapes within the fabric more than you see the shape that you’ve cut the fabric into.

But sometimes we can use that tendency to our advantage and make a high-contrast print work for us.

I’m using examples from the Fish quilt pattern – but this applies to choosing and using your fabric print for any quilt. Here’s just one example of a block from the Wild Flowers quilt pattern that uses stripes really well. Having smaller vertical stripes in that top section suggests the stamens of a flower.

Bright fabric flower applique with red and pink scalloped patterns on green glitter background.

So – back to the fish. In addition to the crosshatch and tiny polkadots prints I used, I also used some skinny stripes. It’s those stripes I want to focus on today.

When you’re working with stripes, you really want to pay attention to the way you position the applique pieces. I actually do that with all kinds of fabrics. See how the crosshatching on Gerald’s body runs at an angle, and on the spot and his tail it runs straight up and down?

Yellow fish on a blue background - Fish Quilt - Gerald - from Shiny Happy World

I actually did that on purpose, but most people don’t even notice it.

That’s not the case with bolder patterns like stripes. You really have to think about how those stripes will run.

On Hank here I made the stripes run horizontally.

On Charlie I chose vertically.

You could use striped fabric on some fish and skip the smaller applique stripes, Like Louis here.

If you wanted to simplify that fish, just skip the purple applique stripes and use a striped fabric set vertically for his body. Easy peasy!

On Angelina I used the stripes to mimic the way a lot of fins have ribs in them, and how the angle of the ribs change – kind of sweeping back as the fish moves through the water.

In both of her fins, the stripes are parallel with the front edge of the fin.

I fully admit that that last example may be overthinking things a bit. 🙂

But I do stand by the notion that when your fabric print is bold, you need to put some thought into how you use it in your applique.

This post is part of a series specifically about working with the Fish pattern. Here are the rest. . .

Vibrant handmade crochet toys and patterns from Shiny Happy World.

Here are links to all the posts about choosing fabric.

And here are links to posts about using specialty fabrics.

Finished with this topic?

Return to the Let’s Make a Quilt main Table of Contents.

Happy stitching!

Vibrant handmade crochet toys and patterns from Shiny Happy World.

Fish Quilt Step 2 – Choosing Fabric

Colorful fish quilt with orange and white striped design, perfect for kids' bedding or decor.
Brightly colored quilt with playful patterns on a cozy bed.

Want to learn how to make a quilt with an easy online workshop – totally free?

Sign up for Let’s Make a Quilt here. You’ll learn how to get started, the tools and supplies you’ll need, and how to make a quilt from start to finish using Quilt As You Go and applique with fusible adhesive.

It’s the easiest, most fun way to make an applique quilt. You can do it!

Brightly colored quilt with playful patterns on a cozy bed.

The Fish Quilt pattern is finished!

In this post I showed how I quilted my background blocks.

Today I’m talking about fabrics. What color will your fish be?

I opted for the brilliant colors you see in a coral reef. Think bright, bright, BRIGHT!

Bright yellow embroidered fish illustration on blue quilt background, children's fabric art.

I used two different fat quarter bundles for my fish. Most of the colors come from the Rainbow Brights fat quarter bundles.

Vibrant rainbow jelly roll fabric bundles for quilting and sewing projects.

That bundle has a darker and lighter shade of each color in the rainbow. That allows me to combine the light and dark for contrast in one fish, like this. . .

Vibrant fish quilt with green fish appliqué on blue water background, perfect for aquatic themes.

Isabella is made with the two shades of green in that bundle.

For a little extra contrast, I also added the Little Stripes fat quarter bundle. I love stripes so much!

Colorful fish quilt block on blue background, playful and vibrant sewing pattern.

Even though the fabrics in the two bundles come from different companies, I picked them so that the colors would still work really well together. 🙂

If I was making this for myself – and not as the sample quilt for a pattern – I probably would have also included fabrics from the Dots fat quarter bundle.

Colorful dots fabric bundles for quilting and sewing projects.

Those irregular dots and the crosshatch background would have added another nice texture to the fish – and the colors coordinate well with the other two bundles.

But I try to keep the numbers of fabrics I use in my samples to a minimum because I don’t want anyone to feel like they need to buy a TON of different fabrics to make the quilt work. Fabric is expensive! But if you have some Dots left over from making a Dinosaurs quilt – add them into the mix!

But what if you don’t want to make brightly colored tropical fish? What if you want to make fish that look like what you can pull out of any freshwater lake or stream?

For you I recommend the Warm Neutrals fat quarter bundle.

Colorful fabric bundles for quilting and sewing projects on green background.

That will give you fish that look trout-tish and bass-ish and perch-ish.

(All of my fish are Ish Fish. The only fish in the quilt that really looks like a very specific type is the angler fish – and even on him I eliminated the exceedingly-scary-looking-very-sharp teeth.)

Bright purple whale applique with a water-inspired quilted blue background, perfect for kids' sewing projects.

Which brings me to my final topic while we’re talking about color.

Camouflage.

I designed most of the blocks so there would be a very high contrast between the fish and the background water. I really wanted those fish to pop!

But I made a few be lower contrast. Angler fish (mine is named Kevin) have a very dull, practically invisible body so that all you really see is that glowing lure. I tried to sort of duplicate that (without making him too invisible) by making his body and the background the same darkness of fabric. You can see that really clearly when I switch his photo to black and white.

Small whale embroidery design on quilt fabric.

I added the lighter purple fin to help you spot him a bit, but you could go all dark for a more hidden fish lurking down there.

I chose purple on the blue because they’re in the same color family – both cool – so there’s even less contrast.

(If you want to read more about my normal “rules” for choosing applique fabrics (which I break here for Kevin) check out this post.

So Kevin is the lowest contrast, and most of the blocks are very high contrast, but I added in just a couple of low-ish contrast blocks to help make the overall quilt mimic a bit the look of a school of tropical fish – where some really stand out and some are less noticeable. Like this block where the lighter purple fish blend a bit with the lighter dapples in the background.

Colorful fish quilt pattern featuring purple fish on blue marbled fabric, perfect for kids' bedding.

These guys appear in another block where they have higher contrast, so it’s only this pair who tend to recede into the background just a bit.

So there you go! That’s how I chose the colors for my fish. I can’t wait to see what you all do! I hope you’ll post photos as you go in the Shiny Happy People Facebook group. It’s awesome to see samples with different fabric choices!

You can order the Fish Quilt pattern here.

You can read about how I quilted my background blocks here.

You can read about how I worked with the print of the fabric here.

You can read about how I did my final quilting (bubbles!) here.

Happy quilting!

Best,
Wendi
Bright, cheerful woman smiling at a colorful fabric craft display at Shiny Happy World.

Fish Quilt Step 1 – Quilting the Background Blocks

Blue watercolor quilt waves pattern with quilted wavy stitching, perfect for quilting projects.

The Fish quilt pattern is finished (you can get it here) and I’m sharing some of the behind-the-scenes design decisions I made for my sample quilt.

Today – quilting the background blocks!

I used a variety of blue batik fabrics and cut all my blocks and batting pieces 11 inches square. They’ll be trimmed down to 10 1/2″ square so that gives me a bit of wiggle room. You can cut yours a little bigger if you like more room for error. 🙂

I usually do different quilting in each block, but for this quilt I decided to use a double wavy line for every block. It gives a nice watery/wavy look that’s perfect for the fish.

Wavy blue quilting fabric with stitched seams, perfect for sewing projects.

You can see how I quilt those wavy lines (no marking!) in this video.

One other change for this quilt is in my choice of quilting thread. I usually match the thread pretty closely to the background fabric, but this time I wanted those waves to stand out a bit more. I chose thread with a little bit of contrast – either darker or lighter blue, and sometimes veering into a blue-green.

Here’s one with slightly lighter thread.

And here’s one with slightly darker thread.Vibrant blue tie-dye fabric with abstract swirling patterns, perfect for quilting or crafting projects. And here’s one with some blueish green thread.

Bright blue quilting fabric with wavy stitch design, perfect for quilting and crafting projects.

It’s subtle – but I like how it adds to the dapply, watery effect.

Read all about choosing colors for your fish here.

Read about how I worked with the print of the fabric here.

Read about how I did my final quilting (bubbles!) here.

Happy quilting!

What size are my craft eyes?

Do you have some plastic craft eyes in a box somewhere… and you aren’t sure how to tell what size they are?

Umm… yup, me too. Don’t worry! Today, I’ll show you how easy it is to figure out what size they are!

All you need is a ruler with millimeter measurements. A craft eye is sized by its diameter in millimeters. So, to determine the size, place the ruler across the widest part of the eye.

Using a ruler to measure plastic safety eyes

You can see that this eye is a 24mm. Easy!

If you have a needle gauge and small eyes, I have an even easier way. Knitting needle measurements are determined by the diameter of the needle, so you can simply stick the eye in the gauge!

Measuring a craft eye with a needle gauge

This is an 8mm eye, and it fits fully in the 8mm slot (size 11 needle).

Here’s a look at the back view:

Note that the eye fits snugly in the hole, but does not go entirely through like a knitting needle would.

Now you can organize your craft eye stash!