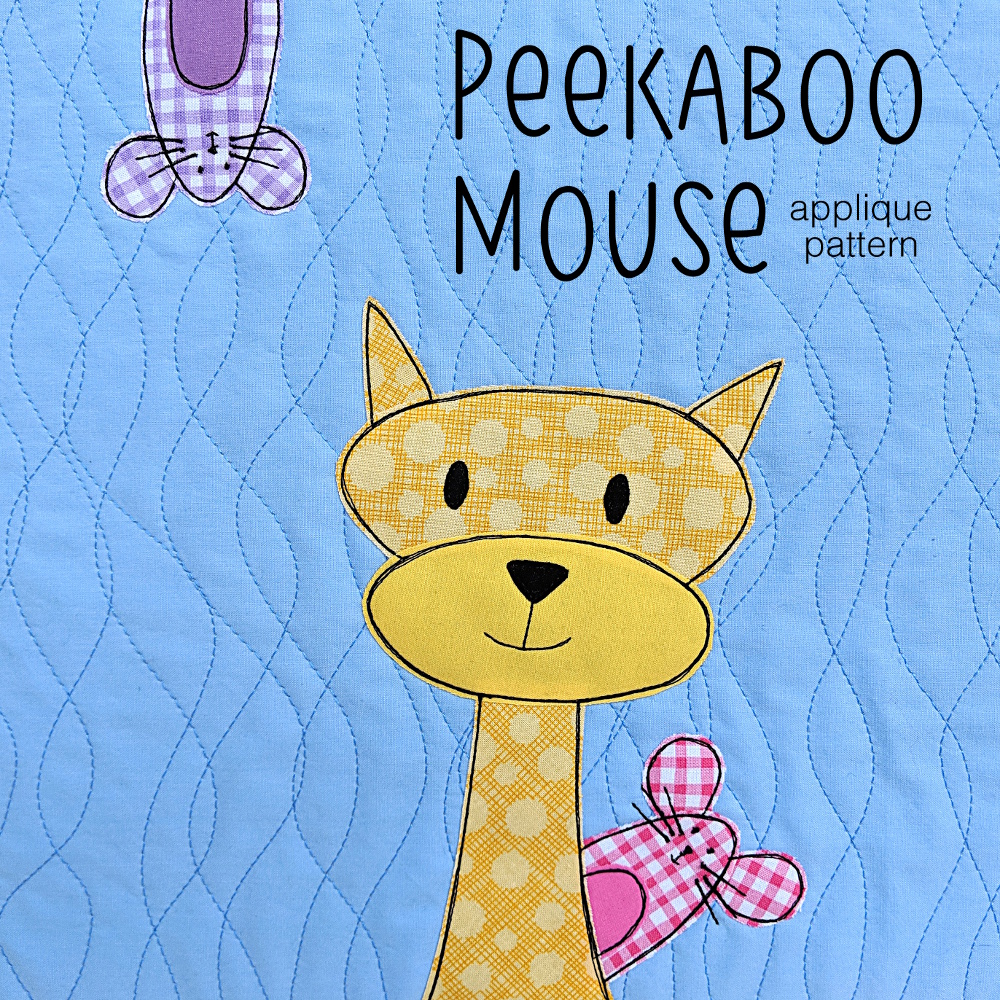
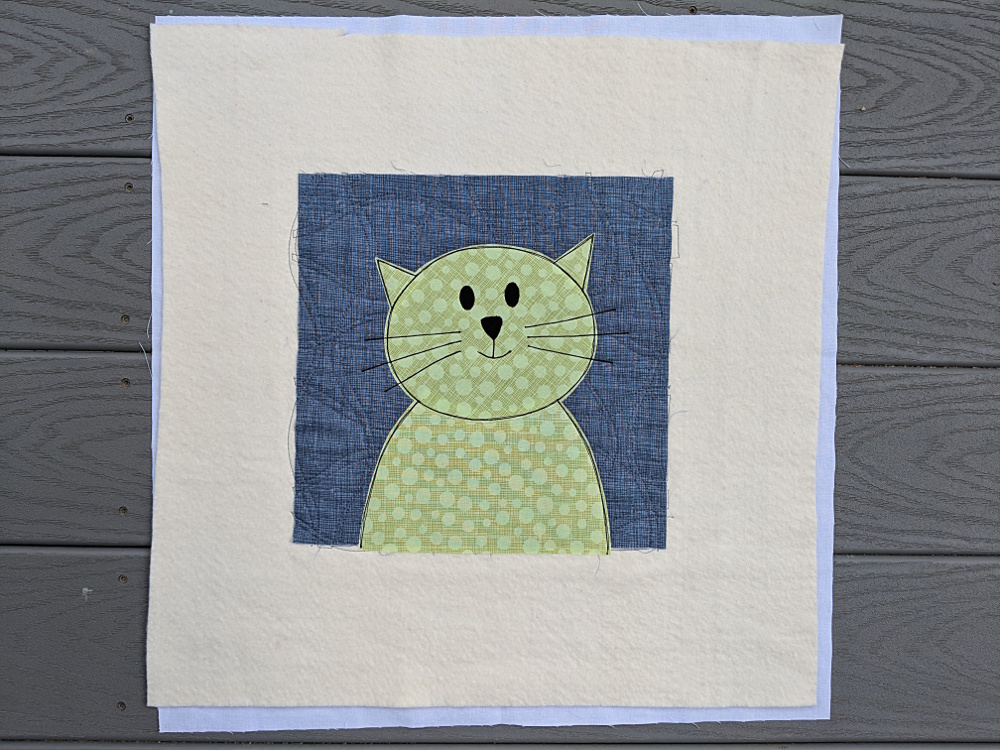
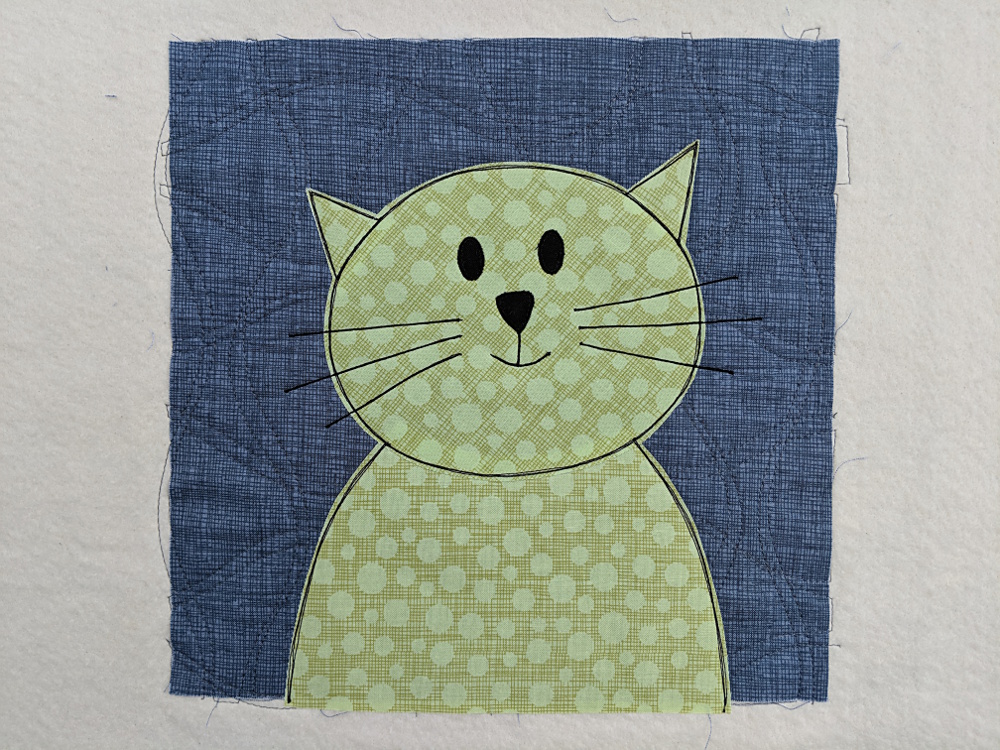
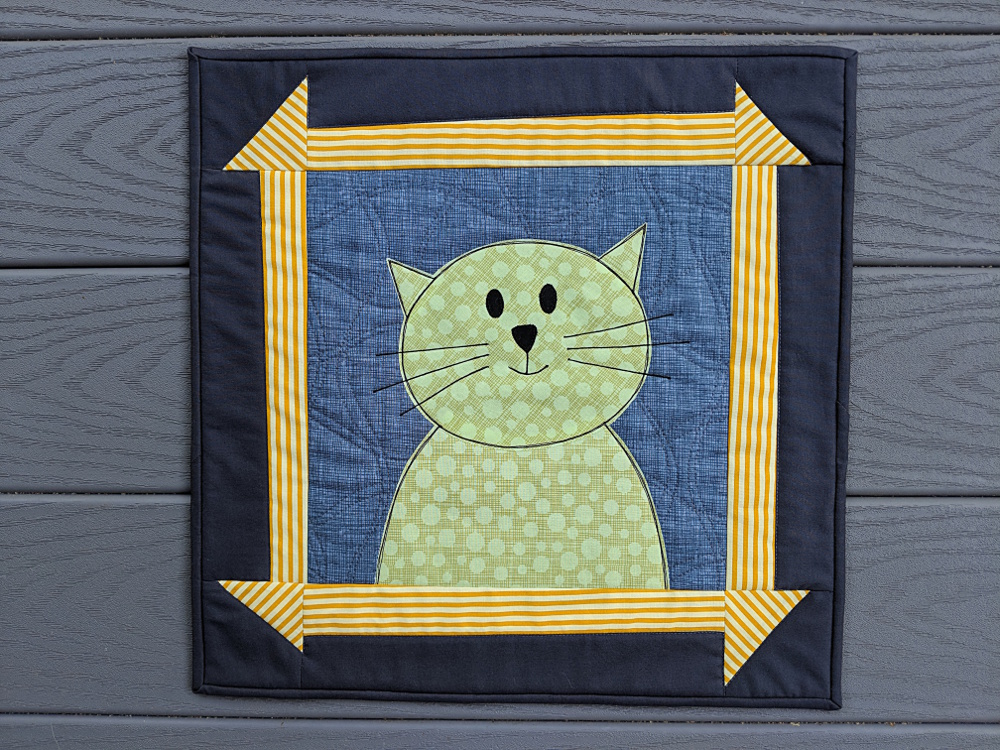
A lot of people have pulled the little mouse from the Noisy Farm quilt pattern to use in other quilts – but not everyone wants to buy a pattern with twelve different farm animals just for the little mouse!
I’ve been getting a lot of requests lately for the mouse as his own little pattern.
You can use it on its own – that mouse would be adorable peeking out of a pocket. Or you can use it combined with other quilt patterns, as shown in the image above.
Important note – the pattern only includes the mouse – not the cat. The cat is just there to show the two ways you can use the mouse pattern in your quilt blocks.
I didn’t just write up the pattern – I also recorded some new video tutorials especially for this little guy!
This is the first pattern I’ve ever done where I also include a link to download an SVG file of the pattern pieces – for those who have cutting machines like Cricut and Silhouette.
This video shows what to do with that file (for a Cricut Maker) once you’ve downloaded it. Heads up – it’s a long one.
If you don’t use a cutting machine, that’s fine. The pattern includes the regular pattern pieces for printing or tracing and cutting by hand.
Once you’ve got all your pieces cut, here’s how to assemble the little guy. I show how to put him on the edge of the block, and also how to make him peek out from behind another applique critter.
Finally – there’s the outlining. I know a lot of people will see that face and think NO WAY. I don’t like hand-stitching and that’s too small to do on the machine.
Not so!
Of course you can stitch the face by hand, but you can do every bit of it on the machine – no fancy embroidery features needed. Here’s how I do it on mine, just using regular straight stitch.
That’s it!
Get the pattern here and start adding adorable little mice to all your projects. 🙂
I get a lot of emails from people asking for advice choosing quilt colors. I always point them to the Shiny Happy People group where they can see many, many different quilts made with my patterns – usually using different colors than what I used in my samples. Really – seeing a finished quilt is the very best way to imagine it in different colors!
So I’ll be making more of an effort to show my quilt patterns in new color combinations – just to show as many options as possible. 🙂
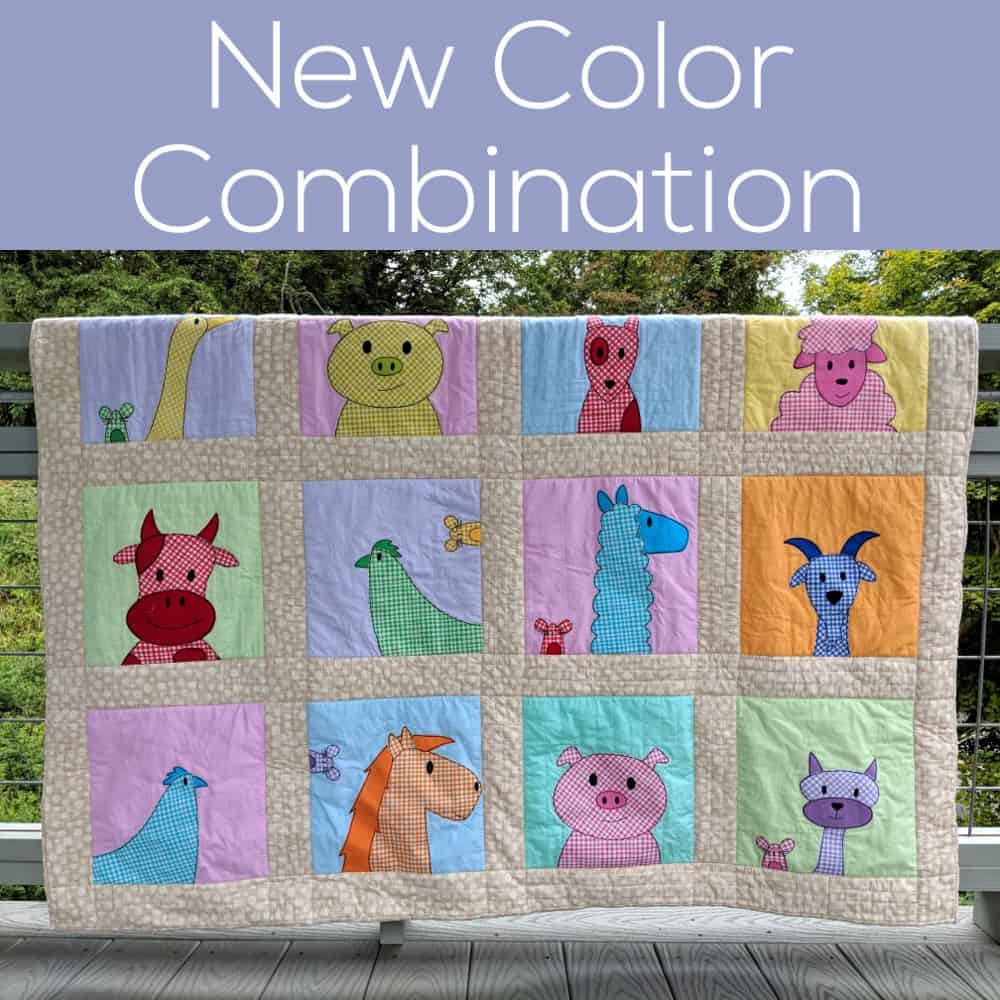
I recently remade the Noisy Farm quilt, using it as an example to how you can add sashing to any of my quilt patterns. While I was at it – I changed the colors too!
Here’s the original quilt in a crib size.
And here’s the new version.
In addition to adding the sashing – I used radically different colors!
I made the original sample before I had fabric bundles in my shop, so it’s not easy to say exactly what fabric packs they’d use now, but the Warm Neutrals would be the best choice for those natural-colored animals. The backgrounds are mostly greens and blues, so the closest match would be the Green Batiks and Blue Batiks.
The new version uses the Rainbow Sherbet bundle for the background blocks – pretty pale pastel solids. They really do look like soft sherbet colors. 🙂
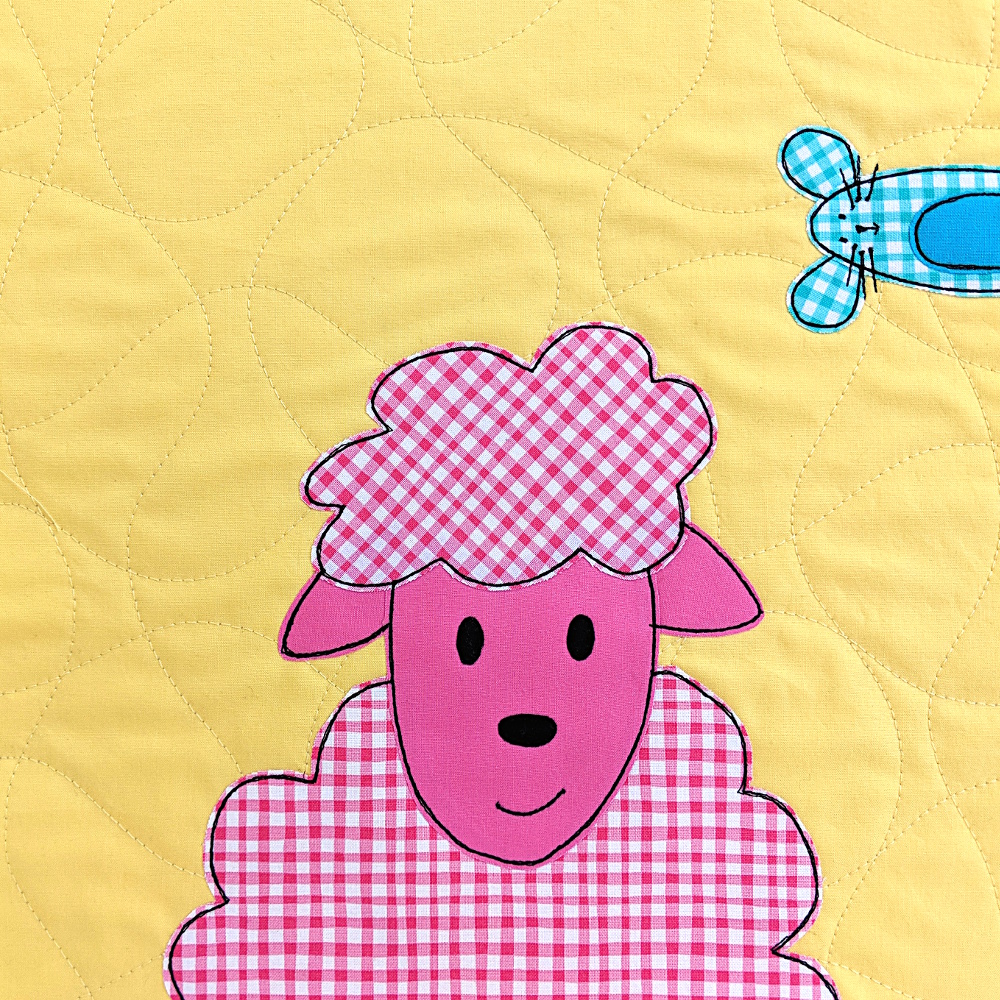
For the animals I went totally UNnatural with all kinds of fun colors and a wobbly, hand-painted gingham print. Here’s a close-up view of a silly pink sheep with a little turquoise mouse popping into the frame.
For the sashing I used Hash Dot in linen, also Michael Miller Fabrics. I liked how it has a slightly barn-ish feel while still balancing nicely with the soft pastel background fabrics. Sorry – I don’t sell that one in my shop, but you can search for Linen Hash Dot and lots of online sellers will pop up.
So there you go! New colors and a new layout for a totally new look for a favorite quilt pattern.
Want to know how to add that sashing? Here are the posts you’ll need for that.
If you’re like most quilters – you have a LOT of patterns. 🙂
It’s always great to come up with another use for one of your favorites – especially if you can make an accessory to go WITH one of your best quilts.
You can turn a single block into a wall hanging and hang it just as it is. But it’s extra fun to give that block a special frame to really set it off and make it into a piece of art. 🙂
And it’s even more fun if that frame uses a wonky version of a traditional quilt pattern.
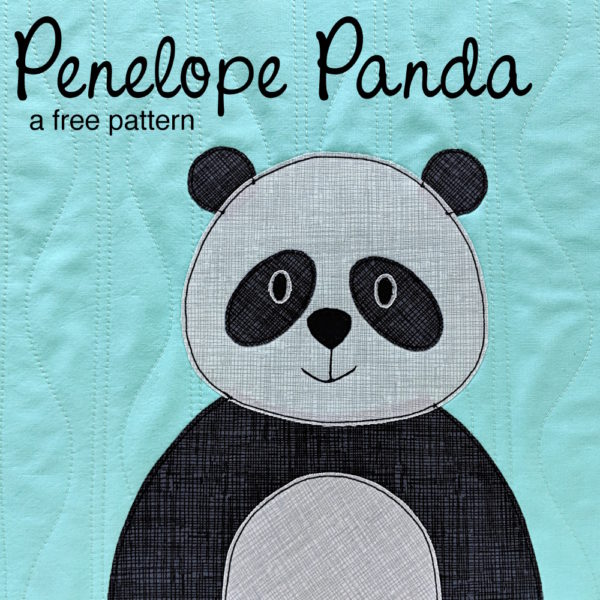
For this wall hanging I used one of my favorite blocks from the Cuddly Cats quilt pattern – no resizing. So it’s a 10 inch block in the center, with a wonky churn dash frame around it. The entire wall hanging is 16 inches square.
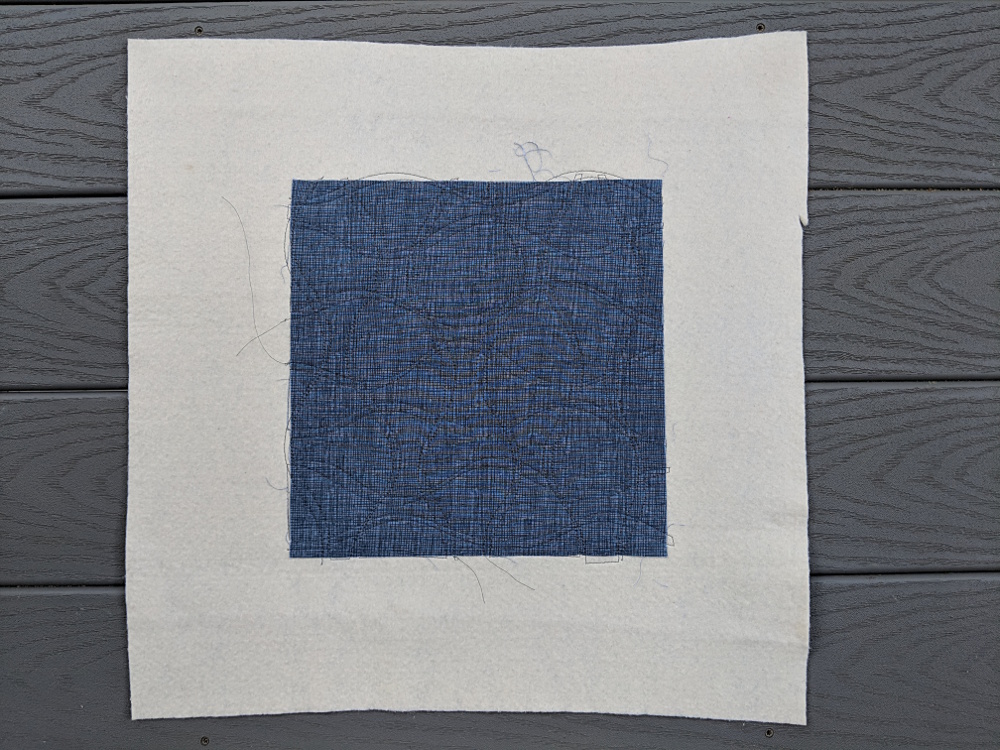
Press your batting square. Center your background block in the center of the batting.
Quilt the square to the batting.
I used double wavy stripes on mine. You can find a tutorial for that here.
Step 2 – Applique the Face
Applique the design to the block – being sure to line the lower edge of the applique up with the lower edge of the background block.
Add a backing to your wall hanging (I used spray adhesive to baste it to the batting) and outline your applique. Here’s a closer look at the placement and the outlining.
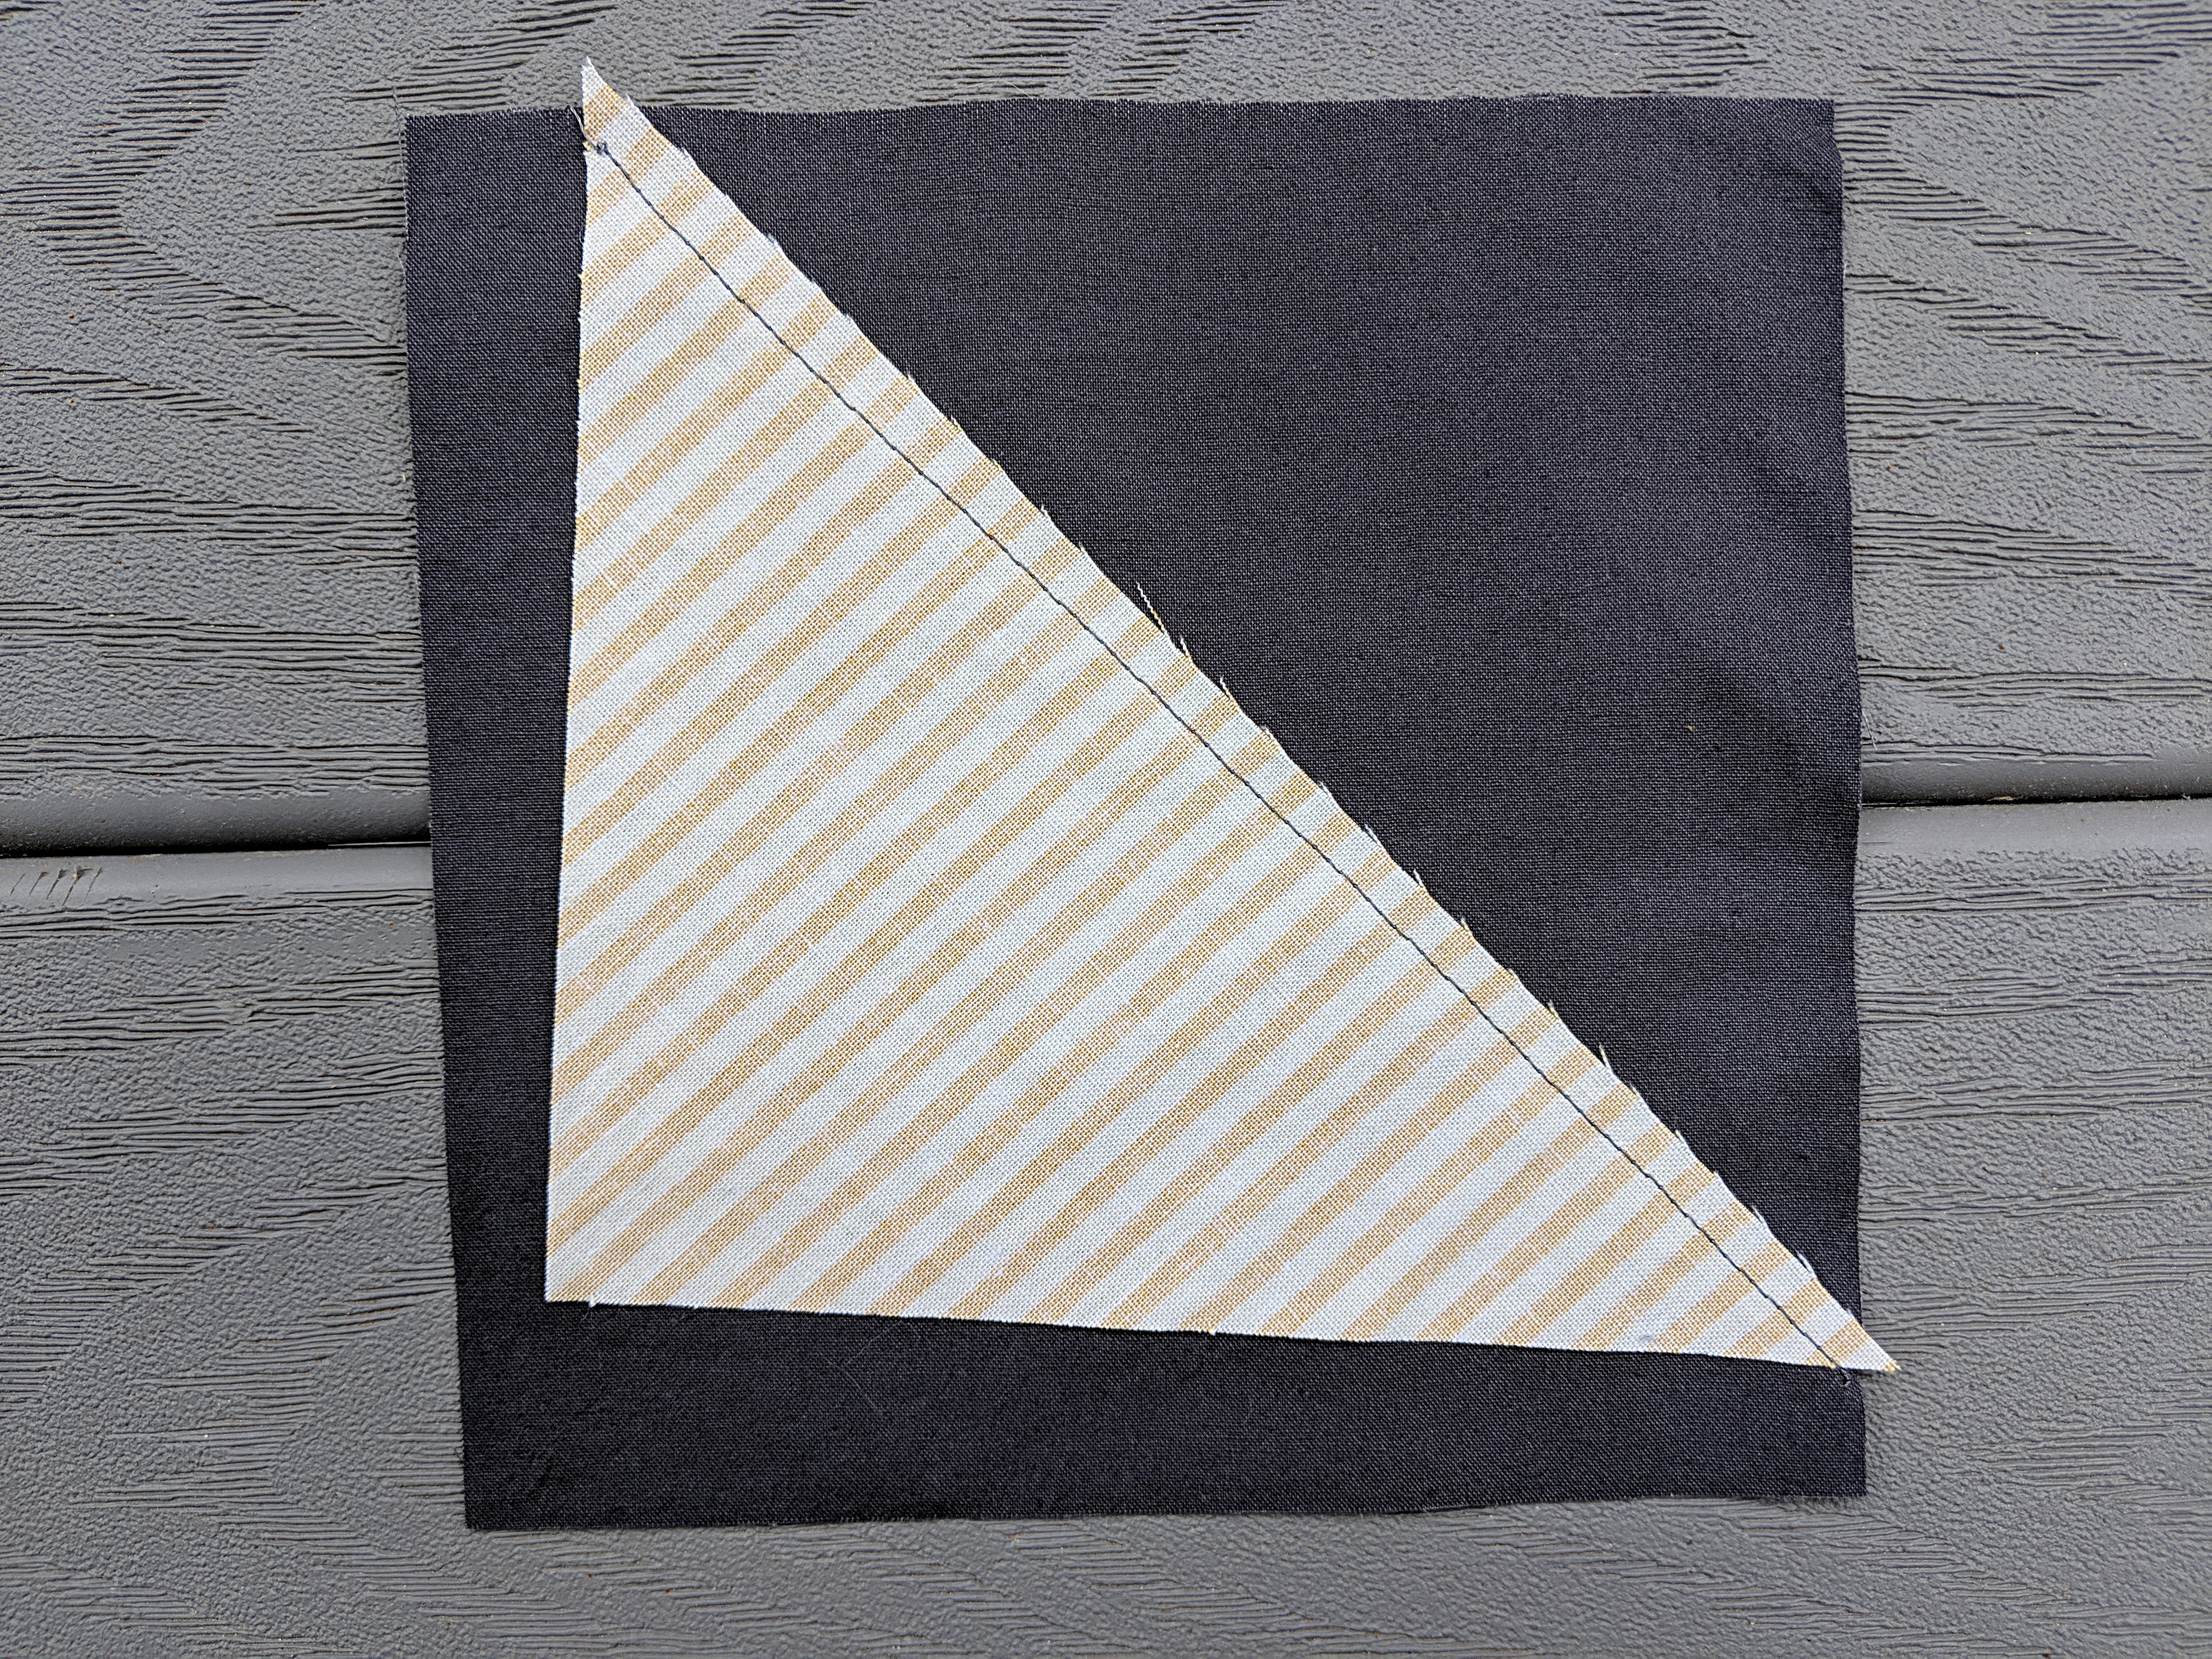
Cut four background corner pieces each 5 inches square. I used dark grey for mine.
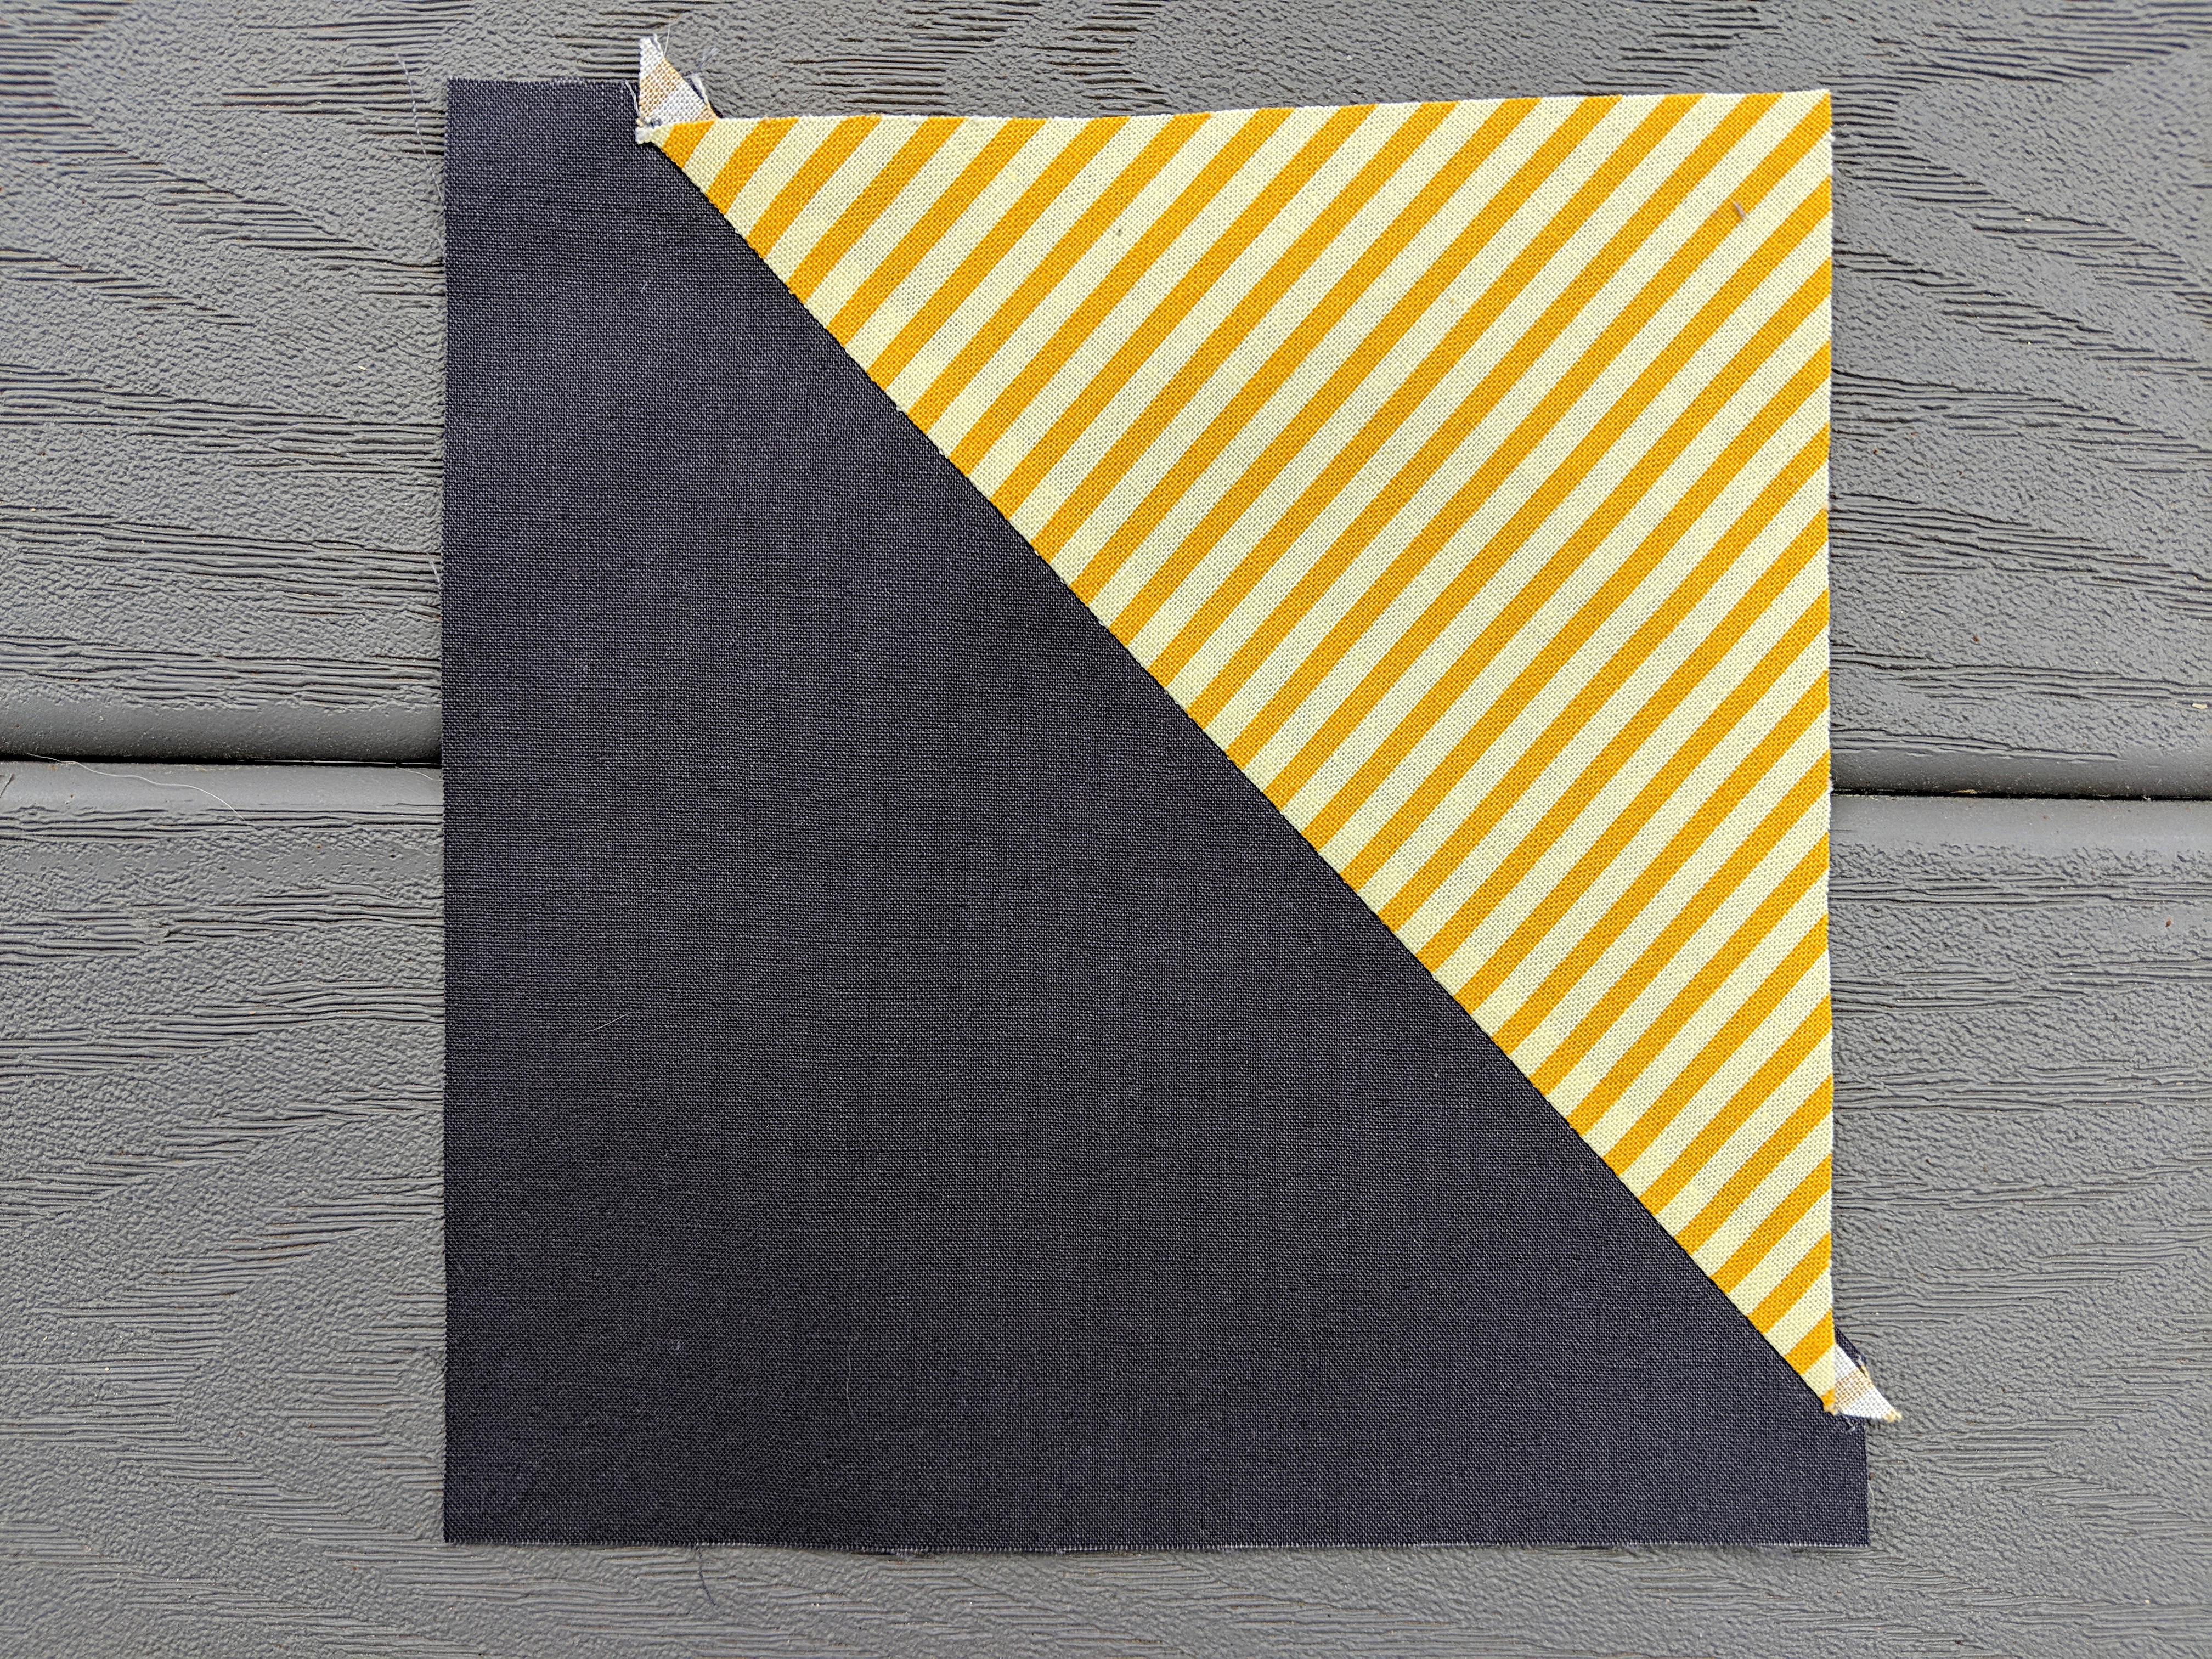
Cut four right triangles with the legs (not the hypotenuse) anywhere between 4 and 5 inches long. The triangles should all be a little different.
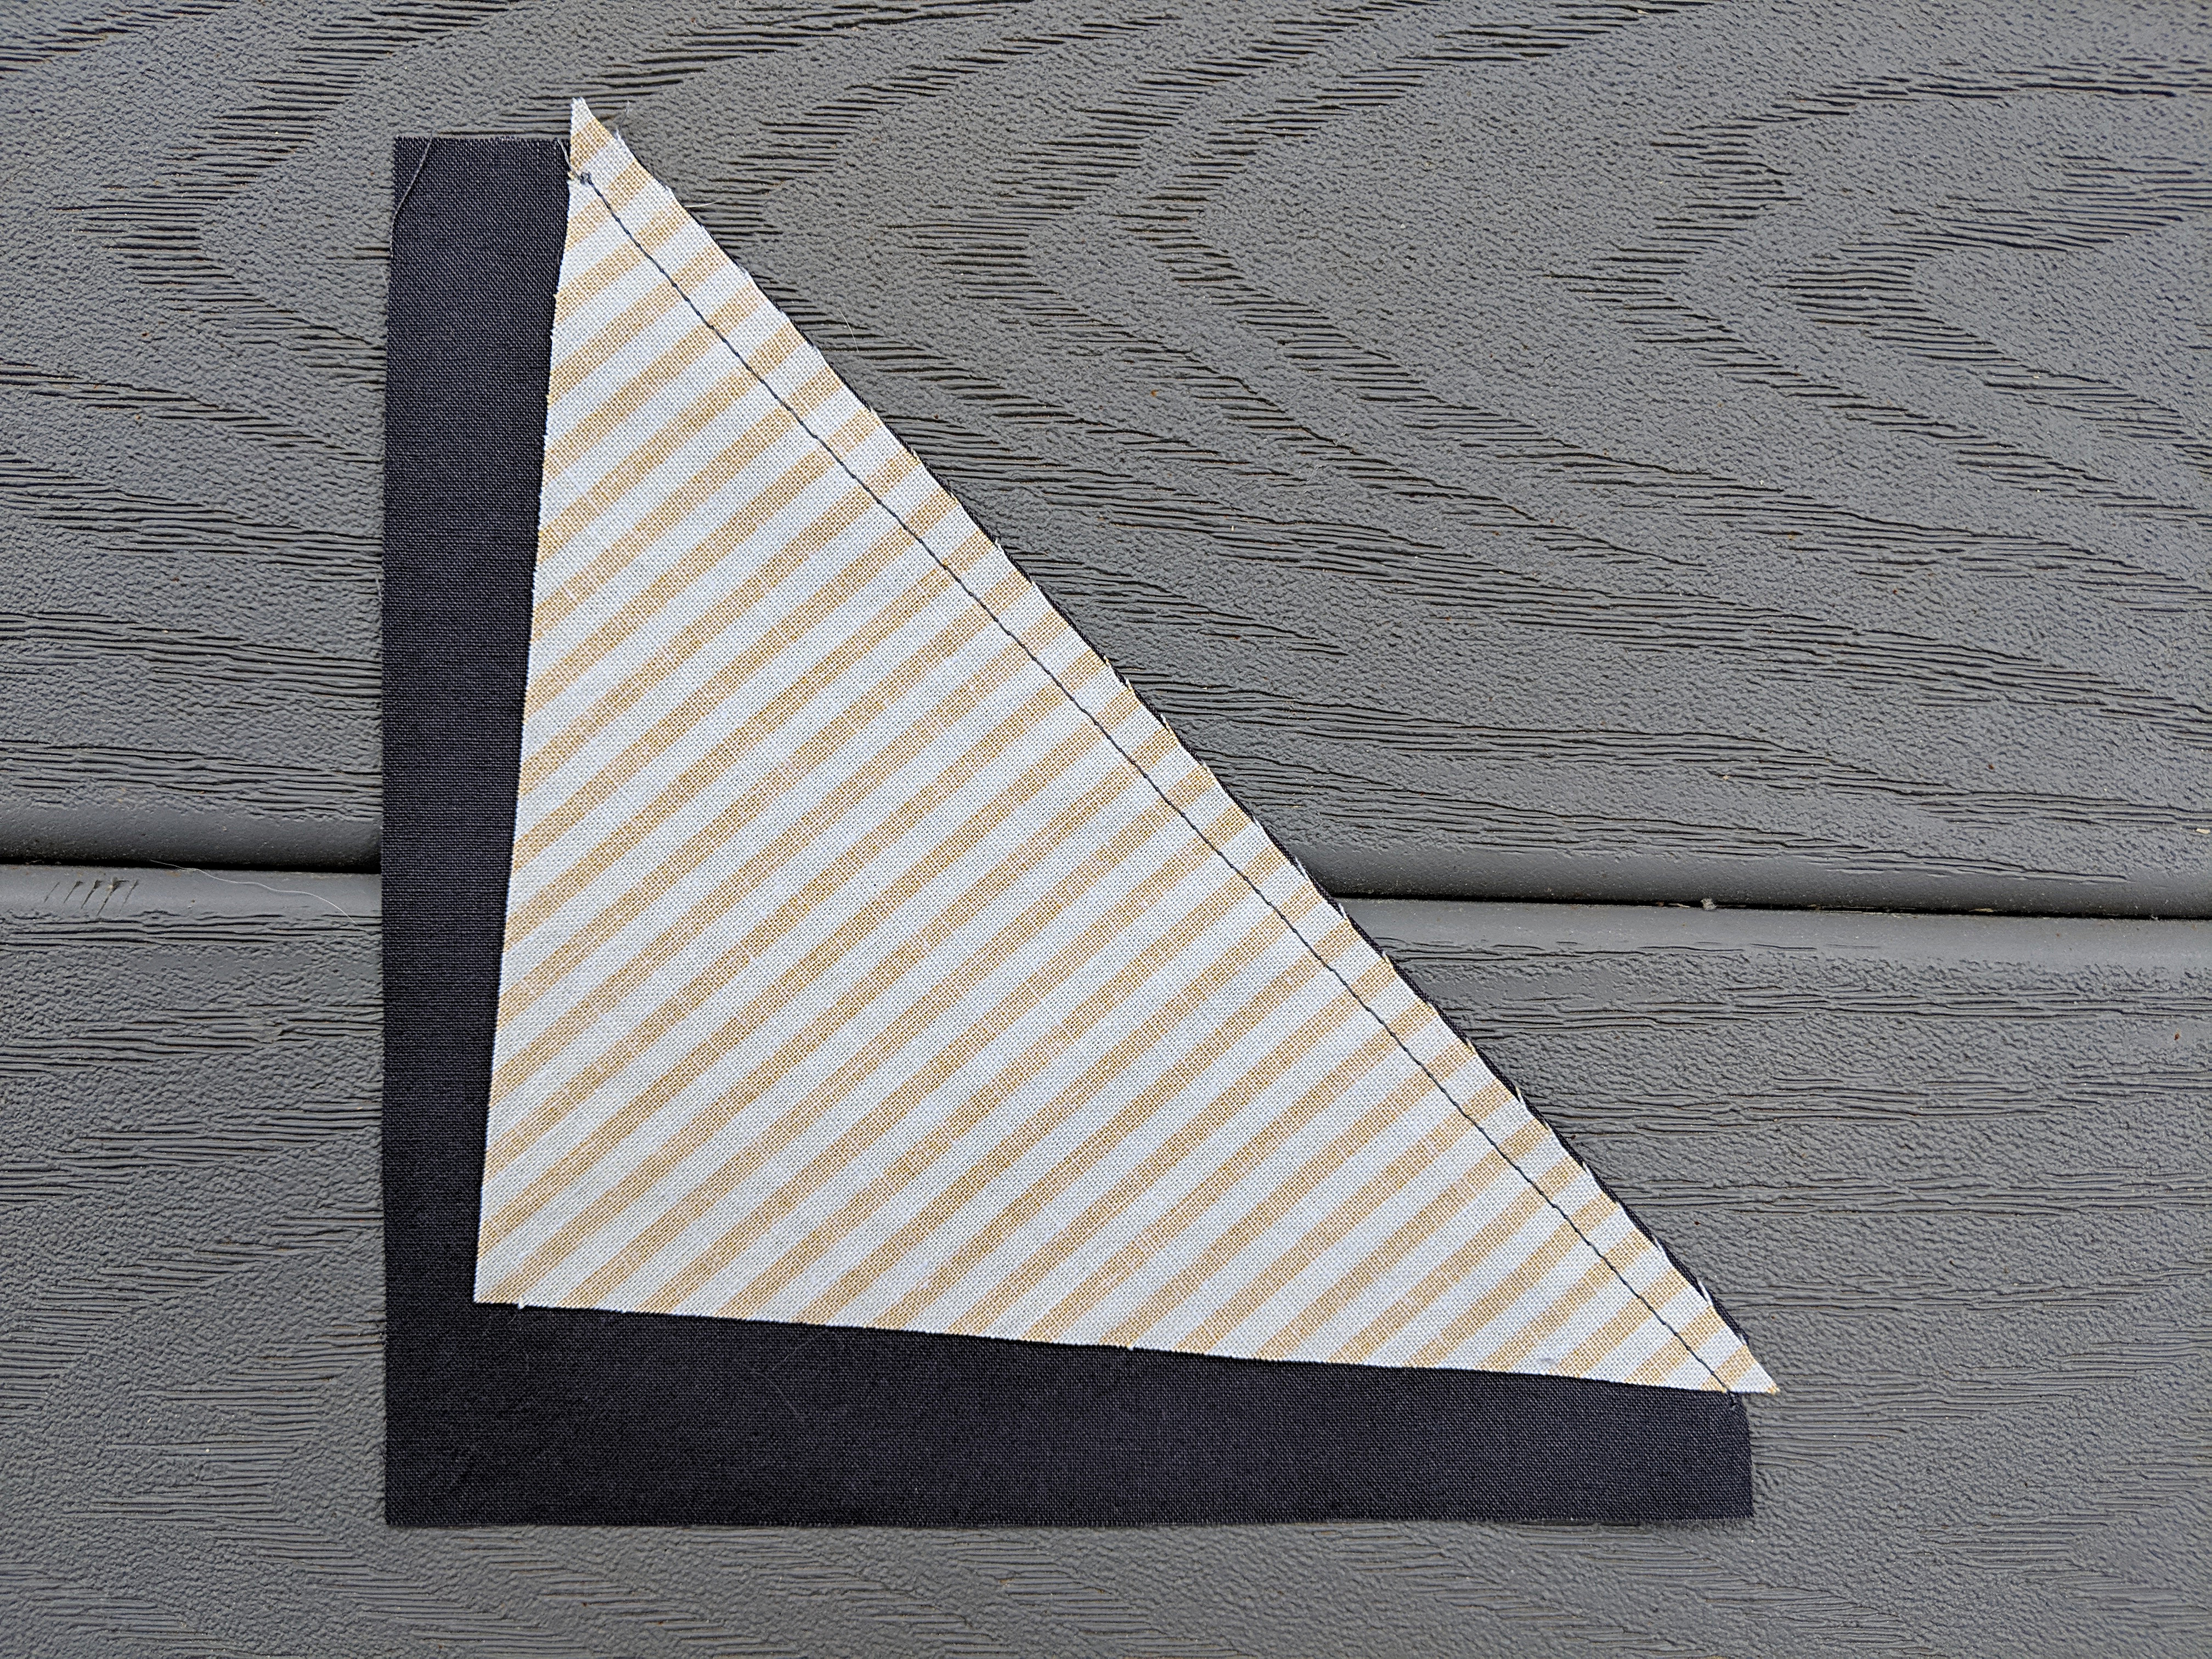
Lay one triangle face down over the corner of one square, so that the points of the triangle (at each end of the hypotenuse) just hang over the edges of the square, as shown.
Sew the triangle to the square. Your seam allowance doesn’t need to be exactly 1/4 inch.
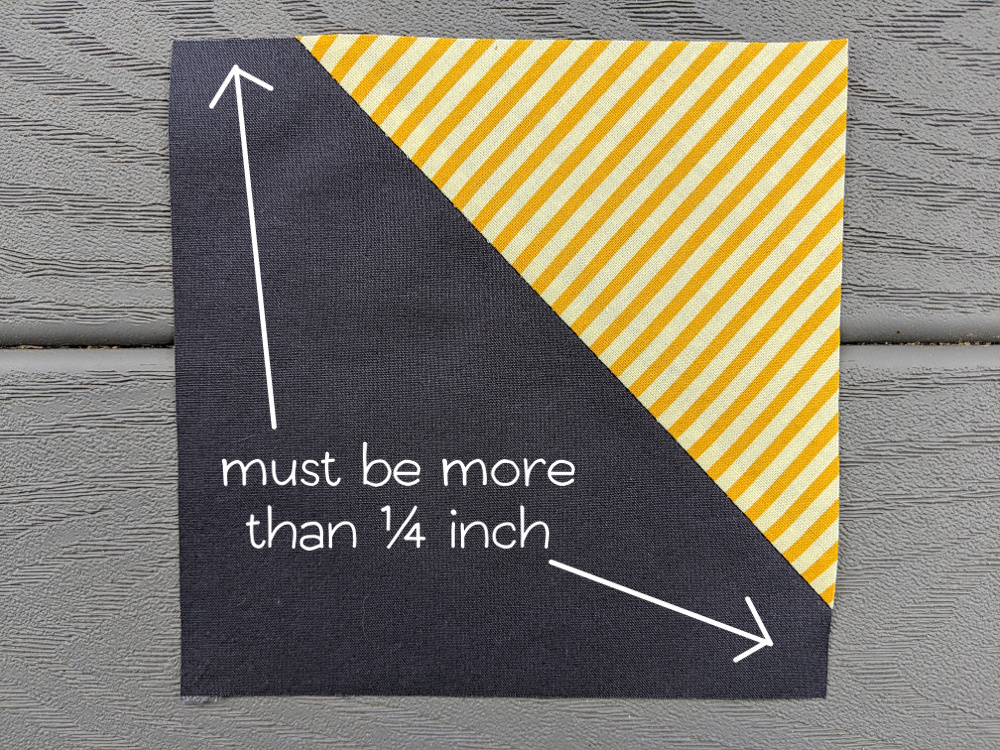
Make sure there is more than 1/4 inch between the points of the triangle and the edge of the background fabric square. That will make it impossible to accidentally chop off the points when you assemble the whole frame. 🙂 Yay for foolproof tricks!
Repeat for the other three squares, so you have the four corners of your churn dash block. The sizes and angles of the triangles should all be a little different.
Set them aside.
Step 6 – Preparing Background Rectangles
Cut four background strips 12 inches x 3 inches.
Cut four frame strips 12 inches x 2 1/2 inches.
Sew the frame strips to the background strips and then trim those rectangles down to 10 1/2 inches x 3 inches. Make the seam between the two strips go at a slight angle – and make all the angles a little different to make your finished block more interesting.
You can see my finished rectangles in the next step. See how some are wider than others? And they all slant a bit?
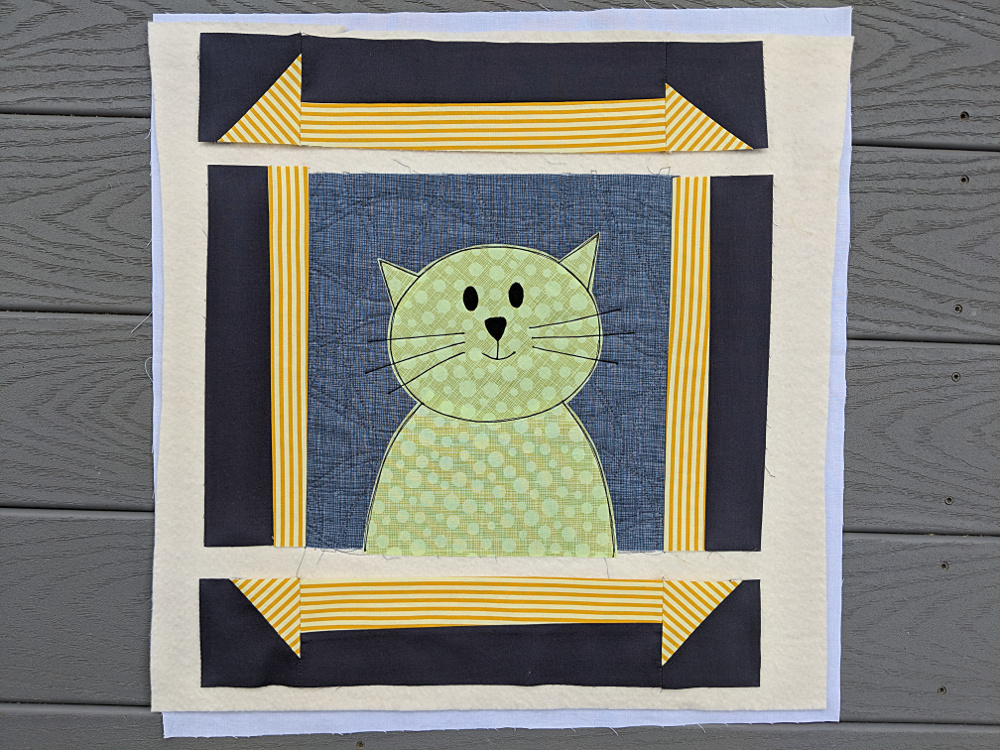
Step 7 – Laying Out the Churn Dash Block
Lay out all the churn dash components as shown.
Play around with the placement of the frame pieces until you’re happy with how things look.
Step 8 – Sew the Side Rectangles
Sew the side pieces of the frame to the sides of the block, sewing through the batting and backing too. For this and the rest of the project it’s important to use an accurate 1/4 inch seam allowance.
Press the side pieces open.
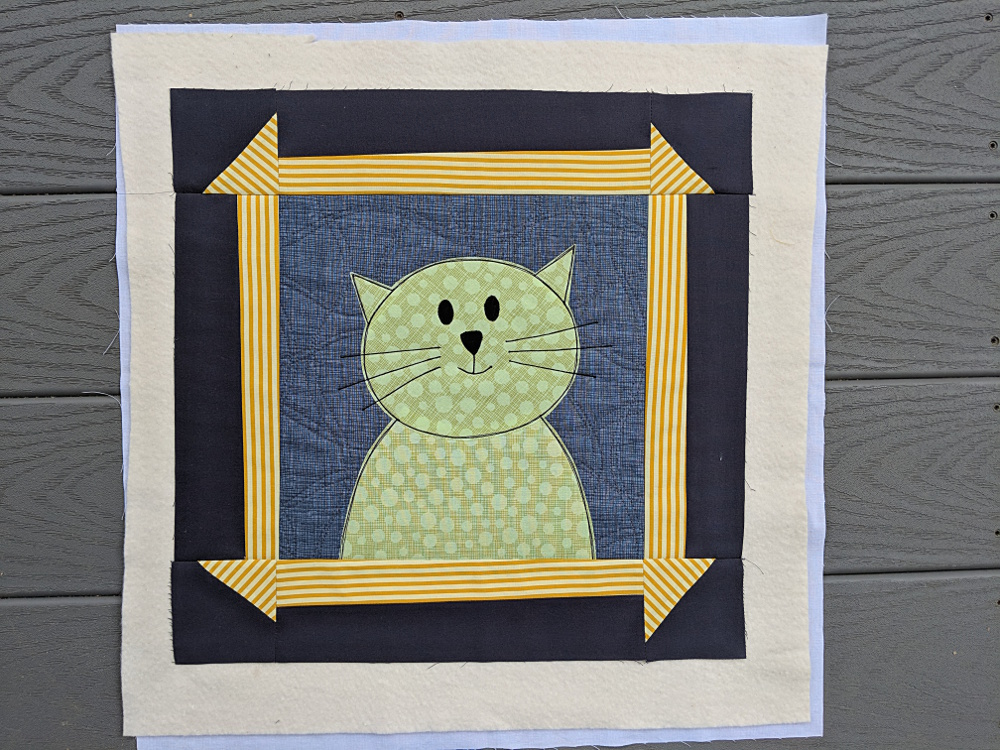
Step 9 – Sew the Top and Bottom Strips
Sew together the corners and strips for the top and bottom rows of the frame.
Press your seams in toward the strips – away from the corner triangles.
Step 10 – Finich Sewing the Churn Dash Block
Sew the top and bottom rows to the center of the block, being careful to line up the seams.
Press the whole block flat.
Step 11 – Quilt, Trim, and Bind
Quilt the frame if you want to. (It doesn’t need it structurally, so just do it for looks if you like.) I stitched in the ditch around the outside edge of the frame and that’s it.
Trim away the excess batting around the edges and bind your mini quilt.
Here are several free patterns that work with just some simple resizing. This post about making coasters has info about resizing an applique pattern that can be applied to any of these projects.
If you’e using an electric cutting machine like a Cricut. . .
Upload the file to your machine.
Resize if needed. (To fit a block that finishes at 10 inches square, the image should be 7.5 inches wide.)
Ungroup the pieces and assign colors
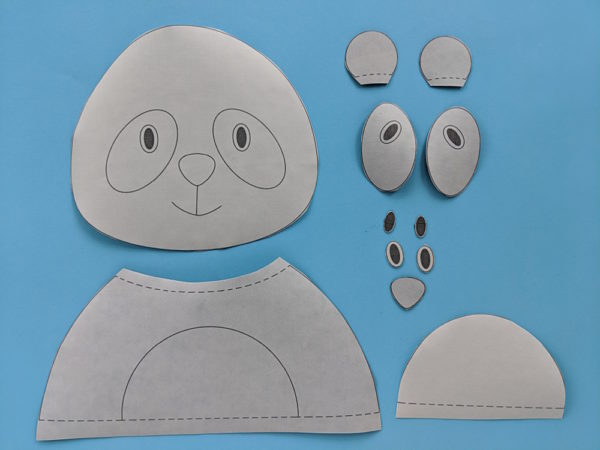
Cut the belly and the face from the lightest color fabric
Cut the shoulders, ears, and eye patches from the darkest color fabric
Cut the eyes and nose from solid black
Cut.
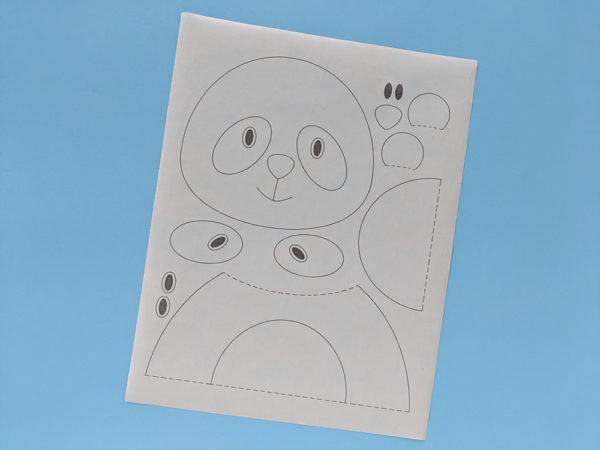
Step 2
Trace or print the pattern onto the paper side of the fusible adhesive.
I use printable Heat & Bond Lite fusible adhesive so I just printed out the page. No tracing!
The image has already been reversed, so just trace or print. If you’re tracing, be sure to trace the facial features and placement guidelines too. You’ll need those for Step 5.
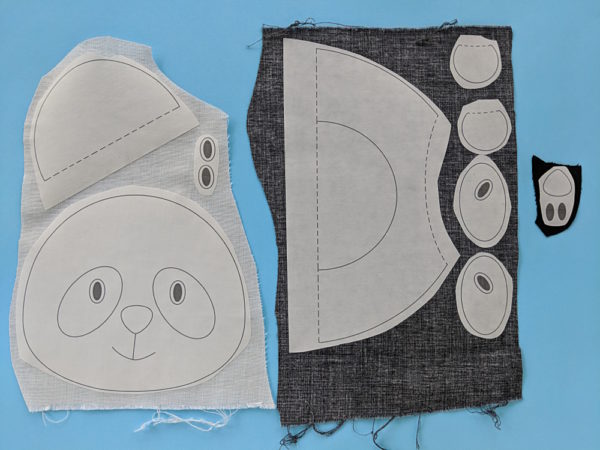
Step 3
Rough cut around each shape and fuse it to the back of your fabric.
Note – if you’re making your panda in realistic colors, use the large eye template pieces to make light-colored eye backings do the dark eyes show up on the dark eye patches. Use the small eye templates for your solid black eyes.
If you’re making a panda in fantasy colors, use the large eye templates for your solid black eyes, and discard the small eye templates.
There’s a video here with more information about helping make sure dark eyes show up well on a dark background.
Step 4
Cut around each piece neatly. Cut directly on the solid lines.
Step 5
Remember back in Step 2 when I told you to make sure you traced the facial features? Now you’re going to do that. Hold the face up to a window so the light shines through it. You’ll be able to see all the dotted placement lines, and the adhesive will stabilize the fabric so you can trace on it without it crinkling up.
Trace the lines to show where all the applique pieces are placed – the eye patches, eyes, nose and mouth are especially important. The belly piece is one you can probably place well without a guide.
Optional – trace the lines to show where pieces overlap, to help you position the ears on the head and the head on the shoulders. These placement lines are less important – you can play around a lot with the placement of these parts.
Step 6
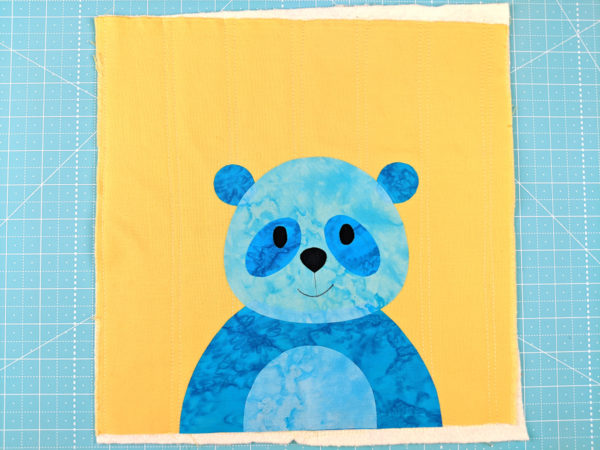
If you’re doing Quilt As You Go (I did) then you can quilt your block before adding the applique. So easy!
Cut your background fabric and a piece of 100% cotton batting 11 inches square.
Layer the block with a piece of 100% cotton batting. Quilt any pattern you like!
Have fun! And share a photo of what you make! You can share it in the Shiny Happy People group or tag it with #shinyhappyworld on Instagram.
If you like this free pattern, sign up for the Shiny Happy News! Subscribers get a weekly newsletter full of sewing tips and tricks, free patterns, special discounts, and other things to make you smile. 🙂
I’ve been working on a super fun North Pole quilt by adding a bunch of cute Santa’s Village signs to houses and buildings made with the Shiny Happy Houses quilt pattern.
There’s a new free applique pattern for you! Merry Christmas! 🙂
This Mrs. Claus pattern is the same size and style as the other free Christmas applique patterns (10 inch finished blocks). There are four now so you can make a square wallhanging!
If you’re using Quilt As You Go, quilt the background to the batting. I’m showing mine from the back so you can see the stitching more clearly.
Step 2
Print or trace the pattern pieces onto the paper side of fusible adhesive.
I love these printable sheets of Heat & Bond Lite because I’m lazypants and don’t like to trace.
The pieces have already been reversed, so no need to flip anything.
Step 3
Roughly cut out the pieces, leaving a little extra all the way around each piece. Leave a little extra extra wherever there’s a dotted line. That edge will tuck under other pieces for a clean finish.
Fuse the pieces to the back of your fabric, following the instructions on your fusible.
Step 4
Trace the features onto the front of the face fabric.
If you hold it up to a window, you’ll be able to see the lines very clearly through the fabric.
I trace just inside the lines marking the position of any applique pieces – like the eyes.
I trace directly on any lines to be stitched – the nose and mouth.
I just use a fine tip black Sharpie.
Here’s what it looks like without the light shining through.
Step 5
Cut out all the pieces neatly.
Cut directly on the solid lines. Leave a little extra seam allowance past the dotted lines.
Step 6
Peel off the paper backing and layer up all the pieces.
Remember – those dotted line edges will tuck behind other pieces. For example – the bottom of the bun has a dotted line, showing it tucks behind the top of the head.
Line up the lower edge of her shoulders with the bottom edge of the block. You’ll trim away the excess when you trim your block down to size so you don’t see that cut edge.
Fuse the design in place, again following the instructions on your fusible package.
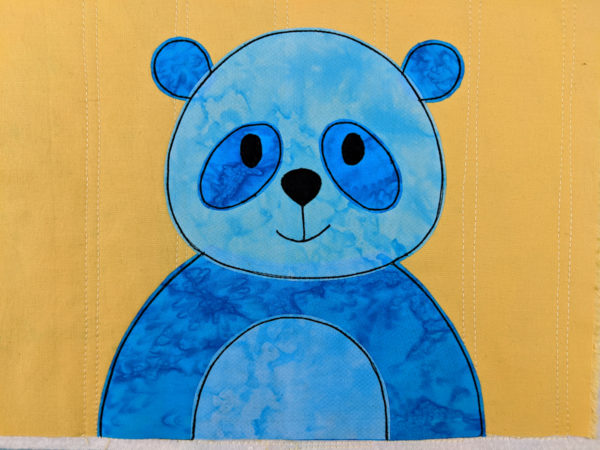
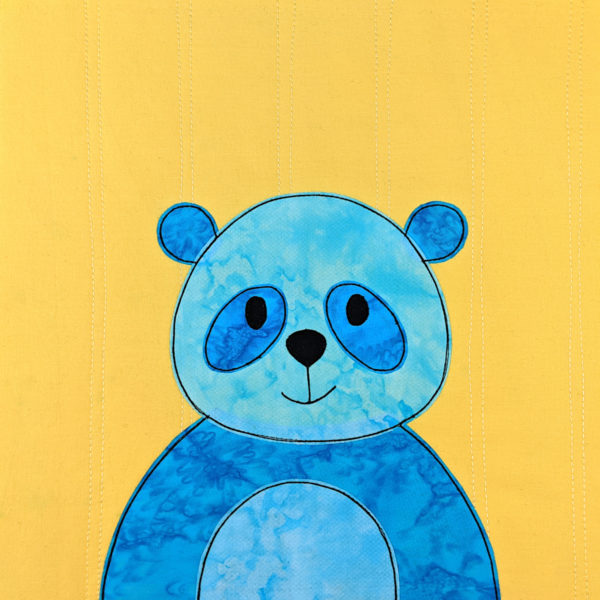
I like to use a simple straight stitch in thick black thread. I think the cartoony outline suits my simple designs, but you can use matching thread and any stitches you like.
Trim it down to size and you’re finished! I recommend starting with an 11 inch square and trimming it down to 10 1/2 inches if you’re making a quilt or a wall hanging – but you can also use this design to make some placemats (free placemat pattern here) and that will need a different starting block size.
It’s a brand new class covering everything you need to know to do GIANT applique.
How to enlarge any applique pattern to any size you like – including an easy formula
How to work with that giant pattern
What to do when the pattern pieces are bigger than the biggest fusible adhesive you can buy
What to do when your applique is way bigger than your ironing board
You’ll get general information that you can use for any applique of any size for any project – but you’ll also get all the pattern pieces and instructions to make four fun projects.
Make a BIG poster.
You’ll get the giant cat pattern, the alphabet, and the instructions to make a big poster.
I made this reminder to hang in my new studio – but you can make anything you like! This would be a great project for a new baby. Make a baby quilt, then enlarge your favorite block from the quilt to make a matching poster with baby’s name and birth date!
Make a BIG pillow.
You’ll get the giant fox pattern plus all the instructions to make a big pillow. Mine is 26 inches square – but the class includes instructions to enlarge to any size you like. Make a big floor pillow to match one of the blocks in your favorite applique quilt!
Make a BIG bunny baby quilt.
This bunny quilt is fast and easy. You can make it in a day! The corner bunnies are “normal” 10 inch blocks and the center medallion is a whopping 30 inches square. The class includes instructions for easy peasy Quilt As You Go construction. You could easily adapt the pattern to work with any applique design in your stash, to match any nursery theme – but you’ll get the bunny pattern in both sizes.
Make a BIG napping quilt.
Whoa! Look at that giant version of my Augie Dog! It’s way WAY bigger than the original. 🙂
You’ll get the full-sized puppy pattern plus complete instructions to make a 50 x 60 inch napping-size quilt – my favorite size for curling up on the couch. Using Quilt As You Go doesn’t make much sense for a quilt made of one HUGE block, so I include a video with tips for quilting it.
Of course, the class includes instructions to enlarge any block to size for a quilt like this. I’ve already had one reader suggest a quilt with a single “doll” from the Paper Dolls quilt, enlarged to be the same size as your child or grandchild. What a brilliant idea!
By the end of the class you’ll be able to adapt ANY applique design to ANY size you like – and add huge fun to all your favorite patterns. 🙂
There are a lot of similarities between the monsters (because I drew them all) but these are not the same pattern!
Scary Squares is the easier pattern. It includes full-sized applique patterns for twelve different monsters, plus all the instructions and links to videos you need to make your quilt. The pieces for each monster are exploded and labeled and ready for you to assemble in the usual way. This one is great for beginners.
Mix & Match Monsters includes 24 pages of mix and match monster parts. The pieces are all carefully sized and proportioned so you can combine them in a bunch of different ways to make a kajillion different monsters.
How do you know which one is right for you?
If you’re new to Quilt As You Go and applique with fusible adhesive, or you just want a monster project that’s fast, easy, and fun – with all the design decisions already made – then the Scary Squares pattern is the one for you. Get it here.
If you look at the Scary Squares pattern and think, “I like the eyebrows on that one monster, but I want to add them to this other one, and maybe add the horns from that guy onto this guy, and use some faux fur while I’m at it. Oh – and I think this guy needs a contrasting belly and that guy could use some stripes and I wonder if I could add some springy, curly hair to this one, and wouldn’t it be fun to make it look like that one is busting out of his block. . .” then the Mix & Match Monsters pattern is the best choice for you. 🙂 Get it here.
This post is originally from November 2013. I updated it in July 2017 to add the quilted batik tablet cover I made for my iPad Pro.
The day before I left for Quilt Market I decided that a really efficient use of my time would be to make myself a tablet cover using some of my new patterns. 😛
Here’s the result.
I posted it on Facebook and I got a bunch of requests for a pattern.
How about a free tutorial instead?
First you’ll need to measure your tablet. Of course, they’re all just a little bit different.
Add one inch to each dimension – length and width. This is your cutting size. If your tablet is 8″ x 11″ your cutting size is 9″ x 12″.
Cut four pieces of fabric to your cutting size. Two are for the outside and two are for the lining.
Or just make it out of the most fabulous fabric you can find!
For the new iPad cover, I used a fabulous hand-dyed batik fabric from Malka Dubrawsky of Stitch in Dye and added Big Stitch quilting around all the circles.
These are the tablet cover front and back, all quilted, trimmed to size, and ready to assemble.
Back the outside layers with some thin cotton batting and hold the layers together with some machine quilting (if you didn’t already quilt it as part of your embellishment). For the cat/dog cover, I just followed the line of the zigzags in the fabric. Easy peasy! Since the tablet is lined you don’t even need to back the batting.
So. You’ve cut your pieces, added any fanciness you like, and quilted in some padding. Time to start sewing it all together. This is super easy.
Sew your front to your back, right sides together, using 1/4″ seam allowance. Sew down one side, across the bottom, and up the other side. Don’t forget to backstitch at the beginning and end of your stitching.
Do the same thing with your two lining pieces except leave a 3-4 inch opening in the bottom for turning the whole thing right side out later.
Turn both the outside and the lining right side out and press.
I’ve got my turning stick poked through the opening I left in the lining. See how I pressed that too? That’ll make it a cinch to sew up when you’re done.
Now turn the outside inside out again. Leave the lining right side out.
Measure a strip of elastic 3 inches long. I used soft fold-over elastic in a pretty color but you can really use any elastic in any size or color.
Fold the elastic in half and pin it to the center of the front of your cover. (Fold the cover in half to quickly find the center.)
I like to leave a little extra hanging over the raw edge.
Slip the lining (right side out) inside the cover (inside out). Line up the side seams and pin or clip the layers together around the top. The elastic loop should be sandwiched between the two layers.
You can really see my quilting lines here on the batting.
Sew the outside to the lining all the way around the top using 1/4″ seam allowance.
I go back and forth over the elastic a couple of extra times. It’s a stress spot and I like to reinforce it.
Now comes the fun part.
Pull the lining out of the bag. Then pull the whole thing through the opening in the bottom of the lining. Sew up the opening in the lining using either whipstitch or ladder stitch and tuck the lining down into the bag.
Flip down the elastic loop to see where you need to position your button and sew the button in place.
Done!
Here’s the back of my cover. Of course I had to decorate the back too!
And here’s a full view of the batik cover.
It’s the same font and back. 🙂
Here are several free patterns that work with my basic 10-inch applique squares – no resizing needed!
Here are several free patterns that work with just some simple resizing. This post about making coasters has info about resizing an applique pattern that can be applied to any of these projects.
Every once in a while a fabric company asks me to work with them on a project – usually for a booth at Quilt Market. When it’s the right company and the right project these collaborations can be really fun. Every once in a while lightning strikes and they’re so perfect that it’s almost magical.
Be sure to listen with the sound on for maximum cuteness. 🙂
I’m in the middle of another magical partnership – this time with Michael Miller Fabrics.
Maybe you saw some of their posts tagged #mmfpets during Quilt Market?
I had SO MUCH FUN making these guys!
Did I mention they’re BIG?
Really big.
Each block is about a yard wide!
When Michael Miller approached me about the project and shared a sketch of their booth, I actually squealed out loud. The concept was just so cute!
They had a bunch of BIG paper doll blocks, with outfits made in soon-to-be-released fabric collections. I would be making their pets – also in brand new fabrics. 🙂
It’s so much fun (and feels so sneaky) to play with new fabrics before they’re even released! Here are some of my favorites from this project. Each image links back to the Michael Miller site if you want more info. (Maybe you want to ask your local fabric store to be sure to bring in your favorite.)
So the whole booth concept was super cute, the fabrics were super cute, and their idea to incorporate my applique patterns was super cute. Of course I said yes!
Before I even started the project, I was already thinking of ways that YOU might want to use some big applique patterns. My plan was just to tell you to enlarge the blocks and then make some suggestions for what you could do with those supersized cuties.
But once I got into actually making the blocks, I realized it wasn’t quite as simple as that. It’s still pretty easy – and boy do they come together quickly! But there were a few Problems To Solve and Quirks To Work Out – so I decided to put it all together in a new online workshop.
No – those aren’t miniature scissors. Those are my regular shears, put in there for scale. 🙂
Update – this class is no longer available, but I’m working on bringing many of the lessons over here as free tutorials.
But that’s not all!
Since the purpose of the blocks was to show off new fabrics, I needed to add some extra doodads and accessories for the pets. That way I could incorporate more fabrics!
That was so much fun that I KNEW you guys would want to play too.
I decided to create a new applique pattern with loads of different hats and eyeglasses and bows and mustaches and speech bubbles and more. I just finished my drawings and I’m going to start making up some sample blocks soon so you can see how they work with all the applique patterns you already have.
So there it is. A perfect partnership – one where every step of the process is a joy and takes me in directions I never even thought of – including back to you. Many thanks to Michael Miller Fabrics for making it fun!